A Course of Instruction On How to Make Business-Building Show Cards
By JOHN H. DeWILD
Prepared for the
EDUCATIONAL DEPARTMENT OF THE
ASSOCIATED ADVERTISING CLUBS OF THE WORLD
New York, N. Y.
Copyright 1923, by John H. DeWild
FOREWORD
It is with pleasure that we present this text on Show Card Writing by Mr. John H. DeWild of
St. Louis.
It is designed primarily for the use of the study classes in the educational work of the Advertising
Clubs that comprise this Association.
It is built out of the practical experience of a class that Mr. DeWild has conducted with success
in the Advertising Club of St. Louis. In fact, the publication of the book has been somewhat delayed
owing to changes that have been made in the original plan; changes that have greatly added
to its practical value and that have come out of Mr. DeWild’s experience in his advertising class.
It should be mentioned that Mr. DeWild is the manager of the Merchants’ Service Department
of the Ely & Walker Dry Goods Co., St. Louis. He has written books before on this subject. Being
a practical merchandise and advertising man he knows the sales and advertising value of
properly made show cards. He understands the technique of show card writing perhaps as well as
any man in the country.
This is one of a series of texts prepared for the Educational Committee of the Associated Advertising
Clubs and it is hoped by the Committee that it may serve an important place in improving
the quality of show card writing and its advertising and sales value throughout the stores of
this country and of Canada and of every country where an Advertising Club is located.
EARLE PEARSON, Educational Director.
PAUL T. CHERINGTON, Chairman Educational Committee.
Associated Advertising Clubs of the World.
INTRODUCTION
The ten practical lessons which follow, together
with numerous supplementary alphabets and showcard
suggestions, are the result of careful study, based upon
years of experience gained in teaching the simple
fundamentals of showcard writing to various groups of
merchants and employees, demonstrations before Retail
Merchants’ Associations, conventions and in other
educational work.
The lessons were formulated into the course recently
inaugurated under the direction of the Educational
Committee of the Advertising Club of St. Louis. So
successful was the course that this book has been prepared
with the idea in mind not only to serve as a text
book for instructors, where it is desired to conduct
classes under the auspices of an Advertising Club, but
also for the student or store employee who desires to
do individual practice outside of a classroom. This is
the only text book published which carries the student
forward, lesson by lesson—in a simple, practical manner.
(Note the charts for beginners).
It is easy to acquire, in a very short time, the
ability to do suitable showcard work, provided the student
first of all masters the fundamentals of lettering.
By “fundamentals” is meant the simple strokes
that form most of the letters, and these “strokes”
should be mastered to the extent that they will always
be made uniformly.
In lesson No. 1, these fundamentals are thoroughly
explained, and by using the large charts which are
original with the author, the student will readily grasp
the idea of properly forming the letters. With the first
lesson thoroughly mastered, the remaining lessons will
be very easy.
The author is grateful to the Advertising Club of
St. Louis for the inspiration—and the opportunity
which led to the demand for a course in card writing.
For many original ideas and suggestions used in the
class-room, and for several alphabets and showcards, a
great deal of credit is due Miss Frances Kaiman and
Mr. Charles Jones, both of St. Louis, who gladly gave
their services during the original course, and also in
the preparation of the text itself.
Experience demonstrates the fact that classes of
this kind are made up of students from all walks of life;
many of them without experience, and the majority of
these young men and women come from the smaller
stores in outlying districts.
For this reason, it is necessary in class work, for
the instructor and assistants to render personal service
to the extent that each student is encouraged along the
lines he or she prefers.
As an illustration: The young man from a drug
store is interested in vastly different styles of showcards
than the young man employed in a grocery store,
and after the primary lessons are completed, it is best
to prepare suitable copy and layouts for the students,
so that each may work along practical lines.
On the pages following the lessons will be found
many showcard suggestions for numerous kinds of
business, and various seasons, all based upon the alphabets
shown in the lesson plates.
MATERIALS FOR BEGINNERS
Secure the proper materials right at the start. Improper
materials are a handicap.
Instructors who undertake the classwork in many of
the smaller cities and towns, as well as individual students,
will perhaps experience some difficulty in securing the right
materials. If, after investigation, such is found to be the
case and the suggested materials mentioned on this page
are not procurable in quantities sufficient for individual or
class practice, the Educational Department of the Associated
Advertising Clubs of the World, 383 Madison Ave., New
York, will be glad to furnish these materials at very low
cost.
Proper materials are necessary, and good work can be
done only when the student is provided with the best.
For the beginner, the following outfit is suggested:
1 set of 5 sizes round speedball pens,
1 set of model “C” speedball pens or several sizes of
broad pointed pens,
1 bottle of black drawing ink,
1 No. 10 and 1 No. 12 red sable “rigger” showcard
brushes,
1 2-oz. bottle black showcard color,
1 2-oz. bottle light red showcard color,
1 “T” square,
1 drawing board at least 22×28 inches,
A supply of thumb tacks.
The “T” square may be “homemade,” if necessary, as
well as the drawing board, the only essential in the drawing
board being that it be “squared up” on two sides—the left
side and bottom, thus enabling the student to do rapid, accurate
“lining” or ruling.
With these materials, the student is ready for the first
lesson, which should be practiced with the aid of the large
instruction sheets, these charts being provided by the Associated
Advertising Clubs, and two of each are included
with this text book.
It is also suggested that where the local Advertising
Club or other organization is fostering the class in showcard
writing, there should be provided extra charts for practice,
together with sheets of heavy paper, enameled on one side,
size 14×22 inches. This enables the student to do extra
practice in addition to the chart work itself.
In purchasing showcard stock, students should keep in
mind certain sizes of stock necessary.
Full sheets of cardboard are 22×28 inches.
Half sheets are 14×22 inches.
Quarter sheets are 11×14 inches.
Eighth sheets are 7×11 inches, and so on.
The thickness or “weight” of cardboard is usually designated
by the term “ply” which means the number of
layers of rough pulp making up the body.
A good weight for ordinary cards is 6-ply.
Heavy board, usually used for half and full sheets, is
10-ply, or thicker. Mat boards and double size cardboard
usually come 28×44. Some mat boards and other fancy
boards can be procured, however, in 22×28 size, thus saving
the time in cutting.
It is suggested that students procure from their printers
or wholesale paper houses, catalogs of samples and sizes of
the various cardboards, etc., and familiarize themselves with
the weights, colors, names, etc.
SUGGESTIONS FOR PRACTICE
If the showcard work is to be conducted in classes, it is
highly desirable to procure a suitable room where drawing
tables are available; for instance, the drafting room of a
high school or college. If this is impossible, the next best
method is to provide large tables, slightly lower than thirty
inches, and chairs where students may sit at their ease, in
using their drawing boards.
As the work progresses, the tables should be raised, so
that those who desire may stand up. This will enable the
students to do better work, especially when the brush work
is being practiced.
In fact, it is suggested that after the third lesson
students be permitted to stand as they work, and if in a
drawing classroom or showcard studio where practical work
is done, the regular drawing tables can be used.
The thorough mastery of the fundamentals is absolutely
essential to good work, and particular care should be
taken with the first four or five lessons that all students
master these details. If the student is without an instructor,
he should exert every effort to be painstaking, and never
hurry the work in the early stages of practice.
Quick, “jerky” strokes, especially with the pen, are
decidedly bad form, and should never be attempted until the
student has advanced to the point where it is possible to
gain a little speed and yet be neat and accurate.
The instructions on the practice charts, as well as on
the following pages, regarding the early lessons are fully
explanatory.
There should be absolute silence in the classroom, and
students should be so arranged that the instructor and assistants
may pass rapidly from one chair to another, watching
each student, and making corrections wherever necessary.
The instructor should provide himself with a pen or
brush as necessary, and use a separate sheet of paper in
showing the students the correct method of making certain
letters. Students need suggestions particularly on the formation
of the letter “C,” the letter “S,” etc. Once the
“reason why” is mastered, the rest is easy.
Students should assume an easy, comfortable position. A
cramped position is hard on the muscles and nerves, and
ruins the eyes. Keep the head well over the work and have
the work in front of the body—never too far toward the
right.
Don’t be afraid to “bear down” on the pen—pressure
will keep the hand from “wobbling.”
Keep the third and fourth fingers “folded in” and permit
the hand to rest comfortably upon the table or drawing
board. Use the thumb, first and second fingers to hold the
pen or brush firmly and do as much of the work as possible
with these fingers. In other words, “loosen up” the wrist
and fingers.
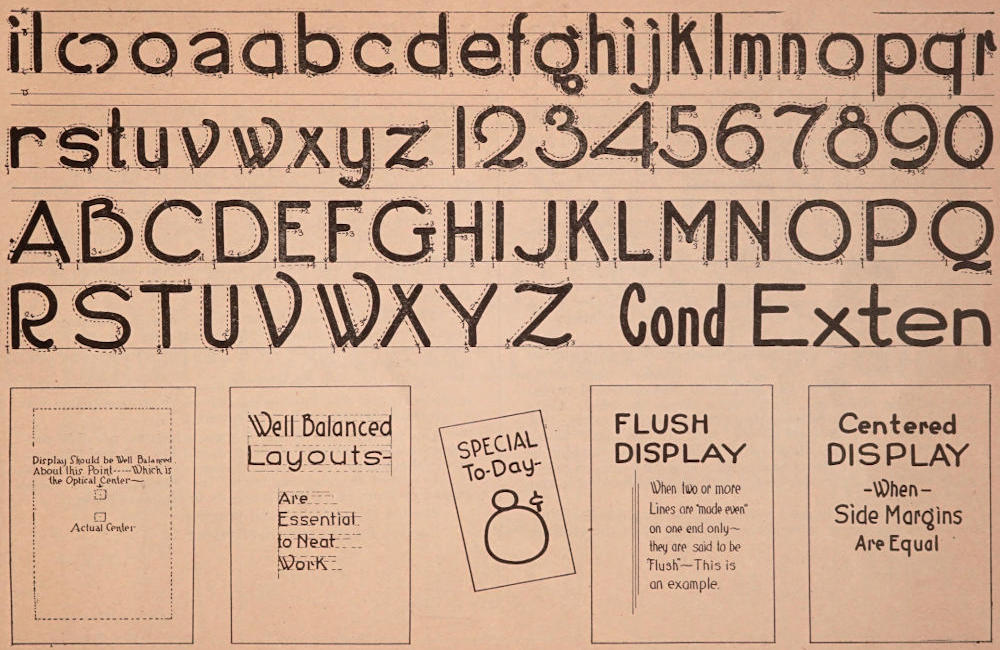
INSTRUCTIONS—LESSON NO. 1 Fundamentals—See Large Chart.
On the adjoining page is shown the plain speedball alphabet,
one of the simplest alphabets that can be formed.
The light lines show the direction in which the pen should
move in forming the letters, and the numerals indicate the
order in which the strokes should be made.
Keep the “foot” of the round speedball pen flat on the
surface of the paper or cardboard and press down with considerable
force so that the pen makes a full, even stroke.
Do not carry too much ink, as it will run and spoil your
work.
Practice slowly and patiently.
Learn to form carefully the “lower case” or small letters,
“i,” “l,” and “o.” All of the “lower case” letters containing
ovals should be of the same uniform proportion.
In this alphabet the “O” has been formed as a perfect
circle, thus giving the student something definite to work
from. It will be noticed that a-b-c-d-e-g-o-p and q contain
ovals which must be uniform. Also notice that the lower
case letter “i” is the first stroke in the letters “m” “n” and
“r,” and with a slope, is used in the construction of u-v-w-x
and z, and that the letter “l” is the first stroke in the letters
“b-h-k and p”; thus the formation of an alphabet requires
very few strokes.
It is also well to bear in mind that the experienced
showcard writer does not “work” or think in terms of letters,
but his mind works in terms of “strokes”; thus he
knows when forming the lower case letter “b” that the first
stroke will be exactly like or similar to the lower case “l”
and then must be added the oval.
The capital letters are made up of uniform strokes, and
the same with the numerals. It will also be noticed that
wherever there is an oval, it should be as nearly the form of
a circle as possible. The “oval” in figure “2” if continued
would be a circle. The figure “3” is the same as figure “8”
except that in “3” the ovals have openings. The loop of
figure “5” should be almost a complete circle, the same as
the loop in “6” and the lower loop of the numeral “8” should
be the same size as the loop in “9.”
The ovals of the lower case letters should be of a proportion
that will occupy the space between cross lines “B”
and “C” shown on the chart. After a little practice on the
charts, and in the first lesson omitting the spurs entirely,
this alphabet will be easily mastered.
It will be noticed that the ruled lines on the chart are
numbered A-B-C-D. This is for the convenience of the student,
with the idea in mind that the ovals of the long stem
letters are two-thirds total height. That is—the space from
line “A” to line “B” should be one-half the space from “B”
to “C” and the space from “A” to “B” should be equal that
from “C” to “D.”
This is an excellent proportion for practice work, although
the student after he progresses is at liberty to vary
these lines as may appeal to his fancy. (See page of speedball
“variations” following lessons).
By “spurs” is meant the little cross finishing lines as
shown on the chart. Omit these “spurs” during the use of
the first two or three charts.
In lesson No. 1 follow on the chart only the lines indicated
on the following page.
Then carefully study the layout suggestions—where
the “balance” of display comes—and the various arrangements.
Fundamentals
Plates used by permission of Ely & Walker Dry Goods Co., St. Louis.
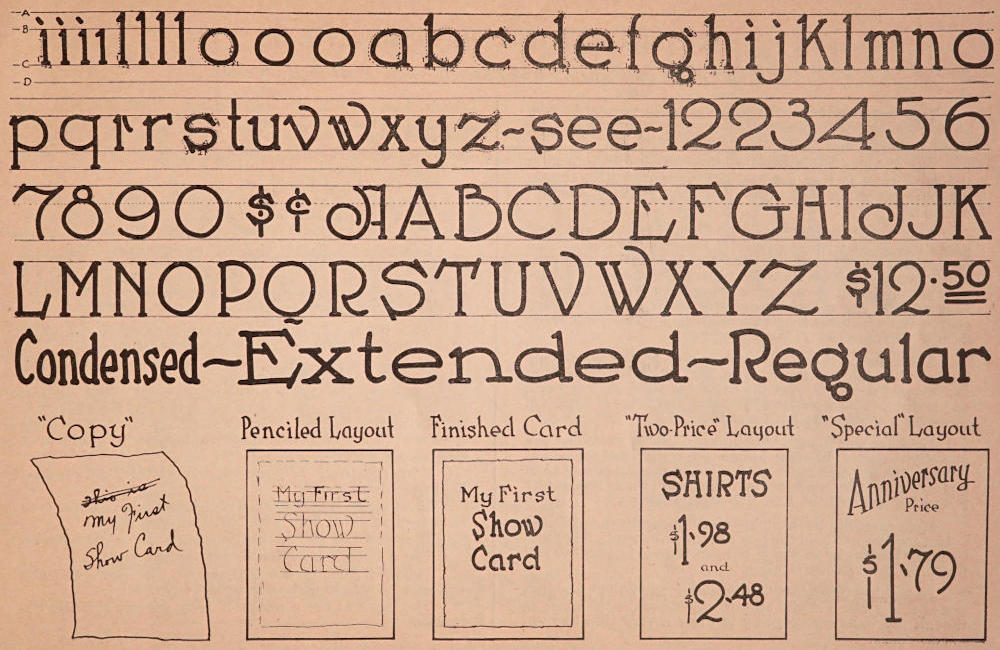
This lesson, shown on following page, should not be attempted
until LESSON No. 1 has been thoroughly mastered.
The student should be familiar with the layout suggestions
shown beneath the alphabet in lesson No. 1 even to
the extent of laying out the same outlines and copying them
on sheets of paper about 9×12 inches.
Lesson No. 2 should be copied by the use of a No. 3
round speedball pen. Follow the dotted lines on the chart
very carefully and observe the details—especially the
“spurs” which are the little finishing touches or cross lines—these
being purposely omitted in the first alphabet.
When the student has carefully lettered in one or two
of these charts the same alphabet should be copied on a
plain piece of paper or cardboard, forming the letters as
nearly perfect as possible.
Use a pencil for the “ruling in” on practice paper other
than the charts.
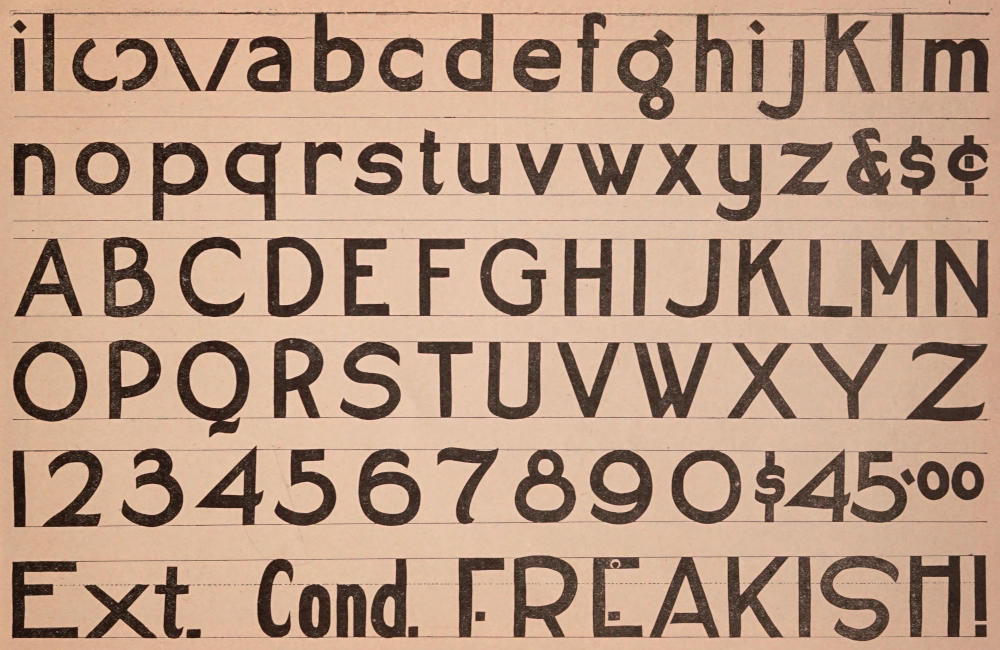
Page 7 also shows the condensed and extended variations
of the alphabet. Keep these forms in mind. Condensed
lettering is often necessary on narrow cards, and
the extended is often used on very wide or “landscape” sizes.
With this lesson thoroughly mastered—the student is
advised to practice the layout work. The first drawing suggests
the “copy” for a showcard as it is often handed to the
card writer.
There is a rule in card writing which demands the elimination
of useless or unnecessary words. Thus the student
scratches out the words “this is.” These words can be eliminated
without changing the sense of the card. Next, take a
piece of enameled cardboard, or enameled paper, and make
a penciled layout as shown.
Keep the balance of display toward the top center. Note
that the three lines are “gathered” in a group—not scattered
all over the card.
With the penciled layout ready—take up a No. 3 pen
and letter in the first line—then use a No. 2 pen for making
the next two lines. Use the smallest pen for forming a
rather wavering or “rugged” border about one inch inside
the margin of the card. Note the reproduced finished card
shown.
This layout should be practiced until it resembles the
original. Then the student should attempt the next card
known as the two-price layout, and then follow with the
special arrangement.
These three layout suggestions will give the student
confidence and the knowledge gained from practicing will
make other layout work much easier.
During the intermission between lessons, possibly covering
several days, the student should lay out and letter in
other showcards from original copy or from copy suggestions
secured through observing the showcards in large
stores, or from the advertisements in the newspapers.
Master the alphabet and practice.
Success follows persistent trying.
Perfected Speed Ball Alphabet—Layouts
Plates used by permission of Ely & Walker Dry Goods Co., St. Louis.
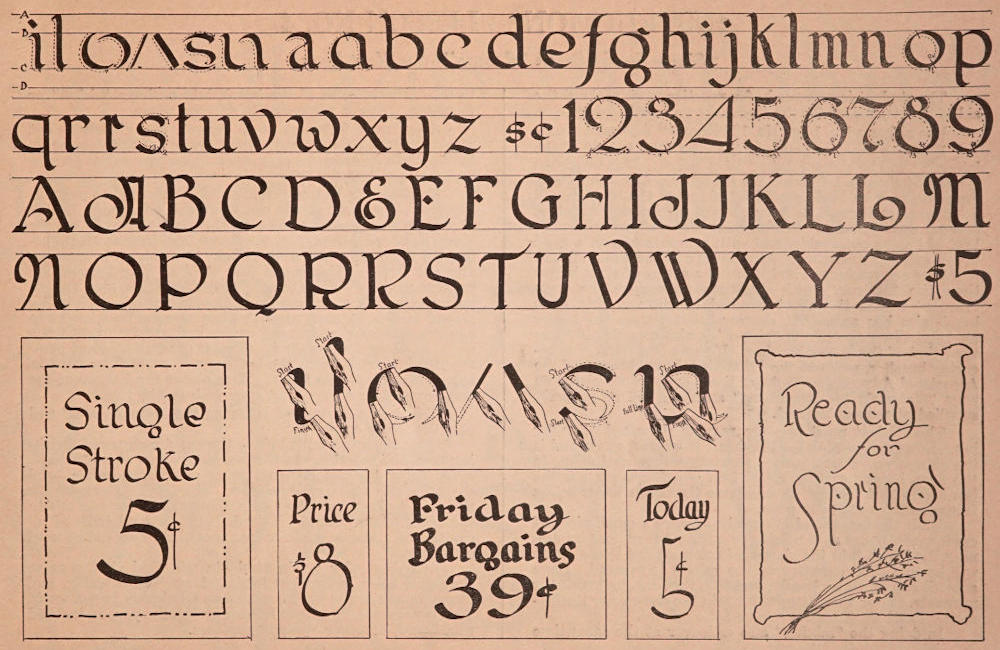
INSTRUCTIONS—LESSON NO. 3 Broad Point Pen Single Stroke Roman—See Chart for Practice
This is a very beautiful alphabet when properly made.
Students should note the graceful curves—and practice each
letter carefully and faithfully from the large charts.
The alphabet reproduced on the opposite page is from
the same copy as that used in making the practice charts,
with the exception that in the book, the practice lines are
omitted.
Any “broad pointed” pen may be used for this alphabet.
Some showcard writers prefer the model “C” Speed Ball
pen, others prefer what are known as “round” writing pens—which
are the same style pen as the “Soennecken,” others
may prefer the “Automatic Lettering Pens.” Any style pen
that will fit the practice lines will suffice. The original
chart from which the illustrations were produced, was made
with a No. 3 model “C” Speed Ball pen.
In beginning the practice work, note on the charts, and
also on the alphabet shown here, that the four guide lines
are lettered A-B-C-D, just the same as in the first and second
lessons. The spacing is the same, and there is a general
proportion common to both alphabets.
Hold the pen firmly, but the hand should guide the pen
at a slight angle. In other words—keep the hand somewhat
farther toward the right of the letter itself—rather than
directly over the work as was the case with the round
Speed Ball pens in the first and second lessons.
Note carefully the sketches shown beneath the alphabet—and
endeavor to hold the pen exactly as shown. Note particularly
the angles in which the pen travels in starting and
finishing the various strokes.
In making the “staff” strokes such as “i”, “l”, etc., the
pen should make a slight upward curve—much the same as
though the writer were going to draw a very thin line upwards
at an angle of about 45 degrees. When this thin line
is fairly started and touches the guide line, then make a
graceful curve and come directly downward almost to the
base line, allowing for the slight curve at the bottom of the
stroke.
Try the letter “i”.
Hold the pen at an angle. Come up slowly, then turn
and follow the practice lines downward. Then try the letter
“l”.
Now take a separate piece of smooth paper. Rule this
off into spaces the same as the practice chart, and continue
making the letters “i” and “l” until the pen feels “natural,”
and you can make perfect perpendicular lines with the graceful
curves of “spurs.”
With the pen “sliding” downward somewhat at a cross
angle, the wide downward strokes will be found easy.
Then try, on the chart, the curves which enter into the
making of the letter “o.” All such curves are made from the
top downward, and this is an important point. Also remember
that there must also be a swing of the pen from LEFT—DOWNWARD.
Then, TOWARD THE RIGHT—AND
DOWNWARD. Two strokes form the letter “o.” The next
strokes are simple.
With the letter “s”, you must use “THREE” strokes.
Note the chart.
Then come the strokes with curves which enter into
the construction of “h”, “m”, “n”, “w” and “y”.
Bear down on the pen sufficiently to get a wide stroke.
Use a sweeping motion to get the curves.
Follow faithfully the outlines on the chart, and you
will soon be able to make a beautiful alphabet.
The capitals are a series of easy curves, also the numerals.
Broad Point Pen Single Stroke Roman
Plates used by permission of Ely & Walker Dry Goods Co., St. Louis.
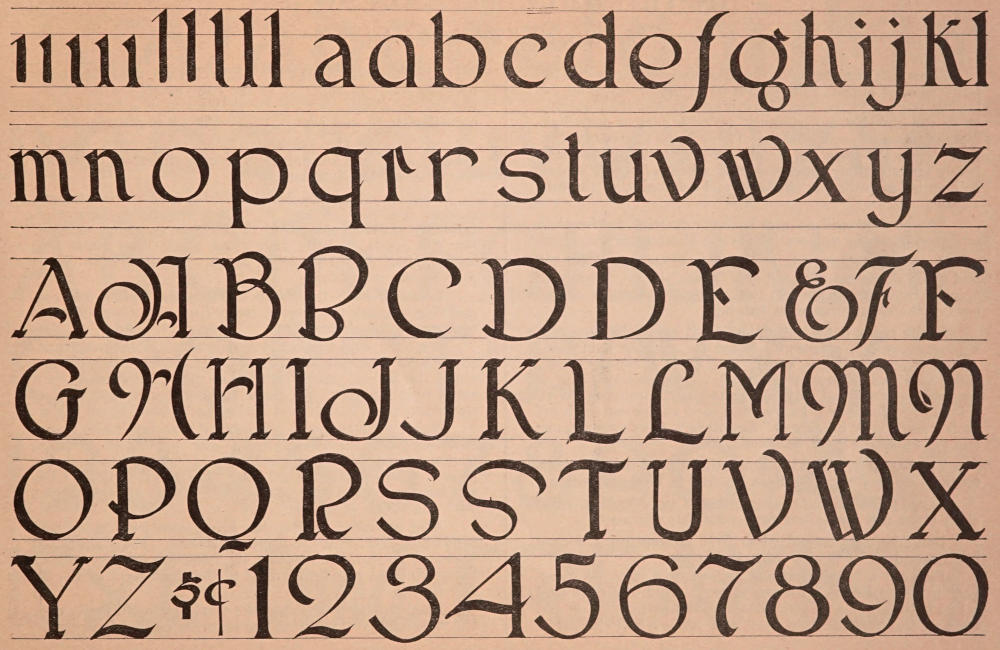
INSTRUCTIONS—LESSON NO. 4 Single Stroke Brush “Roman”—See Next Page
The student is now ready for practice work without the
aid of charts, except for the model shown on adjoining page.
Use either a No. 10 or No. 12 “Rigger” showcard brush.
Rule the practice paper so that the total height of the
letter “l” will be about 2¼ or 2½ inches. This will leave
a space of about 1½ inches for the ovals. Any size letters,
however, may be made providing of course the brushes will
accommodate them. Be very careful in choosing brushes,
and get good brushes. Professional card writers prefer the
best red sable obtainable, and with reasonable care, a good
brush will last a lifetime. Also be sure of the sizes. Brush
numbers are confusing, and there is a series of sizes larger
than the “Rigger,” with duplicate numbers. The term
“rigger” means the short handled brush, and this style
brush also has somewhat shorter bristles than the larger
models. The price of the “rigger” is also considerably less
than that of the larger brushes. If there is difficulty in securing
brushes, write to the Educational Department of the
Associated Advertising Clubs of the World, as suggested on
page “Materials for Beginners,” and you will be properly
supplied at reasonable cost.
The student must also use regular showcard color for
ink. Don’t use pen ink for brushes. It will not work, and is
too expensive. Procure some regulation showcard colors in
the 2-oz. bottles costing about 25c. Professionals use the
term showcard “colors” to designate the brush water colors
from the inks used for pens.
With the brush and ink ready—secure a small piece of
cardboard for use as a palette or mixing board, and by dipping
the brush into the showcard color several times, there
will be sufficient quantity on the palette to proceed. Have
a small cup of water handy, and into this dip the brush for
moisture. Pour very little water into the show color itself—moisten
and work up the color on the palette.
In doing the “mixing” also endeavor at the same time
to work the bristles of the brush into a sharp “chisel” or
flat edge. This is necessary to do good work.
After each letter or two, repeat the chiseling out
strokes on the palette, and always carry sufficient color on
the brush to do good and easy work. Don’t permit the brush
to dry out so that the letters are weak and poorly “covered.”
Now for the lesson. Hold the brush with the point at
an angle—the same as the pen was held, in forming the alphabet
in the previous lesson. The first stroke is a very
short, light one—then, rest the brush, and bear down slightly
until the bristles are well spread. Come down in an even,
straight stroke. This is the first stroke. (See first stroke
on next page). When almost to the base line, stop and go
back to the thin spur, and fill in the open space. (Note the
second stroke on next page). Then resume position as in
downward stroke and taper easily and slowly toward the
right, touching the baseline. (This is stroke 3). Next place
the brush a trifle from the bottom and come downward to
left. (Making stroke four). Then across the bottom of the
line, completing a very neat spur with stroke five.
This is the manner of lettering the lower case “i” and
also the lower case “l.”
Close observation will show the exact manner of finishing
“off” the capitals. In the practical use of this alphabet,
avoid using lines of all capitals as much as possible—and
then, use only the simple capitals. The fancy letters are for
use only as the first letter on a showcard or for capitals in
the main display lines. It is difficult to read lines of all
capitals at a glance, and for this reason they should be used
sparingly.
In doing color work, students will find that regular
showcard color, somewhat “thinned out” with water, and
placed in a separate bottle, will serve admirably in pen work.
This is particularly true in lettering with the pen, on mottled
mat board, or other “pulpy” surfaces.
BRUSH “ROMAN”
Plates used by permission of Ely & Walker Dry Goods Co., St. Louis.
INSTRUCTIONS—LESSON NO. 5 The “Egyptian” Brush Alphabet
Show card writers give this alphabet the name “Egyptian”
when it applies to the plain lettering as shown on following
page. There are many other names that apply—when
the alphabet is “trimmed” up with various embellishments
known to professionals. There is the spurred “Egyptian”
when the lines are finished off with “spurs”—either
heavy spurs or hair line spurs, and a host of other “embellishments”
according to the taste and originality of the card
writer.
The student will do well however to stick to the plain
alphabet until the various letters are thoroughly mastered.
Among printers, this alphabet is known as “Gothic,”
and some showcard men call it a “block” letter. The term
“block” comes from the fact that most of the letters should
occupy the same amount of spacing.
While not a beautiful alphabet—it comes in very conveniently,
and is a splendid letter for making bold lines.
As an illustration—the word “HATS” is a comparatively
weak word on a large show card, unless the lettering is
heavy, or embellished with some shading or outlining. With
a broad brush—if in a hurry—the card writer can dash off
such a word very quickly in “Egyptian”—thus saving time,
and yet making a good, bold card.
The word “HURRAH”—sometimes used to attract attention—is
very weak—unless lettered in bold “Egyptian.”
Large prices on full sheet cardboard signs and letters on
cloth signs are also often done with this alphabet.
Don’t be discouraged when first attempting it with a
brush—and make it only with the brush.
Pick out a brush that has a good even edge. A “ragged”
brush is useless for heavy strokes. And when you find
a brush that will work well, leaving the perpendicular and
ends of the vertical lines even and neat, KEEP SUCH A
BRUSH FOR THIS STYLE LETTERING, and use it for
nothing else. In contrast to the “Egyptian”—a brush for
the Roman alphabets must be pliable and of a “texture” to
permit of light and heavy lines being made alternately.
In forming the “Egyptian” the brush must hold its
“chisel” edge, and keep an even stroke; therefore the necessity
of using the right brush.
First practice the letters that contain the straight
strokes, E-F-H-I-L-V and W. Keep practicing these capitals
until they become easy. Then take up the remainder.
For the capitals—draw your cross guide lines about two
and one-half or three inches apart. Regulate your lower
case letters accordingly.
Learn to twirl the brush between the thumb and second
finger, using the first or index finger as a sort of guide
to keep the brush in place.
Roughen up the polished ferrule of the brush with sand-paper,
or a file. Some showcard writers wrap adhesive tape
about the ferrule, others wind that part of the brush with
small rubber bands. All these “tricks” enable you to hold
the brush more firmly and make the “turns” much easier.
Making the curves is a combined arm, wrist and finger
movement and the student must bear in mind at all times
that the hand must drag the brush. Do not try to push the
brush. KEEP THE HAND AHEAD OF THE BRISTLES,
and keep the chisel edge of the brush always at right angles
with the width of stroke.
Also endeavor to keep the brush somewhat more perpendicular
than with the Roman lettering. Many showcard
writers hold the brush so that the handle is exactly erect or
horizontal and a trifle forward of the third joint of the index
finger.
Keep the head well over the work, almost directly over
the work, and you will find the lettering can be done easier.
BRUSH “EGYPTIAN”
Plates used by permission of Ely & Walker Dry Goods Co., St. Louis.
INSTRUCTIONS—LESSON NO. 6 Embellishing, Decorating, Etc.
If this work is being done in a class under an instructor,
it is suggested that examples be prepared exactly as described
on this page, and illustrated on the following page. This
will enable the students to gain an exact idea of the work
to be done. If the student is practicing alone, it is suggested
that cards duplicating, or at least similar to those described,
be procured, and the various combinations followed out.
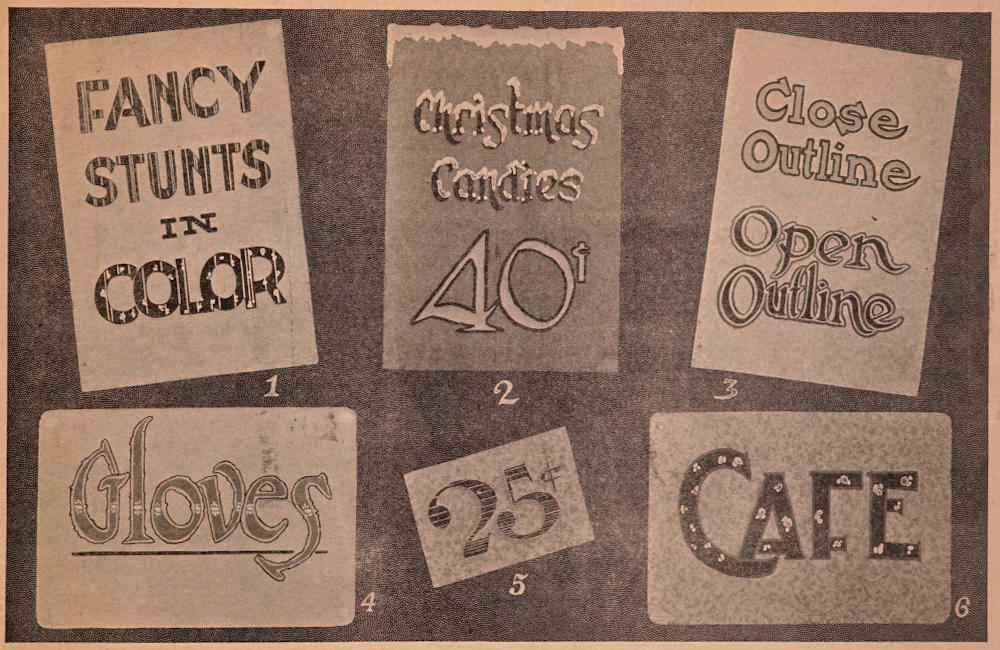
Card No. 1, size 9×13. Mottled mat board with a slight
tinge of very light green. First three lines of lettering were
done in bright red, and then the words “Fancy Stunts” were
striped with light yellow. The word “color” was lettered
in dark brown and embellished with light yellow.
Card No. 2, size 9×13. Light blue mottled mat board.
Lettering was done in blue—the first lines in dark blue,
and the numerals “40” in light blue, outlined with dark
blue. The snow effect was accomplished by coating the
top of the card and the letters very heavily with thick, white
showcard color. Before this color dried, fine “imitation
snow”—ground mica—was distributed. The card was then
left to dry, after which the surplus ground mica was brushed
off into a receptacle, to be used again.
Card No. 3, size 9×13. Pink mottled mat board. Lettering
shows two styles of outlining. The first two lines
were light purple outlined closely with black—the last two
lines were dark purple with rugged light green outline. Note
carefully the methods of outlining.
Card No. 4, size 18×8. Linen finish, cream tinted mat
board. Lettering was done with No. 10 brush, using orange
ink. The outlines and underscoring were done in purple, and
the decorative dots over the face of the letters are white
put on with small brush.
Card No. 5, size 6½×4½ inches. Light tan mottled
mat board. Price was lettered with brush, using dark blue
color, shading was done with light blue. The embellishing
across the face of the figures was done with white.
Card No. 6, size 12×18 inches. Mottled tan mat board,
round cornered. Body of lettering done in dark, reddish
brown, then dotted with gold. The letters were outlined
with bright red.
DECORATIVE SUGGESTIONS
Plates used by permission of Ely & Walker Dry Goods Co., St. Louis.
INSTRUCTIONS—LESSON NO. 7 Use of Pantograph, Pictures, Copying Designs, Etc.
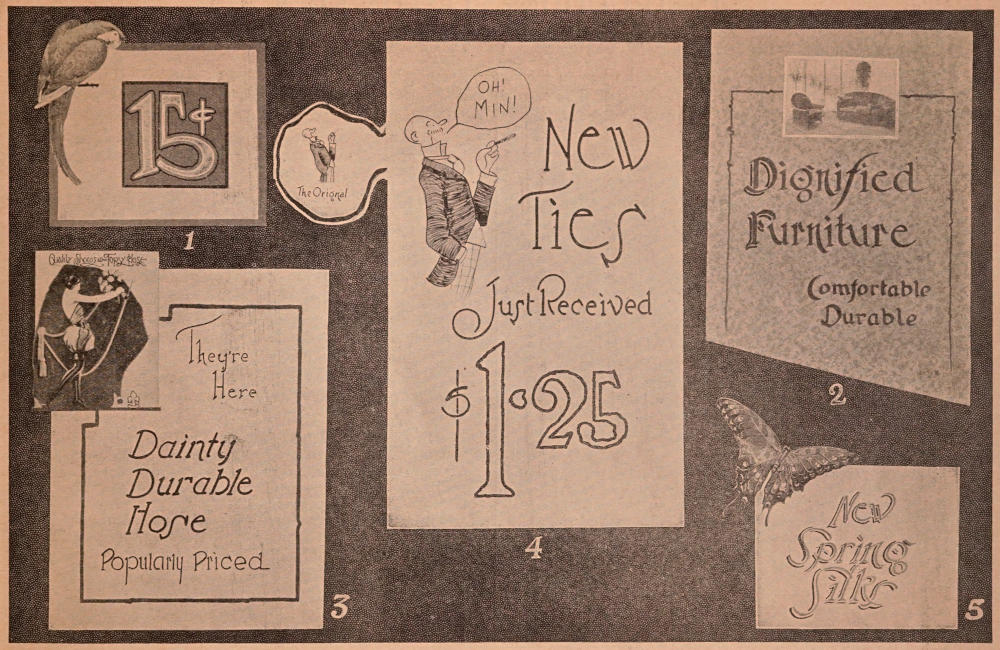
Card No. 1. Size 8¼×7 inches. This was a sample
from a wholesale paper house. Body color was a very light
green. The border and center panel were made with olive
ink. The figures were light yellow and outlined in bright
red. The picture of a parrot was cut from a magazine and
pasted in the corner of the card as shown.
Card No. 2. Size 10½×14 inches. Dark cream mottled
mat board. Lettering was done in a dark gray with No. 10
brush. The initial letters “D” and “F” were shaded with
black. The picture which represents a photograph was a
neatly printed half-tone, cut from a trade paper. The border
of the card was gray.
Card No. 3. Size 10½×13 inches. Plain white cardboard
with a picture pasted on the upper left-hand corner
cut from a manufacturer’s showcard. The lettering on this
card was done in black with the round speedball pen. The
border is dark green to match the picture.
Card No. 4. Size 11½×18½ inches. Plain white cardboard.
Lettering was done with large round speedball pen.
The picture shows the use of the pantograph and the sketch
was enlarged from the original at the left. This was enlarged
four times as shown on the card itself. After the
sketch was traced with a pencil, the drawing was filled in
with drawing pen.
Card No. 5. Size 8×6 inches. Plain white cardboard
lettered with No. 10 brush, using bright green ink, then
shading with black.
The butterfly was a cut-out from a trade paper and
pasted to the card-board.
In shading the letters on a showcard, or on any piece
of sign work, the student should keep in mind the theory
of shading which is as follows:
Imagine, if possible, that the letters to be shaded are
about one inch in height from the paper and that a light is
being held above and to the right of the letters at an angle
of about 45 degrees. If this experiment is carried out in
actual practice it will be found that the shadows fall to the
left and below the letters. This is the rule for proper shading.
The effect can be reversed by imagining the light coming
from above and to the left. This would necessitate the
shading on the right side of the letter and at the bottom.
Students should study the large cloth signs made by
professional sign men, for splendid examples of shading.
PRACTICAL EXAMPLES
Plates used by permission of Ely & Walker Dry Goods Co., St. Louis.
INSTRUCTIONS—LESSON NO. 8 Air Brushing, “Spatter” Work, Etc.
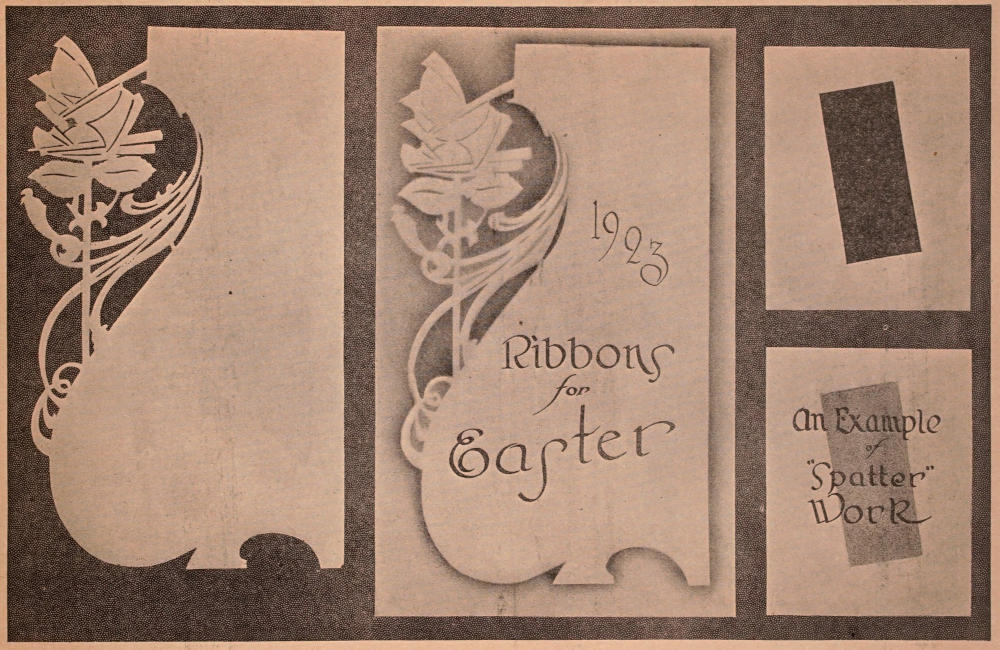
The first figure, that is the figure to the left on the
adjoining page, shows the stencil, or pattern, as it is cut
from regular stencil stock for use in air brush work or other
decorative methods.
The card in the center shows the design after being
copied on the showcard. The stencil itself was placed on
white showcard, size 14×22, and the air brush color was
blown about the margin of the stencil, with the result as
shown. The lettering on this design was done with a large
size model “C” Speed Ball pen.
The two cards shown to the right are illustrations of
how to proceed in doing “spatter” work. The card at the
top shows the panel cut out, and this was placed over the
card shown just below. The spatter was done with light
green color, and the method employed was as follows:
A brush similar to that used in cleaning typewriters
was used with regular air brush ink, and this brush was
moved backward and forward across the blunt edge of a
knife blade. The face of this panel was then lettered as
shown. This lettering was done with a large size model
“C” pen.
Students who desire to further familiarize themselves
with air brush work, should write to the various manufacturers
of air brushes, and get literature on this interesting
subject. Stencils may also be procured from showcard supply
firms or from the manufacturers themselves. Patterns
from stencils may also be copied from wall paper designs,
pictures, etc., and then cut out with a very sharp knife.
“Air brush” is a name for a finely made tool which has
a very delicate spray, operated by means of air pressure.
It is necessary, of course, to attach the air brush to
some sort of tank containing air, and for those who use the
air brush a great deal, nothing is more convenient than the
carbonic air tank furnished by any carbonic gas company.
It is necessary to attach an air regulator to such an air
tank. Bear in mind that an air regulator is a combined regulator
and pressure gauge.
In addition to the air brush, it is necessary to have extra
color cups and about eight feet of rubber hose to attach
to the tank.
Ordinary spatter work may be done in a great many
ways, in addition to the method mentioned here.
Many showcard men find that an ordinary fine spray
atomizer will do very good work, and some even attach an
atomizer to a home made air pressure tank, which is fed
from a hand or foot pump.
Any method that will add novelty to the appearance of
a showcard is very good, especially at the important seasons
of the year.
In doing air brush work however, or spatter work, it
is very necessary to first procure the regular air brush
colors. Ordinary homemade mixtures will drip and ruin
your work. The regular air brush colors have in their composition
a dryer which causes the color to dry immediately,
and also a binder which prevents the color from being rubbed
off. Air brush colors are very reasonably priced, and
can be secured in a great range of shades and colors.
If the student has difficulty in procuring these materials,
he should write to the Educational Department of
the Associated Advertising Clubs as suggested in previous
lessons.
SPECIMENS—FOR LESSON 8
Plates used by permission of Ely & Walker Dry Goods Co., St. Louis.
INSTRUCTIONS—LESSON NO. 9 Finished Work in Air Brushing, Etc.
This lesson has been designed as a direct follow-up of
Lesson 8.
There is a variety of simple and practical suggestions
on the following page—giving the student much actual
practice.
If work is being done by classes, the instructor should
have similar designs prepared and permit the students to
copy from them.
It would be much more practical if such designs could
be shown to the students before the class closes on Lesson 8.
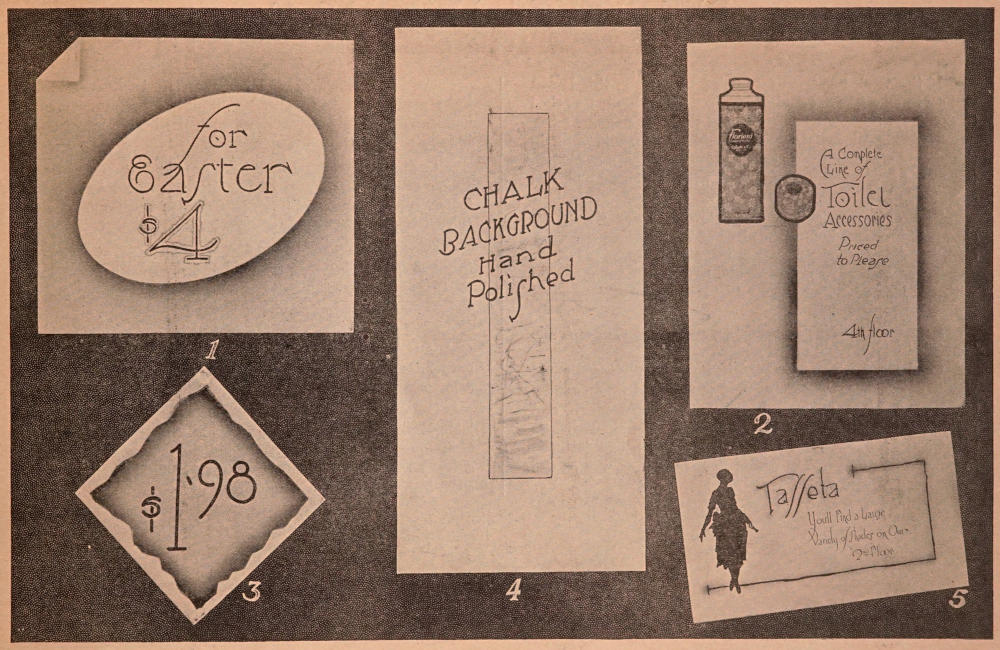
These designs are all on white cardboard so that very
little extra stock is necessary.
Card No. 1. Size 12×11. Plain white card, air-brushed
in black around the oval cut-out. The “turned-down” corner
effect was obtained by clipping off the corner and airbrushing
a section to represent the portion that would be folded
over. The lettering was done with No. 3 round Speed Ball
pen, and the figure “4” was outlined in purple.
Card No. 2. Size 11×14 (quarter sheet). Airbrushing
was done over a panel with purple ink. The pictures were
then pasted on and the lettering done with small size broad
point lettering pen.
Card No. 3. Size 7×7. Air-brushed panel background
was obtained by “spattering” the color through a “jagged”
edged cut-out. Lettering was done with large size round
Speed Ball pen.
Card No. 4. Size 9½×20. Plain white cardboard.
Faintly decorated panel was made by rubbing in colored
chalk dust and outlining this with small pen. Lettering was
done with No. 4 round Speed Ball pen.
Card No. 5. Size 11×16. Plain white cardboard.
Silhouette was made by transferring the outline of a picture
by means of carbon paper. This outline was then filled in
with black ink. The border and shading were done in dark
red. The lettering was done with small broad lettering
pens: a No. 4 Model “C” Speed Ball and a No. 5 Model “C”
pen.
SUGGESTIONS FOR PRACTICE
Plates used by permission of Ely & Walker Dry Goods Co., St. Louis.
If the work has been conducted by classes, this lesson
will serve as a general review, and students should be asked
to duplicate the examples shown on the next page.
The general review work should also include work in
the simple alphabets with each student making a card with
the round speed ball pen, one card with the broad pen, and
one simple brush card.
The examples shown on following page should be
shown to the class before the close of the previous class session,
in order that the proper preparation may be made.
These cards are not difficult, but have been made up
with the idea of giving the student an idea of variety—and
individuality.
If an air brush is not available, an atomizer, or a simple
“spatter” process will serve just as well.
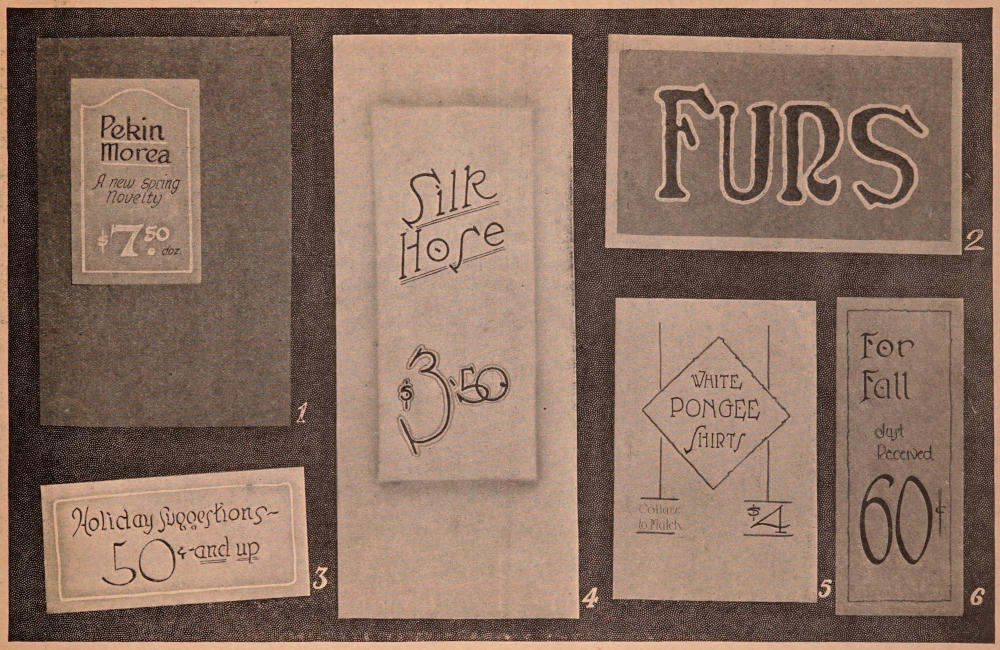
Card No. 1. Size 9¾×14½ inches. The lettered panel
was 5×7½ inches. The large part of the card was made by
covering a piece of wall board with purple plush and
mounting the showcard on it as shown. The showcard itself
was of pebble finish, cream colored mat board, lettered
in black with the price in white. The border as well as the
underscore is also white.
Card No. 2. Size 14×8 inches. The background was
light gray; with the mounting in light blue mottled mat
board. The lettering was done with the brush, using dark
blue ink. The outline was in white.
Card No. 3. Size 10×15 inches. Stock used was linen
finish, cream colored mat board; lettering was done in black
ink with a wide pointed pen. The border was finished with
the air brush, and then striped with white.
Card No. 4. Size 9½×22 inches. Panel was air-brushed
in purple; lettering was done with large size round Speed
Ball pen; first two lines were underscored in light green.
Price was outlined in light green ink.
Card No. 5. Size 8×11¼ inches. Lettering was done
with a round Speed Ball pen, and the panel effect with the
perpendicular lines was done with the pen, using orange
color ink.
Card No. 6. Size 5×12 inches. Light tan cardboard;
lettering done in reddish brown ink, using wide pointed lettering
pen for the large letters, and the price was done with
a No. 10 brush. The border was bright red, and the small
lettering was done in bright red.
SUGGESTIONS FOR LESSON 10
Plates used by permission of Ely & Walker Dry Goods Co., St. Louis.
SPEED BALL VARIATIONS
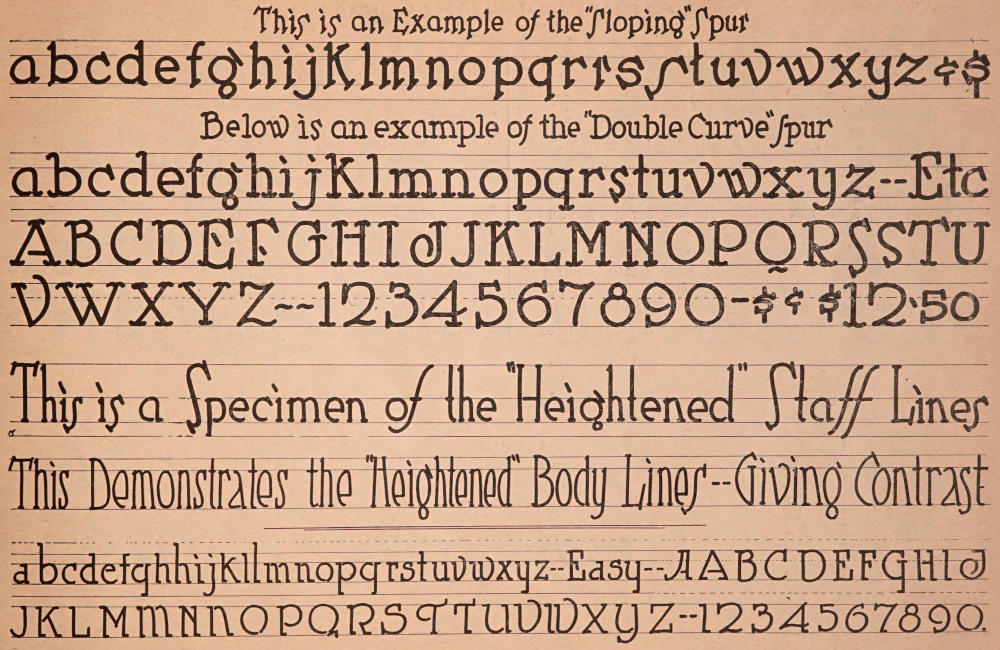
The chart on the following page shows a number of
variations which really make separate and distinct alphabets
based on the Speed Ball pen alphabet practiced in Lesson 2.
From these variations, if studied closely, it will be noticed
that the Lesson No. 2 alphabet is used as the basis, and by
simply changing the spurs, it is possible to make four or
five alphabets from the one model.
The chart as shown on the opposite page is self explanatory.
It is only necessary to state that the student
should study the changes thoroughly, and when well mastered,
they will add much to the attractiveness and individuality
of showcards.
By varying the height of the body lines, known also
as the staff lines, it is possible to change the entire appearance
of this simple alphabet.
The last alphabet shown is much the same as that in
Lesson No. 2 with the exception that the spurs are square
and face generally in one direction.
It will also be noticed that many of the strokes are
left open, at least there is a bit of white space showing between
the staffs and the next stroke. This adds a touch of
individuality to the alphabet, which is patterned after a
popular type face.
In practicing this alphabet, simply rule off the practice
paper as shown in previous lessons and follow the chart as
closely as possible.
CHART OF VARIATIONS
Plates used by permission of Ely & Walker Dry Goods Co., St. Louis.
“SPECIAL” ALPHABET
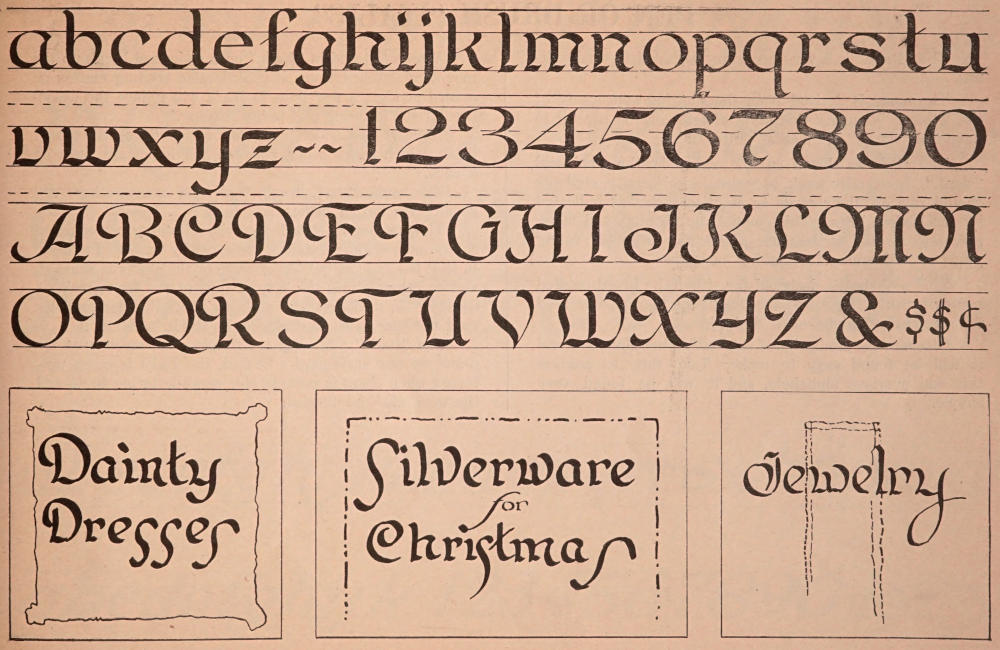
This alphabet is a Variation of the Roman and Old
English combined. There is always a demand for something
neat, and attractive, and not too difficult or “fancy”
to be easily made and easily read.
The same alphabet used week after week becomes
monotonous, and students will find the “special” alphabet
shown on the following page a very interesting one.
The capitals are quite easy, and follow somewhat after
the style of the plain, single stroke Roman, for the pen and
brush, shown previously.
Cards to be used in jewelry stores, for millinery, and
other high class lines of merchandise, look “classy” and are
very attractive when lettered in this style.
When using this alphabet it adds greatly to its attractiveness
to procure tinted cardboard. A faint tint of
purple, blue, brown, etc., greatly enriches the cards. Cream
tinted cardboard is also admirably adapted to this purpose.
Black cardboard may also be used, or other solid color.
By thinning the regular showcard colors somewhat with
water, beautiful work can be done. Black cardboard with
white lettering is decidedly appropriate in jewelers’ windows
but the cards must not be too large.
At Christmas time this is a very desirable alphabet because
it has many traits of the Old English.
With a little practice the fundamentals will soon become
fixed in the mind, and the student will have one more alphabet
added to his “vocabulary.”
Practice the layouts as shown, using black cardboard
and white ink for the second, and light blue ink on white
to form the dotted center panel of the third card.
FOR BRUSH OR PEN
Plates used by permission of Ely & Walker Dry Goods Co., St. Louis.
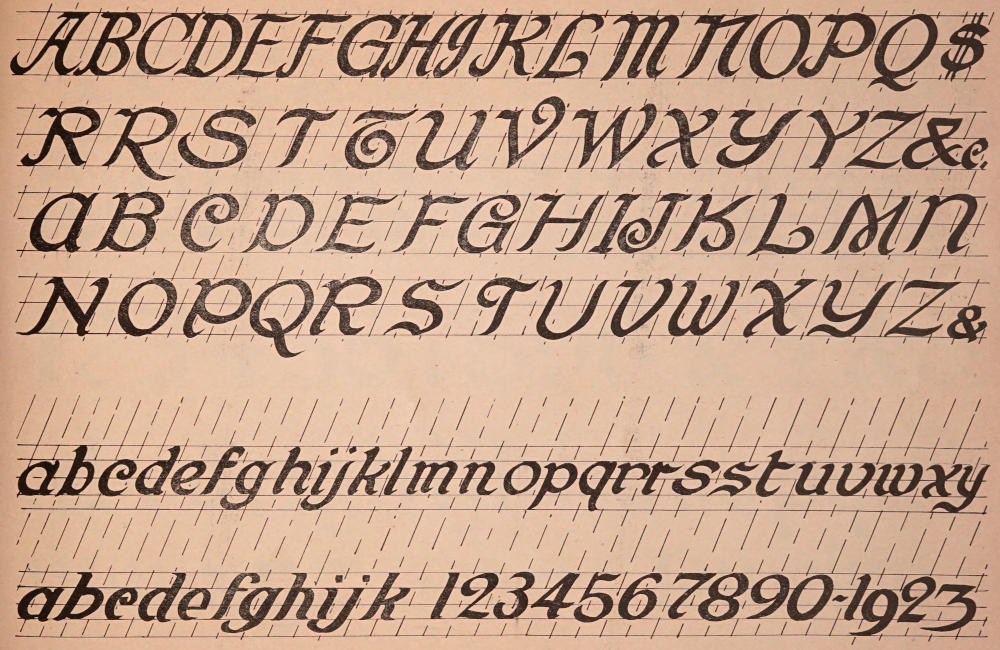
PEN OR BRUSH “ITALIC”
The “Italic” is a very necessary alphabet in card writing.
The name is derived from the slanting appearance of
the letters. In using this style of lettering be careful to
have the “slopes” or “slants” uniform.
The angle as shown on the chart is the preferred
“slant.” In practice work, to maintain uniformity, students
should rule off their cards or practice sheets as indicated
by the broken lines. This compels uniformity, and many
professional card writers use a specially “slanted” ruling
guide or “T” square for making such lines.
This alphabet is designed for either the broad pointed
pen or brush. The round speedball pens may also be used
for a “slanting” alphabet, if desired.
Compare the similarity of this with other alphabets and
it will be found easy to make. Take time to analyze
this and previous alphabets, and it will be found very
simple.
Words lettered in “Italic” on a showcard break up the
monotony. When there is considerable reading matter on
a card or sign, a few lines in Italic will relieve the denseness
of the lettering and invite reading.
Italic is also much used for catch lines—the short
lines—which often occur between the important lines on
a card.
The words “the”, “our”, “on” and many others are
usually written in Italic.
The last line of lettering on the adjoining reproduction
shows some slight variations preferred by showcard writers,
in that the spur at the top of some of the staffs is sharper,
and on other letters the bottom spur of the first stroke is
omitted. In working under pressure many showcard writers
omit the spur in all first strokes on the h, k, m and n.
The “Italic” numerals are simple—and much used for
prices on any style card. In fact, the Italic is much preferred
when there is considerable small lettering to do and
the work must be hurried.
“ITALIC” CHART
Plates used by permission of Ely & Walker Dry Goods Co., St. Louis.
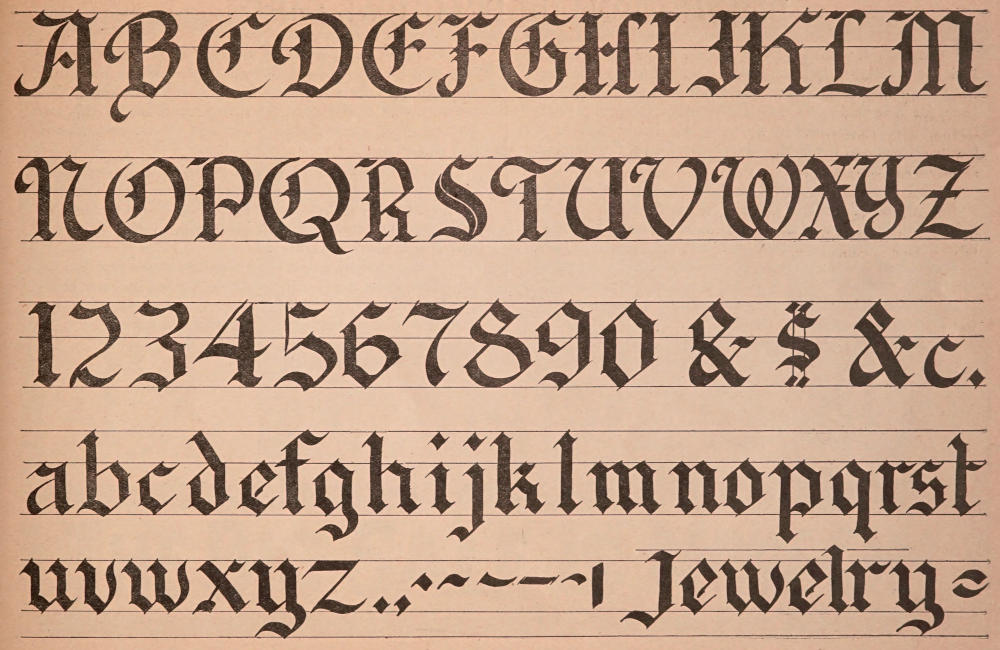
DIRECTIONS FOR “OLD ENGLISH”
While the “Old English” stands out in an unusual way
for beauty and dignity it must at all times be used with the
utmost discrimination. It does not lend itself ordinarily to
showcard or poster work and finds its best purposes in connection
with Christmas showcards or monogram effects.
Jewelry, silverware and gift suggestions of the valuable
variety express themselves to the highest advantage in the
“Old English” alphabet.
A point to be remembered in using this alphabet, however,
is not to combine capitals in one word. Capitals can
only be used in connection with the lower case letters. Some
of the other alphabets, more specifically the “Egyptian,”
work out very effectively in “solid caps.” However, this
effect can never obtain in the case of the “Old English.”
The alphabet as shown on the plate is self-explanatory
as to combination of strokes. The letters may be made with
the brush held at an angle square with the stroke, emphasizing
the fine lines, or they may be made with the broad
point pen, depending on the size desired.
This alphabet is the most time-taking of any to make
and as it adapts itself to only limited purposes, should be
used very rarely.
“OLD ENGLISH” CHART
Plates used by permission of Ely & Walker Dry Goods Co., St. Louis.
DESCRIPTIONS OF PRACTICAL CARDS
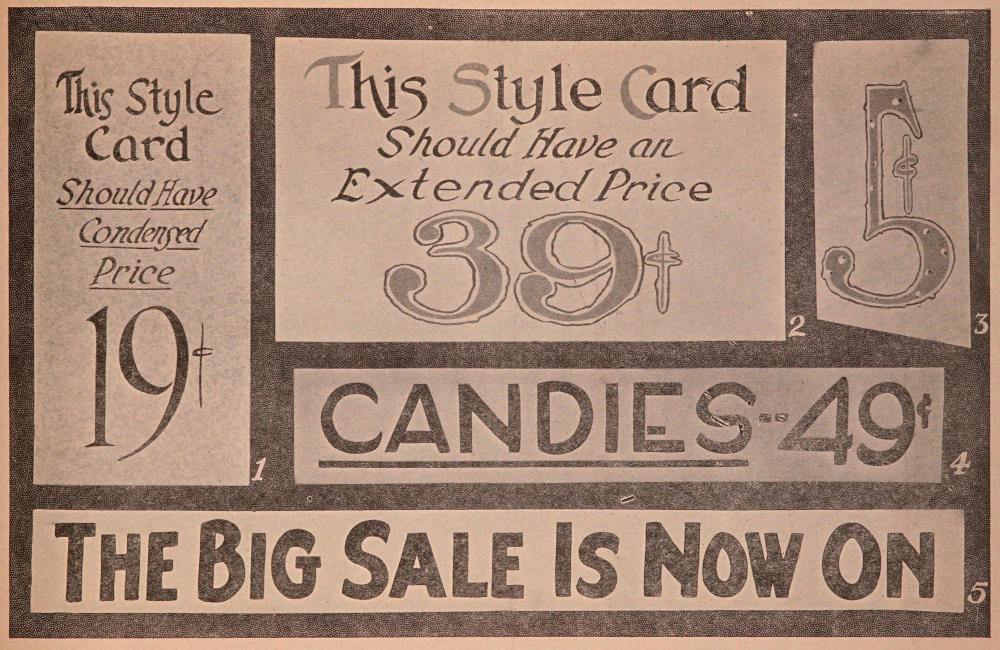
Card No. 1. Size 8½×17½ inches. Light tan mottled
mat board lettered in dark brown ink. This card demonstrates
an important point in showcard writing, that—if
the price is to be displayed in large figures, the general outline
of the space occupied by the numerals should conform to
the proportions of the card. Thus a narrow card demands a
condensed price.
Card No. 2. Size 20×12 inches. Cream tinted linen
finish mat board. Initial capitals in the first line were in
bright red, the other lettering in brown, while the price figures
were bright red outlined with brown. This style card
is reproduced for the purpose of showing that an extended
card such as this, which is called the “landscape layout,”
should have an extended price that will be in keeping with
the general proportions of the card.
Card No. 3. Size 6×12 inches. Light green mottled
mat board with lettering in light blue outlined with dark
blue and then decorated with dots of white and black. This
shows a very pretty card for single price, and in this size
also the price figures should conform to the general outline
of the card.
Cards Nos. 4 and 5 are what is known as “strip” signs.
That is, they are lettered on narrow strips. The originals
were about 4½ inches wide. Card No. 4 was lettered on
light maroon cardboard with black ink. Card No. 5 was
white with black lettering.
If the student enters into practical work and has occasion
to make many narrow strips on paper, such paper
can be procured in varying widths and in rolls from any
firm that carries supplies for showcard writers.
PRACTICAL CARDS
Plates used by permission of Ely & Walker Dry Goods Co., St. Louis.
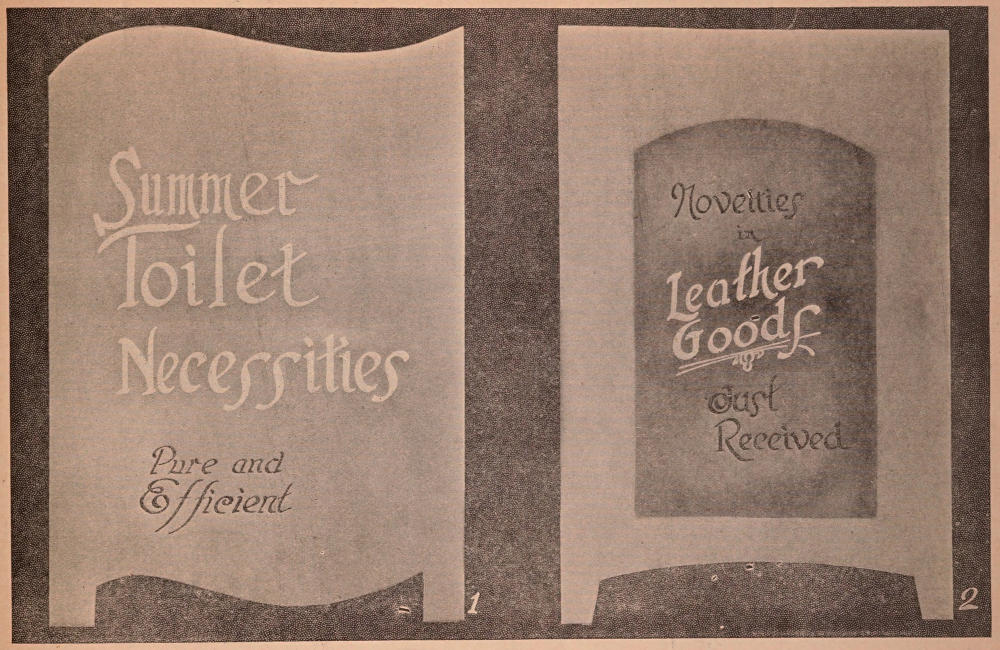
DESCRIPTIONS OF CARDS FOR SUMMER
Card No. 1. Size 16×22 inches. Gold mat board in
fancy “cut-out” pattern. Large lettering done in white
color with air-brushed shading in light red. Smaller lettering
done in black ink.
Card No. 2. Size 16×22 inches. This card was made
of tan mottled mat board with air-brushed panel as shown
in reddish brown. Large lettering is in white—the small
lettering in black. Such cut-out panel effects have the appearance
of two sheets of mat board being used.
CARDS FOR SUMMER
Plates used by permission of Ely & Walker Dry Goods Co., St. Louis.
DESCRIPTION OF CARDS ON PAGE 39
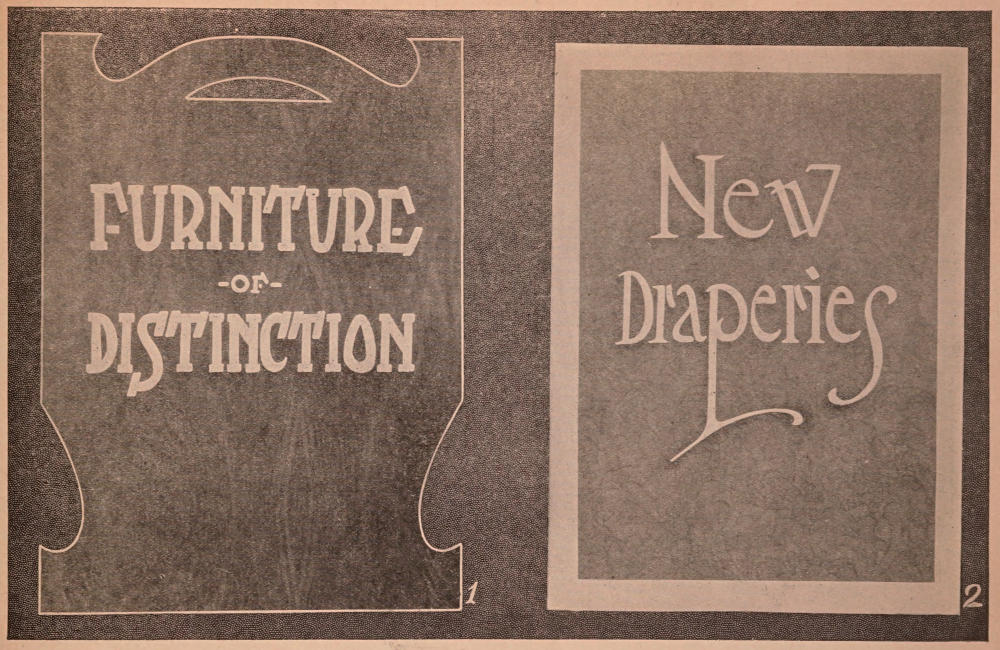
Card No. 1. Size 16×22 inches. Cardboard is imitation
Circassian Walnut lettered in plain white. In lettering on
cardboard of this character the student should bear in mind
that such board is of necessity an oil finish and that paint
with considerable dryer, or printer’s ink mixed with gasoline
are best for lettering. Water colors are very unsatisfactory
on surfaces of this kind.
This board is a fancy cut-out and may also be procured
in the mahogany finish.
Card No. 2. Size 16×22 inches. Plain white cardboard
with wall paper mat pasted onto the white board. Space
occupied by the lettering was first air-brushed in light green
which shows very faintly in the reproduction and this was
then lettered with white showcard color, using No. 12 brush.
SUGGESTIONS FOR FURNITURE DEALERS
Plates used by permission of Ely & Walker Dry Goods Co., St. Louis.
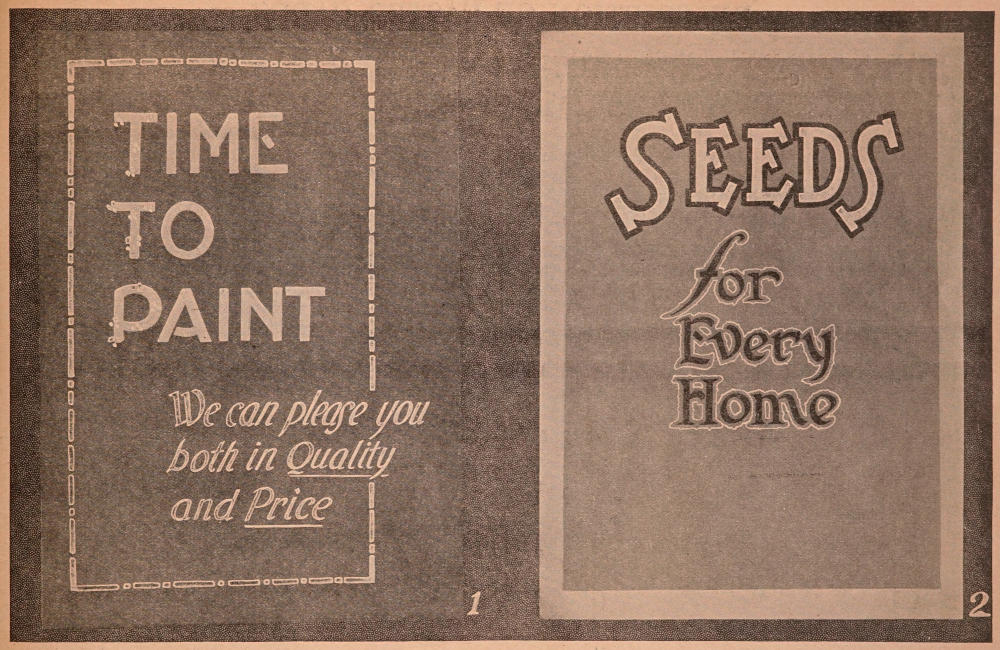
DESCRIPTION OF “SPRING” CARDS
Card No. 1. Size 16×22 inches. This showcard was
made of maroon colored railroad bristol. The large lettering,
in the “Egyptian” style, was done with yellow color.
The clover effect on each of the first letters in the three
words was done by grouping three dots in light red color.
The smaller lettering at the bottom of the card was done in
white color as was also the border, as indicated. This card
is attractive in style, featuring the side panel effect with
broken border.
Card No. 2. Size 16×22 inches. Plain white cardboard
mounted with a card of pale green. The word “Seeds” is
lettered in deep yellow, closely outlined in dark green. The
smaller lettering is done in the same shade of dark green
and outlined “raggedly” in bright yellow. The color combinations
are very effective, especially in connection with
this particular kind of “merchandise.”
CARDS FOR EARLY SPRING
Plates used by permission of Ely & Walker Dry Goods Co., St. Louis.
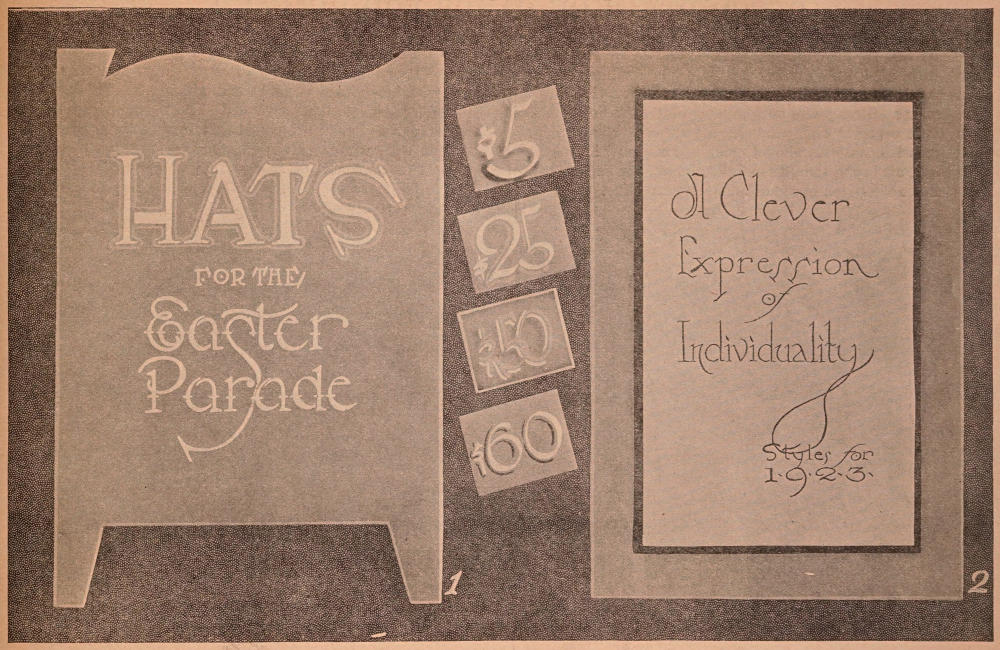
DESCRIPTION OF EASTER CARDS
Card No. 1. Size 16×22 inches. Fancy cut-out, heavy
purple mat cardboard. Card was beveled and makes a very
pretty design for Easter. The lettering was done with the
No. 12 brush, using white ink. The word “Hats” was outlined
with lavender. The words “Easter Parade” were
cross-striped, as shown, with gold ink although this appears
as almost white in the reproduction.
The price cards shown in the reproduction were lettered
on purple cardboard. The first price ticket was white,
shaded in light green with the air brush. The next card
was lettered in white and shaded with lavender. The third
card was lettered in lavender and outlined with white. The
border of the card was air-brushed with green ink and then
striped with white. The last card shown was lettered with
yellow on purple cardboard shaded with light red.
Card No. 2. Size 16×22 inches. The original of this
card was very beautiful. The center panel in the reproduction
does not give the clear detail of the quality of stock
used. The background of the original was heavy purple
mat board and the center panel was of grain finished cover
stock tinted with purple. The center panel in the original
gave the appearance of a piece of white kid stretched over
the surface of the mat. The edges of the lettered panel
were heavily air-brushed in black ink. The lettering was
done with small size model “C” speed ball pen.
Such cards add much to the attractiveness of any window
display and students should procure samples of this
paper stock from some source and note its beautiful finish.
If work is being done in class—such examples should
be exhibited to the students.
EASTER CARDS
Plates used by permission of Ely & Walker Dry Goods Co., St. Louis.
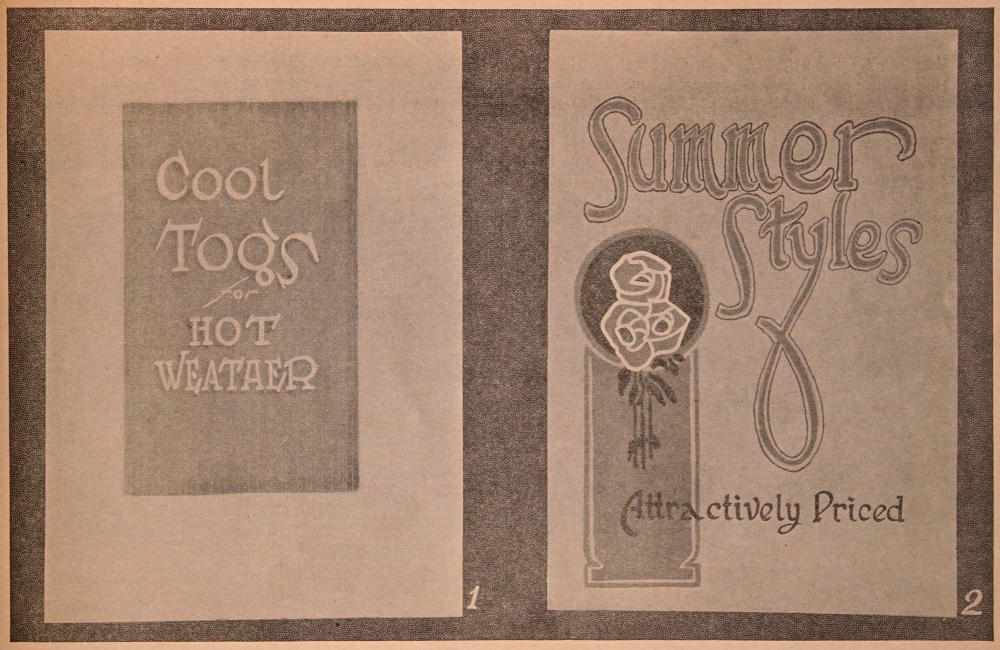
DESCRIPTION OF CARDS FOR SUMMER
Card No. 1. Size 16×22 inches. Made of white cardboard
with air-brushed panel in light blue and panel is
striped with faint white lines. You will note that the lines
are heavier at the top and bottom, apparently “fading out”
toward the center. This produces a very cool, elusive effect,
suggesting water. The lettering is done in white color
with slight air brush shading in light green. For suggested
coolness the colors here used are uniquely effective.
Card No. 2. Size 16×22 inches. Light tan mottled mat
board. Large lines of lettering in dark gray—first line outlined
with black lines, second with light green. The bottom
line of lettering is done in black. The panel in the ornamentation
was done in gray—the flowers are of bright red
outlined with white against circular background of dark
blue. The conventional foliage falling from flowers was
done in light green. Card No. 2 would be very effective in
a window display of footwear.
CARDS FOR SUMMER
Plates used by permission of Ely & Walker Dry Goods Co., St. Louis.
MORE CARDS FOR SUMMER
Card No. 1. Size 9½×20 inches. Gold mat board with
a cut-out picture pasted near the top as shown. The checker-board
border was made with bright red. The word
“Dresses” was lettered with No. 12 brush using bright red
showcard color. This line of lettering was also shaded and
striped with white showcard color. The small lines of lettering
were done with No. 4 model “C” speed ball pen, using
regular ink for pen work. The numeral “4” was lettered
with white and then lightly air-brushed or shaded with dark
red.
Card No. 2. Size 16×22 inches. Dark brown cardboard
with the letter “W” in light green, outlined with gold. The
balance of the first two lines of lettering was done with No.
12 brush using cream showcard color. The last three lines
were made with a smaller brush using light red showcard
color and mixed with yellow to form a very pale pink.
Card No. 3. Size 8½×13 inches. Plain white cardboard,
round-cornered, with border outside of the panel
air-brushed in light yellow. The flowers which show faintly
in the reproduction were violets made with a small brush,
using purple ink. The vines were done in light green. The
lettering was done with model “C” speed ball pens, using
gray ink for shading the words, “Men’s Shirts.” The numeral
“3” was outlined in white.
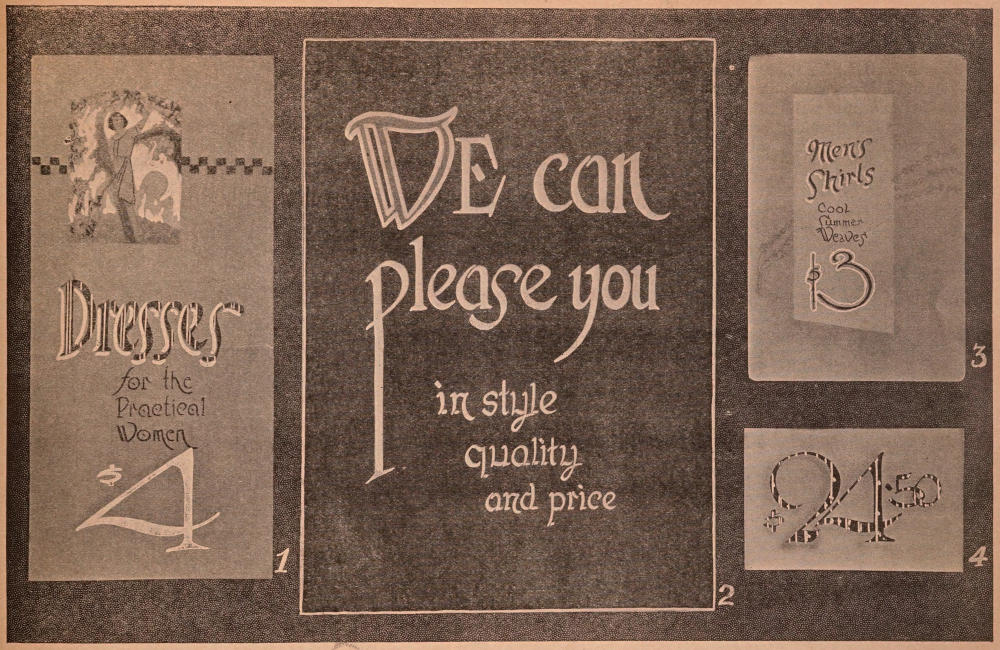
Card No. 4. Size 9×5½ inches. Plain white cardboard
lettered with No. 12 brush and black showcard color. The
border and the figures were then airbrushed in purple ink
and the face of the figures striped with white.
ATTRACTIVE SUMMER DESIGNS
Plates used by permission of Ely & Walker Dry Goods Co., St. Louis.
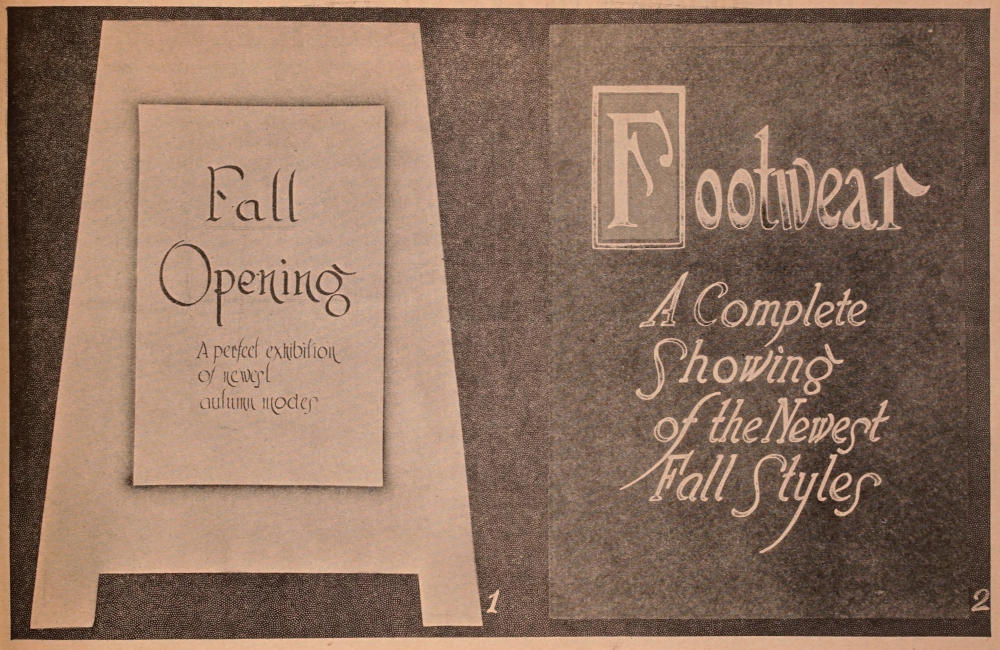
DESCRIPTION OF FALL CARDS
Card No. 1. Size 16×22 inches. Greenish gray mottled
mat board, cut out in attractive easel effect. Panel is
of white cardboard with air-brushed shading in yellow.
The words “Fall Opening” are lettered in dark red. The
smaller lettering was done in black ink with the model “C”
speed ball pen.
Card No. 2. Size 16×22 inches. Dark green mottled
mat board. Initial letter in “Footwear” was done in white
color against a bright red background, with border in gold.
Balance of letters in word “Footwear” were done in white.
The four lines of Italic lettering were done in light
cream color. Note the even slant in the “Italic.”
CARDS FOR FALL
Plates used by permission of Ely & Walker Dry Goods Co., St. Louis.
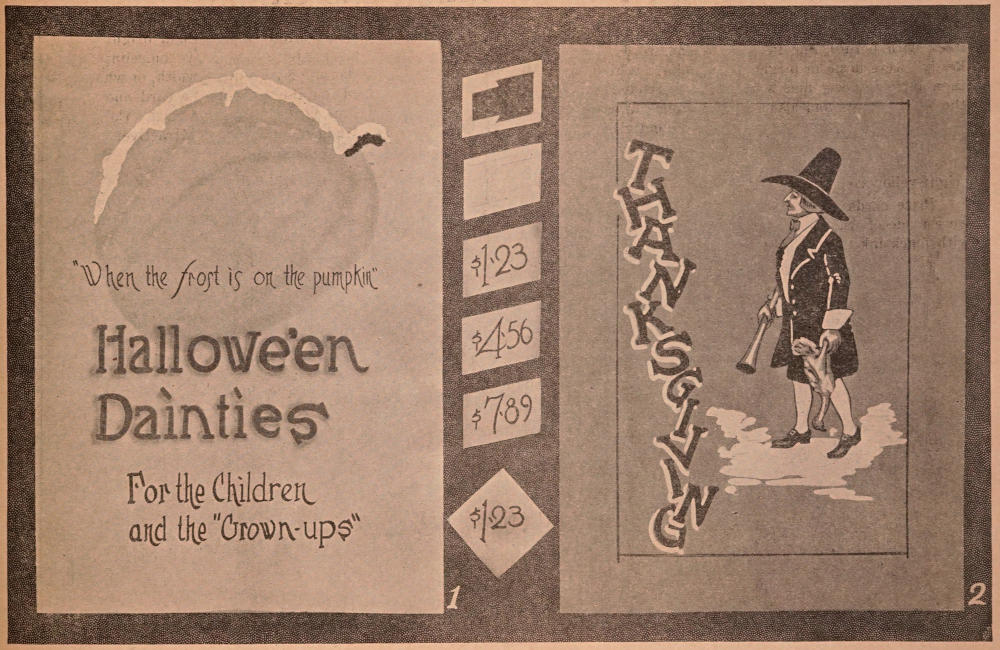
DESCRIPTION OF LATE AUTUMN CARDS
Card No. 1. Size 16×22 inches. The pumpkin design
was air-brushed, by first cutting out a stencil the size necessary
and then using orange and yellow air brush ink with
an outline of light green.
The small line of lettering was done with a No. 3 model
“C” Speed Ball pen. The words “Hallowe’en Dainties” were
lettered in “Egyptian” with a No. 12 brush, and the color
was dark red.
These two lines were air-brush shaded in light green.
The last two lines of lettering were done with a small brush
in black ink.
The “frosting” effect was obtained by using heavy
white showcard ink as indicated, and then ground mica was
sprinkled on the ink. This makes a very attractive showcard
for Hallowe’en season.
Card No. 2. Size 16×22 inches. Thanksgiving design.
The drawing of the Pilgrim was made offhand, first being
sketched in with pencil, and then black ink was used, touched
up with white. The showcard stock was of reddish
orange. The word “Thanksgiving” was drawn with the
brush in black and shaded with white.
The small price cards shown in the center were plain
white cardboard. The first sign shows the method of making
a “mask” or “cut-out” for the lining of a large number
of cards, when it is necessary to have them equally spaced.
The next card shows a suggested penciled-in sketch,
and the remainder, the actual pen lettering. These cards
were then daintily air brushed on the edges. The square
card shown was a small card three inches square, also lettered
with pen.
CARDS FOR LATE AUTUMN
Plates used by permission of Ely & Walker Dry Goods Co., St. Louis.
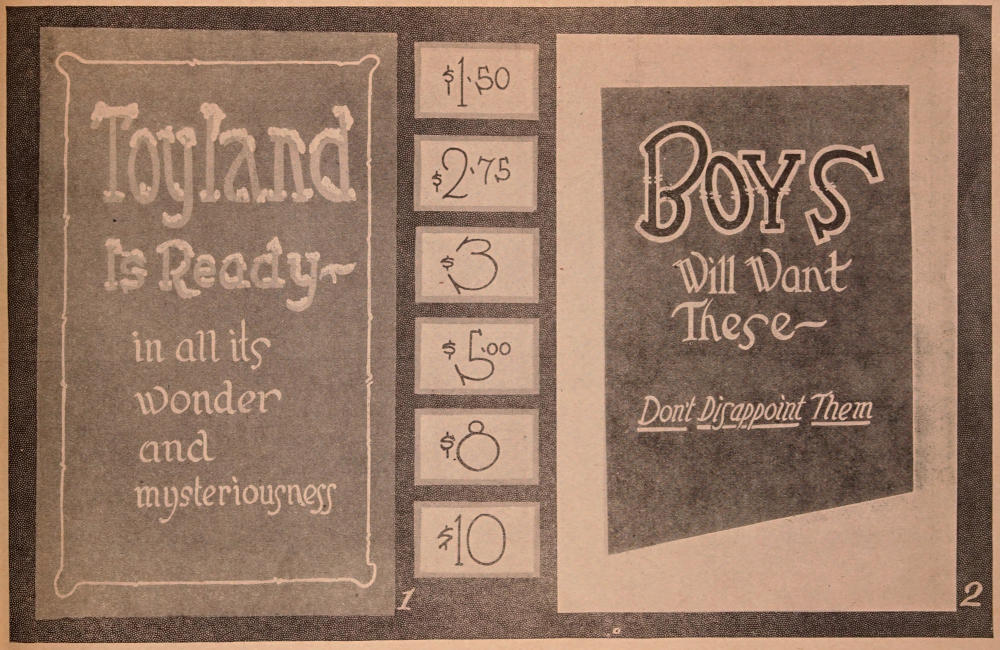
DESCRIPTION OF CHRISTMAS CARDS
Card No. 1. Size 14×22 inches. Deep blue cardboard
stock with border line in white. The words “Toyland is
Ready” were done in bright green color. White color was
then applied freely and with careless effect at the top of
the white letters and also in the bottom curves and spurs.
While the white color was quite wet ground glass or “mica”
was sprinkled into it, thus producing the effect of snow.
The balance of the lettering was done with the brush in
bright yellow color.
Price cards shown in the center of the reproduction
were made of white cardboard. Numerals were written in
with black ink with model “B” speed ball pen. Each card
features a different colored, flat band border of dark blue,
tangerine, maroon, orange, mauve and bright yellow, respectively.
This border is made by “chiseling” the brush
out perfectly flat and laying it full width, or whatever width
may be desired, on the edge of the card and dragging it
steadily down on each edge of the card. Colored borders
on price cards add much to their attractiveness. Try out
the combinations suggested.
Card No. 2. Size 14×22 inches. Plain white cardboard
mounting with panel of dark green, mottled cover
stock. The word “Boys” was lettered in dark green and
closely and somewhat unevenly outlined in bright yellow.
The balance of the lettering was done in very light green,
the last line also underscored in the same color.
CARDS FOR CHRISTMAS
Plates used by permission of Ely & Walker Dry Goods Co., St. Louis.