A BOOK WHICH SHOWS CHILDREN JUST HOW TO
MAKE MOST ATTRACTIVE TOY FURNITURE OUT OF
MATERIALS WHICH COST PRACTICALLY NOTHING—TOYS
WHICH GIVE AS MUCH PLEASURE AS
THOSE FROM EXPENSIVE TOY SHOPS.
By G. ELLINGWOOD RICH Teacher of Art and Manual Training, Brooklyn Training
School for Teachers
ILLUSTRATED BY THE AUTHOR
NEW YORK
MOFFAT, YARD AND COMPANY 1914
Copyright, 1914, by
MOFFAT, YARD & COMPANY
New York
All Rights Reserved
TO
MY FATHER AND MOTHER THE BEST PLAYFELLOWS I EVER HAD
TO WHOSE ORIGINALITY AND INGENUITY
I OWE MY FIRST CONSTRUCTIVE IMPULSES
LIST OF ILLUSTRATIONS — TO GROWN-UPS. — TO VERY LITTLE GIRLS AND BOYS. — TO MIDDLE-SIZED GIRLS. — TO BIG GIRLS AND MIDDLE-SIZED AND BIG BOYS. — TO MAKE OTHERS HAPPY. — MATERIALS AND HOW TO USE THEM. — BOXES. — SIZE AND PROPORTIONS. — “SCORING.” — CUTTING. — FASTENING. — PAINTING. — THESE ARE SOME PRACTICAL SUGGESTIONS: — TO BOYS. — TO GIRLS. — MAKING THE BED.
You are interested in very little, middle-sized
or big girls or boys, each child according to his
years craving a medium for self expression and
opportunity to create.
To each according to his interests and developing
powers the suggestions in this little book are
offered.
It is the author’s hope that the industry, perseverance
and ingenuity needed to work out the
suggestions may help in some small way to lay
the foundation upon which big after things may
be builded.
You can make the furniture easily if your big
sister or brother will read the directions to you.
You will have great fun looking at the pictures,
listening to the rhymes and playing with the furniture.
You, also, will enjoy the pictures and rhymes.
Of course you will take great pleasure playing
with your doll furniture, but, best of all, you can
make every bit of it yourself. Just think—you
can make it just the size and just the color you
wish it; and the rhymes will suggest many delightful
little “extras” to make your doll home
attractive just as mother makes hers.
Even though you may not wish to play with
the furniture yourself you will thoroughly enjoy
making and giving it to some dear little folks of
your acquaintance. You will also be getting and
giving a great deal of pleasure by helping other
little friends make their own furniture.
You will enjoy changing the designs or making
other pieces of furniture from your own original
ideas. I suggest that you design and make
a china closet, sideboard, combination desk and
bookcase, four posted bed, wash stand with towel
rack, music cabinet, business desk for “father,”
rocking chair, circular top table, lamp or shirt-waist
box. I’m sure you will think of many
more.
You might make toy furniture for the children’s
ward in a hospital.
You might make them for some little friend
who is quarantined.
You might make them for some little “shut-in.”
You might teach some little “shut-in” how to
make them, being sure to keep him supplied with
boxes.
You might organize a toy-making club and
make them as gifts for poor children.
Your Sunday school class might make them to
be sold on a “Toy Table” at your church fair.
You might show them to your teacher at school.
She might wish to form a club so that many
children may have the pleasure of making them.
You might make them for Christmas or birthday
presents for your little friends.
NECESSARY TOOLS.
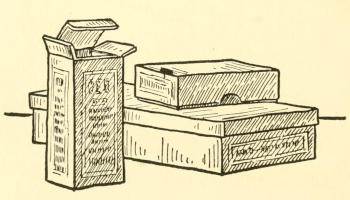
Boxes of all sorts, sizes and kinds are to be
had by simply asking for them. Every store
throws away dozens of them every day. They
seldom keep any because they haven’t room for
them. If you explain to a clerk in a store what
you are doing with the boxes, I am sure that he
will save them for you. You must be sure to go
for them at the time he tells you because they will
be in his way. You will find many fine, strong
boxes at drygoods, stationery, drug and candy
stores.
You must first decide about what size you wish
your set of furniture to be and then make a collection
of boxes of suitable sizes.
If you wish to make a tiny set to fit into a little
play house to be used for small china dolls or
paper dolls, then collect small peppermint, spool,
jewelry, powder or pill boxes.
If you wish to make larger furniture to be
used in a large play house or on the floor, for
medium-sized dolls, make a collection of large
candy, stocking, collar and corset boxes.
If you wish to make quite large furniture to
be used on the floor, for good-sized dolls, collect
still larger corset, envelope, shoe and wholesale
candy boxes.
Try as far as possible to keep all the pieces of
furniture planned for one room in good proportion
to one another.
Try also to keep all the parts of each object in
good proportion.
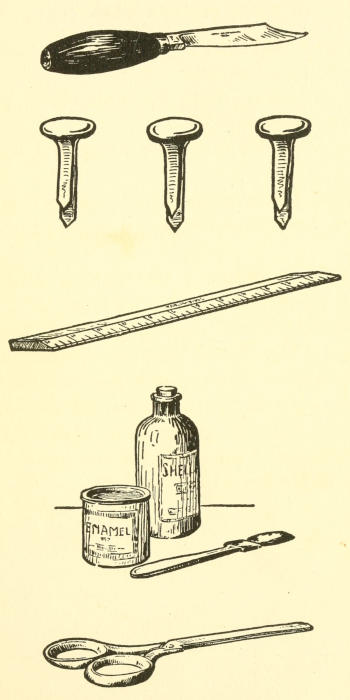
To bend a stiff piece of cardboard so that the
edge will be nice and straight, it should be
“scored.” Lay a ruler along the line where it
is to be bent and make a light scratch with the
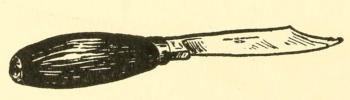
knife. This is called “scoring.” The cardboard
should then be bent with the “scoring” on
the outside.
To cut a box or cover into two pieces, draw
around the sides and bottom, making it “square”
by using a carpenter’s square, a draughtsman’s
triangle or the corner of another box or cover.
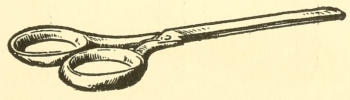
Use scissors to cut down the edges of the box; if
the scissors will not cut quite to the bottom,
finish with the knife. “Score” across the bottom
and bend it. By bending back and forth,
the two pieces will come apart.
To cut a piece out, as when shaping a leg like
those of the dresser, use scissors to make two
cuts in from the edge; use the knife to “score”
across between the cuts, and bend back and forth
until the piece comes out.
To cut a piece out to make slats like those in
the headboard of the bed, use a ruler to draw the
shape of the “hole”; stick the point of the knife
through the cardboard at the corner of the
“hole,” and, with a sawing motion, carefully follow
the lines. To prevent the cardboard from
tearing, put your hand underneath to support it,
but be very careful to keep your fingers away
from the knife.
To fasten the parts of the furniture together
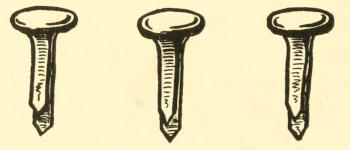
use brass fasteners instead of glue. Fasteners
cost about ten cents for a box containing one
hundred. Glue is not satisfactory because it
will not securely hold the heavy cardboard.
These toys are to be played with by children and
must be strong and securely fastened together.
Hold two parts together and stick the point of
the knife through both pieces. Push the prongs
of the fasteners through the slit and separate
them on the under side; then flatten them in opposite
directions.
The fasteners can be put in and bent to fasten
and, at the same time, suggest knobs, hooks and
piano pedals. The directions and pictures will
show how.
It is possible to fasten parts together by
punching two holes instead of one and using
string. The string can be pulled through with
a darning needle and must then be tightly knotted
and cut off. This is strong enough but
slower and more difficult.
The little pieces of furniture are very cunning
whether they are painted or not, but painting
them adds greatly to their attractiveness.
When you have finished one piece you may be
so anxious to see how it will look when painted
that you will be tempted to paint it immediately.
It will be wiser and more workmanlike to plan
and make all the furniture for one room before
you paint any of it.
Before you begin to paint, it is a good idea to
examine the corners of the furniture; if any of
them are split or weak, strengthen them with adhesive
tape of some sort (passe-partout tape
comes in convenient and inexpensive rolls).
The paint will cover up the tape.
Since boxes usually have printed labels which
may show on the furniture, it is best to use a
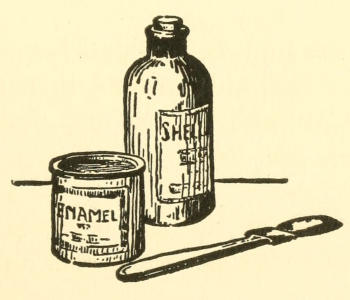
thick paint. Enamel in small ten cent cans may
be bought in a variety of colors suitable for the
furniture, black, white, mahogany, antique oak,
light oak and rosewood. If dull paints or stains
are used, put on a coat of shellac to make it shine
like varnish. White shellac can be bought in
bottles for about twenty cents a pint.
One brush will do for all colors because with
care it can be kept clean and soft. Clean shellac
brushes with alcohol; clean paint brushes with
turpentine. The turpentine will take paint off
of fingers or remove any little spatters which
may accidentally have gone on to other things.
Choose a place to work—kitchen table, bench
in woodshed, sewing table in nursery, workshop,
barn, back porch, under a tree in the orchard
or back yard.
Spread papers or oil cloth to protect mother’s
furniture and carpets from paint.
Choose a place to put your furniture while
it is drying, where no one is liable to put
other things which might be damaged by the
paint.
Use a screw driver to pry off the cover of the
paint can; scissors or knife will break if used
for this purpose.
Use a small stick like a meat skewer or old
pen-holder to stir your paint from the bottom.
It will need to be stirred thoroughly each time
it is used.
Paint all the underneath and lower parts first,
while you are still able to hold it in your hands;
then set it down and hold an upper corner while
you paint all the rest; then let go and paint
that corner.
Put the cover on the can when you have finished.
If the paint has thickened on the edge of
the can it should be scraped off, because the paint
will dry up if the cover is not tightly closed.
Thoroughly clean your brush.
Put your painting materials in some place
where mother lets you keep such things.
Pick up and destroy all the soiled papers.
Don’t think this work’s for girls alone,
For surely that’s not true;
It’s every whit as boyish sport
As anything you do.
And won’t the girls be pleased indeed,
When to them you present
As fine a set of furniture,
As if to a store they’d sent?
And you can good designers be,
Makers and painters, too,
The happiest little workmen known,
In your occupations new.
And you can play you’re salesmen keen,
When all your goods are done,
Or give them to your little friends,
For surely that is fun.
So now get boxes from the stores,
And fasteners, bright and strong;
Ruler and knife and scissors, too,
Will help your work along.
Don’t think this work’s for boys alone,
For that’s not really true;
It surely is as girlish fun
As anything you do.
Of course, when boys have made the toys,
They’ll give them right away;
But girls, when they have finished theirs,
Will sit right down and play.
You also may designers be,
Makers and painters as well,
And in your dainty workmanship
May even the boys excel.
But there’s one thing that girls can do,
Which boys won’t undertake,
That is, the attractive little things
With needle and thread to make.
So get your boxes and fasteners strong,
And sewing materials you’ll need,
And then your playhouse, when ’tis done,
Will be unique indeed.
A mattress you need and some pillows,
Some cases, a blanket and sheet,
To place in the little white bed you have made,
I’m sure it will then be complete.
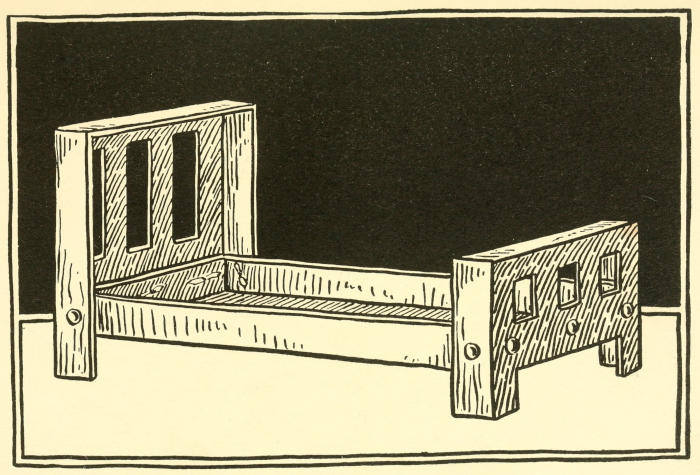
Bed.
BED. — COSY DIVAN.
Use a shallow box and its cover.
For a large bed use a stocking box.
For a smaller bed use a spool or caramel box.
For a very small bed use a jewelry box.
1. Cut the cover into two parts, making one
part longer than the other. The longer part is
the headboard, the shorter part is the footboard.
2. Fit the headboard and footboard on the
ends of the box and hold them with both hands.
Slide the box up or down until it looks like a bed.
3. Lay the footboard down, but hold the headboard
and box together, until you fasten them.
4. Fit the footboard on again to match the
headboard, and fasten it.
5. Cut the bottom of headboard and footboard
to look like legs. Also cut the slats in the headboard
and the footboard.
6. Paint brown or white.
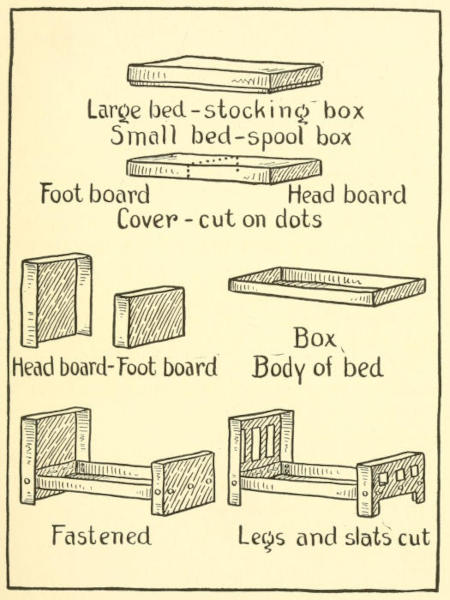
Details of Bed.
Large bed—stocking box
Small bed—spool box
Foot board
Head board
Cover—cut on dots
Head board—Foot board
Box
Body of bed
Fastened
Legs and slats cut
To make this divan comfortable,
What would you next suggest?
You might make sofa pillows,
So dolly may lie down and rest.
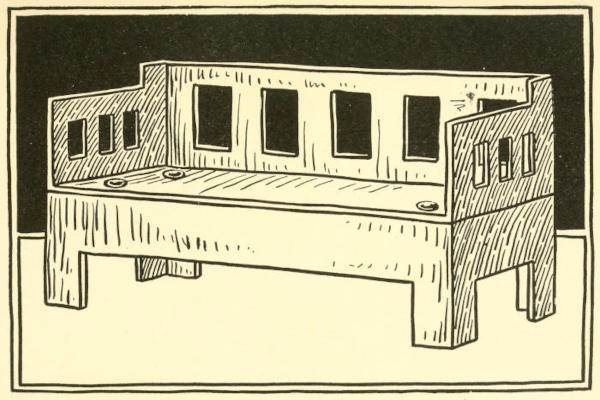
Divan.
DIVAN. — SETTING THE TABLE.
Use a box with a cover which entirely overlaps
it, or two boxes exactly alike without their covers.
They should be fairly deep, long and narrow,
like an ordinary candy box.
1. Cut away one long side, leaving the other
long side for the back, and the short ends for
arms.
2. Set this on top of the cover and fasten
through the seat.
3. Cut away pieces to shape the legs.
4. Cut slats in the back and arms.
5. Paint to match the rest of the furniture in
the living-room. Use antique oak, rosewood or
mahogany.
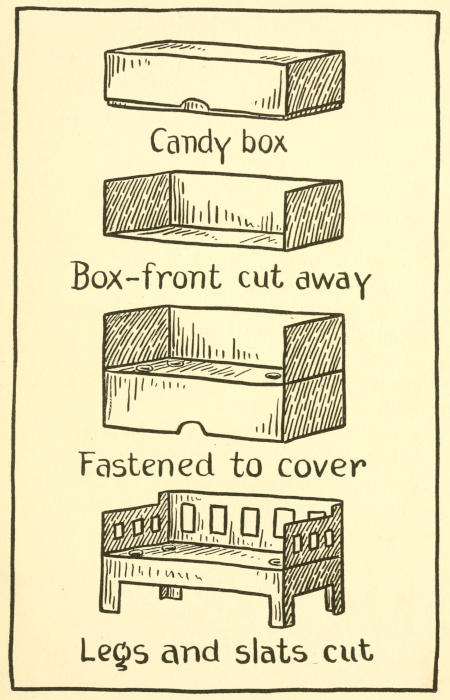
Details of Divan.
Candy box
Box—front cut away
Fastened to cover
Legs and slats cut
If mother has an extra piece
Of linen she won’t need,
I’m sure she’d let you make a cloth,
And be very pleased indeed.
Perhaps you can make some napkins, too,
Out of pieces, oh, so tiny;
Then just set them with your dishes small,
And knives and forks so shiny.
Dining Room Table.
DINING TABLE. — THE FAMILY AT DINNER.
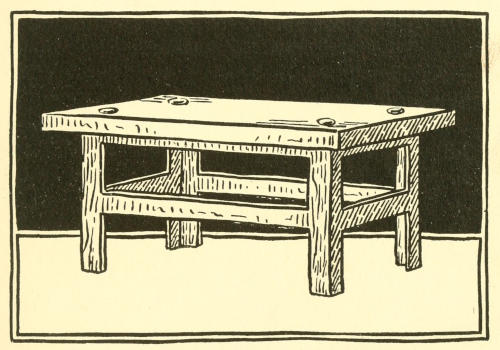
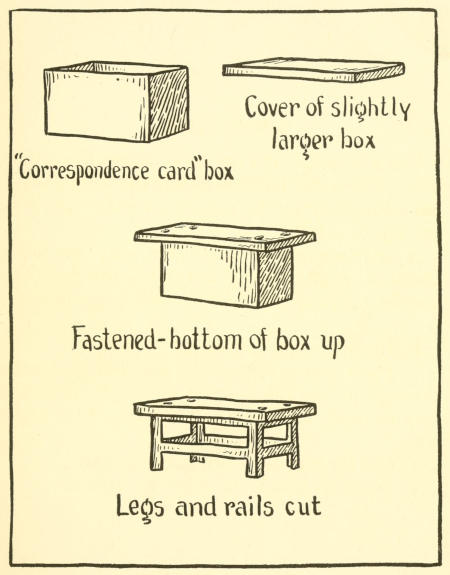
Use a deep box and the cover of another larger
box. The cover must be about the same shape,
but enough larger to project over the box like
the top of a table.
A correspondence card box may be used.
Quite deep and strong boxes for this purpose
may be got from a drug store or dry goods store.
1. Place the box bottom up.
2. Place the cover on top and put fasteners
through it into the box. A piece of cardboard
may be used, if you haven’t a cover of the right
size.
3. Cut the legs as shown in the picture.
4. Paint to match the other furniture.
Details of Dining Table.
Cover of slightly larger box
“Correspondence card” box
Fastened—bottom of box up
Legs and rails cut
Put this arm chair at the head of the table,
And into it put father doll;
Before him place the platter for meat,
And play that he serves them all.
At the opposite end, where the tea set stands,
Of course mother doll should be,
And on either side of the table,
Their little children you’ll see.
Arm Chair.
ARM CHAIR. — A DAINTY LITTLE DRESSER.
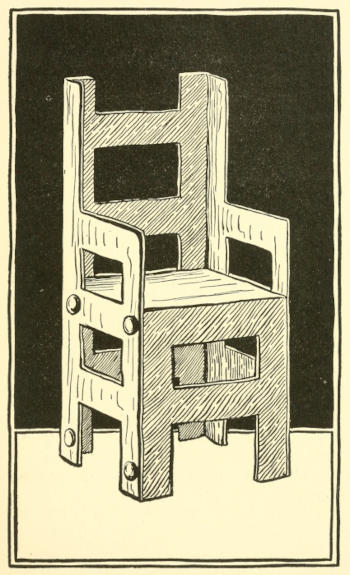
For a large chair, use two shoe boxes without
their covers.
For a small chair, use a chocolate peppermint
box and its cover.
For a medium sized chair, use a corset box
without its cover.
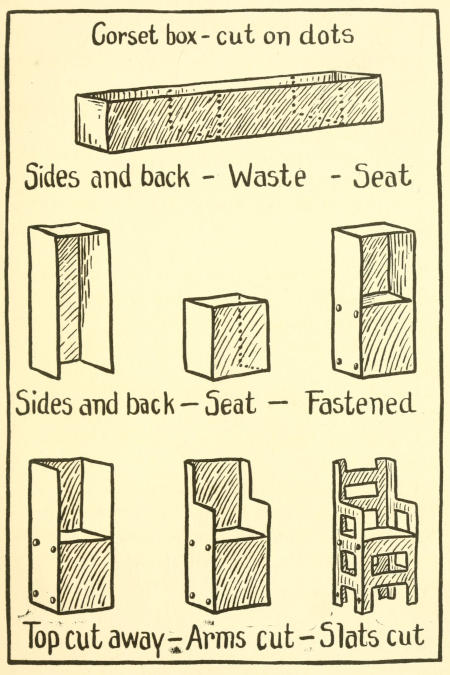
The following directions are for the corset
box:
1. From one end cut a piece as high as you
wish the seat. From the other end cut a piece
at least twice as high, for the back.
2. Fit the seat into the back and fasten together.
3. Cut away the unnecessary “end” at the
top.
4. Cut out the pieces to form the arms, the
legs and back.
5. Paint to match the other furniture.
If you cut a corset box just in the middle, you
can make two chairs. Use the two ends for the
two seats, and the other two pieces for the two
backs.
Details of Arm Chair.
Corset box—cut on dots
Sides and back—Waste—Seat
Sides and back—Seat—Fastened
Top cut away—Arms cut—Slats cut
A little girl’s dresser should always be neat,
As all little maidens know;
And brushes and combs and scissors and files
Must all be placed in a row.
So when you arrange dolly’s dresser,
Be careful of what you choose;
And put on the top, only such things
As you’re sure she’ll really use.
Just make a muslin scarf of white
Over yellow or pink or blue;
Then make a pretty cushion small,
Which things will nicely do.
Add a powder puff and mirror,
With comb and brush between;
She surely can be taught, I know,
To keep these neat and clean.
Dresser.
DRESSER. — BIG BROTHER. — DOLLY’S BOOKS.
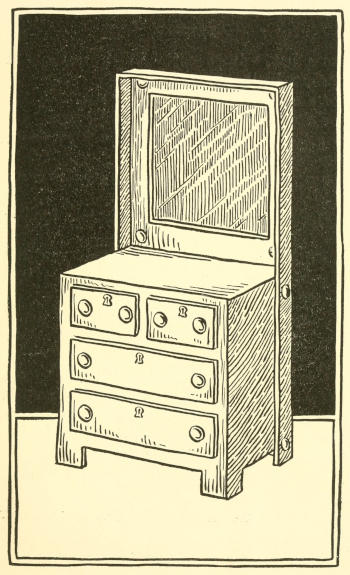
Use a box, with a cover which overlaps the
box only a little.
For a large dresser use a shoe box.
For a medium sized dresser use a candy box,
having the right kind of cover, or a corset box
of the wide and shallow kind.
For a very small dresser use a jewelry box.
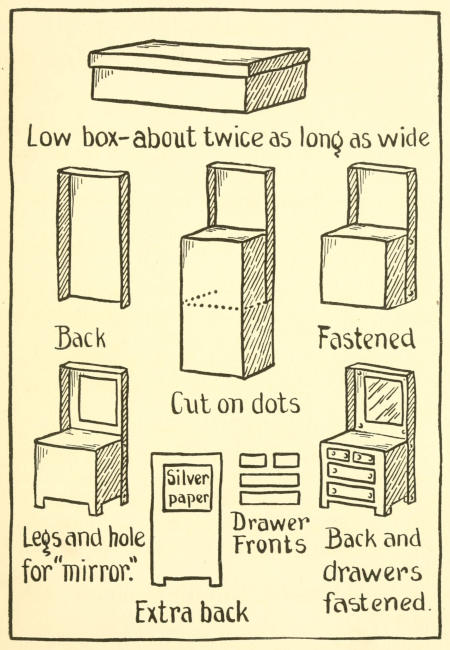
1. Cut the cover the height you wish the back
to be.
2. Fit the box into the cover; hold with both
hands, and slide the box up or down until it looks
like a dresser.
3. Mark where you wish the bottom of the box
to be cut off. Cut it off and fasten the two parts
together.
4. Cut a hole for the “mirror” and fasten an
extra piece of cardboard behind it. Paste silver
paper on the cardboard, or fasten a real
piece of looking glass between it and the back.
5. Cut pieces of cardboard for the “drawers,”
and fasten them so that the fasteners look like
knobs.
6. Paint to match the other furniture. Mark
key holes.
Details of Dresser.
Low box—about twice as long as wide
Back
Fastened
Cut on dots
Legs and hole for “mirror.”
Silver paper
Drawer Fronts
Extra back
Back and drawers fastened.
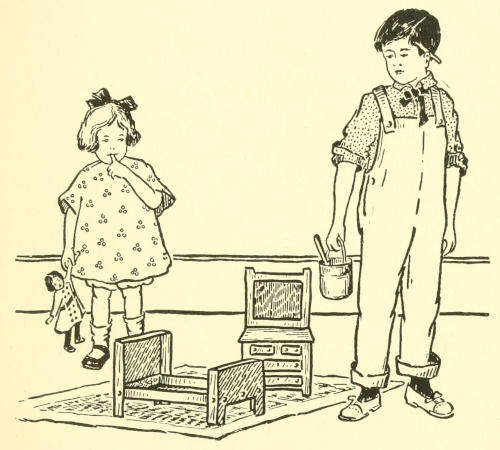
Mother let me make these toys,
And I made them all myself;
And all I used was boxes
I found upon a shelf.
Now that the cute little things are made,
I’ve painted them all as well;
Dear little sister is surely pleased,
As you from her face can tell.
Big Brother.
Cut small strips of paper,
And fold them like a book;
Upon the outer covers print,
So they’ll quite natural look.
If you would have some fairy tales,
Or tales of gnomes and elves,
Just make a goodly pile of these,
And put them on the shelves.
When dolly dear then learns to read
Her tales of fairyland,
She’ll find that all the books she loves,
Are here right close at hand.
Book Case.
BOOK SHELVES. — DOLLY’S CORRESPONDENCE
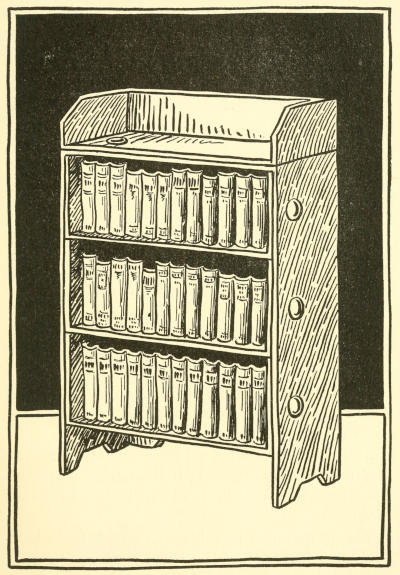
Use a shallow box with a cover which entirely
overlaps it, like an ordinary candy box or a
note paper box. For a very small bookcase, use
a box such as druggists use for powders.
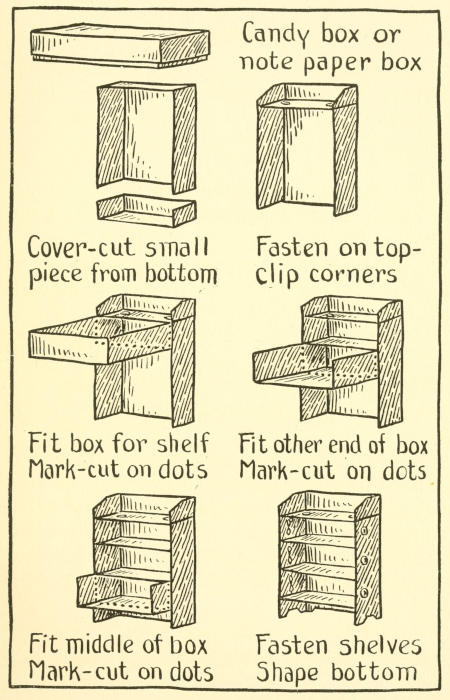
1. Study the picture carefully. Notice how
one end of the cover is cut off and then fastened
on the top to form the little railing.
2. All the shelves are made from the box. If
the case is tall enough for three shelves, use both
ends and a piece of the middle.
3. If the case is not tall enough, then make two
shelves, using only the ends.
When fitting the shelves, push the box in as
far as it will go; then mark where it is to be cut
off.
4. For books, use the corrugated cardboard in
which bottles are packed. Cut strips of this,
making some parts high and some parts low, to
look like a row of books. By painting them different
colors, and making little marks to suggest
the titles, they can be made to look very much
like books.
The strips must be cut long enough to be bent
back and fastened to the sides.
Details of Book Case.
Candy box or note paper box
Cover—cut small piece from bottom
Fasten on top—clip corners
Fit box for shelf
Mark—cut on dots
Fit other end of box
Mark—cut on dots
Fit middle of box
Mark—cut on dots
Fasten shelves
Shape bottom
Cut tooth picks up for pencils,
And fold small papers, too;
Tuck these inside the little desk,
As grown up people do.
Fit a piece of mother’s blotter
On the shelf on which you write;
Lay on this your doll’s note paper,
Choosing dainty blue or white.
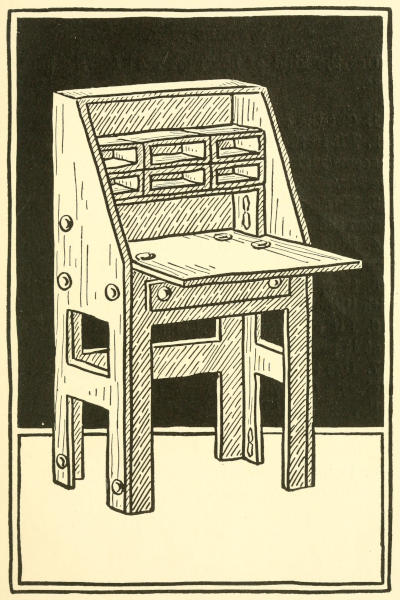
Writing Desk.
WRITING DESK. — MAKING FATHER COMFORTABLE.
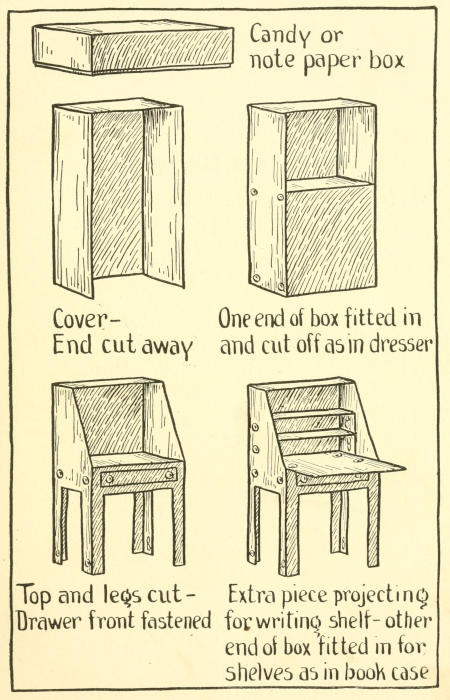
Use the kind of box suggested for the bookcase.
1. Cut the cover the right height for the desk.
2. Fit in the box, and slide it up or down until
it seems right in proportions, as in making the
dresser.
3. Mark where it is to be cut off. Cut and
fasten the parts together.
4. Study the picture; then cut the top and
slanting sides.
5. Shape the legs. Fasten the “drawer”
with “knobs.”
6. Fit and fasten in the extra cardboard so
that it projects and forms the writing shelf.
7. Use the other end of the box for the inside
shelves. Cut these narrow and fit them carefully.
Real pigeon holes can be made by cutting
up penny-in-the-slot caramel boxes, and gluing
them into place.
8. Paint to match furniture. Glue a piece of
blotter on the writing shelf.
Details of Writing Desk.
Candy or note paper box
Cover—End cut away
One end of the box fitted in and cut off as in dresser
Top and legs cut—Drawer front fastened
Extra piece projecting for writing shelf—other end of box fitted in for shelves as in book case
Haven’t you often noticed,
As father sits in his chair,
How he enjoys the cushions
As he reads his papers there?
So try to make some cushions
Of velvet or silk, and see
If by stuffing them with cotton,
Father doll as “comfy” might be.
Then if, with hands that are skillful,
You could small “papers” make,
And place with his chair by the “fire,”
What comfort he could take!
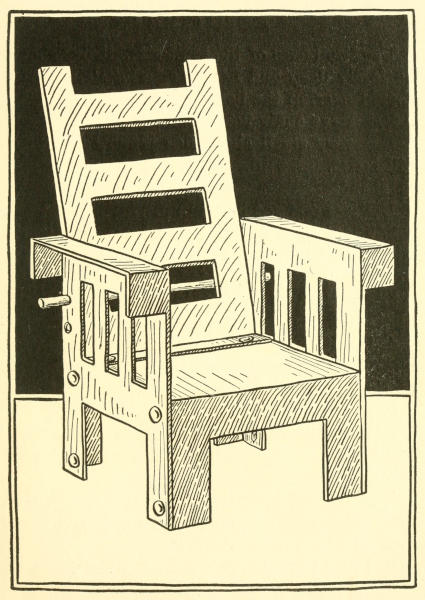
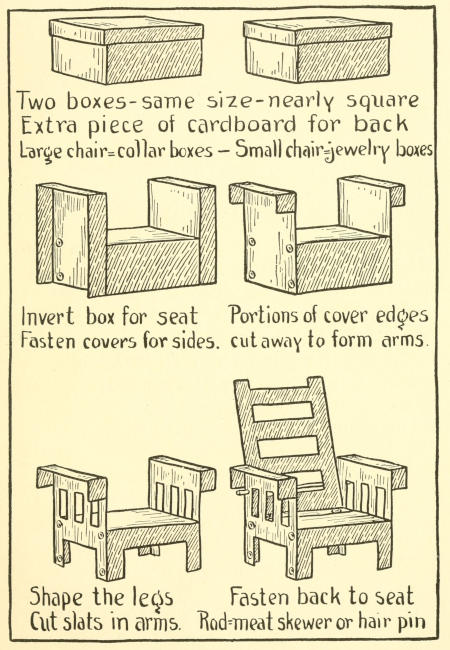
Morris Chair.
MORRIS CHAIR. — THE TABLE SCARF.
Use two boxes of the same size. They should
be fairly deep and nearly square. The covers
should overlap the boxes only a little.
For large chair use collar boxes.
For very small chair, use jewelry or square
pill boxes.
1. Place one box bottom up.
2. Place both covers against the sides; hold
with both hands and slide up or down until the
proportions seem right for arms.
3. Mark where they are to be cut off. Cut and
fasten the three parts together.
4. Study the picture to see how the arms are
made to look more natural by cutting away parts
of the edges of the covers.
5. Shape the legs and cut the slats.
6. Use extra cardboard for the back. “Score”
and bend the lower end, so fasteners may be put
through it into the seat.
7. Make holes at the proper places. Use a
meat skewer or a heavy wire hairpin as the rod
against which the back rests.
8. Paint to match furniture. Make cushions.
Details of Morris Chair.
Two boxes—same size—nearly square
Extra piece of cardboard for back
Large chair = collar boxes—Small chair = jewelry boxes
Invert box for seat
Fasten covers for sides.
Portions of cover edges
cutaway to form arms.
Shape the legs
Cut slats in arms.
Fasten back to seat
Rod = meat skewer or hair pin
Your library table you’ll want to keep smooth,
And free of all scratches from books;
Make a scarf then of velvet or linen or felt,
And see how attractive it looks.
You can, if you wish, hem both of the ends,
And embroider or stencil them, too;
Then, if across the table you lay it,
The top will keep shiny and new.
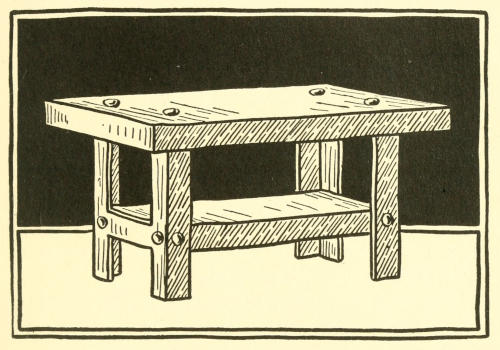
Library Table.
LIBRARY TABLE. — LITTLE COOKS.
Use two shallow boxes and their covers.
Spool boxes might be used, but caramel boxes
would be better.
1. Use both covers for the legs. Cut them the
height the table is to be.
2. Turn one box bottom up; fit the two pieces
of the covers on the ends and fasten.
3. Turn the other box bottom up and fit it in
from the bottom. Slide it up or down until the
proportions look right for the shelf. Fasten the
shelf at both ends to the legs.
4. Fasten on the projecting top. This may be
the cover of a slightly larger box or of extra
cardboard.
5. Shape the legs. You might cut vertical
slats in the ends between the shelf and top.
6. Paint to match furniture.
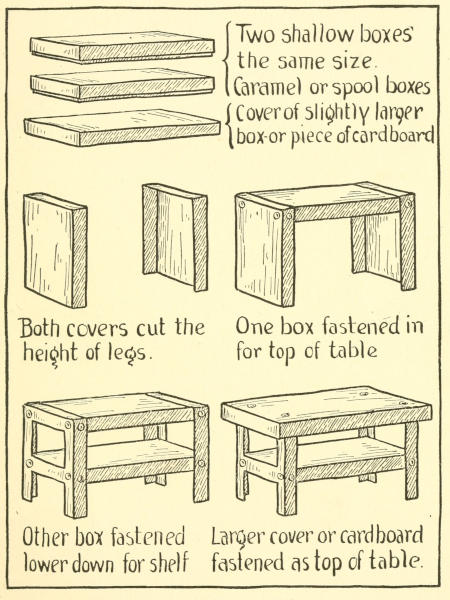
Details of Library Table.
Two shallow boxes the same size.
Caramel or spool boxes
Cover of slightly larger box or piece of cardboard
Both covers cut the height of legs.
One box fastened in for top of table
Other box fastened lower down for shelf
Larger cover or cardboard fastened as top of table.
The oven doors won’t really open,
But the holes are really there;
You can play there’s fire in them,
And your dollies’ meal prepare.
If you have some little pans,
And pots and skillets as well,
And mother lets you have some things,
What to do with them, I’ll tell.
Don’t use any water for cooking,
For that might make a mess;
Just mix up some little dry things,
That would be better, I guess.
If you take some rice or barley,
Some coffee, beans or tea,
A fine make-believe supper you’ll have,
Just try it, and you will see.
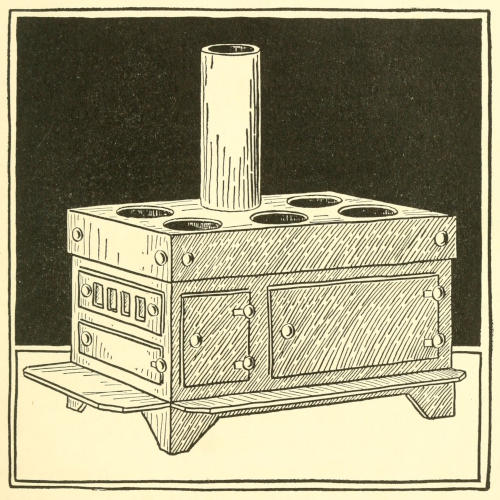
Stove.
STOVE. — FUN ON A RAINY DAY. — BEFORE THE FIRE.
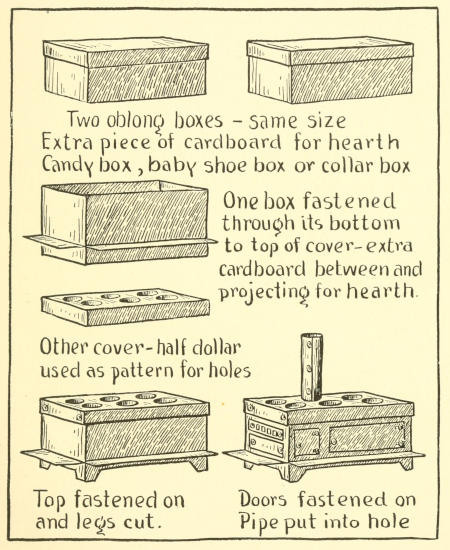
Use two boxes of same size, with covers which
overlap only a little, like collar boxes, candy
boxes with this kind of cover, baby-shoe boxes or
jewelry boxes.
1. Place one box right side up on top of its
cover. Place between the two an extra cardboard,
large enough to project from one end and
side. Fasten through the bottom of box and
cardboard, into the cover.
2. Shape the projecting cardboard into front
and side hearths. Shape the legs.
3. Cut six holes in the other cover. Use silver
half dollar or spool for pattern. Fasten on
the top.
4. Fasten on the oven “doors,” etc. Study
the picture to see how the fasteners have been
made to look like hinges, by cutting two little
slits for the prongs, and bending one out flat and
then down. The “knobs” are put through one
slit as in the dresser.
5. The pipe is made of a roll of stiff paper or
a pasteboard mailing tube. Push through one
hole; if it fits, it will not need to be fastened.
6. Paint it with black enamel.
Details of Stove.
Two oblong boxes—same size
Extra piece of cardboard for hearth
Candy box, baby shoe box or collar box
One box fastened through its bottom to top of cover—extra cardboard between and projecting for hearth.
Other cover—half dollar used as pattern for holes
Top fastened on and legs cut.
Doors fastened on
Pipe put into hole
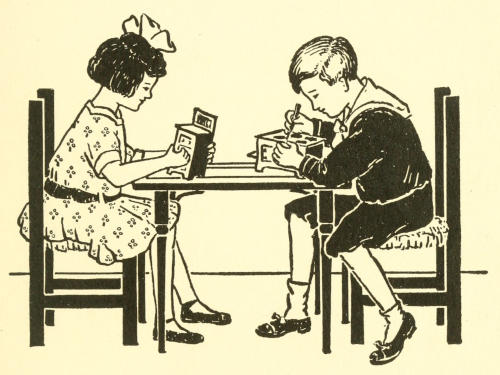
When the rain comes down, and the wind does blow,
And indoors we must stay,
Mother lets us to the nursery go
And with our boxes play.
Oh, it’s lots of fun when we’re all alone,
To make such lovely toys,
Especially, when the rain beats hard
And keeps in girls and boys.
Fun on a Rainy Day.
Take some beads of jet and coral,
And fuzzy white wool for smoke;
Of course ’tis only a make-believe fire,
But it’s just as much fun to poke.
Pull a cozy chair in front of your “fire,”
Where grandmother doll may sit;
While all the little dolls ’round her gather,
That she may tell stories and knit.
Play it’s Christmas and hang up the stockings,
If your dolls are fast asleep;
Fill them with a few little trinkets,
Which out of the tops will peep.
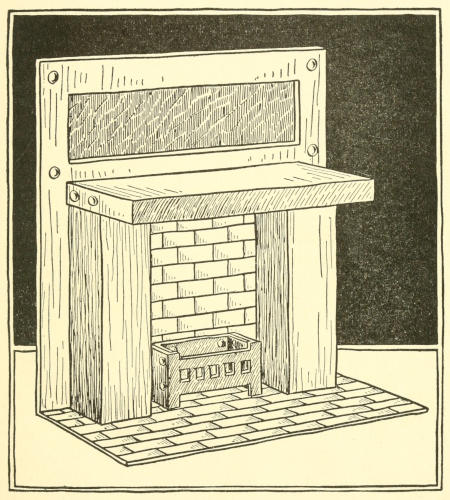
Fireplace
FIREPLACE. — A TINY MUSICIAN.
Use two chocolate peppermint boxes of the
same size, or one peppermint box and its cover;
also a long and narrow cover of some other box.
1. Stand the boxes on their ends. If too tall
for the mantel, cut them off; but be sure to cut
off the tops, as the bottom ends are needed to
fasten to the hearth.
2. Use extra cover for shelf and fasten the
ends to the boxes.
3. Use extra cardboard for hearth and back.
“Score” and bend it.
4. Set the mantel on the hearth and close
against the back. Let the back slant out while
you fasten through bottoms of mantel into the
hearth.
5. Push the back up again and reach under
the shelf, to put fasteners through back edge
into the back.
6. Make “mirror” of silver paper or real
looking-glass, using extra cardboard as in the
dresser.
7. Use small box and its cover for the grate.
Cut slats and legs. Fasten the back of grate to
back of fireplace.
8. Paint grate with black enamel and the
“woodwork” like your furniture, or with white
enamel. Paint the hearth and fireplace like
brick or tiles.
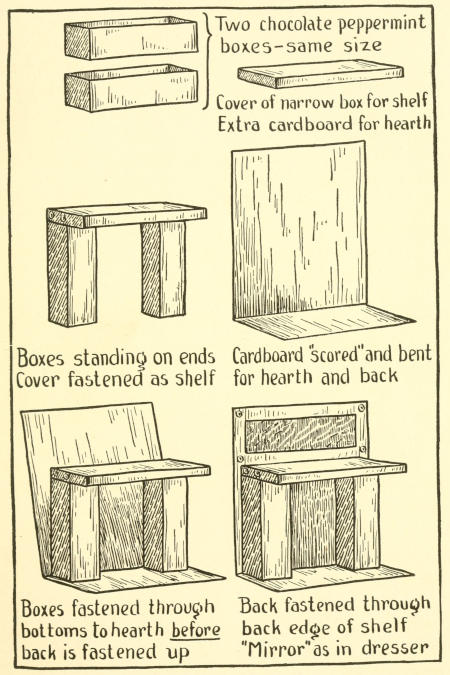
Details of Fireplace.
Two chocolate peppermint boxes—same size
Cover of narrow box for shelf
Extra cardboard for hearth
Boxes standing on ends
Cover fastened as shelf
Cardboard “scored” and bent for hearth and back
Boxes fastened through bottoms to hearth before back is fastened up
Back fastened through back edge of shelf
“Mirror” as in dresser
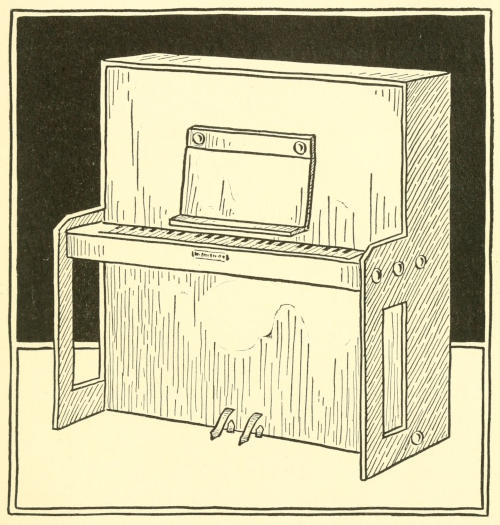
Many children practice
An hour every day,
Then let your dolly do the same,
And on this piano play.
She will need some sheets of music
With notes so black and small,
These I’m very sure you’ll make her,
So that she can play them all.
Piano.
PIANO.
Use a box with a cover which entirely overlaps,
like a writing paper box.
1. Stand the cover on one end; cut it the right
height for the piano.
2. Study the picture to see just what parts of
the sides and top are to be cut away.
3. Cut the box the same height as you cut the
cover.
4. Carefully study the picture. Notice how
the box is made to fit into the piano, by cutting
down the edges of box until they are as deep as
“A” in the picture. Fasten the parts together.
5. Use the other end of the box for the key-board;
cut and fit this very carefully; then
fasten with two fasteners at each end.
6. Draw the black and white keys on a strip
of white paper or cardboard, and fasten it on.
7. Cut, “score,” bend and fasten the music
rack as shown in the picture.
8. The picture will show you how one prong
of each fastener is pushed through from the
back, and bent to look like a pedal. The other
prong turns up a little over the edge to make it
firm.
9. Paint with rosewood, mahogany or black
enamel.
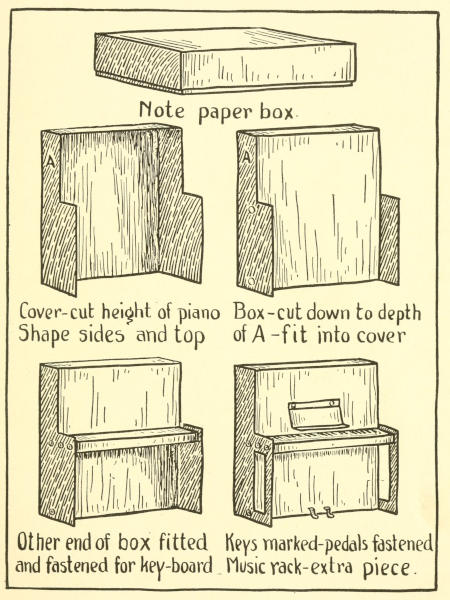
Details of Piano.
Note paper box.
Cover—cut height of piano
Shape sides and top
Box—cut down to depth of A—fit into cover
Other end of box fitted and fastened for key-board
Keys marked—pedals fastened
Music rack—extra piece.
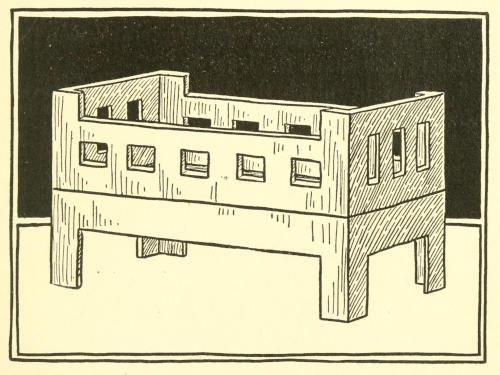
CRIB. — GOOD NIGHT.
Use box and cover, or two boxes, as suggested
for the divan.
1. Fasten one on top of the other through their
bottoms, as in the divan.
2. Cut the legs.
3. Cut the slats as shown in the picture.
4. Paint with white enamel or gold to look
like brass.
Get a little china doll,
Then make a night-gown white;
Tuck her in her little crib,
And kiss her a loving good night.
Crib.
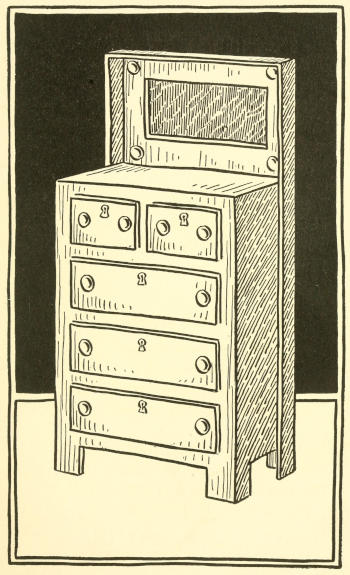
CHIFFONIER. — CANDLE STICKS.
Use the same sort of box and cover as suggested
for the dresser.
1. Cut the cover the right height for the back.
2. Slide the box up or down as in making the
dresser. Make the part containing the “drawers”
higher, and the “mirror” shorter than in
the dresser.
3. Make the “drawers” and “mirror” as in the
dresser; also shape the legs.
4. Paint to match the rest of your bedroom
furniture.
A simple scarf upon the top
Is all you really need,
Unless you make some candle sticks,
And these are cute indeed.
Just take a spool and paper firm,
Red worsted use for light;
The paper ’round it smoothly roll,
Till in the hole it’s tight.
Chiffonier.
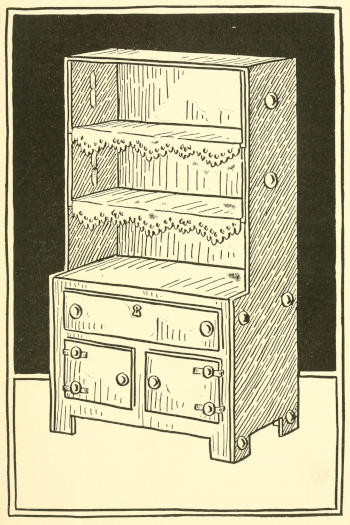
KITCHEN CABINET. — “SUGAR AND SPICE AND ALL THINGS NICE.” — GETTING SUPPER.
Use a box with a cover entirely overlapping
it, like a candy or writing paper box.
1. Cut the cover the right height for the back.
2. Study carefully the proportions of the cabinet
shown in the picture; then cut pieces from
the sides and top as in the piano.
3. Slide the box up to the point where the sides
are cut out. Mark, cut off the bottom and
fasten the parts together.
4. Use the other end of the box for the shelves,
as in the bookcase. Fasten them in.
5. Cut pieces of cardboard for the “drawer”
and “doors”; then fasten them on with “knobs”
and “hinges.” Shape the legs.
6. Paint some color suitable for a kitchen.
Possibly someone might show you how to
“grain” it.
Lace paper from candy boxes
Can be used upon the shelves;
Paint and print on spools some labels,
And arrange them all yourselves.
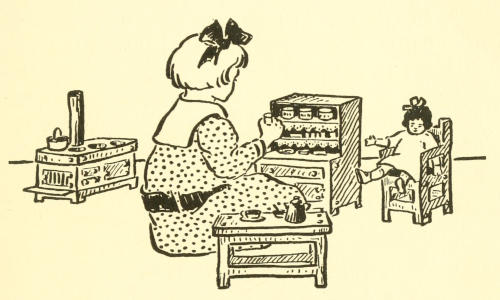
Then when you play you’re little cooks,
How nice ’twill be to see
Your shelves with sugar, salt and spice,
In rows so orderly.
Kitchen Cabinet.
Surely, I couldn’t be lonesome
With dolly right here in her chair;
With my stove, my table and dishes,
Her supper I now shall prepare.
Getting Supper.
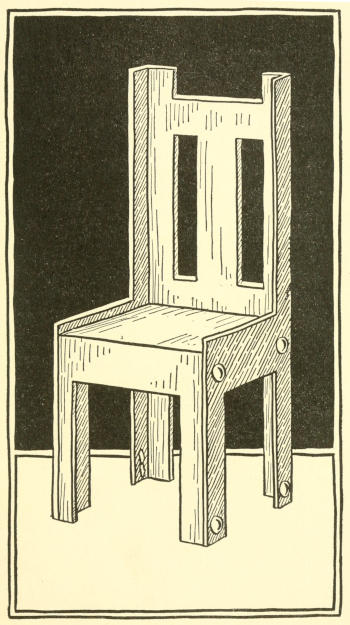
PARLOR CHAIR. — THE LITTLE UPHOLSTERER.
Use the kind of box suggested for the arm
chair.
1. Make this exactly as you made the arm
chair, until you are ready to shape the legs and
back.
2. Study the picture and you will see that
there are no arms, and no slats between the legs.
Notice how the back is cut.
3. Paint mahogany, oak or rosewood like the
rest of your parlor furniture. You might paint
one with white enamel for your bedroom, or with
gold as a fancy parlor chair.
When your parlor chairs are finished,
With varnish make them shine;
Then on the seats glue velvet,
If you wish them ’specially fine.
Chair.
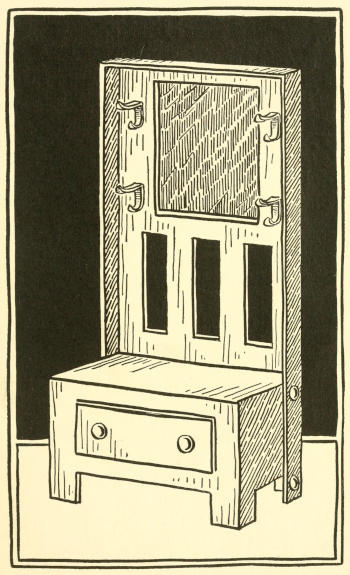
HALL RACK. — TIDY CHILDREN.
Use the kind of box suggested for the dresser
and chiffonier.
1. Cut the cover the right height for the back.
2. Slide the box up or down until the proportions
are right.
3. Cut off the bottom and fasten the parts together.
4. Shape the legs. Fasten on the “drawer”
with “knobs.” Cut the slats and hole for “mirror.”
5. Fasten on an extra cardboard, putting
either a silver paper “mirror” or a real looking-glass
between it and the back. The fasteners
should be pushed through from the back. Look
carefully to see how the little prongs are bent
and curved to form little hooks.
The little hooks are very small,
Yet are strong enough to safely use;
So you can hang up dollies’ hats,
And their jackets and furs, if you choose.
It will be very wise indeed,
To teach your dolls as mother taught you,
That tidy children always remember,
To hang up clothes as grown-ups do.
Hall Rack.
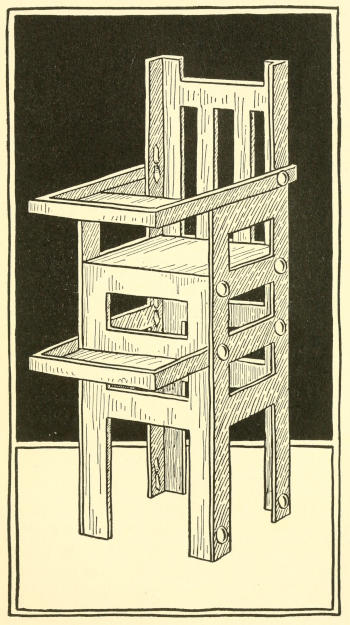
HIGH CHAIR. — WHEN BABY DOLL IS HUNGRY.
Use a corset box.
1. Cut seat and back from opposite ends of
box as in arm chair. Make the back about 8½
inches and the seat about 5 inches.
2. Fasten parts together near the seat and at
the bottom (the other fasteners on sides hold the
foot rest which will be put in later.)
3. Shape the arms, back and legs. Be sure
to have one slat on the sides where the foot rest
is to be (about 1½ inches below the seat).
4. From the two ends of the cover, cut two
pieces about 4 inches long for the tray and foot
rest. The edges are too deep for the proportions
of the chair, so must be carefully cut down
about one-half.
5. Cut away all but about 1 inch of bottom of
foot rest. The projecting pieces must be pushed
between the other two parts and fastened as
shown in picture.
6. The tray is the same shape, but about ½
inch more of its bottom must be left. When the
projecting ends are pivoted to the sides by two
fasteners or a wire hairpin, that extra half-inch
of bottom will rest on the front corners of the
arms, and keep the tray level. The tray can be
moved up and down as on a real high chair.
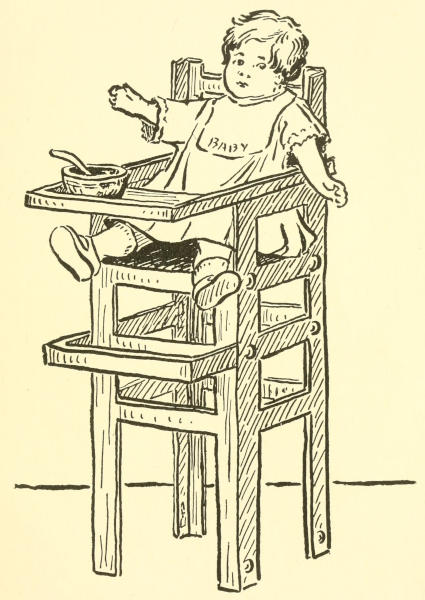
High Chair.
If your baby doll is hungry,
Set him in his new high chair;
Put his bowl upon the tray,
So that he can reach it there.
You can play he has some milk
In the bowl for shredded wheat;
If you’re careful not to spill it,
With some sugar make it sweet.
When Baby Is Hungry.
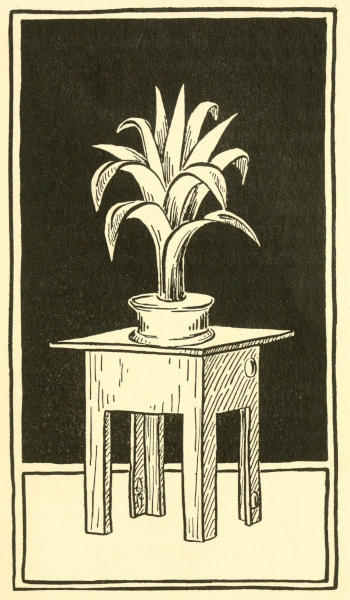
TABOURET AND PALM. — A LITTLE FLORIST.
Use the kind of box in which bottles of shoe
dressing are packed—tall, with nearly square top
and a cover which entirely overlaps it.
1. Cut a piece of the cover the right height;
shape the legs. If you haven’t a box of this
kind, a peppermint box and its cover can be used,
by cutting off an end of each and fastening them
together, as shown in the picture.
2. Fasten on an extra piece of cardboard,
which will project for the top.
3. Use an empty twist spool for the “jardiniere.”
Cut a strip of green paper the height
you wish your plant to be; roll this firmly so it
will just fit, and stand up in the hole of the spool.
4. With sharp point of scissors cut down the
roll in several places. Spread out and shape the
“leaves.”
5. Fasten in some small artificial flowers, or
stick in toothpicks or straws, with bits of bright
paper tied or glued on like flowers.
Gild your spool to look like brass,
And paint your leaves a pretty green;
Fasten a small artificial flower,
Like those on growing plants you’ve seen.
Tabouret and Palm.
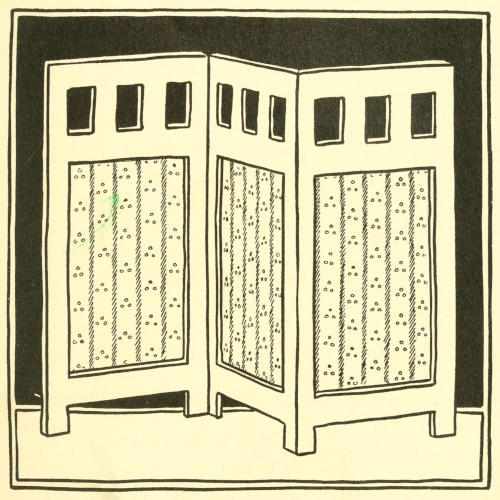
SCREEN. — THE PARLOR SCREEN.
Use three pieces of cardboard cut from bottoms
or covers of boxes.
1. Hinge the pieces together at their edges
with thread, wire or ribbon.
2. Cut out the slats at the top.
3. Cut out the three large holes and gather in
silk or muslin; or paste pretty paper or figured
cloth flat on the cardboard; or paint flowers or
landscape right on the cardboard.
4. Paint the “wooden” parts gold or white.
If the screen in your parlor you use,
You might burnish it all with gold;
Then colored silk so pretty and bright,
On each of the sides you might fold.
But if in the bedroom it finds a place,
White enamel is better to use;
Then for each side, instead of the silk,
Some dainty white muslin I’d choose.
Screen.
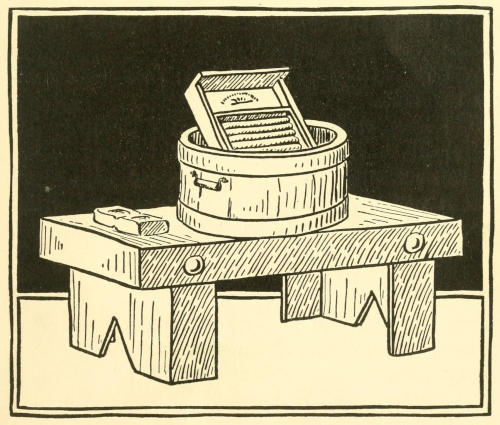
WASH TUB AND BENCH. — WASH DAY.
For the bench use a long, narrow and shallow
box and its cover. For a small bench use a spool
box; for a larger one, a stocking box.
1. Use the box for the legs, and the cover for
the top.
For the tub use a pasteboard ribbon “bolt.”
For a larger tub, use one of the fancy miniature
hat boxes used for silk flowers.
1. Cut out the top of the ribbon “bolt.”
2. Paint black “hoops” and little vertical lines
to show the strips of wood of which a tub is made.
3. Make handles out of hairpins. Use thread
to bind a tiny strip of paper around the wire for
the “wooden” part of the handle.
For the washboard use part of the cover of a
jewelry, corset or shoe box, according to the
size of the tub.
1. Cut the cover the right length; then cut the
“legs.”
2. If the board is large enough, fasten on a
piece of corrugated cardboard; if it is small,
draw lines to suggest that part.
3. From a scrap of soap, whittle out a little
“bar.”
The tub is made only of pasteboard,
So water you can’t really use,
But a cute little “bar” you can whittle,
From a scrap of real soap if you choose.
Wash Tub and Bench.
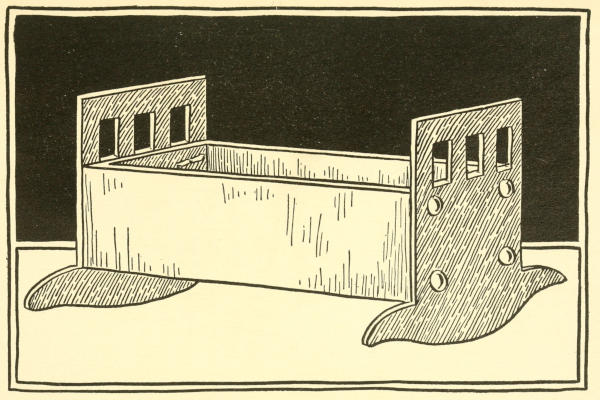
CRADLE. — ROCK-A-BY BABY.
Use any box of the right proportions—jewelry,
candy or shoe box.
1. Fold a piece of paper and cut a pattern
of the end with the rocker. Cut several until
one fits your box and will rock.
2. Lay pattern on cardboard; then draw and
cut two ends.
3. Fasten these as shown in the picture. If
the cradle is a large one, use very heavy cardboard
or fasten several thicknesses together, so
that it will be strong enough to be played with.
4. Paint with white enamel.
Cradle.
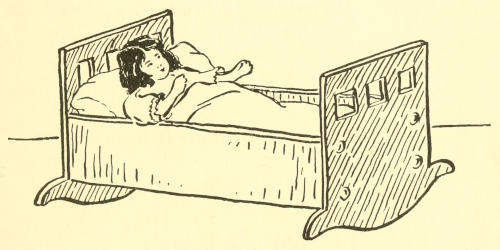
In this cradle clean and white,
Our baby doll will sleep;
We’ll tuck her blanket snug and tight,
So nice and warm she’ll keep.
Then with one little finger,
Rock it gently to and fro,
And softly hum a lullaby—
Don’t mothers do just so?
Rock-a-By-Baby.
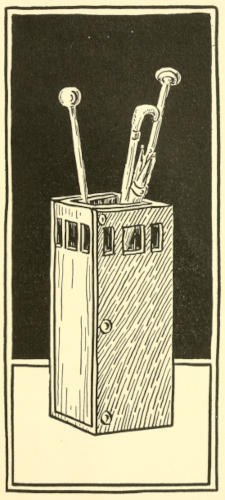
UMBRELLA STAND. — DOLLY’S UMBRELLA.
Use the kind of box suggested for the tabouret.
1. Cut off the box the right height. If peppermint
boxes are used, fasten the pieces of box
and cover together, as shown in the picture.
2. Cut the slats.
3. Paint with gold to look like brass, or with
a color to represent wood or porcelain.
Whittle a stick for a handle,
Paint it a nice dark brown,
’Round it twist some soft, black paper
And firmly bind it down.
This umbrella will not open,
So let’s hope it will not rain.
But don’t you think it will look cunning
In the stand with a little cane?
Umbrella Stand.
PIANO BENCH. — PLAYING THE PIANO.
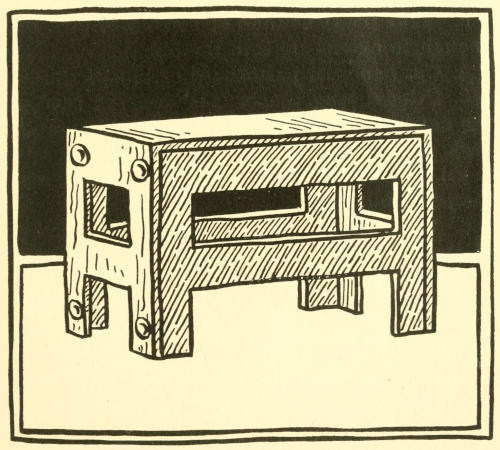
You might find a small box just the right size
and shape. Turn it bottom up and cut the legs.
You might have to cut ends from the box and
cover of a candy box, and fasten them together
as shown in the picture.
Before the piano, not too far away,
Place the bench so dolly may sit there to play;
In order that she may do this with ease,
Place her hands so that lightly they rest on the keys.
Piano Bench.
CLOCK. — TICK-TOCK, TICK-TOCK.
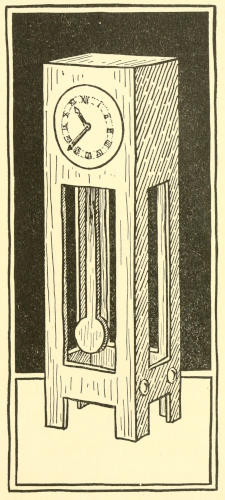
Use the kind of box described for the tabouret,
or box and cover of a peppermint box cut
the right height and fastened together.
1. Use a silver dollar or end of large spool as
pattern for the face. Mark the face directly
on the box, or make it on white paper and glue
it on.
2. Cut the legs and openings.
3. Make the pendulum of cardboard and long
enough to extend up into the top.
4. Cut hands of pasteboard or bits of tin.
5. Push a long pin or wire hairpin through
the hands, middle of face, top of pendulum and
back of the clock. Bend the end of the wire
down. You can then move the hands and swing
the pendulum.
6. You might put a fastener into the lower end
of the pendulum and double the prongs out of
sight. This looks attractive and also makes the
pendulum heavier so that it swings better.