The primary object of the author, in offering
The Turner’s Companion to the notice of the
public, is the hope of explaining, in a clear,
concise, and intelligible manner, the rudiments
of this beautiful art; an art immortalized
by the pen of Virgil, practised by the
Greeks and Romans, and, as we are told, still
existing in those exquisite chef-d’œuvres of
former years, so much admired and sought
after in our century.
A short treatise on this subject is much
wanted, and the author has endeavoured to
give such correct and comprehensive information
as will, he hopes, render the following
pages useful as a book of practical
instruction to the beginner, and of reference
to those already advanced in the study of
this beautiful science. The activity of mind
requisite for the attainment of perfect success
in all the various branches of Turning, by
exercising the inventive and reflective powers,
cannot fail of producing a beneficial effect
on the character of youth, which must prove
a lasting advantage; and the minute accuracy
necessary for handling the tools, serves
to confirm a steadiness of sight and hand
that must, in after years, and in other
branches of science, be highly appreciated.
From a long experience in the endless
sources of interest and occupation derivable
from this pleasing and salutary employment,
the author feels assured that whoever has
once patience and perseverance to overcome
the first difficulties, will speedily, like himself,
become an enthusiast in the art. And
why should not our fair countrywomen participate
in this amusement? Do they fear it
is too masculine and laborious for a female
hand? If so, that anxiety is easily removed;
the rough work can be executed by any carpenter,
and when once prepared, what occupation
can be more interesting and elegant
than ornamenting wood or ivory in delicate
and intricate patterns, and imitating, with
the aid of the lathe, the beautiful Chinese
carving, so much and so justly admired?
Besides, the taper fingers of the fair sex are
far better suited than a man’s heavier hand,
to produce the requisite lightness and clearness
of effect. To our charitable countrywomen,
who employ so much of their time
in raising funds for the diffusion of Christianity
in far distant lands, and for augmenting
the comforts of the poor in our own happy
land, the lathe will prove a most useful auxiliary,
as well as to those who are anxious
to bestow beautiful and cherished remembrances
on absent friends.
Another very forcible argument in favour
of the amusement of Turning being cultivated
by the ladies and gentlemen of our free
and independent country, and one which
will, I am sure, plead most strongly with all
parents and guardians, is, that all occupations
within doors being usually of a sedentary nature,
the exercise attendant upon the use of
the lathe must prove highly beneficial to
health; and one moment’s reflection will
point out the incalculable advantage to be
derived from instilling the love of useful employment
in every youthful mind; or, when
freed from the irksomeness of graver study,
may they not seek companions and pursuits
to whom they would ever have remained
strangers, had their idle hours not hung
heavy on their hands?
Should this little work prevail upon any
of my readers to commence the study of this
truly beautiful science, and should the occupation,
as no doubt it must, prove a source
of pleasure by adding to their amusement, it
will amply repay the labour it has required,
and bestow sincere gratification on the
Author.
THE LATHE.
“The pride of arts from fair Ambition springs,
And blooms secure beneath her fostering wings,”
Among all the many descriptions of the varied,
beautiful, and useful inventions that owe their discovery
and perfection to the genius and hand of man,
inventions that in so wonderful a degree assist and
facilitate the operations of the mechanic, no one has
ever written the history of the Lathe. It seems
strange that in a land where mechanism is carried
to its greatest extent, where science of every kind
is fostered and encouraged, the beautiful machinery,
the easy management, and wonderful precision obtained
by the aid of the Lathe, have never yet, in
our language, found a pen willing to describe them.
And yet, to the architect, the mathematician, the
astronomer, and the natural philosopher, Turning is
as useful, nay indispensable, as to the watchmaker,
the goldsmith, the joiner, and smith. And it is not
by these alone that its powers are appreciated;
many of those who by birth, station, and riches are
not in a situation to require its aid in their scientific
and mechanical operations, still find this art, from
its great simplicity, from the perfect ease and accuracy
with which the most delicate and intricate
workmanship is performed, the agreeable occupation
it gives to the mind, and the beauty, elegance, and
utility of its products, one of the most interesting
and healthful that can be followed.
The treasures of all lands are converted into various
and beautiful articles by the aid of the lathe.
Gold and silver, brass, iron, and copper,—the magnificent
trees that grow in the deep forests of the
West, and those that flourish on the burning plains
of Africa—the ivory obtained from the tusks of the
elephant and hippopotamus,—the coal, jet, alabaster,
and marble, dug from the bowels of the earth—are
all of the greatest value to the turner. A kind
of cocoa nut has also lately been brought from the
West Indies, which, being hard, white, and tough, renders
it excellent for working in the lathe; when polished,
it has the appearance of a substance between
ivory and mother-of-pearl.
To the Greeks and Romans (for the exact place
of its origin is not known) the invention of this ingenious
machine is ascribed; and though, doubtless,
in our time it has been greatly improved and perfected,
still the ancients, to whom we owe so much,
first discovered and used it; and by them its powers
were so well appreciated, that we are told it became
a proverb among them to say any thing was
formed in the lathe to express its justness and accuracy.
The Greek and Latin authors frequently mention
it in their writings, but they have not clearly handed
down to posterity the name of the first inventor;
indeed, on this point there are many and varied
opinions. The Sicilian historian, Diodorus Siculus,
informs us that the first person who made use of the
lathe was a nephew of Dædalus, by some authors
named Talus, by others Perdix. This youth, we are
told, invented the saw, compasses, and other mechanical
instruments; and to him we possibly are indebted
for the lathe also, for we are told, in ancient
mythological history, so great were his ingenuity
and talent for invention, that his genius soon surpassed
even that of his uncle, who, enraged at his
celebrity, and jealous of his rising fame, scrupled
not to sacrifice him to his feelings of rage and hatred:
some say he was poisoned; others, that he was
precipitated from a high tower in the citadel of
Athens; and the same authors assure us he was
changed into a partridge.
Pliny, however, (and his words are great authority),
ascribes the invention of the lathe to Theodore,
of Samos, an artist who discovered the method of
melting iron, of which he made statues. The same
author also mentions a man of the name of Thericles,
who was celebrated for his dexterity in Turning;
and Virgil says—
“Lenta quibus torno facili superaddita vitis.”
These testimonies, of ancient poets and historians
conjoined, prove it to be an art of the greatest antiquity.
Cicero also mentions it; and it is affirmed
that, with this machine, the Greeks and Romans
turned all kinds of urns and vases, and adorned
them with ornaments in basso relievo. If to Turning
we really owe those treasures of other days
which are found buried among the ruins of Herculaneum
and Pompeii—treasures so valued by the
antiquary as a memorial of former ages; by the
lover of the fine arts as beautiful and graceful additions
to his cabinet of curiosities; and by the rich
and opulent as ornaments superior to any that modern
hands can produce;—surely we must confess
the workmanship of the lathes of our times is not
to be compared with that performed by the more
simple machinery of centuries ago. It seems, indeed,
almost miraculous, that the beautiful figures
and elegant and graceful designs here spoken of
should be produced by a potter’s wheel, so was the
lathe anciently denominated; but the testimonies
of so many learned historians agree in declaring
that to its aid we owe those exquisite productions,
that it is impossible for even the most skeptical to
deny it. Before we quit, what may not unaptly be
denominated, the romance of the history of the
lathe, we will add, that the saw, which we have
already said was invented by Talus, is supposed to
have been first made by him in imitation of either
the jaw-bone of a snake, or else the back-bone of a
fish; and in a painting still preserved among the antiquities
of Herculaneum, is a saw exactly resembling
our frame saw, with which two genii are dividing
a piece of wood.
It is, however, certain, that could these Roman
and Grecian artificers see a modern lathe, examine
its complex yet beautiful mechanism, and the almost
endless additions and improvements it has undergone
since the days of Virgil and Pliny, they would
hardly recognise it in its more finished state, and
would be much puzzled to discover in what manner
to manage its machinery. Among the numerous apparatus
adjusted to it is a machine, by the aid of
which medallions have been executed; and in the
British Museum is a profile in basso relievo of Sir
Isaac Newton, wholly worked in the lathe; but how
different from the turning of the ancients! The
medallion machine requires much labour and very
expensive apparatus, while the potter’s wheel cannot
have possessed much mechanism or great quantities
of tools: most of those now in use being unknown
in former days.
Having now established the great antiquity of
the lathe as a useful and classical employment, we
will briefly mention a few of the improvements it
has undergone in latter years. The potter’s wheel
is, of all lathes, the most simple; it merely consists
of an iron beam, or axis, a small wooden wheel
placed on the beam, and a larger one fastened to
the end of the same beam, which turns by a pivot
on an iron stand. With this simple contrivance
the workman still forms the body of the vessel of
clay, but never attempts to turn the handles, feet,
mouldings or ornaments. In latter years, various
and important tools and improvements have been
made; chucks have been invented, which enable the
turner to accomplish with speed and facility an almost
innumerable variety of circles, lines, ellipses,
and arcs, all so delicate and true in their form and
design, that they cannot fail exciting the admiration
and wonder of all who contemplate them. The
screw also, once a formidable difficulty to the uninitiated,
is now rendered perfectly easy of execution
by means of the traversing mandrel; those, too,
who are very learned in this art, can out of a piece
of ivory or mother-of-pearl, produce in the lathe
beautiful brooches, ear-rings, and studs, worked in
raised flowers; chessmen in imitation of carving,
and ornamented vases full of detached flowers;
while fluted and spiral columns, delicate mouldings,
and fanciful beadings, are of comparatively easy
execution.
To form patterns upon wood or ivory, various descriptions
of chucks are employed; one lathe serves
for all, as they are made to screw on to the nose of
the mandrel. By the aid of the concentric or
common chuck, every article you turn is circular;
the lines forming the circle are enlarged or decreased
as the tool approaches or recedes from the
axis. The oval chuck, as its name signifies, works
designs of an oval or spherical shape; the eccentric
turns patterns of a circular form, but its peculiar
properties enable the workman to alter the centre
of his work at pleasure: the geometric and compound
eccentric produce beautiful geometric and
carved designs; the oblique and the epicycloidal
also turn curious and intricate patterns, and the
straight line chuck performs all its work in direct
lines. These are the chucks most in use, but many
of them are expensive and complicated, and they only
execute the ornamental work; the shape and size of
the object are accomplished by the lathe, without
any aid but that of a common chuck and common
tools.
The curious and varied mechanism of the above-mentioned
chucks are truly wonderful, and the patterns
they perform very beautiful; one of peculiar
form, and exceedingly intricate, has been invented
for bankers’ checks, to prevent forgery.
There are also two rests, which are necessary appendages
to them; the sliding rest, that moves in a
direct line at any angle, and the circular rest, which
enables the turner to ornament balls, spheres, and
round objects. We must not omit, too, to mention
the eccentric cutter, the drill, and the universal cutter,
all exceedingly useful, and enabling the turner
to execute a great variety of designs and patterns.
The rose engine, also, is much admired for all kinds
of ornamental work, but it is very expensive, and
new inventions are daily adding to the machinery
of the lathe, and rendering its powers more extensive.
The wonderful discovery of voltaic electricity, by
which copper-plates, plaster casts, wood engravings,
and medals may be copied, can also be applied in
various ways to turning, either in wood or ivory.
For instance, by its aid a wooden thimble may be
changed into the resemblance of gold, or a box
take the appearance of silver; thus, while your work
retains its first beauty and delicacy, the material is
apparently of much value. It would be going
beyond the bounds of a work on turning, to give
any directions for this transmutation, particularly
as there are so many already published on the
subject. We must also add, that by a careful and
steady management, the drill may be made almost
to take the place of the graver; by holding a plate of
copper steadily against it, and using various tools,
(not letting the lathe go too quick,) portraits and
landscapes can be executed for printing.
Having now finished this short sketch, which we
hope will not be unacceptable to our readers, and
will perhaps induce them to follow this interesting
and healthful occupation, we must beg that those
who peruse “The Turner’s Companion,” and follow
the directions it contains, will not be daunted by the
first difficulties that assail them, but will patiently
persevere till experience enables them to overcome
and vanquish them, remembering that—
“The wise and active conquer difficulties,
By daring to attempt them. Sloth and folly
Shiver and shrink at sight of toil and hazard,
And make th’ impossibility they fear.”
LIST OF TOOLS NECESSARY FOR TURNING.
Gouges.
Screw-driver.
Chisels.
Pincers.
Scrapers.
Compasses.
Side tools.
Rule.
Point tools.
Callipers.
Moulding tools.
T square.
Inside tools.
Brace and Bits.
Planes.
Screw tools.
Drills.
Milling tools.
Hatchet.
Oil-can.
Mallet.
Glue-pot.
Hammer.
Sand Paper.
Files.
Chalk.
Vice.
Glue.
Hand Vice.
Isinglass.
Gimlets.
Pumice Stone.
Saws.
Nails.
CHUCKS. — THE SCREW. — BORING COLLAR. — OF WOODS. — TO STAIN WOOD RED. — A YELLOW STAIN. — A BLACK STAIN. — A PURPLE STAIN. — A MAHOGANY STAIN. — TO DIE IVORY RED. — BLACK DYE.
THE
TURNER’S COMPANION.
The machines used for Turning, whether round
or oval objects, are called Lathes; they are of various
shapes and sizes; some very small, as those
generally used by watchmakers; others very large
and powerful, for turning iron; and others, the
kind I am going to describe, of a middling size,
for fashioning wood and ivory. The large lathes,
being too heavy to be worked with the foot, are
usually turned by a steam-engine, but the foot-lathe
is the most convenient for the turner in
wood; it may be made of iron or wood: if of the
latter, it should be constructed entirely of very
hard, well-seasoned oak, or of mahogany. There
are various opinions respecting the advantages
and disadvantages of metallic and wooden lathes;
in the former, it is impossible to obviate an elastic
tremor, which is unpleasant and injurious; but then,
on the other hand, they are so much more durable
and compact; and they enable you to perform your
work with so much more accuracy and exactitude,
that they are, on the whole, perhaps, to be preferred.
The drawing given in Plate 1 will serve as a pattern
for either an iron or a wooden lathe; but as the
workman could construct the latter for himself, we
will suppose the description we are about to give
relates to a wooden one.
The bed of the lathe, B B, may be of any length
required, and is firmly fastened with bolts to the
uprights O O, which form the legs of the lathe, and
to which the bed is strongly attached by bolts passing
through both; while the nuts that draw them
tight, being what is called countersunk, are of no
inconvenience to the workman. The feet and the
two uprights must also be firmly fastened to the
legs O O; and to prevent the least unsteadiness or
motion, they must be screwed strongly to the floor,
and must be of a sufficient size to form a solid support
to the lathe.
Plate 1.
The left hand puppets, C D, or, as they are sometimes
called, the headstock, should be of iron, and
cast in one piece. The under part fits tightly into
the open space in the bed of the lathe, and is fixed
there with screws; while the two cheeks of the puppets
rest on the bed itself. The mandrel E, to prevent,
as much as you can, any vibration, should be
as long as possible; it runs in a metal collar,
through the puppets C D, and is of steel, turned perfectly
cylindrical; it is kept constantly oiled, by
pouring a few drops of oil upon it through holes
made in each of the puppets. The screw E, at the
end, is called the nose of the spindle, and upon it
the chucks intended to receive the work are screwed.
The back puppet, G, is used to support long
pieces of wood; it is moved backwards and forwards
on the bed of the lathe, so as to suit the work upon
which you are occupied, by loosening the screw L;
within the upper part of G is a steel spindle, J,
which screws in and out of the headstock, by turning
the screw K. Care must be taken that the
point of this spindle be exactly on a line with the
nose of the mandrel, E. The point, J, takes out,
and another nose, L, can be inserted in its place, to
receive the pointed end of any small work, should it
be more convenient.
Upon the spindle is a brass or a mahogany wheel,
F; it has three grooves in it, and the great wheel,
K, has three similar grooves turned in a V, so as
more effectually to take hold of the band which moves
them round. The three different grooves in this
wheel, and in the small one, give different velocities
to them. The band which turns them is made
of strong catgut, and passes under the lower and
over the upper wheel, working in the corresponding
grooves of each; it is joined with a hook and eye
of iron, that have a screw in them. Slightly taper
off with a sharp penknife a little of each end of the
catgut, so that it will just enter the hook and eye;
then hold the band firmly in a vice with your left
hand, and with your right take up the hook or eye
in a pair of pincers, and screw it upon the catgut
till quite firm. This is a far better means of joining
the band than any other that can be employed,
as the hooks and eyes seldom give way, and obviate
the necessity of knots or joins, which are always
clumsy and inconvenient. Cord, too, gives way
with the variations of the atmosphere, so that it
constantly requires shortening in dry, and lengthening
in rainy weather; catgut is so slightly influenced
by these changes, that its use is far preferable.
The treadle, N, when moved up and down with
the foot, gives motion to the two wheels, and thus
the spindle, with the wood to be worked screwed
upon it, is turned round with a quick or slow movement.
The axle of the great wheel, S, works in two
screws, Q; the crank, M, is connected at one end
with the axle, S, and at the other hooks into the
treadle frame, N. Plenty of oil should be given to
the axle at Q to enable it to work easily. The rest
which supports the tools is represented at Fig. 1,
and M; it is made of iron, and consists of three
parts; the lower has a forked foot, T, which rests
upon the bed of the lathe, and enables it to be
drawn backwards and forwards, so as to accommodate
the workman; this foot is held in its place by a
bolt, O, which, passing through the bed of the lathe,
is sufficiently broad to rest upon each side of the
foot, T, and is tightened by a screw that passes underneath
the lathe, P, through which it passes; the
upper part of the rest is a cross piece of iron with
a cylindrical stem, that fits into the socket, U, and
is moved up and down, to the right or the left, by
loosening the screw, H. The workman should have
rests of different sizes, to suit various kinds of work,
but they must all fit into the same socket.
Having now given a clear description of a lathe,
I need only add, that it should be placed opposite
a window, so as to have the benefit of as much light
as possible; a skylight above the head is also a
great advantage. As it is indispensably necessary
for the learner to exercise himself in plain turning,
that is, in the formation of different articles, so as
to be able to turn them perfectly round, oval, or
hollow, as required, before attempting more difficult
and complicated work, we will now give a list of
the most useful tools for this purpose.
For the wood, the gouge, Fig. 1, plate 1, is first
to be employed, to reduce the unevenness of your
work; its edge is rounded. To use it, place the
rest on a level with the axis of the work, and hold
the handle of the tool downwards so that its cutting
edge is above the axis. These tools are useful
for making concave mouldings. In using them, do
not push them roughly against the wood till it becomes
tolerably even, or you will spoil their edge
and chip the work; and hold your hands very
steady.
The chisel, Fig. 2, is next used, to give a smooth
and polished appearance to the wood. Its cutting
edge is oblique. Elevate the rest considerably above
the axis of the work, so that, though held with a less
inclination than the gouge, the edge of the chisel
operates on a higher part of the surface. Use this
tool at first with great caution, for it is much more
difficult to manage than the gouge; with an inexperienced
hand, the point is apt to dig into the wood,
quite spoiling its surface, or else, by pressing it too
firmly upon the work, it cuts great pieces in an uneven
manner. When skillfully used, it should feel
almost to work by itself, merely running steadily
along the wood, shaving off all its inaccuracies, and
making it look quite bright, smooth, and polished.
All soft woods are entirely turned with the gouge
and chisel, of both of which you must have several
sizes.
Fig. 3 is called a right-side tool, and has two
cutting edges, a side edge and an end edge: so as
at the same time to cut the bottom and side of a cavity.
The left-side tool cuts with the opposite side.
In using them, hold the bevel which forms the edge
downwards.
Fig. 4 is a point tool, useful for making small
mouldings, and much employed in finishing the
shoulders and flat ends of work.
Figs. 5, 6, 7, 8, 9, are inside tools, used to turn
out hollows; also to make cups, and various other
articles.
Fig. 10 is a parting tool, used to cut off work, and
to make incisions.
Fig. 11 is used exclusively for very hard woods,
as cocoas and ebony, which chip if attempted to be
smoothed with a chisel; also for turning ivory, bone,
or jet; one side and the end are sharp. This tool
is very strong, and requires some practice to use it
well. Be very careful, in sharpening it, to keep the
front edge quite straight, or else, in hollowing out
boxes, the inner sides will not be turned out evenly;
that is, one part will be thinner than another. This
tool is held flat upon the rest, which must be on a
level with the axis of the work, or sometimes the
tool, by raising the handle, may be lowered so as
just to scrape the wood. It is frequently called a
graver; in turning metals, it is the tool first used.
Copper and brass are easy to turn, and in case of
necessity, it is useful to have the proper tools, and
to know how to manage them.
These tools all are indispensably necessary to the
turner, and he should exercise himself constantly in
their use; for until he becomes quite master of
them, he will injure, spoil, chip, and destroy, whatever
he attempts to turn.
Figs. 12 and 13 are very useful to make mouldings
of various kinds.
The handles of the tools must be made of very
hard wood, and it is a great convenience to have
them all of nearly the same size; for the hand, getting
accustomed to them, manages them with more
facility. Drive the tool firmly into the handle, and
hold it there by a broad brass ring, as in No. 1.
To keep the tools in good order, that is, properly
ground and sharp, demands great attention. If
they become chipped, grind them even on a grindstone,
taking care that the BEVELS retain their
proper angles. To avoid spoiling their edges, and
to enable you to have them always near at hand, a
rack perforated with holes, into which they can slip,
is very useful. This rack may be fastened against
the wall, near the lathe. A screw-driver, two or
three different-sized gimlets, and nails of various
kinds, must always form part of the turner’s tool-box;
also some files, and a hand-vice.
Before we leave the description of turning tools,
we will mention the saw, which is an indispensable
addition to the tool-box. There are many kinds,
but the most useful are the hand-saw, the tenon
saw, and the circular saw. The first is about
twenty-six inches long, and is generally made with
four teeth to an inch. It is used for cutting wood
across, and in the direction of its fibres. The teeth
at the lower end are smaller than the upper ones,
by which means the wood is not so much torn as if
the teeth were all of an equal size. The tenon saw
is used for cutting across the fibres of wood; the
smallest saw of this kind is about fourteen inches
long, the largest about twenty inches. Circular
saws are of all sizes; they are easily fitted up with
a spindle, which, being screwed on to the nose of
the mandrel, and supported at the other end by the
back puppet, enables the workman to turn them by
the wheel of the lathe, while at the same time he
holds the wood or ivory firmly against them.
Should a larger circular saw be required, it is more
advisable to fit it up separately from the lathe,
with a frame-work and wheel to itself.
Glue, which is very necessary for turners, requires
some little care in preparing; it must first be
steeped for several hours in cold water to soften it;
if it swells without melting, it is good, and must
then be dissolved in water; the proper quantities
are, a quart of water to half a pound of glue. The
heat should be just enough to melt it, and the pan
in which it is contained must be placed in a larger
copper vessel, filled with water; by this means,
when the water in the outer pan boils, the glue will
be dissolved without any fear of its burning, which
would immediately spoil it. When you are going
to glue a piece of wood to a chuck, put very little
glue thinly and evenly over the surface of the latter,
then press the wood upon it firmly, and place a lead
weight upon them to unite them perfectly.
Plate 2.
The chucks, upon which the material to be turned,
whether of wood, ivory, or metal, is always fixed,
next demand our attention. They are of every
variety of size and form, and are all screwed upon
the mandrel of the lathe. Many are made of
brass; others (the most numerous, because the
turner can make them for himself), are of wood;
but these latter should be used soon after they are
made; for if not constructed of very dry, hard
wood, any great variation in the weather will cause
them to shrink, and thus the screw becomes slightly
altered, and will not fit tightly to the neck of the
mandrel. To avoid the expense of having many
brass chucks, which would be very great, if we procured
them of the size and shape requisite for all
kinds of work, it is a good plan to have several
brass plates made about the size of half-a-crown,
plate 2, A, with a screw in them, to fit upon the
mandrel, and four screw-nails with which to fasten
them to wooden chucks of any form. Thus, when
these chucks are worn out, unscrew the brass plates
and screw them on to others. In plate 2 are the
drawings of several chucks, which are useful for
various purposes; they are all made of brass, with
a screw that fits upon the mandrel. B is a brass
plate, about two inches in diameter; from the middle
projects a tapering screw, about half an inch
long. This is used to hold any thing that is flat, as
a stand, or candlestick base, or, with the aid of the
back puppet, to support a long piece of wood, while
turning down to fit a stronger chuck. For this
purpose, bore a hole in the wood, and screw it on to
the chuck. C is the same shape, but has five iron
points projecting from its surface; upon them the
wood must be firmly fixed by hammering it on. It
is better to use the back puppet, as the wood is apt
to become loosened by a sudden jar, or any unevenness
in the surface.
D is universally useful, either for large or small
pieces of work. The wood or ivory may be turned
to the proper size to fit, on the chuck B, and then
driven firmly into the hollow cup with a wooden
mallet; or a piece of common wood may be made
to fit it tightly, and a hole turned in it to hold the
object you intend to turn.
E is called a ring chuck, and is made of box
wood. Drill a hole through the centre, and then
saw it across in six parts. By its being turned
smaller at one end than at the other, this chuck
opens at the sawgates; you then drive on to it, with
a hammer, a ring of metal, and the wood inserted
in the hole will remain immovable.
F is called a square hole chuck, the hole in the
middle having several drills and bits to use with it,
as in 3, 4, 5, 6. G is called a die chuck: it is the
same in shape as the cup chuck, only not so deep,
and it has several screws passing through its sides
at equal distances, and meeting in the centre, by
which the work is held, so that it serves equally for
a large or a small object.
H is exactly the same in shape as G; with the
addition of an arm, No. 1, the use of which is as
follows. If this chuck does not turn the wood round
properly, fasten to the latter what is called a carrier,
No. 2, the end of which, projecting further than the
chuck, rests upon the arm, 1, and causes all to turn
together.
These appear to us to be the chucks most universally
in use for concentric turning; the ordinary
ones the turner may make of wood, and those for
ornamental work we shall mention hereafter.
It may, however, be as well to describe the method
of making the wood chucks:—Select a piece of
close-grained dry wood—box is the best; having
taken off the corners and made it tolerably round
with a chisel, or a small hatchet, you must then find
the centre of the two ends. To do this, lay the
piece of wood on a bench; open a pair of compasses
to nearly half the diameter of the piece; fix one
point of the compasses firmly in the middle, and
with the other draw a circle as near the edge of the
wood as you can. If you find the circle is not
exact, but further from the edge on one side than
the other, alter the position of the compasses, till
they become right. Bore a hole in the centre, when
found, and screw the wood on to the chuck, B.
Place your rest facing the work, and cut in the
centre of it a hole, the depth and NEARLY the size
of the screw on the nose of the mandrel. This
done, take the piece of wood off the brass chuck,
and fasten it firmly in a vice; then screw into the
hole a TAP, which has been made on purpose to fit
the screw of the mandrel. This tap cuts a thread
as you turn it round in the hole, so that when you
unscrew it, you have only to screw the wood to the
nose of the mandrel, taking care to make it fit quite
close to the shoulder; it must then be turned quite
round and smooth with the gouge and chisel, and
the face of it also perfectly flat, which is seen by
holding against it the flat part of the T square,
plate 1, R. If the square touches all the face of
the chuck, it is ready to receive the wood; but if
you can in any part see the light between them,
take the chisel and smooth it over again. The
chuck being ready, cut a piece of wood, we will say
for a box, round it with a chisel, take some thin
glue, and fasten the wood to the chuck with it.
When quite hard and dry, begin to turn the sides
even, then cut down the groove to receive the lid,
which should be glued on to another chuck. To
hollow out the box, turn the rest to the face of the
work and use the gouge. When of a sufficient
depth, take the callipers, plate 1, K, push the small
ends down the box to the bottom, stretch them out
as far as they will, and set the screw, then pull
them slowly out, so as to measure the size of the
top of the inside of the box; if not exactly the
same, turn out a little more of the bottom. Now
begin to smooth the outside and hollow out the lid,
taking great care to make it fit exactly the groove
made in the bottom of the box; for this purpose
the callipers must be set, so that the forked end
stretches to the width of the circumference of the
groove; you will then find that the other end will
be exactly the same width, and keep trying them to
the inside of the lid, till they enter it very tightly;
then try the lid on the bottom, and it will fit. By
thus using the callipers, you are saved much trouble
in taking the work on and off the lathe, to fit the
parts together.
You must now cut the lid off the chuck, either
with the parting tool, or with a saw, and having it
firmly placed on the bottom, smooth and finish off
the sides so that they look quite even, and as if
there was no separation between them. This done,
move the rest to the front of the lid, and finish it
up the same, taking care not to leave the slightest
scratch or unevenness on the surface; then rub the
whole of the work well with sand paper, making
the lathe turn very rapidly, first one way, then the
other, and finish by rubbing it over with a drop of
olive oil on a piece of rag, and the shavings of the
wood. The great beauty of turning consists in all
the parts being exact, shining, well finished off, and
not too thick; to attain this latter perfection, experience
is necessary, and I should advise constant
practice in turning box-wood and holly, till the
learner is able to make his boxes fit properly, and
also look neat and light. The lid being finished,
lay it aside, and saw off the bottom; then turn its
own chuck to a proper size to receive it, while you
smooth and polish the outer part. It is requisite
to be very particular in the manner of chucking
work, such as boxes, thimbles, or any thing that has
been hollowed out; and remember always to make a
chuck to fit INTO THEM, instead of putting THEM
into one. It is also better to leave a shoulder that
the work can rest against,—you are then sure that
it is supported evenly; if not, you may find that
the slightest inclination to one side or the other will
cause you to turn one side much thinner than the
other; and if you are working, we will say the top
of a box, it will always look crooked, and if the
bottom, it will never stand steady. Should the box
feel loose and fall off the chuck before it is finished,
a little chalk may be rubbed upon the former, which
will give it a firmer hold, and prevent the slipperiness
consequent on the friction of two pieces of
wood; and sometimes a thin piece of paper inserted
between them is useful in the same way; for although
the work should fit close and firm on the
chuck, if the chuck be too large, so that you have
to use force to make them unite, you will most
probably split your work all to pieces. Great care
also is requisite to get it off the chuck; insert one
of the small chisels between it and the shoulder of
the chuck, and move it slightly, first on one side,
then on the other. Many neat ornaments may be
made on boxes with the smaller chisels, such as
lines and mouldings; and there are several useful
and ornamental tools, called milling tools, (see plate
5, Nos. 1, 2, 3), which are not expensive, and give
much effect to the work. They consist of small
wheels, upon which the pattern is cut. Place the
rest so that there is space for the wheel to turn
between it and the work, push it close up to the
wood, hold the handle very firmly with both hands,
so that the tool cannot slip, and with a few quick
turns of the wheel of the lathe, the pattern will be
clearly impressed upon the wood. With these simple
tools innumerable beautiful articles may be finished;
and though they require neither the application
nor talent that can be displayed in performing
other ornamental work with the eccentric chuck,
cutter, and drill, still they possess two great advantages—cheapness,
and facility of management, and
are easily procured.
By a little attention and ingenuity, a great variety
of elegant and useful articles may be made on the
lathe, with the assistance of but a limited collection
of tools,—such as thimbles, boxes, cups, rings,
stands, small vases, stilettos, pen-handles, pin-cushions,
needle-cases, and vinaigrettes.
We now come to the most difficult operation in
turning, that of cutting a screw; to perform it well
and easily is a proof of the workman’s skill and
proficiency in the art. There are many ways of
doing it; we shall therefore give the best and least
expensive. The screw tools, figures 14 and 15,
plate 1, must fit exactly one into the other. Fig. 15
is an outside, Fig. 14 an inside tool. As the
threads may be required to be cut coarse or fine,
according to the work you are engaged upon, the
small grooves in the tools are made to suit. Having
turned your box quite round, and hollowed it out,
cut the groove upon which the lid is to fit; place
the rest at a convenient distance, turn the wheel,
not too fast, and move the outside screw-tool along
the rest with a regular horizontal motion, and it
will cut a screw, the threads of which will fill up
the space between the teeth of the tool. But care
must be taken to jerk the tool off when at the end
of the space intended for the screw; or if it be allowed
to remain stationary, cutting the wood, the
threads will be destroyed, and become useless.
When this is well done, turn out the lid of the box
till it nearly fits the bottom, and in the same manner
press the inside screw tool against the side of the
cavity, draw it out horizontally as the work moves
round, and if carefully managed, it will soon be
made to fit upon the outside screw. As, however,
to accomplish this well, and with precision, great
practice is requisite, an invention, called a traversing
mandrel, is frequently used, particularly by beginners:
we will endeavour to give a description of
its form and use.
At the end of the mandrel A, pl. 4, is a brass
cylinder, I, which fits upon the end, and is kept in
its place by a nut, 2, which screws firmly into it.
Below this, fixed to a brass plate that rises and
lowers at pleasure by turning the screw-key, B, is
attached the screw-guide; (a brass plate cut into
grooves of various sizes to suit the thread you wish
to cut, fig. 3;) this guide moves round on a pin.
To use this machine, unscrew the nut B, pull off the
brass cylinder, and in its place put on the guide, C,
and screw the nut in again; turn the other guide,
3, to the groove which corresponds with it, and
which is usually numbered, to avoid mistakes; turn
the key B till the lower guide meets the one you
have just put on the mandrel, and slips easily into
it. You will now find that by only allowing the
fly-wheel to move half round and back again, the
mandrel will run backwards and forwards, and thus
have the exact motion requisite for cutting a screw.
Fix your rest, and hold your tool (which must have
the same sized thread as the guide then on the mandrel)
quite steady upon the rest, against the revolving
wood, and in a few minutes the screw will be
produced. The inside screw is made in the same
manner, with the inside tool, by turning the rest in
front of the work. Do not press the tool too hard
to the wood at first, till the threads are slightly cut,
so that the teeth may enter always in the same place.
About six different-sized screw guides and tools to
fit will be quite sufficient for an amateur turner.
There is also another way of cutting screws, by
means of a traversing chuck. On the mandrel, R,
pl. 4, is screwed the chuck B, to which are screwed
the chucks of the lathe, R. On the outside of B
is turned a screw, fitted to an inside screw worked
in the block C, from which extends an arm, D, sufficiently
long to allow the arm E to slide up and
down it; a piece of iron should be screwed to the
circular block, C, of such a length as to be capable
of moving in a groove that may be cut in the collar;
it is intended to prevent the block C from turning
quite round. The rest, G, must not stand, as usual,
parallel to the work in cutting the outside screw,
but at right angles, as when an inside screw is to
be cut, in order that the further arm of the rest, F,
may be joined to the end of the second arm, G. It
is necessary that the second arm, E, shall be capable
of fastening firmly the first arm, D, to any part
of the rest, G, F, as also to have a joint at each
end, to admit in a horizontal plane its free action.
Thus, as the lathe turns to or from us, the arms
must traverse forwards or backwards, which gives a
similar motion to the tool, H, that is screwed firm
to the further arm, F, of the rest, and thus you can
cut a screw with a single point tool. Of course
any unsteadiness would spoil the screw. If you
draw the centre of the rest nearer to you, and thus
bring the tool nearer to the arm, E, a screw of a
much larger-sized thread will be cut; for as the
rest, turning in its socket, moves on a centre, the
further the tool is from the centre, the greater will
be the radius of the circle described, and vice versâ.
It may, perhaps, be feared that a piece of wood
so far from the collar, K, may be apt to spring;
but this is easily avoided, by not making use of the
chuck, B, till the screw is to be turned. Another
disadvantage would seem to arise from the impossibility
of cutting screws when the puppet head is
made use of. But this may also be obviated by
lengthening the arm, E, to the part where the screw
is to be cut, and thus we have the same screw as the
traversing one. The socket, S, slides on the rest,
and may be fastened to it by a screw, the upper
part that turns on a pivot admits the arm, E, to
slide through it, which arm is held firm with a screw.
At the commencement of the work, the rest stands
at right angles with the wood on which the screw
must be cut; then, by bringing it back to its original
angle, and sliding forwards the tool to the last
thread of the screw that was just cut, we proceed
to any length required. When two or three threads
are cut, the most unskillful turner will be able to
continue the screw with a common screw tool.
Fig. D, plate 4, is a boring collar, used to support
any long slender body which is required to be
turned hollow. Without a support of this kind it
would be impossible to keep the wood in its place;
and it would either incline from the centre, thus
causing the hollow to be drilled out quite crooked,
or it would spring from the chuck. To obviate
these two inconveniences, the two collars, figs. C
and D, plate 4, are employed. In the former one,
which is made of iron or brass, the holes are conical,
and their centres are all precisely at the same distance
from the axis of the collar. In using it, remove
the right hand puppet, and provide a much
lower one. Through it drill a hole, the same size
as that in the centre of the boring collar. The
centre of this hole must be in the same line with
the centre of the mandrel. The collar, when attached
to it, faces the mandrel, and is held firm by
a screw. When fixed, the centre hole is opposite
the axis of the mandrel; and when the largest hole
is used, it clears the top of the headstock to which
it is affixed. The end of the work to be bored
being placed in the hole which fits it, the tool is
held upon the rest against its centre, and the boring
is easily and accurately performed.
Plate 3.
The collar, D, is perhaps, a simpler apparatus
for supporting long pieces of slender wood or ivory,
and has this advantage, that the workman can easily
make it for himself. It should be constructed of
very hard, well-seasoned wood. The foot, E, must
be in breadth exactly the size of the aperture in
the bed of the lathe, and is kept quite steady by a
bit of wood thrust through it underneath the lathe.
Into this collar, fit many pieces of wood with different
sized holes bored through them, (all exactly in
a line with the axis of the mandrel,) so as to admit
large or small pieces of work, the sides being
grooved, and the supports sawn to correspond: they
all slide in with great ease, and are kept quite steady
by an iron pin which runs through the top. The
fig. G, shows the collar, with one of the supports
slipped in, the other sliding upon it; H is the collar,
showing the groove, and L L are two supports that
fit into it. The middle of the apertures of these
supports, whether large or small, must always be
exactly on a line with the axis of the mandrel,
therefore, after they are bored quite true on the
lathe, they are sawn exactly across the hole. This
is a very useful addition to the lathe, not only as a
support when boring holes, but also to be used with
the right hand puppet, to give strength to any long
slender piece of work, as a screen-handle or a pen-holder;
for, being of great length, the stress necessary
to the proper management of the tools would
be apt to break the wood or ivory, and it is easy to
make one of the ornamental mouldings of a proper
size, to enable it to run smoothly in one of the supports;
if too tight, the wheel will not turn, and if
too loose, the work will jerk up and down.
For boring, there are many shaped tools of
various sizes; 16, 17, pl. 1, are drawings of the
most useful. They have no handles, but at the
smaller end a hole is drilled, to admit the point, J,
of the puppet, G, pl. 1. Having, with one of the
turning tools, made an aperture in the work sufficiently
large to allow the boring tool to enter,
screw the puppet, G, firmly to the bed of the lathe,
then turn the small wheel, K, till the point enters
the hole in the tool, which must be steadied by
holding it straight and firm with a pair of pincers.
Make the wheel turn rather quickly, and with the
left hand keep moving the left wheel, K, very
gently, so as to force the tool into the wood. After
a few turns, stop the lathe, and take out the boring
tool, to get rid of the shavings and dust; move
the puppet nearer and begin again. A little difficulty
will be found in making the tool enter the
wood, or bite, as it is called, but, by humoring it
gently, it will soon take hold; care must be taken
to keep it quite straight, and not to go too fast, or
it will be liable to break. This method of boring
is only used for small hollow tubes, needle-cases,
crochet-needles, handles, and small work.
There are many beautiful English woods which
are excellent for turning; beech is very universally
used, and it should be cut into moderate sized
pieces and boiled, to render it more durable, and to
make it work smoothly.
Elm and chestnut are also much admired; if the
latter be dipped in alum water, then brushed over
with a hot decoction of logwood, afterwards with
one of Brazil wood, it will be made to imitate mahogany.
Green wood should never be used, as it is
apt to split; it should be kept for at least a year
before attempting to turn it. Some persons, if they
fear the wood has not been sufficiently seasoned, cut
it up and put it in a vessel filled with a ley made
of wood ashes. In this it must be boiled for an
hour, and allowed to remain in the liquor till quite
cold, afterwards it must be dried in the shade.
Old walnut wood is very beautiful; to improve
its colour, it may be put in the oven, and when
worked, polish it with its own oil, very hot.
Sycamore, when grown in favourable situations,
is as white and nearly as hard as holly; the cherry,
yew, laburnum, and pear-tree woods, are also
very beautiful; but though invaluable for plain
turning, they are not hard enough, or of a sufficiently
close and fine grain, to admit of ornamenting
them in delicate and minute patterns. The
milling tools are generally employed for them. Of
all English woods, the holly is the whitest, and is
rendered still more so by boiling; it is, when very
good, used for inlaying, in imitation of ivory. Box
is the hardest and toughest of our woods; when
cut plank-wise, it is apt to warp, if not well seasoned;
but its yellow colour, if highly polished, is
much admired, and it will receive the most delicate
patterns; it is also used as a substitute for ivory.
The foreign woods are those most prized by the
ornamental turner, on account of their hardness,
and the beautiful polish which can be given to them.
Cocoas, or the wood of the palm, is much used for
all kinds of ornamental work. It is of a beautiful
brown, streaked with darker veins, and is found in
the West Indies.
Ring wood is extremely hard, of a chocolate
brown, with black veins; it is a good wood for turning,
and comes from Brazil.
Partridge and leopard woods, tulip and snake
woods, are also frequently used; the latter is of a
very deep red, and very hard.
Calamander wood, a tree growing in the island
of Ceylon, is very hard and heavy, and the veins
in it most beautifully shaded. The principal colours
are a fine chocolate, sometimes deepening almost
into black, then gradually shading into a cream
colour. It is a very hard wood, and takes a high
polish.
African thorn is of a beautiful dark colour, and
much prized when it can be obtained good, which is
rarely the case.
Ebony, an exceedingly hard, smooth, foreign
wood, is much admired by turners. The best is a
jet black, free from any veins, and receiving a very
high polish. There is some difficulty in keeping
woods to prevent them from warping or cracking.
The foreign woods, particularly, being usually very
dry, often open in fissures while working. The best
method of preserving them is to place them in a
cool and rather damp place, and to rub a little oil
now and then over the outsides, to keep them moist.
If the wood is sufficiently large to allow of its being
quartered, the danger of its splitting is much less;
but the foreign woods are rarely large, as the trees
are generally very high, but small in circumference.
If foreign woods cannot easily be obtained, box wood
and holly may be stained so as greatly to resemble
them. The dying woods to be used must be in small
chips or raspings. When the wood is ordered to be
brushed over several times with the fluid, it should
be dried between each time. If the stain is wished
to be very deep, the wood should be boiled in the
stain.
Mix two ounces of Brazil wood, and two of
potash, in a quart of water; let them remain in a
warm place for some days, stirring them occasionally.
With this boiling liquid, brush over the wood
till it becomes of the requisite colour; then dissolve
two ounces of alum in a quart of water, and, while
the wood is wet, brush it over with it. For a pink
or a rose red, use double the quantity of potash.
Steep one ounce of turmeric in a pint of spirits
of wine; let it stand for several days. Brush the
wood over with it. A red yellow is made by adding
to the above a little gum tragacanth.
Brush the wood with a hot decoction of logwood,
then with common ink.
Boil one ounce of logwood and two drachms of
Brazil wood in a quart of water, over a moderate
fire. When one-half is evaporated, strain it, and
brush the wood over with it. When dry, brush it
over with a solution composed of a dram of pearl-ash
in a pint of water.
For a light stain, mix two ounces of madder and
one of fustic in a quart of water, and boil them all
together; a darker stain is made by using half an
ounce of logwood in the place of the madder, and
then brushing the wood with a weak solution of
potash.
All hard woods are easily polished; first, they
are made perfectly smooth and even, with the turning
tools, after which rub them with sand paper,
then with Dutch rushes, which, to prevent their
breaking into small pieces, should be steeped in
water. While using these, make the lathe turn
quickly round, sometimes one way, sometimes the
other, to prevent any unevenness, and keep moving
the sand paper, &c. &c., or the edges are apt to cut
lines. When this is done, and the work looks
smooth, rub over it a drop or two of olive oil, wipe
it clean with its own shavings, take it off the lathe,
and brush it with a very hard brush, the same as
those used for blacking leather.
As it is impossible to turn well unless your tools
are in good order, great care must be taken to keep
them very sharp. If a bit of the steel splits away,
as is frequently the case in turning hard woods,
grind it down till it becomes even again, then rub it
on the Turkey stone, with a little olive oil, till the
edge is so sharp that you cannot see it; for the
gouges and hollow tools, thick Turkey stones, rounded
at the edges, are sold, which enter into the
groove, and the outer edges are rubbed on the flat
stone.
As soon as the turner becomes quite master of
his tools, he will find ivory much pleasanter to work
than wood; it is not so liable to split, it turns
smoother, polishes with less trouble, and shows any
ornamental work much better than wood. But then
it is very expensive, and very difficult to obtain
good and white. New ivory may be bleached by
exposing it in the sunshine, and wetting it constantly,
or it will crack; but till the ivory is cut up, you
cannot tell whether it will be good or not. Pieces
may be bought cheaper that have a hollow in the
middle, they serve very well for pedestals of vases,
by screwing another bit into the hole, or for boxes,
by gluing in a piece of ebony to fit the hollow.
Ivory is polished before ornamenting, with putty
powder, ground very fine, rubbed on with a piece
of linen dipped in water, dry it, and rub very hard
with a bit of felt, and the polish will be beautiful.
But after it is ornamented, polish only with a brush
dipped in water and chalk, or even in plain water.
For dying ivory, it is first necessary to cleanse it
from the grease which it always contains, more or
less, and which would prevent its receiving the stain
or dye. For this purpose, mix half a pound of
nitre in an equal quantity of water, tie a string
round the pieces of ivory, and dip them in while
the liquor is hot, then plunge them into cold water.
Take half a pound of pieces of scarlet cloth, put
them into a clean earthen pot; add one ounce of
soft soap, after which pour in three quarts of soft
water. Boil all together for half an hour, stirring
it frequently, and squeeze the cloth several times,
to extract the colour. When this is done, have
ready an earthen vessel, put into it as much pulverized
alum as will lie upon a sixpence, pour the
scarlet liquid over it, and extract all the colour
from the cloth by pressing it in a canvas bag.
Steep the ivory in this liquor till it becomes of the
proper scarlet.
Boil a quarter of a pound of logwood shavings
in a quart of water, in an earthen vessel, for half
an hour. Steep the ivory in it.
On taking the ivory out of these boiling liquors,
immerse it instantly in cold water, to prevent its
cracking.
ELLIPTIC TURNING.
This machine is frequently called, by those who
do not understand the ellipse, an oval chuck; but
it is not oval, for an oval expresses an object that
is smaller at one end than at the other. Fig. 1,
plate 3, is a front view of the machine. I K is the
iron plate to which all the parts (except the ring,
hereafter described) are fastened. A screw, similar
to that on the nose of the mandrel, is riveted to
this plate, fig. W, and upon it whatever you wish to
turn is fixed. Fig. 2 exhibits a back view of this
machine; at each of the four corners there is a
short square pillar, marked D. Within these are
two narrow ribs of steel, reaching the whole length
of the plate I K. Each of them, being bevelled,
forms an angular groove, reaching all its length.
By means of these grooves the slider, F, moves up
and down.
Plate 4.
When the slider is in its place, two pieces of
steel, M M, bear upon the side pieces, to which,
and to the plate, I K, they are firmly attached by
four screws, X X X X. The plate, F, being cast
in the same piece as the slide, cannot be thrown out
of its place, but moves in a longitudinal direction
only, the nut, L, acting as a stop to prevent its
going too far. The space between the end pieces,
M M, is just equal to the diameter of the ring, O,
Fig. 3, upon the outside of which they revolve
when the nut is screwed upon the mandrel. Two
arms, R R, are connected with it, and in each there
is a groove extending nearly their whole length.
This machine is connected with the lathe, and its
motion obtained as follows:—E E, fig. 4, represents
a headstock, through which two holes are drilled,
the centres of which are precisely in a line with the
centre of the mandrel, M; the ring is fastened to
the headstock by two screws, I I, the shanks of
which pass through the grooves and through the
holes in the headstock. When the ring is in this
position, it will be perceived that it can only move
from side to side, and its centre must always be in
the same horizontal line with that of the mandrel.
Now screw upon the mandrel the nut, L, fig. 2.
The plate, I K, if set exactly opposite the mandrel,
will revolve in a circle; but if the centre of the ring
be the least in the world on one side of the mandrel,
it will revolve in an ellipse. When, therefore,
the work is fastened to the screw, W, it is quite as
easy to turn an ellipse as on the ordinary lathe to
turn a cylinder.
Of course, the slider must move with great steadiness
and freedom, to effect which, very great accuracy
in the workmanship must be observed. Figs. 5
and 6 are two different views of the machine,—5 is
the side, 6 the end view.
To turn a hollow sphere, the convex surface is
first turned, and perfectly smoothed and finished; it
must then be bored with a centrebit, to make an
aperture sufficiently large to admit the tool, fig. 7,
plate 1, with which the interior must be worked
away. As, however, it would require a large aperture
to enable you to hollow out the whole sphere,
it is preferable to make six openings with the centrebit,
each in a line with the centre; they must also
be made at equal distances from each other, and
every hole must be at right angles with all the rest,
except one, which is exactly opposite to it. Place
the sphere in a chuck, with the middle of any two
of the holes in a line with the axis of the mandrel;
turn out as much as you can of the first hole, then
bring the other holes forward and do likewise; at
last the excavations will be cut through.
To turn the Chinese balls, which are so much
admired for their beauty and curious workmanship,
we are told to proceed as follows:—As they are
composed of spheres one within the other, the holes
must be just deep enough to leave the thickness
between each little more than the diameter of the
smallest sphere. The work must be begun by forming
the innermost sphere, and afterwards it must be
continued regularly on to the larger, till at last the
outer sphere is completed.
An immense, almost an endless, variety of figures
may be worked in the lathe by carefully regulating
the tools. Beautiful flowers in ivory, equal to the
Chinese carving, are formed by the experienced
turner, with small wheels and other instruments:
medallions, even, are executed in the lathe, with
machinery so constructed that the tool follows on
the wood the exact lines of the head that is being
copied.
Gold and silver ornaments, such as watches,
snuff-boxes, and other trinkets, are worked with
what is called a rose engine; plates with patterns
indented upon them are fastened upon the mandrel:
the screw regulates the tool, which produces an
exact counterpart of the pattern.
Many of the copper cylinders used in printing
calicoes afford curious specimens of engraving in
the lathe. It is impossible to imagine any thing
more beautiful than the effect produced, and a whole
web of linen is printed by them in a very few minutes.
The methods employed in this kind of turning
by the various artists who practice it are but
little known; and, indeed, to look at the patterns
produced, it would be supposed that the graver must
have been used to form them. A general idea of
the nature of the work is all we are enabled to give.
The pattern intended for the cylinder must be cut
upon a small steel wheel, which revolves upon an
axis. This wheel is then to be held against the
copper cylinder, which, quickly revolving in the
lathe, carries it round, and receives from it the impression
of its pattern. The wheel operates like a
punch, but the roughness it makes on the edge of
the work is easily polished down.
Having now finished the directions for concentric
and elliptic turning, we will, before beginning the
ornamental parts of this interesting art, beg to impress
upon the minds of our readers that they must
never be discouraged by failure in their first attempts,
even though they may be subjected to many
disappointments; for, as the Bard of Avon expresses
it:—
“Oft expectation fails, and most oft there
Where most it promises; and oft it hits
Where hope is coldest, and despair most sits.”
ECCENTRIC TURNING. — THE DRILL.
Plate 5.
This name includes all the various, beautiful, and
intricate work for which the powers of a lathe are
so justly celebrated, and which, once seen, must be
admired by all who love the fine arts and examine
the powers of machinery. The eccentric cutter, the
drill, the eccentric chuck, and the universal, or vertical
cutter, are all indispensable for those who wish
to perform ornamental turning, and with them the
most delicate and intricate patterns can be worked
with a precision and accuracy that are truly wonderful.
A sliding, or parallel, rest is absolutely necessary
for turning patterns, as upon it, in some degree,
depends their exactness. Fig. 1, plate 5, is
the drawing of one. The foot, A, screws firmly to
the bed of the lathe, like the common rest, and the
upper part fits into the socket, B, and, by means of
the nut, C, is turned in any direction you wish.
D D is a bed of steel, five or six inches long;
through the groove down the middle is a screw which
passes from one end to the other, and, by turning
the squarehead, E, the tool slider, J, is pushed
backwards or forwards, while the rest itself remains
stationary. The steel bed is graduated. Between
the bed and the screw, E, is a small brass wheel,
divided into numbers, G; this regulates the position
of the tool. The tool slider, J, fits into the
bed, H, and slides in and out; J is the part where
the tool slips in, and it is kept firm by a screw, K.
The handle draws it to and from the work, and the
nuts ll, regulate the depths of the cuts. The
tools belonging to this rest, 1, 2, 3, 4, 5, are of
steel, about two inches long, and are ground to different
angles: there are various sizes of each. When
you intend to ornament a piece of wood or ivory,
first turn it quite round, and smooth it with the
common tools; you must then make the surface
perfectly flat, and to accomplish this, adjust the
sliding rest at a proper distance, put in one of the
round-ended tools, No. 5, let it just touch the wood
by setting the screws, ll; put the lathe in motion,
and gently approach the tool to the work; if it cuts
too deep, tighten the screws a little more; if too
little, push the screw forward. Keep the tool
steadily up to the work by pressing on the lever, S,
which impels the tool to slide forward, then, with
the right hand, turn the head, E, by means of a
handle, P, which will thus enable the tool slide to
run from one end of the brass bed to the other, at
the same time that the lathe is turning rapidly
round, and thus the surface of the wood is rendered
perfectly smooth, level, and polished. Sometimes,
however, it will require to be worked over in this
manner three or four times before it becomes quite
flat; and frequently, even when it appears level,
there will still be a hollow in the middle, which will
quite destroy the accuracy of the patterns: to discover
whether this is the case or not, take the T
square, see plate 1, fig. R; place it with its edge
against the wood: if you can see light between it
and the work, the surface cannot be even, and requires
smoothing over again. The next process is
to cut very delicate circles all over the work, at regular
distances: this is done to take off the bright
look of the wood, that the patterns may appear to
greater advantage. Put into the tool slide a double
angular tool, No. 4; adjust it so as to make a distinct,
but still delicate, cut into the wood. Make
one cut in the middle of the work; move the brass
wheel, G, one number, or from 1 to 2; make a second
cut; move to 3, then to 4, and so on: each circle
you will find enlarges gradually, till you arrive at
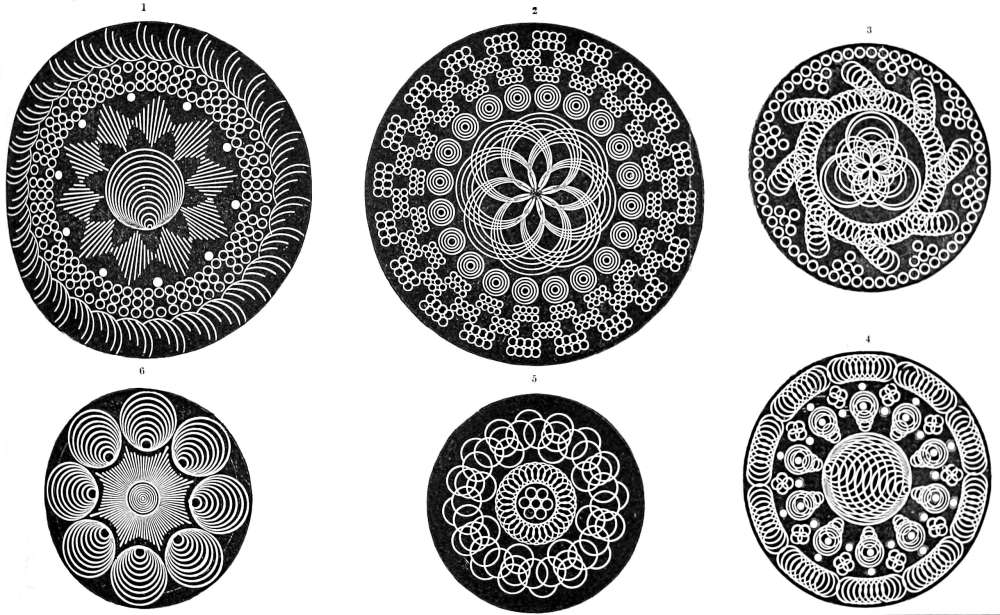
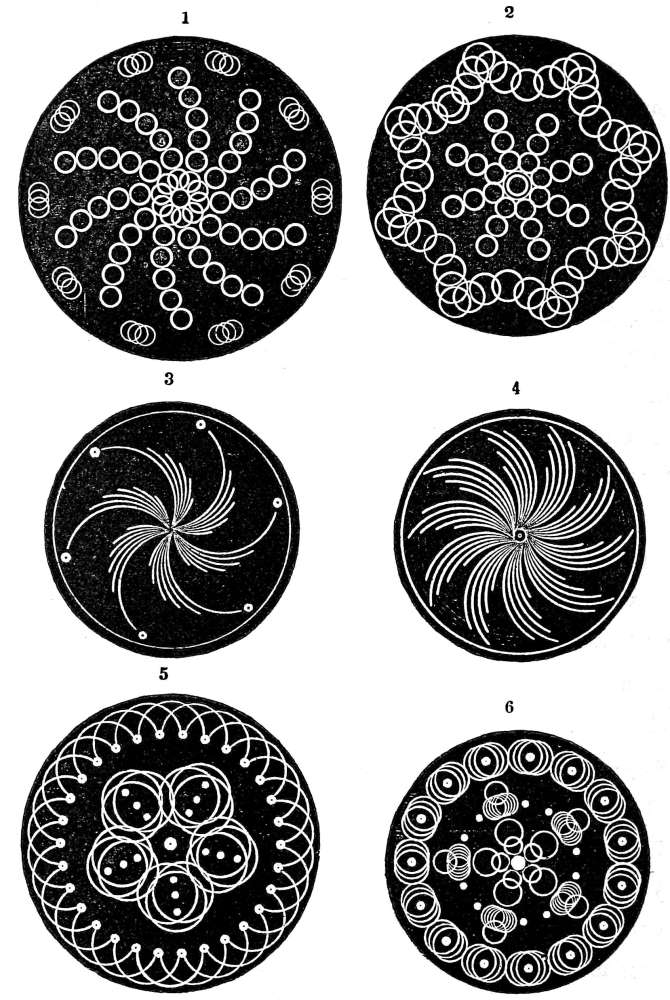
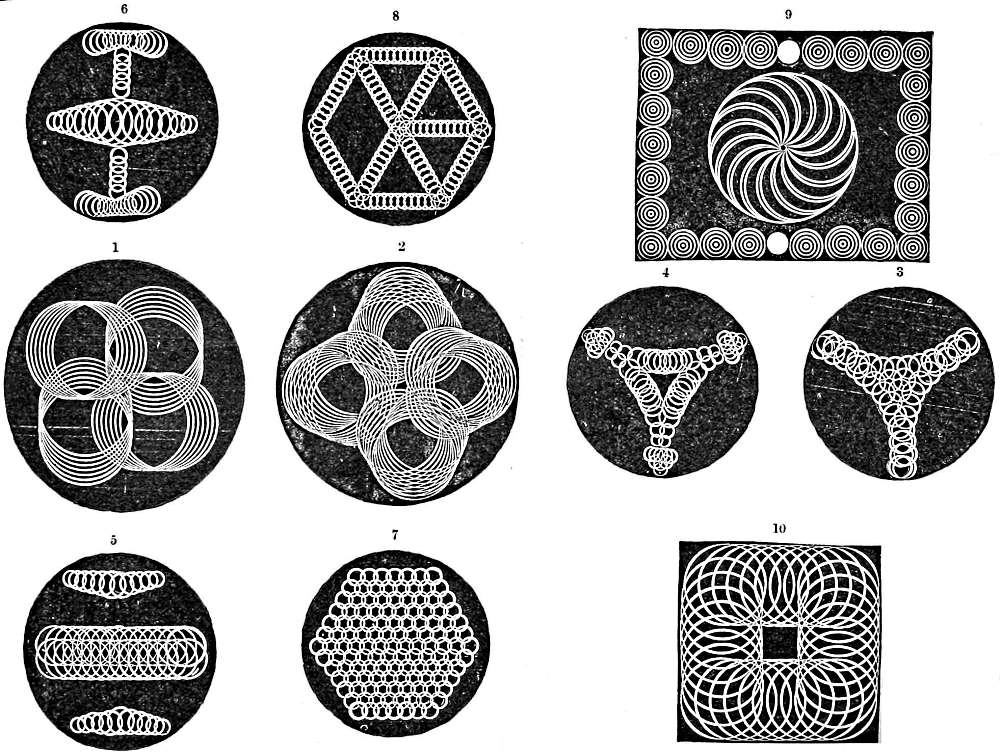
the end of the wood. Pattern 1, plate 6, is a specimen
of this work; but remember, it is merely a
preparation for other patterns. In doing side work,
as the side of a box, or a knitting-case, unscrew the
screw C, and turn the brass bed of the rest round
till in a line with it, then proceed as directed for
face work. The wood being ready, we will now go
on to give a description of the eccentric cutter,
plate 5, fig. 2. Like the tool slider, it fits into the
sliding rest, but now it is no longer the work which
moves round and the tool stationary, but the wood
remains firmly fixed while the tool rapidly revolves
and cuts the patterns. For this purpose, it is obviously
necessary that the fly wheel should turn the
cutter, while the small wheel remains immovable.
Several methods are used to perform this: the one
given plate 4, fig. K, is the easiest. The frame
here represented should be of iron, firmly screwed
to the bench of the lathe, and of sufficient height
to be about a foot above the head of the workman.
In front is a spindle, which works in two nuts, No.
1 1, exactly in a line with the mandrel. Two
wooden wheels, No. 2 2, are fastened to this spindle;
the one on the left hand remains stationary over the
fly wheel of the lathe, by which it is turned, the
other slips backwards and forwards, according to
the work it is required to do. Take off the usual
catgut from the fly-wheel, and pass a long one over
it, and over the small wheel on the over-head frame,
No. 2. When the cutter, 2, plate 5, is fixed in the
slide rest, draw the other small wheel on the spindle,
No. 2, forward, till just above the rest, then
pass a catgut over it, and round the small brass
wheel, B, of the cutter, and the whole will turn
together. The brass wheel of the lathe must then
be fixed at one particular number. It is usually
divided into three hundred and sixty divisions, each
marked by a small hole in the brass wheel, as in
fig. A, plate 4, and it is by properly dividing the
numbers on this plate that the accuracy of the patterns
depends; to keep the wheel steady, a small
steel key, h, plate 4, is slipped into the brass knob, O,
plate 4, and the other end, being pointed, enters into
one of the small holes, say the one marked 360;
the work is then immovable until you remove the
key into another hole. The cutter itself is of brass,
with a spindle, C, which works in two brass collars.
At one end is the wheel, B, by which it is turned,
at the other a steel frame, T D, which is marked on
the upper edge in small lines, E, to regulate the
quantity of eccentricity. The steel tool-box, F,
holds the tool, which is kept firm by a small screw
underneath. By means of a screw through the
frame, D D, similar to that of the sliding rest, the
tool is pushed backwards and forwards, and cuts a
large or a small circle. G is the nut that moves
it, and it also is divided into numbers. This cutter,
for many patterns, is quite as useful as the eccentric
chuck, but, in conjunction with the former, is invaluable,
and the patterns performed by them may
be multiplied according to the taste and genius of
the turner. The two screws, H H, fix the depth of
the cut; the wheel of the sliding rest determines
the necessary distance, that of the cutter the eccentricity,
while the brass wheel keeps the pattern accurate.
The tools, Nos. 1, 2, 3, 4, 5, plate 5, are
of various forms and sizes: care must be taken not
to break them, and the cutter must be constantly
well oiled with olive oil; the holes, K K, are made
to receive it. In using this tool, make the wheel
of the lathe go very quick, but approach the tool
very gently and slowly to the work. The better to
do this, the lever, S, is used; it enters into one of
the holes in the side of the cutter, and into a
similar one in the sliding rest, so that by a slight
pressure the tool is impelled gently forward. There
are generally about two dozen tools shaped like
those in the plate, but of various sizes.
To imitate the second pattern, plate 6, which, it
will be perceived, is a number of circles, slide the
cutter towards the edge of the work by turning the
screw of the slide rest, then, to make the outer
circle of the border, turn the small nut, G, of the
cutter six times round; put a double angular tool
into the tool box, screw it firmly, adjust your cutter
by the screws, H H, to the proper distance, and
stop your wheel with the steel key at 360. Cut
one circle, alter your wheel thirty numbers, cut
another circle, then thirty numbers more, till the
twelve circles are all cut. This done, alter the
wheel fifteen numbers, which will make the circle
cut half through two of the former ones, then move
30, as before, till the twelve are done. For the
small inner circles turn the nut, G, of the cutter
two turns back, to reduce the size, and move 30 as
before. The pattern in the middle is still circles,
though differently arranged. Draw back the cutter
till a little past the middle of the work, then unscrew
the nut, G, fifteen turns, cut one circle, move
the brass wheel 15, cut another; move 15, cut
another; then move 45, cut another; move 15,
then 15, and so on till all are finished.
Third pattern.—Set the cutter at five turns, and
move five numbers on the brass wheel for every
circle. For the middle pattern, turn the nut of the
cutter eight times, move ninety numbers on the
wheel, till four circles are cut; then move 45, cut
another; then 90 again. To make the small circles,
turn the nut, G, backward two turns, and
move 90 as before, for the four first circles; then
move 45; then 90 to the end.
Plate 6.
Fourth.—The border of this pattern is the same
as the one in No. 3, only you place a piece of wood
about a quarter of an inch in depth across the bed
of the lathe, letting it pass half under the slide
rest; screw the rest down firmly, and proceed as
above. By thus raising the rest in a slanting position,
half the circle only is cut, which has a very
pleasing effect. For the centre pattern, set the
cutter at a small circle, cut one in the middle,
having the wheel fixed at 360. Then move the
brass wheel of the slide rest, plate 5, three numbers
for each circle; these done, return to the middle
circle and continue the same to the other end.
Then move the brass wheel of the lathe to 45, and
repeat as above, three numbers for each circle, till
the next row is finished; then again move forty-five
numbers on the large wheel; and so on to the end.
Fifth pattern.—Set the cutter at a large circle,
the brass wheel at 360. Move 5 for four circles,
then move 15, then 4 four times more, then 15
again, and so on to the end. For the middle, set
the cutter to a small circle, and move the brass
wheel of the lathe 90 four times.
Sixth pattern.—Set the cutter to the largest circle
it will make, begin in the middle of the work,
set the wheel at 360, and move ten every time.
To assist the beginner, a drawing is given of the
wheel, supposing the largest number to be 360, A,
plate 4. By this the numbers are all arranged; a
table of the divisions is also given; for on the
proper and accurate calculation of the numbers depends
the exactness of the patterns. The plate on
the wheel divided at 144 is the plate for marking
half-circles and arcs, as in plate 12, fig. 3, which
shall be described hereafter. These patterns are
very beautiful, and, from the arcs being gradually
reduced in size, they have a curious and elegant appearance,
but they cannot be worked without an
eccentric chuck.
The drill is a most useful auxiliary to the eccentric
cutter, not only for drilling holes, which it does
with great nicety and speed, but also for making
mouldings and patterns of various kinds. Unlike
the cutter, which moves either in a large or small
circle, the drill can only work upon its own centre,
and therefore the size of the pattern depends upon
the tool placed in it, its position being regulated by
the screw in the sliding rest, into which it slips like
the cutter. It is turned by a rope exactly the same
as in the directions already given for the eccentric
cutter, and greatly resembles it in shape, except at
the end, A, plate 7, which is made just to receive
the tool, and a small screw keeps it firm. Suppose
you wish to ornament anything—say, the pen-holder,
plate 9—with concave mouldings, as in A. Having
set the rest, by the aid of the T square, exactly in
the same slanting direction, put a round-ended tool,
No. 3, into the drill, set it to the proper distance,
fix the brass wheel at 360, cut a round hole; move
the wheel to 72, cut another, and so on till five are
drilled; then, without altering the rest, put in a
smaller round-ended drill, hold it by means of the
lever well up to the work, make the large wheel go
very quick, and slowly turn the screw of the slide
rest, so as to impel the drill which ever way you
wish. Do not cut too deep at first, or you will
break the tool; if a great depth is required, go
over in the same line three or four times. This
done, count 72, as before, and proceed the same; the
pattern will have the appearance of the pen-holder
in the drawing. The end, B, after being turned
to the shape, is ornamented in small holes, that
resemble a honeycomb, in the same manner, with a
round-ended drill; counting so as to make them fit
nicely between each other. To do this, you must
be able to subdivide your first numbers. Thus, suppose
you drill a round hole at 1, 40, 80, and so on
till you come to 360, these numbers can be divided
by beginning the next row (which must be begun
the breadth of the tool from the former one, by
turning the slide-rest screw half, or a whole turn,
according to the breadth of the tool) at 20, then
count forty numbers as before; but if you had
taken forty-five instead of forty for your number,
you could not have divided it evenly in the second
row, so as to make the holes intersect each other.
Be very careful to remember how many times you
turn the slide-rest wheel, that each cut may be of
equal length. There are generally about four
dozen tools belonging to the drill, of various sizes,
but of the shapes given in plate 7. Nos. 1 and 2
drill large or small holes, as for instance, round the
sides of a turned pincushion, or needle-book, for
the stitches to go through; 3 is used to make concave
mouldings, or to cut quite through the work in
straight lines, as in the lighter case, E, plate 9.
This pattern looks very pretty, and is quite easy,
if your work is turned sufficiently thin; it should
be lined with coloured velvet. No. 4 makes concave
mouldings flat at the bottom; these tools are
also used to cut round dots: 5, cuts small or large
beadings, which give great lightness and finish to
the work. Having made a moulding with the hollow
tool No. 2 of the slide rest, choose a beading
tool that just fits the moulding, put it in your drill,
set it to cut sufficiently deep to be quite round at
the top; having cut one, count by the brass wheel
the proper distance, to make them fit close, but
without one spoiling the shape of the other; the
round dots on the bottom of the lighter case are
intended to represent these beads. Tool No. 6
cuts mouldings of the same shape as the drawing.
In using this and the tools Nos. 7 and 8, be careful,
after the first cut, where you place them for the
second, to make them fit; and in using all the drill
tools, make the lathe go as quick as you can, but
move your tool very slowly, and keep the drill slide
well oiled.
GONEOMETER. — CIRCULAR REST. — THE VERTICAL, OR UNIVERSAL CUTTER.
LIST OF NUMBERS ON THE SMALL WHEEL AND
ECCENTRIC CHUCK.
LATHE WHEEL.
CHUCK WHEEL.
No. of divisions for one cut.
No. of cuts to complete the circle.
Odd numbers.
No. of divisions for one cut.
No. of cuts to complete the circle.
Odd numbers.
No. of divisions for one cut.
No. of cuts to complete the circle.
Odd numbers.
1
360
—
1
96
—
1
120
—
2
180
—
2
48
—
2
60
—
3
120
—
3
32
—
3
40
—
4
90
—
4
24
—
4
30
—
5
72
—
5
19
1
5
24
—
6
60
—
6
16
—
6
20
—
7
51
3
7
13
5
7
17
1
8
45
—
8
12
—
8
15
—
9
40
—
9
10
6
9
13
3
10
36
—
10
9
6
10
12
—
11
32
8
11
8
8
11
10
10
12
30
—
12
8
—
12
10
—
13
27
9
13
7
5
13
9
3
14
25
10
14
6
12
14
8
8
15
24
—
15
6
6
15
8
—
16
22
8
16
6
—
16
7
8
17
21
3
17
5
11
17
7
1
18
20
—
18
5
6
18
6
12
19
18
18
19
5
1
19
6
6
20
18
—
20
4
16
20
6
—
21
17
3
21
4
12
21
5
15
22
16
8
22
4
8
22
5
10
23
15
15
23
4
4
23
5
5
24
15
—
24
4
—
24
5
—
25
14
10
25
3
21
25
4
20
26
13
22
26
3
18
26
4
16
27
13
9
27
3
15
27
4
12
28
12
24
28
3
12
28
4
8
29
12
12
29
3
9
29
4
4
30
12
—
30
3
6
30
4
—
31
11
19
31
3
3
31
3
27
32
11
8
32
3
—
32
3
24
33
10
30
33
2
30
33
3
21
34
10
20
34
2
28
34
3
18
35
10
10
35
2
26
35
3
15
36
10
—
36
2
24
36
3
12
Plate 7.
These tools are also useful for cutting out the
edges of work in vandykes, as in the top of the
lighter case, E, for which pattern the tool No. 8
was used, the gimped edge being cut with No. 2;
the end of the needle-case, D, in plate 9, is done
with a round-ended drill, No. 3, in the same manner
as directed for the end of the pen-holder. In
the patterns Nos. 1 and 6 of plate 11, the straight
lines near the centre are cut with the round-ended
drill.
All the eccentric tools require the greatest care
in sharpening, and the above ingenious machine has
been invented for this purpose; it is represented at
P, in plate 4. The upper part, 1, is a plate of
brass, the outer edge, 2, is graduated as high as 50
each way, beginning at the tongue, 3. Beyond the
numbers is a groove, in which one end of the tool
slide, 4, slips, and is firmly fixed (so as to point to
any of the numbers that suit the angle of the tool)
by a nut underneath. The whole plate, 1, is raised
and lowered at pleasure by a small hinge at 5, and
the requisite height is fixed and settled by counting
the numbers on the steel tongue, 3. Underneath
is another brass bed with two feet, upon which the
machine rests, while the front part leans forwards
and rests upon the end, 5. The box that contains
the goneometer has three drawers in it; the first is
lined with brass, except for about three inches in
width, which space is covered with fine Turkey
stone. To use this machine, take out this drawer,
lay the feet of the goneometer on the brass, put the
slide-rest tool, No. 4, into the tool box, screw it
firm, then slide the tool box along the groove till it
arrives at the proper angle, say 45; fix it with the
nut underneath, then raise the whole brass plate, 1,
sliding it along the tongue, 3, till at the exact
height necessary for the tool to touch the Turkey
stone. Rub it backwards and forwards upon it
with oil. When one side is sharp, move the tool
slide to the opposite angle, to sharpen the other.
The small eccentric tools are placed in the steel
case, U, and the case fits into the tool slide.
The rest we have already described, called the
Parallel Rest, works, as its name sufficiently expresses,
in a straight line; it is therefore useless for
ornamenting spherical objects, and the circular rest
has lately been invented to supply this deficiency.
It is a most ingenious contrivance, and perfectly
fulfils the purpose for which it was invented.
Plate 8.
The bed, A A, is the same as in the parallel rest,
and screws in the same way to the bed of the lathe.
B is a brass socket and pillar, which support the
bed C, in which the tool box slides; they are formed
in the same piece with the lower bed, L L, and
firmly fixed into the lower part, which is grooved,
by four brass-headed screws, N N. The grooves
enable the whole socket and tool box to slide backwards
and forwards on the bed of steel, D D, and
by means of the screw which passes through it the
workman regulates the advance or retreat of the
rest to or from the work in a straight line, while the
lower part remains stationary. The small wheel,
E, is graduated, and turned by a key, to enable the
turner to count the distance. F is a steel spindle,
which works in two brass collars, G G; about half-way
down. The spindle is formed into a screw, O,
which turns upon the brass wheel, H, and by moving
the nut, J, moves the whole rest in a circular direction,
in the same way that the screw in the steel
bed, D D, impels it in a straight line: by this ingenious
contrivance all objects that are round or
spherical can be ornamented: such as balls, the
globular sides of vases, or small baskets, in every
variety of pattern. The learner will easily discover
the proper method of using this rest, which is very
simple in its mechanism and use. The nut, K, is
for setting the tool slider at different angles, the
same as in the parallel or sliding rest; the tools to
be employed are those of the above-mentioned rest.
Plate 7.
This cutter, which also fits into the slide rest, is
different from the others; and, as its name denominates,
the patterns it can cut are almost endless, for
it may be turned in any direction. The bed of the
slide is the same as with the drill; at the end,
No. 1, is a screw, which, when turned by the key, B,
inclines the tool-holder, 2, to any angle that may
be required, and it is regulated by the lines on the
brass plate, 3, which are marked by a small steel
point; so that if you wish to cut out a pattern
slanting to the right, and another to correspond
slanting to the left, you have only to mark the number
on the plate, where you cut the first, and then
with the key move the cutter to the same position
on the opposite side. When the tool-holder, 2,
stands straight, as in the plate, the tool cuts horizontally:
when it is screwed down to the last line
on the plate, it cuts perpendicularly, but the cut always
scoops out; and by putting the tool as far out
of the holder as you can, the cut will be larger, and
the scoop deeper. The back support of the pulley,
4, moves with the tool-holder; and the pulleys, 5,
correspond with each; the back one is turned in
the same direction as the front one, by unloosing
the screw, 6. The gut, after passing over the
pulley on the over-head frame, comes through the
two back pulleys of the cutter and round the front
one, as in the plate; but when the cutter is screwed
flat, a short cord, the same as that used for the
drill, is sufficient; and the back pulleys are then
not necessary. This tool requires constant oiling
at D D, for the friction is very great; it also demands
much care and delicacy in using it, as it
must not be incautiously thrust against the wood,
or it will stick fast, and not turn round. There are
about four dozen tools, all of the shapes given in
the plate, but of various sizes. This cutter slides
into the slide rest, and the depth of the cut is, as
usual, regulated by the screws at the end, and the
cutter is brought to the work by the aid of the same
lever as is used for the drill and eccentric cutter.
The patterns cut by this tool are counted and regulated
by the numbers on the brass wheel, as with
the others. When the turner has once tried it, he
will readily discover its advantages for all kinds of
ornamental work, particularly for the sides of boxes,
needle-cases, and many other articles; but it is
needless to give many drawings of the patterns, as
they much depend upon the taste of the turner.
One beautiful design for a lighter case, or small
basket, is worked with this cutter with a flat-ended
tool. Turn the work very thin, chuck it firmly,
make one cut deep enough to allow the tool just to
cut through, and no more. Count thirty on the
brass wheel of the lathe every time; the next row
make the cut deeper, so that the opening will be
larger, then move 60. By this means a piece of
ivory will be left standing out, with openings cut
between, which, when lined with coloured velvet,
looks light and elegant. This row count sixty
every time; the next, thirty, as at the beginning.
Plate 9.
The needle-case in plate 9, fig. K, is entirely
ornamented with this cutter in a variety of patterns.
Figs. 1, 3, 4, and 8, are worked with the flat and
round-ended tools; 2, with the tool No. 6; 5 with
the tool 3; 7, with 4; and 6 with No. 6.
The bottle, B, is also ornamented with the same
tools. It is hollow down the neck, and is intended
to contain a tin or glass of water; in the stopper is
glued a small camel’s-hair brush, which rests in the
water, and is meant to be used for wetting postage-stamps,
and fastening them upon letters. The
bottom of the neck unscrews at fig. 1, and the part
below it is hollowed out like a box, to hold the
stamps. The neck is ornamented in steps. Set
the cutter quite flat, facing the side of the work;
use the tool No. 5; cut one line, move the brass
wheel of the lathe just far enough to make the
second cut join the first, and the same all round.
In the next row make the first cut half-way between
the others; thus, if you have begun at the
numbers, 1, 6, 12, in the second row begin at 3,
then go to 9, then to 15, and so on. Every row of
steps begins half-way through the former ones, and
for each row move the cutter on the slide rest the
breadth of the tool. The convex moulding at the
bottom of the neck is done by putting one of the
hollow tools of the sliding rest into a handle, and
rounding the ornament with it. The other patterns
are all done with the same cutter, by placing the
tools at different angles. In the same plate, 9, the
two patterns F and G are very beautiful, they are
worked with the eccentric cutter. F resembles the
scales of fish lying one over another: put the most
angular tool, No. 5, (of the cutter tools), into the
cutter; describe a circle from the edge of the
middle line to the outer one; cut one circle very
deep, move ten numbers on the brass wheel of the
lathe, and so on to the end.
The pattern, G, is worked exactly the same, only
a less angular tool, No. 4, is used, and fewer numbers
are counted: it resembles leaves, one lying
over the other.
The stopper of the bottle, B, is also ornamented
with this cutter, and with an angular tool. First
turn the stopper quite circular, (the knob at the top
must be glued in afterwards). Set the sliding rest
at a convenient distance, and place under it one of
the slide-rest tools, so as to raise it in an uneven
manner; screw the rest firmly, and set the circle
just large enough to encircle half the stopper. By
this means the tool cuts the UNDER part of the
circle, and passes over the other half: this pattern
must be cut very deep, and about five numbers be
counted between each cut on the brass wheel of the
lathe.
D is another pattern for a stopper; it is worked
with a round-ended drill. Cut the holes rather deep,
and as near as you can to one another, only leaving
a very little thin shell of ivory between them, and
the pattern will resemble a honeycomb. The lighter
case, E, is ornamented with the drill and vertical
cutter. Turn the upper part very thin, then drill
long lines quite through the ivory, leaving a space
between each; this looks light and elegant, if lined
with coloured paper. The base is cut in steps with
the vertical cutter; count twenty for each cut; the
second row, make each cut between the former ones,
moving for each row the breadth of the tool. The
top is cut out in leaves with the drill tool No. 8.
To sharpen all these tools, use the goneometer,
taking care that you fix it exactly at the proper
angle, by counting the position by the numbers. If
you do not place the tool just at the right angle,
it will cut the patterns quite crooked.
ECCENTRIC CHUCK. — PATTERN 2. — PATTERN 3. — PATTERN 4. — PATTERN 5. — PATTERN 6. — PATTERN 1, PLATE 12. — PATTERN 2. — PATTERN 5. — PATTERN 6. — PATTERN 1, PLATE 14. — PATTERN 2. — PATTERN 3. — PATTERN 4. — PATTERN 5. — PATTERN 6. — PATTERN 7. — PATTERN 8. — PATTERN 9. — TO LINE WOODEN BOXES WITH TORTOISE-SHELL. — TO FINISH THE SNUFF-BOX. — HORN TO IMITATE TORTOISE-SHELL. — MASTIC USED IN TURNING IVORY VERY THIN. — BEAUTIFUL VARNISH FOR WOOD, TO BE USED WHILE THE WORK IS ON THE LATHE. — TURNER’S CEMENT. — NEW AND VALUABLE RECIPE FOR TAKING BEAUTIFUL IMPRESSIONS FROM TURNING PATTERNS. — Transcriber’s Notes
“The centre mov’d—a circle straight succeeds;
Another still, and still another spreads.”
Plate 10.
Perhaps the most useful of all the additions to
the lathe is this chuck, for by its aid the turner can
alter the centre of his work as he pleases, producing
a great variety of circular lines of different
sizes, and other ornaments, which cannot be attempted
without it. The tools are those already
described belonging to the slide rest, which latter,
when used with this chuck, assumes quite a different
character than when employed with the eccentric
and universal cutters and the drill. With these
three, it merely serves to mark, by aid of its screw,
the distance they require to be from the work, and
the position in which they are to be placed, but does
not assist in the size or form of the patterns to be
cut; with the eccentric chuck, however, it is quite
different. The rest marks the size of the circles,
while the chuck fixes their position. Thus: suppose
you wish to cut a circle, or series of circles,
not as in the pattern, No. 1, plate 6, which begin
from the centre and gradually enlarge, but like
those in No. 3; the slide rest must be set to the
proper position, to enable the tool to cut the requisite
circle, and then the chuck must be screwed
down till the tool arrives opposite the exact place
where the pattern is to be worked. With this
chuck the over-head frame is no longer used; the
brass and fly-wheels being employed together, as in
common turning, the chuck having a wheel of its
own by which to regulate the patterns. In the annexed
plate, fig. 1, is a front view of the eccentric
chuck; fig. 2 is the same seen sideways.
A A are two brass plates, with a screw at the
back of them, as shown at P, fig. 2; by this screw
it fastens on to the mandrel of the lathe like a
common chuck. A A are so shaped as to admit of
D sliding up and down them, and the four screws
enable the slide to be tightened or loosened. Down
the middle of the chuck is a screw with a very fine
thread; it is turned at either end by the square
head, 3, and thus D slides up and down at pleasure,
but cannot in any way get out of its proper position,
and, above all, can never shake in its bed. E
is a brass wheel divided into 120 teeth, upon which
the distances are calculated, the same as on the
other brass wheel; in the middle of it, F, is a
screw, the same in size as that on the mandrel,
upon which the chuck that holds the work must be
screwed. The wheel, E, has a spring screw, which,
by turning back the spring, H, enables you to move
the wheel round as many numbers as you wish, and
the steel point, K, marks the one you wish to set it
at. L is a small wheel with four numbers marked
upon it; by setting it at O, the steel screw passes
from line to line of the wheel, E, fig. 2; by turning
it one line further, it stops at ¼; another line, it
stops at ½; and a third, at ⅓; thus enabling you to
cut your patterns as fine and delicate as you like.
The square heads, 3 3, are placed at each end of
the chuck, so that the plate D can traverse the
whole length, and thus enable you to ornament a
square or an oblong piece of work; both heads have
four numbers marked upon them, by which you regulate
the motions of the chuck. For instance,
when D D is screwed up level with the black line
O, the screw F will be exactly in the centre of the
lathe. Now, suppose the tool in the slide rest is
set to cut a very small circle, and you wish, having
done that one, to cut several others of the same
size round it, thus, you must turn the chuck
down one turn by counting the numbers on the
square head, No. 3; and having cut one circle in
the proper place, count as many numbers on the
brass plate, E, as are necessary to make them fit
properly. Should you wish to make a second row
of circles larger than the first, besides turning down
the chuck, you must, to enlarge them, turn the
screw of the slide-rest one turn forwards. All the
patterns already given for the eccentric cutter can
be done equally well with the eccentric chuck, except
the border pattern in No. 4, which can only
be worked by the cutter. Patience, calculation,
and attention will enable you to perform the most
beautiful, minute, and intricate patterns with the
eccentric chuck; but though I have endeavoured to
give many specimens, when printed they only in a
slight degree convey an idea of the real beauty of
this kind of turning; the depth of the cut will
wholly alter the appearance of a pattern, and the
same circles cut with another shaped tool present
quite a different appearance; in all, however, there is
one rule, which must never be forgotten—viz., be very
careful to make your wood or ivory perfectly smooth,
flat, and even, before attempting to ornament it, or
you will be disappointed by finding that your circles
are cut deep in one part and are scarcely visible in
another; also remember to line it, as directed when
treating of the slide-rest, for this gives much effect
to the work.
Plate 11.
Pattern 1, plate 11. Begin by the shell. Having
smoothed and lined your wood, put a double angular
tool (No. 4 of the slide-rest tools) into your rest;
turn the slide-screw till the tool is exactly in the
centre of your work, when, if you move the wheel
round, you will find the tool will only cut a dot.
The outer circle is the one with which to commence;
turn the slide-rest screw forwards ten whole turns,
and you will find you have the circle of the proper
size. Now approach the tool to the wood, cut the
circle carefully at first, till you decide on the proper
depth for the cuts; then set your screw guides,
and proceed as follows. For the other ten circles,
move the eccentric chuck downwards half a turn,
and diminish their size by moving the slide-rest
screw backwards half a turn, so as to keep the
lower part of each circle in the same place. To
have a good effect, shells should be well cut up—that
is, each circle should be of a sufficient depth
for the edge of the cut to meet the former one, and
thus efface the lines made in preparing the wood.
The rays from the centre are worked with the drill;
put a fine round-ended tool, No. 3 of the drill tools,
into the drill; place it in the slide rest, stop the
fly-wheel, arrange the cords, and set the tool with
the screw guides to cut very little at first. By
means of the slide-rest screw, push the drill forwards
till the tool touches the outer edge of the
shell; hold it well up to the work with the lever;
make the lathe go very quick, and move the drill on
the slide forwards very slowly, by turning the slide-rest
wheel round with the key 12 turns FORWARDS,
then the same backwards. Move 12 numbers on
the eccentric chuck wheel for each of the other
middle lines, and cut them as above; then move
the slide-rest half a turn forwards to shorten the
line, and move 1 number on the eccentric chuck
wheel, and cut a line moving the slide-rest 11 turns
forwards, by which it will be equally shortened at
each end. Move to the other side of the long lines
and do the same. The whole pattern is done in
this manner, counting one for every line on the
eccentric chuck wheel, and gradually shortening
them by reducing the turns of the slide rest. For
the third pattern, which would look better done in
dots than in circles, take away the drill, put back
the slide rest tool-box, and take a flat-ended tool;
set it to cut a dot about the same size as the circles,
just deep enough to efface the under lines, so that
each dot will look bright and shining. Having cut
one, count 2 on the eccentric chuck wheel for each
of the other 60; then screw the chuck downwards
2 turns, so that the next row may be just above
those already done; cut five dots, counting 2 numbers
for each, then pass over four and cut five more;
and so on to the end. The upper circle is worked
precisely the same as the lower one. The outer
pattern is done like the arc patterns in plate 12,
counting 5 for each arc on the eccentric chuck.
The middle pattern is formed of eight shells,
with only four lines in each; but these parts of
shells begin at the centre point, not round it, as in
the former pattern. Use a double angular tool,
screw the tool slide out 10 turns, and the eccentric
chuck downwards, till the outer or largest circle
just touches the centre; cut one circle, move 15
numbers on the eccentric chuck wheel; cut another,
and continue the same till the eight are done; then
diminish each as directed for the shell, counting 15
for every circle. The second pattern, of rings one
within another, is worked with the same tool; set
it to the centre point of the wood, screw it forwards
four turns, then screw the chuck downwards until
you can cut a circle just above the shells; count 6
numbers on the eccentric chuck wheel for each of
the 20: then diminish your circles by turning the
slide-rest screw backwards half a turn; do the
second row, counting 6 as before, and the same for
the two inner ones. A still prettier way of doing
this pattern is to cut steps instead of circles. Put
a fine flat-ended tool into the slide, set it to cut a
circle the same circumference as the largest in the
pattern; then reduce its size as before, and cut the
next deeper, by screwing out the screw guides a
very little; the third is still smaller and deeper.
A little dot should remain in the middle, standing
up as high as the level of the wood; to do this
pattern the wood must be thick, as the steps require
a certain depth. The outer pattern is done in the
same manner as that in pattern 1, only the numbers
are counted differently.
Count 40 on the eccentric chuck wheel for each
of the three large circles, diminish one turn of the
eccentric chuck. Then diminish the circle two turns
of the rest screw, and lower the eccentric chuck
two turns, and cut a circle every 20 numbers; the
others are done the same. For the second pattern
of circles, cut one for every number on the eccentric
chuck wheel; then move one number on the eccentric
chuck wheel, and move the eccentric chuck downwards
one turn, and cut a circle every 15; by
moving the chuck down, and advancing one number
every time, the circles are made to incline sideways.
The outer pattern is much the same as in the two
former ones.
This is a double shell in the centre. Begin with
the large circle, having fixed the eccentric chuck
wheel at No. 120. Having cut one whole shell,
move the wheel to No. 60, and work the other in
the same way. For the circles, keep the tool in the
same place on the slide rest, and screw the eccentric
chuck down two turns to clear the edge of the
shell; cut one circle every 12 numbers on the eccentric
chuck wheel, enlarge the circle by moving
the slide rest one turn forwards; cut the second
row, and so on till the fourth or largest one is done,
then diminish the size for the other two WITHOUT
altering the chuck, but counting the same. The
white dots are worked out with a flat-ended tool,
cutting one every six numbers on the eccentric
wheel; then move your chuck downwards three
turns, and cut one every 12; this done, move back
to the former row to the dot that comes between
the circles, replace the double angular tool, enlarge
your circle, and cut one every 12; screw the chuck
downwards three turns, and proceed the same; then
screw the chuck upwards one turn and a half, which
will bring your tool to a level with the middle of the
two former circles; move the eccentric chuck wheel
one number on each side of the former ones, and
the rosette will be finished. The border is formed
of plain circles, omitting 3 numbers every ninth cut.
The middle and second row of circles are too
simple to require explanation. For the clusters of
rings, begin with the middle row; cut two a little
apart from each other, then one through the middle
of them, and so on to the end; set the eccentric
chuck wheel to the middle circle of one of the clusters,
and move the eccentric chuck downwards, till
the tool can cut through the middle of the others,
then upwards the same number of turns. The extra
half circle is made by moving the wheel of the lathe
with the hand, as for the arc patterns, and counting
the numbers on the eccentric chuck wheel, between
those already formed.
This is merely a circle of shells, worked the same
as in pattern 1; only with this difference, that each
circle is done to correspond in each shell, instead
of working every one separately, which would be
more tedious; 15 is counted on the eccentric chuck
wheel for each row of circles. The rays in the
middle are done with the drill; these can also be
done without an eccentric chuck; the numbers must
then be counted on the fly-wheel, which, for this
kind of line work, is kept steady with the stop.
Cut a small circle, then one every 12 numbers on
the eccentric chuck wheel. Move the chuck downwards
two turns, and the eccentric chuck wheel 1
number, either backwards or forwards; if the
former, the rows of circles will incline to the right;
if the latter, to the left. Proceed the same for
every row of circles, always counting twelve between
each, and advancing the chuck 1 number at
the beginning of every new row.
Begin with a small circle in the middle, then
turn the eccentric chuck down two turns, and cut
one every 15. For the other two rows proceed the
same, lowering the chuck two turns, and counting
15 for each on the eccentric chuck wheel. For
the chain work, cut a circle every 15 near the edge;
then screw the eccentric chuck one turn upwards,
move 1 on the eccentric chuck wheel on each side
of the others; thus, if the upper row of circles
begin at 120, the second row will begin at Nos. 1
and 119, then at Nos. 14 and 16, and so on: the
third and fourth rows are the same as the two first;
and the last is cut between the others.
Plate 12.
Patterns 3 and 4 are called arc patterns, and are
worked in a different manner. In plate 4, fig. A
is a drawing of the brass fly-wheel of the lathe,
with the numbers marked upon it. D is a brass
circle half an inch wide, which is attached to it:
and upon which are marked 144 lines, every 18 of
which is described by a number. B B are pieces
of brass which, by means of a groove in the edge
of the circle, fit upon two steel slides that fit into
the groove, and are kept firm by two nuts, which
fix them opposite any number you wish. P is a
long thin piece of steel, which enters by one end
the bed of the lathe, so as always to stand quite
upright, by which means, when the brass fly-wheel
is gently turned with the hand, the flat end of the
stop, P, catches upon the lower piece of brass, B,
and if you reverse the motion of the fly-wheel, the
other piece, B, will rest upon the stop, so that you
will find the wheel can only turn half or three parts
round, just as you choose to set the stops. These
patterns, it will immediately be seen, are worked
with the hand, which must guide the wheel slowly
up and down; therefore slip off the cord, and
having arranged a double angular tool in the slide
rest, hold it up to the centre of the work, put the
stop, P, into the hole, n, of the bed of the lathe,
and gently move the wheel till you find the extent
of circle you wish to cut; fasten on one slide
firmly, then fix the other end of the arc, and fasten
the other slide. This done, approach the tool carefully
to the wood, and cut the first long arc by
moving the fly-wheel with your left hand as far up
and down as the stop will allow; then move 20
numbers on the eccentric chuck wheel for every one
of the other five arcs, and cut them in the same
way. After these are completed, move one number
on the eccentric chuck wheel and unscrew the
UPPER slide, and move it down as many lines as
you think fit, in order to shorten the next arc;
count 20, as before, for every other of the 5. Each
row is worked the same, shortening the arcs and
advancing one number on the eccentric chuck wheel
for each row. Pattern 4, and the border in pattern
1, plate 11., all are done in the same manner, only
counting differently. A great variety of arcs can
be worked, and have a very curious effect, but you
must be careful in cutting them not to let the tool
go too deeply into the wood or ivory, or it will
either stick fast, or else cut jagged, uneven arcs;
rather prefer to spend more time over the work, by
working the arcs over and over again till the proper
depth is obtained.
These patterns will enable the learner easily to
discover and invent many others, all beautiful when
properly and neatly worked.
Cut a circle every 24 numbers of the eccentric
chuck wheel. Lower the chuck one turn, and cut a
circle on each side of the former ones, so as to form
the five knots of threes. The edge is worked like
the arc patterns, making each half circle meet and
join with a dot, cut with a small flat-ended tool.
For the border cut three circles, one for each
number on the eccentric chuck wheel, then cut
another at 6, 7, and 8, and so on till all are done.
The pattern in the middle needs no explanation.
Plate 13.
Plate 13 contains several specimens of eccentric
turning. The temple may be made either of wood
or ivory, and be left open, as in the plate, or have
a coloured card-board case made to fit inside it.
The upper and lower parts of the pillars, six in
number, are fluted with a round-ended drill, but the
middle parts are worked with the eccentric chuck,
and are curious specimens of its powers. They
much resemble a spiral staircase, and though at first
sight they may appear difficult, yet they are not so
when properly explained. Begin by turning the
wood or ivory perfectly cylindrical with the slide-rest
tool. This done, screw your eccentric chuck
one turn downwards, and turn the screw of your
rest one turn forwards, moving 12 numbers on the
eccentric chuck wheel for every step. As this requires
great nicety, delicacy, and care, (the cuts
being very deep,) you must no longer depend upon
the lever to approach the tool (which is No. 1, of
the slide-rest tools) to the work; instead of using
it, screw one of the screws, L, at the end of the
tool slider, to the deepest cut, and leave it so; then,
as you push the tool against the wood, gently unscrew
the other screw, L, till the first one prevents
its cutting any deeper. For every step, move
exactly the breadth of the tool. If the piece you
are working is thin and long, it will be necessary to
use the back puppet; in which case remember to
draw it away from the wood at every change of
movement; for, of course, when the eccentric chuck
is altered, the centre of the work becomes altered
also. Nos. 1 and 2 of plate 13 are different patterns
for pillars, both worked without the eccentric
chuck. The depth of the cuts, it will immediately
be seen, form the steps. The rings now demand
our attention; the tool used for forming them is
No. 6 of the slide-rest tools, plate 5; one side of
the tool cuts the outer; the other, the inner part
of the rings. Put the tool into a handle, where it
must be held firm by a screw; the same handle will
be very useful to hold the slide-rest tools for making
mouldings and delicate ornaments. The end of the
ring tool, No. 6, being very sharp, cuts a road for
itself into the wood or ivory, then press it gently to
the left, till you find one half of the ring is formed,
which will be seen by its filling up the half circle of
the tool; then remove the tool to the outside of the
work, and press the other side against it till the
ring falls off. It is a good way to turn a small cup
and line it with velvet, or some soft article, into
which to allow the rings to fall, as the delicate ones
would be apt to split by striking against the steel
bed of the lathe. To form the chain, cut the rings
carefully through on one side with a sharp penknife,
and slip them one through the other. The handles
of the temple are large rings, the pins they hang
upon are of wood. Flatten the knob either with a
file or a small saw, and drill a hole through it to
receive the ring; the pin is then glued into the
moulding.
The ball at the top is turned quite round, and
may be ornamented with the circular rest. The ball
pendant from the chain is circular, except on one
side, where a small pin is left, through which drill a
hole and slip the ring through it. All the ornaments,
pillars, and flutings may be made of separate
small pieces of ivory, which, when worked, are easily
fastened together by a strong cement made of isinglass
melted in gin. The top of the temple may be
worked with the universal cutter, or the drill, and
the feet are turned quite round, and then ornamented
with the eccentric cutter, as directed for the stopper
of the bottle, B, plate 9. The needle-case, E, in
plate 13, is also a specimen of curious turning; the
whole thing should be of ivory, or else the twists of
ivory, and the pillar in the middle of cocoa, or some
dark wood. Turn the ivory perfectly cylindrical,
and hollow it very carefully; this done, throw your
eccentric chuck four times outwards, the screw of
the sliding rest one turn downwards, and the eccentric
chuck wheel four numbers for each plate. The
other twists are each worked exactly the same, and
they must have a small pin left at either end, which
is glued into the moulding. When your centre
pillar is hollowed, fit the twists to it.
Another method for working this pattern is with
the aid of the drill, and by this means the twists
are in the same piece of ivory as the pillar. Having
formed a smooth cylinder, hollowed it out, and made
the screws, take your largest flat-ended drill, and
drill fifteen holes round the pillar, or one at every
eighth number of the eccentric chuck wheel. Your
ivory must be very thick, to enable the tool to cut
very deep. Having cut one row of holes, slowly
and carefully, you must move the sliding rest forward
two turns, then cut another hole every eighth
number again; do a third circle the same, moving
the chuck and slide the same every time. Now
examine your work, and see whether the twists
begin to appear. They should, as in the plate, be
quite separate from the ivory tube in the middle,
being only joined at the top and bottom. For this
no exact rule can be given, as it depends on the
circumference of the work: if very large, the tool
must cut very deep to detach it: but, after trying
two or three times by these directions, it will be
found quite easy. As the ivory twists are, of course,
very delicate, and the least jar in working is apt to
break, do not use the lever, but employ the screw
guides, as directed for the spiral turning. Line the
ivory before beginning the twists, and leave about
half an inch at each end, which you can ornament
with the cutter: this gives strength to the work.
For the same reason, it is advisable to cut one piece
of your ivory longer than the other: on the shorter
one make the outside screw, and below it about half
an inch of ornament; on the other, make the inside
screw, and work it with the cutter to correspond
with the other part, quite beyond where the screw
extends. When screwed together, it will not be
perceived that the two pieces are not even; and as
the part where the inner screw is worked is, of
course, thin, you would have no thickness for the
spiral pattern. When one end is finished, put a
fine double angular tool into your cutter, and very
carefully cut some circles at regular distances between
the twists: this adds much to the curious
effect of the patterns: to do it, work backwards,
counting the same numbers on the chuck wheel and
on the sliding rest as for the twists.
Patterns that are not cut deep can have the impression
taken off on paper, either by slightly rubbing
the wood over with printers’ ink, and laying
upon it silver paper, which must be pressed down
upon it; or by laying the paper on the wood, and
rubbing it well with a piece of lead melted into the
shape of a pencil. Patterns on ivory also look very
well by rubbing a little printers’ ink well over them
till the lines are full of it, then wipe off the superfluous
ink from the surface, and the design will be
black on a white ground.
An immense variety of most beautiful and intricate
patterns are worked with the eccentric cutter,
in conjunction with the eccentric chuck; indeed,
many of those formerly supposed to be only done
with the double eccentric chuck, invented by Mr.
Ibbetson, can be worked by these two when used
together, but they require much patience, and
knowledge of the powers of the eccentric chuck, to
enable the learner to use them properly. When the
eccentric cutter is used, always set the tool exactly
in the centre of the work, at its lowest degree, before
you begin any pattern, or you will never be
quite sure that your work is done straight; when
once you have settled the centre, the patterns will
diverge regularly and evenly from it. In the patterns
we are going to describe, the slide rest fixes
the position of the tool; the chuck must be screwed
down to the proper situation to meet it, and the
cutter tool must then be screwed out to cut the
circle required.
This pattern is formed of four groups of circles,
containing seven in each. Your wood being perfectly
smoothed and lined, set the cutter tool (a
double angular one) at its lowest degree, exactly in
the centre of the work, so that if moved it would
only cut a dot. Unscrew it eight or ten turns to
make a large circle, then by impelling the cutter
box forwards with the slide-rest screw, fix it so that
the tool cuts the circle a little over the centre: arrange
your screw guides: having cut one circle,
count 30 on the eccentric chuck wheel, and the
same for the other two. It will be observed that
these four groups go in straight lines, each towards
the edge of the work; to perform this, in the six
following rows of circles, move the slide rest forwards
half a turn, and the small wheel of the
eccentric chuck half a turn upwards for each row
of four circles, counting 30, as before, till the
twenty-eight are all done.
Plate 14.
Arrange the circle a little smaller than for pattern
1, and on a level with the centre point of the
work. Set the chuck wheel at 120, cut a circle;
then one at 15, 30, 45, 60, 75, 90, 105, when you
will find the eight outer circles of the pattern are
formed. Then move the slide-rest screw forwards
four numbers, and to No. 1 on the eccentric chuck
wheel; then to Nos. 14-31, 44-61, 74-91, 104.
By following the same rule in the other circles you
will find the pattern is not difficult, though at first it
may appear very intricate. As all depends upon
properly counting the numbers on the eccentric
chuck wheel, to make the calculation more easy, I
give the proper numbers for the sixteen circles
composing one cluster, and you will then see that
the others can readily-be done the same, always
remembering to move the slide-rest screw forwards
four numbers for every row; 1, 15-2, 14-3,
13-4, 12-5, 11-6, 10-7, 9-8; the latter
single number forms the centre or outer circle near
the edge.
This pattern requires great attention and care to
work it properly. Having arranged the cutter tool,
screw it out four turns to make the circle the proper
size, then move the cutter to the edge of the work,
cut a circle at Nos. 120, 40, and 80, on the eccentric
chuck wheel, then set the wheel at 20, and leave it
fixed. Your next operation must be to screw down
the eccentric chuck, and alter the position of the
tool on the slide-rest, till, by laying your hand
on the fly-wheel and moving it gently, the tool of
the cutter appears to describe a half circle across
the wood, in the same way as for the arc patterns.
Having arranged the first arc, move 40, as before,
and see whether the second will exactly meet it,
then the third; they should each diverge from the
centre of the first circles which were cut round the
edge; if they do not exactly fit, move the chuck
up and down, and the slide-rest screw backwards
or forwards, till you find the exact position; as,
however, the arc is difficult to settle, the line being
of course an imaginary one, as the tool must not
touch the wood, it is a good way to cut a piece of
pencil to fit like the tool into a box, and with it
mark the arcs; they will easily rub out, and thus
you will be able to be more certain of your proper
distance and position. The next thing is, to see on
the fly-wheel of the lathe how many numbers are
required to form the arc; thus, if it begins, as the
one I have worked did, at 360 of the brass wheel,
and ended at 85, stop the wheel at the former
number, cut a circle, then one at every fifth number
on the same wheel, till you arrive at 85; then move
forty numbers on the eccentric chuck wheel, and do
the other arc the same; then the third one.
The arc pattern is first worked: arrange it as
directed for pattern 3, and mark the outline with a
pencil: in this, the arc began at 280 of the fly-wheel,
and ended at 168, making in all 116 numbers;
to divide 58 for each half of the arc, divide
them thus—4, 5, 6, 7, 8, 9, 10, 3, 4; then count
back 4, 3, 10, 9, 8, 7, 6, 5, 4. You will see that
the numbers increase one every time or for every
circle, which also is enlarged one notch for each.
Having made the three arcs fit by marking their
position with the pencil in the cutter box, cut a very
small circle at 280, enlarge one notch, count 5, cut
another, enlarge a notch, count 6, and so on till
you have counted, in all, 49 numbers; do not enlarge
the circle, but cut one, counting three numbers,
then 4, which will be the middle, then 4 again,
then 3, then 10; after 10, decrease the circle one
notch for every cut, and count backwards, 9, 8, 7,
6, 5, 4. The other three arcs are done the same,
by counting 40 for each on the eccentric chuck
wheel; for each of the crowns cut five circles just
above the arc, by counting one number for each
circle on the eccentric chuck wheel, then lower the
chuck one number, and cut the same circles again
through the others; lower it half a turn more, and
cut two circles; then half a turn again, and cut
one circle above and between the last two.
Set the cutter to the middle, enlarge the circle
four turns; then turn the slide-rest screw two numbers
to the right, cut one circle, and for each of the
other eleven, screw the chuck down one turn, then
return to the middle and cut eleven the other way.
When 23 are finished, screw the slide rest to the
left four numbers, and cut 23 more exactly in the
same manner. To work the side patterns begin by
that on the right, set the cutter to the middle of the
work, unscrew it two turns, move the cutter slide
twelve turns to the right on the slide-rest, cut the
middle circle, enlarge one number of the cutter,
lower the eccentric chuck one turn, and, to keep the
outside of the circles in a straight line, move the
screw of the slide-rest inwards half a number: proceed
the same till the nine circles are cut, then
return to the middle circle by counting back nine
turns of the eccentric chuck, nine numbers of the
cutter, and four and a half numbers on the slide-rest;
proceed exactly in the same way to cut the
other eight circles, only raising instead of lowering
the eccentric chuck one turn for each circle. The
opposite pattern is worked the same, only taking
care to turn the slide-rest screw outwards the half
turn for every circle, or the straight pattern will
come contrary.
In all these straight patterns take great care that
the fly-wheel is stopped in such a manner that the
eccentric chuck stands perfectly upright: to do
this, hold the T square against one side, and make
a mark on the brass wheel for the stop to enter.
When you are quite sure that the chuck inclines
neither to the right nor the left, drill a small
hole in the wheel sufficiently deep for the stop to
hold it quite firm. You will then find your patterns
will always come straight.
Set the cutter to the centre, enlarge the circle
six turns, cut one, diminish one number on the
cutter for each of the other eight circles, and move
the eccentric chuck downwards one turn for each.
Count back to the middle circle, and work the other
eight the same. The side patterns are done much
like those in pattern 5, only the large circle is in
the middle, and the straight lines incline inwards.
Set the cutter to the middle of the circle, enlarge
it two turns and a half, cut a circle in the
middle, turn the chuck down two turns, so as to cut
another a little into the former ones; continue the
same till the seven are done; return to the middle
circle, and cut the other six in the same line, by
screwing the eccentric chuck upwards instead of
downwards. When the thirteen are completed,
lower the chuck one turn, and screw the slide rest
outwards (if doing the lines to the right) two turns,
cut a circle, then move the eccentric chuck downwards
as before, till the second line of circles is
cut, each line diminishing one turn of the eccentric
chuck at the top and bottom.
Set the cutter to the middle, enlarge it two turns,
turn the slide rest outwards twelve turns, cut a
circle near the edge; count 20 on the eccentric
chuck wheel, cut another, then 5 more, each distant
twenty numbers from each other. To make the
circles join in straight lines, screw the eccentric
chuck downwards two turns for every one; when
the outside pattern is done, return to the middle
circle, and cut the other lines the same.
Square patterns require great care in working
them. First saw the wood perfectly square; then,
when on the lathe, take the T square; hold the flat
edge firm on the bed of the lathe, and the handle
against one side of the wood, till both are even,
then fix the wheel of the eccentric chuck to that
number. Having with the cutter worked one row
of patterns, move the chuck 30 numbers, which, if
the wood is quite square, will enable you to do the
second row; then 30 more for the third side, and
30 for the last.
We are told, that French and Italian turners
often line boxes with the peel of the Bergamot
orange; they cut a circle through the peel, and
carefully strip it off in two quarters, turning the
inside out, and drying them; the scent is very
powerful; of course they can only line globular
boxes the size of themselves.
As many of my readers may wish to line their
snuff-boxes with tortoise-shell, I think it needful to
give some instructions in the best method of doing
it. Cut the shell into very thin leaves with a sharp
fine saw, then divide these into the size you wish
for the inside of the snuff-box, leaving a very little
extra for the joint. Take a new rough file, and
scrape away a little of the two ends of the narrow
strip of shell, so that they can lie one upon another,
and fit so closely that the aperture is hardly perceptible.
Plunge the tortoise-shell into warm water
for a few minutes, and it will become quite soft.
Have ready on the lathe a piece of wood a little
less in circumference than the inside of the box,
and perfectly round and smooth. While the shell
is soft, place the joints together, wrap a wet piece
of linen tightly over them to hold them fast, and
press them firmly together with the finger and
thumb. Then heat a pair of tongs to a proper heat,
(which is known by trying them on writing paper;
if they brown it, they are too hot; if they only
turn it yellow, they are right,) and with them compress
the joint of the tortoise-shell. The water,
the heat, and the pressure united, will make the
two parts join firmly. When finished thus far, file
away any roughness that may remain, and steep the
shell into hot water till quite soft, then slip it upon
the piece of wood before mentioned, and see if it
fits it perfectly; if not, try with pressure to give it
the requisite shape; and if this does not succeed,
take the wood out of the lathe, leaving the tortoise-shell
upon it, and hold them over a brazier, turning
them frequently and quickly between the hands,
that the heat may equally penetrate all the parts;
then strike the side that bulged out with a mallet,
and with a little care it will soon assume the required
form. You may finish it on the lathe, observing
only to place it so that the tool does not
catch the lap of the joint, which might cause it to
open; and when you take it off, plunge it in cold
water to make it retain its form.
Make your box and lid of hard, well-seasoned
wood; hollow them out, and polish the insides, only
omitting to cut the lip upon which the lid fits, and
which will be formed by the tortoise-shell. As you
hollow out the box and lid, keep fitting in the shell,
that you may not make them too large; when it
slips in rather tight, take a point tool and cut some
circles on the inside of each; (this is done to enable
the glue to hold firmly.) Now, take the tortoise-shell
and file that part that is to be cemented to the
box, so as to make it rough. Take a pair of compasses,
in one end of which is a sharp knife, set
them to the exact size of the inside of the bottom
and lid, then place them on a piece of tortoise-shell,
and cut out the two round pieces. Melt some glue
till rather liquid, thicken it with vermilion, lay a
coat on the inside of the top and bottom of the
box, and press in the two circles of tortoise-shell;
in the same manner glue in the sides, leaving the lip
(upon which the lid is to fit) standing up above the
bottom part of the box. Leaving the glue to harden
for a day, then replace the work on the lathe, turn
the inside quite even, and polish it with pounce
powder and oil, then with tripoli powder and water.
Should the lid, when finished, become too small for
the box, dip it for a minute in boiling water, fit it
on to a piece of wood the exact size, and leave it
there to harden.
Dissolve three ounces of potash in a pint of boiling
water. Let it boil for a quarter of an hour,
then pour it into a basin capable of holding about
as much again, and in which you have put half a
pound of quick lime, stir it well, and when the latter
is slacked, add three ounces of red lead and one
ounce of vermilion.
When the whole is of the consistency of thick
soup, dip a thin pointed stick into it, and lay the
drops it will take up upon a piece of horn in those
parts required to be coloured, leaving those that are
to be transparent. When quite dry, clean the
whole with a wet sponge, and you will find it will
greatly resemble tortoise-shell.
To turn ivory as thin as writing paper, so as to
render it quite transparent, is very difficult to accomplish,
but is much admired when done, and shows the
skill of the artist. To enable the ivory to bear the
action of the tool without splitting, the following
mastic has been found very useful, both for strengthening
it and for giving a deep colouring, by which
means the thinness is more perceptible. Some
turners wet the ivory for the latter purpose, but as
when wet it is quite transparent, and thickens again
when dry, the mastic will be found much preferable.
Take some lamp or ivory black in powder, and
strain it through a fine sieve, so as only to retain
the finest parts. Steep these in water to free them
from any impurities. After lying in it a few
minutes, pour off the water, and make some glue
very hot, mix it with the lamp black till of the consistency
of oil paint. This mastic must be kept
warm near the fire, and when you have sufficiently
hollowed out the vase, or whatever you wish to turn,
very thin, shape the outside a little: then dip a
large camel’s-hair brush in the warm varnish and
lay a thick coat all over the inside; let this dry,
put on another, and repeat the process till sufficient
strength is obtained. You may now, without fear
or danger, work your ivory as thin as possible, and
ornament it with the cutters and drill. Without
this mastic it would not, when transparent, bear the
force of these tools.
When the work is all finished and carefully
polished, take it off the lathe, and put it in a basin
filled with warm water. After a few minutes’ immersion,
take it out, and plunge it in clean water,
shaking it gently. This will make the mastic dissolve
and leave the ivory. Renew the warm water
frequently, as leaving it in the blackened liquid
might injure the colour of the work.
To one quart of spirits of wine add four ounces
of lacker, three ounces of gum benzoin, one drachm
of camphor, half a drachm of sandarac, half a
drachm of dragon’s blood, one drachm of turpentine.
Put these ingredients in a long-necked bottle
capable of holding two quarts, and tie a piece of
wet parchment over the neck; when dry, pierce it
with holes with a large pin. Place the bottle in
the bain marée till the contents are perfectly dissolved,
shaking it frequently. When cold, strain
the liquid through a piece of coarse muslin, and
keep it well corked for future use.
Having finished and polished your work with
tripoli powder and sand-paper, wipe the wood quite
clean with a piece of fine linen. This done, put a
few drops of the varnish on a bit of cotton wool,
and one drop of olive oil, to prevent its drying too
quickly; while applying this varnish, make the
lathe wheel go very quick, and hold the cotton
close to the work.
To polish the above, when the varnish is perfectly
dry, take some finely-powdered whiting or chalk,
and with it polish the work in every direction, but
be careful not to press too strongly on the varnish,
or it will be marked; and do not rub it for more
than a few minutes at a time, as the friction and
excessive speed and heat will spoil the polish. When
done, take a sponge dipped in water, wash the work
well, and then rub it with a piece of fine linen, and
a drop or two of olive oil; lastly, clean it with a
bit of soft old rag or leather.
Sometimes the workman is too much hurried to
wait till the work can be glued upon the chuck; the
following cement will be found useful. Take two
pounds of Burgundy pitch, one pound of rosin, one
pound of colophonium, two ounces of yellow wax,
and one ball of whiting. Melt all, except the latter,
in an earthen pot, over a slow fire. When it begins
to bubble, stir it well with a stick to prevent its
passing the edge of the pot, and when all is quite
melted take it off the fire. Add the whiting, finely
powdered, little by little, stirring in well till the
contents are perfectly mixed. Replace the pot on
the fire, still stirring it; and after a few minutes,
pour all the cement quickly into a tub or basin of
cold water for about a minute. Then take it out,
and knead it well with the hands. Roll it into
sticks upon a smooth stone, and plunge them into
cold water to harden. The strength and goodness
of this cement depends greatly upon its being made
as rapidly as possible. To use it, melt the end of
one of the sticks by putting it near the fire; rub it
on the chuck; when you think there is sufficient
cement laid upon it, heat the bit of wood or ivory
you wish to unite to it, and the warmth will make
it adhere firmly.
Another cement, that is preferable for using in
cold weather, is made by adding two pounds of Burgundy
pitch, two ounces of yellow wax, and two
pounds of Spanish white. These are melted
together, rolled into sticks, and used as above; one
stroke of the mallet will detach the work from the
chuck when joined with this cement.
Take a sheet of rice-paper, paste it upon letter-paper
with flour paste, which must be mixed as
smooth as possible, and laid on very thin. Leave
it till quite dry, then lay the rice-paper thus backed
upon the piece of Turning, and with the thumb nail
or a piece of cloth rub the back of the paper, pressing
it gently so as to make it enter into all the deep,
fine cuts of the Turning. The impression will be
beautiful, and have the appearance of a raised
medallion. It is invaluable for taking off patterns
from ivory, as it can in no way injure the colour or
delicacy of the work; and from the facility of bending
the paper, impressions can as easily be taken
from round articles (as the sides of a box or pillar)
as from flat ones. The medallions may be left white,
or the pattern coloured with water colours, leaving
the ground white; and they can, besides their
utility as patterns to which to refer, be employed in
ornamenting various useful articles.
In turning the pillars in the temple, pl. 13, great
inconvenience and trouble have been found in working
them, for want of the support of the puppet G,
plate I; for as in each step the eccentric chuck has
to be slightly altered, the point, J, of the puppet,
when the work is moved, is apt to slide back into
the hole it first formed, thus making the steps quite
crooked. To obviate this difficulty, I should advise
my readers to use the following simple contrivance.
Take out the point, J, and replace it by a piece of
wood turned to fit exactly into the tube, and on the
end of which is left a circular piece the size of a
half-crown. Take another bit of wood, of the
diameter of your pillar; fix a short nail into the
middle of it; glue the other side to the pillar, put
it on the lathe, screw up the puppet, G, and you
will find the nail will always, whenever you move
the chuck, firmly fix itself into the wooden end
which replaces the point J.
And now, having, I trust with sufficient clearness,
explained the practical and ornamental parts
of concentric and eccentric Turning, I will take
leave of my readers, only adding that, if they wish
to attain perfection in this interesting art, they
must patiently continue their exertions, for experience
and industry will alone enable them to avoid
many faults, and discover the real cause of many
failures; and to those who may feel disheartened
with repeated disappointments, I will say—
“Courage! try thy chance once more.”
Let me also observe to those who cannot afford to
purchase much expensive machinery, that with care,
patience, and perseverance, the common tools may
be made to work a great variety of very beautiful
articles: and if they will also keep in mind the
old-fashioned but true saying, “that whatever is
worth learning at all, is worth learning well;” they
will, I have no doubt, soon become proficients in
an art that has been admired and practised for centuries.
THE END.
STEREOTYPED BY L. JOHNSON AND CO.
PHILADELPHIA.
pg 20 Changed are great authority,) to: authority),
pg 28 Added period after Gimlets
pg 40 Changed make them for himself,) to himself),
pg 47 Changed 1, 2, 3,) to: 3),
pg 63 Changed pedestals of vases. to: vases,
pg 70 Added colon after: Bard of Avon expresses it
pg 75 Changed wheel on the overhead to: over-head
pg 81 Changed resemble a honey-comb to: honeycomb
pg 92 Changed (of the cutter tools,) to: tools),
pg 92 Changed glued in afterwards.) to: afterwards).
Other hyphenated and non-hyphenated words left as written.

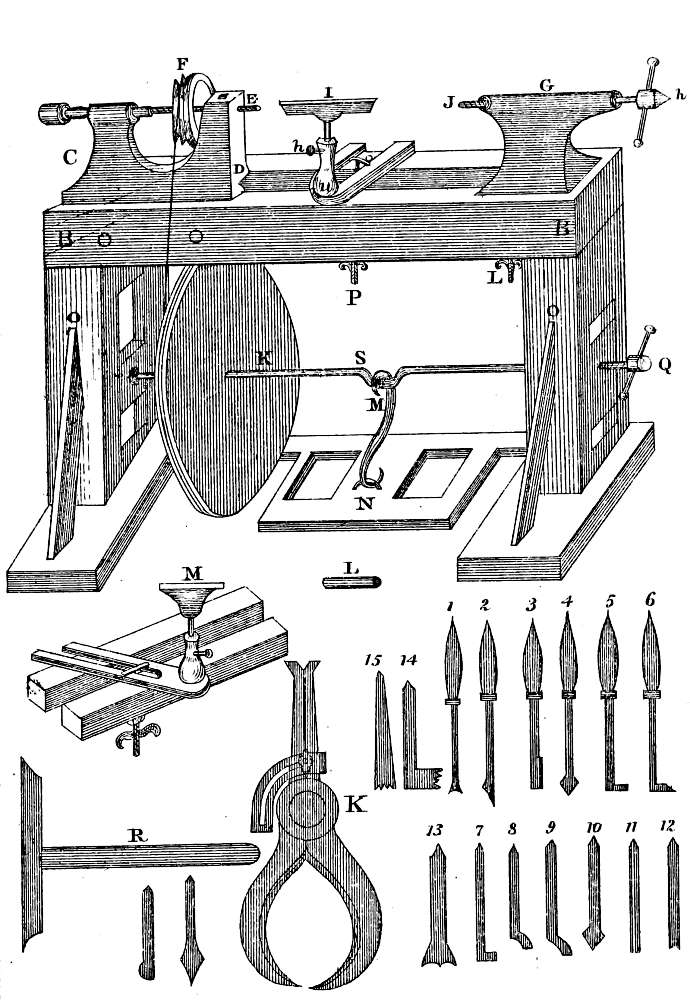
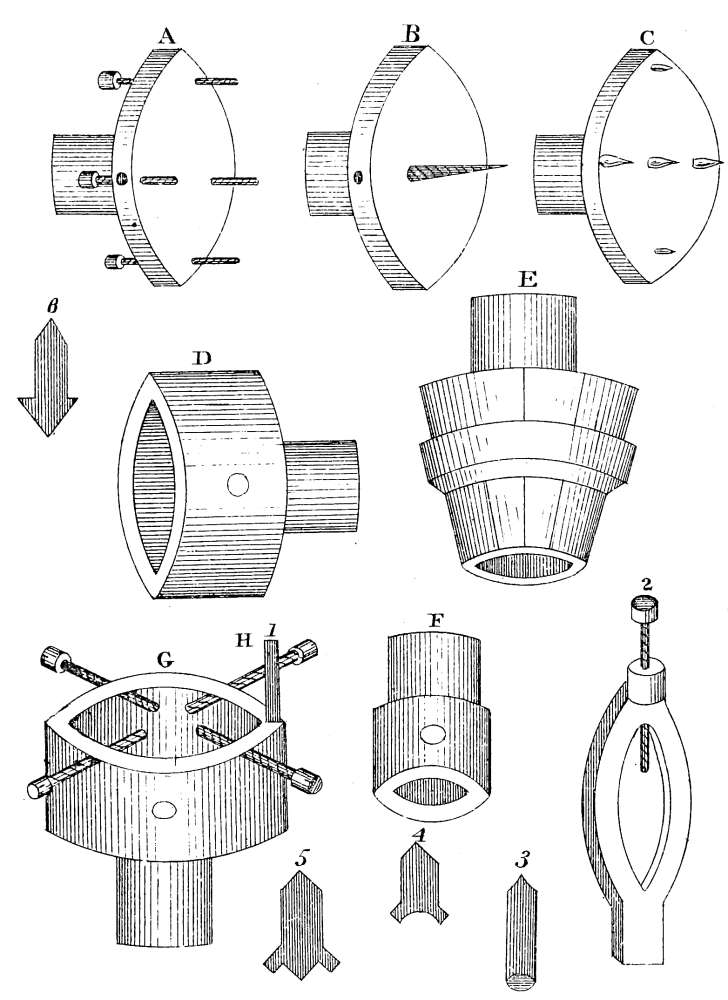
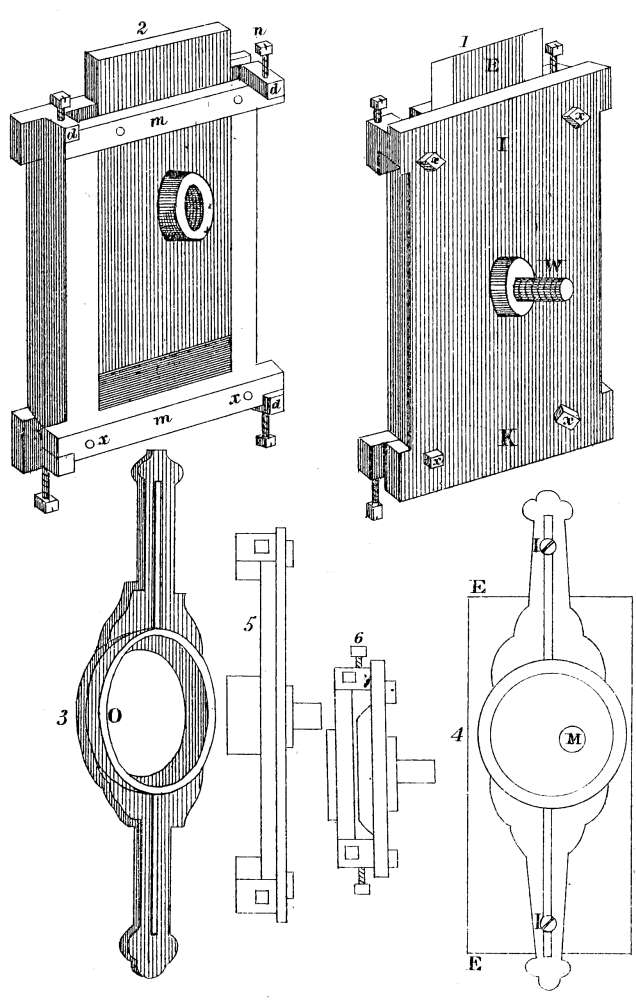
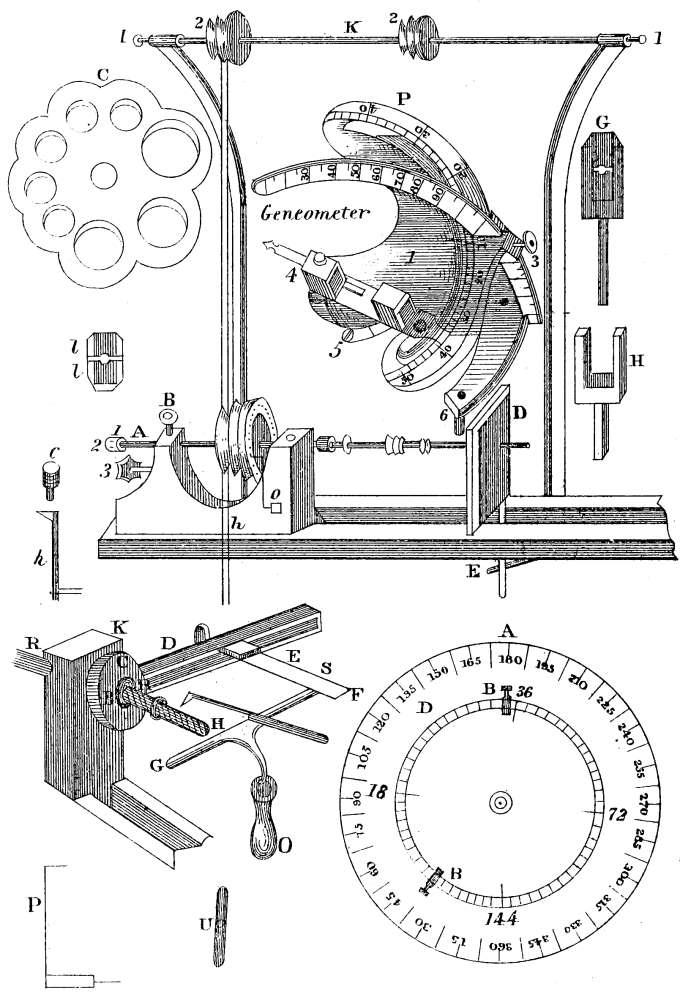
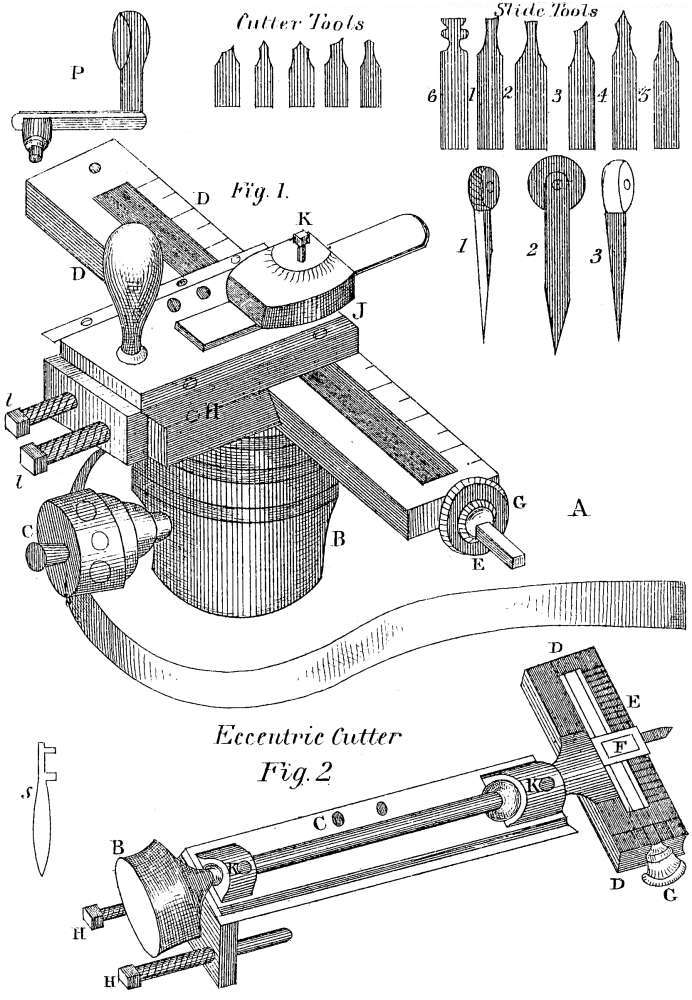
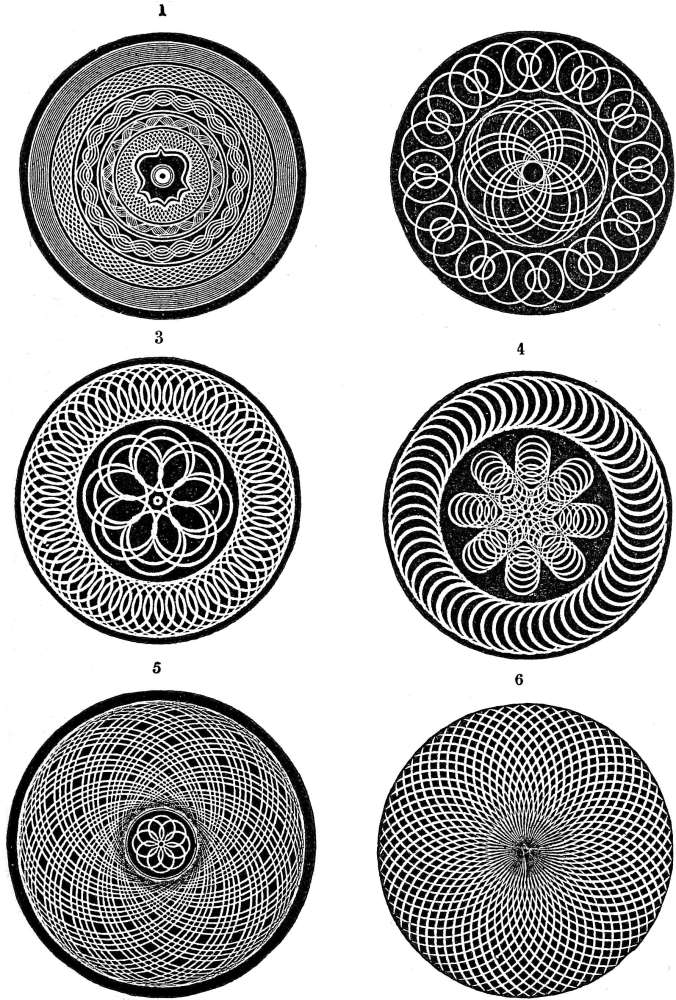
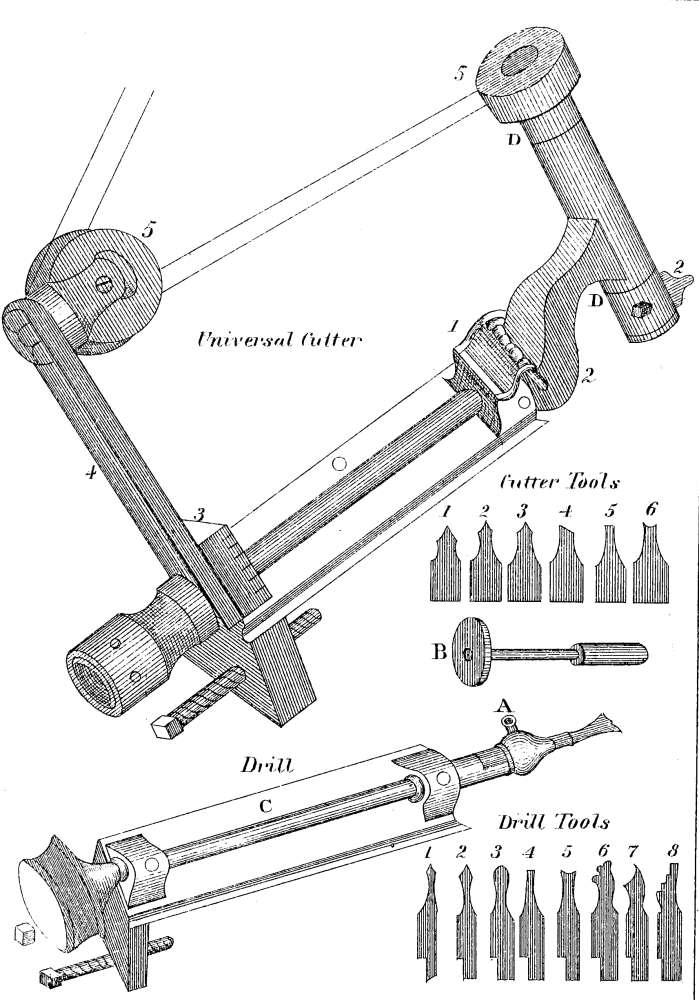
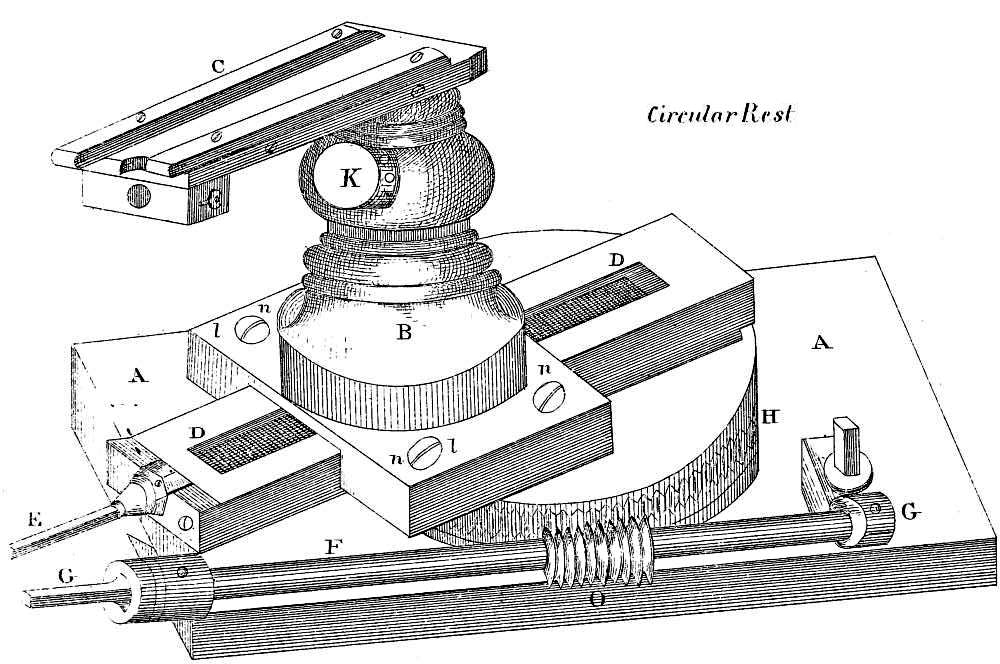
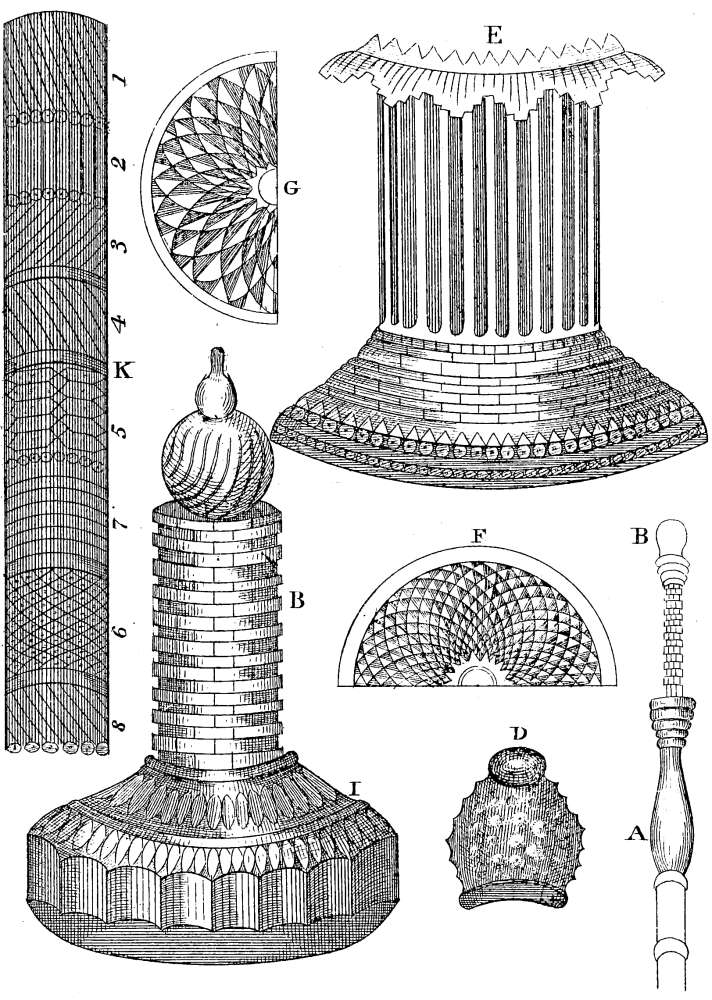
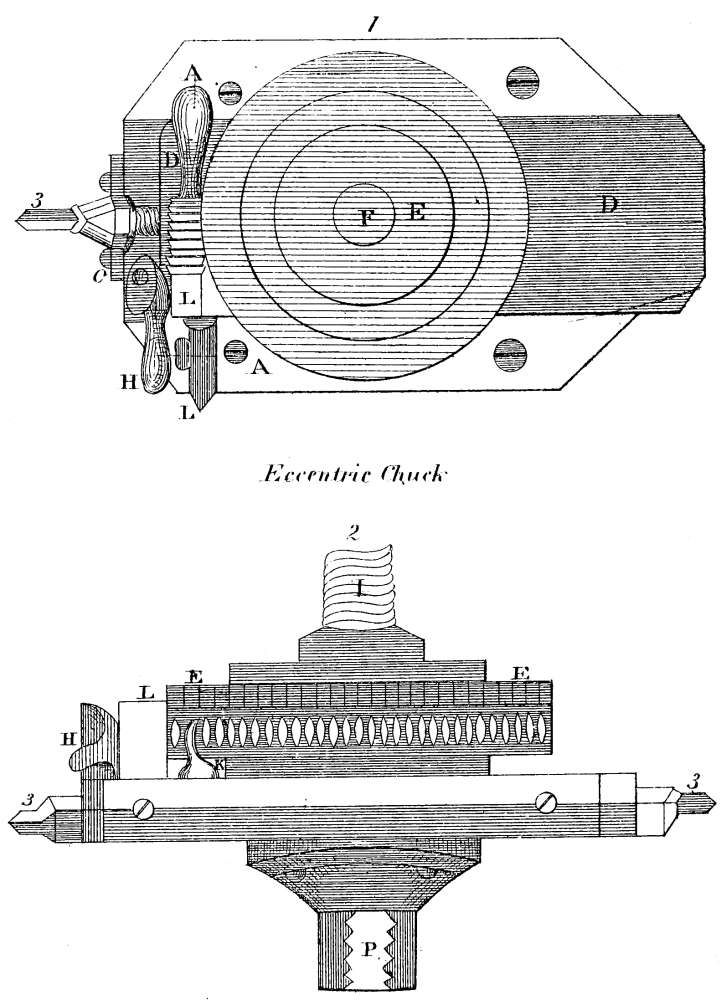
 you must turn the chuck
down one turn by counting the numbers on the
square head, No. 3; and having cut one circle in
the proper place, count as many numbers on the
brass plate, E, as are necessary to make them fit
properly. Should you wish to make a second row
of circles larger than the first, besides turning down
the chuck, you must, to enlarge them, turn the
screw of the slide-rest one turn forwards. All the
patterns already given for the eccentric cutter can
be done equally well with the eccentric chuck, except
the border pattern in No. 4, which can only
be worked by the cutter. Patience, calculation,
and attention will enable you to perform the most
beautiful, minute, and intricate patterns with the
eccentric chuck; but though I have endeavoured to
give many specimens, when printed they only in a
slight degree convey an idea of the real beauty of
this kind of turning; the depth of the cut will
wholly alter the appearance of a pattern, and the
same circles cut with another shaped tool present
quite a different appearance; in all, however, there is
one rule, which must never be forgotten—viz., be very
careful to make your wood or ivory perfectly smooth,
flat, and even, before attempting to ornament it, or
you will be disappointed by finding that your circles
are cut deep in one part and are scarcely visible in
another; also remember to line it, as directed when
treating of the slide-rest, for this gives much effect
to the work.