Many women in these days will find it
difficult to believe that it is possible
to bake without the constant presence of fire,
but our great-grandmothers were well aware
that foods continued to cook in the brick ovens
long after the fire in them had burned out or
was raked out. The insulated oven represents
an adaptation of old-fashioned ideas to new
and modern conditions. Although we cannot
go back to the days of brick ovens, superior as
they were, in certain respects, to the portable
range with its quickly fluctuating heat and great
waste from radiation, yet the insulated oven will
not be found impossible or very difficult to set
up, and the adventurous woman will, perhaps,
not be content until she has tried this development
of the fireless cooker.
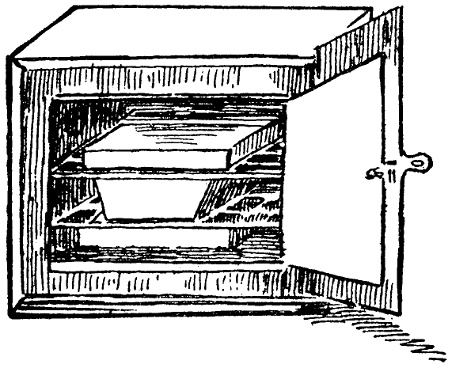
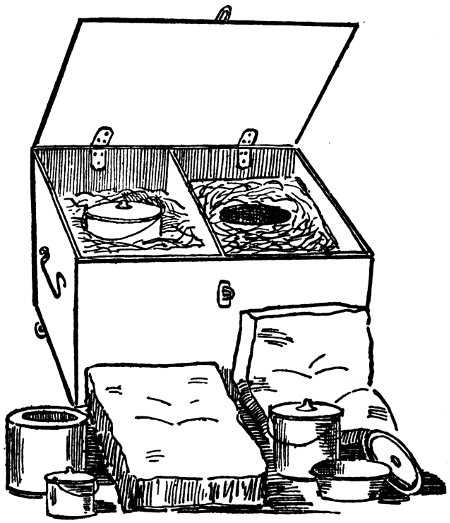
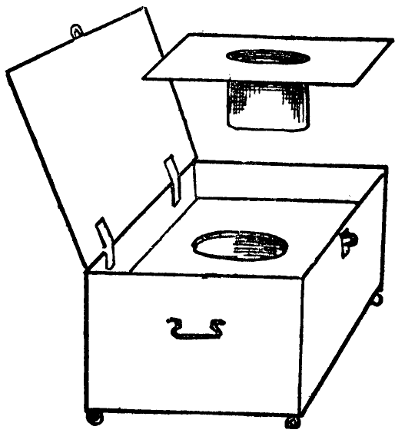
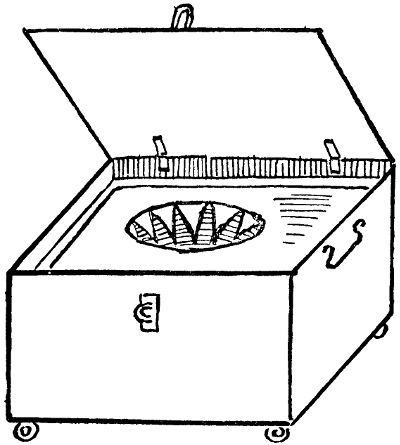
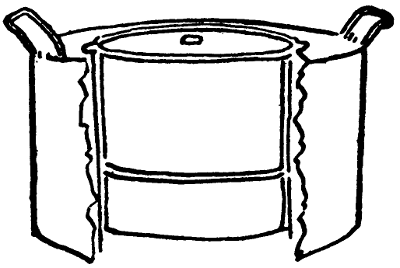
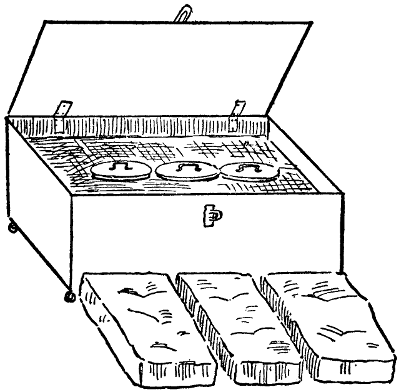
Insulated oven with stones and pan in place.
The advantages of an insulated oven lie in the
even brown and thorough baking which it gives;
the development and retention of flavours, which
is greater than with ordinary baking; the economy
in fuel where food requires long cooking; the
absence of heat in the kitchen; and the possibility
of baking where only a camp-fire is obtainable.
The principle is the same whether a portable
oven is insulated or a cooker-pail is utilized.
There must be hot stone slabs, iron plates, fire-brick,
or some such heat-radiators, which can be
made very hot and which will retain their heat
well. Stones or fire-brick are preferable to
iron in this respect. There must be insulation
for the oven or utensil, and cooking will then
proceed, although somewhat differently from
the familiar method of baking with a fire.
Choose as small a portable oven as will hold
the food to be cooked, since the larger the oven
the larger or more numerous the stones must be
to heat it. Very large stones are heavy and
awkward to manage, and with their number
the cost of using the oven increases. A portable
oven is on the market which is about thirteen
inches in each dimension. This is a good size
for a family of four or five. Cut six pieces of
heavy sheet asbestos, fitting one to each surface
of the oven, except the door, and two to the
bottom. One of the two pieces for the bottom
is to go inside the oven. Place the asbestos
so that it entirely covers the oven. These pieces
may be tied on temporarily to hold them in
place during packing. Select a box which is at
least two or three inches larger in every dimension
than the corresponding dimension of the
oven. It should be fitted with cover and hasp
just as any cooker. Lay it, while packing, with
the cover opening upward. Pack in the bottom
a sufficient layer of insulating material,
such as is used for other cookers, to raise the
oven to within a couple of inches of the top.
Place the oven, lying upon its back, on this
layer with the door uppermost, and opening in
the same direction as the cover of the box. Pack
on all sides around it till level with the door.
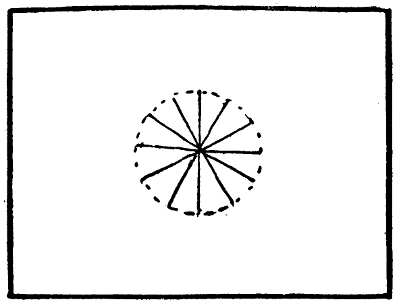
If desired, a facing may be made to cover
the packing material, from a piece of cloth cut
a few inches larger, in each direction, than the
top of the box. Draw on it a square the size of
the oven. In the centre of this cut a small hole
to insert the blade of scissors. From this hole
cut diagonally to the corners of the square.
When the cloth is put in place over the packing
the triangular flaps thus made may be tucked
between the asbestos and the packing, while the
edges of the cloth may be tucked between the
packing and the sides of the box. Fit a cushion
that will fill the space left at the top and nail it
to the cover of the box. Face this with a piece
of the sheet asbestos nailed into place. It will
be well to reinforce the nail-heads with little
rounds of tin, in order to prevent them from
pushing through the soft asbestos. The box is
then ready for use and should be stood up on
end so that the cover will open like a door, and
the oven will be right side up. The extra piece
of asbestos may be laid in the bottom, the stones
heated, and the food put in to cook.
Method of using the oven. Heat the slabs
very gradually the first time that they are used.
It will be best to put an asbestos mat or piece
of the sheet asbestos between a hot gas flame and
the stones for a few minutes, not turning the gas
on full force for the first five minutes. After
the first using it will be safe to heat the stones
directly over the flame, providing it is not burning
with full force for the first few minutes.
The degree of heat in the stones will regulate
the heat of the oven. For most baking, the centre
of the top side of the stones should be about as
hot as a flatiron for ironing. This will mean
that the side toward the flame is very much
hotter, perhaps red hot. Another and better
test is the browning of a piece of white tissue
paper laid on the centre of the stones when they
are put on to heat. When this grows a shade
darker than manila paper, or a golden brown,
the stones are right for loaf cakes, pastry, apples,
potatoes, beans, scalloped dishes, most puddings,
and bread. For a hot oven the paper
should be a rich brown. This is suitable for
biscuits, small cakes, roasting meat, etc.
Although gas is the fuel here mentioned any
other fuel will serve to heat the stones, provided
a hot enough flame can be procured. The
stones may, when warmed, be set directly on a
hot coal or wood fire to complete the heating,
and, for out-of-doors use, a crude fireplace might
be built up of rough stones to support the soapstones
or they may be buried directly in the hot
coals. In such a case it will probably be necessary
to have some device, perhaps ice-tongs,
for removing the stones, as the metal handles
might in time become burned off, bent, or weakened
so as to be unsafe.
Small soapstone griddles or foot-warmers make
excellent slabs for the home-made insulated oven.
Griddles are on the market that are as small as
twelve inches in diameter, and foot-warmers
come in many sizes. Those measuring eight by
ten inches will be about as large as most women
can easily handle, since they are thicker than
the griddles, and are very heavy for their
size. It will not be difficult to get an extra
handle fitted to these, which will make them
less awkward to manage. For baking many
loaves of bread and cake, and for foods to
cook over night, or for many hours, more
than two stones may be necessary to maintain
enough heat.
The oven should not be opened during the
baking, but if the food is not found to be cooked
when it is opened, it may be quickly closed again,
and left till the food is done. A succession of
articles may be baked in an already heated
oven by quickly removing the finished article
and one or two stones to be reheated and tested,
and slipped again into place. In this case the
door of the oven should be instantly closed
after removing anything from it. This method
of baking a number of things in quick succession
is very economical as a few minutes will reheat the
already warm stones.
Lay one hot stone on the asbestos at the bottom
of the oven with the hotter side down; put
a wire oven shelf on this, and the food on the
wire shelf. If the food will not rise higher
than the top of the pan, a hot stone may be laid
directly across the pan, but if this is not possible
place the second wire shelf as close over the food
as the cleats at the side of the oven will permit,
and the stone on this shelf, also with the hot
side down. In case more than one pan is to go
in at once, and two stones will not supply enough
heat, hot flatirons or stove lids may be used
to supplement them. It is often convenient,
when the oven is heated for baking one article,
to put other things in to cook at the same time,
even though they may not require browning.
For instance: A chicken or roast may be cooking
between two stones, while on top of the
upper stone the giblets may be stewing in water,
or some vegetables be boiling. It will be best
in such cases to heat these foods till boiling
before putting them in the oven, or they will
cool it too much. Such foods, as do not require
browning, will not need another stone on top.
It may not be wise to put so much watery food
in the oven when baking anything so critical as
bread or loaves of cake, as it cools the oven to
some extent.
No matter how carefully the directions are
given and followed some experimentation will
probably be required before a novice, or even
an experienced cook, will feel at ease with this
new method of cookery, since the conditions
may be so variable. But there is no reason why
a careful observation of results and their causes
should not soon lead one to become mistress
of her own insulated oven, and it is likely that
she will then become sufficiently attached to it
to justify her perseverance.
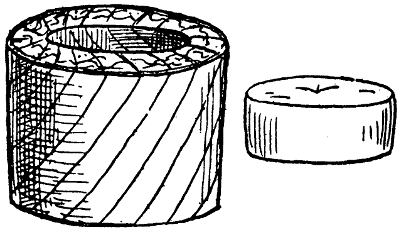
In case a cooker-pail is to be utilized for baking
it will be well to surround it, on top, bottom,
and sides, with the heavy sheet asbestos described
for insulating the oven. A wire rack will be
needed for separating the food from too direct
contact with the hot stones, and some device,
such, perhaps, as an inverted wire frying-basket
for supporting the upper stone.
LIST OF ARTICLES REQUIRED FOR MAKING AND
USING AN INSULATED OVEN
- Box.
- Hinges.
- Hasp.
- Packing material, hay, excelsior, etc.
- Portable oven.
- Two or more stone slabs, or iron plates.
- Cooking utensils, baking pans, etc.
- Cloth for facing and cushion.
- Nails and screws.
- One dozen small rounds of tin about one inch in diameter.
- One and one-quarter yards sheet asbestos (price about 20 cents a yard).
Weigh the meat, trim off all parts which
will not be good to serve, and save them for soups
or stews. Wipe the meat clean with a damp
cloth. Dredge it well with salt, pepper, and
flour, put it into a dripping pan, and cook it in
an insulated oven heated as directed for roasts of
meat on page 225. Heat the pan and meat a
little before putting them into the oven. The
time for roasting beef depends upon the size
and shape of the roasts. Thick pieces weighing
under ten pounds will roast rare in twelve
minutes to a pound, medium rare in from fifteen
to eighteen minutes, and well done in twenty-five
or thirty minutes a pound. Thin pieces
will take a few minutes less to each pound.
Prepare the meat for roasting as directed for
roast beef. Cook it in an insulated oven heated
as directed for roasts on page 225, allowing twenty-five
minutes to each pound for lamb, and from
fifteen to eighteen minutes for mutton.
Prepare the meat for roasting as directed for
roast beef. Cook it in an insulated oven, heated
as for roast beef, allowing from twenty-five to
thirty minutes for each pound.
Wipe the meat clean with a damp cloth;
sprinkle it with pepper and salt, put it in a pan,
and roast it in an insulated oven, heated as directed
for roasts on page 225, allowing twenty minutes
or more to each pound. Heat the pan and
meat a little before putting it in the oven.
Drain away all fat from the pan, leaving the
brown sediment. Add to this enough water
to make the desired amount of gravy. Using
this in the place of stock or water make Brown
Sauce, using a measured quantity of the fat from
the roast. Various seasonings may be added
to this sauce to make a variety. Wine, Worcestershire
sauce, ketchup, currant jelly, etc.,
are used in this way.
Draw, stuff, and truss a chicken as directed
on page 130. Put it on its back in a baking-pan,
lay strips of fat salt pork on the breast, or rub
breast, legs, and wings with butter or clarified
veal fat. Dredge it well with salt and pepper.
Heat the pan and chicken over the fire for a few
minutes, and put it into an insulated oven heated
as directed for roasts on page 225. Allow twenty-five
minutes a pound for roasting chicken.
Remove the string and skewers and serve it
with Brown Gravy for Roasts to which the chopped
giblets have been added. The giblets may be
cooked, with salted water to cover them, in the
insulated oven at the same time that the chicken
is roasting; but in this case the stones should
be hotter than otherwise.
Singe and remove the pin-feathers from a
goose. Wash it in hot, soapy water. Draw it
and rinse it in cold water. Fill it two-thirds
full with Stuffing for Poultry, or Potato Stuffing.
Truss it, and rub the surface with butter, or
lay fat salt pork on the breast. Dredge it with
salt and pepper, heat it to warm the pan, and
roast it in an insulated oven heated as directed
for roasts on page 225, allowing fifteen or twenty
minutes a pound.
Prepare and cook it as roast mutton, allowing
from twelve to fifteen minutes a pound for it to
roast. Venison should be served rare, with
Brown Gravy for Roasts, to one pint of which
one-half tumbler of currant jelly and two tablespoonfuls
of sherry wine have been added.
- 2 cups hot potato, mashed
- 1 cup soft, stale breadcrumbs
- 1⁄4 cup chopped salt pork
- 2 tablespoons chopped onion
- 1⁄4 cup melted butter
- 1⁄3 cup milk
- 2 teaspoons salt
- 1 teaspoon powdered sage
- 1 egg
Mix the ingredients in the order given.
Draw, clean, and truss a wild duck in the same
manner as a goose. If it is to be stuffed, use
Stuffing for Poultry, omitting the herbs; or merely
fill the cavity with pared and quartered apples,
or pared, whole onions. These should be
removed before serving, but Stuffing for Poultry
should be served with the duck. Roast it for
from twenty to thirty minutes in an insulated
oven, the stones heated a little hotter than for
other roast meats. Serve it with mashed
potato and currant jelly.
Draw and clean a grouse, remove the feathers
and the tough skin of the breast. Lard the breast
and legs. Truss it, and lay fat salt pork on the
breast. Dredge it with salt and flour, put it
into the roasting-pan with scraps of fat salt
pork. Roast it for twenty or twenty-five
minutes in an insulated oven heated as for
wild duck. Remove the strings or skewers,
sprinkle it with browned breadcrumbs, and
garnish it with parsley.
Prepare the quail in the same way as grouse.
Roast it for fifteen or twenty minutes in an
insulated oven heated as for duck.
Prepare and cook it the same as quail.
- 3 shad or 6 small mackerel
- 1⁄3 cup salt
- 1⁄8 teaspoon cayenne pepper
- 1⁄6 cup whole cloves
- 1⁄6 cup peppercorns
- 1⁄6 cup whole allspice
- 1 onion, sliced
- Vinegar to cover
Clean the fish, remove the head, tail, fins,
skin, and large bones. The small bones will be
dissolved in the vinegar. Cut the fish into pieces
for serving. Mix the salt, pepper, and spices.
Pack the fish in layers in a small stone crock
or deep agate-ware utensil, sprinkling the salt
and adding pieces of onion between the layers.
Pour over it vinegar to completely cover it.
In the absence of a tight-fitting cover, use heavy,
buttered paper tied on. Bake it for five or six
hours in an insulated oven, the stones heated
until the paper test shows a delicate brown.
Potted fish will keep well if put into a cold place
and kept covered with vinegar. It makes a
good relish for lunch or tea.
- 1 cup beans
- 1 teaspoon salt
- 1 teaspoon sugar
- 1 teaspoon molasses
- 1 tablespoon butter, or
- 1⁄8 lb. salt pork
- Water to cover
Cook the beans for four or more hours, as
directed in the recipe for dried navy beans.
Put them into a baking-dish, add the other
ingredients, gashing the pork frequently and
laying it on top. Put it into an insulated
oven with stones that will turn white tissue
paper a golden brown. Bake them for eight
hours or more.
Select potatoes of equal size, so that they
will all bake in the same length of time; wash
them and bake them in an insulated oven
with the stones heated till the paper is a
golden brown as explained in the test on
page 225. Good-sized potatoes (eight ounces)
should bake about forty-five minutes. Lay them
on a rack to prevent them from touching the
hot stone. They will bake better than in an
ordinary oven.
- 1 cup macaroni, in one-inch pieces
- 1 small onion, grated
- 11⁄2 cups milk
- 2 tablespoons butter
- 1 tablespoon flour
- 1⁄6 teaspoon pepper
- 1⁄4 teaspoon salt
- 11⁄2 cups minced, cooked ham
- 2 cups buttered crumbs
Cook the macaroni as directed in the recipe
for macaroni. Make white sauce of the milk,
butter, flour, and seasoning, add the onion,
ham, and macaroni. Put it into a buttered
baking-dish, cover the top with the crumbs, and
bake it until the crumbs are brown, heating the
stones until the paper test shows a golden brown.
Serves six or eight persons.
- 1 pt. or 30 oysters
- 3 cups buttered crumbs
- 1⁄2 teaspoon salt
- 1⁄4 cup oyster juice
- 1 tablespoon finely chopped celery leaves
- Few grains pepper
Wash the oysters, strain the juice through
cheese-cloth. Put one-fourth of the crumbs in
the bottom of a baking dish, add half the oysters,
half the salt and pepper and celery leaves; repeat
these layers, pour over it the oyster juice, and
put the remaining crumbs on top. Bake it in an
insulated oven till brown, as directed for scalloped
dishes, page 225. If double this recipe is used
allow three-quarters of an hour for the baking,
and do not heat the stones quite so hot.
- 1 cup macaroni in one-inch pieces
- 1 cup grated or shaved cheese
- 1⁄2 teaspoon salt
- 1⁄8 teaspoon pepper
- 2 cups buttered crumbs
Cook the macaroni in salted water as directed
in the recipe for macaroni. When tender, drain
it and add the salt, pepper, and cheese. Turn
it into a buttered baking-dish and cover the top
with the crumbs. Bake it until the crumbs are
brown, heating the stones until the paper test
shows a golden brown.
Serves six or seven persons.
Cut the chicken in small pieces, slice or cut
the mushrooms small. Put one-fourth of the
crumbs into a buttered baking-dish. Mix the
other ingredients and pour them into the dish.
Spread the remaining crumbs on top and bake
it in an insulated oven till brown, as directed
for scalloped dishes, page 225.
- 1 can of whole tomatoes, or
- 8 good-sized raw tomatoes
- 3 cups soft breadcrumbs
- 3 tablespoons butter
- 1 tablespoon salt
- 1⁄4 teaspoon pepper
- 1 small onion
If canned tomatoes are used, drain away the
liquid from them, using only the solid tomatoes.
If raw tomatoes are used, scald them in boiling
water and remove the skins and hard core.
Melt the butter, add the crumbs, and stir them
lightly until they are evenly buttered. Put
one cupful in the bottom of a baking dish, lay
the tomatoes over them, sprinkle the salt, pepper
and grated onion over these and cover the top
with the remaining crumbs. Bake them for one
hour in an insulated oven, heating the stones
until the paper test, given on page 225, shows a
light brown colour.
Serves six or eight persons.
- 3 cups chopped sour apples
- 2 cups soft breadcrumbs
- 4 tablespoons butter
- 1⁄2 cup brown sugar
- 1⁄4 teaspoon cinnamon
- 1⁄4 teaspoon nutmeg
- 1⁄2 lemon, juice and rind
- 1⁄4 cup water
Melt the butter, add the crumbs, and stir
them till they are evenly buttered. Mix the
spice and grated rind with the sugar. Divide
the buttered crumbs in quarters. Into a buttered
baking dish put one-fourth of the crumbs.
On this layer spread one-half the apples, then one-half
the sugar. Sprinkle half of the lemon
juice and water over this. Repeat these layers
with one-fourth the crumbs and the remaining
apple, sugar, etc. Cover the top with the crumbs
that are left. Bake it for one hour and a half
in an insulated oven. The stones should be
heated till the test given on page 225 will show
the papers a delicate brown colour. Look at
the apples at the end of one hour, closing the
oven after a quick glance, and alter the heat of
the oven, if necessary. Serve it with Hard Sauce.
Serves five or six persons.
- 1 qt. milk
- 1⁄4 cup rice
- 1⁄2 cup sugar
- 1⁄8 teaspoon salt
- 1⁄8 teaspoon nutmeg
Put all the ingredients together in a baking-dish.
Bake it for three hours in an insulated
oven. The stones should be heated until the
paper test, given on page 225, will show a light
brown shade. The pudding, if correctly baked,
will be creamy, with a golden brown, soft crust
on top.
Serves five or six persons.
- 11⁄4 cups pastry flour
- 1⁄2 teaspoon baking-powder
- 1⁄4 teaspoon salt
- 1⁄3 or 1⁄2 cup butter or lard
- Water
Mix and sift the dry ingredients together;
cut the butter or lard in with a fork. Add
enough water to make a paste barely moist
enough to hold together, using a knife and cutting
through the dough to mix it. Roll half of
it with as little pressure of the rolling-pin as
possible, until it is about one-eighth of an inch
thick. If a two-crust pie is to be made, lay
this crust on the inside of an unbuttered pie
plate, trim the edge, and put the trimmings
with the remaining paste and roll it out for the
upper crust. If a single under crust is to be
used, as for lemon pie, lay the paste on the outside
of a pie plate, trim the edge and prick
through the crust in several places. Bake it
for about fifteen minutes in a moderate insulated
oven, with the pie plate upside down in the oven.
Remove the baked crust and fill it.
- Sour apples
- 1⁄2 cup sugar
- 1 lemon, juice and rind
- 1⁄2 tablespoon butter
- 1⁄8 teaspoon cinnamon
Make pie crust by the preceding recipe, put
half of it in the bottom of the plate. Pare
enough apples to fill the pie heaping full, when
cored and cut into eighths. Fill the pie with
the apples, spread the sugar and cinnamon and
grated rind over them. Roll out the upper
crust, cut several gashes in it to allow steam
to escape; lay it over the pie, trim the edges
and press them together with a fork. Bind
the edge of the pie by laying around it a wet
strip of cloth about one inch wide. Bake it
for one-half hour in an insulated oven with
the stones heated until the paper test shows
a golden brown colour.
Apple and berry pies are better made without
an under crust in an extra deep pie plate.
Pick over the berries. Line a deep plate with
crust, or omit the lower crust; fill the pie heaping
full of berries, cover them with one-half
cupful or more of sugar mixed with one-fourth
cupful of flour. Add the upper crust, bind it,
and bake it as apple pie. The amount of sugar
will depend upon the acidity of the fruit.
Wash the fruit, remove the stones, and make
the pie in the same manner as berry pie.
- 11⁄2 cups cooked pumpkin
- 1 cup boiling milk
- 1 egg
- 1⁄2 cup sugar
- 1⁄4 teaspoon salt
- 1⁄3 teaspoon cinnamon
Cook the pumpkin as directed on page 152.
Put it into a cloth and press it with the back
of a strong spoon to squeeze out the water.
Mix all the ingredients, put it into a pan set
over a cooker-pail of boiling water; stir it until
it is 165 degrees Fahrenheit, then put the whole
into a cooker for one hour. Fill the baked crust
with the mixture. Cover the top thickly with
whipped cream.
- 1⁄2 cup flour
- 1 cup sugar, granulated
- 1 cup boiling water
- 3 tablespoons lemon juice
- Rind of one lemon
- 4 teaspoons butter
- 1⁄4 cup powdered sugar
- 2 eggs
Mix the sugar and flour together, add the
boiling water slowly, stirring it all the time.
Boil it gently for twenty minutes, stirring it
frequently. Mix the lemon with the yolks, pour
the hot mixture slowly on the yolks, return it to
the fire and cook it below boiling point until
the eggs have thickened; then add the butter.
Cool the filling a little before putting it into a
baked crust. Beat the whites of eggs until very
stiff, add the sugar, and when barely mixed
with the whites, spread it over the pie for a
meringue; bake it till a delicate brown in a very
hot oven, or put it for a few minutes into an
insulated oven with one very hot stone close
over the pie. Serve it warm, but not hot.
Serves five or six persons.
Wash and core sour apples of uniform size.
Put them into a pudding dish, fill the cores with
sugar, and if more is desired put it into the
bottom of the dish, not over the apples. Pour
in enough boiling water to fill the dish one-fourth
full. Bake them in an insulated oven for one-half
to three-quarters of an hour, depending
upon the size and ripeness of the apples. The
stones should be heated until the paper test
shows a golden brown colour.
- 6 apples
- 30 cloves
- 2 cups water
- 2⁄3 cup sugar
- 6 slices lemon
Pare the apples, remove the cores and stick five
whole cloves into each apple. Make a syrup of
the water and sugar. Put the apples into a pudding
dish, pour the syrup over them, and place a
slice of lemon over the top of each. Bake them in
a slow insulated oven for one hour with the stones
heated until the paper test shows a light brown.
Prepare and cook the pears as directed for
baked sweet apples. If desired, a bit of butter
the size of a bean may be put on each pear before
baking.
Prepare and cook the quinces as directed
in the recipe for baked sweet apples. Twice as
much sugar and water will be required for quinces,
and, perhaps, more time for baking. This
will depend upon the size and ripeness of the
fruit. It is usually cut in halves before baking.
- 8 sweet apples
- 1⁄3 cup sugar
- 1 cup boiling water
Prepare the apples as for baked apples. Cook
them in a slow insulated oven, for about three
hours. The stones should be heated until the
paper barely changes colour, as explained in
the test given on page 225.
- 1 pt. water or milk
- 1 tablespoon butter or lard
- 2 teaspoons salt
- 2 teaspoons sugar
- 1⁄4 cake compressed or 1⁄2 cake dry yeast and
- 1⁄2 cup warm water, or
- 1⁄2 cup liquid yeast
- Flour to make a dough
Soak the yeast for a few minutes in the half
cupful of warm water. Scald the milk or boil the
water, add the fat, let it cool till lukewarm,
then add the remaining ingredients, except the
flour. If compressed yeast is used, add as
much flour as is needed to make a dough that
may be kneaded. If dry yeast or liquid yeast
is used, add only one and one-half pints of flour;
beat the mixture well, and let it rise till full of
bubbles, usually over night; then add the remaining
flour. The rest of the process is the same,
no matter what yeast is used. Knead the dough
until it is smooth and elastic, return it to the bowl,
set it in a warm place to rise until it has doubled
in size. Knead it again until all large bubbles
are pressed out, mould it into two loaves, put
it into greased pans and let it again rise until it
has doubled in size. Heat the insulated oven
stones until the paper test, given on page 225,
shows a golden brown. Put the bread in and
bake it from fifty minutes to one hour. If two
stones will not make a hot oven for a large amount
of bread to be baked, use hot flatirons or stove
lids to supplement them.
Add one tablespoon of butter to the recipe
for bread, or knead the butter into the dough
just before moulding it. Shape it into rolls,
put them into a buttered pan, and when risen to
a little more than double their size, bake them
for twenty minutes in an insulated oven with
stones that will turn the paper a rich brown,
as explained in the test on page 225.
- 4 teaspoons baking-powder, or
- 1 teaspoon soda and two teaspoons cream of tartar
- 1 pt. flour
- 1⁄2 teaspoon salt
- 2 tablespoons butter or lard
- 3⁄4 to 1 cup milk or water
Mix and sift the dry ingredients, work in the
fat with the fingers, or mash it in with a fork.
Add the liquid, one-third at a time, mixing the
dough in three separate portions in the bowl.
Cut through these three masses until they are
barely mixed, then roll the dough to about one-half
inch thickness; cut it into biscuits, lay them
on a greased pan, brush the tops with milk or
melted butter, and bake them for fifteen or twenty
minutes in an insulated oven with stones heated
so as to turn the paper a rich, dark brown, as
explained in the test on page 225.
- 1⁄2 cup butter
- 1 cup sugar
- 11⁄2 cups flour
- 2 eggs
- 1⁄2 cup milk
- 1⁄2 teaspoon nutmeg, or
- 1 teaspoon vanilla
- 11⁄2 teaspoons baking-powder
- 1⁄4 teaspoon salt
Cream the butter, add the sugar, then the beaten
yolks of eggs. Mix and sift the dry ingredients,
add them, one-third at a time, to the butter
mixture, alternating with the milk. Beat the
whites till stiff, add them and the vanilla, beat
the dough till barely mixed, and pour it into a
greased pan. The dough should not much more
than half fill the pan. Bake it for forty minutes
in an insulated oven, tested as explained on
page 225, for loaves of cake.
This recipe may be varied by adding one-half
cupful of raisins, currants, chopped citron or
nuts. Or two ounces of chocolate may be
melted and added to the dough.
If baked in layers or in gem pans the stones
must be heated somewhat hotter than for a loaf
cake. Allow fifteen or twenty minutes in the oven.
- 3 large eggs
- 1 cup sugar
- 3⁄4 cup thick sour cream
- 1⁄2 teaspoon soda
- 1⁄2 teaspoon baking powder
- 11⁄2 cups flour
- 1⁄4 teaspoon nutmeg
- 1 cup raisins
Beat the yolks of the eggs, add the sugar,
then the cream. Mix and sift the dry ingredients,
add them to the liquid mixture, then add the
raisins, which have been floured with a little
of the measured flour, and, lastly, the stiffly
beaten whites of eggs. Put it into a greased
pan and bake it for forty minutes in an insulated
oven, heated for loaf cake, as explained in the
test on page 225.
(Made without butter, milk or eggs)
- 1⁄2 cup white veal or beef drippings
- 1 cup sugar
- 1 cup sour apple sauce
- 11⁄2 teaspoons cinnamon
- 1⁄4 teaspoon cloves
- 1 teaspoon nutmeg
- 1 cup raisins
- 1 teaspoon soda
- 2 cups flour
Mix the ingredients in the order given, beat
the dough well, put it into a greased pan, and
bake it for forty minutes in an insulated oven,
heated for loaf cakes, as explained on page 225.
This cake seems, when baked, very much like
any spice cake.
- 6 eggs
- 1 cup sugar
- Juice and rind of 1⁄2 lemon
- 1 cup flour
- 1⁄4 teaspoon salt
Beat the yolks of the eggs, add the sugar
and lemon; beat the whites of eggs till stiff, add
them to the mixture, and when barely mixed
add the flour and salt, folding them in lightly.
Put it into a bright, ungreased tin, and bake
it fifty minutes or an hour in an oven heated
not quite so hot as for butter cakes. The paper
should turn light brown when tested as explained
on page 225.
Let the cake stand five minutes before removing
it from the pan.
- 1⁄2 cup butter
- 2 cups sugar
- 4 eggs
- 1⁄4 cup chopped nuts
- 1⁄4 cup candied orange peel
- 1 cup raisins
- 1 cup currants
- 5⁄8 cup pickled fruit syrup or molasses
- 2 cups flour
- 1⁄2 teaspoon soda
- 1⁄2 teaspoon cream of tartar
- 2 teaspoons mixed spices
Mix and sift the flour, soda, cream of tartar,
and spices. Put all the ingredients together
in the order given, flouring the fruit with a little
of the measured flour. Put it into a greased
pan and bake it for one and one-quarter hours
in an insulated oven, with stones heated as
explained on page 225, till the paper is a light brown.
- 1⁄2 lb. butter (1 cup)
- 1⁄2 lb. sugar (1 cup)
- 6 eggs
- 1⁄4 cup brandy
- 1⁄4 cup lemon juice
- Rind of 1 lemon, grated
- 2 cups blanched, chopped almonds
- 1⁄2 lb. citron
- 1⁄4 lb. candied orange peel
- 1 teaspoon nutmeg
- 1⁄2 teaspoon cloves
- 1 teaspoon cinnamon
- 1⁄2 teaspoon allspice
- 1 lb. raisins
- 1 lb. currants
- 1⁄2 lb. flour (13⁄4 cups)
Line the pan with three thicknesses of paper,
buttering the top layer. Mix the flour and spices.
Flour all the fruit except the citron. Mix the
ingredients in the order in which they are given.
The pan may be filled nearly full, as this cake
rises but little. Bake it for three hours or more
in a very moderate insulated oven. Test the
stones as explained on page 225, until the paper
will barely change colour. If, at the end of
two hours, the cake is not browned at all, take
out one or both of the stones very quickly and
heat them again till they will slightly brown the
tissue paper. The oven must be promptly closed
when the stones are removed, or the cake will be
injured. Test it with a steel knitting needle or
straw. The needle will come out only a little
greasy when the cake is done.
Let the cake stand at least five minutes after
removing it from the oven before taking out of
the pans, or it is likely to break. Fruit cake
should be kept for at least a week in a tightly
covered tin box or a crock, before it is ready for
use. It will keep for months, and improves
with time.
APPENDIX — 1. A test of the insulating powers of different materials. — Apparatus: — Experiment: Conductivity of different materials. — 2. Heat is carried from the pail partly by convection — Experiment: Convection. — 3. Heat is also lost by radiation. — Experiment: Radiation. — 4. The effect of different degrees or thicknesses of insulation. — Materials: — 5. The effect of the density of foods upon the temperature maintained. — Materials: — 6. The effect on temperature of filling the cooker-pails one-fourth, one-half, three-quarters, and entirely full. — Materials: — 7. Chemistry of the action of food materials (salt, soda, acids, water, etc.) upon cooking utensils made of tin, or aluminum, when used in a cooker or hay-box. — Detection of poisonous metals that may be dissolved from the cooker utensils. — 8. The efficiency of home-made refrigerating boxes compared with other means of keeping foods cold. — Materials: — Bacteriology of Insulating Boxes — 9. Temperatures which kill disease and putrefactive germs, or check their growth. — 10. Cooking temperatures of different starches. — Experiment: Cooking starch. — 11. Cooking temperatures of proteids. — Egg Albumen — Cereal Proteids — Meat Proteids
Reading references and experiments illustrating
the principles upon which fireless cookery
is based.
One or more boxes and fittings, described on pages 9 to 11.
One or more pails of the same size, shape and material,
preferably of from two to four quarts’ capacity, with
close fitting covers.
- Cooking thermometer
- Wool
- Mineral wool
- Cotton batting or waste
- Excelsior
- Hay
- Sawdust
- Newspapers
- Ground cork
- Southern moss
- Pencil
- Notebook
Pack the box successively with as many of
the different packing materials given above as
are to be tested, following the directions given
on page 15; or have several exactly similar boxes
packed at the same time. For all tests fill the
cooker-pail with water, bring it to the boiling
point, let it boil one minute, to permit all parts
of the utensil and its contents to reach the same
temperature; then put it at once into the cooker-box
and leave it for an equal length of time,
not less than one hour. Record the temperature
of the contents of the pail at the expiration of
this period. In order to get a full record and
a fair comparison it would be well to repeat this
experiment with varying periods of time, taking
the temperature, for instance, at the end of one,
three, six, nine, and twelve hours. In taking
temperatures do not wholly remove the cushion
and cover of the pail, but slip them to one side,
enough to insert the thermometer. This is, of
course, a crude method of taking temperatures,
but answers for purposes of comparison. If it is
desired to make more accurate records this can
be done by boring the cover of the box, the
cushion and the pail cover, and inserting a
thermometer through corks which are used to
close the bored holes. The temperature can
then be read while the apparatus is closed.
However, the first method, if carefully done,
will give probably within one degree of the
correct temperature. Record the results in
tabular form.
Which material do you find gives the best
insulation?
Winkelmann,[4]
Duff,[5] and other writers on
physics give tables of the conductivity of felt,
asbestos paper, paper, cotton, flannel, and other
materials; but as different figures are shown,
from different sources, for the same material,
it is likely that the insulating power of any material
used for packing a cooker will depend as
much or more upon the way it is packed as upon
the material used.
Take a piece of copper wire about six inches
long in one hand, and a piece of steel wire of the
same length and thickness in the other. Put
one end of each piece in a flame, holding the
wire by the extreme end. Notice which first
becomes too hot to hold at the end farthest from
the flame. This illustrates the different conductivity
of the two materials, steel and copper.
There is not a great deal of difference in the
conductivity of different materials, but metals
are relatively good conductors, and air is a very
poor conductor.
,
except where solid insulating material,
such as wood or indurated fibre, is used; and
that manner of packing which best entangles
the air and prevents air currents will, therefore,
most increase the effectiveness of the
insulation.
Into a glass flask of cold water drop a few
crystals of potassium permanganate, being
careful not to agitate the flask. Apply a flame
to the bottom of the flask. As the water
becomes heated its density is reduced and it
rises, forming convection currents which are
coloured by the permanganate and may be
distinctly seen.
Convection currents may be formed in any
liquid or gas; for instance, air. By means of
them heat will be carried from one part of the
liquid or gas to another. Thus air heated by
contact with a kettle of food will, if allowed
to flow freely, carry the heat away from the
food.
This takes
place less rapidly from a bright, highly polished
surface, and for this reason “Thermos” and
similar bottles are encased in polished nickle.
A cooker-pail with polished outside surface
retains heat better than one with a dull finish.
In those cookers made with a metal outside
retainer, the surface should not be painted
or roughened or dulled by any means.
Take two empty tin cans of the same size and
shape. Wash off the paper labels. Keep one
of them bright and shining, but move the other
through a candle flame until the entire outer surface
is smoked. Into each pour exactly the same
quantity of water at the same temperature.
Note carefully the temperature and the time.
At the end of any given period, say one hour,
again take the temperature of each. Which
has lost the most heat, that in the bright can or
that in the dull can?
The same as those used in the experiment,
section 1, with the addition of boxes of various
sizes, some smaller, some larger, than the one
used in the first experiment.
Pack the boxes with one or more of the
various insulating materials used in the first
experiment, so as to allow varying thicknesses
of insulation around the cooker-pail. This
should be the same or an exactly similar pail
in each case. Fill the pail for all tests with
an equal quantity of water, boil it for one
minute, and leave it in the boxes for an equal
length of time. Record the temperature maintained
in each test. Keep the record in tabular
form.
What thickness of insulation do you find
gives the best result with the materials used in
your experiment? Is it necessary to assume
that the same thickness will be required with
all insulating materials?
- One cooker or hay-box
- Starch
- Water
- Salt
- Cooking thermometer
- Scales
- Litre or quart measure
- Notebook and pencil
Bring one or more litres or quarts of water to
a boil, boil it for one minute, and put it into the
cooker for one hour or more. Repeat the test,
using, successively, five grams of salt to each
litre, or one teaspoonful to each quart, and 5,
10, and 20 per cent. mixtures of starch
with water. Record the temperatures in tabular
form, and compare the results. What would
you gather to be the effect of density upon the
temperatures maintained?
- Cooker or hay-box pail of eight quarts’ capacity
- Pail of two quarts’ capacity
- “Space adjuster”
- Water
- Thermometer
- Notebook and pencil
Fill the large cooker-pail one-fourth full of
water. Bring it to a boil and put it into the
cooker for a definite period of time, not less
than one hour. Record the resulting temperature.
If desired to make the test more comprehensive,
leave the water in the cooker for six, nine, or twelve
hours, being careful to allow the cooker to become
cold between each test. Perform the same
experiment with the same pail one-half full,
again when it is three-fourths full, and again
when entirely full. Record the results in tabular
form and compare them. Repeat these tests
with a pail of two quarts’ capacity. What is
the influence on temperature of having pails
partially, or completely, filled?
The explanation is that evaporation takes place
in partially filled pails.
The amount of tin dissolved by foods is indicated
by the corrosion of the utensil, which can
often be seen by the naked eye to be altered in
appearance. The exact quantity of tin salts
or other tin compounds which may be formed
can only be determined by careful chemical
analysis. It has been found that many canned
goods supposed to be inert, such as squash and
pumpkin, have a marked effect upon tin. Crude
tests with a number of different foods can be
made with tin, iron, aluminum, and copper
utensils, as in many cases there is evidence to
the eye of action upon the metals. It must be
borne in mind, however, that such tests are
crude and not decisive of the fact of there being
no action in case no action is plainly visible.
Only chemical analysis can prove this.
The action of foods upon tin cans bears a close
relation to their action upon the utensils when
used in fireless cookery, since there is time with
the long cooking involved for similar reactions
to take place in the cooker.[6]
Tin utensils rust badly after short use in a
cooker, and thus affect the flavour of food cooked
in them. This is due to the action of acids and
water on the iron which forms the basis of sheet
tin. When the thin plating of tin is worn off,
the iron is left exposed to the action of water, etc.
Soda dissolves aluminum, and leaves a black
surface on aluminum utensils. This black substance
is iron, which is present with the aluminum
in the utensils. To remove the black appearance,
clean the utensil with acid. Do not try
to remove it by scouring, as this will not do the
work well, and is laborious and injurious to
the pail.
Experiment A. Tin.
In a tin cooker-pail
boil such foods as apple sauce, tomatoes, squash,
or others that act on tin, and put them into a
cooker for twelve hours. Transfer them to an
agate ware or porcelain utensil, evaporate them
over steam until they may be burned in a porcelain
dish until charred and brittle. Pulverize
this charred mass, and extract it with hydrochloric
acid. Filter and wash it. Saturate the
filtrate with hydrogen sulphide gas; add a saturated
solution of potassium acetate to neutralize
the hydrochloric acid present and assist in the
coagulation of sulphide of tin. Warm it slightly,
filter and wash out the stannic sulphide, dry it
and weight it as stannic oxide, from which the
tin dissolved may be calculated.
Experiment B. Aluminum.
To simplify the
experiment a weak solution of malic acid may
be used (seven grams per litre being about the
average amount found in apples). Bring this to
a boil in an aluminum cooker-pail and put it
into a cooker for twelve hours. Transfer it to
a porcelain vessel and add ammonia to precipitate
the alumina. Filter and wash this, dry
and weigh the aluminum oxide. It is probable
that a smaller quantity of aluminum would be
dissolved by foods of a mushy consistency than
would be found in this clear solution.
- One box fitted as for fireless cooking, with two or three
covered crocks of at least one-half gallon capacity, packed
as directed on page 37, with either sawdust, hay, straw,
excelsior or paper. Sawdust is specially recommended.
- Thermometer
- Ice
- Notebook and pencil
Fill the central crock with a weighed quantity
of ice. Fill one or both of the other crocks
with water at room temperature. Cover the crocks
and close the box. Record the temperature of
the water at the end of six, twelve, twenty-four,
and forty-eight hours.
Make repeated observations of the temperatures
found in ordinary household refrigerators,
cellars, cold storage rooms, and any other places
used for keeping foods cold. Compare these
with the temperatures obtained with a home-made
refrigerating box. Is there any economy
in using these boxes?
It is taken for granted that the student of this
subject will be more or less familiar with the
nature of bacteria and the elements of bacteriology.
It will be recalled that bacteria are a
vegetable form of life; that, like all plants, they
have, under certain conditions, the power of
growth which is shown, largely, by their reproduction;
and that under other conditions they
are killed. When their growth is merely checked,
they are in a dormant state, or perhaps form
spores, in either of which cases they are ready
to develop as soon as their environment permits.
Temperature has much to do with the state of
bacteria. If the temperature and other conditions
are such that they are in an active or growing
state, they will multiply with enormous rapidity.
When in food stuffs they effect certain changes
by reason of the products which they form as a
result of their life processes, or of the alteration in
the food materials, owing to their abstraction
of some chemical elements or compounds used
for their nutrition. When bacteria form
unpleasant smelling or tasting substances we
speak of them as “putrefactive bacteria.” Those
which, if introduced into the bodies of humans
or animals, will cause diseases, are called “disease
bacteria.” Foods are liable to contain both kinds;
and, therefore, it is, obviously, wise to do all that
is possible to kill them or prevent their growth.
Most forms occurring in foods grow best
at from 80 degrees to 98 degrees Fahrenheit.
Few bacteria grow at above 100 degrees, and,
if kept at 125 degrees, the weaker ones soon die.
After subjection to a temperature of 150 degrees
to 160 degrees Fahrenheit, for ten minutes, if
water is present, almost all kinds are killed
unless they are in the spore state. Prolonged
boiling will often be resisted by spores. Dry heat
is not as effective in killing bacteria as moist, and
a higher temperature must, therefore, be reached
to effect this end. Below 70 degrees Fahrenheit
the growth of bacteria is more and more retarded,
but not entirely checked until freezing point is
reached. The popular idea that freezing may be
relied upon to destroy bacteria is not true.
The bearing of these facts upon the subject
of bacteria in foods cooked in insulating boxes
is evident. Whether foods are cooked or kept
cold, care must be taken that such a temperature
is reached that bacteria may not grow.
In application of these principles we see that
foods must be heated sufficiently to kill bacteria
before it will be safe to subject them to the comparatively
low temperature of the cooker for
the long period necessary. This is one reason
why foods in large pieces, such as roasts of meat,
whole vegetables, and moulds containing a mass
of food, must be boiled for a considerable time
before being put into the cooker. Heat will not
penetrate at once to the centre of such foods,
and they would be likely to ferment or putrefy
unless boiled long enough to heat the centre
beyond the point where bacteria thrive. The
fact that meats, cereals, and other foods have
been known to sour or ferment, even after such
boiling, if left in the cooker for a very long time,
may be explained by the fact that, though all
growing bacteria were killed, spores, which
resisted the boiling, might have been present
in the food, and when it cooled to a point conducive
to the germination of these spores, and
remained at this temperature for long, they might
have developed, become active, and produced the
objectionable changes characteristic of their kind.
In the case of foods to be kept in refrigerating
boxes, a temperature considerably below 70
degrees Fahrenheit must be maintained. 50
degrees Fahrenheit, or lower, will be found an
excellent preventive of germ growth.
Mr. L. A. Rogers has written a clear and
concise description of the nature, growth, and
conditions necessary to combat bacteria such as
are found in food, in his paper entitled “Bacteria
in Milk,” published in the Yearbook of the
Department of Agriculture, 1907, pages 180 to 196.
Other books which give information on this
subject are “Bacteria, Yeasts, and Molds in the
Home,” by Conn, and “Household Bacteriology,”
by S. Maria Elliott.
Yeasts and moulds also may take part in the
changes which spoil foods; but the temperature
conditions which control bacteria would be
practically the same for them.
Pare and grate one or more potatoes. Wash
the gratings by placing them in a cheesecloth
bag and immersing them in cold water. Squeeze
and press the contents of the bag until no more
starch seems to pass through the cloth. Let it
settle, pour off the water; add clear water and let
the starch settle again. Pour off the second
water. Take one tablespoonful of the starch,
mix it with one cupful of cold water. Heat it
slowly over a moderate fire, stirring it constantly,
and recording the temperature at which the
mixture becomes noticeably clearer and thickens.
Repeat this experiment with corn-starch;
wheat starch, washed from wheat flour, as is done
with the grated potato; with starch washed
from rye flour; and, if desired, with rice, bean,
pea, oat and tapioca starches, also.
“Food and the Principles of Dietetics,” by
Hutchison, gives, on page 378, a list of different
starches and the temperatures at which they
gelatinize.
In a bulletin entitled “Digestibility of Starch
of Different Sorts as Affected by Cooking,”
by Edna D. Day, Ph.D. (U. S. Dept, of Agriculture,
Office of Experiment Stations, Bulletin
No. 202, page 40), we read that starch takes
up water at 60 degrees to 80 degrees Centigrade
(140 degrees to 176 degrees Fahrenheit) and
forms a sticky, colloidal substance known as
starch paste, in which form it is very easily digested.
Long boiling, at least to the extent of three
hours, does not make it more quickly digestible.
There is something to be considered besides
the mere starch in cooking starchy foods, and
the fact that potato starch will form paste at
149 degrees while rice starch requires 176 degrees
does not mean that less cooking will be needed
for potatoes than for rice. The woody fibre
or other constituents of foods, as well as their
density and difference in size, must be taken
into account.
In the bulletin entitled “Eggs and Their
Uses as Food,” by C. F. Langworthy, Ph.D.,
published as Farmers’ Bulletin, No. 128, by
the U. S. Department of Agriculture, the statement
is made that “egg white begins to coagulate
at 134 degrees Fahrenheit. White fibres appear
which become more numerous until at about
160 degrees Fahrenheit the whole mass is coagulated,
the white almost opaque, yet it is tender
and jelly-like. If the temperature is raised to
212 degrees Fahrenheit, and continued, the
coagulated albumen becomes much harder and
eventually more or less tough and horn-like; it
also undergoes shrinkage. It has been found
by experiment that the yolk of egg coagulates
firmly at a lower temperature than the white.”
It also says that these changes in the albumen
suggest the idea that it is not advisable to cook
eggs in boiling water in order to secure the most
desirable result.
Experiment A: To show the changes that
take place in egg white at various temperatures.
Materials:
- Test-tube and holder
- Beaker or saucepan of water
- Thermometer
- Egg white
Put the white of egg into the test-tube. Insert
the thermometer. Hold the test-tube in the pan
of cold water to the depth of the egg white.
Gradually heat the water and observe the temperature
at which the first change in the egg
albumen takes place. Notice also the temperature
of the water at this point. Continue the
experiment until the water in the outer vessel
has boiled ten or twenty minutes, noting the
temperatures at which the various changes occur.
Experiment B: To show the temperatures
obtained in the proper cooking of eggs.
Materials:
- Fireless cooker
- Eggs
- Water
- Thermometer
Cook eggs as directed for soft-cooked eggs on
page 190, observing the temperature of the water
after the eggs are added to it, and when they
are removed from the cooker; also the condition,
flavour, etc., of the eggs.
Professor Harcourt, in his bulletin, “Breakfast
Foods,” published by the Ontario Department
of Agriculture, pp. 20 and 29, says that
long cooking of cereals renders the protein more
digestible. The cooking which he describes was
carried on in a double boiler, and, therefore,
below boiling temperature, and in this respect
is similar to fireless cookery. He says that
while short cooking, which was done at boiling
temperature, seemed to make cereal proteids
less digestible, the long cooking at below boiling
temperature, which followed, somewhat changed
them and made them more digestible.
While little study appears to have been made
of the digestibility of cereal proteids when cooked
for a long time at a low temperature, it is probably
fair, in the absence of further definite information,
to assume that, like animal proteids,
it is better to cook them at a low temperature
such as that of the fireless cooker, than at the
temperature of boiling water or higher.
In the bulletin entitled “A Precise Method
of Roasting Meat,” by Elizabeth A. Sprague
and H. S. Grindley, published by the University
of Illinois, a study is made of the temperatures
at which the changes take place from
raw meat to “rare”; from “rare” to “medium
rare,” and from this to “well done” meat. The
authors found that if the centre of the meat is
between 130 degrees and 148 degrees Fahrenheit
(55 degrees and 65 degrees Centigrade), it is
rare; if it is between 148 degrees and 158 degrees
Fahrenheit (65 degrees and 70 degrees Centigrade),
it is medium rare; and if it is between
158 degrees and 176 degrees Fahrenheit (70
degrees and 80 degrees Centigrade), it is well
done. They found no advantage in cooking
meat in a very hot oven (385 degrees Fahrenheit,
or 195 degrees Centigrade), but rather a difficulty
to keep it from burning; that in an oven
which was about 350 degrees Fahrenheit (175
degrees Centigrade), the meat cooked better;
and that in an Aladdin oven which kept the
meat at about 212 degrees Fahrenheit (100 degrees
Centigrade), it cooked best of all; that is, it was
of more uniform character all through, more
juicy, and more high flavoured. This seems
to point to an advantage in fireless cookery for
meats, and practical experience bears it out.
The initial heat of the insulated oven serves
to sear and brown the meat, and when this
heat is reduced by the cooling of the stones, the
low temperature found to be best for completing
the roasting is obtained. With regard to meats
cooked in water in the cooker, experience has
shown that they become well done and are more
tender than when boiled, showing that the temperatures
necessary to reach that degree of
cooking are obtained even in the centre of a large
piece of meat, without toughening or hardening
the outside of the meat, as is done when more
intense heat is applied.
The hardening effect of long cooking at a
high temperature on meat proteids can be demonstrated
by broiling a tender piece of steak
until it is rare, cutting off a small piece, continuing
the broiling for a few minutes, cutting off another
piece and comparing these pieces with the
remainder, which should be broiled until very
well done.