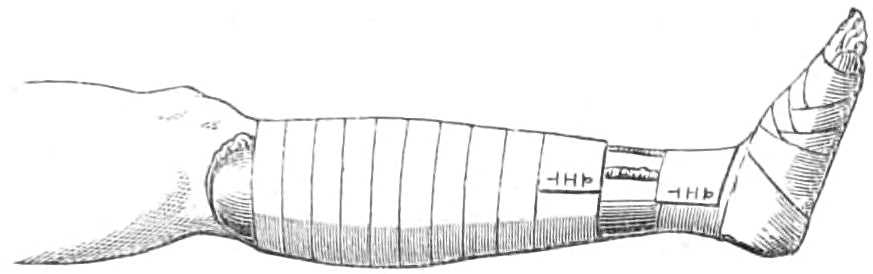
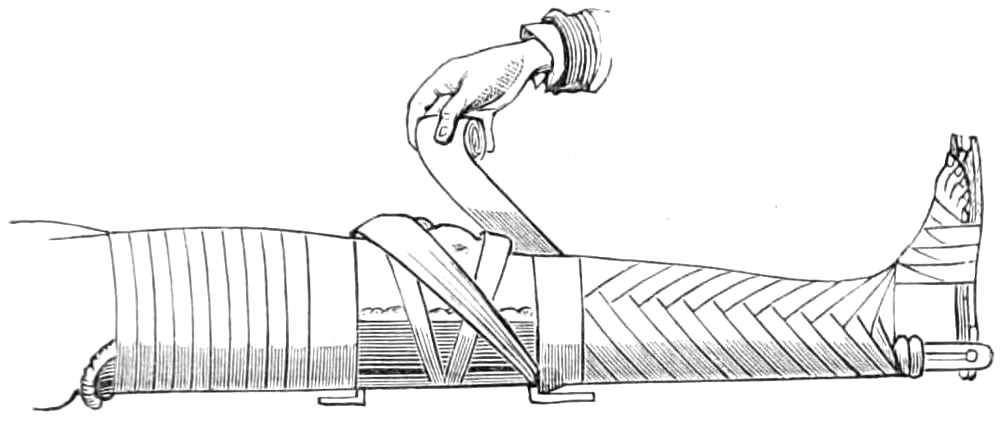
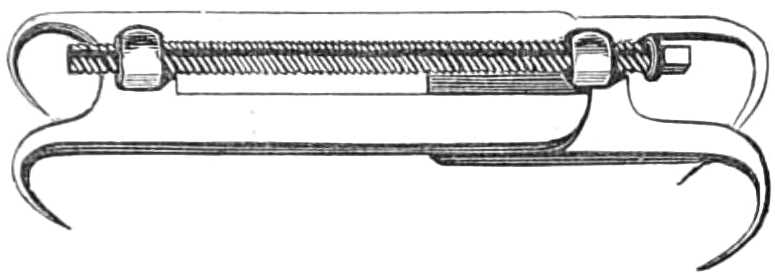
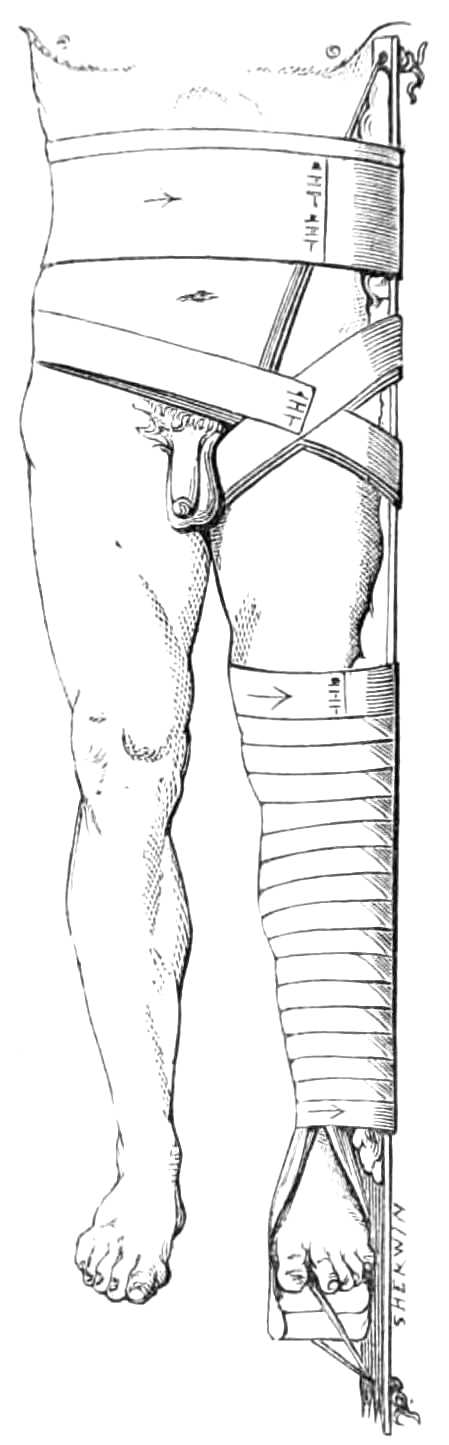
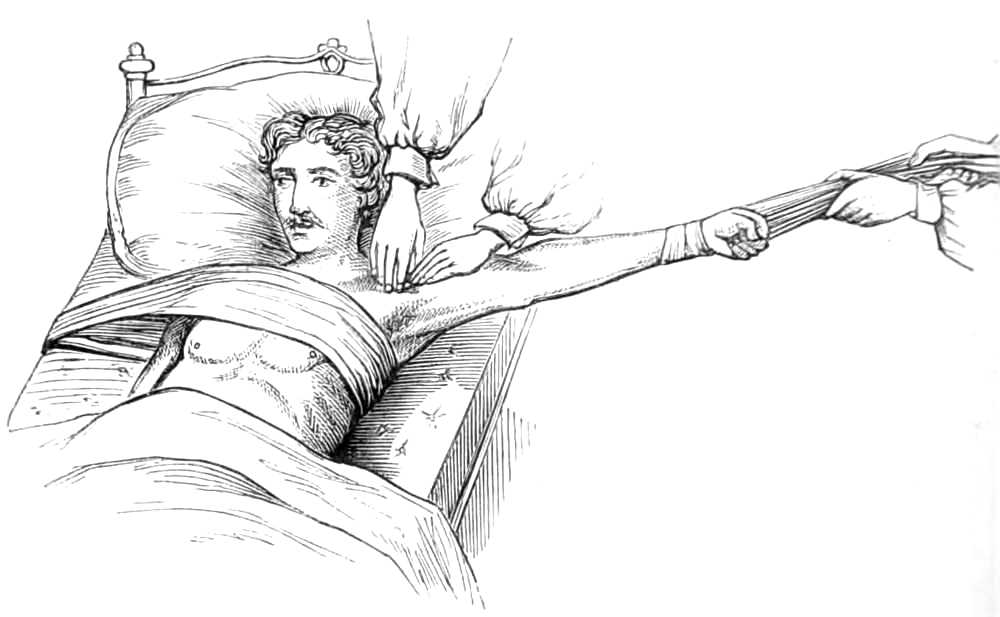
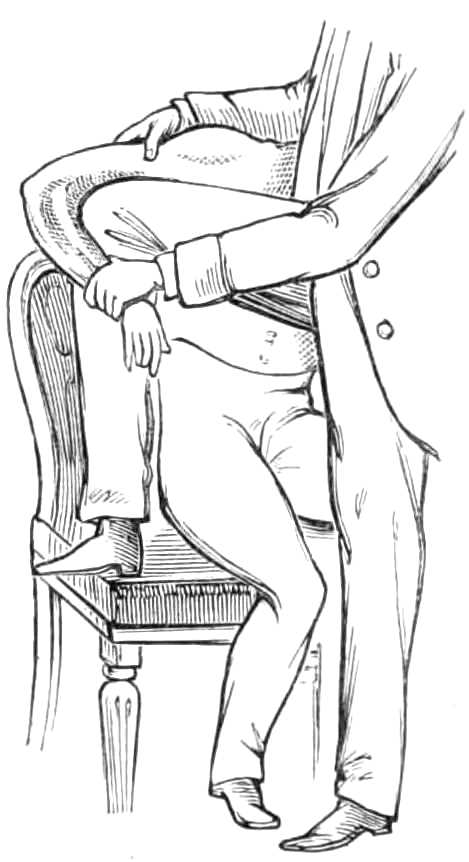
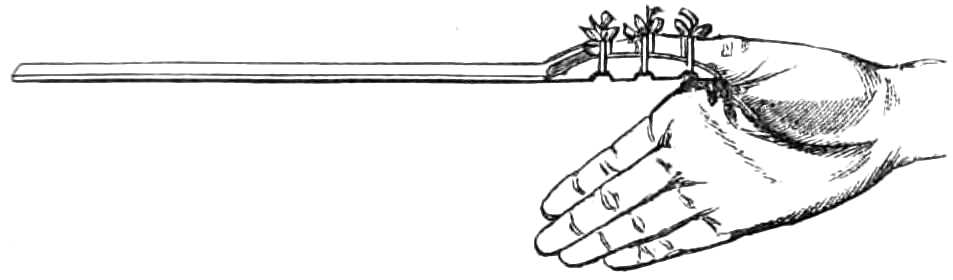
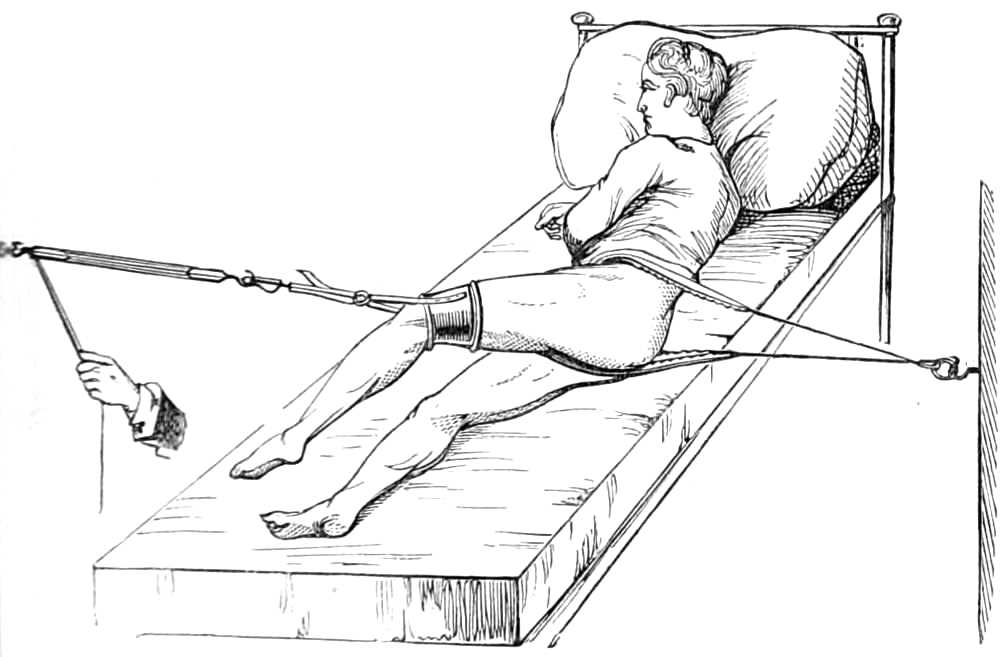
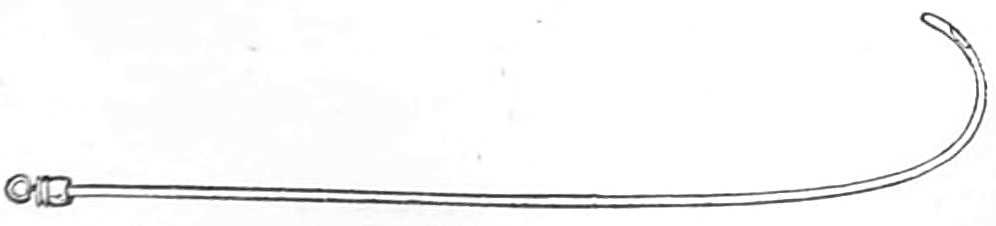
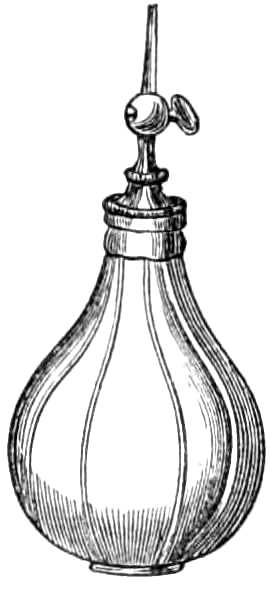
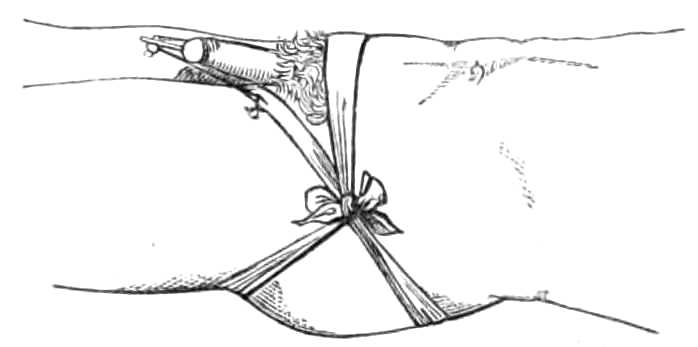
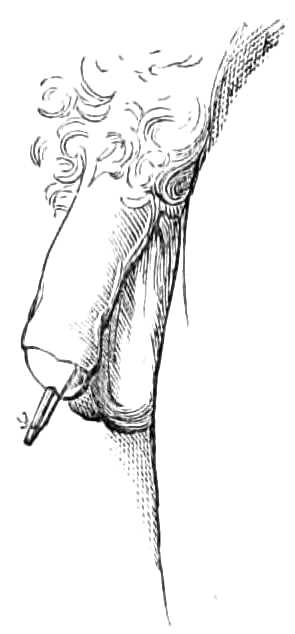
THE ESSENTIALS OF BANDAGING; INCLUDING THE MANAGEMENT OF FRACTURES AND DISLOCATIONS, WITH DIRECTIONS FOR USING OTHER SURGICAL APPARATUS.
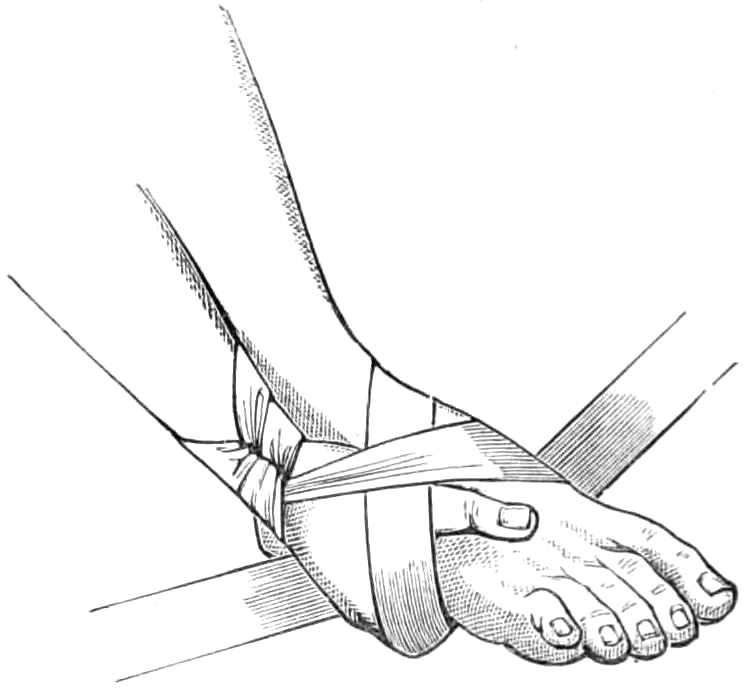
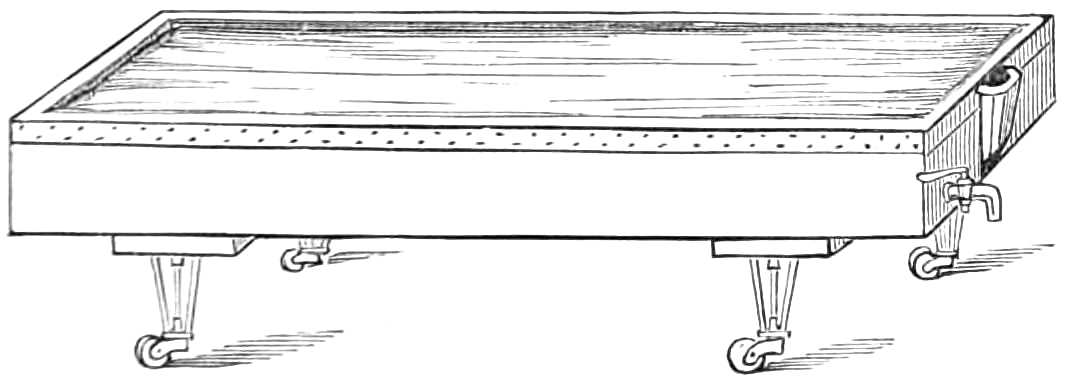
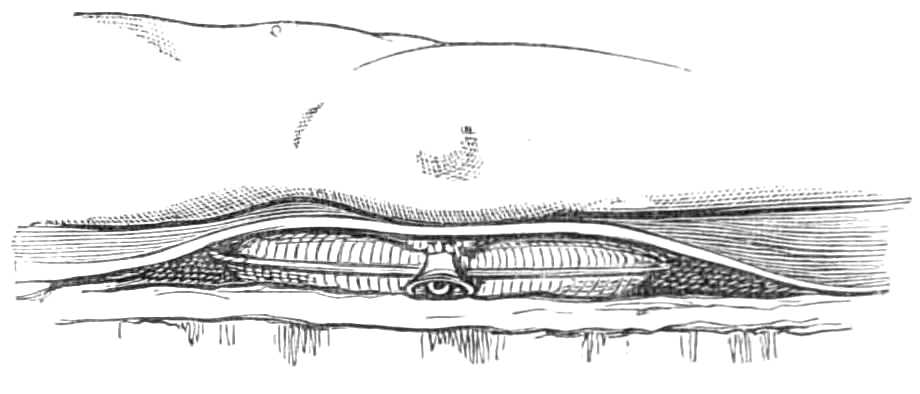
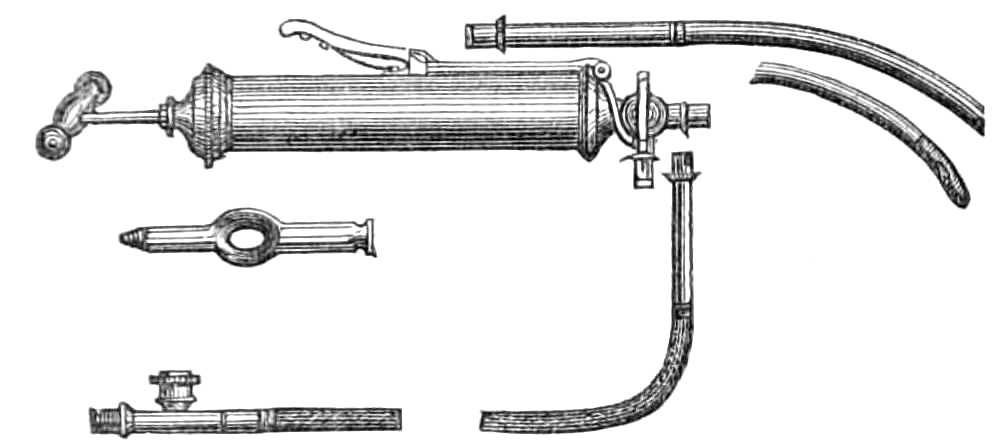
ILLUSTRATED BY 122 ENGRAVINGS ON WOOD.
BY
BERKELEY HILL, M.B. Lond., F.R.C.S.,
Instructor in Bandaging, &c., in University College, Assistant Surgeon to University College
Hospital, and Surgeon to Out-patients at the Lock Hospital.
SECOND EDITION, REVISED AND ENLARGED.
LONDON:
JAMES WALTON,
BOOKSELLER AND PUBLISHER TO UNIVERSITY COLLEGE,
137, GOWER STREET.
1869.
LONDON:
BRADBURY, EVANS, AND CO., PRINTERS, WHITEFRIARS.
PREFACE TO THE SECOND EDITION.
In laying a Second Edition before the
public, I have decided not to alter the scope
of this little work, but simply to endeavour
to increase its usefulness, by remedying omissions,
and by adding new instructions where
such appeared desirable. I have ventured to
insert, as an Appendix, lists of the preparations
requisite for the sick room and for the operating
room before the ordinary operations of surgery
are performed; also, lists of the instruments
and appliances requisite, or possibly useful,
in performing forty-nine different operations
on the human body. It is hoped that, by
giving the surgeon a list, such as most operators
draw up in manuscript for their private use,
whereby they may check their preparations before
proceeding to operate, some trouble may be
saved.
14, Weymouth Street, W. November, 1869.
PREFACE TO THE FIRST EDITION.
The descriptions and directions for using
surgical apparatus in the following pages, are
those originally prepared for oral delivery in a
short course of practical lessons in bandaging
and the application of surgical apparatus, given
by me in University College Hospital. No attempt
is made to include all efficient modes of treating
surgical injuries: it is merely proposed to supply
the student or practitioner with instructions by
which he may refresh his memory when about to
employ the ordinary surgical appliances.
The drawings are by Mr. R. W. Sherwin, who
has taken much pains to furnish exact representations
of the apparatus, as it was applied by
myself for his delineation. The directions for
giving chloroform have had the advantage of
Mr. Clover’s revision before publication.
14, Weymouth Street, W. October, 1867.
CONTENTS.
CHAPTER I.
BANDAGING.
PAGE
General rules.—Different materials of bandages.—Position of
the operator.—Mode of holding the bandage.—Varieties
of turns; the simple spiral; the reverse; the figure of 8.
Bandaging the head.—The common roller.—The knotted
bandage.—The Capelline bandage.—The shawl cap.—The
four-tail bandage.—Fastening ice bladders to the head.—Compressing
the jugular vein
Bandaging the trunk.—The breast.—The groin.—After operation
for hernia.—For tapping the belly.—The T-bandage.—The
strait jacket.—Manacles for delirious patients.—To
suspend the testicles
Bandaging the upper extremity.—The fingers.—The thumb.—The
hand.—The fore-arm.—The elbow.—The shoulder.—The
axilla.—Wound of the palmar arch.—Bleeding at
the elbow
The head and trunk.—Of the lower jaw; by the external splint
and bandage; by interdental splints, Morell Lavallée’s
plan; fitting a cap to the teeth.—Of the ribs; by
plaster; by a body roller.—Of the pelvis
The upper extremity.—Of metacarpal bones; by a gutta-percha
glove; by a ball of tow.—Of phalanges.—Of the lower
end of the radius; by the pistol splint; by the gutta-percha
gauntlet.—Of both bones of the forearm.—Of the
olecranon; by figures of 8 and an inside splint; by
Hamilton’s plan.—Of the humerus near the elbow; by
lateral hollowed splints; by a gutta-percha L-shaped
splint.—Of the shaft of the humerus.—Of the anatomical
or surgical neck, and of the great tuberosity of the humerus,
by a cap for the shoulder.—Of the acromion.—Of the
clavicle; by an axillary pad and elevation of the elbow; by
a figure of 8 behind the back; the American ring pad
The lower extremity.—Rupture of the tendo Achillis.—Separation
of the epiphysis of the os calcis.—Fracture of the
fibula, by Dupuytren’s splint.—Of the tibia, by
McIntyre’s splint; slinging the splint; elevating it on a
block.—Transverse fracture of the tibia, by lateral
splints; in the flexed position.—Of the patella; by back
splint and figures of 8; by Malgaigne’s hooks; by strapping
plaster and stick.—Of the shaft of the femur; by
Liston’s method of using the long splint; by using elastic
extension; Coxeter’s elastic perineal band; elastic stirrup.
By continuous extension with the limb bent; tendency to
angular union; double incline planes; slinging the
double incline planes in fracture of the neck of the femur;
by continuous extension of weight and pulley
The starch bandage.—The plaster of paris bandage.—Plaster
of paris splint.—Gum and chalk and other stiffening mixtures.—Sand-bags.—Cradles;
Salter’s swing cradle
General rules.—Of the lower jaw.—Of the clavicle.—Of the
shoulder; signs of dislocation into the axilla; when beneath
the clavicle; when behind the scapula. Modes of reduction;
by the heel in the axilla; by simple extension. The
clove-hitch knot.—Of the elbow, signs when both bones
go backwards; distinctions between dislocation and
fracture near the elbow; the mode of reduction by the
knee inside the fore-arm; by extension at the wrist.—Of
the radius, only, by extension at the wrist.—Of the thumb
and fingers; handle for commanding the phalanx.—At
the hip; signs of dislocation backwards, reduction by
extension; by manipulation or leverage; signs of dislocation
downwards, mode of reduction; signs of dislocation
on to the pubes, mode of reduction.—Of the knee;
incomplete, lateral, and posterior; mode of reduction.—Of
the patella, mode of reduction.—Of the foot, mode of
reduction
The Hair suture.—The eye douche, drops for the eye.—Syringing
the ears.—Epistaxis; Ice-cold injection; Plugging
the nares; Belloc’s sound.—Drawing teeth; varieties
of forceps; extracting incisors and canines, bicuspids,
upper molars, lower molars, wisdom molars, roots; the
elevator.—Stopping bleeding after extraction.—Sore nipples;
nipple shields.—Plugging the vagina; Kite’s tail
plug for vagina.—Injecting the urethra. Catheters,
silver; different kinds of flexible catheters and bougies;
conformation of the urethra.—Passing catheters and
bougies; difficulties in doing so; passing the female
catheter.—Washing out the bladder.—Tying in catheters.—Position
for lithotomy.—Bed-sores, applications to
prevent the formation of bed-sores; the floating bed; the
water-cushion.—The stomach-pump, when used to empty
the stomach or to inject food.—Transfusion of blood;
precautions; mode of using the apparatus.—Tourniquets;
the Ring; Petit’s; Signoroni’s; Carte’s; Lister’s; the
make-shift.—Mercurial fumigation; general; local.—Hot
air baths.—Vapour baths.—Sick carriage.—Cupping.—Junod’s
boot.—Leeches.—Stopping leech bites.—Tents.—Setons.—Drainage
tubes.—Issues.—Trusses, requirements
of, inguinal, femoral, umbilical, Salmon and Ody’s.—Cauteries,
iron; gas; galvanic. Caustics.—Vesicants,
mustard, cantharides, iodine.—Corrigan’s hammer.—Poultices
and fomentations.—Lister’s mode of dressing
with carbolic acid.—Irrigation; Esmarch’s irrigator.—Administration
of chloroform, precautions; dangers;
methods; Clover’s inhaler.—Artificial respiration.—Local
anæsthesia.—Ether spray, pulverised fluids.—Chloroform
vapour to the uterus.—Subcutaneous injection.—Collodion.—Vaccination
Trephining the skull.—Operations on the eye.—Hare-lip.—Resection
of the jaw.—Excision of the tongue.—Cleft
palate.—Excision of tonsils.—Laryngotomy.—Tracheotomy
Removal of breast or tumours.—Nævus.—Tapping the pleura.—Tapping
the belly.—Colotomy.—Ovariotomy.—Cæsarian
section.—Strangulated hernia.—Radical cure of
hernia.—Hæmorrhoids.—Fistula in ano.—Cleft perinæum.—Extirpation
of the cervix uteri.—Amputation of
the penis.—Circumcision.—Excision of testis.—Tapping
a hydrocele.—Vesico-vaginal fistula.—Retention of urine.—External
urethrotomy.—Lithotomy.—Lithotrity.—For
removing foreign bodies from the urethra and bladder
Ligature of the larger arteries.—Resections: of the head of the
humerus, the elbow, the hip, the knee.—Removal of
necrosed bone.—Amputations: at the shoulder-joint;
arm; fore-arm and wrist; metacarpus; hip; thigh
and leg; Syme and Chopart’s operation; metatarsus and
toes
CHAPTER I. BANDAGING. — THE HEAD. — THE TRUNK. — UPPER EXTREMITY. — THE LOWER EXTREMITY.
General Rules.—Ordinary bandages are strips of
unbleached calico 6 or 8 yards long, having a breadth
of ¾ inch for the fingers and toes, 2¼ inches for the
head and upper limb, 3 inches for the lower limb, and
6 inches for the body. These, when tightly rolled for
use, are termed rollers. Besides these rollers for
general use there are special bandages, such as rollers
of muslin for using with plaster of paris, of stocking-webbing
when elasticity is needed; four- and many-tailed
bandages for particular fractures, &c. Messrs.
J. & J. Cash, the cambric frilling makers of Coventry,
now make a very firm light bandage of unbleached
cambric woven in the necessary widths and lengths for
use; these are very cool and pleasant, and a decided
improvement on the ordinary calico strips generally
used.
Position of the Operator.—He should place himself
opposite his patient, not at the side of the limb to be
bandaged; the limb too should be bent to the position
it will occupy when the bandage is completed.
Before applying any kind of apparatus, the surgeon
should see that the limb is carefully washed and
dried.
How to hold a Roller.—When applying a roller it
is best to begin by placing the outer surface of the
roller next the skin (see fig. 1, page 3), for it then
unwinds more readily, and the first turns are more
easily secured; moreover the bandage should be carried
from the inner side of the limb by the front to the
outer side, for the muscles are thus more firmly and
pleasantly confined than by turns passing in the
opposite direction; of course this observation supposes
the hand and forearm to be in their usual position of
semi-pronation.
Varieties of Turns.—In carrying a bandage up a
limb, it is necessary, in order to support the parts
evenly, to employ a combination of three different
turns. The simple spiral, reverse, and the figure of 8.
The simple spiral turn is used only where the circumference
of the part increases slightly, as the wrist;
but when the limb enlarges too fast to allow the fresh
turn to overlap the previous one regularly, the turn
must be interrupted, and the bandage brought back
again by reverse, or by figure of 8.
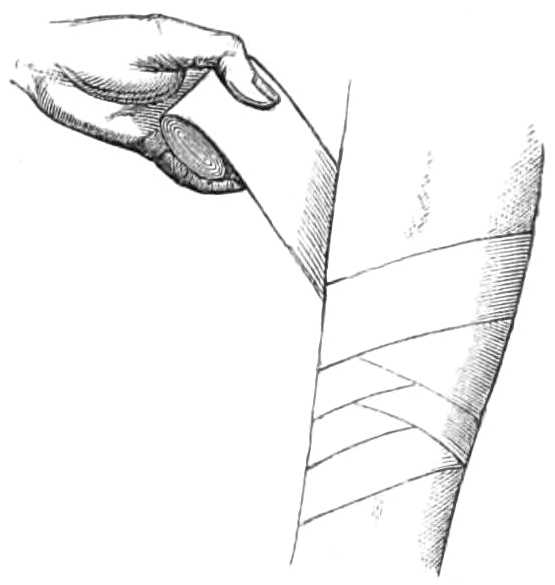
Fig. 1.—Figure of 8 turn.
To reverse the bandage, the thumb of the unoccupied
hand is placed on the lower border of the
bandage while the roller is turned over in the other,
and then passed downwards to overlap and fix the
previous turn evenly. At the moment of reversing,
the bandage should be held quite slack, and not unrolled
more than is necessary to make the reverse.
All the reverses must be carried one above the other
along the outer side of
the limb, and only employed
where really necessary.
Figures of 8 are made,
as their name implies,
by passing the roller
alternately upwards and
downwards as it enwraps
the limb (see fig. 1).
They are adopted where
the enlargement is too
great and irregular for reverses to sit evenly, over the
ankle and elbow joint for instance.
Bandages for the Head.—A roller is commonly
applied in three different ways to the head. 1st. For
keeping simple dressings in place.
Apparatus.—1. A roller 2 inches wide, and of the
usual length.
2. Some pins.
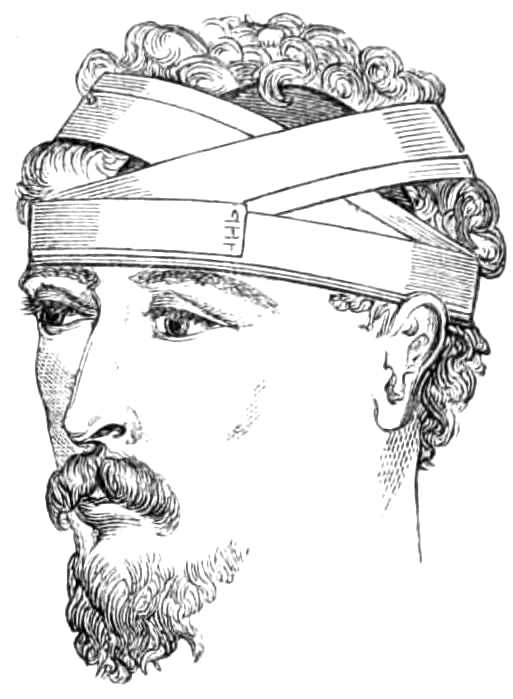
A turn is first carried round the head, over the brows
and below the occipital protuberance, and fastened by
a pin; this being done, the roller is carried across the
dressing, and getting into the line of the first turn, is
passed round the head again, then across the dressing,
and round the head by horizontal and oblique turns
alternately, the former to fix the latter, and prevent
their slipping off the dressing (see fig. 2). In the figure
the oblique turns have been
doubled, and would fix
dressings on each side of
the head.
Fig. 2.—Bandage for retaining
dressings in position, showing
two sets of oblique turns.
Knotted Bandage.—This
is used when pressure
on the superficial temporal
artery is required.
Apparatus.—1. A roller
8 yards long, 2 inches wide,
one-third being rolled into
one head, the rest into
another head.
2. Some lint.
3. A piece of a wine cork
one-third of an inch thick.
4. Needle, thread, and pins.
The cork is folded in a double thickness of lint;
over this are placed six or eight more folds of lint of
gradually increasing size, and the whole are kept in
shape by a stitch passed through them and through
the cork. This forms a graduated compress, and is
then laid on the wound small end downwards.
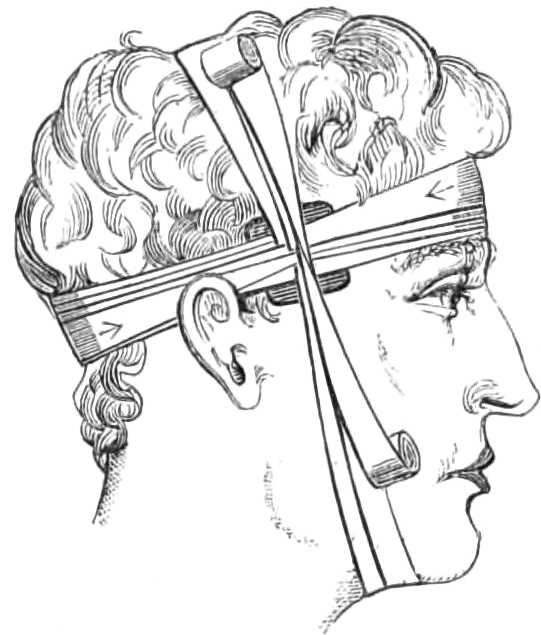
One head of the roller is taken in each hand, its
middle laid over the compress on the injured temple,
say the right; the ends are carried round the head,
one just above the eyebrows to the left temple, and
the other backwards below the occipital protuberance,
to the same point; the ends are then crossed and
changed from one hand to the other to be brought to
the wounded temple. Here they are again tightly
crossed, one end being
carried under the chin
and by the left side to
the vertex, there meeting
the other end, which
has passed over the head,
in the opposite direction
(see fig. 3); at the right
temple the ends are again
crossed or “knotted,”
but this time they are
passed horizontally round
the head. Having done
this the ends are pinned and cut off, or if necessary
the knots repeated before fastening; the first pair,
if tightly drawn, usually
suffice as well as several.
Fig. 3.—Knotted Bandage.
The Capelline
Bandage is rarely required,
but is used when
the restlessness of the
patient renders it difficult
to keep dressings
or ice-bags in place.
Apparatus.—1. A
double-headed roller, 2
inches wide and 12 yards
long.
2. Some pins.
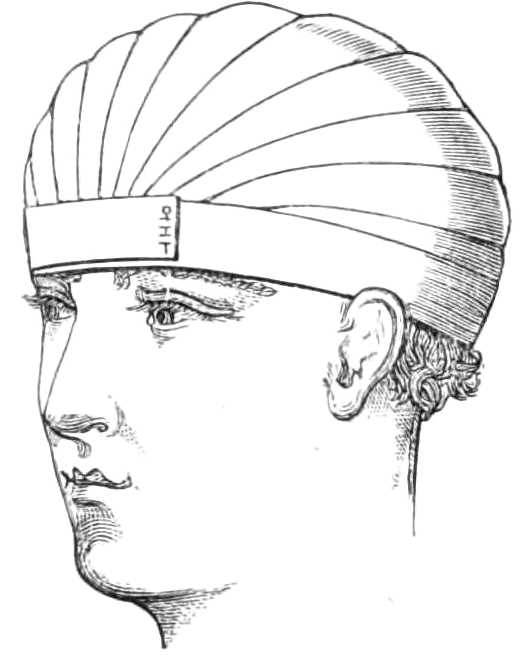
Fig. 4.—Capelline Bandage.
The middle of the roller is laid against the forehead
just above the brows, and the ends passed behind the
occiput, where they are crossed, and while one continues
the circular turns round the head, the other
head of the bandage is brought over the top along the
middle to the front, passing under the encircling turn,
which fixes it. It is then carried back to the occiput,
on one side of the first transverse band, when again
fixed behind by the circular band it is brought forward
on the opposite side of the first, and fixed in front.
This arrangement is repeated until the head is covered
in a closely fitting cap (see fig. 4).
In beginning this bandage, it is necessary to keep
the first circle low down, close to the brows in front,
and below the occipital protuberance
behind, or the
cap will not fit firmly over
the skull.
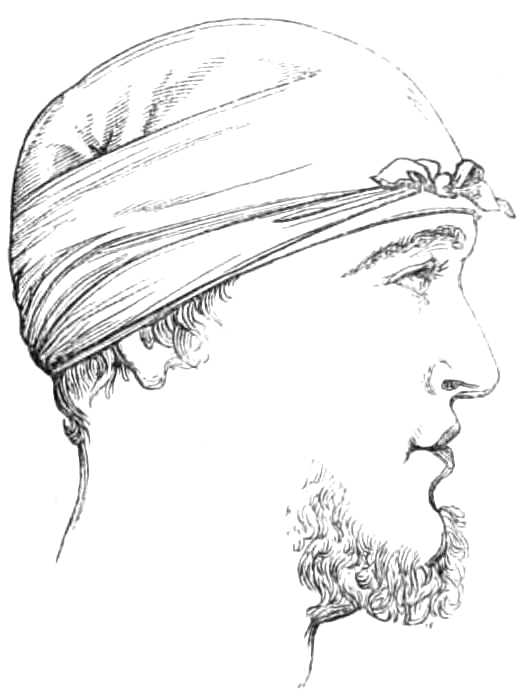
A Shawl Cap is readily
improvised with a silk or
cambric handkerchief folded
diagonally into a triangle;
the base of the triangle is
then carried over the brow,
the apex let fall behind
the occiput, where the ends
cross, and catching in the
apex, come round to the
front to be tied on the forehead.
Fig. 5.—Shawl Cap.
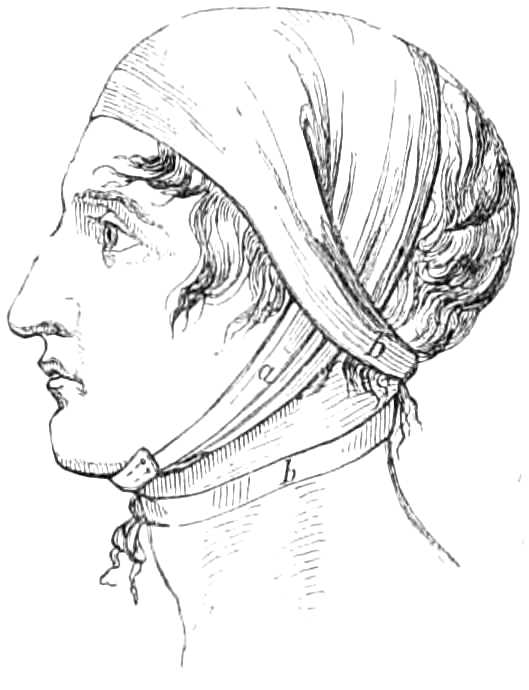
The Four-tail Bandage.—Instead of applying the
handkerchief in the manner just described, it may be
split from each end to within six inches of the middle,
and so converted into a broad four-tail bandage; the
middle is laid on the top of the head, the hinder ends
tied under the chin, and the forward ones behind the
nape of the neck (see fig. 6). Or a piece of calico,
1½ yards long and 4 or 6 inches wide, is split from
each end 3 inches short of
the centre—one pair of tails
being rather wider than the
other. If used on the face,
the middle is put against
the point of the chin, the
two narrow tails are carried
backwards to the nape,
crossed, and pinned together
on the forehead above the
brows. The two broader
tails are carried upwards
in front of the ears, where
they turn round the two
narrow tails, to be either tied or pinned at the vertex.
Four-tail bandages are used elsewhere, as in the axilla,
to keep poultices in place, &c.
Fig. 6.—Four-tail Bandage.
To retain Ice Bladders on the Head.—This is
done by folding a thin napkin over the bladder, which
is then laid against the head or part to be kept cool,
and the ends of the napkin are pinned tightly down to
the pillow at each side. In this way the bag cannot
slip, and its weight is at the same time prevented from
pressing on the head.
To compress the Jugular Vein after bleeding.—After
venæsection of the external jugular vein it is
requisite to keep a compress of lint on the wound.
This is done by fastening the bandage on the neck with
two simple turns, then carrying it in a figure of 8 round
the neck, over the compress and under the axilla of the
opposite side, then round the neck again; if the figure
of 8 is passed pretty firmly, sufficient pressure is made
in this way without interfering with the circulation
through the vessels, and the turns round the neck of
course must not be tight.
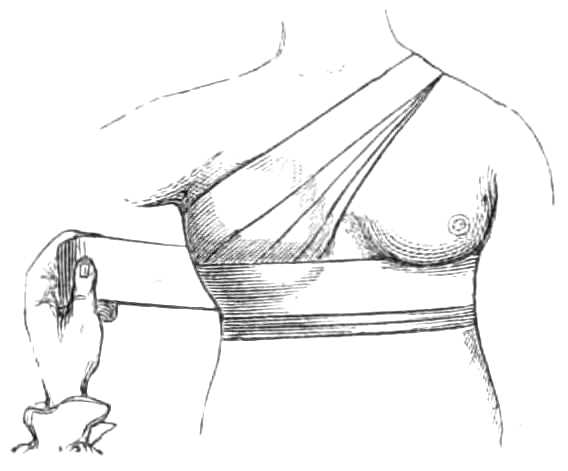
To bandage the Breast.
Apparatus.—1. A roller 3 inches wide and 8 yards
long.
The roller is first carried once round the body below
the breast, beginning in front and passing towards the
sound side. When the bandage is fixed, the roller
ascends over the lower
part of the diseased
breast, to the opposite
shoulder, and comes back
by the arm-pit to the
horizontal turn; it is
then passed round the
chest to fix the oblique
turn. Having done this,
it again is carried up
over the breast and shoulder, and round the body in
alternate turns until the breast is fully compressed,
each turn over the breast being carried higher than the
preceding one, and each turn round the body overlapping
the oblique turn to keep it in place (see fig. 7).
Fig. 7.—Bandage for a Breast.
To bandage both Breasts.—This is readily done
by first bandaging one breast and then, carrying the
roller over the shoulder of the side already bandaged,
bringing it across the sternum and under the second
breast on to the horizontal turns, which it follows
alternately with the oblique ones, as was done in
bandaging the first breast. The only difference is,
that in compressing the first breast the bandage was
passed obliquely upwards, for the second it is carried
obliquely downwards over the breast.
Spica Bandage.
Apparatus.—1. A roller or 2½ or 3 inches wide.
2. Some pins.
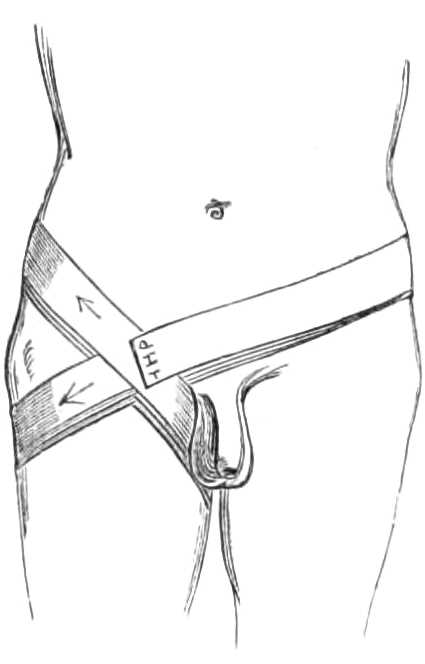
Fig. 8.—Spica for the Groin.
Lay the end on the groin to be bandaged, carry the
roller between the great trochanter and the crista ilii
round the pelvis to the other
side, passing there also between
the crista ilii and trochanter;
next take the roller downwards
in front of the pubes to the
injured groin, then outwards
round the thigh below the
trochanter to the gluteal fold,
and pass it up between the
thighs to the groin, where the
figure of 8 is completed. A
second and a third are to be
passed in the same way, carrying
them exactly one over the
other, round the body and below the buttock (see
fig. 8); at the groin they should overlap, each lying
a little above the preceding turn. A pin, when the
necessary number of turns is completed, fastens down
the end.
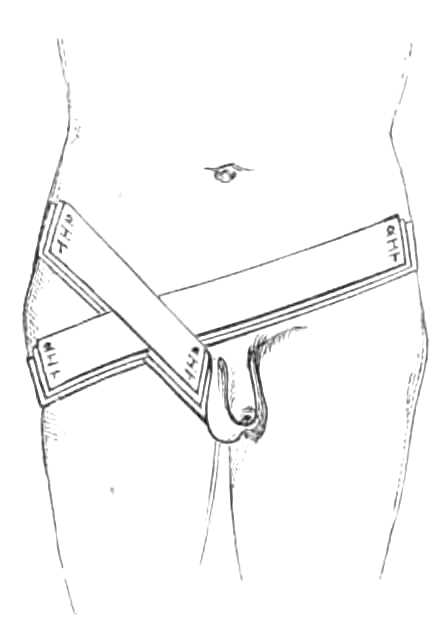
Hernia Spica.—The spica bandage is usually required
to keep dressings and compresses in place over
wounds after operation for strangulated hernia, sinuses,
&c., in the groin; when the figure of 8 has been put
on the first time it may be cut across in front; and,
the dressings being changed, the ends may be fastened
together by pins. If additional
strips are laid across
and fastened to the figure of
8 underneath, the required
pressure is obtained, and much
tedious lifting of the patient is
saved (see fig. 9.)
Fig. 9.—Hernia Spica.
Body bandage for tapping
the Belly in Ascites.—This
is made of two thicknesses
of stout flannel, 2 feet
wide in the middle, where it
forms a continuous sheet for
18 inches, but beyond that it is split into 3 tails, 6
inches wide and 3 feet long. In the middle line, 4
inches below the centre, is a round hole 2 inches
across, through which the surgeon reaches the skin to
insert the trocar.
When in use, the middle of the bandage is placed in
front with the hole in the mesial line of the body,
and midway between the umbilicus and pubes; the
ends of the right side are passed behind the back to the
left, interlacing with those from the left side. When
all is ready, an assistant standing on each side of the
bed pulls steadily on the ends to keep up continuous
pressure on the abdominal viscera as the fluid escapes.
After the fluid is evacuated the ends are wound
firmly round the body in front, while the puncture in
the wall of the belly is closed by a fold of lint attached
with a strip of plaster.
The T Bandage is used to apply dressings, compresses,
&c., to the anus or perinæum. A roller 3 inches
wide is fastened by a couple of turns round the pelvis,
and then fixed by a pin at the middle line in front.
From this point the roller is carried tightly over the
dressings to the corresponding point behind, and returned
once or twice more until sufficient pressure is
gained, when it is fastened off.
The Strait Jacket is made of jean or stout canvas.
It is cut long enough to reach below the waist,
around which a strong tape is carried to be drawn
tight and tied after the jacket is put on. The sleeves
are several inches longer than the arms, and their ends
can be drawn close by a tape which runs in the gathers;
a similar tape confines the garment round the neck,
and it is tied behind by tapes down the sides. When
the jacket is to be put on a patient it is first turned
inside out, then one of the nurses or assistants thrusts
his own arms through the sleeves, and facing the
patient, invites him to shake hands; having thus obtained
possession of the patient’s hands he holds them
fast while a second assistant, standing behind the
patient, pulls the jacket off the first assistant on to
the patient, whose hands are thus drawn through the
sleeves before he perceives the object of the manœuvre;
the jacket is next tied round the neck and behind, the
tapes of the sleeves are carried round the body, drawn
tight till the arms are folded across the chest, and
fastened to the bed on each side, or tied round the
body.
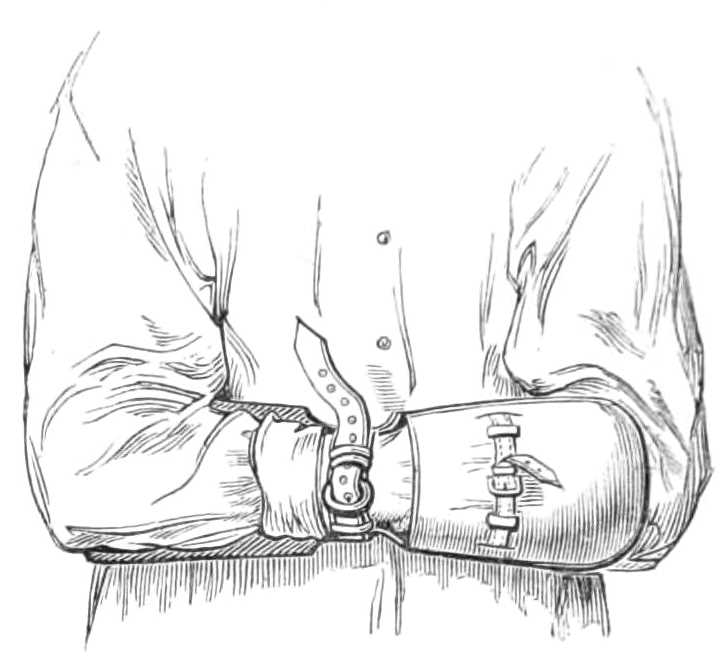
Manacles for Delirious Patients.—Instead of the strait
jacket a double leathern muff is now generally used to
restrain unruly patients. It irritates them less, and is
far more easily applied.
Fig. 10.—Manacles for confining the arms of
delirious patients.
In wearing it the arms are crossed in front, and a
strap drawn tight round both wrists. Each hand is
thrust into a stout leathern glove, or muff, connected
with the wrist-strap, and capable of being tightened
over the fingers by a strap and buckle across the
glove.
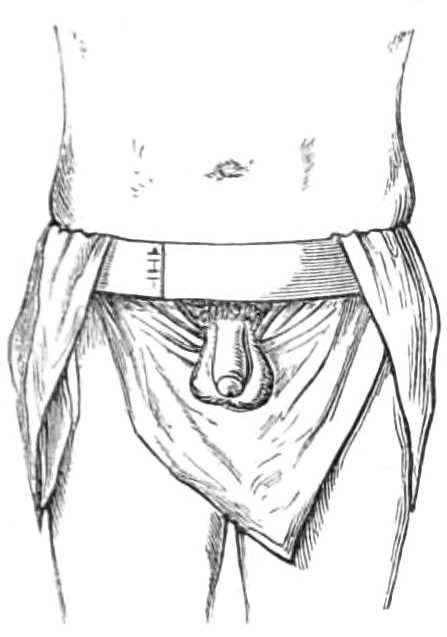
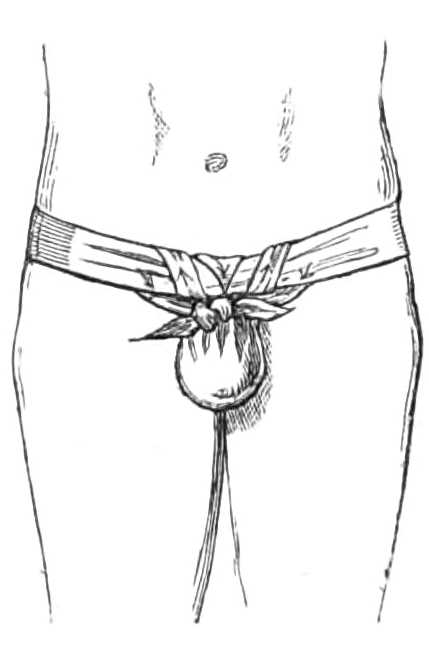
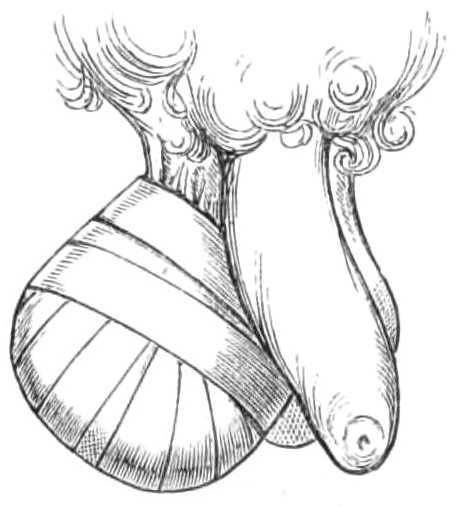
To suspend the Testicles.—Suspensories are
made specially for this purpose. The best are fastened
round the neck by a loop of elastic tape, but a very
efficient one can be improvised with a pocket handkerchief
and a piece of bandage. The bandage is tied
tightly round the hips for a girdle, the handkerchief is
folded three-corner wise, and its longest side slipped
behind the testes, the ends being passed over the girdle
(see fig. 11), and tied again behind the scrotum. The
loose apex of the handkerchief is drawn up in front
over the girdle and pinned to it, which is all that is
required (see fig. 12).
Fig. 11.—Shawl Suspensory
for the Testes, in the first
stage of application.
Fig. 12.—Suspensory for
Testes completed.
When the patient is recumbent, the testes may be
supported by a strip of diachylon plaster 2 feet long
and 4 inches wide, passed across from hip to hip underneath
the scrotum and testes, which lie supported on a
shelf.
Another way of raising the testes is to place a soft
pincushion between the thighs, and allow the swollen
gland to rest on the cushion.
Bandage for the Fingers and Thumb.
Apparatus.—A ¾-inch wide roller.
The fingers are bandaged to prevent œdema when
splints are tightly attached to the fore or upper arm.
A roller ¾ inch wide is passed once round the wrist and
then carried over the back of the hand to the little
finger; then wound in spirals round it to the tip and
returned up the finger, completed by a figure of 8
round the wrist and the root of the finger, and returned
to the wrist before being brought across the
back of the hand to the next finger, to which it is
applied in the same manner till the four fingers are
covered. It is a good precaution
to place a shred of cotton wool
between each finger before carrying
the figure of 8 turn round
the root; it prevents the bandages
from chafing the tender skin.
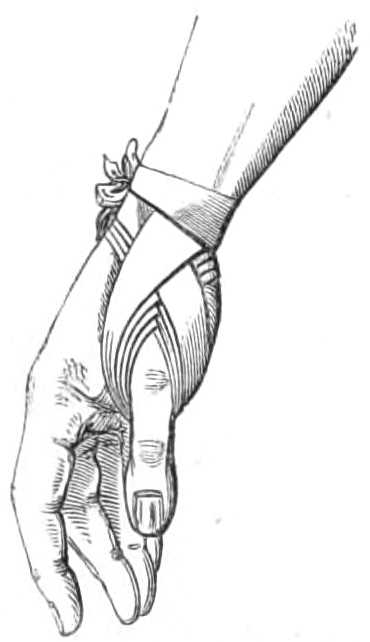
The thumb is bandaged rather
differently: the roller is commenced
in the same way round
the wrist, but the first turn is
carried at once beyond the last
joint, turned once or twice
round the last phalanx, and continued
by reverses to the metacarpo-phalangeal
joint; the ball of the thumb is then
covered by figures of 8 round the thumb and wrist.
This is called the spica for the thumb.
Fig. 13.—Spica for the
Thumb.
This plan is sometimes employed to compress bleeding
wounds of the ball of the thumb, and is applied
without previously covering the phalanges, as in fig. 13.
The Hand and Arm.
Apparatus.—1. A roller 2¼ inches wide for an adult,
but narrower for a child.
2. Some cotton wool.
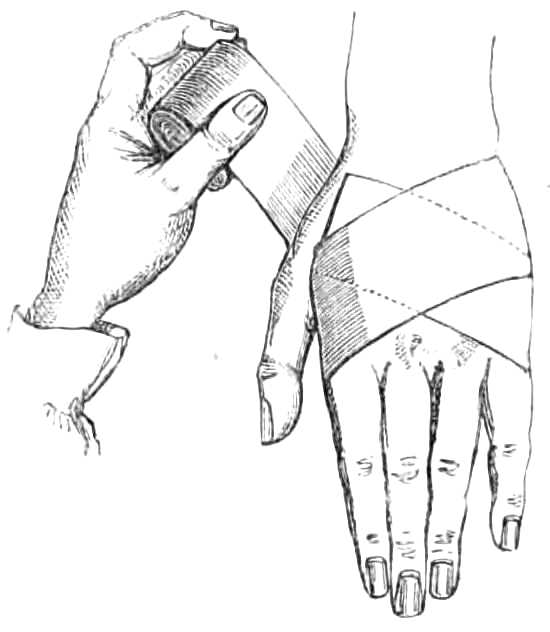
A little cotton wool should fill the palm before
applying the roller. The bandage commences with
figures of 8 carried round
the hand and wrist.
The roller is first passed
across the back of the
hand from the radial
border of the thumb to
the root of the little
finger (see fig. 14), and
then across the palm,
reaching the back of
the hand between the
thumb and forefinger.
Fig. 14.—Commencing to bandage
the hand.
When the hand is
covered by these figures
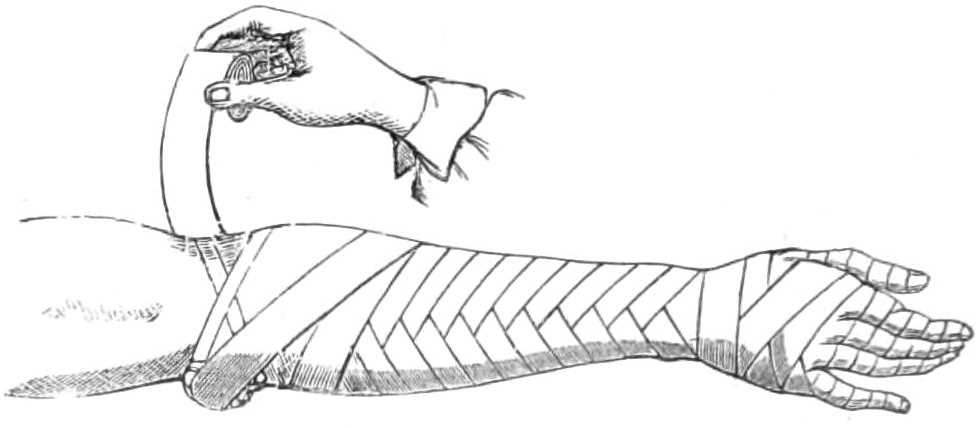
of 8 the bandage is passed up the forearm by reverses
placed over the extensor muscles till the elbow is nearly
reached. Before going further a dossil of cotton wool
is placed in the bend of the elbow, and on the inner
condyle; the joint is bent to the degree that will be
required by the splint, and the patient told to grasp
some part of his dress, or the sleeve of the other arm,
that he may not unconsciously extend the joint again
while the bandage is being rolled round it.
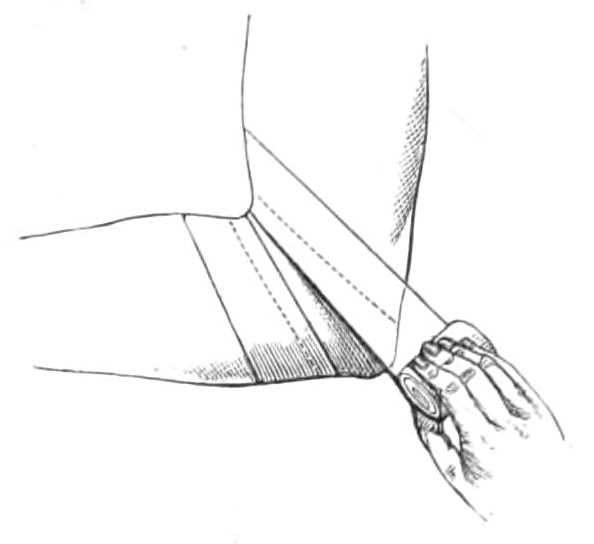
The elbow is covered by first carrying the roller
round the joint, so that the point of the olecranon
rests on the centre of
the turn (see dotted
lines, fig. 15). The
bandage is then continued
in figures of 8,
passing above and below
the first turn until the
elbow is covered in and
the bandage of the forearm
is completed.
Fig. 15.—Bandage covering the
elbow. The first turn over the
point of the elbow is shown by
the dotted lines.
Fig. 16.—Spica Bandage for
the shoulder.
The arm is covered by
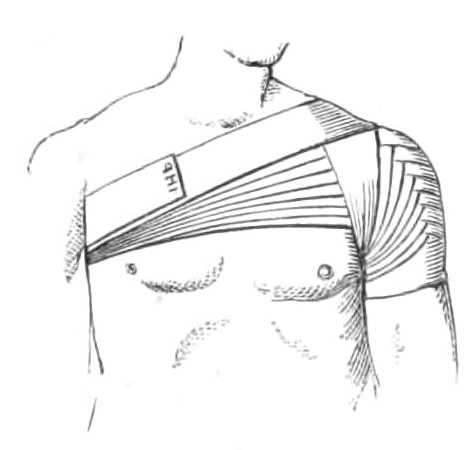
spirals and reverses till
the armpit is reached. Before bandaging the shoulder
the armpit is protected by cotton wool or a double fold
of soft blanket; the roller is then carried in front of
and over the shoulder, across
the back to the opposite axilla,
where also some wool should
be placed, then across the
chest to the top of the shoulder
again, and under the armpit
to the front (see fig. 16).
These figures of 8 are repeated
as often as necessary to complete
the covering. The
bandage is applied in this
method for dressings; but when pressure is needed the
first turn may be carried at once to the root of the
neck, and each succeeding turn made to overlap below
the last, until the point of the shoulder is gained, as
in fig. 37, p. 55. These are called the spica for the
shoulder.
Wound of the Palmar arch.—Bleeding from
this wound can usually be stopped by pressure on the
bleeding point, when this fails an attempt should be
made to tie the vessel at the wound, and if this be
impracticable the arteries of the forearm must be
deligated.
For compression the following is necessary:—
Apparatus.—1. Petit’s tourniquet.
2. Straight wooden splint.
3. Rollers 2 inches wide, and ¾ inch wide for fingers.
4. Pad and cotton wool.
5. Lint.
6. A slip of a wine cork.
7. Scissors and needle and thread.
8. Lunar caustic.
Step 1. First apply the tourniquet to the brachial
artery, to control the hæmorrhage while the apparatus
is being adjusted.
Step 2. Make a graduated compress by folding a
sixpence or slip of a cork in two or three thicknesses
of lint, trim the lint into circular disks and prepare a
dozen similar disks of increasing size; lay these one on
each other to form a round cone about one inch high
with the piece of cork at the apex, and fasten them
together by a thread.
Step 3. Clean and dry the wound, then rub its
surface carefully with nitrate of silver, to lessen the
suppuration.
Step 4. Bandage the fingers and thumb, and prepare
the splint, which should be straight, as broad as
the forearm, and long enough to reach from the elbow
to the tips of the fingers; it should be lightly padded.
Step 5. Envelope the wrist with a little wool; next
lay the graduated compress on the wound, the small
end downwards, and press it firmly in with the left
thumb, while the splint is applied to the back of the
hand and forearm. These are then fixed by a roller
carried in figures of 8 round the hand and wrist
across the compress until that is tightly pressed into
the wound and the splint fixed to the limb. The
roller is then carried along the forearm, a fold of wool
laid in front of the elbow, the tourniquet removed and
the roller carried to the axilla while the forearm is
raised, flexed across the chest, and fastened to the side.
This apparatus is worn without being disturbed for
three or four days if bleeding do not return; but at
the end of this time it should be examined; if painful
or if discharge ooze out at the wound, the bandage
should be removed and readjusted less firmly than
before, a piece of wet lint replacing the graduated
compress.
Venæsection.—Bandage and bleeding at the bend
of the elbow.
Apparatus.—1. Lancet.
2. Tape.
3. Pledget of lint.
4. Dish.
5. Staff.
In opening a vein at the bend of the elbow, the
median basilic is selected, simply because it is usually
the largest, but any branch that is superficial, and well
filled with blood, may be opened.
The patient should sit or stand, in which positions,
syncope, one of the objects of bleeding, is attained by
the abstraction of a less amount of blood than in the
horizontal posture.
The surgeon places a graduated bleeding dish on a
chair or stool within his reach, and a pledget of lint in
his waistcoat pocket; he next gives the patient a heavy
book, or staff to grasp in his hand. The arm being
bare to the shoulder, a tape, ¾ inch broad and 1¼ yard
long, is tied round the arm tight enough to impede the
venous, but not the arterial flow.
The surgeon standing opposite his patient and
grasping the arm to be bled with his left hand, so that
his thumb controls and steadies the swollen vein, takes
his lancet between the right forefinger and thumb;
then going through skin and vein at one stroke,
carries the lancet upwards for about ¼ inch along the
vein. The puncture of the lancet should be quite
vertical, and the extraction also made quite vertically,
that the slit in the vein may correspond to the slit in
the skin.
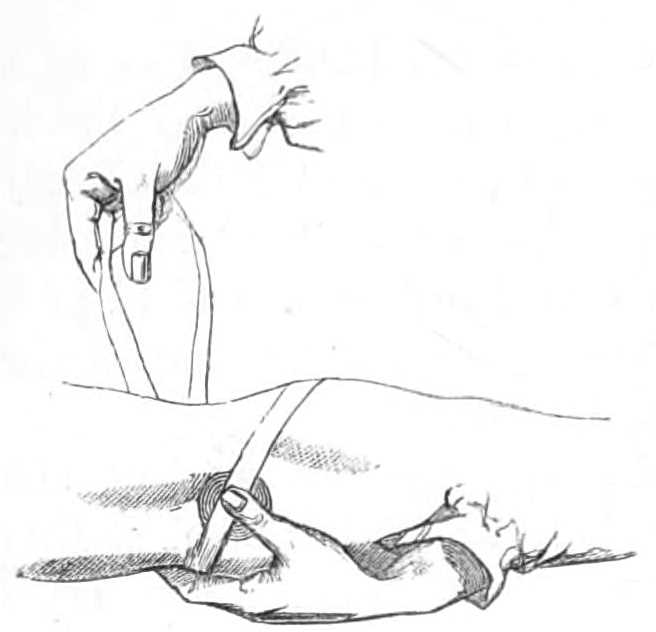
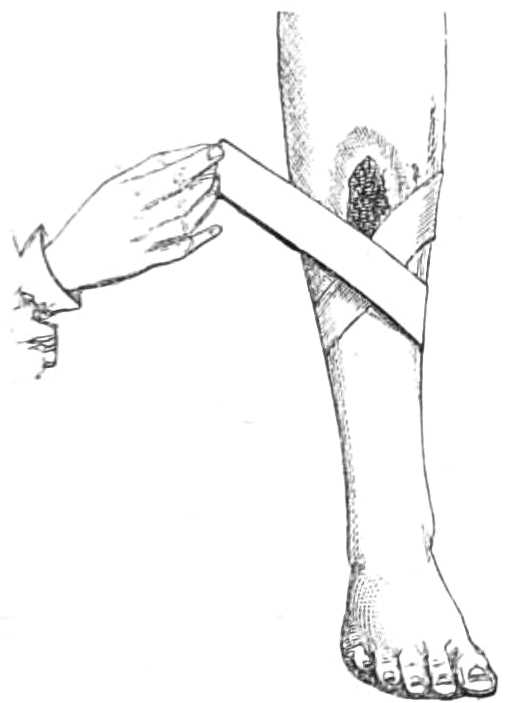
Fig. 17.—Adjusting the tape after
bleeding.
This being done, the operator lays aside his lancet,
and takes up the dish, holding it so that the blood shall
flow into it: when the dish is placed, he lifts his left
thumb from the vein cautiously or the sudden spirt of
blood will fall outside the dish and be lost. When the
desired amount is drawn, the operator compresses the
vein again with the left thumb, and setting down the
dish, puts the pledget of lint over the wound. He
keeps the pledget in place with his left thumb, while
he releases the tape round the arm and places its
middle obliquely across the pledget. His left thumb
presses the pledget on the wound, while the right hand
takes the end of the tape which is farthest from his
left, and passes it
under the forearm
below the elbow to
his left fingers, which
grasp it tightly. He
then takes the other
end with his right
hand (see fig. 17), and
bringing it round the
arm above the elbow,
carries it across the
pledget: as he does
this, he replaces his
left thumb on the
compress with his
right forefinger, which he keeps there while he brings
up the end of the tape he has already in his left
fingers, and throws it over the arm above his right
forefinger, then passing his left hand below the right
forefinger, he catches the same end of the tape again
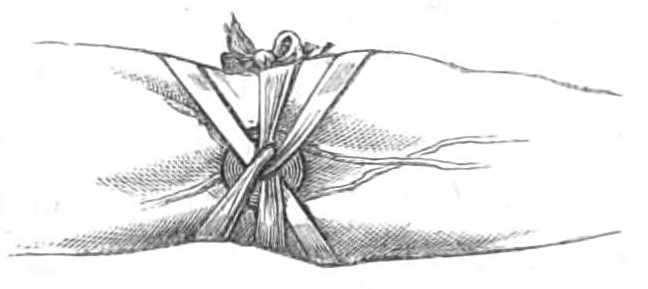
and draws it back. The two ends thus locked in a
loop over the compress, are secured by tying them in
a bow outside the elbow and the operation is finished
(see fig. 18).
Fig. 18.—The bandage completed.
For adults the most useful width for the rollers is
3 inches, and the length the ordinary one of 8 yards.
The Foot is usually bandaged without covering the
heel, and the bandage is begun as follows:—
The roller being held in the right hand for the right
foot, or in the left hand for the left foot; the unoccupied
hand takes the end, and passing it under the sole,
brings it up on the back of the foot just behind the
toes, where it is made fast by carrying the roller outwards
over the back. When one turn is completed,
the bandaging is continued by reverses until the metatarsus
is covered, then one or two figures of 8 round
the foot and ankle carry the bandage to the leg, where
it proceeds upwards by spiral turns round the small of
the leg, and by reverses up the calf. The reverses lie
at equal distance up the leg, on the muscles, not over
the bone, that the skin be not pinched between the
crease of the bandage and the bone. When the calf is
passed, the roller is continued by figures of 8 above and
below the knee, until that joint is covered in, then by
reverses up the thigh to the groin, where the bandage
terminates by a spica round the body (see page 9).
This is the ordinary bandage for the lower limb. There
are some varieties for particular parts, these are:—
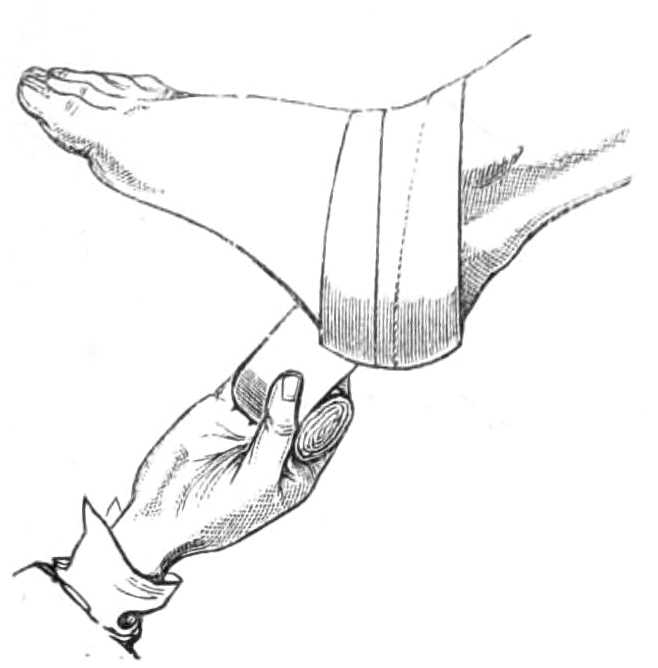
To cover the Heel.—Holding the roller as for the
foot, pass the end behind the heel, bring it out by the
outside over the front of the ankle-joint, and complete
the turn with the roller. In doing this, the point of
the heel must catch the middle of the bandage. If
the foot is a long one, the roller should be three
inches broad; but a narrower bandage is more easily
fitted on a small foot. After the first turn, the bandaging
is continued by
carrying the roller in
figures of 8 round the
foot and ankle, passing
alternately above
and below the first
turn until the ankle
is covered as in fig.
19.
Fig. 19.—Covering the Heel.
To bandage a
Toe.—Take two
turns round the foot,
with a bandage one
inch wide, then go round the toe to be raised, and back
again round the foot. This figure of 8 lifts a toe above
the rest if taken from the dorsal, and depresses it if
taken from the plantar surface.
The Knee is bandaged by beginning with a simple
turn round the leg above the calf, then carrying the
roller across the patella to the thigh above the knee:
and next entwining it in a circular turn round the
thigh before descending over the patella to the leg
below the knee, where this is repeated until the knee
is covered.
To bandage a Stump.—The flaps are first supported
by two or more strips of plaster, one inch wide
and ten or twelve long, carried from the under surface
of the limb over the face of the stump, and a slip of
wet lint and oilskin is applied to the wound. The
muscles and soft parts are next confined by a bandage.
This is first fixed by simple turns below the nearest
joint, and brought downwards in figures of 8 round
the limb till the end of the stump is reached, which is
next covered in by oblique and circular turns carried
alternately over the face of the stump and round the
limb, as is shown in fig. 2 for bandaging the head. Or,
if a double-headed roller be used, in the manner directed
for the capelline bandage on page 5.
Extending a Stump.—When the soft parts fall
away from the bone they may be drawn down by attaching
a weight by cord and pulley, as described for
extending the hip-joint (see fig. 80). The stump should
be lightly bandaged and the cord fastened to its upper
and under surface. The weight is very small at
first, and should be increased from time to time as
required.
Many-tail, or 18-tail Bandage, or bandage of
Scultetus.—A roller is cut into short lengths long
enough to encircle the limb and to let the ends
overlap 2 or 3 inches; these are applied separately,
the lowest first, the next overlapping it, and the next
overlapping the second until the requisite number
are applied. Sometimes the tails are attached to each
other before they are applied. To do this, the tails
are laid out on a table, so that the second overlaps
one-third of the width of the first strip, and the third
strip overlaps the second, and so on. When all the
tails are arranged, a strip is laid across their middle
and fastened to each tail by a stitch; but this is not a
necessary part of the bandage, and it prevents single
tails from being removed. This bandage is used in
compound fractures and other wounds, as the soiled
strips can be replaced without raising the limb to pass
the roller under it.
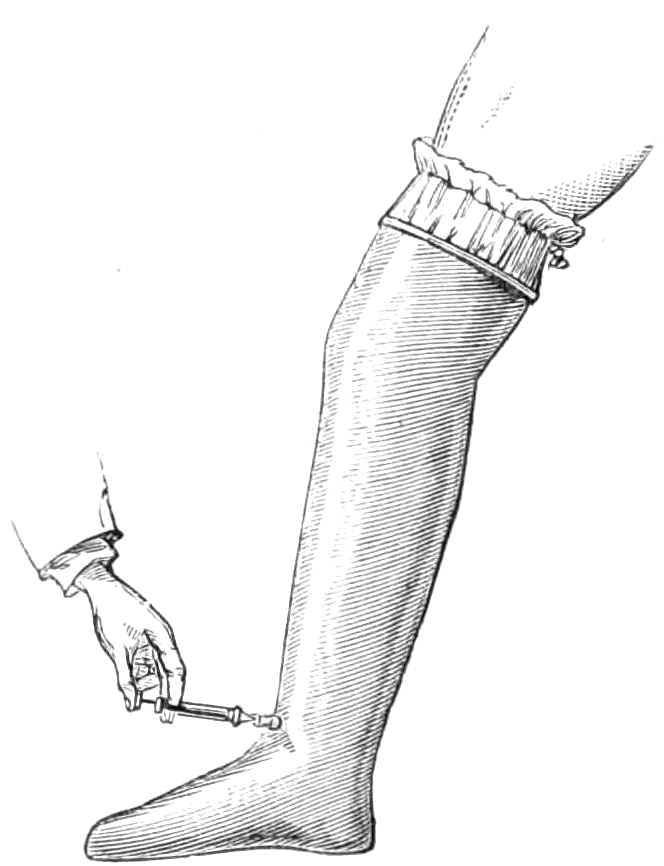
Elastic Socks and Stockings are made to support
varicose veins of the legs. They are woven of
india-rubber webbing with silk or cotton. The latter
are the lowest priced and often even the most comfortable
to wear. The stockings should fit carefully
everywhere, especially at the small of the leg, where
they generally are too slack, while they cut at the
upper end below the knee.
CHAPTER II. STRAPPING.
Strapping is a method of supporting weak or swollen
joints and other parts. Sheets of calico, wash-leather,
or white buckskin, spread with lead or soap plaster,
are prepared for this purpose. A sheet should be
rubbed with a dry cloth before using, to remove adherent
dust, &c. It is then cut into strips varying in
width between ¾ inch and 2 inches, according to the
evenness of the surface to be covered: narrow strips
fit best over joints and irregular surfaces. When
applied to a limb, the strips should be about one-third
longer than its circumference. Each strip or strap is
first warmed by holding it to a fire, or by applying its
unplastered side to a can of boiling water; when hot,
the strip is then drawn tightly and evenly over the
part. If the surface to be strapped be irregular, it is
best to dip each strip of plaster in hot water before
applying it, being thus quite supple the strap fits the
limb more exactly. When the limb is thickly beset
with hairs, it is a good plan to shave the part where
the plaster will lie before putting on the straps.
Strapping the Breast.—Strapping is put on the
breast in the same way as the bandage (page 8). The
straps should be not more than 2 inches wide, and long
enough to pass forward under the axilla and breast
from the lower angle of the scapula on the same side
as the injured breast, across the chest as far as the
spine of the other scapula. The strips are then
warmed and laid on alternately over the breast and
across the chest, until the former is fairly supported.
Strapping has this advantage over a bandage—its
circular strips do not pass round the chest completely
and thereby hamper the breathing as the roller
does.
To strap the Testicle.
Apparatus.—1. Strips of soap plaster spread on
calico, or better, on wash-leather, ½ inch wide and 12
inches long.
2. A can of boiling water.
3. Razor and soap.
Fig. 20.—Strapping the
Testis.
First, shave the scrotum; then tighten the skin
over the testis with the left thumb and forefinger
passed above it; take a strip
of plaster 6 inches long and ½
inch wide, and encircle the
cord tightly with it; next pass
another strap of the same
width, 9 or 10 inches long,
from the back of this ring,
over the testicle to the front,
drawing it tight also (see fig.
20). The strapping is continued
by laying fresh straps
over each other until the
whole testis is covered in. Lastly, take a strip 15 or
20 inches long, and, beginning at the ring above, wind
it round and round the testicle until all the vertical
strips are confined in place by this spiral strip.
The strapping should be re-applied the second or
third day, as the testicle by that time will have shrunk
within its case.
Fig. 21.—Strapping an Ulcer.
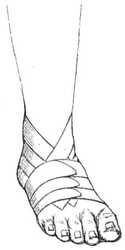
Fig. 22.—Strapping the Ankle.
Strapping Ulcers and Joints.—Cut strips of
plaster one-third longer than the circumference of the
part to be strapped; if that is irregular, as the ankle
or wrist, they must be narrow: commonly the width
varies between ¾ inch and 1½ inch. The strips are
warmed, the middle passed behind the limb, the ends
crossed in front (see fig. 21) and drawn tight, but with
sufficient obliquity for the margins of the strip to lie
evenly. The strapping is begun as low down the limb
as requisite, and continued upwards by laying on more
strips, each overlapping about two-thirds of the preceding
strap. When the process is finished, the ends
should meet along the same line, and all the uppermost
ones be on the same side.
The ankle is strapped differently. Strips are prepared
about ¾ inch wide; one is carried behind the
heel and its ends brought forward till they meet on
the dorsum of the foot; a second, encircling the foot
at the toes, secures the first; a third is again carried
behind the heel above the first, and is fixed by a fourth
round the foot. This is continued until the foot and
ankle are firmly supported (see fig 22).
Strapping a Joint with Mercurial Ointment.
(Scott’s Bandage.)
Apparatus.—1. Mercurial ointment.
2. Diachylon plaster.
3. Lint.
4. Spirit of camphor.
5. Cotton wool.
6. Freshly scalded starch, or solution of gum.
7. Binder’s millboard.
Spread the ointment on a piece of lint large enough
to cover the joint, and to extend four or six inches
above and below it; then wash the joint with warm
water and soap and dry it carefully; next sponge it
well with the spirit of camphor for five minutes. Tear
the lint into strips and wrap it round the joint; then
strap the part firmly from below upwards over the lint
with strips of diachylon plaster, each overlapping the
preceding. Lastly, envelope the joint in a thin layer
of cotton wool, and roll a bandage soaked in starch
over all. If the patient wears no other kind of splint
the bandage may be strengthened by laying a piece of
millboard well softened in boiling water along each
side of the joint before the starch bandage is applied.
As the enlargement of the joint shrinks, this application
must be renewed, usually every fortnight is often
enough.
CHAPTER III. FRACTURES. — HEAD AND TRUNK. — THE UPPER EXTREMITY. — LOWER EXTREMITY.
Fracture of the lower Jaw.—The External
Splint and Bandage.—A method requiring the
lower jaw to be firmly fixed against the upper one
while the broken bone knits.
Apparatus.—1. One and a half yards of bandage
four inches wide.
2. A piece of gutta-percha, sole leather, or binder’s
millboard.
3. Dentists’ silk or wire.
4. Boiling hot, and cold water.
Step 1. The fracture is first reduced. While the
apparatus is being fitted, the recurrence of the displacement
is prevented by the hands of an assistant,
or by lacing the teeth together with stout silk or wire.
It is well also to wet the patient’s chin with a sponge
and cold water, to prevent the gutta-percha from sticking
to his beard while it is soft.
Step 2. A piece of gutta-percha is prepared 2½ inches
wide and long enough to reach from one angle of the
jaw to the other when passing in front of the chin.
This is softened thoroughly by immersion in boiling
water, and when quite pliable should be quickly removed
from the hot and plunged for a moment into
cold water: if a towel be previously laid in the hot
basin, the gutta-percha can be lifted on it without
stretching. It should be laid on a table, and its surface
sponged with cold water to prevent it sticking to
the skin, it is then slit from each end into tails 1 inch
and 1½ inch wide, leaving 2 inches uncut at the centre.
So prepared, the splint is applied to the jaw with the
middle pressing against the chin, the narrower ends
being carried horizontally backwards to the angles of
the jaw; the broader part is next bent up beneath the
chin, its ends overlapping the horizontal ones. While
the splint is still soft, the surgeon presses it firmly
upwards that the gutta-percha may mould itself accurately
to the chin. When set, the splint is removed,
trimmed, and punched with holes here and there for
evaporation. A covering of wash-leather may be
added, if desired. When the splint is finished, it is
replaced on the chin. If sole leather or pasteboard
be used instead of gutta-percha, they must be prepared
in the same way, but allowed to remain on the chin
twenty-four hours that they may set before the final
trimming and adjustment.
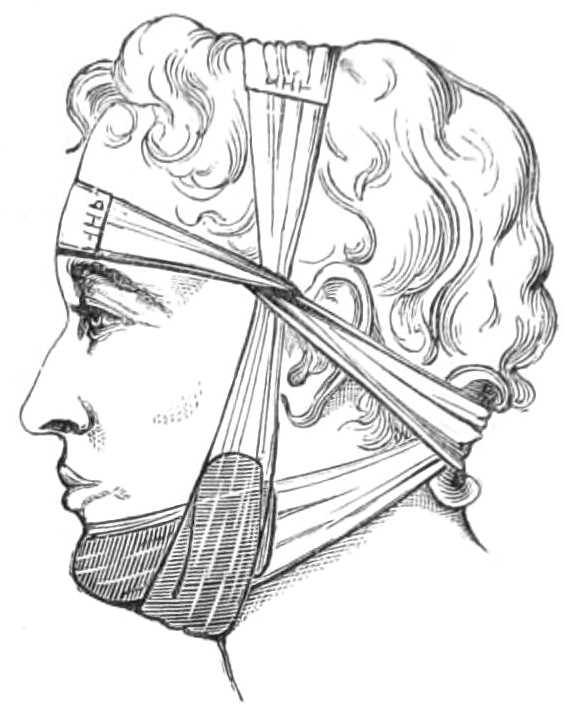
Step 3. A bandage, 4 inches wide and 1½ yard long,
and slit from each end to about 2 inches from the
centre, is then applied to the splint, and a small pad
of folded flannel should be placed at the nape of the
neck to protect the skin from the crossed bandage.
When all is ready, the two upper ends are carried
behind the neck, crossed, drawn tight, and tied or
pinned on the forehead; the lower ends are carried
upwards, taking a turn round the first pair at the
temples, and fastened at the vertex (see fig. 23).
Fig. 23.—Outside splint for fracture
of the lower jaw.
The ligatures that
may have been used on
the teeth can now be
removed, or if they cause
no pain, they may be
left for a week or two.
It is a useful precaution
to place a piece of
soap plaster spread on
soft leather, under the
chin and along the
throat, to protect the
skin from the chafing of
the splint while it is worn.
Sometimes the jaws close too nearly to allow food
to be taken between them. It is then necessary to
place a thin wedge of softened gutta-percha, 1½ inch
long, ½ inch wide, and about ⅓ inch thick, between the
molars on each side. The gutta-percha must not be
softened much, or when the bite is taken the teeth
will pass through it. These plugs should be omitted
unless absolutely required, as the fragments keep a
better position without them.
On emergency, when gutta-percha, leather, or pasteboard
are not at hand, the jaw may be set, and then
kept in position by a four-tail bandage, made from a
pocket-handkerchief, until more complicated apparatus
can be prepared.
The apparatus must be worn five weeks before it is
laid aside and mastication permitted.
Interdental Splints.—In cases of unusual difficulty,
interdental splints may be employed. To fashion
some of these, the mechanical skill of a dentist is
requisite, unless Morel Lavallée’s plan is resorted to.
He applied a mould or socket to the line of the teeth,
and kept it in place by pressure underneath the jaw.
He first brought the fragments into apposition by
means of threads and wire. Then he took a piece of
gutta-percha, about ⅓ inch thick and ½ inch broad,
and long enough to extend, when bent along the lower
jaw, from one wisdom molar to the other. This was
softened in water, and pressed on the teeth; next a
well-padded horse-shoe plate was placed under the
chin, reaching from one angle of the jaw to the other,
and two wires were passed through the side of this plate
opposite the angle of the mouth; these were drawn
through the plate by a screw nut; their upper ends
being curved into hooks with sharpened points. The
points catch into the gutta-percha; by screwing up
the nuts, the chinplate was raised, and the teeth driven
up and bedded into the splint.
This method, however, has its disadvantages. If
the fracture take place behind the first molar, the
bearing on the upper fragment is too slight to keep it
down in its place.
In the New York Medical Journal for September
and October, 1866, Mr. Gunning, of that city, has
published a mode of applying caps fitted to the teeth
for fracture of the jaw-bone. External support is
abandoned wherever it is possible. In simple fractures,
the caps or interdental splints, being accurately fitted,
require no fastening to the teeth.
The jaw should be adjusted in its splint as quickly
as possible after the accident. The fragments are first
brought into their true position. Gaps through loss
of teeth at the line of fracture, are filled by plugs of
hard wood, and the fragments kept in place by wiring
the teeth together tightly. Continued strain on the
teeth causes much pain; hence all means for keeping
the fragments in place
while the splint is being
fitted should be removed
when that is
accomplished, though
ligatures used solely to
support loosened teeth
may be left, as there is
no traction upon them.
Stumps, and teeth loose
before the accident are
best taken out, if they
interfere with the arrangement of the splint.
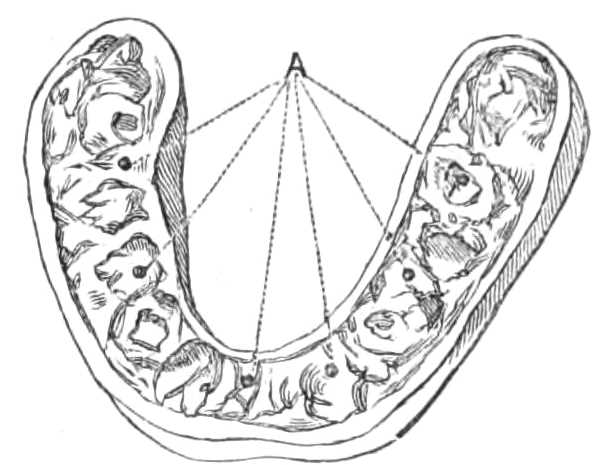
Fig. 24.—Vulcanite Interdental Splint
to fit the arch of the teeth of the lower
jaw, seen upside down. The holes
marked a pass through to the upper
surface, to allow water to be injected
between the splint and the teeth,
while it is worn, for cleaning.
The next thing is to take a mould of the lower jaw
in wax softened by heat, holding the wax in an ordinary
dentist’s tray. From this mould a plaster cast
of the jaw is made. If the line of teeth be uneven in
the cast, it is to be sawn through, the pieces raised to
the right level, and cast again. In this cast a vulcanite
plate is made exactly fitting the teeth (see fig. 24).
The margins of the mould or splint should be carried
down below the line of the gums, to grasp the jaw
beyond the alveolar border; and when the fracture
takes place behind the teeth, its outer side should be
prolonged backwards as far as the muscles will allow,
to prevent the displacement of the anterior fragment
outwards which muscular action produces in these
fractures. Holes should be made in the top of the
splint, to permit a stream of water to be sent between
the splint and the teeth daily, for cleanliness. Also,
in difficult cases, a hole
should be cut opposite
a tooth in each fragment,
for ascertaining
from time to time that
each part continues in
its proper position while
the splint is worn.
Metal is used for the
plate by English dentists,
instead of vulcanite.
It can be made
thinner, and is less
brittle than the latter.
The perfect fit thus
secured suffices, in simple
fracture, to keep
the parts in close apposition; while the movements of
eating and speaking are very little interfered with.
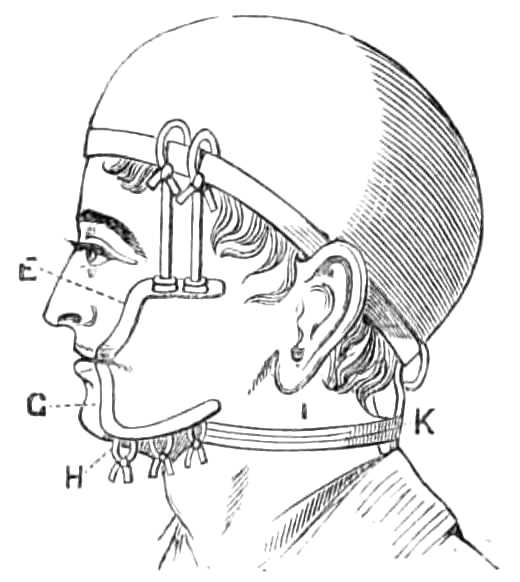
Fig. 25.—Showing the method for supporting
externally the jaws in the
splint, when the teeth are not fastened
to it by screws, E. Upper wing; G.
Lower wing; H. Mental band to keep
the jaw up in the splint; I. Neck-strap
to keep the band back; K. Balance-strap
to hold skull-cap in place.
The upper wings are of course dispensed
with, when a single splint only
is used.
When the displacement is considerable the fragments
are held in place by riveting one or more teeth to the
cap, or, when circumstances prevent support being
obtained in this way, external support is supplied to
the splint by steel wings, fixed into the splint at the
angles of the mouth (see fig. 25), and carried outside
the cheek to the angles of the jaw. A piece of stout
jean or canvas, cut to fit under the chin, is then connected
with these wings, and also fastened by a tape
behind the neck.
If the case require that a bearing be made on the
upper jaw as well as the lower one, as in fracture of
both jaws in edentulous persons, the two splints are
articulated behind, so that they may open and shut
with the lower jaw. Each piece then carries a wing,
the lower one supporting a chin-piece, and the upper
one being connected by strings attached at the temples
to a close-fitting skull-cap. The skull-cap is prevented
from slipping forward by connexion with a strap
fastened to both shoulders.
A fractured Rib is very well treated by strapping
the injured side alone, without enrolling the chest in a
tight bandage, which harasses the patient by impeding
respiration.
Apparatus.—1. Diachylon plaster.
2. Can of boiling water.
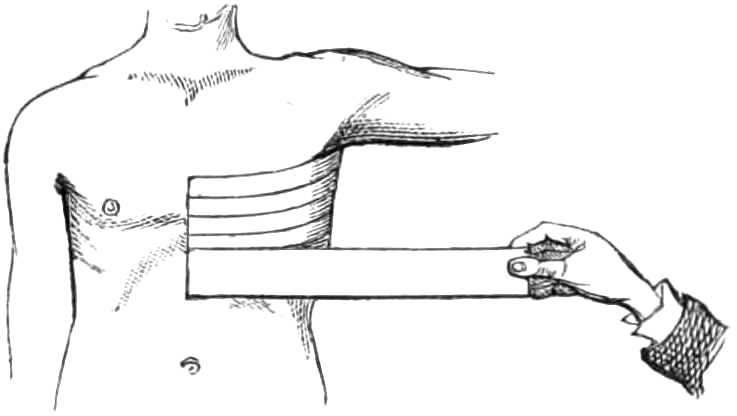
Fig. 26.—Strapping a broken Rib.
Strips of plaster long enough to reach from the
spinal column
to the sternum,
and 2 inches
wide, are to be
firmly drawn
round the
injured side.
The first strip
should be carried
as high as can be managed under the arm-pit.
The next strip overlaps it about an inch (fig. 26), each
succeeding strip overlapping and fixing the preceding
one until the lower ribs are covered in. The arm
should then be bandaged to the side, and supported
in a sling.
A second mode of treating fractured ribs, is to take
a flannel roller 6 inches wide, and 8 yards long, and
carry it firmly round the chest in successive spirals,
beginning at the armpits, and passing down till the
waist is reached. The turns of the roller may be kept
from slipping down by throwing across the shoulders
two strips of bandage like a pair of braces, and stitching
each turn to the brace in front and behind. The
arm should be confined to the side as in the other
method. This plan has the inconvenience before mentioned
of interfering with respiration.
In Fracture of the Pelvis, the fragments are kept
in position by a broad roller carried several times
round the pelvis and fastened.
Fracture of the Metacarpal Bones.
Apparatus.—1. A piece of gutta-percha.
2. A roller 2 inches wide.
In treating this fracture it is important to keep the
broken bone in place without confining the wrist or
fingers.
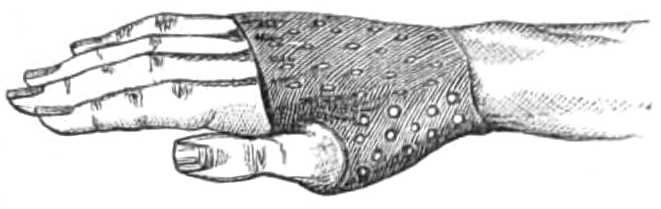
A pattern of the palm and dorsum of the hand is
cut out of paper, which is doubled round the radial
side, letting the thumb out through a hole of convenient
size to clear it (see fig. 27). The piece of
paper is then laid on a sheet of gutta-percha ¼ inch
thick, and the requisite quantity cut off; a hole as big
as a pea is next punched in the gutta-percha in the
middle, about 1 inch from the lower border, or at a
point corresponding
to the hole in
the paper for the
thumb. The fragments
are then
pushed into place
and held so by an
assistant, while the surgeon softens the gutta-percha
in boiling water; when thoroughly soft, he draws the
thumb through the little hole punched in the gutta-percha,
and moulds the splint to the palm and back of
the hand, bringing the ends of the gutta-percha together
at the ulnar side of the hand; the fragments
are held carefully in position till the splint is set. The
splint is afterwards removed and trimmed. A few
holes should be punched in it after it is moulded to
allow perspiration to escape. The splint may then be
covered with wash-leather, and a pair of straps with
buckles stitched on to keep it in place. It is worn for
three or four weeks, or until the fragments are united.
Fig. 27.—Gutta-percha Glove for fractured
Metacarpal Bone.
Should gutta-percha not be at hand, another plan is
effectual.
Apparatus.—1. A firm ball of tow large enough to
fill the palm, stitched in old linen.
2. A roller 2 inches wide.
The broken bone is first replaced; then the hand
and fingers bound on to the ball by carrying the roller
around them until they are all immoveably confined.
This plan has the disadvantage of confining the
whole hand for the fracture of one metacarpal bone;
the gutta-percha allows free use of all but the metacarpal
bones.
Broken phalanges are treated by bandaging them
on to a slip of wood long enough to reach into the
palm; the slip must be well padded, that the somewhat
concave anterior surface of the digit may accommodate
itself on the flat splint. If more than one
finger be injured, and the fracture be compound, the
splint should then reach up the palmar aspect of the
forearm and hand. Fingers should be cut in it to
correspond with the fingers to be fastened to the splint.
Fracture of the lower end of the Radius.—Colles’
Fracture.—The displacement in this fracture is
mainly due to the lower end of the radius and the
carpus being carried backwards while the shaft projects
in front.
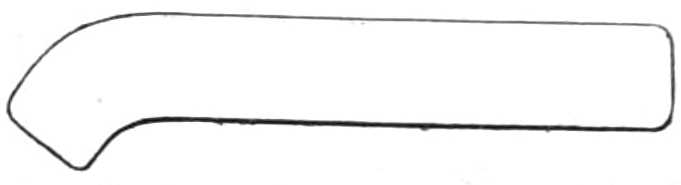
Apparatus.—1. A straight splint of wood. A second
splint, curved at its lower end.
2. Pads and cotton wool.
3. A roller 2 inches wide.
4. A sling.
5. A strip of plaster.
The objects to be attained in treating this fracture
are to press the lower fragment forwards and to draw
(adduct) the hand towards the ulnar side of the limb.
For this purpose a straight and a curved splint are
used.
No bandage should be placed under the splints in
treating any fracture of the shaft of the radius or ulna,
lest the broken ends be pressed into the interosseous
space.
Step 1. Prepare the splints. The straight splint
should reach, when the arm is bent, to a right angle
with the thumb upwards, from a little below the
inner condyle to the lower end of the upper fragment
or shaft; the curved or pistol splint extends from the
outer condyle to the joint of the first and second
phalanges. The width of both splints should slightly
exceed that of the
forearm. The bend
of the lower end
of the pistol splint
should be abrupt,
and directed towards
the ulnar border opposite the wrist, where
the margin of the splint should make an obtuse angle
of about 1½ right angles (see fig. 28).
Fig. 28.—Pistol Splint for fracture of the
Radius near the lower end.
Pads used with these and other wooden splints are
made of layers of cotton wool, carded sheep’s wool,
tow, or folds of old blanket. These materials should
be stitched in old linen or calico, and covered outside
with oiled silk where likely to be stained with the
discharge from wounds.
The pads must be thicker below than above, to keep
the splints parallel along the forearm; and that of
the pistol splint is thickest opposite the carpus, to
push the lower fragment forwards.
Fixed deformity opposite the wrist is usually present
from impaction of the fragments; moderate extension
may be employed to remove this, but forcible or continued
efforts give great pain and do harm, by further
straining the already wrenched ligaments. After these
preparations the splints are applied.
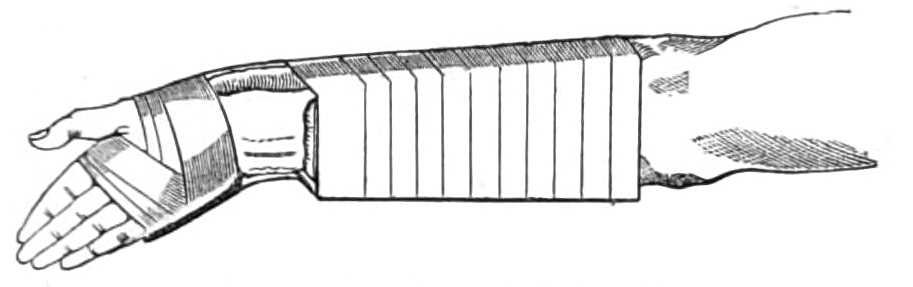
Step 2. Put a very little cotton wool in the palm
and across the root of the thumb, before the roller is
begun, lest it chafe the carpus in front. The curved
splint, with the barrel or longer part inclined downwards
below the forearm, is next attached to the back
of the hand by a roller carried in figures of 8 round
the hand and root of the thumb, but not above the
wrist (see fig. 29). This is made fast by a pin.
Fig. 29.—Fracture of the Radius.
Step 3. Raise the straight part of the outside splint
till parallel to the forearm, thus adducting the hand
to the ulnar side; and fix the splint by a strap of
plaster an inch wide carried round it and the forearm
below the elbow.
Step 4. Apply the inside straight splint next, keeping
the front of the carpus and of the lower fragment
exposed. Draw the two splints together by simple
spiral turns of a roller, begun just below the elbow and
carried down to the lower end of the inside splint,
there fasten it off.
Step 5. Put a narrow sling under the forearm between
the elbow and the wrist to support the limb
comfortably.
When the apparatus is finished the position of the
broken fragments should be visible (see fig. 29) and
not concealed by bandage. The hand should also be
quite free of the sling, lest it be drawn from its proper
adducted position. The fragments are in good position
when the hollow on the anterior aspect of the wrist
and the prominence on the corresponding posterior
surface are removed.
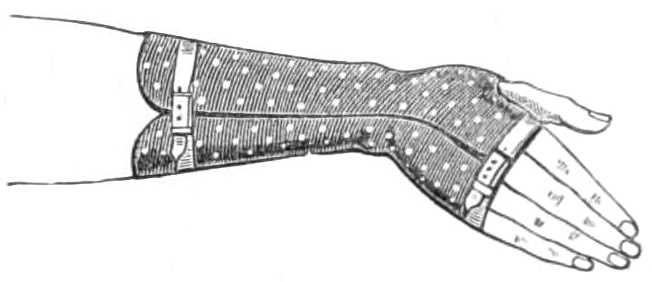
The Gutta-percha Gauntlet is another plan of
treating fracture of the lower end of the radius that
may often be adopted from the first, and may always
replace the wooden splints and bandage when the
swelling has subsided. It was contrived by Mr. Heather
Bigg, and permits the patient to use his hand to some
extent while the bone is uniting.
Apparatus.—1. A piece of gutta-percha ¼ inch thick,
wide enough to enwrap the metacarpus and wrist, and
long enough to reach up the lower half of the forearm.
Two thirds across the width, and about 1 inch from the
lower end, a small round hole is punched. The sheet
is then softened in hot water, and applied to the
hand, the thumb being thrust through the hole
punched to receive it, which rapidly enlarges when
soft. The gutta-percha is then adjusted to the hand
and forearm, its borders meeting at the ulnar side of
the limb, rather
nearer the inner
border of the arm
than is depicted
in fig. 30.
Fig. 30.—Gutta-percha Gauntlet for
Colles’ Fracture.
If the fracture
is recent, it must
be reduced while
the splint is soft by extending the hand and holding
the parts in the required position until the gutta-percha
is set. Before removing the splints superfluous
edges should be marked, and, when the splint is off,
trimmed away with a knife. Holes must also be
punched at frequent intervals that the perspiration
may escape. The splint is next lined with wash-leather,
and fitted with a pair of straps and buckles
to keep it in place.
By this plan the fingers are left free, and some
motion allowed also to the thumb. The only joints
kept immoveable are those of the carpus and wrist.
Apparatus of some kind must be worn three weeks
continuously; then for a fortnight longer, while it is
removed every day to allow passive motion of the
fingers and gradually of the wrist also to be practised.
Care should be taken to warn the patient that pain
and stiffness last long in these fractures, lest he blame
the surgeon because he does not quickly recover full
use of his arm.
Fracture of the Shaft of one or both Bones of
the Forearm.
Apparatus.—1. Two straight wooden splints.
2. Pads and wool.
3. 2-inch wide roller.
4. Sling.
The treatment is the same whether one or both bones
are broken. Caution has been already given against
bandaging the forearm underneath the splints.
Step 1. Prepare two straight wooden splints; one to
go in front of, and one behind the forearm. The posterior
or outside reaches from the external condyle to
the end of the metacarpus; the anterior or inside
splint from a little below the internal condyle only as
far as the wrist, keeping clear of the ball of the thumb.
The splints should be slightly broader than the forearm,
and well padded; towards the lower end the
padding should be thicker than above. The forearm
is bent to a right angle and the thumb put upwards.
Step 2. Reduce the fracture by gentle slow extension
at the wrist; this being effected, apply the splints to
the forearm, and let an assistant hold them while the
bandage is rolled on.
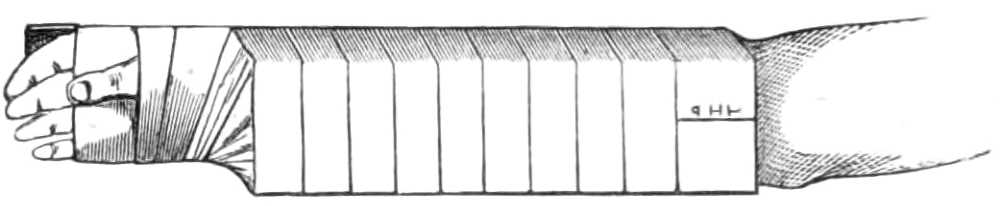
Step 3. When a little wool has been wrapped round
the hand and wrist, fasten the dorsal splint by figures
of 8 carried round those parts; then draw the two
splints together by simple spirals continued to the
elbow (see fig. 31).
Fig. 31.—Fracture of both Bones of the Forearm.
Step 4. Support the forearm in a sling, to complete
the apparatus.
The splints are worn three weeks; after this, passive
motion may be practised daily, and the splints finally
abandoned ten days later. But a sling is still required
some ten days after the splints are laid aside.
When the ulna alone is broken, an anterior splint
reaching from the inner condyle to the tips of the fingers
often suffices without a second one.
When the shaft of the radius is broken high up (a
rare accident) the displacement is sometimes very difficult
of reduction unless the wrist be well supinated.
To preserve this position it may be necessary to use a
wooden angular splint, and to fix the vertical part to
the arm behind the elbow, while the horizontal part is
carried along the back of the forearm.
Fracture of the Olecranon.—This fracture, if
seen early before effusion takes place, may be put up
at once, but if delay till the joint is swollen has
occurred, the limb must be kept quiet on a pillow, or
on a splint in an easy position with evaporating lotions,
until the effusion is absorbed, before any means can be
taken to restore the position of the olecranon. Though
the straight position of the elbow is usually employed,
it is not essential for even very close union of the
fragments.
In treating this fracture the following plan is useful.
Apparatus.—1. Straight hollow splint.
2. 2-inch rollers and finger rollers.
3. Pad, wool, and lint.
4. Strapping plaster.
5. Pins.
Step 1. Bandage the fingers; wrap the hand in
cotton wool and bandage it. When the wrist is passed,
fasten the bandage for a time by a pin, and straighten
the arm.
Step 2. Push the olecranon down as close as possible
to the rest of the ulna, and put a dossil of lint over it.
Place the middle of a strap of plaster an inch wide
and 16 inches long, on the lint, and carry its ends
round the forearm in a figure of 8; to some extent
this alone fixes the fragment.
Step 3. Continue the bandage up the forearm by
reverses, keeping the elbow straight; and pass the
joint by figures of 8 carried over the compress of lint
and the forearm, to draw down the olecranon (see
fig. 32). When this is secured, prolong the bandage
to the deltoid, to confine the action of the triceps
muscle.
Step 4. Pad lightly a hollow splint about 2 inches
wide, reaching from the axilla nearly to the wrist,
and apply it along the anterior aspect of the limb,
then fix it by a second roller. This completes the
apparatus.
Fig. 32.—Bringing down the Olecranon with Figures of 8.
The splints and rollers should be removed on the
fourth or fifth day, that the positions of the fragments
may be examined and the roller again applied to draw
them closer together. After ten or twelve days, passive
motion of the wrist and fingers, with pronation and
supination of the radius, should be adopted, but great
care is to be taken that the patient does not inadvertently
bend the elbow joint while free of the splint.
The splint must be worn, with the frequent removals
directed above, for five weeks, by which time gentle
flexion of the elbow may be practised.
Hamilton notches his splint at each border about
its middle so that the notches shall be 3 inches below
the tip of the olecranon (see fig. 33). He begins the
bandaging by fastening his splint on to the hand and
forearm, as high as the notches; here the roller is
carried above the olecranon and again down to the
notches; this is repeated again and again, each turn
below the last, until the notches are all covered, he
then continues the bandage upwards by circular turns
until the top of the splint is reached.
Fig. 33.—Hamilton’s Splint for fracture of Olecranon.
Fractures of the Humerus near the Elbow.—These
resemble dislocations of the ulna and radius
backwards, but are distinguished from them by the
ease with which the bones slip into place and again
slip back from it when left to themselves; by crepitus;
and, when the fracture is above the condyles,
the common accident, by those projections retaining
their natural relation to the olecranon. In children
and youths the articulating surface of the humerus
may separate from the shaft without carrying the rest
of the lower epiphysis with them. In this rare accident
the main distinctions from the usual fracture are,
the projection of the olecranon behind the condyles;
from dislocation, the absence of the hollow of the
sigmoid notch, and facility of reduction.
In ordinary cases, where the deformity is reduced
without much difficulty, and the injury to the joint is
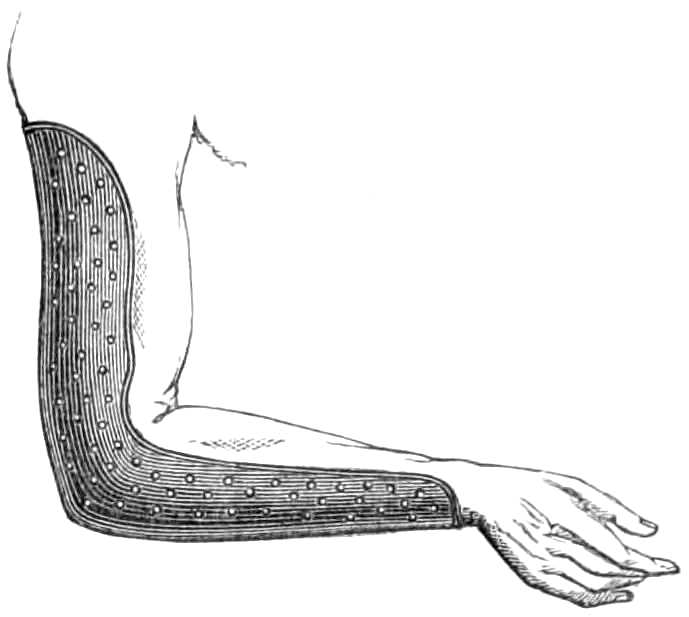
not severe, lateral rectangular splints of leather, hollowed
wood, or wire gauze, answer very well. These
are placed both inside and outside the limb, and reach
from the axilla and shoulder to the wrist. They are
applied in the following manner:—
Apparatus.—1. Lateral hollowed angular splints.
2. Pads and wool.
3. Rollers 2 inches wide for the arm, and 1 inch
wide for the fingers.
4. Sling.
Step 1. The splints must be prepared.
Wooden and wire gauze splints are double. One,
inside the arm, reaches from the axilla to the wrist,
the forearm being bent to a right angle. The other
extends, on the outside, from the deltoid to the wrist.
They are better if provided with hinges opposite the
elbow, so that their angle can be altered, if desired, in
the later stage of the treatment. Splints of wood or
wire gauze must be evenly and lightly padded before
application.
Step 2. Bend the arm to a right angle with the
thumb upwards. An assistant next reduces the fracture,
and holds it in position. Then apply the splints.
When adjusting the inside splint, care must be taken
that the internal condyle is eased from pressure by
sufficient padding above and below it. Next fasten on
the splints by a roller begun at their lower end,
leaving the hand free, and carried up to the elbow.
Before turning round that joint a soft pad must be
placed in the hollow of the elbow to push the lower
end of the humerus back, and the length of the arm
should be measured against the unbroken one to make
sure that the shortening is reduced. Extension is kept
up the whole time the splint is being fixed to the arm,
which is done by carrying the roller round the elbow
with figures of 8 and simple spirals up to the axilla,
where it is finished off.
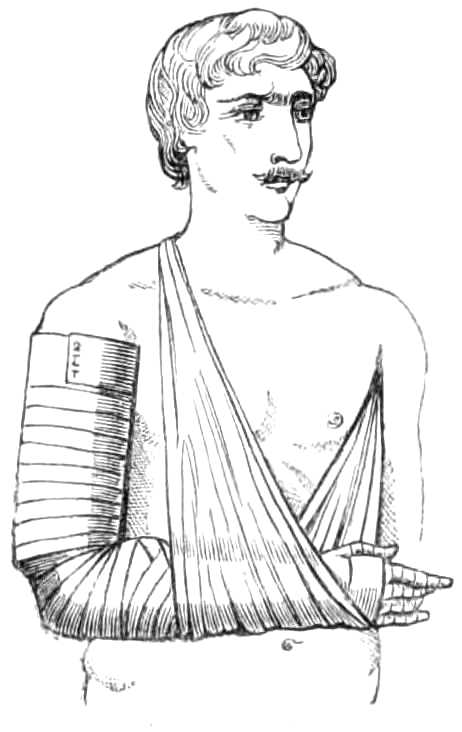
Step 3. Lastly, the forearm is supported in a sling
under the wrist, leaving the elbow free (as in fig. 35,
page 52).
After three weeks of complete immobility, passive
motion should be applied to the elbow daily, during
a fortnight or three weeks more in which the splint is
still worn.
If the displacement returns very easily, it is better
to use an L-shaped splint passing behind the arm and
below the forearm. This may be made of wood, or of
leather, or of gutta-percha, in the mode about to be
described.
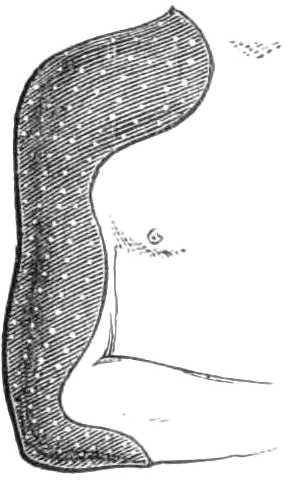
The L-shaped splint of gutta-percha, or leather, is
made as follows:—
Apparatus.—1. Sheet gutta-percha ¼ inch thick.
2. A tray or wide wash-hand basin.
3. A basin of cold water.
4. A kettle of boiling water.
5. A towel.
6. A knife.
7. A sheet of newspaper.
Cut a pattern of paper reaching, while the elbow is
bent and the thumb upwards, from the arm-pit down
the back of the arm and under the elbow and forearm
to the wrist. The sides must be brought forward to
the biceps and front of the forearm as seen in fig. 34.
Next cut from the sheet of gutta-percha a piece to
match the pattern. Prepare the tray with the hot
water, lay in it the towel, and then soften the gutta-percha
by laying it in the tray and covering it with
almost boiling water, adding more water as the first
cools; this may
be done by an
assistant, while the
surgeon directs another
assistant to
grasp the forearm
and reduce the
fracture. The assistant
keep
extension while
the surgeon lifts
the softened
gutta-percha with
the towel from the hot and plunges it a moment into
cold water, then lays it on the limb, which the
assistant keeps at a right angle, and the bone in place,
while the splint is setting to the limb. This done,
the splint is removed to be trimmed, perforated, and
covered with wash-leather. It is then ready for use.
Fig. 34.—Gutta-percha Splint for fracture
at the lower end of Humerus.
Leather takes so much time to set that it should
not be used in recent fractures. When the bone is
partly set, leather is a useful substitute for wood. It
is prepared from a pattern in the same manner as the
gutta-percha, but is trimmed before soaking, not after
it is moulded, like gutta-percha. If possible it should
have twenty-four hours soaking in water before being
fitted to the limb; but when this cannot be done,
immersion in hot water, into which a teacupful of
vinegar has been thrown, will make the leather quite
supple in a quarter of an hour. The leather
splint must be worn twenty-four hours while it
sets, and then be removed for covering (see Leather
Splints).
Fractured Shaft of the Humerus.
Apparatus.—1. Four straight hollow splints.
2. Rollers 2 inches wide, and 1 inch for the fingers,
or straps and buckles.
3. Pads and wool.
4. Sling.
When broken below the attachment of the deltoid
and coraco-brachialis muscles the displacement of the
bone is commonly prevented with ease; neither shoulder
nor elbow-joint need be fixed, and it is not necessary
to apply the splints so tightly as to risk interference
with the venous circulation. If the pectoral muscles
or deltoid be connected with the lower fragment, the
displacement is sometimes obstinate; in such cases it
is necessary to buckle the splints lightly. For this
to be done, the fingers, hand, and forearm must be
previously bandaged to prevent œdema; with this
addition, the method of treatment is the same in both
varieties of fracture.
Step 1. Select the splints; they should be hollowed,
of wood, perforated sheet zinc, or wire gauze,
about 2 inches broad, lightly padded, and provided
with straps and buckles.
The external one reaches from the acromion to the
outer condyle; the inner one from the axilla to the
inner condyle; a third shorter one is placed behind
the arm, and if there is much projection forwards of
the lower fragment, a fourth very short one is added
in front. The patient should sit on a chair while the
apparatus is being put on.
Step 2. The fingers and thumb are bandaged; then,
the hand and forearm, first padded with a little wool
in the palm and over the wrist, are evenly bandaged
to the elbow, round which the roller is carried while
the joint is well flexed; this being covered in, the
roller is made fast.
The first step of bandaging the hand and forearm
before applying the splints is better omitted if the
compression requisite to procure the natural position
of the bone does not interfere with the circulation.
Step 3. An assistant grasping the elbow in one
hand, pulls down the lower fragment, while he steadies
the shoulder with the other.
The displacement thus reduced,
the surgeon applies
the splints, taking care
that the inside splint does
not reach too high into the
axilla, lest it compress the
axillary vein.
In simple cases, the
splints should be drawn
close by straps and buckles;
where the muscles are
powerful, a roller should be
wound round the splints
instead of straps.
Fig. 35.—Fractured Shaft of
the Humerus.
Step 4. A 2 inch wide
roller is fastened to the arm
above the elbow, and then carried round the trunk
to the arm again, to steady the limb against the
body.
Step 5. The hand and wrist are supported by a
sling over the shoulders, the elbow being allowed to
hang (see fig. 35).
This apparatus is worn three weeks, when the bandages
are removed from the forearm, and the splints
replaced less tightly than before. They may be substituted
by a sheath of gutta-percha moulded to the
arm from the acromion to the elbow, and buckled on
to the limb. The arm must be supported by splints
for five weeks, but passive motion of the elbow and
wrist should be adopted after the third week. The
wrist especially should be set at liberty as soon as
possible. In treating this fracture great care is necessary
that the bone be kept in accurate and close
position, as the humerus is specially prone to remain
un-united for many months.
Fracture of the Anatomical or Surgical Neck
of the Humerus, of the Great Tuberosity, and of
the Neck of the Scapula. These fractures are similarly
treated.
Apparatus.—1. Paper for pattern.
2. Gutta-percha, leather, or millboard.
3. Pads. A soft thin pad, 10 inches long, 5 inches
wide (a double fold of thick flannel or blanket answers
very well), is wanted to line the axilla. If the cap is
of leather or gutta-percha, a lining of wash-leather
should be added after the splint is made.
4. Rollers, 2 inches and 1 inch wide for the fingers.
5. Scissors.
6. A tray, and kettle of hot water.
7. A towel, and basin of cold water.
8. Sling.
9. Cotton wool.
Step 1. Cut out a paper pattern of the splint on the
limb to be fitted. The pattern should reach along
the clavicle to the root of the neck, and over the
scapula to its posterior border, and be continued down
the arm to the elbow, tapering as it goes, but having
its anterior and posterior margins brought sufficiently
to the inner side of the arm to give the splint a good
grasp of the limb in descending. The end should be
left long enough to turn a couple of inches round the
point of the elbow (see fig. 36). A notch must be cut
at the upper end of the paper pattern
to make it fit on the shoulder
between the clavicle and the spine
of the scapula; this should not be
repeated in the gutta-percha, as that
can be moulded on without; and
for that reason the cap is much
more serviceable when made of
gutta-percha than of leather, where
a notch must be cut and stitched
together when the leather is set. The
gutta-percha, when cut to pattern,
must be softened in the manner described in making
the splint for the elbow at page 50, fig. 34; then accurately
adjusted to the shoulder as high as the root of
the neck, and turned under the point of the elbow a
couple of inches (see fig. 36), while the forearm is well
raised across the chest.
Fig. 36.—Cap for
fracture near the
Shoulder.
When set, the splint must be removed that it may
be trimmed and lined with wash-leather. If of gutta-percha,
it must be perforated with small holes; if of
leather, the notch at the shoulder must be stitched
together. Next prepare a soft thin pad, 5 or 6 inches
broad, and 8 or 10 inches long, to fill the axilla.
Step 2. Bandage the fingers and thumb separately,
then, putting a little wool in the palm and round the
wrist, bandage the hand and forearm to the elbow,
where the bandage is fastened.
Step 3. Apply the splint. First get on the cap;
then put the soft pad in the axilla, filling it out if the
arm-pit is very hollow with cotton wool, and bend the
elbow till the hand lies on the breast of the opposite
side. Then, while an assistant holds the limb and
apparatus in position, fasten them all in place by continuing
the roller of the forearm in figures of 8 round
the elbow until the splint is
well fixed to it; and carry the
roller up the arm by reverses
to the axilla.
Step 4. A little wool or piece
of flannel having been placed
in the opposite arm-pit to prevent
chafing, a spica for the
shoulder is then applied (see
page 16), beginning at the
root of the neck and working
downwards. Careful extension
is continued by the assistant
all the time this bandage is
being put on, until the head of the bone is well drawn
into the cap.
Fig. 37.—Fracture at the upper
end of Humerus. The apparatus
completed.
Step 5. The arm is drawn to the side, and the forearm
fixed against the chest by a roller carried round
the arm and trunk and over the shoulder (see fig. 37).
After three weeks the forearm may be released, but
the cap and axillary pad must be continued to be worn
two or three weeks longer while the arm is well drawn
to the side, and the wrist carried in a sling.
Fracture of the Great Tuberosity of the humerus
is difficult to treat, on account of the tuberosity
being carried backwards by the muscles and the humerus
being rotated forwards. Hence the parts must be
braced together with a firm cap of gutta-percha moulded
on to the shoulder while soft, and while the fractured
parts are held in apposition, which may be done by
the fingers, or by putting on a wet roller firmly over
the shoulder as a spica before the splint is set.
When the splint is hard the bandage may be taken
off, and the splint removed and finished ready for
application. In doing this, the steps are the same as
for fracture of the surgical neck of the humerus, and
the necessity for fixing the arm well to the side of the
body as great as in that fracture.
Fracture of the Acromion is treated very much
like fracture of the clavicle, that is, the arm is well
raised by a sling under the elbow, and then fastened to
the side. It is not necessary to fill the axilla with a
pad, as in fracture of the clavicle, for in this case the
shoulder is not drawn inwards.
Fracture of the Clavicle.
Apparatus.—1. Axillary pad.
2. Roller, 3 inches wide.
3. Sling.
4. Wool.
Fractures of the clavicle nearly always leave some
deformity after union; this is best avoided by keeping
the patient on his back on a flat couch with the head
alone supported by a cushion, and the arm fixed to the
side until union has taken place. As most persons will
not submit to a fortnight or three weeks’ confinement
in bed for this accident, the fragments must be kept
in position as nearly as possible by apparatus while the
patient goes about.
The displacement of the outer fragment is inwards,
downwards, and forwards. Many varieties of apparatus
are employed to prevent this displacement during
union; the following mode is perhaps as effectual as
any other in accomplishing this object.
Step 1. Fix in the arm-pit a firm wedge-shaped pad
of bedtick filled with chaff; 5 inches broad, 6 inches
long, and 1½ or 2 inches thick
at the thick end, or just enough
to fill the axilla and throw out
the humerus without compressing
the axillary vein, hence the
thickness varies with the hollowness
of the axilla (see fig.
38). A band and buckle are
stitched to the thick end,
which is uppermost. When
in use, this band is passed
over the opposite shoulder and
keeps the pad in place. A
little wool should be put under the band, where it
crosses the root of the neck, to prevent chafing.
Fig. 38.—Wedge-shape pad for
broken Collar-bone, attached
to the American ring-pad.
Step 2. The elbow is elevated by an assistant, who
keeps the arm vertical and lays the fingers on the
breast bone. A roller attached to the arm by a
couple of turns is carried behind the back round the
trunk, and over the arm above the elbow, drawing that
close to the side.
Step 3. To support the elbow, the longest border or
base of a three-cornered handkerchief is carried under
it, one end passes in front, the
other behind the body; both
are then drawn tightly and
crossed over the opposite
shoulder, where one end is
taken under the axilla, and
tied in front. In giving this
direction the ring-pads shown
in the figures are supposed
not to be at hand. Lastly,
the loose corner at the wrist
is folded neatly and pinned up
(see fig. 39).
Fig. 39.—Apparatus for
broken Clavicle finished.
This apparatus must be watched from time to time,
and re-adjusted if any part slips. The sling and pad
are to be worn for four weeks.
Union sometimes takes place in three weeks or less,
in which case the pad may be removed so much the
earlier; but a sling should be worn for a fortnight
after the bandage and pad are laid aside. In children
the pad must be very much thinner and shorter than
that described; the sling should be replaced by a
bandage carried alternately round the body, and over
the opposite shoulder. After it is put on the turns
should be well stitched together, and smeared over
with stiff starch. In bandaging children, great care
must be taken to protect with wool the parts likely to
be chafed.
Figure-of-8 bandage.—Many surgeons still employ
a figure-of-8 bandage carried under each axilla and
crossed behind the back. Under any circumstances
this is exceedingly irksome to the patient, but is least
so if two silk handkerchiefs be substituted for the
bandage, one being passed round each shoulder and
the ends of both braced tightly together behind the
back. The wedge-shaped pad may be dispensed with
if the shoulders are braced back, but the elbow must
still be raised and drawn to the side.
The American surgeons have a very good plan for
attaching the sling to the sound shoulder. Instead of
carrying the ends of the sling round the shoulder and
under the axilla, they pass over the shoulder a loose
but well-stuffed collar or ring-pad (see fig. 38), to which
they fasten the ends of the sling in front and behind;
this prevents all cutting or chafing under the armpit,
and distributes the strain evenly.
Ruptured tendo Achillis is treated by extending
the foot and flexing the knee; for this purpose the
patient wears a high-heeled slipper. A band is sewn
to the heel, drawn tight, and fastened to a buckle
and strap round the thigh, just above the knee. The
patient should not walk for a month unless he will
use a wooden leg on which he can kneel, with the knee
bent.
Separation of the Epiphysis of the Calcaneum,
which sometimes occurs instead of rupture of the
tendo Achillis, is treated in the same way.
Fracture of the Fibula.—Dupuytren’s Splint.—When
the fibula only is broken, it may be treated in
several ways; this, however, is the common plan:—
Apparatus.—1. Straight wooden splint.
2. Pad and wool.
3. A roller.
Step 1. The splint should be about 3 inches broad,
and long enough to reach from the head of the tibia
to 4 inches beyond the sole of the foot. A notch
1½ or 2 inches deep is generally cut at the lower end of
the splint to catch the bandage in. The splint is then
padded, care being taken that the padding is sufficiently
thick to prevent galling at the upper end
against the inner condyle of the tibia, and that it
becomes thicker as it descends along the leg, for that
to rest easily against the splint; lastly, the pad should
end in a thick boss or projection opposite the internal
malleolus, beyond which it should not reach, lest it
interfere with the rotation and adduction of the foot
inwards.
Step 2. The splint, when thus prepared, is applied
along the inner side of the leg, taking care in doing
this that the internal malleolus is against the middle
of the splint, and not allowed by the assistant to slip
towards the anterior or posterior border.
Step 3. A roller is then carried round the limb and
splint, beginning below the knee and continuing in
simple spirals for three or four turns, when it is
fastened and cut off.
Step 4. A light layer of wool is wrapped round the
outside of the ankle, heel, and dorsum of the foot.
Then a roller, beginning at the splint,
passes outwards in front of the ankle
over the external malleolus, behind the
heel and the splint; then over the
dorsum to the outer margin of the
foot, next under the sole through the
notch of the splint to the front of
the ankle joint again, where it repeats
the same course three or four
times. Each turn must be tightly
applied and made to draw the foot well
inwards to the splint, and in doing so
to tilt outwards the broken part of
the fibula (see fig. 40).
This splint is cumbersome, hence
after two or three weeks, should be
replaced by a light starch or gum
casing for the foot and leg, leaving the
knee free.
Fig. 40.—Dupuytren’s
Splint for
fracture of the
Fibula.
Fractures of the Tibia with or
without the fibula, and fractures at the
ankle joint.
These fractures are often from their obliquity difficult
to keep in good position; in such cases McIntyre’s
Splint is very generally used in the early part of the
treatment. For this splint the following apparatus is
required:—
1. McIntyre’s splint.
2. Pads for the double incline plane and foot-piece.
3. Sock of flannel for the foot.
4. Rollers, 3 inches wide.
5. Wool, pins, needle and thread, strapping plaster.
6a. A sling-cradle, or
6b. Board, block, gimlet, screws and screw-driver.
The McIntyre’s Splint may be used either bent or
straight, whichever position of the knee most relaxes
the tension of the muscles on the fragments. As a
general rule the straight position is best if the fracture
is high up, and the bent one, when near the ankle
joint.
Step 1. A splint of suitable length is selected, by
measuring the sound leg. The joint of the splint
should be put opposite the patella, and space be left
below the foot for the foot-piece to slide along the
slot when extension is made.
The splint is next padded, the hollow where the
lower part of the calf and small of the leg will come
being well filled, that the leg may be thoroughly supported;
but the space behind the heel and tendo
Achillis must be left quite clear. A small pad is then
fastened by a strip of strapping or by needle and
thread to the foot-piece.
Step 2. The limb having been first cleaned and
dried, the dorsum of the foot and ankle are wrapped in
an even layer of cotton wool. A sock or boot made of
flannel is next put on the foot. This may be readily
extemporised by cutting off the foot of an angola
stocking, slitting it up along the back to the toes, and
sewing on to the sole, one inch in front of the heel, the
middle of a piece of tape ¼ inch wide and 18 inches
long. The foot is then wrapped in the sock, the edges
drawn together by a needle and thread, care being
taken that the sock fits closely round the ankle and
dorsum of the foot. A little wool having been wrapped
round the knee, the limb is next raised, while the
splint is placed under it; the screw is turned until the
inclined planes are at an angle suited for the maintenance
of the fragments in position, and the foot-piece
is pushed up to the foot with its screw-pin loose,
that it may be adjusted to the amount of flexion or extension
necessary for the foot; this being ascertained,
the screw is tightened to keep it so while the foot is
fastened to the foot-piece. For this the strings of the
sock are brought over the top of the foot-piece, and
drawn tight before tying them.
Fig. 41.—McIntyre’s Splint. The thigh fixed ready for extension
of the leg.
The position of the heel is very important. It
should not sink below the splint, or it will rest on the
bandage; neither should it be drawn up too high, or
the weight of the leg will hang on the sock, instead of
resting on the pad; both frequent causes of pain at
the heel. When the proper position is obtained, the
strings are made fast to the pin behind the foot-piece,
and the foot is steadied by two or three turns of a
roller carried round it and the foot-piece (fig. 41).
Step 3. The thigh is next fastened to the thigh-piece
by a roller carried from the top of the splint
downwards along the thigh to the knee, or below that
joint if the fracture is near the ankle.
In doing this the roller is passed inside the screw,
should that be placed underneath the splint, as in fig.
43 page 65, and not at the side as in fig. 41, for the
screw will be wanted free for further adjustment.
Fig. 42.—McIntyre’s Splint slung in Salter’s Cradle.
Step 4. An assistant grasps with both hands the
foot and foot-piece, and pulls them downwards until
the shortening is removed. While doing this, he tilts
the foot up or down as the surgeon finds necessary for
adjusting the fragments, who also bends the knee and
raises or lowers the foot until a good position is attained.
The general rule is to keep the great toe in a
line with the patella. This done, the surgeon tightens
up the screw-pin of the foot-piece, and completes the
attachment of the foot by continuing his roller with
figures of 8 round the foot and ankle; these turns
should not however pass above the fracture, and be no
more than sufficient to secure the position of the foot
and of the lower fragments (see fig. 42).
Step 5. The bandaging usually ceases with what
has been already done; but if the limb swell, a separate
roller may be carried along the leg to support the
muscles and restrain œdema, otherwise the leg is best
left bare, that the position of the fragments may be
watched, and evaporating lotions applied.
Fig. 43.—McIntyre’s Splint raised on a Block.
Step 6a. This consists in slinging the limb, for
which Salter’s Cradle is very convenient (see fig. 42),
or an ordinary bed cradle answers very well, from
which the limb can be slung on pieces of bandage
carried underneath the splint at the knee and ankle.
b. Instead of elevating the limb by a sling, it is
also customary to raise and fix the splint on a block
(fig. 43), 6, 8, 10, or even 12 inches high, as may be
necessary; this block slides in a groove on a board
3 feet square, put between the mattress and bedstead,
to afford a firm support for the block.
In ordinary cases the limb is kept on the splint
three weeks, until the irritation has subsided, and
partial union is attained; the splint may then be
replaced by a starch bandage, and
the patient may leave his bed.
Transverse Fracture of the
tibia alone, or even of both bones,
when the displacement is small, is
very well treated by a hollow splint
on each side. Both splints are cut
away opposite the malleoli, and the
foot-piece of the inside one should
not extend beyond the tarsus; that
of the outside passes to the toes.
The splints reach on each side to
the head of the tibia, but ought not
to extend above the knee-joint (see
fig. 44).
Fig. 44.—Outside lateral
Splint for the
Tibia.
Step 1. They are padded lightly
and evenly along their whole length,
and applied to the limb on each
side.
Step 2. They should then be fastened by figure of 8
round the foot and ankle until the foot is securely
fixed in them. The bandage should then be fastened
off, and extension made by an assistant, who grasps
the foot and ankle with both hands while the surgeon
fixes the splints to the limb above the fracture, beginning
his roller at the top just below the knee, and
continuing it downwards with spiral turns until the
fracture is reached, above which it should terminate
(fig. 45). After the apparatus is applied, the limb
may be either supported upright by sand-bags, or
slung in a cradle, for three weeks, after which the
splints are advantageously replaced by a starch bandage
for three weeks longer.
Fig. 45.—Lateral Splints for simple transverse fracture of the Tibia.
Flexing the Leg for Fracture of the Tibia.
Sometimes, when there is unusual difficulty in preventing
displacement of the fragments while the limb
is nearly straight, the bones can be readily kept in
position if the patient lies on the same side as the injured
limb and the knee is well flexed. For such cases these
splints are very suitable; they should be applied after
the limb has been bent and the fragments brought
into apposition. When the splints have been put on,
a roller may be carried round the leg and thigh to
keep the limb in its bent position.
Fracture of the Patella.—When this bone is
broken there is usually much swelling from effusion
into the knee-joint; while this is present, rest, with
cold lotions, and elevation of the foot, are alone applicable.
When the effusion has subsided, the upper
fragment must be brought down to the lower one, by
some means like the following.
Apparatus.—1. Straight wooden splint with a foot-piece.
2. Pads.
3. Diachylon plaster.
4. Roller.
5. Lint and wool.
6. Two hooks or screws, gimlet, and screw-driver.
Step 1. The splint is first fitted; it should reach
from the buttock to the heel, at which point a foot-piece
rises for the foot to rest against; at the back
of the splint a line should be marked 3 inches
above, and another 3 inches below the knee-cap, into
which a stout screw or hook is inserted before the
splint is put on. It is then well padded, to support
the calf and leg, while the heel is left free, and a pad
is put between the sole and the foot-piece. A firm
crescent-shaped pad is prepared to sit like a saddle
above the upper fragment.
Step 2. The limb is laid on the splint; an assistant
draws the patella as nearly as possible into its place,
and the surgeon lays the crescentic pad on the thigh
above the patella, and takes a strap of plaster 2 inches
broad and 20 long, warms it, and lays the middle across
the compress, drawing each end tightly around the
limb, and then downwards and forwards in a figure
of 8; a similar strap is then fixed below the lower
fragment. The knee, shin, ankle, and foot are then
protected by a layer of cotton wool, and the bandaging
begins.
Step 3. The roller first fastens the foot against the
foot-piece by figures of 8, then passes up the leg by
reverses until opposite the lower hook, where it is
fastened.
Fig. 46.—Fractured Patella, drawing down the upper fragment.
Step 4. A second roller is then begun at the top of
the thigh and brought down the limb till it reaches
the compress over the patella; from this point it passes
below the lower screw at the back of the splint and
makes one circular turn round the limb; the roller
is then taken upwards across the compress (as shown
in fig. 46) to the upper screw, where it also makes a
circular turn; having done this it again descends to
reach the lower screw, and is returned as before. Each
of these turns should be drawn tightly to bring the
upper fragment as near the lower one as possible;
when this is done the bandage is completed over the
knee by figures of 8. It suffices to fix the lower fragment,
which cannot be drawn up to meet the upper
one; the latter must descend to it.
Step 5. The limb is lastly put into position by
elevating the heel and by raising the body with pillows
till it is in a half-sitting position.
The patient wears this splint four weeks, during the
first fortnight of which the bandage should be perseveringly
re-applied every three or four days until
the upper fragment is brought into apposition with
the lower one. After this the splint may be changed
for a light starch or gutta-percha case, to be worn for
six weeks more, and then replaced by a back splint of
leather and knee-cap, that must not be laid aside for
another period of three or four weeks. If the patient
can be persuaded not to bend his knee for four months,
the union of the fragments will be less likely to yield
afterwards. He should be also warned that much stiffness
will result from the long fixed position necessary
to procure good union between the fragments; but the
stiffness will all subside in time, notwithstanding the
long-enforced rigidity.
Strap and Spiral Bandage.
E. K. Samborne’s Plan of drawing Patella Fragments
together.—A strip of diachylon plaster 4 feet long and
2½ in. wide is applied to the front of the limb from 2 in.
below the groin to the small of the leg, leaving a free
loop or doubling opposite the patella. Beneath this loop
a firm compress or horseshoe pad is placed above the
upper fragment. A roller is then carried round the
limb to keep the strap in place, but leaving the loop
at the knee exposed. This done, the body is propped
up in a half-sitting position, and the limb elevated on
an incline. A stick, 6 inches long and ½ inch thick,
is inserted into the loop of plaster, and then twisted
round and round till, by shortening the loop, the loose
tissues of the thigh, and with them the upper fragment
of the patella, are drawn down to the knee. The stick
is prevented from untwisting by a roller lightly carried
round the knee. As the plaster slackens, the stick
may be tightened from time to time and the fragment
brought in a few days into its proper place.
Fig. 47.—Malgaigne’s Hooks.
Malgaigne’s Hooks (fig. 47), for drawing closely and
holding together the fragments in transverse fracture
of the patella, or of the olecranon, often procure a closer
union than any other method. They should not be inserted
until effusion is absorbed and the soreness has
subsided. To insert them, one pair of hooks should be
bedded in the ligamentum patellæ, and catch against
the lower edge of the bone; the skin is then drawn up
the limb, while the upper pair of hooks is passed through
it and behind the upper fragment; the two ends are then
approximated by turning the screw. The fragments
usually do not come quite close the first day, but the
next they can be drawn so firmly together that if one
is moved the other goes with it. In applying the
hooks care should be taken that the upper pair go well
through the skin and fascia behind the bone, or when
they are screwed up the upper fragment is apt to ride
unevenly over the other, and exact junction is lost.
The pain of the insertion soon passes off, and the hooks
can commonly be worn without annoyance for five or
six weeks, until union is secured.
Fracture of the Shaft of the Thigh-bone.—The
long Splint.
Apparatus.—1. A wooden splint.
2. Rollers, 3 inches wide.
3. Perineal band.
4. Strapping, needle, and thread.
5. Pad and wool.
The splint for an adult should be 2½ or 3 inches
wide, and long enough to reach from the nipple to 4 or
5 inches beyond the heel; two round holes ¾ inch diameter
are cut at its upper end, and at the lower one
two notches 2 inches deep.
Liston’s Mode of applying the Long Splint.
Step 1. The end of a roller is split for a few inches,
and tied in the holes at the upper end. The roller
itself is carried down the inside of the splint and
attached temporarily to the notches at the other end;
a pad is then fastened on, by drawing the margins
together with needle and thread across the outside of
the splint, or by tying strips of bandage round the
pad and splint at short distances.
Step 2. The limb having been washed with soap and
water, well dried, and afterwards dusted with starch
powder, especially at the perinæum, the ankle and dorsum
of the foot are wrapped in a layer of cotton wool,
and the splint applied along the outside of the body.
The bandage which was fastened to the splint is now
released from the notch; and, taking with it the end
of the pad, is carried under the sole, then over the
ankle joint to the splint, and behind the ankle round
the internal malleolus to the dorsum of the foot, then
through the lower notch of the splint to the inside of
the foot again. This figure of 8 is carried four times
over the dorsum of the foot, twice through each notch
of the splint, and is made fast by a pin or a stitch.
In doing this, care must be taken to keep the leg and
splint parallel, and that the splint does not ride over
the back of the foot; the external malleolus should be
midway between the margins; moreover, the bandage
must fit firmly round the ankle and splint, not spreading
over the dorsum more than can be helped, to avoid
straining the front of the ankle. Means for more effectually
preventing this will be afterwards detailed.
Step 3. Next apply counter-extension; for this, the
perineal band is used. The band consists of a silk
handkerchief or napkin folded into a flat ribbon, 1 inch
wide and covered for about 1 foot of its length with
oiled silk. A piece of smooth brown paper, 1 foot long
and 4 inches wide, folded into a ribbon one inch wide,
makes an excellent foundation for the silk handkerchief
to be folded upon. A band thus prepared is too stiff
to become a cord after it has been worn a few days,
which a simple handkerchief is apt to do. One end of
the band is passed in front in the groin, and one behind
the buttock, so that it bears on the tuber ischii in the
perinæum; the ends are then drawn separately through
the holes in the splint. All being ready for extension,
an assistant, grasping the leg and splint above the
ankle, pulls out the shortening till the broken bone
is in a good position; the ends of the band are then
tightened and made fast in a knot.
Step 4. First protecting the bony points with cotton
wool, the muscles about the hip are confined by a spica
carried round the body and the splint, not merely a
simple figure of 8 as depicted
in the figure, but a
series of overlapping turns
which ascend and cover in
the hips well. Afterwards the
upper end of the splint is
drawn close to the body by
a few turns of a broad roller
carried round the chest from
above downwards (see fig. 48).
Fig. 48.—The long splint,
with elastic stirrup extension
at the foot. Bandage
carried up to the seat of
fracture.
Step 5. It is customary to
carry the bandage further than
the ankle, but this is not an
essential part of the apparatus,
which is simply to keep
up the extension in the direction
of the axis of the limb.
This subsidiary bandage has
the disadvantage of concealing
the limb, and the position
of the broken ends of the
bone; but it steadies the limb
on the splint, and confines the
muscles, thereby preventing
pain and perhaps hindering
rotation outwards of the upper
fragment. Before putting it
on, some cotton wool is
wrapped round the knee, and laid along the shin;
the application of the roller is then begun at the
ankle where it first terminated, and is carried up the
leg, over the knee, and along the thigh by reverses
until the groin is reached, where it finishes.
The perineal band must be changed whenever it gets
soiled, and the skin washed before a clean one is
adjusted. After the first few days the band need not
be very tight; it suffices if not slack or loose. Mr.
Coxeter makes india-rubber tubes in the shape of
a perineal band; these are filled with water when in
use (see fig. 49).
Fig. 49.—Coxeter’s elastic perineal band.
Stirrup extension is a mode of relieving the strain
on the front of the ankle, caused by the lower end of
the splint being attached to it. A 3-inch wide roller
or bit of wood of the same breadth is laid against
the sole of the foot, and a stout india-rubber ring
2 inches in diameter is slipped over it. A piece of
strapping plaster, 2½ feet long and 2 inches wide, is
passed half-way through the ring, and its ends carried
up the leg inside and outside; the plaster is kept in
place by a roller or second strip laid on in spirals up
the limb as in fig. 50, and the india-rubber ring is
hitched against a hook at the end of the splint. By
this means the strain is transferred to the leg, and the
ankle is quite free. It is perfectly successful, and very
easy to the patient.
The long splint is to be worn continuously for six
weeks; or, what is better, after the first three weeks it
may be replaced by a starch bandage, and the patient
allowed to get about on crutches with
his leg slung from his neck.
Fig. 50.—Mode
of fastening
the stirrup to
the leg, to
avoid straining
the ankle.
Continuous Extension with the
Limb flexed.—The muscles attached to
the upper end of the femur sometimes
cause so much flexion and rotation outwards
of the upper fragment that union
of the bones in this
position produces a result
approaching that
in fig. 51, drawn from
a preparation in the
museum of University
College.
This crooked union is
prevented by bending
the thigh and relaxing
the muscles of the hip.
This object is accomplished
by using the
double incline planes or
the double incline
planes, slung, shown in
figs. 52 and 53.
Fig. 51.—Fracture
below the trochanters;
bone in
angular union.
Double incline planes are sometimes employed alone.
The limb is raised over a wooden frame about 8 inches
broad, with a double slope high enough at the apex for
the leg and foot to hang unsupported down the further
side (fig. 52). It is well padded before being applied,
and the leg and thigh secured to it by a roller passed
round the limb and plane, or better, a trough of gutta-percha
may be moulded to the limb while it is on the
plane, and when set, screwed down to the wood at one
or two points; in this the limb rests securely.
Fig. 52.—Double incline planes.
Slinging the double incline planes was practised
many years ago by Mayor of Lausanne, and has
been much used recently. It is an apparatus very
easy for the patient, and particularly well suited for
compound fractures of the thigh, for fractures near
the trochanters that require a flexed position, or for
fractures of the neck of the femur where the patient’s
feebleness does not permit the constraint of the long
splint.
Apparatus.—1. A bent wire frame (see fig. 53) with
a separate foot-piece.
2. Two pulleys, a rope with tent stretchers passing
up to hooks in the ceiling, or some suitable support.
3. One long and one short soft pad.
4. Strapping plaster, and some ends of bandage.
Step 1. The limb is washed and dried, and the short
pad fitted to the foot-piece, which is furnished with
some hooks at its lower surface, where ends of bandage
or tape can be fastened, for fixing it to the wire frame.
The frame is next prepared by passing strips of bandage
across it from side to side at short intervals, to make
a support on which the limb is laid; if there is no
wound, a soft pad may be put on the frame first, but
if one be present, the limb should rest immediately on
the strips of bandage, which can be changed whenever
soiled, and replaced by clean ones without disturbing
the limb. These strips should be tacked on with a
needle and thread, that, when the limb is placed on the
apparatus, they can be shortened or lengthened till the
leg bears evenly on them (see fig. 53).
Fig. 53.—Double incline plane, slung.
Step 2. The foot-piece is adjusted and fastened to
the foot by straps of plaster carried round it and up
each side of the leg, as was done for the stirrup extension
in the “long splint” (p. 76).
Step 3. The limb is next placed in the cradle
formed for it, to the lower end of which the foot-piece
is tied securely; the ropes are rove through the pulleys
and tightened till the limb swings easily. The point
of attachment of the ropes must not be just above the
limb, but beyond it, that the leg may be drawn away
from the body along its own axis. The weight of the
body makes counter-extension sufficient to remove all
shortening in a few days. The relief from the constraint
attending the absolute immobility of the long
splint, renders this apparatus a particularly easy one
for the patient; and union is found to take place without
any shortening of the limb. Where there is no
wound, the limb and frame may be kept together by a
roller bandage carried round them from the toes to the
knee, after the limb has been adjusted in the splint.
Continuous Extension in the straight position
is employed for fractures of the femur and in hip-disease.
It is procured as follows. A stirrup is fastened to the
leg in the way described at page 76; to this a cord and
weight are attached below the sole of the foot, and
passed over a pulley fixed to a tripod frame (fig. 54), or
any convenient object below the bed, in a line with the
axis of the limb. The weight should balance the contraction
of the muscles, and usually varies between 2
and 6 lbs. A perineal band fastened behind the
patient’s head keeps the body from following the limb.
The weight may be a common scale weight, or a bag
with a hole at the bottom closed by a string, and
filled with shot or sand, or a can with a tap at the
bottom filled with water: these arrangements allow
increase or lessening of the weight, without slackening
the cord and moving the limb. This apparatus
requires no bandages, which are so difficult to keep
clean in children, and exerts a very even and continuous
strain on the limb.
Fig. 54.—Fracture of the femur. Extension by weight and pulley.
The perineal band may be often dispensed with, by
laying the patient on a flat mattress and raising the
foot of the bedstead a few inches higher than the head;
the body then sinks towards the head of the bed and
resists the extension of the leg.
Starch Bandage.—The following mode of applying
the starch bandage and pasteboard splints may be
used in all varieties of fracture; the length of the
splints and the number of joints that should be
included depend on the bone that is broken.
Some surgeons apply the starch apparatus immediately
after the fracture has happened, others wait until
partial union is procured and the irritability of the
muscles has subsided.
Apparatus.—1. Sheets of bookbinder’s millboard.
2. Rollers suitable for the size of the limb.
3. Cotton wool.
4. A basin of freshly scalded starch.
5. A long strip of plaster, to reach as high as the
bandage will extend up the limb.
6. If the fracture be recent, a wooden splint will
generally be necessary to keep up extension while the
starch is drying.
As a general rule, the joint at the lower end of the
fractured bone should always be fixed, and that at
the upper end also, if the fracture is near that point.
For an example of the mode of fitting, let us suppose
the femur is broken between the middle and lower
thirds as in fig. 56.
Step 1. The limb is first measured for the splints.
The length from the top of the sacrum to the heel,
from the tuber ischii to the inside of the foot, and from
the iliac crest to the outside of the foot, should be
taken, and three strips of millboard prepared of
corresponding lengths; the posterior one being 3
inches wide above and 2 inches, or, if the limb is
small, 1½ inches wide at the heel. The inner and
outer strips of similar width must be cut with side
pieces for the foot, and these side-pieces stop short of
the roots of the toes. For a child’s thigh, the foot
need not be included, it suffices for the splints to
reach the small of the leg, though to prevent shortening
in an adult it is usually necessary to include the
whole limb. The splints are readily cut, by first
marking on the sheet of millboard, the required width
and length of the strips, then bending the sheet over
the edge of a table along these lines. The two lateral
splints may be first taken from the sheet in one wide
strip, after allowing for the foot-piece; the two strips
are separated through a diagonal line, so that the broad
end of one splint is taken from the other (see fig. 55).
Fig. 55.—Diagram showing the mode of cutting out splints from
a sheet of millboard.
When the strips are cut they should be laid on a
large tea-tray, boiling water poured over them, and a
minute or two later, some boiling hot thin starch; this
soon soaks into and softens the millboard till it is
thoroughly pliant. When somewhat softened, the edges
should be thinned by peeling off little strips along
them, after which some more boiling water may be
poured on and allowed to soak in while the limb is
prepared.
Two or three rollers should then be unwound, and
passed as they are rolled up again through the basin
of starch; these, thoroughly soaked in starch, are
used for the first layer, dry rollers serve very well for
the second layer.
Step 2. The limb is washed and dried; a strip of
diachylon plaster one inch wide is laid along the front
to protect the skin when the case is being cut open
after it is dry; the limb is next wrapped evenly in
cotton wool, putting a scrap between each toe. This
is best done by unrolling a sheet of wadding, splitting
the sheet into a layer of suitable thickness, which
is torn into strips about three inches broad, that
are then wound evenly round the limb as high as
the splints will reach.
Step 3. The splints are next adjusted and moulded
to the limb, being temporarily secured by a few ends of
bandage tied round them. One assistant grasps the
splints and foot at the ankle and keeps up extension,
while another holds the thigh. The surgeon then
proceeds to roll the bandages, first round the foot and
ankle, and then up the leg, rubbing in the warm starch
as he proceeds. Each turn of the roller should be made
as tightly as possible, for when the case dries it always
grows loose by the evaporation of the water it holds.
As reverses are always difficult to cut through afterwards,
they should be avoided, and the bandage laid
on in simple spiral or figure of 8 turns. When the
perinæum is reached, the surgeon wraps round the
pelvis a broad strip of cotton wool, while an assistant
on each side of the patient supports his body on a
folded sheet or jack-towel, and a third holds the
broken limb. The bandaging is then continued in a
well-fitting spica, and ended by a few circular turns
round the body. If the splint touches the crest of
the ilium it should be shortened till it clears that
point, or it will gall the patient afterwards. A fold
of soft lint in addition to the cotton wool should line
the splint at the perinæum, or the sharp edge of the
bandage, when it is dry, will chafe there also. When
the first bandage is complete, the limb should be
smeared again with starch, and a dry bandage rolled
over it from below upwards, which must be similarly
saturated with starch as it is laid on the limb, and
when finished the whole is well covered with starch.
If the fracture is recent, and no union has taken place,
a long splint should be put on outside the case, fastened
to the foot and extended by a perineal band, while the
starch is drying, that the limb may not shorten. With
children it is best to apply the wooden splint in all
cases, as they are apt to wriggle about, or sit up in
bed and disarrange the case while it is in a pliant condition.
If the wood splint is not used, the limb should
be supported in a good position by sand-bags laid
along its sides.
Fig. 56.—Starch Bandage.
In three days the starch is quite dry, but the drying
may be hastened by hot-water bottles or hot sand-bags
laid in the bed. It must then be cut up along the
front from bottom to top; it will often be found loose,
especially where swelling had existed before; this is
best remedied by paring the overlapping edges with
scissors. If any projecting part is chafed, an accident
that ought not to happen, the case may be lifted from
the sore part by a little more wool laid around, not on
the part pinched. The limb being in a satisfactory
position, and the case fitting properly, a roller is
carried up over the whole to keep it in place while it
is worn (fig. 56).
The patient need not now be confined to bed; on
the contrary, the limb should be supported by a sling
round his neck, while he gets about with crutches, if
his leg be the part injured.
The fracture should be examined from time to time,
and at the end of three weeks some of the joints previously
confined in the splint may be released by
cutting off the part covering them; but if the part is
a dependent one, such as the leg, it should be supported
by a bandage after the splint has been removed.
The limb may also be washed with soap and water,
and then anointed with simple ointment, if the skin
be roughened or irritated by long confinement.
In six weeks the starch splint may usually be discarded,
and a roller alone worn for a few weeks longer.
Plaster of Paris Bandage.
Apparatus.—1. Freshly burned white plaster of
Paris. If the plaster have become stale by keeping
in improperly closed vessels, and it be impossible to
obtain fresh plaster, the water the plaster has
absorbed from the atmosphere can be driven off by
heating the powder in a dry oven to about 200° F. to
260° F., but not higher, as greater heat destroys the
power of “setting.”
2. Rollers, about 2¼ inches wide, of muslin with a
coarse open texture.
3. A roller of Welsh flannel 3 inches wide and 6
yards long.
4. Basin of cold water, sponge, and a kitchen spoon.
5. Soft lard or spermaceti ointment.
Step 1. The muslin rollers are prepared by being
loaded with dry powder just before they are used.
To do this the roller should be gradually unrolled on
a table while one person rubs in the powder, and a
second rolls the loaded bandage up again. When
three or four are loaded they should be plunged for a
minute into cold water, and then are ready for use.
While this is being done the limb should be thoroughly
washed and dried, supported, if the fracture be recent,
by sand-bags.
Fig. 57.—Plaster of Paris Bandage, for simple fracture of the tibia,
and common bed cradle.
Step 2. The surgeon carefully greases the limb
wherever the plaster will reach, and rolls a Welsh
flannel roller round it for about 3 inches at the point
where the plaster roller will cease. This protects the
skin from the rough edge of the plaster splint when
the apparatus is set and hard. Indeed, if the whole
of the surface to be covered with plaster be enveloped
in a flannel roller, the apparatus is more comfortable
to the patient, and in this case the grease may be
dispensed with. When the limb is prepared the
surgeon intrusts it to assistants, who will maintain
reduction while he lays on the plaster rollers, wetting
them freely as they are laid on, with a sponge at
hand in a basin of cold water. Usually two layers of
roller give sufficient rigidity to the apparatus; but if
the limb is heavy, the case should be strengthened,
by smearing over it a coating of plaster, prepared by
shaking the powder into a basin of water kept constantly
stirred, till it has the consistence of cream.
The surgeon must watch that the fractured bones are
kept in position till the plaster is set, a process sufficiently
advanced in five minutes, when the bandage,
supported by sand-bags, may be left to dry.
When the plaster is quite set the bone is immoveable
and may be carried about without risk of displacement.
In deciding what joints should be included
in the bandage, the same rules obtain in this as for the
starch bandage; no more joints should be rendered
immoveable than are necessary to obtain command of
the broken bone; when the fracture is near a joint,
that must be confined to prevent the bones being
moved with the movements of the joint; when the
fracture is far away from it, sufficient control can be
exercised over the bone to prevent the broken ends
moving, and the joint may remain free.
If the plaster apparatus is applied over a wound, the
latter should be covered with greased lint, and its
position noted before the rollers are applied; when the
apparatus is set, the plaster must be dissolved around
the wound by touching it with strong nitro-hydrochloric
acid; when this is carried completely round,
the isolated fragment of plaster may be removed, and
the wound exposed.
For removal, the roller can be unwound again readily,
or it can be softened by acid along a line, and slit up
with scissors, when the apparatus comes off in a piece.
Should bandages of loose texture not be at hand,
common rollers can be made to answer the purpose
tolerably well in the following way.
Having washed and dried the limb, and reduced the
fracture; the bones are held in position by assistants,
while the limb is greased and enveloped in a dry roller
by simple turns and figures of 8. A basin of plaster is
prepared by shaking the powder into water till a thin
cream is formed, which is laid on the bandage with a
spoon, or the hands. Then a second but wetted roller
is put on in the same way quickly before the plaster
has set, and covered in its turn, until a case of sufficient
thickness is procured.
This bandage is much improved if the first roller be
of flannel instead of calico. The flannel roller may be
unrolled and loaded with dry plaster, like the muslin,
and wetted before using; in this way it contains nearly
as much plaster as the loose webbing rollers of muslin.
In the Army Medical Reports for 1865 (1867), Mr.
Moffitt describes a very ready method of employing the
plaster splints for recent fractures. Instead of bandaging
the limb, an envelope of Welsh flannel is fitted
to the part to be supported.
The flannel should envelope the limb, except for a
longitudinal space about ½ inch in width between the
edges of the flannel. The dotted lines in the accompanying
figure show the shape of the flannel when fitted
to the leg. The limb being thoroughly greased, the
flannel is well soaked in thin plaster cream, and laid on
a table while the creases are smoothed out of it.
When ready it is applied accurately to the limb,
so as to fit everywhere, but
leaving a narrow open space
along the whole length of the
limb. The flannel must be
held steadily till the plaster
is set, which takes place in
about five minutes, and the
splint is complete. If one
layer is not stiff enough, a
second may be laid over the
first in the same way. When
the splints are fitted, they
are kept in place by a roller
applied lightly over them. If
instead of soaking the second
layer of flannel in plaster, it
be thickly spread with strong
solution of British gum (dextrine),
and the gummed side
laid next the first flannel, the
splint is tough enough to stand any ordinary strain
without breaking.
Fig. 58.—Moffitt’s method of
applying plaster of Paris
splints. Copied from Army
Medical Reports for 1865.
Gum thickened with powdered chalk, glue, silicate
of soda, Hides’ leather felt and stiffening solution,
paraffine, &c., are also employed for stiffening bandages
and flexible splints, after they are moulded to a limb,
but none of them are as readily procured or have
much advantage over starch and plaster of Paris.
A detailed description of the mode of using them is
unnecessary.
Sand-bags are very useful, when laid along an
injured limb, to prop it up on either side. For this
purpose they are better than pillows, as their weight
prevents their slipping from under the part they support.
They should be made of macintosh cloth
about 4 or 6 inches diameter, and in lengths varying
from 1 to 4 feet, well closed that the sand may not
escape through the seams; the macintosh should be
covered with flannel, renewed from time to time.
The sand should be washed and well dried before the
bags are filled, that it may not rot the cloth containing
it. Moreover, the bags should be only three quarters
full, or they will be too hard to adapt themselves to
the limb when in use.
Cradles are light arched frames of wire or cane to
support the bedclothes over an injured limb. On
emergency an efficient cradle can be constructed from
a band-box, by knocking out the bottom and putting
the leg through it. If used to protect a foot, a notch
may be cut with strong scissors, not a knife, for that
splits the wood.
If the cradle is stout enough, it is useful to sling a
broken limb in its splint, and often great relief is thus
given to the patient. Dr. Salter’s Swing Cradle is
specially contrived for the purpose, and is shown,
fig. 42, page 64.
Leather Splints.—For these sole leather, to be
purchased at any leather dealer’s, is used. In preparing
them, the required length should be first noted down,
then a series of transverse measurements taken at
the widest and narrowest parts of the limb and over
the projections of joints, &c., or a pattern may be first
cut in paper and laid on the sheet of leather from
which a corresponding piece is cut. The splint should
always be so arranged that its edges do not bear on any
bony point, the shin, or malleoli, for example, but
either fall short of or pass beyond them. The hair side
of the leather should go next the skin, as it is the
smoothest and least irritating. The edges of the
splint must be thinned by bevelling off the outside for
about an inch all round, and no sharp corners should
be left. When the leather is prepared it should be
soaked, if the time can be spared, for twenty-four
hours in cold water, but when wanted quickly it can
be softened in a few minutes by soaking it in warm
water to which a little vinegar is added—this, however,
renders the leather brittle when dry, and apt to
curl at the edges. When the leather is softened, a
very thin even layer of cotton wadding or of lint is
laid on next the skin; the splint is then moulded to
the limb with the hands, and bandaged firmly; in
twelve hours it will be dry and rigid. The roller is
then unwound, and any parts of the splint pressing
on bony projections are marked before removal. It is
then trimmed, and laid between two layers of wash-leather
stitched together round the edges. The splint
is now finished, and can be either fastened on by
a roller or by two or more straps and buckles stitched
to it.
When support is required for a joint, the splint
should be fitted on the sides, where the leather may
have the rigidity of its width rather than only that of
its thickness to prevent bending.
Leather Splint for the Hip.—This joint is by far
the most difficult to fit. The hip splint should obtain
a good grasp of its fixed point, the pelvis, and a stiff
bearing on the front of the thigh where its pressure
is to be exerted. There are many plans of procuring
a satisfactory fit; the following is one of the best.
First cut a pattern on a sheet of paper from which
to shape the leather. If possible the patient should
stand while the pattern is fitting. Take a sheet of
paper large enough to reach round the body, and long
enough to extend from the waist to the leg below the
knee. Lay it against the diseased hip, carry its vertical
margin a little beyond the middle line in front
towards the sound side, and the other part round the
body behind, till the front is reached on the sound
side. Feel for the anterior iliac spine, and mark
with a pencil the point midway between it and the
pubis; from this draw one horizontal line inwards to
the border of the paper, and a second obliquely to the
perinæum. Then seek for the junction of the sacrum
and iliac bone behind, which corresponds pretty nearly
to the point first found in front; from this mark the
gluteal fold. Next carry a line vertically from the
upper border of the sheet of paper to the great trochanter;
and lastly, mark the level of the pelvis.
Lay the sheet on a table and slit it with scissors along
the lines marked, apply it a second time to the body
and bend the thigh part round the thigh, making its
anterior margin reach well to the inside of the limb,
while the posterior part should almost meet it from
behind. The splint should also reach downwards to
the back of the knee. The paper is then trimmed
down to these dimensions. The hip part is next
trimmed so that it clears the buttock on the sound
side and passes round to the anterior iliac spine of
that side. The pattern being complete, cut a piece of
sole-leather to correspond, arranging that the hair or
short side of the leather will lie next the skin; bevel
off the outer edge all round, and soak the leather till
thoroughly soft in water, wipe it dry, and bandage it
carefully first to the trunk and next to the thigh.
When it is set, superfluous and overlapping edges
must be marked before removal; lastly, the sides of
the vertical notch, between the hip and trochanter,
are stitched together, and the splint is covered with
wash-leather.
Fig. 59.—Leather splint for the hip.
When extension of the hip is required (see page 80),
it can be applied to the leg below the splint without
lessening the support that affords.
The accompanying figure, 59, is drawn from a splint
fitted by Mr. Heather Bigg on the plan just described.
Gutta-Percha may always be substituted for leather
in these splints, and the same plan of fitting is used,
except that the notching requisite in leather is not
necessary in using gutta-percha; for the directions to
use this material see page 50.
CHAPTER IV. DISLOCATIONS.
The main obstacles in reducing dislocations are
entanglement together of the displaced bones and
contraction of the muscles; the entanglement of the
bones determines the direction in which extension
must be made, and also of the counter extension, or
point at which the body is fixed to resist the traction
practised on the limb; this should be exactly opposite
the direction in which the limb will be drawn. The
muscles can always be relaxed by chloroform, hence it
is better when they are powerful, not to use the limb
as a lever to prize the head of the bone into its place.
Steady extension instead is better, to disengage the
bone from the parts against which it is caught, and to
bring it opposite its socket, into which the hands of
the surgeon guide it with less risk of laceration of the
soft parts than attends forcible leverage.
Lower Jaw.—This bone is dislocated on one or
both sides; when the condyle has slipped forward
from the glenoid fossa, the contracted temporal muscle
keeps the bone from regaining its proper position, and
causes the coronoid process to hitch against the malar
bone.
Treatment.—Apparatus.—1. A towel.
2. A four-tail bandage.
Fig. 60.—Dislocation of the jaw.
The patient should be seated in a high-backed chair,
resting his head against the back. The surgeon winds
the towel round both thumbs, and standing immediately
in front of his patient, places a thumb on the second
molar of both
sides, if the
dislocation be
double, or on
one side only,
if that be
alone displaced
(see
fig. 60). He
then presses
steadily downwards
until
the condyle is released, when it slips back to its place.
The return of the bone may be aided by pushing up
the chin with the fingers after the ramus of the jaw
has been lowered.
When the jaw is replaced, a four-tail bandage or split
handkerchief should be tied over the nucha and vertex
of the head, to keep the jaw closed (see fig. 23, page 32).
Biting or chewing should not be attempted for ten days
or a fortnight. The patient should be warned also
that when the jaw has been once dislocated it very
readily slips out of place again; he must thenceforth
avoid gaping or opening the jaw very widely.
The Clavicle is rarely dislocated, nevertheless both
the inner and the outer end may be displaced. The
signs are obvious—the end of the bone is felt in its
new position. The treatment for all is the same.
Apparatus.—1. Roller, 2¼ inches wide.
2. A piece of old blanket.
The blanket should be torn into strips about a foot
square, and folded thrice, thus making a long soft pad
to line the axilla, one for each armpit. The patient is
next seated on a stool; an assistant standing behind,
draws back the shoulder while he presses on the spine
with his knee; the dislocation being reduced, the
surgeon fixes the bone by a figure of 8 carried round
the shoulders and across the back. The forearm is
then bent and fastened to the body by a few turns of
the roller round it and the chest. This prevents the
pectorals from acting on the bone. The apparatus
may be laid aside at the end of a week, but the arm
must be fixed to the trunk for a fortnight longer.
This bone is often difficult to keep in place after
dislocation, and even the most accurately fitted apparatus
sometimes fails to effect its object, hence many
varieties of collar and yoke have been devised by
different surgeons to accomplish this purpose.
The Shoulder is dislocated in three directions,
downwards, inwards, and backwards. These have subordinate
varieties, but the signs depend chiefly on the
direction of the greatest displacement.
Signs of dislocation into the axilla. When the bone
is displaced below the glenoid fossa the acromion is
prominent; underneath it, the surgeon feels a hollow
instead of the head of the humerus, which the finger
detects in the axilla. Movement of the shoulder is
very limited and painful If the elbow is rotated
while the finger is in the armpit, the head will be
found to move with the rest of the bone.
If the head of the bone is carried more inwards on
to the ribs, it can be seen and felt near the clavicle;
the hollow is again readily detected below the acromion,
while the axis of the arm is altered, being directed
inside its proper position.
When the bone is carried backwards the head is
plainly felt on the scapula below the spine.
For the reduction of these dislocations several plans
are employed. When recent the two first displacements
can generally be restored without chloroform,
but if the patient is muscular it often saves time and
pain to produce anesthesia before attempting to replace
the bone.
Fig. 61.—Reducing a dislocated shoulder by the heel in the armpit.
By the heel in the axilla (fig. 61).—The patient lies
flat on a couch; the surgeon pulling off his boot from
the left foot if he has to reduce a left dislocation, and
vice versâ the right boot, seats himself on the couch
facing the patient. Putting his unbooted foot into
the armpit, he grasps the forearm with both hands
and pulls steadily downwards. When the head of the
bone is disengaged the muscles draw it into the socket,
and the movements of the limb become at once easy
and natural. The arm must then be fixed to the side
by a roller for a fortnight, and the shoulder is wetted
with an evaporating lotion to allay the pain and inflammation
resulting from the laceration of the soft
parts. Should the surgeon’s strength be insufficient
for the requisite extension, a jack towel may be attached
in a clove hitch round the wrist and held by an
assistant, who standing behind the surgeon draws
steadily in the same direction.
To make a clove hitch.—Grasp the towel in the left
hand, the little finger being downwards, then pronating
the right hand till the
little finger is upmost, seize
the towel below the left hand;
if the wrists are then rotated
in opposite directions the towel
will be drawn into two loops,
of which the ends cross above
the connecting part between
the loops (see fig. 62); if one
hand holds the loops and the
other pulls the ends, the loops
will be found not to slip, however
tight the ends are pulled.
Fig. 62.—The Clove-hitch knot.
Reduction by simple extension.—The patient again
lies flat on his back, a jack towel is passed round his
body and fastened behind the opposite shoulder for
counter-extension, while a second towel is attached to
the wrist by a clove hitch and intrusted to two or
three assistants, who are desired to pull quietly and
steadily directly away from the patient’s body. The
surgeon meanwhile watches the progress of the extension,
altering its direction as he finds the head more or
less engaged against the scapula, and finally with his
hands thrusts the head into its socket. Sometimes
there is much difficulty in getting the head back to
the glenoid fossa, even when the humerus is completely
disengaged from the scapula; this difficulty is
often overcome if an assistant rotates the humerus
backwards and forwards, while the extension at the
wrist and the pressure on the head of the humerus is
steadily maintained. When the limb is replaced it is
fixed to the side as before directed.
Fig. 63.—Dislocation of the shoulder reduced by simple extension.
If the dislocation has existed more than a few hours,
relaxation of the muscles by chloroform and extension
of the limb carried directly away from the body are
more sure of success than the heel in the axilla, because
they allow greater power to be exerted in a
steadier manner than is possible by the other mode.
The Elbow.—The signs of dislocation at this joint
are tolerably evident, but there is often coexistent
fracture of the coronoid or olecranon processes. Separation
of the articulating surfaces of the humerus from
the shaft is sometimes mistaken for dislocation of the
forearm backwards.
In dislocation of both bones backwards the olecranon
is very plainly felt behind the lower end of the
humerus; the sigmoid notch is generally to be made
out, and the forearm is fixed at a right angle. The
altered relation of the olecranon to the condyles
suffices to distinguish dislocation from fracture of the
humerus at its lower end, where the olecranon also
goes backwards, but the condyles go with it. The immobility
of the joint distinguishes it from separation
of the lower articular surfaces of the humerus from
the shaft, an accident, moreover, only met with in
children.
Other subordinate distinctions between dislocation
and fracture are, the limited movement, the difficulty
of restoring the bones to their natural position, and
the absence of crepitus; lastly, the peculiar form of
the articular surfaces can sometimes be made out.
In reducing the backward dislocations the patient
sits on a chair on which the surgeon rests his foot,
pressing his knee against the forearm at the elbow for
a fulcrum; then, grasping the wrist with one hand,
and steadying the arm with the other, he flexes the
elbow to dislodge the coronoid process from the fossa
at the back of the humerus; when this is done, the
articulating surfaces slip into place. This plan is commonly
adopted when the olecranon is displaced, but if
it fails to reduce the dislocation, direct extension at
the wrist must be employed, as for the following
dislocation.
Fig. 64.—Reducing dislocation
of the elbow round the knee.
When the radius only is displaced, the body should
be fixed by a jack towel
carried under the armpit of
the injured side, and over
the shoulder of the sound
side. A wetted bandage is
rolled round the forearm,
and a second towel is attached
by a clove-hitch (see
fig. 62, page 99) to the wrist
for extension, which is made
in the axis of the limb until
the radius can be slipped
into its place on the outer
condyle.
In all dislocations of the
elbow, when the bones are
returned the limb should be
bent to a right angle and put on a lateral angular
splint for a week or ten days, after which time it
should be worn in a sling a fortnight longer.
Fig. 65.—Handle for obtaining grasp of the thumb in dislocation.
The Thumb and Fingers.—When the first phalanx
is dislocated from the head of the metacarpal bone it
is sometimes very difficult of reduction. The most
effectual mode is steady extension, which is procured
by fastening the thumb to a piece of wood, which
serves as a handle to give command of the phalanx,
and is contrived as follows: the thumb is first bandaged
with a narrow wetted roller over the two phalanges,
and a thick layer of cotton wool is rolled round it; a
piece of stiff wood, 1 inch wide, ½ inch thick, and 12
long, is perforated at one end with three pairs of holes
½ inch distant from each other and from the end;
through these, three stout tapes, ½ inch wide and 2
feet long, are threaded, leaving three loops on one
side of the piece of wood (fig. 65). The wood is then
applied to the palmar aspect of the phalanges, the
loops passed over the thumb, their ends drawn tight,
and tied, not in a bow as the figure represents, but
wound round the end of the stick. The stick thus
attached becomes a good handle for extending the
digit, and also a long lever for altering the direction of
the phalanx if desired. Langenbeck of Berlin employs
a pair of forceps to seize the thumb, instead of the
wooden handle just described. But with the greatest
care and perseverance it is sometimes impossible to replace
the bone unless the constricting bands be divided
with a tenotome.
Hip-joint.—There are three chief directions in
which the hip is dislocated. First backwards on the
dorsum ilii, or further on to the sciatic notch. In
this dislocation the limb is shortened, moved with
difficulty, drawn inwards over the other, and its great
toe touches some part of the back of the other foot.
The hip itself is altered, the great trochanter being
nearer to the crista ilii, and more prominent than on
the uninjured side, and the head is often plainly felt
in its new position. Resistance to extension of the
limb, limited movement of the hip, with rotation inwards,
are the distinguishing points between this dislocation
and fracture at the neck of the femur.
Treatment.—Apparatus.—A complete apparatus for
this purpose is contrived and sold by instrument
makers, but a sufficiently serviceable one can be extemporised
when the former is not at hand; it
consists of:—
1. A rope running in two pulley blocks.
2. Three jack towels.
3. Two stout hooks to screw into the wall, or some
firm object, to obtain fixed attachment.
4. A wetted roller 3 inches wide.
The complete apparatus is as follows:—
Apparatus.—1. A set of multiplying pulleys.
2. A leathern padded girth, 2 inches wide and 3
feet long, having at each end an iron ring.
3. A stout leathern belt about 6 inches broad,
furnished with buckles, straps, and rings to fasten
on to the thigh above the knee; a rope is run
through the rings to connect the hook of the pulleys
with the thigh.
4. Two strong iron hooks to screw into the wall, for
fixing the apparatus.
5. Half-a-dozen yards of stout cord.
6. A hook, fitted with a buckle and strap, and hinged
so that, by turning a pin, it at once disengages
itself. If this is interposed between the pulleys and
the hook fixed in the wall, the limb may be instantaneously
released if desired.
Fig. 66.—Dislocation of the dorsum ilii.
Treatment.—Step 1. The patient is laid on a flat
couch, and put under the influence of chloroform.
When he is narcotised, a jack towel, or if it be at
hand the pelvic girdle, is carried across the perinæum,
arranging it to bear on the tuber ischii behind and
the pubes in front, its ends being attached to one
of the hooks screwed into the wall behind, and
about six inches below the level of the patient. This
towel should be put slightly on the stretch, that the
pelvis may be kept in the position first assigned to it
when the pulleys begin to draw. A wet roller is put
on the lower third of the thigh, the jack towel slipped
up the leg to the bandage, and fastened in a clove
hitch. Another jack towel is then doubled and passed
up the limb to the perinæum. The patient is next
turned on to his sound side, and the belt of the thigh
connected by the disengaging hook to the pulleys, which
are drawn out from each other as far as their cord will
allow, and attached to a hook fixed a little above the
level of the patient, on a line carried from the hip
across the junction of the middle and lower thirds of
the uninjured thigh (see fig. 66).
Step 2. The surgeon being ready, an assistant draws
on the pulley cord, getting gradual extension of the
limb as required by the surgeon, who, keeping his
hands on the hip and great trochanter, watches
the progress of the head of the bone towards the
acetabulum.
Step 3. When the bone has reached the edge of the
acetabulum, a second assistant slips the doubled jack-towel
over his shoulders, and by raising his body, lifts
the femur away from the brim of the acetabulum,
while the surgeon, grasping the foot and knee, makes
a few movements of rotation backwards and forwards
to ease the head into its socket.
When a reduction is effected, the limb should be put
in a long splint or starch bandage for three weeks, and
the patient not allowed to exercise the limb freely or
violently for a month afterwards.
Reduction by Manipulation.—When the patient is
not very muscular, and the dislocation recent, the
bone can often be speedily returned by movements of
flexion and rotation.
The patient is put fully under chloroform and brought
to the foot of the bed; the surgeon grasps the ankle
in one hand, and the knee in the other, bending that
joint till the heel reaches the thigh; he next flexes
the thigh on the abdomen, in doing this he carries the
knee outwards away from the body, and then rotates
the limb by pushing the foot outwards, on which the
head often slips into the acetabulum. If this plan do
not quickly succeed it is better to have recourse to
extension, by assistants if pulleys are not at hand, but
the irregularity of the force when assistants are
employed renders the traction of pulleys much preferable
to manual strength.
Dislocation downwards into the ischiatic foramen.
The limb is lengthened, capable of little motion;
the knee is bent; the toe points forwards, and
away from the other foot. Here the reduction is
best managed by extension; the apparatus required
being the same as that employed in dislocation backwards,
but it is differently arranged.
Step 1. The patient lies on his back, the pelvic
girth, or towel, is carried round the pelvis and fastened
to the wall on a level with his body, opposite the
uninjured side. A jack towel is put round the upper
part of the dislocated thigh, and attached to the pulleys
outside, which are fastened to the wall opposite
(see fig. 67).
Fig. 67.—Dislocation into the foramen ovale.
Step 2. Extension is then made by an assistant, the
surgeon grasps the leg above the ankle, and rotating
the limb inwards and outwards, but without lifting it
from the bed, guides the head into the acetabulum.
Here, as after dislocation backwards, a long splint
should be worn on the limb for three weeks before the
patient is allowed to move about at all.
Dislocation on to the Pubes.—The limb is easily
moved at the hip, shortened, rotated outwards, and the
head of the bone is felt in the groin.
The same apparatus is used in this as in the dislocation
on the dorsum ilii. It is applied as follows:—
Step 1. The patient lies on his back (fig. 68), with
his legs separated. The pelvic band is passed over the
perinæum and pubes, and attached above the patient,
in a line passing from the pelvis a little to his sound
side. A double jack towel is slipped up the limb to
the perinæum; the pulleys are fastened to the thigh
above the knee and fixed, in the manner directed on
page 106, to the wall below and external to the injured
side of the body.
Fig. 68.—Dislocation on to the pubes.
Step 2. Extension is then steadily made, while the
surgeon watches the head getting free from the pubes,
over the edge of which a second assistant slipping his
neck through the doubled towel, raises the bone a
little outwards. The surgeon in the meantime encourages
the bone by rotation to enter the socket.
A splint is necessary here also after reduction.
The Knee.—These dislocations are rarely complete,
and are easily reduced; the lateral ones by flexing the
thigh on the belly, straightening the leg, and rotating
it a little from side to side.
Another Plan.—Apparatus.—Two jack towels. This
is more useful when the tibia is carried backwards.
Lay the patient on his back, and slip a jack towel in a
clove hitch up the leg to the ham, and another round
the small of the leg; the thigh is bent and retained
in a semiflexed position by an assistant holding the
jack towel at the ham, while a second pulls on the
one at the ankle and so disengages the bones from
each other, when the surgeon readily slips them into
place.
After reduction is accomplished, the limb should be
fixed in a leathern back splint until the inflammation
subsides.
Dislocation of the Patella.—The displacement of
this bone on to the outer or inner condyle is generally
easily reduced if the knee is straightened and the vasti
relaxed by bending the thigh on the belly. When the
patella is turned on its own axis, the side, not the
under surface, is locked against the condyle, and reduction
is sometimes extremely difficult or impossible.
The same movements must be adopted as for simple
lateral displacement, and the surgeon must endeavour
to release the bone by pressing its upper edge downwards
with his thumbs.
After their reduction, all dislocations about the
knee-joint must be treated by rest, straight splints,
and evaporating lotions.
The Foot is very rarely dislocated from the leg
without fracture of the malleoli. Its reduction requires
simple extension of the foot on the leg, with the
knee bent; the surgeon grasps the heel in one hand,
the foot in the other, while an assistant fixes the thigh
in the half-bent position. The foot is first drawn
downwards to disengage it from the tibia, and then
directed into its place.
After reduction the limb should be put in a McIntyre’s
splint, in the way described for fracture of the
tibia near the ankle-joint.
Scarpa’s Shoes are instruments for restoring deformed
feet to their natural shape. The shoe (fig. 69)
consists of a flat metal sole broader and longer than
the foot, furnished with a rest for the heel. A rod,
attached to the side of the sole beneath the ankle,
reaches up the limb, to which it is secured by one broad
band and buckle below, and by a second above the
knee, opposite which joint the iron stem moves on a
free joint backwards and forwards. Opposite the malleoli
are set the centres of movement required for the
restoration of the deformity; they are moved by a
key. The foot is fastened to the sole by straps across
the instep and ankle; the toes are restrained by a
strap passing round them and fixed to a horizontal
toe-bar by the side of the foot. In fitting one of these
shoes, which of course must always be made specially
for the limb it is to control, the points to be attended
to are—1st, the centres of the joints must be so arranged
that, when traction is made, the foot shall
revolve back again round the same centres it has
passed in reaching its distortion. For example, if the
heel is raised, as in talipes equinus, the fore part of
the sole of the shoe must be capable of elevation, by
moving a joint that rotates in a plane parallel to
the rotation of the astragalus on the tibia. In most
cases of talipes, the bones of the foot have been
displaced round several centres; hence, the apparatus
must be furnished with power of traction along all of
these, or along the lines resulting from these different
directions acting simultaneously. 2nd. The heel must
be got thoroughly into its place at the back of the sole
to ensure that the foot will follow the shoe in all its
movements.
The treatment of talipes frequently requires division
of tendons before extension is attempted, if they are
too firmly contracted to permit the bones to regain
their proper position until they are lengthened by
division. Thus, in varus, the tibiales and tendo
achillis; in valgus, the peronci; in equinus, the tendo
achillis; are often divided.
The limb must not be very tightly braced into the
shoe, slight tension, if continuous, suffices to overcome
the resistance; and in children if the straps are drawn
tight the skin almost invariably inflames, and even
sloughs where it is compressed. Before the instrument
is applied, the limb should be bandaged with a
soft cotton, or Domett’s flannel roller. The foot is
first fixed to the sole or shoe, and then the leg to the
rod. Traction is increased gradually with frequent
small alterations, as the foot yields to the tension and
regains its natural position. The accompanying figure
(No. 69) represents an instrument made by Mr. Heather
Bigg. It shows the shoe restoring a much elevated
heel to its proper position after division of the tendo
achillis.
There are three common varieties of talipes—equinus,
or horse-heel, where the heel is drawn up
and the toes only touch the ground; varus, club-foot
proper, where the foot is twisted
inwards; and valgus, splay-foot,
in which the foot is
drawn outwards. Equinus is
often associated with varus,
and sometimes also with valgus,
and consequently for such
cases the instrument must provide
the mechanism proper
to each direction of displacement.
In Equinus the heel is raised
by the extreme extension of
the ankle, and the sole of the
foot is shortened by the metatarsus
being drawn backwards.
In this kind of deformity the
shoe must have a joint to
bring the astragalus forwards
on the tibia, and the sole of
the shoe must be well padded beneath the scaphoid
and metatarsal bones, that, as the foot is released from
its position of extreme extension at the ankle-joint,
the anterior parts of the foot may be thrust upwards
into their proper relation to the astragalus and os
calcis.
Fig. 69—Shoe for reducing
talipes equinus.
In Varus, or rather Equino-varus, for varus without
elevation of the heel is rare, the displacement is compound,
the ankle is extended, the heel raised, the scaphoid
and metatarsus are drawn inwards and downwards,
so that the scaphoid lies immediately beneath,
sometimes even in contact with the internal malleolus.
The astragalus and cuboid are drawn forwards so as to
lie in front of their natural position against the tibia
and os calcis. To bring down the heel the upright
stem passes outside the limb, the toe of the shoe can
be raised by a circular joint on the stem opposite the
malleolus, which by its revolution raises the toes and
depresses the heel. A second joint working outwards
and upwards elevates the outer border of the foot, and
restores the scaphoid to the front of the head of the
astragalus. Lastly, the metatarsus is drawn outwards
by a horizontal spring toe-bar along the outer border
of the foot, to which the toes are fastened.
In Valgus, the plantar arch is flattened or even
rendered convex downwards by the sinking of the
scaphoid, and in extreme cases, by rotation outwards
and upwards of the tarsus. The shoe here has the
vertical rod inside the limb, and if necessary, an axis
for rotation below the inner malleolus, and an elastic
arched pad under the scaphoid to lift it into its natural
position.
Casting in Plaster of Paris.—It is often convenient,
when ordering an apparatus for deformity, to
send the instrument-maker a cast of the deformed
part. This is readily made in the following way:—
Apparatus.—1. Two packets of freshly burned plaster
of Paris.
2. Some pasteboard, an old bandbox, or several newspapers.
3. Olive oil.
4. A basin of cold water.
Step 1. The part to be modelled should be laid in an
easy position, thoroughly oiled, and a shell or trough
of pasteboard roughly built round it to contain the
plaster till it sets.
Step 2. The plaster is then prepared by shaking the
powder into cold water, till a thick cream without
lumps is formed; this is secured by constantly stirring
the water as the plaster is shaken in. The cream is
then poured into the trough, little by little, that it
may make its way into the inequalities and recesses
under the limb, until the limb is half immersed, leaving
the projecting parts, such as joints, half exposed, so
that the halves of the mould may separate opposite
them. This first instalment is then allowed to set,
and a fresh supply of plaster is prepared.
Step 3. The surface of the hardened mould is oiled,
that the fresh cream may not stick to it, and the whole
of the limb is then covered by pouring the cream on a
second time. Plenty of plaster should be laid over the
projecting parts that the mould may be strong enough
for use. It should be ¾ inch thick everywhere, and
1 inch thick along the sides. When the second half
is set, the trough or shell is cleared away, and the
two halves of the mould removed from the limb
separately.
For casting, the mould is well oiled inside and filled
with cream, which sets into the cast required. While
the plaster is liquid, the mould should be well shaken,
that the air-bubbles may be all driven from the surface
of the cast.
CHAPTER V. MISCELLANEOUS. — FOOTNOTES: — LIST OF THE INSTRUMENTS AND APPLIANCES REQUISITE, OR OCCASIONALLY USEFUL, IN MOST OF THE IMPORTANT AND ORDINARY OPERATIONS IN SURGERY.
Hair Suture.—This is useful to bring the margins
of small scalp wounds together, where plasters are
not employed. It consists in taking a lock of hair
½ or ¾ of an inch on each side of the wound, and
tying them together over a double thickness of lint;
by this means the margins of the wound are kept
together, and the dressing in place. The slits left
after the removal of small sebaceous tumours are
very conveniently treated in this way.
Fig 70.—Eye Douche.
The Eye
Douche is a
small elastic
bottle fitted
with a nozzle
and flexible
tube, ending in
a rose, through
which, by
means of a
valve, the water
is drawn from
a vessel and driven in a fine spray over the eye held
open to receive it (see fig. 70). The syringe in fig. 70
is very useful for a variety of purposes.
Eye-Drops.—Little bottles are sold by chemists
for this purpose, with a tubular stopper; at one end of
the stopper is a fine jet, the other is closed by a piece
of indian rubber stretched over it; on pressing this a
drop escapes from the jet. In dropping astringents
into the eye the patient should put his head well
back; while the surgeon raises one lid from the eye,
drops in the lotion, and then raises the other and
drops it in again, and tells the patient to move his
eyelids about a little to force the lotion over the whole
conjunctiva.
Fig. 71.—Syringe for sending a continuous current into the nose or ear, &c.
Syringing the Ears is best performed by a
syringe having a long nozzle to direct the current of
soap and water down the meatus on to the wax.
Figure 71 consists of a syringe with double opening
and air chamber; when in action it supplies a continuous
gentle current, which breaks up the concretions
more speedily and with less discomfort to the patient
than the intermitting jet of a common syringe; but an
important part of the apparatus is the long slender
nozzle to direct the stream well into the meatus. The
instrument-makers supply a little spout or shoot to
hang under the ear, to turn off the water into a basin
clear of the neck. If time permit, the patient should
keep the ear charged with olive oil for a few days
before syringing, that the wax may be softened.
After the wax is removed, the irritation of the canal is
best allayed by a little glycerine or olive oil put into
the meatus, and covered by a pledget of cotton wool,
large enough to fill the concha and too large to enter
the passage, where it may be lost sight of.
Ice-Cold Injection.—In obstinate epistaxis the
nares are sometimes plugged, but, before proceeding
to this painful mode of treatment, a simpler plan
should first be tried; namely, the injection of ice-cold
water into the nostril along which the blood flows.
The stream should be directed upwards that the water
may first dislodge the clots entangled in the meatuses,
and then flow over the bleeding surface. This is best
done by employing a clyster or douche bottle (see
fig. 71), one tube of which lies in a vessel of ice-cold
water (containing solution of gallic acid or other styptic
if desired, though cold water alone usually suffices), the
other tube, having a long narrow nozzle, is passed up
the nostril and directed upwards among the spongy
bones. With this apparatus the water is injected
steadily for half an hour, before being abandoned as
unsuccessful. The patient is kept still, sitting upright
in a cool room. If these means fail to check the flow
of blood, the nares may then be plugged.
Plugging the Nares.
Apparatus.—1. A flexible catheter, No. 7, or Belloc’s
sound.
2. Whipcord.
3. Lint.
4. Scissors.
Step 1. Roll up a strip of lint tightly into a mass,
1 inch broad and ½ an inch thick, trim the ends away
with scissors till the mass is of a size to enter a
posterior naris, then tie the wedge in the middle of a
yard of doubled whipcord. If blood trickle down
both nostrils both must be plugged, and two such
plugs must be prepared; next, make two similar rolls
of lint, and tie these up with a short piece of silk or
twine to prevent their unrolling.
Step 2. Pass along the interior of the catheter a
yard of twine, and draw its end through the eye of
the catheter a few inches, then introduce the catheter
through the naris directly backwards, not upwards
nor downwards, because, when the patient is upright,
the floor of the nose is nearly horizontal. When the
catheter has reached the pharynx, the finger, or a
forceps, must be passed through the mouth to catch
the string hanging from the end of the catheter and
bring it out of the mouth, where it is held while the
instrument is withdrawn from the nose. The step is
repeated in the other nostril if required.
Step 3. Next wash out the nostrils with a few
syringefuls of ice-cold water, in which some tannin is
suspended.
Step 4. Fasten the double string of the plug to the
end of twine hanging out of the mouth (see fig. 72), and
then draw out the
other end through
the nose; this will
carry the plug
to the pharynx,
where the finger
guides it over the
soft palate and
thrusts one of its
ends into the
naris, where the
strings draw it
tight. The plug
for the anterior
nostril is then put
in place, and the
strings tied tightly
over it (see fig. 73).
Thus the plug in front keeps the plug behind in place
and vice versâ. The end of string from the posterior
nares, left hanging out of the mouth, must next be
tied to the string of the anterior plug to keep it out
of the patient’s way, till wanted to withdraw the
posterior plug, when that is to be removed. If blood
run from both sides, the other nares are stopped by a
repetition of this operation.
Fig. 72.—Plugging the nares. Belloc’s sound
passed through the nares, and projecting
at the mouth.
This apparatus is very painful, and, if borne so long
as a couple of days, should always be taken out then.
If bleeding recur, which is very unlikely, fresh plugs
must be introduced. Sometimes the posterior plugs
are soaked in styptic
solutions; this is bad,
because the bleeding
part is not at the posterior
nares, and the
styptics increase the
soreness the plugs themselves
produce.
Fig. 73.—Plugging the nares; the
strings from the posterior plug
tied over the anterior plug.
Fig. 74.—Belloc’s Sound, for drawing a thread from the mouth
along the nares.
Belloc’s Sound.—Fig.
74 is a curved silver
cannula like a female
catheter, furnished with
a long spring stylet,
that arches round in a
circle when thrust out
of the cannula, and has
a hole at the end to carry a thread. The long stylet
can be unscrewed into two parts, when not in use.
The figure represents the instrument with the stylet
ready for protrusion, and the same arching forwards
after it is protruded.
The cannula is passed along the nares till the end
reaches the pharynx, then the stylet is protruded
and arches forward till it reaches the teeth, when
a thread is passed through the hole, and the stylet
being withdrawn, the thread is carried with it into
the pharynx and through the nostril, where it can be
used to draw the plug into its place at the posterior
nares.
Tooth Drawing.—A surgeon is frequently required
to draw a tooth on emergency, and should be provided
with instruments (see fig. 75). Seven pairs of forceps
and an elevator are sufficient for all he is likely to
deal with. They are differently shaped for the different
teeth, which vary much at the neck, the part
grasped in the forceps.
Fig. 75.—Tooth Forceps.
For the operation the patient should be seated
in a high-backed chair; the surgeon stands at his
right side, holds the jaw with his left hand, while
with the right he thrusts the beaks of the forceps
between the gum and the tooth on its lingual and
buccal aspects; having reached the neck, he holds the
tooth firmly, pushing it inwards and outwards with
a rotary motion of the wrist (except for the molar
teeth). Sudden tugs break the tooth and leave the
fang behind; when loosened by rotation and lateral
motion, the forceps readily lift the tooth out of its
socket.
For the upper incisors the beaks of the forceps are
straight, slightly hollowed inside, to give them hold of
the teeth, and have crescentic edges (see fig. 76).
The upper incisors and canines can be drawn by the
same pair, as the shape of these teeth at the neck
varies to a small extent.
For the lower incisors a very narrow forceps is necessary.
The beaks (fig. 77) should be curved at the
joint sufficiently to form an angle of 25° with the
handles, that the latter may clear the upper jaw. The
edge of the beaks is crescentic, similar to that of the
upper incisors. These forceps are also very useful for
removing roots, as their fineness enables them to sink
between the stump and the alveolus with ease.
Fig. 76.—Upper incisor tooth and forceps.
Fig. 77.—Lower central incisor and forceps.
Fig. 78.—External aspect of upper bicuspid tooth, and
bicuspid forceps.
For the bicuspids, beaks with crescentic edges also
are used, but the inside of the beak is more hollowed
to fit the round neck of these teeth (see fig. 78). All
the bicuspids can be drawn with the same pair, but
it is convenient to have forceps bent
at the joint to clear the upper jaw
when extracting a lower bicuspid (see
fig. 79).
Fig. 79.—Lower
bicuspid forceps.
For the upper molars two forceps are
required, one for each side of the jaw;
the beaks of these are well hollowed to admit the
crown of the tooth. The inner beak terminates in
a crescentic border to fit the large internal fang
(see figs. 80 & 81); the outer beak has two smaller
grooves separated by a
point, that passes between
the two external
fangs.
In drawing these teeth
the forceps should be
thrust as high as possible
and held firmly, while
the fangs are loosened
by moving the tooth
from side to side, but
from the multiplicity of
fangs, rotary motion is
not available.
Fig. 80.—Left
upper molar
tooth and forceps.
Fig. 81.—Right
upper molar
forceps.
The wisdom molars
are often difficult to seize from being almost buried in
the jaw; as they resemble a bicuspid in shape, bicuspid
forceps (fig. 78) should be employed; if this fails to
penetrate between the tooth and the alveolus, the
narrow incisor forceps (fig. 77) can be driven up till it
grasps the tooth. Not unfrequently the fang of this
tooth in the lower jaw is curved backwards and prevents
extraction when the tooth has been loosened;
this difficulty may be overcome by pushing the crown
of the tooth a little backwards so as to tilt the fang
forwards out of place.
When the molars are closely set, or the tooth to be
extracted is overhung by its neighbour, it is often
difficult to avoid tearing the gum extensively
and even carrying away more
than one tooth; tearing the gum is
easily avoided by lancing it before
applying the forceps, and slow and
steady movements of the wrist usually
prevent the latter accident, or the overhanging
tooth may be filed away before
the forceps are applied.
The inferior molars (fig. 82) have
forceps, whose beaks are doubly
grooved and pointed, to enable them
to seize the neck on each side between
the two fangs.
Fig. 82.—Inferior
molar tooth and
forceps.
Fig. 83.—Elevator.
In raising stumps, so much decayed
that the forceps will not hold them, the elevator
must be employed; this instrument (fig. 83), straight,
pointed, and a little
grooved at the point, is
thrust down between
the alveolus and the
tooth; the jaw being then the fulcrum, the elevator
is the lever to push forwards the fang; when thus
loosened it is easily lifted out. In working with an
elevator there is some risk of thrusting the point
through the alveolus, and wounding the tongue or
floor of the mouth, hence it should always be guided
and covered by the left forefinger. In removing the
fangs of incisors the narrow forceps are most useful,
and should it not be possible to penetrate between the
fang and the alveolus, the alveolar border may be
included in the grasp of the forceps and brought away
with the tooth. The injury thus inflicted is very unimportant
and much pain is saved.
After the tooth is extracted the mouth should be
well washed with warm water a few times, the attending
bleeding being of no importance, except in individuals
of hæmorrhagic diathesis, in whom measures
should be at once taken to arrest the flow.
To stop a bleeding socket the alveolus must be well
cleared of clots, and fragments of sponge, soaked in
a solution of perchloride of iron, one part of the salt
to three of water, packed into the cavity. A plug of
cork is placed between the jaws, and a four-tailed
bandage (see page 32) carried round the head to keep
them firmly closed. Should this plan fail, the socket
must be cleared again, and the wire of the galvanic
cautery pushed well down to the bottom and then
heated till it has cauterised the cavity (see page 168).
Nipple Shields and Artificial Nipples made of
flexible ivory, vulcanized india-rubber, &c., are required
when the nipple is chafed and excoriated by the
child’s sucking, especially if his mouth be attacked by
thrush, as is usually the case. When the nipple is sore
it should be well washed and dried after suckling,
covered with glycerine of starch or plastic collodion and
protected by a shield. If much inflamed it may be
wrapped in lint dipped in alum water or solution of sulphate
of zinc (one grain to the ounce), and deep chinks
should be freely rubbed with lunar caustic. The breast
should be regularly emptied by the breast-pump if the
child’s sucking gives much pain, lest the accumulation
of milk in the ducts cause milk abscess.
Plugging the Vagina is employed in cases of
rapid hæmorrhage from the womb, &c.
Apparatus.—1. A silk pocket-handkerchief.
2. A dry new fine sponge or pellets of cotton wool.
3. Silk thread.
4. A body roller or folded sheet.
The sponge should be cut into pieces the size of nuts;
if the sponge is compressed it answers better. When
prepared, the vagina should be cleared of coagula by a
syringeful of ice-cold water; the handkerchief, unfolded
and thrown over the right hand, is passed up
the vagina till its centre reaches the os uteri, the
borders and ends then project from the vagina. The
interior of the handkerchief is next filled by firmly
packing the sponge in bit by bit until the vagina is
distended by the mass; the ends of the handkerchief
are then tied together. The sponge swells as it
absorbs the blood, and compresses the bleeding vessels
by its distention.
The abdomen and uterus are then supported by a
body roller, or folded sheet, wrapped tightly round the
hips and waist, while the patient, lightly clad, is kept
quiet in a cool chamber.
When the plug has answered its purpose it is removed,
by withdrawing the sponge bit by bit, and
the vagina is washed with tepid water.
The kite’s-tail plug.—Masses of cotton wool the size
of a hen’s egg are tied at two inches distance from
each other along a long string. When about a dozen are
tied on, a speculum is introduced, and the first ball
of wool is passed to the bleeding point and pushed
firmly against it, and then another, and so on, until
the vagina is firmly packed. An end of string is left
hanging out of the vulva, whereby the plug may be
removed when necessary. Each mass comes away
successively with ease as the string is pulled out of the
vagina.
Injecting the Urethra often fails from the inefficient
mode in which it is done. The syringe
employed should be short enough to be worked easily
with one hand, and need not contain more than one
or two tea-spoonfuls, as the capacity of the urethra
does not exceed that amount. One of such a size
is just 2 inches in length, and easily worked by one
hand. The opening through the nozzle should also
be wide, that a forcible stream may be injected into
the urethra.
The patient should fill the syringe, then place on a
chair or stool before him a chamber pot, and, having just
made water to clear out the discharge collected in the
urethra, he inserts the slightly bulbous nozzle into the
meatus urinarius. He then grasps the sides of the glans
with the left forefinger and thumb to close the mouth of
the passage. The right forefinger next presses down the
piston slowly, so that the whole of the injection passes
into the canal and distends it; keeping the meatus
shut with his left finger and thumb, the patient lays
down the syringe and rubs the under part of the penis
backwards and forwards, that the injection may be
forced into any folds or follicles of the mucous membrane.
Having thus occupied about thirty seconds, he
releases the mouth of the passage, when the fluid is
ejected sharply into the vessel placed ready to receive
it. This rapid ejection is a test of the proper performance
of the operation.
In counselling the use of astringent solutions, the
surgeon should always caution the patient not to
employ one that produces severe smarting, which
lasts more than a few minutes after injection. If it
causes much pain, the solution is too strong.
Catheters and Bougies.—Silver catheters are
made in sizes, increasing from No. ¼ to No. 12, the
first having a diameter of 0·64 inch, the latter 0·25
inch. Larger ones than these are seldom employed.
Fig. 84.—Silver catheter.
Fig. 85.—English Flexible catheter.
The curve preferred by different surgeons varies
much; that depicted in fig. 84 is the one used by Sir
Henry Thompson; it begins at 3¼ inches from the
point, and ends when the point is at right angles with
the stem. Each catheter is fitted with a wire stylet.
The flexible catheters are of many kinds; the English
gum-elastic (fig. 85), the French black flexible (fig. 86),
and the vulcanised india-rubber (fig. 87), catheters,
being the three varieties most generally employed.
English flexible catheters should be kept on stylets
well curved at the last 3 inches, that, when the stylet
is withdrawn, for the catheter to be passed, the latter
may retain sufficient curve to pass over the neck of
the bladder easily.
Fig. 86.—French bulbous-ended catheter.
Fig. 87.—Vulcanised india-rubber catheter.
Sounds are solid, being of steel, plated or gilt.
Their curve varies, and is generally 20 or 30 degrees
more obtuse than that of the catheters.
Bougies are made of the same materials as the flexible
catheters; they are kept straight, and the more supple
they are the better, the black bulbous-ended bougies
being the most useful variety for dilating the urethra.
Fig. 88.—The Olive-headed bougie.
Olive-headed Bougies (Bougies olivaires) are used
for exploring the urethra in cases of gleet, where the
discharge is often kept up by a stricture or a tender
patch of chronic inflammation of the mucous membrane.
They are made of metal, or of black gum
mounted on a very flexible leaden wire; the latter
kind are far preferable. The stem of the instrument
is slender, no bigger than a No. 3 or No. 4
bougie; the end terminates in a conical point about
¼ or ⅜ of an inch long, expanding at its base to any
required size. These bougies are most useful from
No. 4 to No. 16 of the English scale, or from No.
10 to No. 24 of the millimetrical scale. The stem
should be marked with white rings an inch apart,
so that when the instrument is passing over a tender
part, or is arrested by a stricture, the distance of the
impediment down the urethra can be at once estimated.
In withdrawing the instrument, the wide base
of the olive shows the exact position and length of
those strictures which are not too narrow for the olive-head
to slip by, for it is nipped by the stricture and
released as soon as the narrowing is passed. By using
instruments large enough to fill the normal urethra,
an induration beneath the mucous membrane can be
detected in its earliest stage before it has produced
symptoms diagnostic of stricture.
Rigid instruments have one advantage over flexible
ones, in that their points can be guided by the surgeon;
the points of flexible instruments cannot be
directed, hence the introduction of the latter into a
stricture is less easily managed, consequently bougies
with various kinds of points should be kept. But
flexible instruments cause far less irritation than rigid
ones, and should always be employed instead of the
latter when possible: with patience and practice much
of the difficulty attending their introduction is overcome.
The French bougies, with tapering ends and bulbous
points, slip more easily through a stricture than instruments
having the same diameter throughout, and
bougies with fine tapering points can sometimes be
introduced where others fail.
Passing Catheters.—In passing instruments along the
urethra the conformation of its interior should be borne
in mind. From the meatus to the triangular ligament,
the normal urethra, when gently stretched, becomes a
straight tube; having, nevertheless, just within the
meatus, a pouch in the roof, the lacuna magna, where
the point of the instrument may catch if not turned
downwards. At the bulbous part the urethra enlarges
in capacity by having a slight downward curve in its
floor, just before the triangular ligament is reached.
In this depression, the beak of the catheter is apt to
sink below the level of the passage through the ligament,
which is always a fixed point. Beyond the
triangular ligament the urethra curves gently upwards,
has a floor beset with irregularities, in which the point
of the instrument easily catches, if not raised as it
passes along the curve.
A Silver Catheter is passed most easily while the
patient is in a horizontal position, with the shoulders
low and the thighs separated. The surgeon stands on
the left side of the patient, and holds the catheter,
previously warmed and lubricated with oil or lard,
lightly between the thumb and two first fingers of the
right hand, the beak downwards and the stem across
the patient’s left groin. Then taking the penis between
the middle and ring fingers of the left hand, the
palm being upwards, he pushes back the foreskin with
the thumb and forefinger, and steadies the meatus
while introducing the beak of the catheter. This
done, he draws the penis gently along the catheter
as the point is lowered to the perinæum, but without
raising his right wrist until the instrument has travelled
5 or 6 inches along the passage and reached the
triangular ligament. The surgeon then carries his
right wrist to the middle line of the patient’s body,
and while pushing the point onwards, raises the hand
round a curve till it again sinks between the patient’s
thighs. When the bladder is reached he withdraws
the stylet that the urine may escape. Three points of
difficulty are usual in passing catheters; the lacuna
magna just within the meatus, the triangular ligament,
and the prostatic part of the urethra just before the
bladder is reached. The first is escaped by keeping
the beak along the floor of the urethra for the first
two inches; the second is best avoided by raising the
wrist as the instrument passes the triangular ligament,
and directing the beak against the upper surface of the
urethra, lest, being in the enlarged bulbous part, it
sink below the opening in the ligament; the third
difficulty is overcome by depressing the hand well as
the point approaches the bladder.
To pass the catheter in the upright position, the
patient is placed against a wall or firm object, with his
heels eight or ten inches apart and five from the wall,
that he may rest easily during the operation. The
surgeon sets himself opposite the patient and grasps the
penis with the two middle fingers of the left hand, the
palm upwards; he next exposes the meatus with the
thumb and forefinger, and his right hand holding the
catheter by its middle obliquely across the left side of
the patient, he draws the penis on to the instrument
till the triangular ligament is gained. He then carries
the shaft of the catheter to the middle line and, holding
it by its end, brings the right hand downwards and
forwards, to carry the point upwards over the obstruction
at the neck of the bladder.
The operation should be done slowly and with great
gentleness, giving the urethra time “to swallow the
instrument,” as the French surgeons express it. Hasty
or forcible movements tend to thrust the point against
the wall of the urethra, where it hitches, if it does not
penetrate and make a false passage. However easy
the introduction may have been, the withdrawal of the
catheter should be always done slowly to avoid giving
pain to the patient.
When the canal suddenly contracts, as from a stricture,
the point of the sound often stops at the obstruction;
by withdrawing the instrument a little, and diverting
its point to another side or along the upper part of
the urethra, a part where the obstruction is less abrupt
will often be found to let the catheter glide into the
stricture. The floor of the urethra should always be
avoided, as false passages nearly always branch off
from the floor close to the stricture.
Difficult narrow strictures are most easily overcome
by injecting a drachm of warm olive oil into the
urethra, and then passing fine black gum or whalebone
bougies (bougies filiformes) along the urethra.
These, from their fineness (their diameter is only ⅓ or
⅔ of a millimetre, about 1/100 inch), are very apt to
catch in false passages; if so, the bougie should be left
engaged in the false passage, and held in the left hand
while another bougie is passed along the urethra; if,
in its turn, this one gets into a false passage, it also
should be left, and a third passed; and so on till all
the false routes are occupied, or a bougie enters the
stricture and reaches the bladder, which is known by
the readiness with which it will pass backwards and
forwards. The other bougies should then be withdrawn,
and the bougie which has passed the stricture
be tied in for twenty-four hours, until the passage is
sufficiently dilated to allow a small catheter to replace
it. If the patient is not suffering from retention of
urine, there need be no anxiety about evacuating his
bladder, as urine will find its way alongside the bougie
when he attempts to make water. In passing to
relieve retention, No. ½ English flexible catheter
should be used instead of bougies; but when the
stricture is too narrow for these, a bougie may still be
tried, as the urine will generally dribble alongside the
bougie with sufficient rapidity to relieve the patient.
English flexible Catheters should be kept on stylets
curved as represented in fig. 85, that the first 3 inches
of the instrument, when the stylet is withdrawn, may
retain sufficient curve to ride over the impediment at
the neck of the bladder. In warm weather, after being
oiled, they should be dipped in cold water just before
using, to render them a little stiffer, and less likely to
lose their curve while traversing the urethra.
They may also be passed while the patient lies or
stands, and the movements are the same as for the
silver catheter.
Bulbous-ended or probe-ended Catheters and Bougies
(Bougies à boule) are always straight; their suppleness,
their tapering ends, and their smooth rounded
point enable them to glide along the urethra, and to
accommodate themselves readily to the windings of
the passage; for which reason they are the easiest to
pass both for the patient and the surgeon. In passing
them they are slightly warmed, if the weather is cold,
to restore their flexibility, and gently pushed along the
canal till the bladder is reached.
Vulcanised India-Rubber Catheters (fig. 87) are used
when the bladder is to be kept empty; their suppleness
renders them very unirritating, and as phosphates
crust on them very slowly, they may be worn for a
week without being changed.
They are easily passed by threading them on a stylet
with the appropriate curve, and lubricating them with
white of egg or water, not with grease, which injures
them. The stylet is withdrawn after they are passed.
To pass a Catheter in the Female.—The
patient may lie on one side or on her back; if on her
side the knees should be well drawn up; if on her
back, the thighs must be somewhat separated. Before
introducing the catheter, a wine bottle or narrow-necked
bed urinal should be placed in the bed ready
to receive the urine. If the ordinary slightly curved
female catheter be not at hand, a No. 7 or 8 flexible
one does just as well.
Having oiled the instrument, go to the patient’s
back, and take the catheter in the right hand if the
patient lies on her right side, and in the left hand if
she lies on her left side; if she lies on her back, go to
either side and take the catheter in the hand nearest
her feet. Hold the stem of the catheter in the palm,
so that the beak lies against the tip of the forefinger,
while the thumb and second and third fingers grasp the
stem. Then passing the hand under the bed-clothes,
seek the buttock; from that pass the forefinger to
the perinæum, and let it enter the vulva, keeping the
back of the finger against the posterior part, then pass
it between the nymphæ to the entry of the vagina.
This is known by the tip of the forefinger being lightly
grasped, unless the vagina is very wide. Keeping the
finger just within the entry, feel for the arch of the
pubes in front; having found this, withdraw the tip of
the finger slightly from the vagina: in doing this, it will
strike a small projection of mucous membrane hanging
just at the anterior margin of the entry. Keep the
finger steady against this, while the other hand pushes
the catheter gently onwards, which then rarely fails to
enter the urethral opening close above
the projection of mucous membrane.
Having penetrated the urethra, arrange
the catheter in the receptacle for the
urine, and push the instrument into
the bladder.
To Wash out the Bladder.
Apparatus.—1. A flexible catheter;
Nos. 8 or 9 are convenient sizes; but
a smaller one can be employed.
2. A caoutchouc bottle, holding six
ounces, and fitted with a tapering
nozzle and stop-cock. (Fig. 89.)
Fig. 89.—Elastic
india-rubber
bottle for injecting.
During the operation the patient
should stand, if possible, as the mucus is thus more
easily cleared from the bladder. The surgeon first
fills his bottle completely with tepid water, that no
air may remain; then directing his patient to stand
against a wall or some firm object, passes the catheter
and draws off the urine. He next inserts the nozzle
into the catheter, and, turning the cock, compresses
the bottle slowly until two or three ounces of water
have run into the bladder; this he lets escape by
removing the bottle for a minute, and then repeats his
operation till the water returns clear, without exhausting
the patient’s strength. Three or four small injections
wash the sediment and mucus from the bladder
as quickly, and with far less fatigue or risk of spasm
than a prolonged flow of water through a stiff double
current catheter. In this way the bladder may be
washed twice or thrice daily to the great comfort of
the patient.
Injections of solutions of nitrate of silver, carbolic
acid, alum, &c., in the proportion of 1 part to 100, or
to 50 of water, can be used instead of water for this
purpose.
To Tie in a Silver Catheter.
Apparatus.—1.
A few yards of
tape ¼ inch wide.
2. A roller.
3. A spigot of
wood; or,
4. A yard and a
half of fine india-rubber
tubing.
Fig. 90.—A silver catheter tied in the urethra.
A narrow roller is tied round the hips; from this, on
each side, a tape is passed round the thigh at the
groin, and fastened before and behind to the roller
round the hips (see fig. 90); a narrow tape run through
the rings of the catheter connects them with the loops
in the groins. The tapes are tied short enough to
prevent the catheter slipping out; a yard or two of
narrow india-rubber tubing, fixed on to the end of the
catheter, conveys the urine to a pan under the bed,
and keeps the bed dry, or a spigot of wood fitted to
the catheter may be inserted, for the patient to draw
out when he desires to void his urine.
To Tie in a Flexible Catheter. (Fig. 91.)
Apparatus.—1. A piece of soft twine, or Berlin wool,
about 15 inches long.
Fig. 91.—A flexible
catheter tied in
the urethra; the
string fastened behind
the corona
glandis, and concealed
by the foreskin.
A catheter is first passed into
the bladder, and the urine runs off.
The catheter is then gently withdrawn,
till the stream ceases, that
the end of the instrument may remain
just without the neck of the
bladder. The string should be tied
round the catheter ½ an inch from
the meatus, its ends gathered together
and tied in a knot about 1
inch farther on. The foreskin is
then drawn back, the ends passed
beneath the glans and tied round
the penis behind the corona; the
superfluous string is snipped off,
and the foreskin brought forward.
The catheter is cut off obliquely ½ an inch beyond the
string and then stopped with a spigot, direction being
given to the patient to withdraw the spigot, and
push the catheter a little further in when he wants to
make water.
To Tie a Patient in Position for Lithotomy.
Apparatus.
Two bandages, each 3 yards long and 2 inches wide,
of calico or saddle-girth, with tapes sewed on the ends.
Fig. 92.—Tying for lithotomy.
The patient is laid on his back, a slip-knot made in
the middle of the bandage and passed over the wrist;
the hand is then
made to grasp
the foot, the
thumb above,
the fingers
under the sole
(fig. 92); one
end of the bandage
is carried
behind and inside
the ankle
to the dorsum
of the foot,
where it meets
the other end passing in front of the ankle. The ends
are then carried under the sole, brought up and tied in
a double bow over the back of the hand.
Bedsores are best treated by great cleanliness, and
by washing the skin exposed to the discharges with
spirit of wine every day. Brown-Sequard recommends
cold and heat to be applied daily, by means of an ice
bag for ten minutes, followed by a warm poultice for
an hour. The pressure of the skin over the sacrum
or trochanters is prevented by a ring of soft thick felt,
covered on one side with adhesive plaster, and applied
like a corn plaster around the prominent bone.
In addition to these local applications, the pressure
of the body should be evenly distributed over its under
surface by placing the patient on a water cushion, or,
better, on Arnott’s water-bed.
Fig. 93.—Water-bed.
Arnott’s Floating Bed.—In the hydrostatic or floating
bed of Dr. Arnott, the patient floats on the surface
of a trough of water, into which he sinks until he has
displaced his own weight of water; his floating apparatus,
or raft, so to speak, being a sheet of waterproofing,
and a thin mattress or folded blanket, on
which he lies. The bed consists of a trough running on
large castors, about 8 feet long, 2 feet 8 inches wide,
and 1 deep, with a tap at the bottom for letting out
the water, and a spout in one corner to fill it by.
Over the top a macintosh cloth is spread, its edges
being firmly nailed to the margin of the trough, but
the cloth is left slack enough to float easily on the
surface of the water when the trough is partly filled.
This slackness is requisite to allow the water displaced
by the weight of the patient’s body to rise up around
him without tightening the cloth, or the floating principle
of the bed is not carried out, and the pressure of
the patient’s weight not evenly distributed over his
body (see fig. 93). Three or four blankets are laid
evenly over the macintosh, and these again protected
from the moisture of the patient by a macintosh
under-sheet. If a mattress is used, it must be
very thin, and supple enough to let the surface of the
water adjust itself to the patient’s body and receive
the pressure evenly. The water employed to fill the
bath should be about 50°.
Fig. 94.—Water-cushion.
Water Cushions are flat cushions of stout macintosh
cloth, half or two-thirds full of water, and laid on
the mattress beneath the blanket and sheet (see fig. 94).
They are more portable than the water-bed, but
they are simply soft pillows, and do not counter-balance
the weight of the patient in the manner of
the floating bed.
The Stomach-Pump is used for emptying the
stomach, or for injecting fluid food when patients
refuse to swallow.
It consists of a brass syringe holding 4 ounces, of
which the nozzle is connected with two tubes, one at
the end, the other at the side. The passage through
these is directed by a valve which is governed by a
lever lying on the barrel (see fig. 95). When the lever
is at rest, the current passes in and out of the syringe
by the lateral tube; when depressed, by the direct
tube. The elastic tubes with smooth nozzles, about
2 feet long, are fitted to the syringe. There is also a
gag of hard wood, having a hole in the middle, through
which the tube passes on its way to the stomach, to
protect it from the patient’s teeth.
Fig. 95.—The stomach-pump.
When the pump is employed to remove the contents
of the stomach, two washhand-basins are placed at
hand, one empty, one full of tepid water. The patient
is seated in a high-backed chair to steady his head;
one assistant holds his hands, while a second screws the
small end of the gag between the teeth and forces open
the mouth, across which it is then easily fixed. The
flexible tube, being well oiled, is next passed across the
pharynx and down the gullet slowly and cautiously,
without staying for any effort of vomiting it may induce;
when about 20 inches are passed through the
gag the nozzle has reached the stomach. First, two or
three syringefuls of water are injected into the stomach;
then, removing the second tube from the basin of water
to the empty basin, the action of the syringe is reversed,
by pressing on the lever as the piston is raised, and
letting it fly up when the piston is depressed. Thus
two syringefuls may be withdrawn, then fresh water is
again injected and withdrawn, until the contents of the
stomach are removed and the water returns clear.
Precaution must be always taken not to exhaust from
the stomach before water is injected, lest the coats of
that organ be injured by being sucked against the
nozzle of the tube.
If desirable, antidotes may be dissolved or suspended
in the water injected. When the pump is used for
feeding patients, one or two pints of beef tea, eggs
beaten with milk or wine, Liebig’s soup, &c., are the
kinds of food suited for the purpose. Each time the
pump is used, it should be thoroughly cleaned by
syringing through it plenty of warm water, and the
tubes must be unscrewed to wipe the joints carefully.
Transfusion of Blood.—The points of greatest
importance in performing this operation are:—
1. That the supply of blood come from a vigorous
adult.
2. That the transfer be made within two minutes of
the blood’s escape from the vein of the supplier.
3. That, to prevent coagulation, the blood should
pass over as small a surface, and suffer as little exposure
as possible in transit.
4. Care must be taken to prevent air entering the
vein with the blood.
The apparatus described below is that devised by
Dr. Graily Hewitt, and depicted in the Obstetrical
Society’s Transactions for 1864, page 137. It consists
of a glass syringe holding two ounces (fig. 96),
with a piston easily attached
and removed; its nozzle is
curved and fits the mouth of
a cannula of silver. The
nozzle of the syringe is provided
with a little stopper
attached by a chain; a stylet
likewise fills the cannula, to be
withdrawn when the blood is
injected through the latter.
Fig. 96.—Graily Hewitt’s
syringe for transfusion
of blood.
The success of the operation
depends in great measure on
the rapidity with which it is
performed, and requires the
aid of two assistants that the
various steps may follow each other as quickly as
possible.
Apparatus.—1. Syringe, cannula and stylet.
2. Lancet.
3. Scalpel.
4. Forceps.
5. Three yards of tape, one inch wide, and lint.
6. A silver wire suture.
7. A basin of cold water.
8. Brandy and Sal Volatile.
Step 1. See that the piston-rod works properly in
the syringe, and that the instrument is fit for use;
then place it in the basin of cold water with the cannula
to lie till wanted.
Step 2. Place the person supplying the blood on a
couch or easy chair in the same chamber, but so that
he cannot see the recipient, lest he faint and his blood
consequently flow feebly. Tie up the arm as for venesection;
lay ready the lancet, and direct the assistant,
in charge of the supplier of blood, to keep his thumb
on the vein when it is opened, that the flow may be
checked when blood is not required.
Step 3. Place a tape round the arm of the recipient,
above the point for injection, and another below it at a
convenient distance, and lay bare a vein (usually the
median basilic) for an inch and a half of its course;
holding the vein by the forceps, make a slit with the
scalpel and introduce the cannula, which is then intrusted
to the second assistant. The stylet is withdrawn,
and a minute drop of blood escapes through
the cannula, showing that the point has been properly
introduced into the vein. The assistant replaces the
stylet and slackens the ligature, while the surgeon
proceeds to fill his syringe.
Step 4. The surgeon, going to the supplier of blood,
makes a large opening in the vein with a lancet, or if
the first assistant be a surgeon also, he may do this
while the chief operator is preparing the vein of the
recipient. When the vein is open and the blood flowing
freely, the barrel of the syringe is inverted over it
and filled with blood; when full, the nozzle is stopped
by the plug and the piston attached while the syringe
is carried to the recipient.
Step 5. This being reached, the plug is pulled out,
the nozzle inserted into the cannula, and the blood
slowly injected by depressing the piston gently, but
without quite emptying the syringe. A minute should
be spent in injecting one ounce and a half, and a pause
of five minutes ensue before a second supply is introduced.
This interval may be employed in cleaning
the syringe, &c., and procuring a fresh supply of
blood; 3-4 ounces of blood are usually sufficient, but
10 ounces have been injected on some occasions. The
perturbation of the supplier (generally a near friend of
the recipient), renders it necessary he should drink
freely of brandy and water, that the blood flow forcibly
when required.
Step 6. When sufficient blood has been introduced,
both patients’ wounds are dressed, as after venesection
(see page 20), the long incision of the recipient being
closed by a point of suture under the pad.
Tourniquets.—Tourniquets are of several kinds.
The Ring Tourniquet (fig. 97) is used when pressure
is desired on the main artery
of such a limb as the arm.
It is less easily displaced than
the Signoroni, but, like that,
soon becomes irksome by its
continual pressure.
Fig. 97.—Ring tourniquet.
When hæmorrhage has to
be temporarily arrested, that
of Petit (fig. 98) is generally
used. It consists of a strap
of stout webbing and buckle,
that can be rapidly tightened
by a few turns of a screw.
To use this tourniquet, lay a roller over the artery
and carry the end once or twice round the limb to
steady the roller, then pass the strap over the roller,
keeping the buckle about two inches away from the
screw and the screw on the anterior or outer aspect
of the limb, not over the pad, lest that be displaced
when the screw is tightened. The tourniquet should
be screwed up as quickly
as possible, that the limb
be not charged with
blood by obstructing
the venous, before the
arterial flow is checked.
Fig. 98.—Petit’s tourniquet applied to the popliteal artery.
Fig. 99.—The horse-shoe tourniquet.
In Signoroni’s Horse-shoe
tourniquet (fig. 99)
the extremities of the
shoe can be approximated
to each other by
a rack screw working a
hinge. The ends are
furnished with pads, one
broad and flat to bear
on the limb away from the artery, the other rounded
to compress the vessel itself. This tourniquet does
not arrest the whole circulation in the limb. It can
therefore be applied for a longer time than Petit’s.
However, it easily slips out of place, and soon becomes
very irksome and painful.
Fig. 100.—Lister’s tourniquet for compressing the aorta.
The Abdominal Tourniquet of Professor Lister is a
very effectual contrivance for compressing the aorta
during amputation through the hip joint, and operations
where a tourniquet cannot be placed on the
limb. It consists (see fig. 100) of a semicircular bar,
with a broad pad to fit on the lumbar vertebræ behind,
while in front it holds a long screw-pin carrying a pad.
This instrument passes round the left side, and its pad
is forced down into the abdomen, one inch to the left
of the umbilicus, until the aorta is compressed against
the spine.
Fig. 101.—Carte’s tourniquets for femoral aneurism.
Carte’s Tourniquets (fig. 101) are employed to control
and diminish the flow of blood through an aneurism.
They are intended to be worn for several days, and are
fitted with many contrivances for obtaining a continuous
pressure on the artery without completely
arresting the flow of blood. They are always used in
pairs; in the figure, one presses the external iliac on
the pubes, the other the femoral artery. The first is
fastened to the body round the hips, the second round
the thigh. They are constructed as follows: an arm
attached to a pad reaches round the limb to the
artery, over which it supports a ball and socket joint
turning in any direction, but fixed by a screw clamp.
This joint has a long screw carrying the compress
down to the artery. There is a little play of the screw
in the ball of the joint, controlled by india-rubber
bands, that the compress may yield slightly before the
arterial pulse. In the solidification of an aneurism by
this means, the flow of the blood is intended to continue;
hence the current through the vessel need not be completely
obstructed by the pressure of the tourniquet,
and the elastic bands prevent that pressure from becoming
insupportable.
Fig. 102.—An improvised tourniquet.
When the tourniquets are applied, the patient must
lie on a flat hair mattress, have his limb well washed
and dried, lightly but
evenly bandaged, and
somewhat raised. If the
thigh is hairy it should
be shaved where the
pads will press, and
dusted with powdered
French chalk. The
tourniquets are next adjusted,
as seen in fig.
101; the patient is
taught to change the
pressure when it grows
irksome, by screwing
down the second pad,
and then releasing the
first.
To improvise a Tourniquet.—A
tourniquet may
readily be formed on emergency from a handkerchief,
a stone, and a stick. Fold a stone the size of an egg
in the middle of a handkerchief, lay it over the main
artery, tie the ends of the handkerchief round the
limb, slip the stick underneath and twist it round, till
the tightened handkerchief draws the stone on to the
artery and arrests the flow of blood (see fig. 102).
Fumigation.—Mercurial vapour baths are contrived
in various ways. The following plan succeeds
perfectly well when the whole surface of the body is to
be exposed to the vapour (fig. 103).
Fig. 103.—Mercurial fumigation.
Fig. 104.—Lamp for fumigating.
Apparatus.—A Langston Parker’s lamp made by
Savigny and other instrument makers. In this a
spirit lamp,
holding the required
amount
of spirit is protected
in a cage,
on the top of
which is a receptacle
for the
calomel, and a
small saucer for water (fig. 104). The flame beneath
boils the water and volatilises the calomel. Water is
added, because the calomel vapour, when associated
with steam, acts more efficiently than with dry air.
The lamp is placed under a high wicker chair, on
which the patient sits undressed, and round his neck,
a frame is tied, made of cane hoops, with a calico
cover sewn over them; this falls to the ground and
encloses his body in a chamber, where the vapour is
confined while absorbed into the skin. A blanket
thrown over the frame completes the preparation. If
a hoop frame be not at hand a lady’s wire-hooped
petticoat answers the purpose quite as well.
Fig. 105.—Lamp for local fumigation.
The patient, in four or five minutes, usually breaks
into a violent perspiration, his pulse quickens much,
sometimes even syncope
occurs; hence, he should
not be left alone until
the bath is over. This,
if the flame is strong
and the quantity of calomel
not very great—one
or two scruples being
a common dose—occupies
a quarter of an hour.
When the bath is over
the patient should at
once get into bed, and
lie there a few hours;
then he may rise and be
well sponged with tepid
water. Moderate but tolerably speedy mercurialisation
of the system is thus induced.
Local Fumigation is employed when the disease
is confined to a few obstinate patches of eruption.
For this purpose an earthenware alembic (fig. 105)
is fitted to the lamp used for general fumigation;
the calomel is thrown into the bottom of the
alembic. The flame plays over the outside, and
heating it, sublimes the calomel; which reaches the
mouth of the alembic and condenses on any part to
which it is applied.
The throat may be fumigated by inhaling the vapour
as it escapes from this alembic, or by sucking air
through the spout of an earthenware teapot in which
the calomel has been placed, and heated by a spirit
lamp underneath.
The Hot Air-Bath is easily obtained by undressing
the patient, putting him to bed on a mattress, and
fastening across the bed two or three lengths of cane
or stout wire, over which a blanket is next thrown.
The patient’s body is thus enclosed in a small chamber,
the air of which is then heated by putting inside, on
an earthenware plate, a spirit lamp, surrounded by a
kitchen lemon-grater to protect the bed clothes from
its flame. Sheets should be dispensed with while the
lamp is alight, lest they catch fire. The temperature
of the air should be watched, lest it grow hot enough
to scorch, but it must be kept up till the patient
breaks into a sharp perspiration, when the lamp may
be removed and the patient allowed to cool slowly
down.
The action of the bath is greatly accelerated by
sponging the patient all over as he lies in bed with
tepid water, when the air grows warm.
Lamps protected with wire gauze, and furnished with
a cradle to keep the bed clothes up, are sold at the
instrument-makers, but the above arrangement answers
just as well as more elaborate apparatus.
The Vapour Bath.—The patient is put to bed as
in the hot-air bath, and a few feet of vulcanised india-rubber
tubing, fastened to the spout of a tea-kettle on
the fire, bring a supply of vapour into the bed.
The vapour bath may precede the hot-air bath, and
will quicken the action of the latter very greatly.
Fig. 106.—Dr. Horace Swete’s village ambulance or sick carriage.
Carriage for transporting the Sick.
The army ambulance and the carriage of the Invalid
Carriage Society are excellent means for transporting
sick from their homes, or wounded persons from the
scene of injury to the hospital. As their cost is somewhat
considerable, a cheap carriage (see fig. 106) has
been devised by Dr. Horace Swete, of Weston-super-Mare,
for the use of the district in which he is residing,
and which may be kept for use at workhouses, hospitals,
and in remote districts. It is constructed of
varnished wood and iron, and in the following manner.
The dimensions of the carriage are—length, 7 feet
6 inches; breadth, 3 feet 9 inches; height, 4 feet
9 inches. Its weight is under 3 cwt., and its total
cost 21l.
The body is like a skeleton hearse, without fixed
floor or sides. The sides are closed by vulcanised
india-rubber curtains, or by glass sliding panels.
The back, a wooden panel, opens like a door. A
wooden tray slides on three rollers at the bottom, and
on this a mattress covered with vulcanised india-rubber
is placed to receive the patient. For infectious
cases straw should be used instead of the mattress,
as it may be burnt when the patient is removed.
The tray is narrow, and fitted with handles, that it
may be carried up a narrow staircase. The vehicle
runs on four wheels, is fitted with lamp, handle, shafts,
and driving box, and is well hung on good springs.
The material of the carriage admits of being washed,
and thus readily purified, after conveying an infectious
case.
Cupping—Dry, and Bleeding Cupping.
Apparatus.—1. A series or nest of exhausting
glasses.
2. Different sized boxes of lancets for incising the
skin, called scarificators.
3. A spirit lamp (fig. 107).
The glasses are 6 oz., 4 oz., 2 oz., and 1 oz. in size, of
rounded shape, with thick smooth edges.
In dry cupping the object is to relieve internal congestion
by drawing the blood into the subcutaneous
cellular tissue. The back and loins, where the skin is
tolerably loose, are most suitable places for this proceeding.
Fig. 107.—Cupping glasses, lamp, scarificator, and spirit bottle.
The Operation.
Step 1. Light the spirit lamp, direct the patient to
sit forwards, and lay bare the back ready for the
glasses, which should be placed on the bed within
reach of the operator’s right hand.
Step 2. Rarify the air in a glass by plunging the
flame into it a few moments, and then quickly clap the
mouth of the glass on the skin; leave it there while a
second and third glass are heated and applied, when
the first should be removed and its vacuum restored
before it is replaced. In putting the glasses on again,
their rims should not lie exactly in the rings marked
on the skin by previous applications, or the bruises
may inflame and slough afterwards at these parts.
The application and removal of the glasses should be
done as lightly as possible to prevent all unnecessary
pain.
A few repetitions of this incomplete vacuum causes
the skin to puff up readily into the glasses, and much
blood is thereby attracted into the cellular tissue.
Bleeding or Bloody Cupping.—When it is desired
to take blood from the body the skin is punctured or
scarified by the scarificators, half a dozen incisions
being made at a blow by as many lancets protruding
from a box, when a spring it holds is touched; the
glasses are then laid over these incisions, and the
necessary amount of
blood removed by
their exhausting
power.
Fig. 108.—Junod’s vacuum boot for attracting
the blood to the lower extremities.
Junod’s Boot is a
tin case, shaped like
a boot (see fig. 108),
but capacious enough
to allow a limb when
placed within it to
swell freely. It is
sometimes employed
to draw blood and
serum into the lower
extremities during
congestion of internal
organs. When used,
the leg is passed into the boot, and the mouth
of the boot closed round the limb by a packing of
india-rubber tied firmly round the boot and limb,
and well smeared with simple ointment. The air is
then exhausted from the inside of the boot by a small
brass syringe, which screws into a hole in the leg of
the boot, as depicted in the figure. The patient
should wear the boot some two or three hours, while
the vacuum is kept up by an occasional exhaustion of
the syringe. Both limbs may be subjected to exhaustion,
but the patient must remain in bed for
twenty-four hours after the operation; this is generally
necessary for other reasons, and he must wear a
bandage for a few days when he gets about.
Leeches.—Each leech should draw about 2 drachms
of blood, and if the bite is well fomented, another
drachm will escape from the wound afterwards.
Before the leeches are applied, the skin should be
well washed with soap and warm water, and carefully
dried. The leeches should not be taken from their
box, but the box inverted over the part, when they
will quickly fasten themselves. If the leeches are
applied in a dependent position, a soft napkin may
be pinned round the box to support them as they
grow heavy, and to enable them to suck as long as
possible. They should be allowed to drop off; if
pulled off they are apt to tear the wound, or leave
part of their suckers in it, which causes much irritation
afterwards.
The leech is put in a little glass when applied to the
gums or the cervix uteri, and held against the part he
is to suck.
If the leeches do not bite readily the part should
be smeared with blood or warm milk, and the leeches
put into lukewarm water a few minutes; immersion
in small beer is also said to stimulate them to
bite.
If the bites bleed longer than is desired, they may
be stopped by pinching the skin between the finger
and thumb, wiping the bite thoroughly dry, and filling
it with a little bit of amadou or fine sponge, soaked
in solution of perchloride of iron; a larger piece of
amadou is placed over the first, and the whole compressed
with a turn of a bandage or long strip of
plaster. If this fails, a sewing needle may be passed
through the skin beneath the floor of the bite, and the
bleeding surface constricted by twisting a thread round
it under the needle.
Leech-bites should never be left bleeding, especially
in children, for a dangerous amount of blood may be
lost from them in a few hours.
Tents are instruments made of some substance
that enlarges as it absorbs liquid; they are employed
to dilate apertures of sinuses or natural passages, as the
cervix uteri, &c., and are generally short rods 2 to 3
inches long, and 1/10 to ¼ inch in thickness, made of a
whalebone stem, wound round with compressed sponge,
which is smeared with wax to keep it in shape. Slips
of gentian root, or of laminaria digitata, which rapidly
enlarge as they imbibe moisture, are also employed
for this purpose.
Setons are strips of varnished calico, 6 or 8 inches
long and ⅓ broad; a thread is fastened to each end,
which are tied together while the seton is worn. It
is employed to excite irritation either along the course
of a sinus, or in some superficial situation, as the nape
of the neck, to relieve congestion of internal parts. In
sinuses, a few threads of silk usually produce the
required amount of irritation.
Chassaignac’s Drainage-tubes are a form of
seton; they are india-rubber tubes of the calibre of a
wheat straw, of any requisite length, and perforated with
holes at frequent intervals; they are carried into the
cavity to be drained, by hitching the prong of a forked
probe, made for the purpose, through one end of the
tube and thrusting it along the sinus, or across the
abscess. The skin is then incised over the further end
of the sinus to bring the probe out, and the ends of
the tube are tied together.
The advantages of these tubes are, the small amount
of irritation they provoke, and the ready exit furnished
for the matter along their interior.
Issues are a contrivance for keeping up irritation
of the surface. A piece of diachylon plaster the size
of a half-crown, with a hole in the centre as large as a
pea, is laid over the skin where the issue is to be
formed. A bit of potassa fusa is laid in the hole and
kept in sitû by a second plaster, for an hour or till the
skin is destroyed under the hole. The plasters are
then removed, the wound washed, and a fresh piece of
the same size put on, having at its centre a slit ¼ inch
long, under which a pea is slipped into the sore and
covered over by another smaller piece of plaster. The
discharge that soon sets up must be washed away twice
daily, and the plaster and pea renewed from time to
time as they become soiled.
Trusses for ruptures. These are various, in shape,
strength of spring, &c.
Whatever variety of truss is employed, care should
be taken that the pressure is made in the right
direction, and that it is sufficient, but not too great
for the strain it has to support.
In reducible hernia the pressure for inguinal rupture
should be exerted on the inguinal canal and directly
backwards (see fig. 109). For umbilical rupture, the
pressure should be also backwards, and confined as
much as possible to the aperture in the wall of the
belly. In femoral rupture the pressure should be
directed upwards as well as backwards into the femoral
ring (see fig. 110). The pad in all should be large
enough to well cover the passage through which the
rupture passes. The ease and comfort of a truss much
depend on the completeness with which it fulfils these
conditions.
Fig. 109.—Inguinal truss.
Fig. 110.—Femoral truss.
The adequacy of a truss should always be tested by
directing the patient to separate his legs, lean forward
over the back of a chair, and cough or strain deeply.
If the truss support the rupture during this exertion
it fits satisfactorily.
For irreducible hernia large air-, or spring-padded
trusses are made, which prevent further descent of the
viscera, but they are exceedingly difficult to fit and
often unsatisfactory in use.
In inguinal hernia the truss consists of a pad, a
spring, and a neck, with guide straps.
The pad is made of various materials, fine carded
wool is among the best when well stuffed into a
proper shaped leather pad, and in most cases a fixed
pad is better than a moveable one.
The pad should compress the canal and be convex
if the patient is stout. Its size ought to be sufficient
to compress the canal and the margins for a short
distance on each side, but the pad should be as small
as will ensure fair compression. A very flaccid bellywall,
and a large gap or protrusion require a large
surface on the pad. The spring should be supple and
padded behind to rest on the two sacro-iliac synchondroses,
without bearing on the spine. The spring,
narrowing as it comes forward, embraces the pelvis;
and opposite the anterior iliac spine inclines downwards,
because the hernia is a little lower than the
resting-place of the spring behind. When the rupture
is almost reached, the spring takes a slight elbow or
bend (the neck), that its pressure may be directed
against the hernia more fully. Understraps, generally
not necessary, should be omitted if possible.
In trusses for children when the testis is not descended,
the pad should have a notch at its lower
border in which the testis may rest uncompressed.
In the truss for femoral hernia, the spring bears
behind the body and encircles the hips in the same
manner as in the inguinal truss, but when opposite the
femoral artery it turns abruptly downwards to reach
the saphenous opening. The pad should fit the hollow
where the rupture issues and be not oval, but rounded.
The under-strap should be attached to the stud at the
lower end of the pad, and pass round the perinæum
and fold of the buttock, and be attached to the neck
of the spring close to the pad. It should be made of
knitted bandage that it may be changed and washed
frequently.
When measuring a patient for an inguinal truss, the
circumference of the body round the hips (between the
crista ilii and the great trochanter) should be first
taken, and then that between the symphysis pubis and
the anterior iliac spine, half of which distance denotes
the position of the internal abdominal ring, which with
the inguinal canal has to be supported by the pad of
the truss. For a femoral hernia the same measurement
should be taken round the body, and also the
distance of the saphenous opening from the symphysis
pubis and from the anterior superior iliac spine. This
will enable the maker to put the pad at the proper
angle with the spring, so that it compresses the saphenous
opening, and clears the crest of the pubes.
Every patient should, while he wears a truss, show
himself from time to time to the surgeon to see that
any defect in his apparatus may be quickly remedied.
It is a useful precaution also to keep two trusses at
hand, so that if one breaks, the patient may at once
apply the other.
Salmon and Ody’s truss consists of a spring passing
round the hip from a circular pad b, which bears on
the sacrum to a second oval pad a. Both pads are
attached to the spring by a ball and socket joint.
There is also a slide for shortening or lengthening
the spring if desired (fig. 111). This truss is worn
round the sound side of the body and reaches beyond
the middle line to the
hernial opening, with
the object of directing
the pressure of
the spring outwards
and backwards, or
exactly counter to
the course of the hernia
inwards.
Fig. 111.—Salmon & Ody’s truss.
Umbilical hernia.—Spring trusses are not adapted
for restraining umbilical hernia. The support consists
of a broad belt fitted to the belly, made in front
of elastic webbing, and on each flank, of white jean.
Behind, the belt is fastened by straps and buckles, or
by lacing, the better plan. In the centre, the elastic
part carries a nearly flat air-cushion, measuring about
3 inches transversely and 2½ vertically. This cushion
is placed against the aperture of the belly, and presses
back the protrusion. The size of the pad varies with
the size of the hernia, but it should always largely
exceed the extent of the gap in the abdominal
wall. The pad, when the apparatus is used for an
infant, should not be too prominent, as it is then more
difficult to keep in place, and also by pressing into the
aperture hinders it from closing. The pad for an
infant is best made of a disc of ivory, 1½ inch broad
and ½ an inch to 1 inch thick, stitched in a little case
in the centre of the girdle. The quantity of elastic
tissue should be much less in the infant’s belt than in
those for adults that the belt may be frequently
washed. The difficulty of keeping the belt in place
is obviated by attaching two bands to the upper
border, to pass over the shoulders and cross behind
before fastening to the belt, like braces. Two similar
ones may be fastened to the lower border and carried
under the thighs. These bands should be of soft
webbing, and several pairs kept in store, that they may
be frequently changed and washed.
Cauteries.
Cautery irons.—These are masses of iron of different
shapes; some pointed, others rounded like buttons,
&c., set in a stem a foot long, fixed in a thick wooden
handle. They are heated in a charcoal brazier or
common fire to bright redness if required to destroy
deeply, but short of redness if intended only to scorch
the surface.
As these irons are inconvenient for many cases from
their bulk, and yet soon lose their heat if made small,
other cauteries have been devised to which the heat
can be quickly renewed.
Fig. 112.—Gas cautery for large surfaces.
Gas Cautery.—The late Mr. Alexander Bruce perfected
an instrument which employs the gas flame
as a source of heat (see figs. 112, 113). A blowpipe
flame plays on platinum discs of various sizes, and
keeps them at a glowing heat. This hot solid point
can be thrust into the tissue wherever it is desired.
A larger form is also made for cauterising the pedicle
in Ovariotomy, &c. In this a large flame is blown on a
wedge-shaped surface of platinum, 1 inch long and ½
inch broad, and continued backwards for 2 inches by
wire gauze to confine the flame against the platinum.
The flame behind these platinum discs quickly heats
them again if cooled by the blood. This cautery is
very portable, and easily made ready for use.
Fig. 113.—Gas cautery. A. Elastic gas reservoir. B. Gas jet. C. Tube
for convoying air to the flame. 3. Platinum disc to be heated by
the flame.
Mr. Clover has also devised a cautery, very useful
for small growths. A silver bead, the size of a pea, is
set at each end of a horizontal metal rod 4 inches long,
which rotates on a vertical pivot half a circle backwards
and forwards, so that one or other bead is thrown
into the flame of a spirit lamp placed at a proper
distance; when the bead is heated, a touch of the
finger causes the central pivot to rotate, which brings
the hot bead away from the lamp, and carries the cold
one into the flame, to be heated while the first is
used.
Galvanic Cautery.—The instrument consists of a
platinum wire, made to glow by passing through it a
powerful galvanic current. The wire should be thick
(about 1/12 of an inch), and all the other conducting
surfaces sufficiently large to offer no impediment to
the current where heat is not desired. The battery
best adapted for this purpose is a Grove’s battery.
The main advantage of a galvanic cautery is that
the wire can be passed while cold exactly where it is
required, and then heated when it is in place. It is
exceedingly useful in fistulæ between the urethra and
rectum, or in destroying vascular growths, nævi, &c.,
where it is desirable not to destroy all the skin covering
the tumour. Again, by this means, an intense
heat can be applied to a very limited area, and more
quickly renewed than by any other plan, for the wire,
even when plunged in the tissue, is never far below a
red heat.
Of chemical caustics a host exist; those most commonly
employed are:—nitrate of silver, solid, or in
saturated solutions (2 drachms to the oz. of water,
&c.); fuming nitric acid; solution of nitrate of mercury
in nitric acid; oil of vitriol made into a paste with
powdered charcoal; chloride of zinc mixed with dry
starch, then rolled into cakes and cut in slices; Vienna
paste, that is, equal parts of potassa fusa and quick
lime worked into a paste with spirits of wine; potassa
fusa itself; solution of chromic acid. Some surgeons
prefer one, some another; as a rule, the liquid caustics
are employed where the surface to be destroyed
is uneven and spongy, and solid caustics where the
surface is smooth, and a long continued action is
desired.
Vesicants and irritants.—Of the commonest are
mustard poultices, made by mixing mustard flour in a
basin with luke-warm water, i.e. about 100° F., to
a paste and spreading it on muslin, which is again
folded over the exposed surface of the mustard.
Boiling water and vinegar should not be used, for
they lessen the pungency of the poultice. If the full
effect be desired the poultice should remain on the
skin fifteen or twenty minutes. If only slight reddening
is wanted, the mustard flour should be diluted
with its bulk of linseed meal before mixing it with
water.
A stronger vesicant is Corrigan’s hammer, a button
of polished steel with a flat surface, fixed to a handle;
when used it should be plunged for a couple of minutes
in boiling water, or heated over a spirit lamp, but care
must be taken not to overheat it, or it will bring the
cuticle away with it. It is pressed on the skin for ten
or fifteen seconds; this is sufficient to cause reddening
and vesication.
Blisters are raised by the emplastrum lyttæ, lin.
cantharidis, or pâte epispastique, which is milder in
its effect than the two preceding preparations of
Spanish fly. Solution of iodine and iodide of potash,
in three times their bulk of spirit of wine, also produces
a blister when laid on freely.
Poultices are made of linseed meal, bread, or starch,
and are means for applying warmth and moisture
without absolutely wetting. Bread poultices sodden
the parts to which they are applied most, and starch
least, of the three kinds.
Before making a poultice all the materials should
be at hand and thoroughly warmed before a good fire.
They are—boiling water, a broad knife or spatula, soft
old linen or muslin, oil silk, tapes, strapping plaster,
bandages, a piece of old blanket, flannel or cotton
wadding, safety pins, or needle and thread.
The linen on which the poultice is to be spread
should be cut of the intended size, and when for use
about the neck or shoulder should have some tapes
sewn on to it to tie it on to the body. The oil silk
should be large enough to cover the poultice next
which it is laid to keep in the moisture. The flannel
or wadding are used to wrap over and keep in the heat
of the poultice; the strapping or bandage to fix every
thing in situ as required.
When poultices are continued long, their surfaces
should be smeared with lard before application; this
protects the skin somewhat from the irritation that
arises; also when the poultice is to be laid between
folds of skin or on hairy situations, as the buttocks
and perinæum, it is better to cover the poultice with
a thin cambric handkerchief lest some of the meal
stick to the parts.
The Linseed Poultice is made as follows: pour boiling
water into a well-heated basin till the basin is half
full, then scatter meal with the left hand on the water
while that is kept continually stirred with a broad
knife, adding more and more meal until the mass
becomes quite soft and gelatinous, but too stiff to
cling to the knife; then turn it out on the linen, also
well heated at the fire, and spread it in a layer about
½ an inch thick, turn up the edge of the linen for ½ an
inch all round, and carry the poultice at once to the
patient. If it has to be carried far the poultice should
be laid between two very hot plates; apply it to the
part to be poulticed, lay on the oil silk, and cover that
with the hot flannel or cotton wadding, and fasten
these in place with pins or a stitch. Wadding is put
where the part is irregular, as the neck or axilla; unless
the wadding is well placed and the poultice is
fastened by strings, it will soon fall into a narrow
band leaving the part exposed that it should warm
and moisten.
The Bread Poultice is made as follows: the materials
being all at hand, as detailed in the directions for
making a linseed poultice, crumble the inside of a
moderately stale loaf until about half a pint or a pint
of crumbs are prepared; then pour boiling water into
a basin, and throw in crumbs gradually in the same
manner as the linseed meal, until a soft porous mass
is prepared. The remaining steps are the same as
those for making the linseed poultice.
The poultice can be made to hold more water if it is
turned into a saucepan after mixing, and a little more
water added while it simmers for half an hour at a
slow fire. Any superfluous water must be drained off,
and the poultice covered with muslin when it is made
in this way.
The Starch Poultice is made as follows: rub a little
starch in a basin with cold water till it has the consistence
of cream, then mix in boiling water till the
starch is a thick jelly, and spread it on the linen while
hot. Starch poultices retain their heat a long time,
but yield very little moisture to the part. They are
chiefly used as emollients to inflamed affections of the
skin, &c.
Hot fomentations are a means for applying heat when
moisture is not desired. A ready mode is to take a
piece of blanket or thick flannel, soak it in boiling
water and dry it by wringing in a folded towel, and
then wrap it over the part to be fomented with a piece
of oil silk or a hot dry flannel over it. Laudanum,
turpentine, and other applications are sprinkled over
the flannel, when soothing or counter-irritating effects
are required in addition to the warmth. A bag of
bran makes a light warm fomentation if heated in
a steam kitchen, or steamer for boiling potatoes.
When absolutely dry heat is desired, chamomile
flowers, bran, or sand, may be heated in an oven, and
poured into hot flannel bags.
Dry heat is also very agreeably obtained by filling
india-rubber bags and cushions with hot water: they
are rather heavy, but retain their heat many
hours.
Lister’s Method of Dressing Wounds with Carbolic
Acid.—The properties of carbolic acid which concern
the surgeon may be briefly recapitulated as follow:—
It is highly volatile, and the putrefaction of organic
fluids is indefinitely postponed where its vapour is present.
Carbolic acid is soluble in different degrees in
water, alcohol, ether, glycerine, fixed oils, gutta percha,
india-rubber, and shell-lac. Its varying affinity for these
substances enables the surgeon to modify the application
of carbolic acid in various ways; these modifications
are necessary to fully utilise its properties.
Water dissolves the crystallised acid but sparingly, 1
part in 20 being a concentrated solution, and allows it
to escape readily. The aqueous solution is therefore
useful where the effects of the acid are required
copiously, but only temporarily. Glycerine and the
fixed oils dissolve a far greater amount of the acid,
and part with it unwillingly. Their solutions are
adapted for the continuous but abundant application
of the antiseptic. Shell-lac, and some other substances,
hold the carbolic acid still more tenaciously,
and are valuable as solid storehouses which yield up
the antiseptic in small quantity for a considerable
period.
Carbolic acid stimulates raw surfaces, and when concentrated
even destroys animal tissues. It is a local
anæsthetic; with moderate doses, wounds lose their
sensibility after the first smarting of the application
has passed off. When given in large quantities the
acid produces a peculiar kind of delirium, and temporary
paralysis of sense and motion: fatal results
have followed its internal application.
It is rapidly absorbed into the blood from wounded
surfaces, and through the skin, whence it is discharged
from the body by the lungs and kidneys. The urine
of patients dressed with carbolic acid, though of normal
colour when passed, assumes a dark greenish-brown hue
after a few hours’ exposure to the air and light.
How much of the antiseptic must float in the atmosphere
to prevent fermentative changes has not yet
been determined; Bucholtz found that 1 part of carbolic
acid in 600 of milk almost entirely prevented
lactic fermentation, while 1 in 285 did so altogether.
Alcoholic fermentation in sugary fluids was arrested
by a similar quantity.
When using the acid in dressing wounds, the watery
solution, the solid mixture, and the oily solution are
necessary. The first to neutralise the effects of exposure
to the atmosphere and water before the wound
is closed; the second solid mixture in the form of
plaster to provide a very scanty but continuous supply
of carbolic vapour close to the wound: too scanty to
irritate the raw surface, yet enough to check putrifaction
in the discharge oozing from it. The third, or
oily solution, is to supply the carbolic vapour abundantly
to the linen dressings, appointed to receive the
discharge when it has passed from the vicinity of the
wound. The tin is used to afford as close a cover as
possible to the breach of surface; for this purpose it
must be as flexible as possible that it may fit the
wound exactly.
The carbolic plaster is made of 3 parts of shell-lac
and 1 part of carbolic acid crystals melted together
and spread on calico. To render the lac plaster non-adhesive
that it may not stick to the tender wound,
it is painted with solution of gutta percha, which dries
and leaves a thin film of that substance covering the
plaster. This film is easily removed by rubbing the
surface with a rough towel should an adhesive quality
be desired. In either state the carbolic acid continues
to volatilise slowly when the plaster is laid over the
wound.
When adopting this method of treating wounds the
following materials are necessary:—
1. Aqueous solution of crystallised carbolic acid (1
part in 20).
2. Carbolic oil: 1 part of carbolic acid in 5 of olive
oil.
To Dress recent Wounds.—When the apparatus is
ready, the piece of tin is cut and fitted to the wound,
so that it shall overlap the wound to a small extent
on all sides; then a piece of lac plaster, large enough
to overlap the tin one or two inches all round; this
plaster may be cut and notched when the surface is
irregular to make it lie pretty closely; then strips of
diachylon, about two inches broad, are cut ready. The
parts around the wound are well cleaned; dirt and
clots cleared from the wound with cold water, containing
about 1 of carbolic acid to 40 of water, and
the interior of the wound is freely syringed with water
containing 1 of acid in 30 or even 1 in 20 parts. The
sides are brought together with sutures, if necessary, in
the ordinary way, and the tin laid on the wound; the
tin is freely wetted with carbolic water, and the lac
plaster laid over it and kept in situ by strips of diachylon
plaster. In dressing recent wounds the most
dependent side of the lac plaster is left unattached,
that the serous discharge, which is often copious, may
readily escape. To receive this discharge, a piece of
calico, soaked in carbolic oil, is laid over the wound
now covered in, and all kept in place by a folded towel
or a roller bandage. This oily cloth is to be changed
from time to time as it gets soaked with discharge:
at first this change is necessary every night and
morning, but after three or four days once a day
is often enough. The shell-lac plaster and tin need
not be removed for a week unless the wound
grow hot and painful, when they can be removed
at any time if the surface of the wound is immediately
smeared with carbolic oil, and kept well imbued
with the antiseptic while it is being examined.
Should it contain pent-up discharge, the sutures must
be loosened and the discharge washed out by injecting
the 1 in 30 aqueous solution. The tin and lac plaster
may be then replaced, and the dressing renewed. The
same precaution must be followed when the sutures
have to be removed. Usually there is very little
swelling and no pain, and the healing process goes
on tranquilly if undisturbed. Should bruised parts
slough, they may be trimmed away with scissors
dipped in carbolic oil. When the wound has once
been washed with carbolic acid, the antiseptic should
not enter the wound a second time, as its irritant
qualities excite inflammation in the wound.
Chronic abscesses, besides recent wounds, are treated
with carbolic acid. The surface to be punctured is
covered with a piece of thin muslin soaked in carbolic
oil, and the knife to be used is dipped in the oil also.
Then, a second piece of muslin being ready, the surgeon
opens the abscess through the muslin, and as he
withdraws the knife an assistant lays on the second
piece of muslin over the wound. The matter drains
away from under this curtain, and the access of atmospheric
air is prevented. When the matter ceases to
flow, the lac plaster is laid on, and the oily cloth outside,
which can be changed as often as is requisite. Abscesses
so treated usually soon cease to secrete matter, shrink,
and fill up without delay. If the abscess has burst or
had communication with the external air, the interior
must be filled with watery solution 1 to 20 before it is
dressed, that fermentation in the cavity may be prevented;
the further treatment is the same as for a
recent wound.
Fig. 114.—Irrigating a wound.
Irrigation.—The continual flow of ice-cold water is
used to prevent inflammation of certain wounds. In
using cold, it is particularly necessary that the temperature
of the water remain steady, for alterations of
temperature cause alterations in the capacity of the
blood vessels, and promote congestion rather than
diminish it; hence irrigation, badly attended to, becomes
an evil instead of a benefit. The simplest way
(see fig. 114) of contriving irrigation is to lay the
limb in an easy position on pillows, protected by a
sheet of india-rubber cloth, weighted at one corner to
draw the cloth into a channel, down which the water
trickles into a receiver under the bed; over the limb a
jar, wrapped in blanket, is suspended. This is filled
with water from time to time, and kept charged with
lumps of ice. A syphon is made by a few feet of
fine india-rubber tubing reaching from the bottom of
the jar to the wound, the escape of water through
the tube being moderated by drawing the end more
or less tightly through a bit of cleft stick. It is
sufficient that the wound should be kept constantly
and thoroughly wetted; more than that is waste of
cooling power.
Esmarch’s Irrigator.—This is a simple contrivance
for washing out wounds and sinuses with a stream of
water. It consists of a tall can
of block tin (see fig. 115), with
an orifice at the lower end, to
which a couple of feet of india-rubber
tubing are attached. The
tube is fitted with an ivory nozzle
and a hook, so that when the
stream is not wanted the flow of
water is stopped by hanging the
nozzle on the upper edge of the
can. The stream can be made
more or less forcible by raising or lowering the can
above the wound.
Fig. 115.—Esmarch’s
Irrigator.
The Administration of Chloroform.—In administering
chloroform the main points to be borne
in mind are—1. If the patient is fit to undergo an
operation at all he may inhale chloroform. 2. The
patient should be fasting; this is the most effectual
preventive of sickness. 3. He should be in an easy
position, clad in a loose but warm night-dress, which
does not interfere with ordinary or artificial respiration,
should that be suddenly required. 4. The patient
must never inhale more than 4 per cent. of chloroform
vapour in the air he respires; on the other hand,
the vapour may circulate in the blood without harm
for an indefinite time, provided it never pass beyond a
certain concentration. 5. Chloroform is a sedative
and depressant; the pulse gives the earliest indication
of syncope, and the respiration should be constantly
watched the whole time chloroform is inhaled.
It should be noted that the pulse often fails suddenly
at the first flow of blood in an operation. Again, when
the patient is deeply narcotised, the jaw may gape and
the tongue sink back till it closes the glottis. From
this cause respiration sometimes ceases, and danger
quickly arises if the chin is not drawn up to raise the
epiglottis. In beginning to inhale, the quantity of
vapour should be small, and gradually increased. The
patient must be cautioned not to talk, to avoid the
irritation and coughing chloroform sometimes excites
while he is speaking. He should also shut his eyes
lest the vapour make them smart. After inhalation
has been continued a few minutes the patient is often
quiet and inattentive, though easily roused by pain.
His condition at this stage should be tested by asking
him to give his hand, or by pinching him gently; if
no notice be taken of these, the conjunctiva should be
touched, and the amount of winking thus excited will
enable the chloroformist to judge if the patient will
resist when the knife is applied. Patients vary much
in the time passed before recovering consciousness; if
they remain soundly asleep, breathing freely and with
good pulse, it is better to avoid rousing or moving
them until they wake spontaneously; such patients
suffer less confusion and vomiting than those who are
quickly alive to what is going on around them.
Signs of Danger.—Sudden failure or irregularity of
the pulse, with pallor and arrested breathing, are of
great importance; if these occur, the chloroform must
be at once removed, a free supply of fresh air ensured,
the tongue drawn gently forward, and if the breathing
do not quickly begin, it must be set up artificially (see
p. 183) without loss of time, and continued, if necessary,
for at least an hour before recovery is despaired
of. Stertorous breathing is not alarming unless accompanied
by feeble pulse, shallow respiration, and
dilatation of the pupils; with these it becomes a sign
of a comatose condition.
As subordinate adjuvants for faintness the following
are useful:—moistening the tongue and lips with
brandy from time to time, or letting the patient sip a
small quantity from the spout of a feeding cup. In
complete syncope, galvanism to the epigastrium, a hot
iron or scalding water to the præcordia may be employed,
but should never interfere with the maintenance
of artificial respiration, which is of far greater efficacy in
restoring suspended animation than anything else.
Chloroform is safely given on a handkerchief, or in
various ways, if the administrator is careful to watch
the pulse and respiration, and to guard against the
patient, by a sudden deep inspiration, taking too large
a dose of vapour at once. Exact measurement of the
quantity of liquid poured on the handkerchief at a
time is of no value, as it is no index of the concentration
of the air respired by the patient. Of far greater
consequence is it to insure a free supply of atmospheric
air, by keeping the evaporating surface a few inches
from the mouth and nostrils.
Fig. 116.—Clover’s apparatus for administering chloroform.
The safest mode of giving chloroform is by Clover’s
Inhaler (fig. 116), now used in many London hospitals
and elsewhere. It renders it impossible to give the
patient too strong a dose, by preparing an atmosphere
of known strength for him to breathe. Clover’s apparatus
consists of a bag of 8,000 or 10,000 cubic
inches capacity, suspended by a loop behind the chloroformist’s
back, from this a flexible tube brings the
vaporised air to a mask, fitting over the nose and
mouth of the patient. This mask has a flexible metal
border for adjusting it to different faces; and a valve
that opens and closes, to allow more or less common
air to be respired with that drawn from the reservoir if
desired.
The reservoir is supplied by injecting into it, from a
bellows, 1,000 cubic inches of air, drawn through an
evaporating box heated by hot water, into which 32½
minims of chloroform are injected from a graduated
syringe each time the bellows are filled. By these
means, an atmosphere of known strength is prepared
for the inhalation; that is one containing about 4° of
vapour. This apparatus is very easy to use, and the
most efficient in producing anæsthesia quickly and
pleasantly.
Artificial Respiration.—Many plans are employed;
but the two most efficient are those to be described.
Marshall Hall’s Method.—Lay the patient on the
floor, with the clothing round his neck, chest, and abdomen
loose; if wet, remove it, and throw over his
body a warm blanket. Clear out the mouth, and turn
the patient on his face, one arm being folded under his
forehead (see fig. 117), and the chest raised on a folded
coat or firm cushion. Next, turn the patient well on
his side, while an assistant supports the head and arm
doubled underneath it (see fig. 118), and confines his
attention to keeping the head forward and the mouth
open during the movements to and fro. When two
seconds have elapsed turn the body again face downwards,
and allow it to remain so for two seconds, and
then raise it as before. This series of movements,
occasionally varying the side, should be repeated about
fifteen times a minute, and continued until spontaneous
respiration is restored, or, until two hours have been
thus spent in vain.
Fig. 119.—Artificial Respiration. Silvester’s Method.
Expanding the Chest.
Fig. 120.—Artificial Respiration. Silvester’s method.
Compressing the Chest.
Silvester’s Method.—Lay the patient on a flat surface,
the head and shoulders supported on his coat folded
into a firm cushion. Loosen all tight clothing, and if
wet replace it by a warm dry blanket, his arms being
outside the blanket. Clear the mouth of dirt, blood,
&c., draw the tongue forwards, and fasten it to the chin
by a piece of string or tape tied round it and the lower
jaw. Next, standing at the patient’s head, grasp the
arms at the elbows, and draw them gently and steadily
upwards till the hands meet above the head (see fig. 119);
keep them so stretched for two seconds. Then slowly
replace the elbows by the sides, and press gently
inwards for two seconds (see fig. 120). These movements
are repeated without hurry about fifteen times
in a minute, until a spontaneous effort to breathe is
made, when exertion should be directed to restoring
the circulation by rubbing the limbs upwards towards
the body, and by placing hot bottles at the pit of the
stomach, to the armpits, between the thighs, and to
the feet. Should natural breathing not commence,
artificial respiration should be continued for two hours
before success is despaired of.
Fig. 121.—The Spray-producer.
Richardson’s Ether Spray-Producer (fig. 121)
consists of a tube on which two india-rubber bags are
placed; one, protected by a silk net, acts as a reservoir;
the other, furnished with a valve, is the pump;
these drive a constant stream of air over the tip of a
fine tube projecting from a flask of ether; this sucks
up the ether and throws it in fine spray on the surface
to be chilled by its evaporation. The ether for this
purpose must be very pure and dry, having a specific
gravity of ·720, or the evaporation will not be sufficiently
rapid to produce congelation. The first effect
of the spray is a numbing aching pain with reddening
of the surface. This is succeeded by a pricking pain.
In ten seconds, if the ether be good, a dead white hue
spreads rapidly over the skin, and when this appears
the surface is quite insensible.
The bottle and elastic air-pump may be attached to
the glass jet seen in the corner of fig. 121, which then
makes an apparatus for injecting astringent solutions
in spray over the nasal passages, the throat, and air-tubes;
but the tubes used for watery fluids are much
wider than that for pulverising ether into spray.
Tannin in solution of 3-10 grains to the ounce of
water, sulphate of zinc, or alum in similar quantity,
may be thus inhaled with much benefit by persons
suffering from chronic congestion of the mucous membranes.
Injecting Chloroform Vapour into the Uterus
is a ready means of relieving pain in cancer of that
organ; special apparatus is made for the purpose, but
an ordinary elastic clyster syringe will answer the
purpose, if the flask is unscrewed and a few drops of
chloroform are poured into it, from time to time,
while air is pumped through the delivery tube, which
is passed up the vagina to the ulcerated cervix-uteri.
Subcutaneous Injection.—The syringe for this
operation (fig. 122) consists of a graduated glass tube
holding six minims. The piston works in a silver
continuation of the graduated tube, and is thus kept
clear of the solutions used for injection. To the
nozzle of the syringe fine sharp-pointed cannulæ are
screwed on; they are of different lengths, some of
steel, others of steel gilt; the gilding renders the points
very blunt, and consequently much more painful to
insert. In filling the syringe, care should be taken
not to draw the fluid above the level of the graduation
on the tube, that the exact amount injected may be
read off as the liquid sinks in the tube. The finer the
cannula, and the sharper its point, the less pain is
caused by its introduction.
Fig. 122.—Subcutaneous Injection.
The solution of morphia should contain a grain in
six drops and be as little acid as possible. In injecting
morphia, it should be recollected that ⅙ grain is the
usual dose to allay pain, and produce sleep; doses
even far smaller often suffice for this purpose, though
very much greater quantities can be administered by
injection, where long use has rendered the patient
tolerant of the drug. Some persons dread the puncture
considerably; for them the pain may be entirely
prevented by numbing the surface with ether-spray
(see page 186) before inserting the syringe, though
usually the prick is of so little consequence that any
precaution of this kind is unnecessary.
The cannula should be thrust completely through
the skin into the subcutaneous cellular tissue; if the
fluid is injected into the skin itself, inflammation and
suppuration of the puncture sometimes ensues. After
the cannula is withdrawn, the finger should be placed
for a few seconds over the puncture, or much of the
fluid will leak out again. When large quantities of
solution (one or two syringefuls) are injected the cannula
need not always be withdrawn, the nozzle can be
unscrewed and the syringe charged again; but more
than ten or twelve drops injected into one place generally
causes much pain, even where the cellular tissue
is very loose.
The syringe and cannula should be carefully cleaned,
by sending plenty of cold water through them each
time they are used, or the cannula will rust and
become unfit for use.
Collodion is much used in drawing the edges
of small wounds together, &c. Preston’s plastic collodion,
or the flexible collodion of the British Pharmacopœia,
1867, have advantages over the common
form by furnishing a tougher pellicle, yielding to the
movements of the skin beneath without cracking.
Collodion should be kept for use in a small wide-mouthed
bottle, with stopper and brush, and when
employed should be laid on quickly in a thick mass, so
that the crust it leaves shall be of one layer. A tougher
crust is obtained if a piece of muslin is soaked in the
collodion and then laid on the wound, than if the
collodion is used alone.
Vaccination.—The lymph of the vaccine vesicle,
taken between the seventh and tenth days, is preserved
for use on lancet-shaped slips of bone 1 inch
long, called points. These are dipped in the lymph as
it exudes from the vesicle, and exposed to the air till
dry; they are then wrapped in paper ready for use.
When used, the lymph should be moistened, by holding
them over a vessel of steaming water a few seconds
before inserting them in the wound made to receive
the lymph.
The points often lose the virus in a few days, and
should, if possible, be used the same day they are
charged.
The lymph may be much longer preserved if hermetically
sealed in glass tubes. These are about the
thickness of a darning-needle, 3 inches long, and open
at both ends. When the tube is to be charged, one end
is inserted in the lymph exuding from a punctured
vesicle; a drop then enters the tube by capillary
attraction, but filling not more than half its interior:
a few shakes of the hand will send the drop a little
further in. The lymph end of the tube is then taken
in the thumb and forefinger, while the unoccupied
part of the tube is passed once or twice quickly
through the flame of a candle. This rarifies the air,
and while it is warm the end is closed by melting it at
the edge of the flame. The second end is then closed
in the same way as the first. When the lymph is
wanted for use, the ends of the tube are broken, and
the lymph blown out on the point of a lancet.
Lymph preserved in these tubes retains its efficacy an
indefinite time. The National Vaccine Institution,
Russell Place, Fitzroy Square, London, W., supplies
to medical practitioners both points and tubes gratis
on application.
In performing the operation the common lancet does
very well; but two or three forms of narrow-grooved
lancets are employed by surgeons for this purpose.
The operation is most successful when the lymph is
transferred direct from arm to arm; the lancet making
the puncture is then charged at the vesicle of a child
vaccinated a week before, and points are unnecessary.
When making the puncture the surgeon grasps the
child’s arm in his left hand, puts the skin on the
stretch over the insertion of the deltoid with his left
forefinger and thumb, pushes the lancet downwards
between the cutis and cuticle, about 1-10th of an inch,
to raise the latter in a little pocket; he then charges
his lancet with lymph and inserts it in the pocket, or
if using points, inserts the moistened point for a
minute, taking care as he withdraws the point to press
the skin down on the point with his left thumb, that
the lymph may be well wiped off the point and left in
the wound. This process is repeated four or five times
and the operation is complete. The corium should
not be penetrated, or it will bleed freely and the blood
will wash away the lymph; one drop of blood is of
little consequence; indeed, it shows that an absorbing
surface has been reached.
The phenomena following the insertion of the vaccine
virus in an infant’s arm are as follows:—On the second
day the puncture is slightly elevated; on the third it
begins to grow red; on the fifth it is marked by a
distinct vesicle with a depressed centre and red areola;
on the eighth the vesicle is perfect, of pearl-like aspect,
full of clear lymph; the areola, often little marked by
the eighth day, rapidly increases on the ninth and
tenth days, and reaches an inch or more in diameter.
This bright-red inflammatory action in the skin is
essential to show the system is properly infected with
the vaccine disease; by the twelfth day the areola
has lessened, the lymph is yellow, and often escapes
by rupture of the vesicle; on the fourteenth day the
vesicle has dried to a scab, that falls on the twenty-first
day, leaving a dotted cicatrix, the vestige of the
multilocular structure of the vesicle. The three important
marks diagnostic of the vaccination being
satisfactory, are—1, the pearly multilocular vesicle of
the 8th-9th day; 2, the widely-spread areola on the
9th-12th day; 3, the well-marked foveated cicatrix
after the scab has fallen.
Observation shows that the number of people who
take small-pox after vaccination is very small indeed,
when more than three well-marked scars exist; and
this number at least should be secured by making five
insertions of lymph at the time of vaccination.
[1] Lister’s shell-lac plaster can be obtained of the Glasgow
General Apothecaries’ Company, and the sheet tin of Messrs. Compton
& Co., 148, Fenchurch Street, E.C.
PREPARATIONS AND REQUISITES FOR OPERATIONS IN GENERAL. — OPERATING ROOM. — SICK ROOM AND BED. — SEDATIVES. — RESTORATIVES. — THE ARREST OF HÆMORRHAGE.
The Operating Room.
Sedatives and Restoratives.
The Sick Bed and Bed-room.
The Arrest of Hæmorrhage.
Having a good Light and Windows that open readily, and a Fire
in Winter.
25. A fire, or in summer a lamp to burn in the fireplace, to create a draught of air.
9. Cotton-wool.
26. Enamelled saucepan.
10. Towels.
27. Two feeding cups.
11. Soft pocket-handkerchiefs.
28. Spittoon.
12. Three pieces of Mackintosh, 2 feet 6 inches square.
29. Tea-equipage.
13. Bed cradle.
30. Tea-kettle.
14. Light bedgowns.
31. Medicine measure.
15. Flannel jacket, and flannel Zouave drawers.
32. Apparatus for keeping food warm, with lamp.
16. Hot-water bottle.
33. Flowers.
17. Bed-pan.
Before a room is occupied by a patient who has been operated on,
it should be thoroughly cleaned; the walls and ceiling should be well
brushed, the carpet taken away and the floor thoroughly scrubbed with
soda. All curtains and chintz furniture should be removed, old window-blinds
replaced by new green ones, and the window made to open
readily at the top and bottom. A fire or oil-lamp should be lighted
in the fireplace to maintain a circulation of air. If the season require
a fire, the iron fender should be removed and replaced by a wooden
tray of sand or ashes, to prevent the noise of cinders and fire-irons
falling on the fender and hearth. It is well also to flush all the
drains, water-closets and sinks in the house with disinfecting fluid
one or two days before the operation, and a store of Sir William
Burnett’s, or similar disinfecting fluid, should be made ready to clear
away the fœtid odours of discharges as they arise.
When possible, it is a great advantage to have two beds of similar
height and size, that the patient may occupy them alternately. The
cool bed refreshes the patient greatly, and the vacated bed is easily
cleaned and aired without fatigue to the sick person.
1. Tincture of opium.
3. Morphia suppository.
2. Solution of morphia and hypodermic syringe.
4. Ice.
1. Brandy, champagne, sherry.
10. Milk.
2. Eau-de-cologne.
11. Lime-water.
3. Liquor ammoniæ.
12. Soda-water.
4. Smelling salts.
13. Eggs.
5. Spirit of chloroform.
14. French bread.
6. A fan.
15. Biscuits.
7. A Rimmel’s perfume vaporiser.
16. Arrow-root.
8. Beef-tea.
17. Liebig’s extract of meat.
9. Chicken-broth.
1. Artery forceps.
11. Richardson’s styptic colloid.
2. Torsion forceps.
12. Ice, ice-cold water.
3. Tourniquet.
13. Cautery irons.
4. Tenaculum.
14. Galvanic cautery wire.
5. Hare-lip pins.
15. Ligatures, silk, fine hemp, and whipcord.
6. Acupressure needles.
16. Lint.
7. Nævus needle.
17. Amadou.
8. Wire nippers.
18. Bandages.
9. Solution of perchloride of iron (equal parts of the salt and water).
19. Compressed sponge.
10. Solid perchloride of iron.
20. Scissors.
(See List for the Ligature of Arteries.)
INSTRUMENTS AND APPLIANCES FOR OPERATIONS ABOUT THE HEAD AND NECK. — TREPHINING THE SKULL. — OPERATIONS ON THE EYE. — Strabismus. — Extirpation of the Eyeball. — Cataract ( Congenital ). — Cataract ( Senile ). — Iridectomy. — HARE-LIP. — RESECTION OF THE JAW, AND TUMOURS CONNECTED WITH IT. — EXCISION ON THE WHOLE TONGUE. — CLEFT PALATE. — EXCISION OF TONSILS. — To repress Hæmorrhage from the Tonsils. — LARYNGOTOMY IN THE CRICO-THYROID SPACE. — TRACHEOTOMY.
Trephining the Skull.
Cleft Palate.
Operations on the Eye.
Excision of Tonsils.
Hare-Lip.
Laryngotomy.
Resection of the Jaw.
Tracheotomy.
Excision of the whole Tongue.
1. Scalpel.
8. Quill, cut like a tooth-pick, to clear the groove of bone-dust.
2. Trephines—several crowns.
9. Lenticular knife.
3. Hey’s saw.
10. Small polypus forceps.
4. Elevator.
11. Sponges.
5. Stout dissecting forceps.
12. Lint.
6. Brush to clean away the bone-dust.
13. Ice.
7. Probe.
1. Chloroform, if used.
5. Strabismus scissors and hooks.
2. Laurence’s, or other head-fixer.
6. Fine curved needles, and finest thread.
3. Specula of different sizes.
7. Lint.
4. Toothed forceps.
8. Ice, or cold water.
1. Chloroform.
9. Ice-cold water.
2. Head-fixer.
10. Perchloride of iron.
3. Speculum.
11. Fine curved needles, and finest silk thread.
4. Toothed forceps.
12. Lint.
5. Curved scissors.
13. Pulled lint.
6. Strabismus hook.
14. Basin.
7. Small and large sponges.
15. Bandage.
8. Dissecting forceps.
1. Atropine drops.
6. Toothed forceps, to fix eyeball.
2. Chloroform.
7. Lint.
3. Head-fixer.
8. Cold water.
4. Speculum.
9. Gelatine plaster.
5. Lacerating needles.
1. Atropine drops.
8. Scoop.
2. Chloroform.
9. Platinum spatula, to adjust edges of wound.
3. Head-fixer.
10. Small sponges.
4. Speculum.
11. Basin and water.
5. Lacerating needles.
12. Gelatine plaster.
6. Toothed forceps.
13. Wool and bandage.
7. Cataract knives.
14. Lint.
1. Chloroform, if used.
9. Light curved scissors.
2. Head-fixer.
10. Lint.
3. Specula.
11. Gelatine plaster.
4. Toothed forceps.
12. Wool and bandage.
5. Right-angled knives.
13. Atropine drops.
6. Iris forceps.
14. Small sponges and basin.
7. Iris hooks.
15. Hot and cold water.
8. Capsule scissors, if required.
1. Scalpel.
10. Cheek compressor.
2. Artery forceps, or sharp hook.
11. Sponges.
3. Hare-lip pins.
12. Large towel to wrap the child in.
4. Wire nippers.
13. Chloroform and inhaler.
5. Dentist’s silk twist.
When the bone has also to be bent back—
6. Strapping plaster.
14. Bone nippers.
7. Silver suture.
15. Sequestrum forceps.
8. Collodion.
16. A knitting needle; and
9. Scissors.
17. Spirit lamp to check deep hæmorrhage by the actual cautery.
1. Scalpels.
16. Wire nippers.
2. Artery forceps.
17. Actual cautery.
3. Torsion forceps.
18. Perchloride of iron.
4. Ligatures.
19. Ice.
5. Retractors.
20. Sutures, silk and wire.
6. Tooth forceps.
21. Solution of chloride of zinc.
7. Narrow saw.
22. Lint.
8. Hey’s saw.
23. Bandages.
9. Bone-cutting forceps.
24. Plaster.
10. Lion’s-tooth forceps.
25. Collodion.
11. Sequestrum forceps.
26. Mackintosh sheet.
12. Gouges.
27. Small sponges tied on sticks.
13. Chisel.
28. Larger sponges.
14. Gag.
29. Chloroform and inhaler.
15. Hare-lip pins.
1. Scalpel.
17. Needle for passing the chain.
2. Torsion forceps.
18. Sharp and blunt hooks.
3. Artery forceps.
19. Stout silk.
4. Gag.
20. Metallic sutures.
5. Archimedian bone-drill.
21. Ligatures.
6. Cheek retractors.
22. Ice.
7. Incisor tooth forceps.
23. Perchloride of iron.
8. Narrow saw.
24. Cautery iron.
9. Nævus needle, and
25. Solution of chloride of zinc.
10. Half a yard of thick whipcord.
26. Collodion.
11. Stout copper wire.
27. Small sponges mounted on sticks.
12. Key for twisting the wire tight.
28. Brandy.
13. Wire cutters.
29. Chloroform and inhaler.
14. Stout acupressure needle.
30. Lint.
15. Hare-lip pins.
31. Mackintosh sheet.
16. Two ecraseurs.
1. Long-handled, narrow-bladed knife, for dividing the palatine muscles.
8. Scissors.
2. Long-handled curved scissors.
9. Ice, ice-cold water.
3. Slender hooked forceps, to seize soft palate.
10. Mackintosh sheet.
4. Long-handled small bistoury, for paring edges of fissure.
11. Sponges set on sticks.
5. Long-handled needles, with the eye at the point for passing sutures.
12. Glass syringe for washing the mouth.
6. Fine blue silk, or catgut.
13. Smith’s gag.
7. Blunt and sharp hooks.
14. Chloroform and inhaler.
1. Long vulsellum.
3. Ice, ice-cold water.
2. Tonsil guillotines; or, probe-pointed bistoury, the posterior two-thirds of the blade covered with lint or plaster; or, tonsil excisors of various kinds.
1. A small lump of ice held in a long vulsellum against the tonsil.
3. Long straight polypus or gullet forceps with padded ends, to compress the tonsil; one blade being passed within the mouth, the other outside against the neck.
2. Small sponge on the end of a stick, dipped in ice-cold solution of perchloride of iron, or other styptic.
1. Scalpel.
5. Tapes.
2. Artery forceps and ligature silk.
6. Sharp and blunt hooks.
3. Torsion forceps.
7. Two hooked forceps.
4. Silver tube, curved on the flat.
8. Sponges.
1. Scalpel.
9. Trachea-dilator, to assist introduction of tube.
2. Dissecting forceps.
10. Sponges.
3. Blunt hooks for veins.
11. Brandy.
4. Sharp hook to draw forward trachea.
12. Ammonia.
5. Double silver tube and tapes.
13. If a foreign body is lodged in the larynx, forceps of various kinds to extract with.
6. Torsion forceps.
14. Strapping plaister.
7. Artery forceps.
15. Silver suture.
8. Ligatures.
INSTRUMENTS, &c., FOR OPERATIONS ABOUT THE TRUNK. — REMOVAL OF THE BREAST OR TUMOURS. — NÆVUS. — For Ligature. — For Cauterising. — For Excising. — For Injecting. — For Passing Setons. — TAPPING THE PLEURA. — TAPPING THE BELLY. — AMUSSAT’S OPERATION OF COLOTOMY AND GASTROTOMY. — OVARIOTOMY. — CÆSARIAN SECTION. — STRANGULATED HERNIA. — WOOD’S OPERATION FOR RADICAL CURE OF HERNIA. — HÆMORRHOIDS. — External,—Excision of. — Internal. — PROLAPSUS ANI. — FISTULA IN ANO. — CLEFT PERINÆUM. — EXTIRPATION OF THE CERVIX UTERI. — AMPUTATION OF THE PENIS. — CIRCUMCISION. — EXCISION OF TESTIS. — TAPPING AND INJECTING A HYDROCELE. — VESICO-VAGINAL FISTULA. — RETENTION OF URINE. — EXTERNAL URETHROTOMY. — LITHOTOMY. — LITHOTRITY. — REMOVING FOREIGN BODIES FROM THE URETHRA AND BLADDER. — INSTRUMENTS FOR OPERATIONS ON THE LIMBS. — LIGATURE OF THE LARGE ARTERIES. — RESECTION OF THE SHOULDER. — RESECTION OF THE ELBOW. — RESECTION OF THE UPPER END OF THE FEMUR. — RESECTION OF THE KNEE. — REMOVING NECROSED BONE. — AMPUTATION AT THE SHOULDER JOINT. — AMPUTATION OF THE ARM. — AMPUTATION OF THE FOREARM AND WRIST. — AMPUTATION OF METACARPAL BONES AND PHALANGES. — AMPUTATION AT THE HIP JOINT. — AMPUTATION OF THE THIGH AND LEG. — AMPUTATION AT THE ANKLE AND FOOT. — AMPUTATION OF THE METATARSAL BONES AND TOES.
Removal of the Breast or Tumours.
Extirpation of the Cervix Uteri.
Nævus.
Amputation of the Penis.
Tapping the Pleura.
Circumcision.
Tapping the Belly.
Excision of Testis.
Colotomy.
Tapping a Hydrocele.
Ovariotomy.
Vesico-Vaginal Fistula.
Cæsarian Section.
Retention of Urine.
Strangulated Hernia.
External Urethrotomy.
Radical Cure of Hernia.
Lithotomy.
Hæmorrhoids.
Lithotrity.
Fistula in Ano.
Removing Foreign Bodies from the Urethra and Bladder.
Cleft Perinæum.
1. Scalpel.
10. Wire or silk sutures.
2. Artery forceps.
11. Lint.
3. Torsion forceps.
12. Diachylon plaster.
4. Dissecting forceps.
13. Sponges.
5. Double hook.
14. Scissors.
6. Blunt hooks.
15. Three-inch wide rollers.
7. Tenaculum.
16. Folded towel compress.
8. Fine ligatures.
17. Chloroform and inhaler.
9. Half-yard of stout whipcord, for irremovable glands.