What You will Need for the Funnel Cooker:
1. A piece of flat cardboard, about 2 feet wide by 4 feet long.
(The length should be just twice the width. The bigger,
the better.)
2. Ordinary aluminum foil.
3. A glue such as white glue (like Elmer's glue), and water
to mix with it 50-50. Also, a brush to apply the glue to the
cardboard (or a cloth or paper towel will do). Or, some may
wish to use a cheap "spray adhesive" available in spray cans.
You can also use wheat paste.
4. Three wire brads--or small nuts and bolts, or string to hold
the funnel together.
5. For a cooking vessel, I recommend a canning jar ("Ball"
wide-mouth quart jars work fine for me; the rubber ring on
the lid is less likely to melt than for other jars I've found.
A two-quart canning jar is available and works fine for larger
quantities of food, although the cooking is somewhat slower.).
6. The cooking jar (or vessel) should be spray-painted black on
the outside. I find that a cheap flat-black spray paint works
just fine. Scrape off a vertical stripe so that you have a
clear glass "window" to look into the vessel, to check the food
or water for boiling.
7. A block of wood is used as an insulator under the jar. I use
a piece of 2"X4" board which is cut into a square nominally 4"
x 4" by about 2" thick. (10cm square x 5cm thick.) One square
piece of wood makes a great insulator.
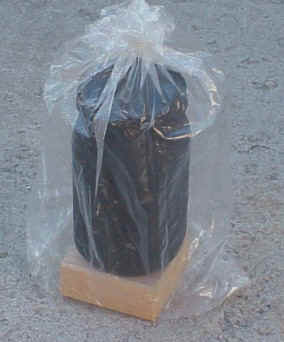
8. A plastic bag is used to go around the cooking-jar and block
of wood, to provide a green-house effect. Suggestions:
-Reynolds" Oven Bag, Regular Size works great: transparent
and won't melt. (Cost about 25 cents each in U.S. grocery
stores.)
-Any nearly-transparent HDPE bag (High-density
Polyethylene).
Look for "HDPE" stamped on the bag. I've tested HDPE
bags which I picked up for free at my grocery store, used
for holding vegetables and fruits. These are thin, but
very inexpensive. Tested side-by-side with an oven bag
in two solar funnels, the HDPE bag worked just as well!
(Caution: we have found that some HDPE bags will melt
should they contact the hot cooking vessel. For this
reason, we recommend using the oven-safe plastic bag
wherever possible.)
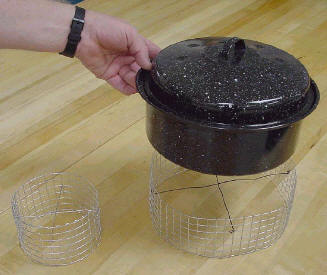
-An idea attributed to Roger Bernard and applied now to the
BYU Funnel Cooker: place a pot (having a blackened
bottom and sides) in a glass bowl, and cover with
a lid. Try for a tight fit around the bottom to keep
hot air trapped inside. The metal pot or bowl should
be supported around the rim only, with an air space all
around the bottom (where the sunlight strikes it). Put a
blackened lid on top of the pot. Then simply place this
pot-in-bowl down in the bottom of the funnel--no plastic
bag is needed! This clever method also allows the cook
to simply remove the lid to check the food and to stir.
I like this idea - it makes the solar cooker a lot like
cooking over a fire. See Photographs for further details.
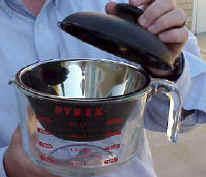
[Image: 02.jpg -- Photo description: This photo shows a Pyrex
glass measuring cup -- looking like it might hold one-half
gallon. Inside the measuring cup is a chrome or stainless
steel dish, fitting the sides of the cup very tightly.
The shiny dish is blackened on the outside and still shiny
on the inside. A man is holding the lid for the dish,
similarly blackened.]
Construction Steps
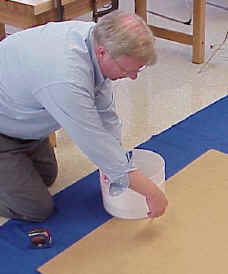
1. Cut a Half-circle out of the cardboard, along the bottom
as shown below. When the funnel is formed, this becomes
a full-circle and should be wide enough to go around your
cooking pot. So for a 7" diameter cooking pot, the radius of
the half-circle is 7". For a quart canning jar such as I use,
I cut a 5" radius half-circle out of the cardboard.
[Image: 03.jpg -- Photo description: This photo shows a man
kneeling beside a rectangular sheet of cardboard on the floor.
He is using a plastic bucket as a pattern to cut a half-circle
from the center of a long edge of the triangle.]
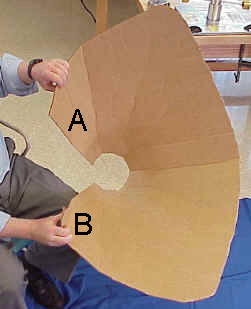
2. Form the Funnel. To form the funnel, you will bring side
A towards side B, as shown in the figure. The aluminum foil
must go on the INSIDE of the funnel. Do this slowly, helping
the cardboard to the shape of a funnel by using one hand to
form creases that radiate out from the half-circle. Work your
way around the funnel, bending it in stages to form the funnel
shape, until the two sides overlap and the half-circle forms
a complete circle. The aluminum foil will go on the INSIDE
of funnel. Open the funnel and lay it flat, "inside up", in
preparation for the next step.
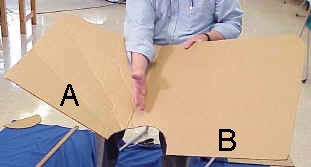
[Image: 04.jpg -- Photo description: A man is holding the sheet
of cardboard, with the long edge against his stomach, the other
long edge with the circle cut out on the opposite side. He is
using the edge of his hand for a hard edge to bend and crease
the cardboard. He is creasing the cardboard to form triangular
sections; the points of each triangular section are missing --
the points of all the triangles would have come together in the
circular cut out area of the other long side,across from the man.
Side A is the side to the left of, and directly adjacent to
the half-circle. Side B is the other half of the edge, to the
right of the half-circle.]
[Image: 05.jpg -- Photo description: This is looking
strait down into the mouth of a cardboard funnel. A man
grabbed what was the long edge of the sheet of cardboard,
now divided in two by the half circle cut from it. The two
now separate edges are now brought together to form a cone.
The cone has no tip because of the cut-out half-circle.]
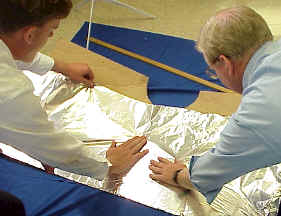
3. Glue Foil to Cardboard. Apply glue or adhesive to the top
(inner) surface of the cardboard, then quickly apply the aluminum
foil on top of the glue, to affix the foil to the cardboard.
Make sure the shiniest side of the foil is on top, since this
becomes your reflective surface in the Funnel. I like to put
just enough glue for one width of foil, so that the glue stays
moist while the foil is applied. I also overlap strips of foil
by about 1" (or 2 cm). Try to smooth out the aluminum foil
as much as you reasonably can, but small wrinkles won't make
much difference. (If even cardboard is not available, one can
simply dig a funnel-shaped hole in the ground and line it with
a reflector, to make a fixed solar cooker for use at mid-day.)
[Image: 06.jpg-- Photo description: two men are spreading
a sheet of aluminum foil across a rectangular sheet of cardboard.]
4. Join side A to side B to keep the funnel together. The easiest
way to do this is to punch three holes in the cardboard that line
up on side A and side B (see figure). Then put a metal brad
through each hole and fasten by pulling apart the metal tines.
Or you can use a nut-and-bolt to secure the two sides (A &
B) together.
Be creative here with what you have available. For example,
by putting two holes about a thumb-width apart, you can put a
string, twine, small rope, wire or twist-tie in one hole and
out the other, and tie together.
When A and B are connected together, you will have a "funnel
with two wings". The wings could be cut off, but these help to
gather more sunlight, so I leave them on.
[Image: 01.jpg -- Photo description: This photo shows the
outside edge of the cone where the edges of the cardboard
meet. Two people are securing the edges together.]
Tape or glue a piece of aluminum foil across the hole at the
bottom of the funnel, with shiny side in.
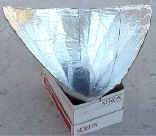
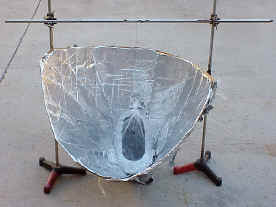
This completes assembly of your solar funnel cooker. For
stability, place the Funnel inside a cardboard or other box to
provide support. For long-term applications, one may wish to
dig a hole in the ground to hold the Funnel against strong winds.
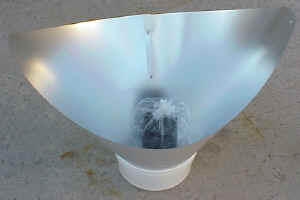
[Image: 08.jpg -- Photo description this image shows a cardboard
box being used to support a silvery funnel, roughly 3 feet high.
The funnel is placed within the box so that the sides of the box
hold the funnel upright. Sitting within the base of the funnel
is a black jar inside a clear plastic bag. The plastic bag is
inflated like a balloon to seal an insulating air pocket around
the jar.]