The Book of Wireless The Book of Stars
The Book of Magic The Book of Electricity
Gas, Gasoline and Oil Engines The Amateur Chemist
The Amateur Mechanic How to Fly
The Home Handy Book Keeping Up with Your Motor Car
Motor Car Starting and Lighting
D. APPLETON AND COMPANY
Publishers New York
THE BOOK OF STARS
BEING A SIMPLE EXPLANATION OF THE STARS
AND THEIR USES TO BOY LIFE
WRITTEN TO CONFORM TO THE TESTS OF THE BOY SCOUTS
BY
A. FREDERICK COLLINS
“THE BOOK OF WIRELESS”; “THE BOOK OF MAGIC,” ETC.
FULLY ILLUSTRATED
D. APPLETON AND COMPANY
NEW YORKLONDON
1920
Copyright, 1915, 1920, by
D. APPLETON AND COMPANY
Printed in the United States of America
TO THE BURNHAMS
WITH PLEASANT MEMORIES OF MOUNT HAMILTON NIGHTS
A WORD TO YOU
The stars are the friends of everyone who knows them.
If you have never stood out in the open and watched the stars on a
clear night, you have missed the most wonderful sight to be seen from
this little old mud ball of ours, and my advice to you is not to let
another night go by without making friends with the stars.
By the stars I mean everything in the far off sky that we can see,
and this includes the white hot points of light we call the fixed
stars, the blazing sun, the bright planets, the pale, cold moon,
the fiery comets and the burning meteors.
All of these things in the sky are so easily ours to look at, to
enjoy and to use, that we are apt not to take them at their true value,
just as many of us do not appreciate to the fullest the green grass,
the trees, the birds and all the other good things we have without
price.
You may wonder how you can make any use of the stars, but there are
dozens of ways by which they will serve your purpose, from finding
the north to lighting a fire, and from telling the time to sending a
signal, and they are all easy to you when you know how.
All the apparatus you need so that you can know the stars is a pair
of good, sharp eyes, and if you are fitted with these you are ready to
begin your work in starcraft this very night.
A great many folks believe that they must have a telescope with
which to see the stars, and while, of course, a great deal more can be
seen with a telescope than without one, still it must be remembered
that the telescope was invented not longer than four hundred years ago
and that many important discoveries in astronomy were made long before the
telescope was invented. And, by the way, it was a boy who invented the telescope.
A small telescope, or a pair of field or opera glasses, will show
you many things in the sky which you cannot see with the naked eye, and
if you have one of these instruments, by all means use it. On the other
hand, you can get along very well without a glass of any kind until you
have learned the things that are set down in this book.
To win a merit badge in the organization of Boy Scouts, a boy
must pass certain tests; but it is just as necessary for you to know
the stars as it is for a Boy Scout, and this book is so written that
anyone who studies it can pass the Boy Scout tests, and there are a few
other things in it which everyone should know.
Once that you have an insight into starcraft, you will never need
to be told again how very interesting and useful the stars are, and
once that you have mastered the chief points in this book, you should
make or buy a telescope having a two-or three-inch objective and get a
little closer to the stars.
If any questions should come up which you don’t understand, if you
will write to me, I will write to you.
If you want to know something about the stars which will be helpful
as well as entertaining, the first thing you should do is to be able to
find the North Star.
The North Star is taken as a starting point in the sky for two very
good reasons: first, of all the thousands of stars which the eye can
see, it moves the least; and second, it is north from any place
on the Earth’s surface from which it can be seen.
It must be plain then that this star is the most important one of all
to us, for by its friendly light we can easily tell the points of the
compass, though we may be lost in an unknown land or shipwrecked on a
strange sea. That is, of course, we can easily find the points of the
compass if we have first learned how to find the North Star.
How to Make a Star Finder.—To find the North Star for the first
time is a very easy matter if the simple directions given below for
making and using a star chart, or star finder, are followed.
Get a smooth pine board, about 16 inches wide, 20 inches long and ⅞
inch thick; make two cleats of wood, each of which is 1 inch wide, 12
inches long and ½ inch thick, and screw these to the board near the
ends and on the same side, to prevent the board from warping, as shown
in Fig. 1. If a drawing board of any size is at hand,
it will serve the purpose just as well as a homemade board.
The next thing to do is to obtain a sheet of cardboard about 12 by 16
inches and cover one side of it with a dull black paint; when the paint
is thoroughly dry lay it, black side up, on the smooth side of the board.
Fig. 1.—Starboard Showing Cleats.
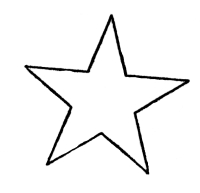
From another sheet of white cardboard cut out seven stars, about the
size and shape shown in Fig. 2, and cut out another
star nearly twice as large, to represent the North Star.
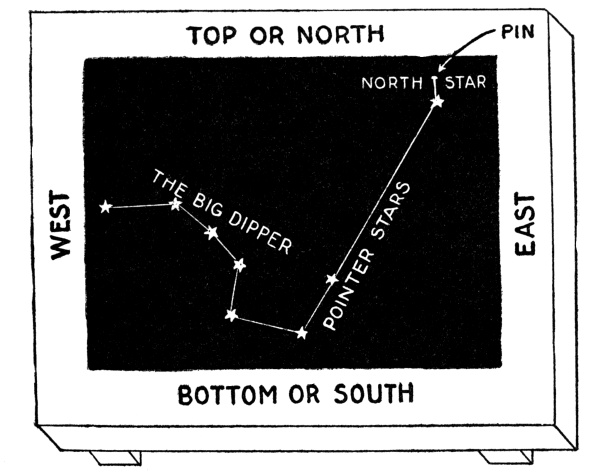
Now place the white stars on the black surface of the cardboard in the
positions shown in Fig. 3, using the smaller stars to form
the outline of the Big Dipper and the large star for the North Star.
Fig. 2.—Cardboard Star.
When all of the stars have been properly arranged, fasten them to the
black cardboard with a bit of glue or mucilage. Push a thumb tack, or
a pin, through the center of the large star, which is the North Star,
and well into the board, so that the chart, or star map, can be turned
round on the board with the North Star as its axis. When this is
done your star finder is complete.
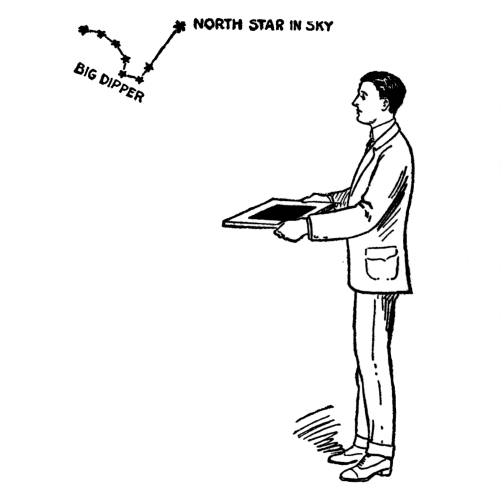
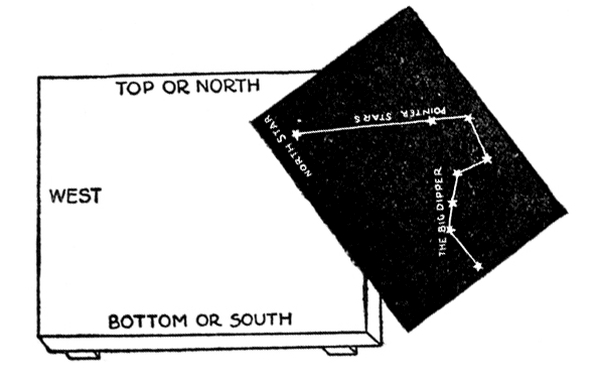
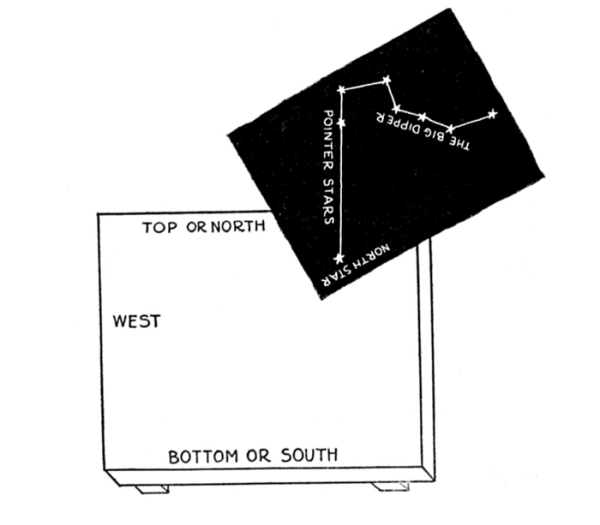
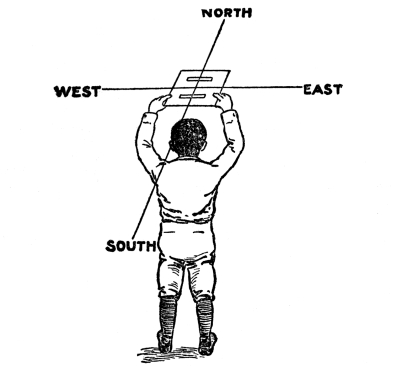
Finding the North Star.—All being in readiness, take this
chart, or star finder, out-of-doors some evening when the seeing
is good and all the stars in the northern sky are shining brightly, and
face about north, holding the starboard in front of you, as shown in
Fig. 4.
Usually the direction of north is well known, and yet there are some
places where the streets and roads do not run due north and south,
and for this reason it is sometimes hard to tell exactly which way is
north. In such a place either use a compass to get your bearing, or, if
you haven’t a compass, face about as nearly north as you know how.
Fig. 3.—The North Star and Big Dipper on Starboard.
(Position of Big Dipper in Autumn.)
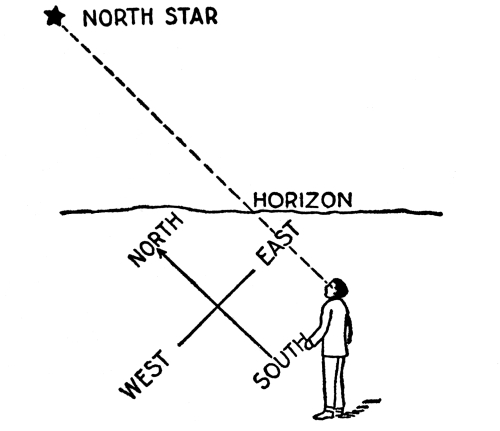
Having looked at your star chart carefully raise your eyes from the
board until they are in a line with the northern horizon, that
is, the line where the earth and the sky seem to meet. Keep on raising
your eyes in a straight line until they reach a group of stars, which
is about 40 degrees above the horizon. (See Fig. 98.)
The line for sighting the North Star is shown in Fig. 5.
All the stars of this group are very faint except one and this
particular star will stand out bright, distinct and alone, for the
other two stars of the same group which can be plainly seen are not
very close to it. The star you have found is the North Star,
or Pole Star, or to give it its proper name Polaris
(pronounced Po-la´-ris).
Fig. 4.—Finding the North Star
and the Big Dipper.
To make sure you have not mistaken some other star for the North
Star it will be a good idea to prove your find. Search around in the
northern sky a little and you will see a group of seven bright stars
fixed in the sky just as the cardboard stars are fixed on the black
surface of your chart, and which are shown in Figs. 4
and 5.
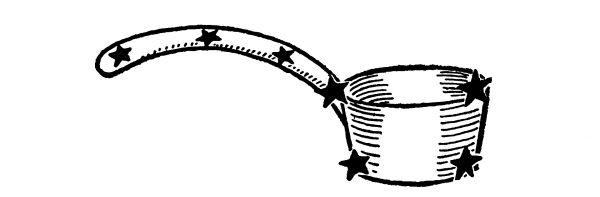
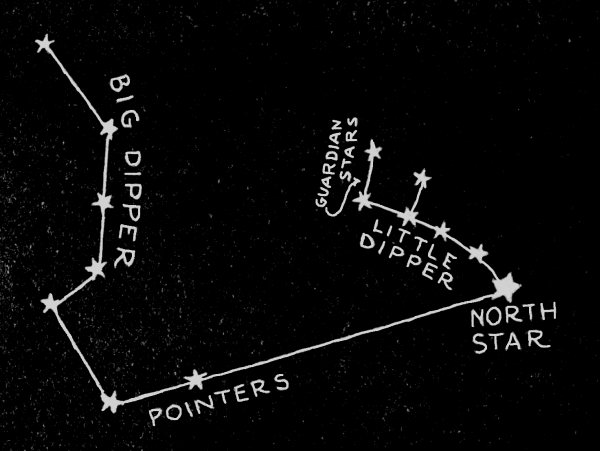
The Big Dipper.—This group of seven stars is called the Big
Dipper because if a broken line joined all the stars together a very
good figure of a big dipper would be formed. A group of stars is called
a constellation, and this constellation is shown as we see it in
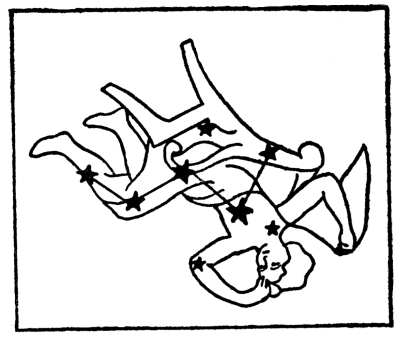
Fig. 6, and as the ancient shepherds and sailors
pictured it in Fig. 7.
Fig. 5.—Line for Sighting the North Star.
In England this group of stars, or constellation, is sometimes called
the Plough, for our friends across the pond see in it the
likeness of a plough as well as of a dipper. It is also called the
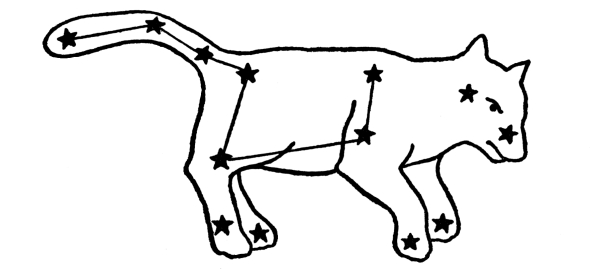
Great Bear the world over after the ancient name given it, but
it requires some stretch of the imagination to liken it to that nubbly
short-tailed animal.
All these fancy names were given this great group of stars long
before the birth of Christ and by these names the constellation is
still familiarly called. Astronomers of the present time also call
this constellation the Great Bear, but they say it in Latin and so it
becomes Ursa Major, which is a very high toned and scholastic
sounding word. But the Big Dipper is a name that is good enough for all
ordinary purposes and so we’ll use it.
Fig. 6.—The Big Dipper As We See It.
The stars forming the Big Dipper stand out so bright and clear in the
northern sky that you won’t have the slightest trouble in finding it,
especially if you have the star finder at hand to help you.
In using the star finder there is one thing you should keep well in
mind and that is that the Big Dipper as we see it turns round the North
Star, like the hands of a clock, but in the opposite direction. That
is, the Big Dipper, when below the North Star, seems to turn
round the North Star from left to right.
Fig. 7.—The Great Bear as the Ancients Saw It.
In a word the North Star forms one end of the axis round which not
only the Big Dipper but the whole starry heavens seem to revolve as
though they were fastened to the spokes of a great wheel. This is the
way it seems to us. As a matter of fact, though, all the stars are
fixed in their positions in the sky, and the reason they seem to
revolve round the North Star is because the Earth from which we see the
stars turns round instead.
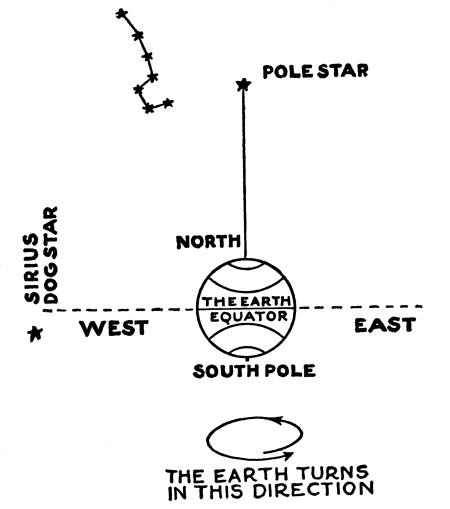
Fig. 8.—The Earth, Pole Star and Dog Star.
By looking at the drawing shown in Fig. 8, it will be seen that the
north pole of our Earth is directly under the North Star,—hence
the name Pole Star—and that if we could draw a line through the center
of the Earth from the south pole to the north pole and
extend the line far enough, or produce it as it is called, it
would finally meet the North Star.
Let us take, now, another star, called the Dog Star—its real
name is Sirius (pronounced Sir´-i-us)—which is not far from
a line with and overhead of the Earth’s equator; suppose we are some
place on the earth where we can see both the North Star and the Dog
Star at the same time, and keeping in mind that the Earth is turning
round on its axis; it must be plain, then, that though both of these
stars are fixed in the sky and never change their positions we on the
Earth will turn away from the Dog Star until the Earth has turned half
way round, but we will not turn away from the North Star.
The eye, however, is easily deceived; for example, if we are on a
moving train nearby objects, such as houses, trees, etc., will seem to
be moving in the opposite direction to which we are going while we seem
to be standing perfectly still. The illusion is much more complete when
we are seeing the stars, for the motion of the Earth as it spins on its
axis and shoots round the Sun in its orbit is so steady that we cannot
notice it; for this reason it seems as if it is the stars which are
moving and that we are standing still.
It is easy to understand now why the Big Dipper, and all the other
stars, seem to move in great circles round the North Star as well as
why the Big Dipper marked with cardboard stars on your chart may not
have the same relative position to the horizon as the Big Dipper of
real stars in the northern sky, when you view them together as in
Fig. 4.
Not only does the revolution of the Earth on its own axis once in every
24 hours cause the Big Dipper to seem to turn round the North Star, but
the yearly journey of the Earth round the Sun makes a change in the
position of the Big Dipper as we see it at different seasons of the
year. And what has been said about the Big Dipper is just as true of
all the other constellations.
For these reasons we would need an almanac to help us keep track of
the exact hour when the Big Dipper would be in a given position for
every night in the year. But you can always find the Big Dipper any
evening in autumn about nine o’clock, by remembering that it is turned
right side up as shown in Figs. 3 and 4.
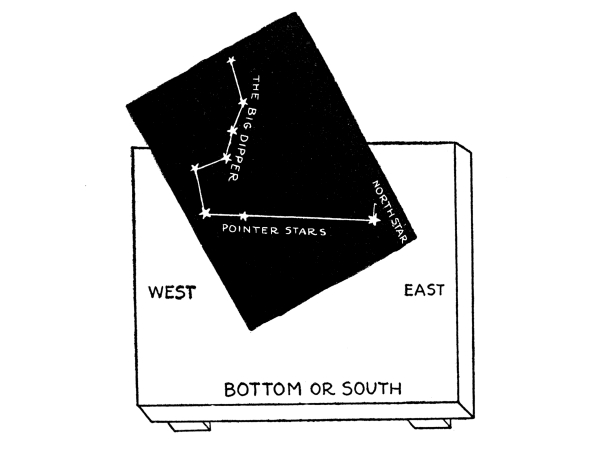
Again, if you look for the Big Dipper in winter at about nine o’clock in the
evening you will find it standing on its handle a little to the east as in Fig. 9.
In spring about 9 o’clock, it will have moved on round the North Star until it
is upside down, as in Fig. 10, while in summer, at 9, it is hung up by its
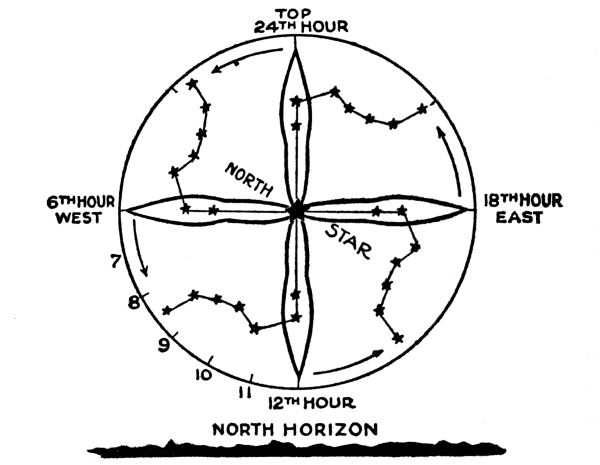
handle high in the sky, as shown in Fig. 11. The four positions of the
Big Dipper during the same hours of the different seasons are shown in
Fig. 12, which also shows the four positions of the Big Dipper during
each 24 hours.
Fig. 9.—The North Star
and Big Dipper in Winter.
By turning the chart round on the board counter-clockwise you
will soon come to a point where the Big Dipper of paper stars and the
Big Dipper of real stars are in exactly the same position.
Fig. 10.—The North Star
and Big Dipper in Spring.
You have, no doubt, noticed that a line joins the two end stars of the
Big Dipper and the North Star in Figs. 3,
4, 10, and 11.
These two end stars of the Big Dipper are called pointer stars, for they
point directly to the North Star; that is if we draw a line with the eye
through the pointer stars and produce, or continue the line, it will
run into the North Star, nearly.
By using these pointer stars it is easy for any one who knows the Big
Dipper to be able to find the North Star on any clear night in the
year, for the Big Dipper can be seen the year round.
The seven stars which form the Big Dipper are not the brightest stars
in the sky by any means, yet each one is a great white sun as large or
larger than our own Sun.
Fig. 11.—The North Star
and Big Dipper in Summer.
Now look sharply at the middle star in the handle of the Big Dipper,
whose name is Mizar (pronounced Me´-zar), and see if you can
make out another little star whose name is Alcor (pronounced
Al´-cor) hugging up close to it. The Arabs who named them called these
two stars the Horse and its Rider. If you can see this
little star Alcor you will have cause to shake hands with yourself,
for if your eyes are good you can see it and if they are only fair to
middling you cannot see it. This is one of the famous Arab tests for eyesight.
Fig. 12.—Telling Time by the Big Dipper.
How to Tell Time by the Big Dipper.—We have seen how the Big
Dipper seems to turn round the North Star and this being the case we
can use the pointer stars for the hour hand of a big star clock.
You must always bear in mind, though, that while the hands of a clock
turn from right to left, the Big Dipper swings round from left to
right; and there is another thing to be kept in mind and that is while
the hour hand of a clock goes twice round in 24 hours, the Big
Dipper revolves only once in 24 hours, and for this reason the hand
formed by the pointer stars of the Big Dipper moves only half as fast
as the hour hand of a watch or clock.
Each quarter of the circle, then, is equal to 6 hours and by dividing
the quarter circles into 6 equal parts you can mark off the hours.
The best way to do this at first is to make a large drawing of Fig. 12
on your starboard and compare it with the Big Dipper; then draw an
imaginary circle round the North Star in the sky so that it will just
clear the last star in the handle of the Big Dipper. With some practice
you will be able to tell the time within half an hour or less.
In telling the time by the Big Dipper you must remember that the stars
in turning round the north pole run fast an hour every 15 days, and
this makes them gain 6 hours in 3 months and so they gain a complete
revolution in a year. But every time the Big Dipper makes one complete
turn round the North Star, one complete day, as measured by star time,
will have passed.
The Pointers of the Big Dipper are in the four positions, shown in the
figure, on the following dates at 8 P.M.: May 1, 24th hour; Aug. 1, 6th
hour; Nov. 1, 12th hour; Feb. 1, 18th hour. In the same way, on Sept.
1 at 8 P.M. the pointers will be at 8 and they will also be there at 7
P.M. on Sept. 16.
CHAPTER II HOW TO KNOW THE STARS
One of the tests a Boy Scout must pass in order to obtain his badge
of merit for starcraft is to be able to name and point out twelve
principal constellations, and every boy, whether he is a scout or not,
should be able to do the same thing for his own good.
The word constellation is formed from two Latin words, the
first being con which means together, and the last
being stella which means star, or in plain English,
constellation means stars together.
In your efforts to find the North Star you have already learned one of
the principal constellations—that of the Big Dipper—and to learn more
of them will be even easier and much more fun, for now you have learned
the game.
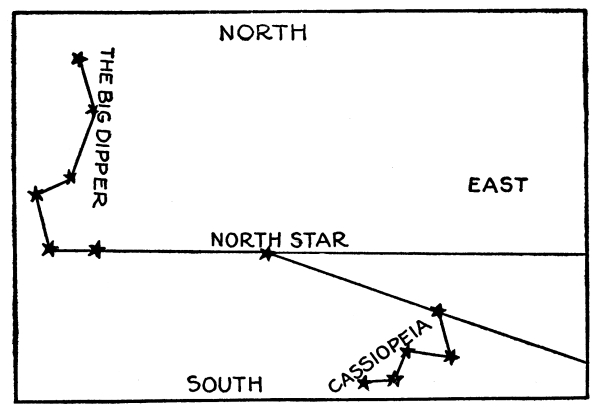
The Constellation of Cassiopeia.—To find the constellation of
Cassiopeia (pronounced Cas´-i-o-pe´-ah) again make use of your
star finder. Remove all the stars from the blackened cardboard and
rearrange them so that the North Star is in the center of the board and
the Big Dipper is on the left hand side with the two pointer stars in
a line with the North Star. On this chart the Big Dipper must be made
much smaller than the one described in the first chapter.
Cut out five more stars from white cardboard and place them on the
opposite side of the board from the Big Dipper in such a manner that
they will form the letter W being careful to fasten the stars to
the cardboard so that the letter W stands in the exact position
shown in Fig. 13.
A line drawn through the pointers of the Big Dipper and produced will,
as before, pass through the North Star, and if it is extended an equal
distance beyond it, will pass very closely to the constellation of
Cassiopeia; this line will aid you in placing the stars on your chart
in the right positions.
Having thus prepared the star finder, take it out into the open when
night comes on and begin by locating the North Star and the Big
Dipper. Now set the Big Dipper and the North Star of your star chart
in a position which to your eye corresponds to the Big Dipper and the
North Star in the sky. Follow the line from the pointer stars to the
North Star and beyond when the great letter W which is the
constellation of Cassiopeia, will stand out so clear and bright that
you will wonder why you have never seen it before.
Fig. 13.—Constellation of Cassiopeia.
Fig. 14 shows this group of stars and the outline of the unhappy
Cassiopeia who is as often standing on her head as on her feet, but it
requires the imagination of an Arabian star-gazer to see the likeness.
The Little Dipper.—Although some of the stars which form the
Little Dipper are very faint it is included in our list of 12
principal constellations for two reasons: first, because it contains
the very important North Star, and second, because it is easy to find.
Fig. 14.—Cassiopeia
as the Arabs Saw Her.
Fig. 15.—The Little Dipper or Little Bear.
The North Star is the last star in the handle of the Little Dipper. The
two outer stars which form the bowl of the Little Dipper, and which are
called the Guardians of the Pole, are quite bright, and after a
few trials you can easily put in the other stars that are much fainter,
and so complete in your mind’s eye the outline of the Little Dipper as
you have it on your chart. Fig. 15 shows the arrangement of the stars
in the Little Dipper and the relative position of the Little Dipper to
the Big Dipper.
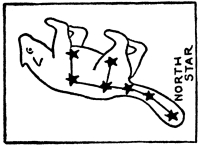
The Little Dipper is also called the Little Bear and this latter
name when done into Latin becomes Ursa Minor, which is its
scientific name. How the Little Dipper was made into a Little Bear by
the ancients is shown in Fig. 16.
The Great Square of Pegasus.—Unlike the Big Dipper, the Little
Dipper and Cassiopeia, which are so close to the North Star that they
never set and hence can be seen at any hour of the night and at any
season of the year, we now come to some constellations which are quite
distant from the North Star and are for this reason to be seen only
at certain times of the year. The Great Square of Pegasus can
always be seen on clear, crisp nights during the autumn months.
Fig. 16.—The Little Dipper
Made into a Little Bear.
To find a constellation that is as far away from the North Star as
Pegasus (pronounced Peg’-a-sus) is not an easy thing to do, at least
the first time you try it, for while our chart is marked with a
straight line the sky is like a great bowl and a line produced from the
North Star to Pegasus will, in consequence, not be a straight line, but
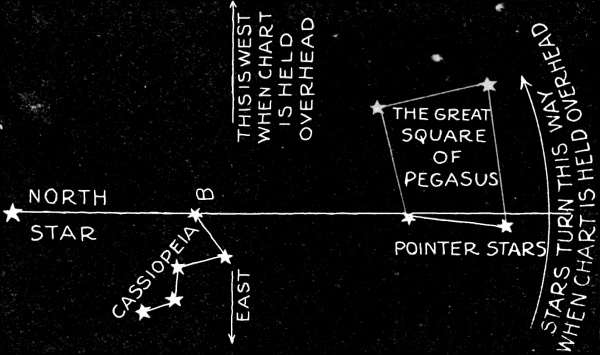
a curved line. However, with your star finder charted like the diagram
shown in Fig. 17 you will be able to locate Pegasus
with very little effort.
After taking off all the stars from the
cardboard surface, pin or paste the North Star to the lower left hand
corner of the black surface of the cardboard and place the five stars
of Cassiopeia in their proper positions. Now draw a line from the North
Star through Cassiopeia just below the star marked β which is the Greek
letter beta (see Appendix C) and produce,
or extend that line until the edge of the cardboard is reached. On
the extreme right hand end of this line set two stars, which we will
also call pointer stars, and place two more stars above them so that a
nearly perfect square will be formed as shown in Fig. 17.
Fig. 17.—The Great Square of Pegasus.
To find Pegasus take the star chart out-of-doors, say some evening in
November about 9 o’clock, for the Great Square will then be on the
meridian, that is, on a line passing over your head and which
runs north and south across the sky. This time, instead of looking down
on the chart, as you did in finding the Big Dipper and Cassiopeia,
turn the board bottom side up, as shown in Fig. 18,
but still keeping the cardboard North Star pointing north and the
four stars of Pegasus pointing toward the south.
By looking over your chart into the sky and following an imaginary line
with your eye from the North Star through Cassiopeia past the star β
(beta) and lengthening this line toward the equator in the southern
sky you will come upon four bright, white stars which form the Great Square
of Pegasus and you have added another and fourth constellation to your list.
The practical value of knowing the mighty constellation of Pegasus
is that you can always find the north, by means of its friendly stars,
though the North Star, the Big and Little Dippers and Cassiopeia are
hidden by clouds. To find the north you only have to wait until Pegasus
gets very high in the sky and run an imaginary line through the pointer
stars of Pegasus and produce it until it reaches the northern horizon.
Fig. 18.—Holding the Chart of Pegasus Overhead.
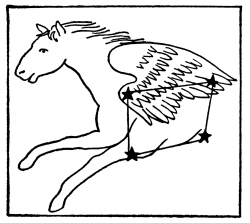
The Great Square of Pegasus was fancifully pictured by the ancients as
a Flying Horse and, curiously enough, with only half a body at
that, as shown in Fig. 19. To those who do not know the lore of the
stars it is not so easy to see in the Great Square the fabled winged
steed who still continues his flight through the sky just as he did
when he was invented over four thousand years ago.
Fig. 19.—The Flying Horse of Pegasus.
Fig. 20.—Figure of a Trapezium.
The Mighty Orion.—The brightest constellation in the whole
sky is Orion (pronounced O-ri´-on), the Great Hunter, as the
ancients liked to imagine this group of stars.
With the exception of the Big Dipper, Orion is the easiest of all the
constellations to find provided you look for it at the right time of
the year, which is during the winter months.
To locate Orion cut out of cardboard seven large stars and three small
stars. Near the lower edge of the blackened cardboard pin two large and
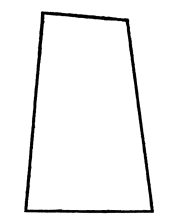
two small stars to form what is called a trapezium, that is,
four straight lines forming a figure, none of which are parallel, as
shown in Fig. 20. About halfway across the figure pin three large stars
in a row, at equal distances apart and tilted a little, as shown in Fig. 21.
Fig. 21.—Constellation of Orion.
Fig. 22.—Orion the Mighty Hunter.
These three stars form the Belt of Orion, for a mighty hunter
must needs have a belt, and this belt of bright stars is one of the
best known groups in the whole sky. Across the belt and nearly at right
angles to it pin three small stars; these small stars form the sword or
dagger of the fanciful hunter but they are of more use to us than to
him, as will be seen presently.
At the top of the star chart pin the North Star so that it will be
in a direct line with the three small stars forming the Sword of
Orion. Your star chart of Orion is now ready to be compared with
the one in the sky. The best time to find Orion is in January about 9
o’clock, when the constellation is high in the southern sky, though he
may be seen shining in all his glory all winter long.
On taking your star chart out-of-doors hold it overhead just as you did
in finding the Great Square of Pegasus; now look toward the south until
your eyes rest on the equator running across the southern sky from east
to west and you will see the mighty Orion, though you may not recognize
the lion skin he holds.
Having found Orion draw an imaginary line through the three small stars
called his sword and produce this line until it meets the North
Star. Once you have found Orion you will never again require the help
of a star chart to locate him, but it is a good plan to look him up as
often as you can, and to draw the imaginary line through his sword and
on to the North Star, for should you ever lose your way or want to find
the north and the North Star should be hidden by clouds a line through
the Sword of Orion when Orion is in the south will direct you as
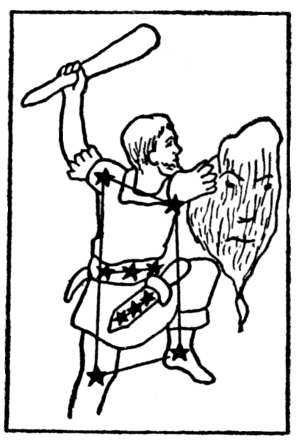
certainly as the needle of a compass. Fig. 22 shows the fabulous Orion
as a giant hunter holding the skin of a lion which he killed, according
to Arabian star-lore.
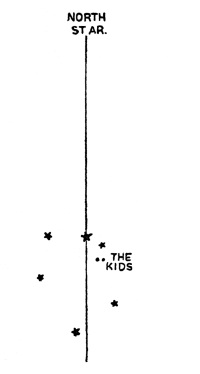
Fig. 23.—Constellation of Auriga.
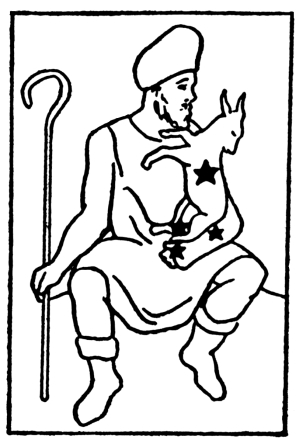
Fig. 24.—Auriga the Shepherd.
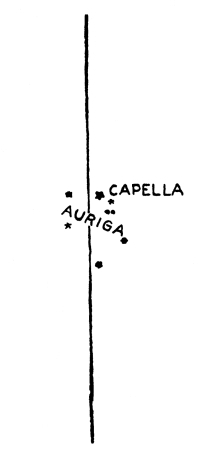
Auriga, the Charioteer or Shepherd.—After finding Orion the
constellation of Auriga (pronounced Aw-re´-ga) will get right in
your way so that you cannot by any chance miss it. This is because
the chief star in Auriga and whose name is Capella (pronounced
Ca-pel´-la) lies nearly on the line drawn through the Sword of Orion
and produced to the North Star as shown in Figs. 21,
23 and 27.
Auriga was pictured by the Assyrians as a charioteer, but the early
Greeks saw in this constellation a good shepherd, who carried a goat
on his back and two kids in his arms. The brilliant star Capella is
supposed to be the goat and the three small stars which form a triangle
close to Capella are the kids as shown in Fig. 24.
When the North Star cannot be seen the star Capella will prove a useful
aid with Orion in finding the north; and since it is just about half
way between Orion and the North Star it may again be useful in judging
the distance of the North Star from Orion when the former star is obscured.
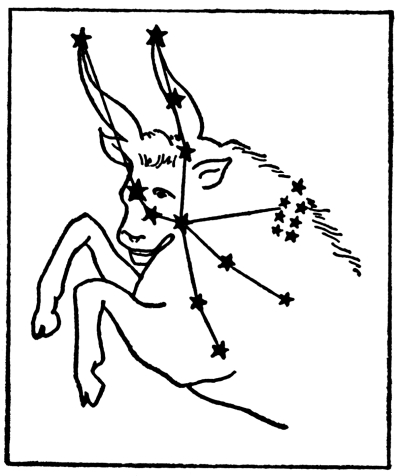
The Constellation of Taurus.—The last constellation which need
concern us here is Taurus (pronounced To´-rus) the Bull. Taurus
is one of the constellations of the zodiac of which we will
have something to say in Chapter XI. By the time you
have learned the foregoing constellations you will be able to locate Taurus
without using your star chart, for it lies to the north of Orion, to the south
of Auriga and a little to the west of both of these constellations as
you will see in Figs. 25 and 27.
Fig. 25.—Constellation of Taurus.
Fig. 26.—Taurus the Bull.
The little group of stars nearby is the Pleiades (pronounced
plē-ya-dez), and is a part of the constellation of Taurus. There are
six small but bright stars grouped closely together when seen by the
ordinary person, but if you have very sharp eyes you may be able to
make out one or two more.
It is believed that the stars of Taurus were the first to be woven into
a group or constellation by the ancients, and it is thought that the
Bull of Light, as Taurus was called, was known long before the
time of Abraham, or over four thousand years ago. Fig. 26 shows Taurus
as the Egyptians saw him. The bright red star which sets in the right
eye of Taurus is called Aldebaran (pronounced Al-deb´-a-ran) and
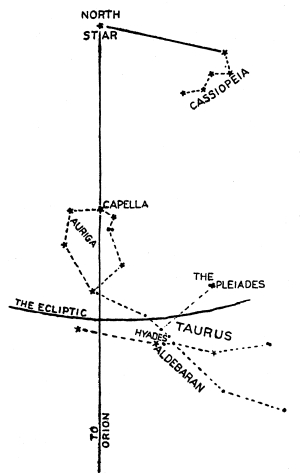
is one of the brightest stars in the sky. In the star chart shown
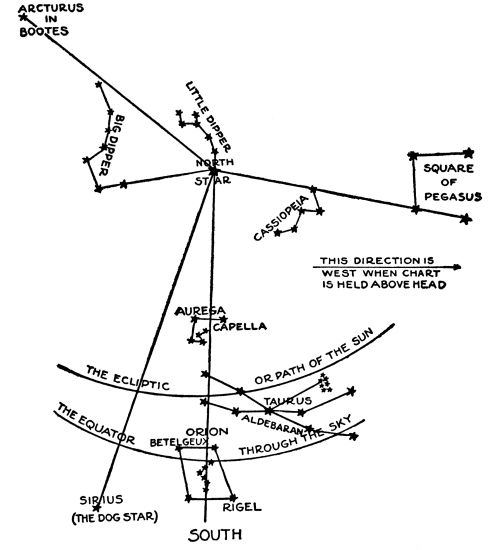
in Fig. 27 the different constellations you have learned are grouped
together in the same positions in which they are placed in the sky.
Fig. 27.—Star Map Showing Six Chief Constellations.
Six stars of the first magnitude, that is 6 of the 20 stars which
shine the brightest (see Appendices F and G), are also shown on the chart,
Fig. 27. By following the equator from west to east across the
bowl of the sky, and which runs right through the middle of Orion,
you will find to the west and south of it the brightest star in the
heavens—Sirius, the Dog Star, so named because it is in the
constellation of Canis Major, which is Latin for Big Dog.
Of the other stars on the chart, Capella in Auriga is the next
brightest star, and Arcturus (pronounced Arc-tu´-rus) which
can be found by following the handle of the Big Dipper, is third in
brilliancy. The fourth place is held by Rigel (pronounced
Rai´-gel) in Orion; Betelgeux (pronounced Bet-el-gerz´) in
Taurus is fifth in order, and Aldebaran in Orion comes last.
There are many other constellations and a large number of other stars
but when you are able to name and point out those described in this
chapter you will have made a very good running start.
CHAPTER III THE SUN, THE BRIGHTEST OF ALL STARS
In naming over the stars of the first magnitude—that is, the stars
that shine the brightest—there is one star I did not mention and yet
as we see it it is brighter than all the other stars put together.
This great star is our Sun and since we owe everything we
possess on Earth to him—light, heat, power and even life itself—he
should and does stand in a class by himself, though after all he is
just as much of a fixed star as the North Star, the Dog Star, or any of
the thousands of other stars which we see as mere points of light in
the sky.
How to See the Sun.—You must never look directly at the Sun
with the naked eye, for he is so powerful that his light will injure
your sight for all time.
Fig. 28.—Smoking Glasses over Candle Flame.
Fig. 29.—Seeing the Sun through Smoked Glasses.
There are several ways, though, to observe the Sun without danger to
your eyes and as all of these are simple and cost nothing you can
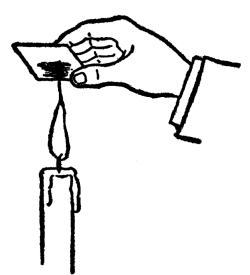
easily try them. The most common way is to take a bit of window glass,
say an inch square, and smoke one side of it over the flame of a
candle, as shown in Fig. 28.
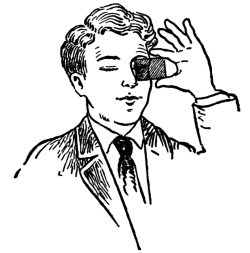
When this blackened glass is held closely to the eye, as shown in Fig. 29,
and the latter is directed toward the Sun, a little circle of light
will appear on the film of smoke and the surface of the Sun may
be examined at length and without the least danger.
A decided improvement over the smoked glass idea is to use a piece of
red, or a piece of yellow glass, as an eyepiece, or, better, place the
red and yellow glasses together and bind the edges with paper. Another
plan to see the Sun without injury to the eyes is to make a hole with
the point of a needle in a visiting card and look through the hole
directly at the Sun.
A still better view of the Sun can be obtained if a pinhole telescope
is used. A telescope of this kind can be easily made without tools,
metals or lenses. It is described and pictured in Chapter IX.
To observe the Sun hold the pinhole end of the tube closely to your
eye, to cut off all the outside light, and sight the tube so that the
Sun shines directly into your eye through the pinhole, and you will get
a very brilliant view of the great yellow star which we call the Sun.
What the Sun is Made of.—When a candle is lit the wax of which
it is made begins to melt and this is drawn up the wick where it is
changed into gas and the burning gas forms the flame.
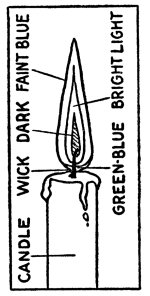
The flame of a candle is made up of four parts, which are really layers
of heated gas surrounding the wick, as shown in Fig. 30. In the center
of the flame is the wick; the first layer of gas is at the bottom of
the flame and this gives a greenish-blue light; the second layer is the
dark and cool part of the flame; the third layer is a cone of
heated gas which gives out the bright light, and surrounding this cone
is a faint blue light which can just be seen.
We know, of course, what the candle is made of and we also know why
it burns and in a way how it gives off light and heat because we have
examined it closely, but if we could get no nearer a candle flame than
a quarter of a mile it is very doubtful if we could ever be able to
learn anything about the real source of the flame—that is its greasy wick.
Fig. 30.—A Candle Flame
Showing Layers of Flame.
It is much the same with the Sun, for we can only examine it at a great
distance and know it by its action on our senses, for the flaming
layers of the Sun are so bright that no one ever saw through them, so
the real source of its light and heat—the core of the Sun—remains
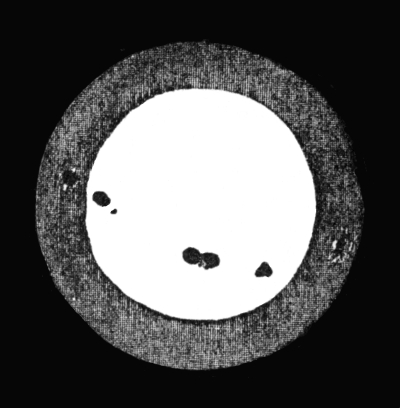
unknown. Fig. 31 shows the Sun as seen with a field glass.
Since the Sun gives out light and heat it is easy to believe that it is
a great ball of very hot gases and from what astronomers have learned
of him with their wonderful instruments this idea seems to be pretty
well founded.
The Sun must be a tremendously hot body—for the iron and other metals
in it are not only melted but they boil away like water and are
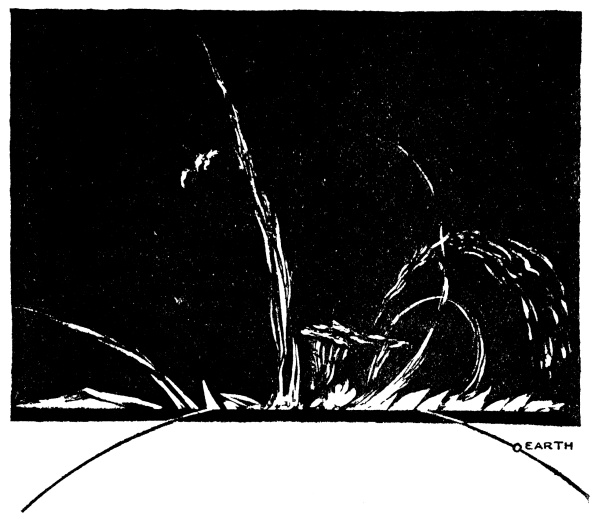
changed into gases. Under certain conditions gigantic flames, called
prominences, shown in Fig. 32, can be seen to leap from the
edge, or limb, as it is called, of the Sun, and finally, great
spots, called sun spots, are formed on the Sun that are so large
a dozen worlds the size of our Earth could be dropped into any one of
them and rattled around like marbles in a cigar box. These are a few of
the reasons we are led to believe that the Sun is a seething ball of fire.
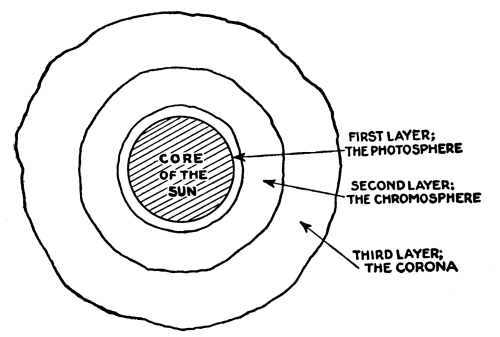
The Sun’s Layers of Flame.—Just as the wick of a candle is
surrounded with several kinds of flame, so the Sun has three layers of
flame around a central core.
The core of the Sun is believed to be formed of liquid gases which are
about as thick as New Orleans molasses.
Around this core, which is the real source of the Sun’s light and
heat—and which has never been seen—is a dark layer of flame usually
called the Sun’s surface; this layer, which is covered with
numerous dark spots like freckles on the face of a red-headed boy, is
called the photosphere, and it is this part of the Sun which
gives out the most light.
Fig. 31.—The Sun as We See It.
The second layer, which is called the chromosphere, is about
5,000 miles thick, and if you could imagine the whole world afire you
would then have but a faint idea of what a mighty seething sea of flame
this layer is. It is in this layer of luminous gases that terrific
explosions take place and red tongues of flame, or prominences,
are shot out for upwards of 300,000 miles.
Around the chromosphere is another layer of flame which extends for
hundreds of thousands of miles in all directions. This last layer is
called the corona, and it is as thin as the stuff of which
dreams are made. It is formed of the gas coronium and since it is
so thin it can never be seen except when there is a total eclipse,
that is, when the Moon passes between us and the Sun, which will be
explained in Chapter VII, and so shuts out the intense light of the
other two layers. A cross section of the Sun is shown in Fig. 33.
Fig. 32.—Prominences of the Sun Compared
with the Size of the Earth.
Sun Spots and Their Effect on the Earth.—Very often great spots
are seen on the Sun’s surface. These purplish black spots appear to
be holes, like the craters of volcanoes, in the photosphere, or layer
of flame next to the core of the Sun. The sun spots are caused by
great eruptions which take place in the core of the Sun, and these sun
spots are sometimes over 100,000 miles in diameter, when they can be
easily seen with the naked eye; indeed if a sun spot has a diameter
only as large as that of our Earth, it can be seen with the naked eye,
protected, of course, with either a smoked or a colored glass, or
better, with a pinhole telescope; in any case it will look like a black
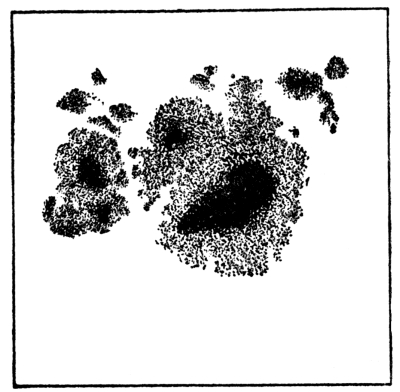
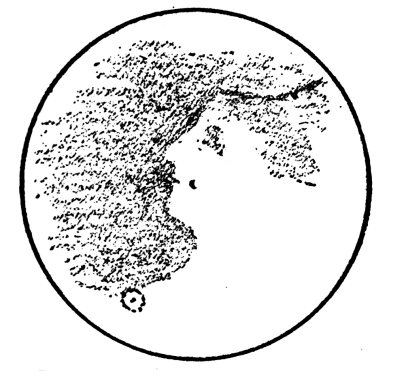
speck about the size of a pinhead. Fig. 34 shows
a view of a sun spot made through a large telescope.
Fig. 33.—Cross Section of the Sun.
Whenever the sun changes his spots magnetic storms take place
on the Earth, when compass needles, telegraph and telephone apparatus
and wireless systems are disturbed. When a large number of spots appear
at the same time on the Sun the Northern Lights are often very
bright. Sun spots have something to do with our weather, but the
effects are not yet well understood.
The Sun and the Weather.—Of course the Sun has everything to
do with the weather, but to be able to predict the kind of weather we
shall have even the next day is a very hard thing to do.
The changes in the weather are caused by the heat of the Sun alone.
The heat of the Sun produces clouds by vaporizing the water of rivers,
lakes and oceans. He causes hot and cold weather by heating some parts
of the air more than other parts, and this sets the air in motion and
we call this movement of the air the wind.
Fig. 34.—Sun Spot in Photosphere.
Changes of heat, moisture and wind are the cause of all the kinds of
weather we have, and we have a good many kinds, be it hot or cold, dry
or wet, calm or windy, clear or stormy, good, bad and indifferent.
To Forecast the Weather by a Barometer.—The best way to tell
what the coming weather will be in the next few hours is by the rise
and the fall of the pressure of the air, or barometric
pressure, as it is called.
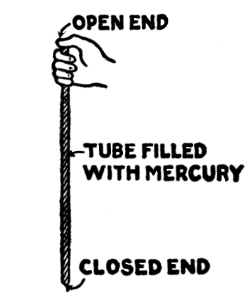
A simple barometer for showing the changes in the pressure
of the air can be made of a glass tube about 3 feet long, ½ inch in
diameter, and closed at one end as shown in Fig. 35. Fill the tube with
mercury and, placing your finger over the mouth of the tube, turn it
upside down and put the open end into a cup, or other vessel, which is
half full of mercury; in placing it into the cup be careful that no air
gets into the tube.
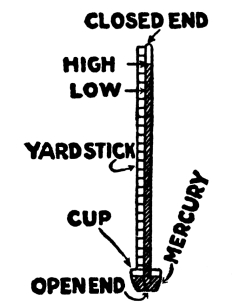
Only a small part of the mercury in the tube will run into the cup
and this will leave a space in the top of the tube. Now fasten a
yardstick, the purpose of which is to show the changes in the height of
the mercury in the tube, with a string or wire to the tube, and your
barometer will be complete, as shown in Fig. 36.
Since the air presses on the mercury in the cup but not in the tube,
the pressure of the air on the mercury in the cup just balances the
weight of the mercury in the tube and, hence, any increase or decrease
in the pressure of the air, which ordinarily is about 15 pounds to the
square inch, is shown by the rising or the falling of the mercury in
the tube.
The barometer in helping to forecast the weather shows that: (1) when
the mercury rises in the tube, that is when it is high, the
weather will be fair; (2) when the mercury falls in the
tube, that is when it is low, bad weather may be looked for; (3)
when the mercury suddenly falls in the tube a storm is
coming, and (4) when the mercury continues at a high point the
weather will remain fair.
Fig. 35.—Barometer Tube.
Fig. 36.—Barometer Complete.
To remember these forecasts easily they may be briefly stated thus:
(1) A high barometer shows fair weather.
(2) A low barometer shows bad weather.
(3) A sudden fall of the barometer shows a coming storm.
(4) A constant high barometer shows continued fair weather.
To Forecast the Weather by Signs.—It will seldom happen that
a boy who goes camping, or one who otherwise wants to know what
the weather is likely to be on the morrow, will have a barometer to
consult, so the next best thing is to know how to read the weather signs:
(1) “Red at night is the sailor’s delight” is an old
forecast, and means that the morrow will be a fine day.
(2) “Red in the morning is the sailor’s warning,”
which means that rain is coming.
(3) A golden sunset is a sign that a high wind is
coming.
(4) A yellow sunset is a sign that rain is
coming.
(5) When the Sun sets clear it is a sign of a fine
day on the morrow.
(6) When the Sun sets behind a cloud it is a sign
that the next day will be cloudy or rainy.
(7) A misty dawn shows the coming of a fine
day.
(8) A low dawn, that is when the Sun shines clear
on rising, shows the coming of a fine day.
(9) A high dawn, that is when the Sun rises over a
haze, or clouds, shows wind.
To Light a Fire with the Heat of the Sun.—A small magnifying
glass, or burning glass, is simply a convex lens. It is a little
piece of apparatus that every boy should always carry with him just as
he does his pocket knife and compass. A lens 1½ inches in diameter and
having a 4-inch focus may be bought for 25 or 30 cents.
A lens of this kind will be found very useful in many ways, for it
will greatly magnify any object such as cloth, leaves, insects,
finger-prints, in fact anything you may wish to see better than you
could with your naked eye, though you cannot use a single lens for a
spyglass. A magnifying glass will also frequently come in handy for
lighting fires, by using the Sun’s rays when matches are scarce.
While a Boy Scout would disdain to use paper to kindle a fire, yet if
a scrap of paper is at hand it will prove a good medium on which to
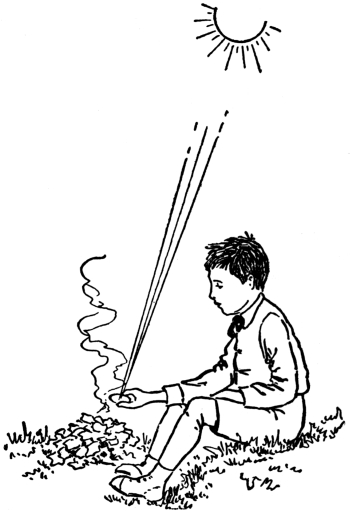
direct the rays of the Sun with a burning glass. If you have no paper
focus your glass on some punk or very dry leaves, as shown in Fig. 37.
To focus the glass means to hold it away from the paper or leaves so
that the rays of the Sun are brought to a point like the sharpened end
of a lead pencil; when all the rays of sunlight, each of which carries
a little heat, are brought to a point, they will make enough heat to
light a piece of paper or a dry leaf.
Fig. 37.—Boy Focusing Burning Glass
on Leaves to Make Fire.
Signaling with the Sun’s Rays.—There are many ways of sending a
signal or a message across space by day, as, for instance, by means of
smoke, by flags and flashes of sunlight; by bonfires, pine-knot flames
and burning arrows by night, and by wireless, which can be used either
by day or by night.
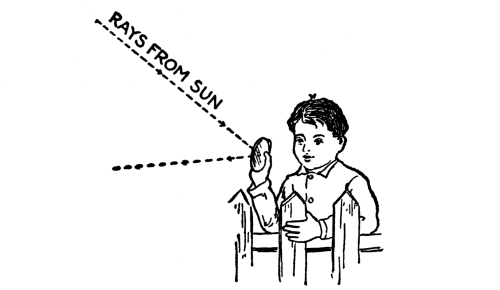
A simple and effective way to signal in the daytime when the Sun is
shining is by using a mirror, that is, a looking-glass, as it is
commonly called. Every boy knows how to make flashes with a mirror, so
it will be enough to say here that the glass is held in the hand in
such a position that the sunlight falling upon it will be reflected in
the direction you wish to send the signals. Fig. 38
shows how it is done.
Fig. 38.—Boy Sending
Flash Signal with Mirror.
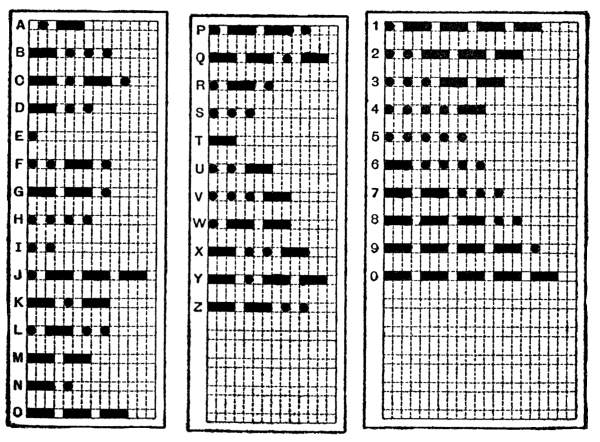
Fig. 39.—Continental Morse Code.
Any sort of a code can be used, but it is far more interesting and will
prove very useful if you are able to send and receive messages in the
dot and dash alphabet, or Morse telegraph code, which is given in Fig. 39.
A short flash represents a dot, a long flash a dash and short and
long flashes represent letters. This is the same code that is used for
wireless telegraphy.
How to Make a Simple Heliograph.—A heliograph is merely
a mirror mounted on a baseboard, but this is a big improvement over
holding the mirror in the hand, for to send and receive flashes over
long distances the mirror must be carefully aimed and kept in position.
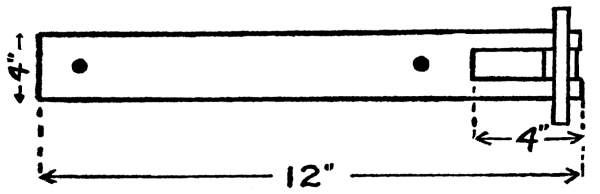
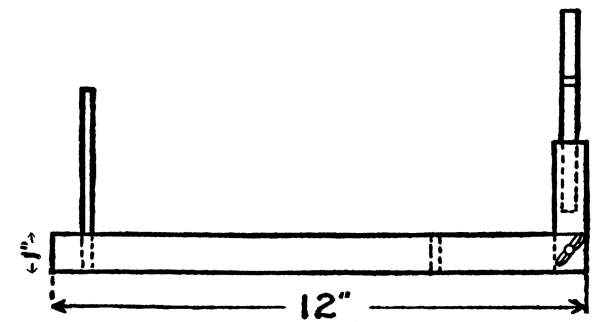
To make a heliograph, get a board 12 inches long, 4 inches wide and
1 inch thick and cut a piece out of one end 4 inches long and 1 inch
wide, as shown in Fig. 40. Bore a ¼inch hole through the slotted
end and another ¼ inch hole 4½ inches from the slotted end, as shown in the cut.
Fig. 40.—Base for Heliograph.
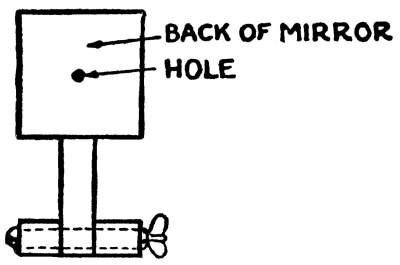
Fig. 41.—Back View of Heliograph.
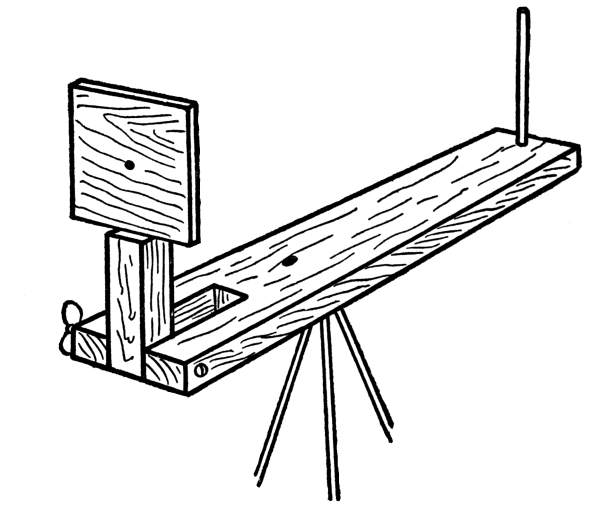
Make a block of wood 4 inches long, 1 inch wide and 1 inch thick and
bore a ¼ inch hole through it near one end. To the other end of this
stick fasten a mirror about 4 inches square. This mirror should be
perfectly smooth—a plate glass mirror is the best—and have a hole
¹/₁₆ inch in diameter drilled through the center of the mirror for
sighting the heliograph, as shown in Fig. 41. Any optician will drill
the hole for you for a quarter or less. Fig. 42 shows a top view of the
heliograph and Fig. 43 shows a side view of it.
Make a wood frame so that the mirror can be fastened in it and screw
the frame to a stick of wood. Get a bolt 5 inches long and ¼ inch
in diameter and have a thumb screw fitted to it. Set the end of the
stick which has the mirror fastened to it into the slotted end of the
baseboard, push the bolt through the holes and after slipping on the
washer put on the thumb screw. The mirror can now be moved to and fro.
Fig. 42.—Top View of Heliograph.
Fig. 43.—Side View of Heliograph.
Into the hole in the front part of the base put a wire or a thin round
stick to sight the mirror by. The heliograph is now ready for use.
After sighting the mirror at the place where the signals are to be
received, set the mirror so that the reflected beam of sunlight shines
directly on the place. To send signals in the Morse code all you need
to do to make dots and dashes is to place a sheet of cardboard before
the mirror and take it away; the length of time the mirror remains
uncovered determines whether it is a dot or a dash. The heliograph
complete is shown in Fig. 44.
Fig. 44.—Heliograph Complete.
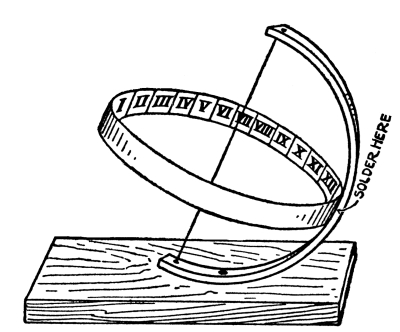
How to Make a Simple Sundial.—To make a sundial of the usual
kind that will give the correct Sun time is not an easy matter, for the
spaces marking the hours on the dial are not equal as they are on the
face of the clock and this will make it hard to figure out.
A kind of sundial that will give the correct Sun time though, can be
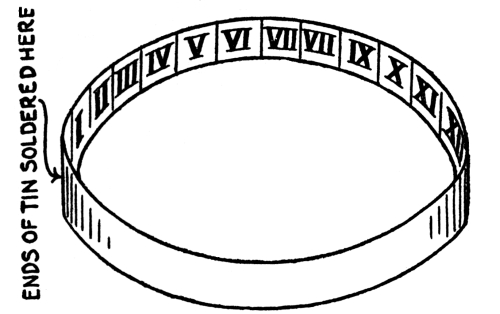
easily made and at little cost. Get a strip of tin 2 inches wide and 24
inches long; mark it off into 24 equal spaces like those on a two-foot
rule, and beginning at one end with the number 1, number each space
to 24, as shown in Fig. 45. This done, bend the strip of
tin into a perfect ring with the numbers inside and solder the joint, as shown
in Fig. 46.
Fig. 45.—Numbered Strip for Sundial.
Fig. 46.—Tin Ring for Sundial.
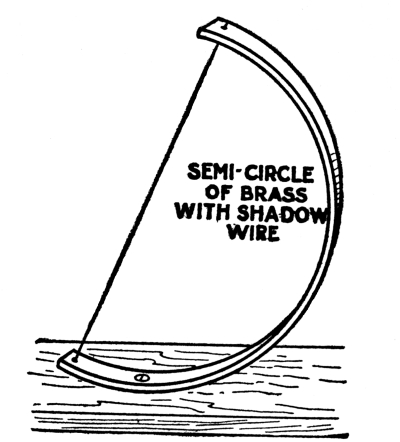
Next get a strip of iron or brass ¼ inch wide, ¹/₁₆ inch thick and 13
inches long; drill a ¹/₁₆ inch hole through each end and a ⅛ inch hole
4 inches from one end; bend this strip into an exact semi-circle, as
shown in Fig. 47 and solder the tin ring, at the point where numbers 1
and 24 meet, to the middle of the brass semi-circle. Through the holes
in the ends of the brass semi-circle fasten a wire, and this wire must
run exactly through the center of the tin ring. Now screw the brass
semi-circle to a baseboard (see Fig. 48), so that the angle made by the
wire and the surface of the board will be equal to the latitude of the
place where it is to be used; in other words, when the board is level
the wire should point directly to the North Star and when this is done
it will be adjusted to the proper angle. The board should be about 12
inches square and 1 inch thick.
Fig. 47.—Brass Semi-Circle with Shadow Wire.
Fig. 48.—Sundial Complete.
Since the shadow of the wire made by the sunlight will fall on XII
at noon, it will be plain that the shadow of the wire falling on the
numbers on one side or the other of the ring will mark the Sun time.
To change Sun time to mean solar time, or ordinary time, see
Equation of Time, Appendix M.
Fig. 49.—To Find the North by a Watch.
To Find the North by a Watch.—To use a watch as a compass,
that is to find the north by means of a watch, is easy if the Sun is
shining. The watch should be held face upward; then turn the watch
around until the hour hand points in the direction of the Sun. Draw an
imaginary line from the hour XII to the center of your watch.
If, now, in the middle between this line and the hour hand you draw
another line from the center of the watch and produce, or extend it,
the middle line will point just about north, all of which is clearly
shown in Fig. 49.
CHAPTER IV THE PLANETS, THE SUN’S KIDDIES
In the last chapter we said that all the stars in the sky, including
our Sun, are fixed in their positions; by this we mean that if we
were to look at the Big Dipper every night for a hundred years we
could see no change in the positions of any of the stars forming this
constellation.
But if we look at the sky along the line of the ecliptic—that
is the path of the Sun—one night after another we are likely to see
a bright point of light which looks exactly like a star and yet it
is certain that this point of light really does move among the other
stars. What kind of a heavenly object then is this?
The bright point of light which thus seems to us to be a star when we
look at it with the naked eye is really another world, or planet
as it is called, and very like our own Earth. To prove that this moving
point of light is really a world, or planet, and not a distant star,
all you need to do is to look at it through a pair of opera glasses, or
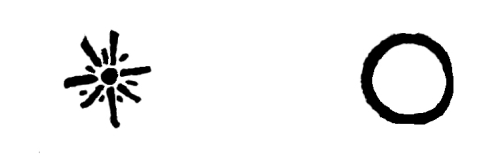
a small telescope, when it will be seen to be a round body, whereas a
star when viewed through the greatest telescope is never larger than a
mere point of light. (See Fig. 50.)
Fig. 50.—A Star and
a Planet in a Telescope.
The reason the planets, some of which are smaller and some larger than
our Earth, can be seen to move is because they are quite near our
Earth; that is, they are near when compared with the fixed stars.
Again, the reason the planets shine like the stars is not because
they are hot and flaming bodies like our Sun and the other stars, but
because the light from the Sun which strikes them is reflected to the
Earth in exactly the same way that the sunlight falling on a mirror is
reflected away in another direction.
Names and Sizes of the Planets.—The names of all the planets,
and there are eight chief ones, should be learned as well as the order
in which they are arranged around the Sun. The names of the planets are
given below in the order of their size.
Mercury—The smallest planet and the one nearest the Sun. Pale
ash in color. Has no moon.
Mars—The Red Planet. Reddish in color. Has two moons.
Venus—Called the Evening Star. Brilliant straw in color. Has
no moon.
Earth—Our own planet. Has one moon.
Uranus (pronounced Yew´-ra-nus)—Called Herschel’s planet.
Pale green in color. Has five moons.
Neptune—The planet farthest away from the Sun. Has one moon.
Saturn—The planet with the rings. Its color is a dull yellow.
Has ten moons.
Jupiter—The largest planet. He is marked with lines called
belts. He has nine moons. Bright silver in color.
The Asteroids—A group of small planets, the largest of which
is about 500 miles in diameter.
How to Know the Planets.—While it is not an easy thing to tell
a planet from a star with the naked eye, still there are several ways
of doing it.
First, always look for the planets along the path which the Sun and
Moon travel. As all the planets are nearly in the same plane with the
Sun and Moon they must all follow the same path across the sky.
Second, it is useful to remember that none of the planets, except
Mercury, ever twinkle, unless they are very near the horizon.
Third, by watching a planet closely for a few hours it will be found
to have moved a little. To note this change of position the planet and
some fixed star near it must be closely watched and their distances
compared from time to time.
Fourth, and last, the surest way of finding the different planets is
by using an almanac which will tell you which planets can be seen at
certain times of the year and in what part of the sky they are to be found.
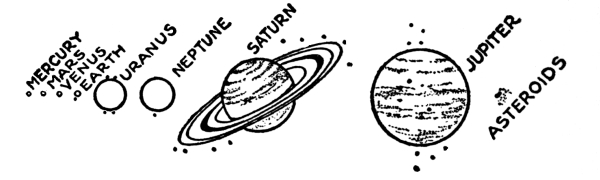
Fig. 51.—Sizes of Planets Compared.
Seeing Mercury.—Mercury is so near the Sun that it can
only be seen with the naked eye at certain times. Mercury should be
looked for just above the eastern horizon for about an hour before
the Sun rises in the spring; and above the western horizon for about
an hour after the Sun sets in the autumn. You will have no trouble in
knowing Mercury if you can only see him, for he is very bright and will
be near the horizon. His pale ash color will also help you to single
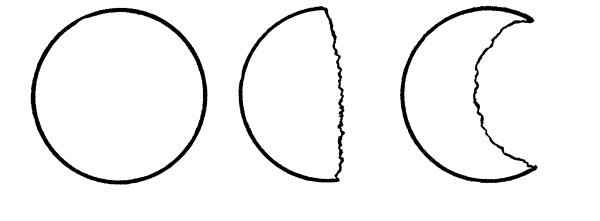
him out from the stars about him. Mercury goes through phases
like our Moon, but these cannot be seen with the naked eye.
Mercury is a curious planet in that his day and his year are of exactly
the same length, just like our Moon; this means that he turns on his
axis once in exactly the same length of time it takes him to travel
round the Sun. This causes one side of Mercury to be always turned
toward the Sun, and of course this side is hot and light, while the
other side is always turned away from the Sun and, consequently, it
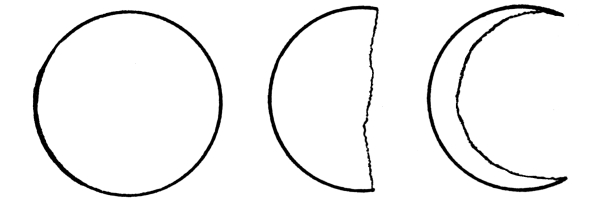
is dark and cold. Three views of Mercury in different phases as seen
through a telescope are shown in Fig. 52.
Mercury is 36 millions of miles from the Sun.
His diameter is 3,000 miles.
His day is 88 of our days long.
His year is 88 of our days long.
Fig. 52.—Three Views of Mercury.
Seeing Mars.—We hear more of Mars than of any other
planet for two reasons: first, because great lines can be seen on
his surface which are thought to be canals, and second, since Mars
sometimes comes almost as close to the earth as Venus, there has been a
great deal of talk since the invention of wireless telegraphy about our
signaling to him.
That people could live on Mars is possible, for the Red Planet is like
our Earth, in that it has land, water and air, weather and seasons,
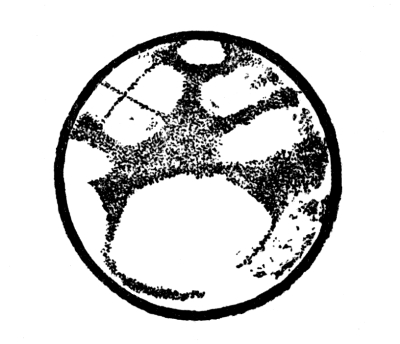
with a warm equator and ice-covered poles. Seen through a telescope he
looks like Fig. 53, though much smaller.
Fig. 53.—Mars as Seen through a Telescope.
But Mars cannot always be seen, for sometimes he disappears for a
couple of years, but when he finally does return he is a good planet,
for he stays a long time, and you cannot mistake him, for he will shine
ruddy and bright with never a merry twinkle.
Mars is 141 millions of miles from the sun.
His diameter is 4,200 miles.
His day is 24½ of our hours long.
His year is 687 of our days long.
Seeing Venus.—Venus is so much brighter than any of the
other stars or planets that you will know her the instant you see her.
Indeed, when Venus is the brightest and the Sun is far enough away from
her, she can often be seen with the naked eye in the daytime if the sky
is clear. Three views of the phases of Venus are shown in Fig. 54.
Fig. 54.—Three Views of Venus.
To see Venus you must look for her early in the morning in the east
before the Sun is up, or in the evening in the west just after the
Sun has gone down. This is the reason Venus is sometimes called an
evening star and sometimes a morning star. Venus goes
through phases like Mercury and our Moon, but these cannot be seen with
the naked eye.
When Venus and the Sun get too close together she cannot be seen, for
the light of the Sun is so powerful that her reflected light is dimmed
by it. Venus is a bright straw color and she is a beautiful object in
the sky when visible, but there are weeks at a time when she cannot be
seen, by reason of the Sun outshining her when she is between us and
the Sun or on the other side of the Sun. The day and the year of Venus
are, like Mercury, probably equal, and hence one side of Venus is
always turned toward the Sun and basks in its light and heat, while the
other side is turned away from the Sun and is doomed forever to cold
and darkness.
Venus is 67 millions of miles from the Sun.
Her diameter is 7,700 miles.
Her day is 225 of our days long.
Her year is 225 of our days long.
Our Earth.—The Earth is the third planet in distance
from our Sun, and although it is small compared with some of the others
it is so important to us that it will be described in a separate
chapter. Fig. 55 shows a view of the Earth as she
would be seen from the Moon.
Fig. 55.—The Earth.
Fig. 56.—Jupiter.
The Earth is 93 millions of miles from the Sun.
Her diameter is 7,920 miles.
Her day is 24 hours long.
Her year is 365 days long.
Seeing Jupiter.—Jupiter, the largest planet which
revolves round our Sun, is fifth in distance from him. He is not as
bright as Venus, but he is brighter than any of the fixed stars, and by
his brightness and silvery color he is quite easy to recognize.
This great planet seems not to have cooled down yet into a nice world
like our own Earth or someone’s else Mars, but rather he is a ball
surrounded by clouds of hot vapor. Still he is not hot enough to give
out any light himself, but like the rest of the planets he shines by
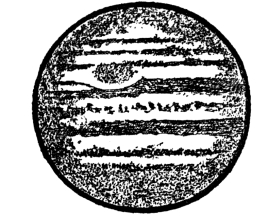
the reflected light of the Sun. Fig. 56 is a view of Jupiter as seen
through a telescope; one of the moons, and its shadow on the planet, is
shown.
Jupiter is crossed with several bands and he has nine moons to light up
his great surface on a dark night, but neither his belts nor his moons
can be seen without a glass.
Jupiter is 483 millions of miles from the Sun.
His diameter is 87,000 miles.
His day is about 10 of our hours long.
His year is almost 12 of our years long.
Fig. 57.—Saturn.
Seeing Saturn.—It is not quite as easy to single out
Saturn with the naked eye, for his light is just about as bright
as Capella in the constellation of Auriga, or any of the other first
magnitude stars.
This disadvantage is offset by the fact that when he rises at sunset
he can be seen during the whole night, so that you will not only have
plenty of time in which to find him, but to observe him as well. Again,
Saturn may be seen any clear night during the winter months until the
year 1920.
Like the Earth, Saturn is believed to have a more or less solid core,
but hotter and with layers of gas around him. It is the sixth planet
from the Sun, and with his beautiful rings, which are formed of
millions of little pieces—each a moon in itself—and with his ten
large moons, when seen through a telescope he is far and away the
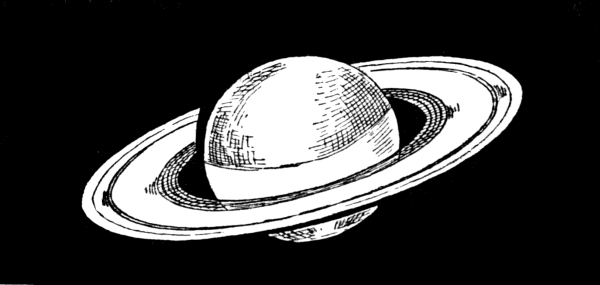
mightiest sight in the whole sky at night. He and his wonderful rings
are shown in Fig. 57.
Saturn is 886 millions of miles from the Sun.
His diameter is 73,000 miles.
His day is 10 of our hours long.
His year is 29 of our years long.
Seeing Uranus.—If you have sharp eyes and will look for
Uranus in the spring and summer months, you should be able to
see him. He has a pale green color, and on a clear moonless night is
visible to a good eye.
Fig. 58.—Uranus.
Fig. 59.—Neptune.
Uranus is the planet star from the Sun and before Herschel discovered
him with his homemade telescope astronomers frequently mistook him
for a fixed star. As seen through a large telescope Uranus shows some
indistinct markings.
Uranus is 1,780 millions of miles from the Sun.
His diameter is 32,000 miles.
His day is thought to be 11 hours long.
His year is 84 of our years long.
Neptune.—Neptune is so far away from the Sun he cannot
be seen with the naked eye, but he can be easily seen with a good
opera glass. He is attended by one moon. He is simply a disk of light
when seen through a big telescope, as shown in Fig. 59.
Neptune is 2,790 millions of miles from the Sun.
His diameter is 36,000 miles.
His day is unknown.
His year is 165 of our years long.
The Asteroids.—The Asteroids are a group of small
planets moving around the Sun in orbits between the Earth and Mars and,
hence, at times these little bodies come very close to us. The group
occupies a place in the sky where we should expect to find a single
large planet.
Fig. 60.—Marbles on Top of Table.
But when the planets were made, Jupiter, with his great bulk pulled the
soft pieces apart of which a planet would have been formed, and instead
of one planet of respectable size there are hundreds of little planets
ranging anywhere from 10 miles to 500 miles in diameter.
One of these small planets is called Vesta, and although she is
only 240 miles in diameter she may be seen on certain occasions with
the naked eye.
Positions of the Planets Round the Sun.—It was mentioned in
the beginning of this chapter that all of the planets lay not far from
one plane, and that the Sun’s equator is nearly in this plane.
Now let us see just what this means.
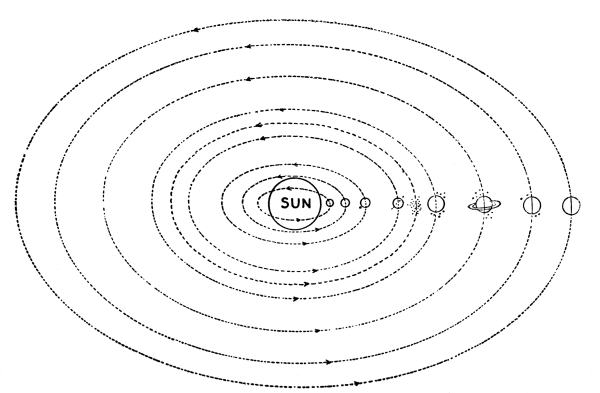
Fig. 61.—Top View of Solar System.
Suppose we lay eight marbles around a large marble placed on top of a
table and in the center. This means that all the marbles lie in the
same plane which is the top of the table, as shown in Fig. 60. The
planets are all arranged round the Sun, as shown in Fig. 61, just the
same as if they were all placed on a big, level board or table top. If
we draw a picture of the plane view of the planets (Fig. 60) and the
top view of the planets (Fig. 61) together, we shall have a picture of
the solar system, as the Sun and all of his planets are called,
as shown in Fig 62. From these pictures you will see that the planets
are not arranged, in distance from the Sun, in order of size.
Fig. 62.—Solar System in Perspective.
To remember the arrangement of these planets in their relation to the
Sun commit to memory this simple sentence:
Men Very Early Made
Jars Serve Useful Needs.
As the first letter of each of the above words is the same as the first
letter of a planet, you will be able to instantly recall the proper
place of any one of them.
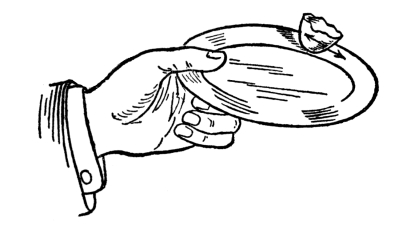
Fig. 63.—Egg Shell on Plate.
How the Planets Are Held in Space.—If you will take an ordinary
dinner plate and half an eggshell, and give the eggshell a slight spin
on the rim of the plate—the rim should be slightly moistened—you will
find that by tilting the plate a trifle the eggshell will revolve in
two directions; first, it will spin round on its own axis, and second,
it will travel round the rim of the plate, which we will call its
orbit, as shown in Fig. 63.
This double motion of the eggshell is exactly like the double motion
of a planet—each one turns on his own axis and each travels round the
Sun in its own orbit; moreover, all the planets travel round the Sun
in the same direction, the nearest planets taking the shortest time
to complete the circle or orbit, while those farthest away take the
longest time to go round their orbits just as we might expect them to do.
In the beginning of things the planets were a part of the Sun, as we
shall see further on, and when they were thrown off by him they spun
round their own axes, and they continued to spin round their axes just
as a ball continues to do so after it has left the pitcher’s hand.
The tendency to fly off at a tangent which every particle of a rotating
body feels is called centrifugal force. Now, no one knows what
centrifugal force is, but how it acts is very well known, and you can
find out for yourself by making the following experiment.
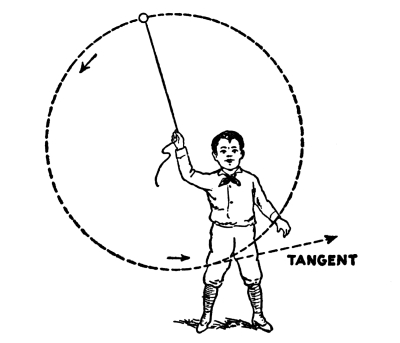
Fig. 64.—Boy Throwing Stone to Illustrate
Centrifugal Force.
Take a stone and tie one end of a string to it; now swing the stone
round in a circle; if the string should break, or you should let it go
accidentally (on purpose) the stone will shoot off at a tangent,
that is in a line away from the circle in which it was swinging, as
shown in Fig. 64.
This is just what made the planets, one after another, separate from
the Sun, but they could not get very far away, for another force which
is not only in the Sun but in every particle of matter in the universe,
pulled them back toward the Sun, just as it pulls a ball when thrown to
the Earth, and this force is called gravitation.
So the centrifugal force keeps them spinning round on their axes and
flying round in their orbits about the Sun. If it had not been for the
attractive force of gravitation of the Sun and the planets, the planets
would have kept right on going out into space and left the Sun to shift
for itself forever after.
As it is they whirl round the Sun, never able to get any farther from
him and yet never getting any nearer to him, for the centrifugal force
tends to make them fly out and away and the force of gravitation tends
to pull them back to the Sun. The result is that these two great
opposing forces exactly offset or balance each other, and the planets
are held in their orbits just as securely as the stone is held out by
the force the boy exerts to move it, and in by the string he holds in
his hand.
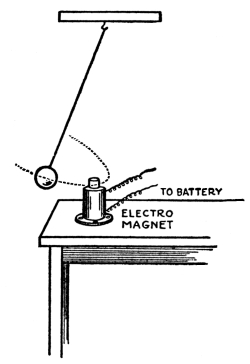
This balancing of opposed forces was nicely shown some years ago by Sir
Robert Ball, the great English astronomer, at one of his lectures in
the Royal Institution of London, and I reproduce it here.
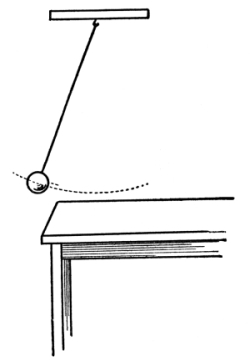
To the ceiling over his lecture table he had fastened a thin wire, the
lower end of which was secured to a hollow iron ball. When the ball
was pulled aside, it would
swing like a great pendulum, forth and back, in a plane, as shown
in Fig. 65.
Fig. 65.—Iron Ball Pendulum Swinging
in Straight Line.
Fig. 66.—Iron Ball Pendulum Swinging
in Curved Line.
But when a powerful magnet was placed on the table and the ball was
set swinging in a plane as before, just as it came close to the end of
the magnet the latter pulled the ball with its mighty force toward it,
and so changed its course, but the ball, instead of being attracted
directly to it, swung in a graceful curve around it, as shown
in Fig. 66.
This is precisely the case of the planets swinging round the Sun, and
shows very nicely the balanced forces of the Sun and the planets and
why the planets stick to their orbits.
Why the Planets Do Not Stop Spinning.—Now you may ask why the
planets do not stop turning on their axes and revolving in their orbits
round the Sun. And the answer is because there is nothing to stop them.
If you spin a top on a plate it may keep going for a long time, but it
will finally die down and stop. This is because there are other forces
which oppose its centrifugal force. The forces a spinning top has to
overcome are friction between the point of its spindle and the
plate, and the resistance between the surface of the spinning
top and the air pressing on its sides, and the friction and the air
resistance together soon use up the energy stored in the top and which
makes it spin.
But if you could spin and throw a top far enough away from the Earth
so that it would not meet with friction or resistance of any kind, it
would go on spinning forever just like the planets.
How to Plot the Position of a Planet.—One of the tests which a
Boy Scout must pass in order to obtain a merit badge for starcraft is
to “plot on at least two nights per month for six months the positions
of all naked eye planets between sundown and one hour thereafter. The
plot of each planet shall contain at least three fixed stars with their
names and designations, colors of planets and stars to be recorded by him.”
Now, by looking at your almanac under the head of Morning and Evening
Stars you will find all the planets which are listed as Evening Stars,
together with the dates when they can best be seen. From your almanac
for 1915 you will learn that
Mercury is an evening star, and can be
seen about Feb. 5, May 31 and September 27 in the west, just after
sunset; that
Venus will be an evening star from
September 12 for the rest of the year; that
Jupiter will be an evening star until
February 24; after that a morning star until September 17, and then an
evening star for the rest of the year, and that
Saturn will be an evening star until June
28.
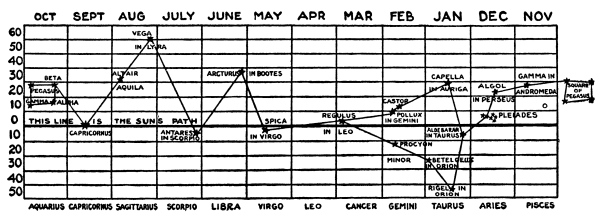
The first thing to do is to find what constellation is on your
meridian at 9 P. M. for the month that the planet you wish to
plot is to be seen. This you can do by looking at the map of the stars
shown in Fig. 67. You can see any of the stars or constellations on
your meridian by looking for them at 9 o’clock P. M. on the months
marked above them.
This done, consult your almanac and find out what time the Sun sets on
the day that the planet you are looking for can be seen.
As an example let’s take Mercury, which the almanac says is an evening
star about February 5, and which can be seen in the west just after
sunset. The almanac will also tell you that the Sun sets on February 5
at 5 o’clock.
Fig. 67.—Map of Stars on Sun’s Path.
The star map (Fig. 67) will show you that the constellation of
Gemini, the Twins, is one which can be seen in February on your
meridian at 9 o’clock at night, and you know that Mercury can be seen
close to the western horizon from 3 to 4 hours earlier.
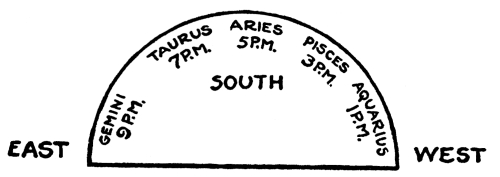
Since Gemini, the Twins, is on the meridian at 9 o’clock,
Taurus, the Bull, which is the next constellation to it, will be
on the meridian at 7 o’clock, and Aries, the Ram, will be on the
meridian at 5 o’clock.
Now the next constellation to the west of Aries, the Ram, is
Pisces, the Fishes, and the next one to Pisces, the Fishes, is
Aquarius, the Water Bearer, and as this constellation sets about
an hour after the Sun, it is in this constellation that you will find
Mercury in the early February evenings.
Fig. 68.—Diagram of Position of Constellations.
The diagram (Fig. 68) shows how it is that when Aries is on the
meridian at 5 o’clock in the evenings of February, Gemini will be
rising in the east, and Aquarius, with Mercury in it, will be getting
ready to set in the west.
You can find all the other planets in the same way, but it is much
easier to find them in the sky than it is to try and imagine their
positions after reading how it is done. You should, though, by all
means, read the chapter on The Stars of the Zodiac before you
try to plot a planet, for there is much useful information in it which
you ought to know.
NO. OF CHART—3 DATE—FEB 5
TIME—5-6 P.M.
NAME OF PLANET—MERCURY
NAME OF NEAREST STARS
COLOR OF PLANET—PALE ASH
PHI & OPHINCUS
NAME WILLIAM BROWN
FORMALHAUT IN SOUTHERN FISH
COLOR OF STARS
ALPHA & BETA, WHITE
FORMALHAUT, STRAW
Fig. 69.—Plotting Position of Planet.
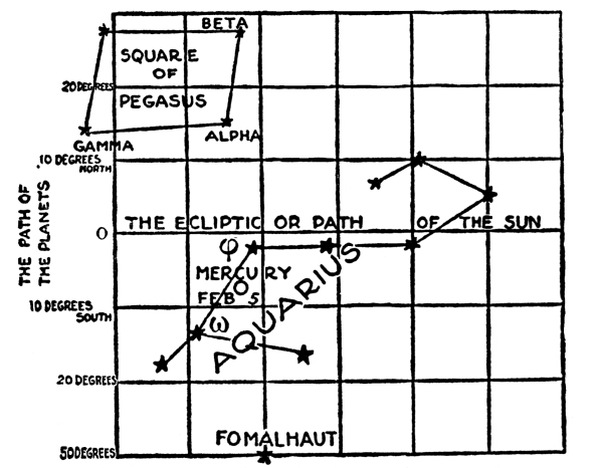
To plot the position of a planet, take a sheet
of stiff paper or cardboard about 8 inches square and divide it into
a square 6 inches on the side, as shown in Fig. 69. This will leave
a margin of 1 inch on both sides, ½ inch on top and 1¼ inches at the
bottom of your paper.
Fasten the paper to your starboard, described in Chapter II, and go
forth with it and your acetylene or flash lamp and find your planet.
Having found it, mark with a pencil in the squares on your ruled paper
the positions of three of the nearest fixed stars which are shown in
the star chart of Fig. 67. Now mark the position of the planet as
you see it on your chart by making a little circle and your outdoor
observation is ended.
Once inside, mark down the chart number, the date and the time you made
the observation; also the names and colors of the stars and the planet,
and finish the record by signing your name. Should any of the other
planets be visible at the time of your observation you will, of course,
have to plot two charts, unless the planets are very near each other.
CHAPTER V MOTHER EARTH, OLD ADAM’S PLANET
The Earth in the Making.—The Earth on which we live and find so
much that is interesting was once a part of our Sun just as the other
planets were.
When the Sun was being made of star stuff great quantities of gases
were set into mighty whirls, and when these acquired enough force they
shot off into space like so many cannon balls, and they are still
a-whirling.
But these new-born planets could only get a certain distance away from
the Sun, as we have learned, for the force of his attraction offset the
force of their motion with the result that they are still held in space
around him.
One of these whirling bodies was the Earth, and when it had comfortably
settled in its orbit and slowed down a bit it began to cool off and
a crust was formed on its liquid surface, just as ice is formed when
water is frozen. Then some of the gases condensed into water and others
became air and when the Earth had cooled down still further some
millions of years afterward it became a more or less suitable place for
human beings to live on.
While the Earth has cooled off until it is possible for us to live
comfortably on its crust, it is still warm outside and very hot inside.
This is proved by volcanoes which throw out white hot lava and gases
when they are in eruption.
If it had not been for the light and heat of the Sun in the past ages
there never could have been any kind of life on the Earth. The Earth
is just as dependent on the Sun now as it was in the past, and if he
should fail to shine on our world for even a little time everything
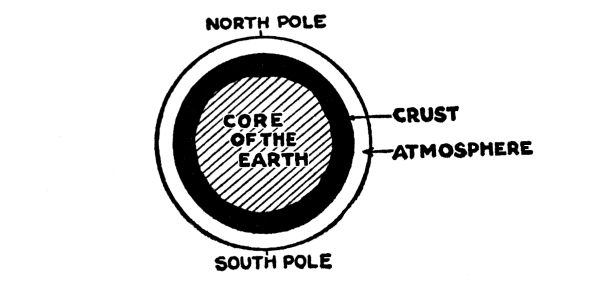
would die. Fig. 70 is a cross section of the Earth.
To Prove the Earth is Round.—Every boy knows that the Earth is
round, but the wisest of men did not know it for certain until about
400 years ago, when one of Magellan’s ships made a complete voyage
round the world and returned to the place she started from.
Fig. 70.—Cross Section of the Earth.
(1) One of the easy ways to show that the earth is round, or at least
that the surface of the earth is curved, as shown in Fig. 71,
is to watch a ship as she sails out to sea. All of the ship—hull, sails
and smokestack, if she has one—can be seen until she sails over the
horizon, and then her hull, which is the largest part of her, is lost
to view, then her sails and stack, and finally only the tops of her
masts can be seen. It is a pretty good sign that the Earth is a ball.
Fig. 71.—Sails of Ship Can Be Seen
After Hull Has Disappeared.
(2) A very pleasant way to prove the Earth is a ball is to take passage
on a ship that makes a round-the-world cruise. If you leave New York
and keep sailing east all the time you will finally land at San
Francisco; keep on going east by rail and you will find yourself back
in dear old New York, where you started from. See Fig. 72.
To Prove the Earth Turns on Its Axis.—(1) Having proved that
the Earth is round, the next thing to do is to prove that it turns
about on its axis.
(1) The best known experiment for showing that the Earth really turns
on its axis was made by Foucault (pronounced Foo-ko´), a French
philosopher, in 1851, who used a pendulum for the purpose.
Fig. 72.—Sailing Round the Earth.
In the top of a great dome in a building in Paris, called the
Panthéon, Foucault hung a large metal ball by means of a wire
about 150 feet long. On the floor he made a mark, exactly under the
ball, running due north and south. Then drawing back the ball, he let
it go, when it swung directly over the line.
The heavy pendulum, which after being started swung for hours, seemed
to move away from the line in the direction of the hands of a watch.
This showed that the floor of the Panthéon was really skewing around
under the swinging pendulum. This is easily explained as due to the
rotation of the earth because the northern edge of the floor was nearer
the axis of the earth than the southern edge and therefore was carried
more slowly eastward.
(2) A much simpler way to show the turning of the Earth on its axis,
though this experiment only proves that either the Earth or the whole
sky turns, is to make a photograph of the North Star and the stars in
its neighborhood, as explained in Chapter XII.
During the time the sensitive plate is being exposed the camera will be
carried round by the Earth turning on its axis and the fixed stars will
leave bright trails on the plate in arcs of circles.
The Earth Turning on Its Axis Makes Day and Night.—The Earth,
in turning round on its axis once every 24 hours, receives the light
of the Sun on half of its surface at a time, making the day, while the
other half is in the shadow, which makes the night.
Fig. 73.—The Earth Moves Away From
the Swinging Pendulum.
If the equator of the earth was in a plane with the Sun, as shown in
Pig. 74, it is easy to see that the days and nights all over the world
would be of the same length, that is, each would be 12 hours long.
Instead, the Earth is tilted a little, as shown in Fig. 75—to be
exact, its axis is tilted 23½ degrees out of the perpendicular
and this makes the day and the night at the equator each 12 hours long and
the day and the night at the north and south poles each six months long.
The circle round the Sky which is in a plane with the Sun is called the
ecliptic. The Sun seems to follow a path round the Earth in this
plane, and this is called the path of the Sun.
To Show That the Earth Travels Round the Sun.—When we look at
the Sun and the stars it is hard to believe that they are standing
still and that it is the Earth which is whirling round on its own axis
and also round the Sun.
Fig. 74.—If the Earth’s Equator
Were in a Line With the Sun.
Fig. 75.—The Earth Tilted on Its Axis.
We have given a couple of experiments to show that the
Earth turns on its own axis, and here is one to make it clear how the
Earth travels in a great circle, or rather ellipse, round the
Sun and gives us our year.
Further, the Earth’s axis being tilted away from the axis of the orbit,
its movement round the Sun causes the north pole to be turned toward
the Sun half of the time, and then the south pole to be turned toward
the Sun an equal length of time, which gives each of them a day and a
night that is six months long.
Fig. 76.—Light in Room to Represent Sun.
In the center of a large room set a light so that it will be about as
high as your eyes. Let this light represent the Sun; you must play now
that you are the Earth, and think of the pictures on the wall as being
the stars fixed in the sky away off in space. Now walk in a circle
around the light toward the right and facing the light all the time.
As you move around the light you will see that it seems to move
in the opposite direction and that it seems to move past the
pictures on the wall. The experiment is shown in Fig. 76.
This, then, is exactly what happens when we look at the Sun and the
stars. The Earth moves round the Sun in a circle, nearly, and since the
Sun is so much closer to us than any of the other fixed stars the Sun
apparently moves by the stars, because the Earth changes its position
relative to it and the stars.
The Earth Turning Round the Sun Makes the Seasons.—We have
seen how the days and nights would be equal all over the world if the
equator of the Earth was in a plane with the Sun, but since the Earth
is tilted the days and nights are unequal except twice a year, and this
is when the places where the ecliptic and the equator
cross each other are facing the Sun.
Fig. 77—Top Spring on Plate.
Again, if the Earth’s equator was always in a plane with the Sun the
day would be just as long as the night all through the year and there
would be no seasons. But the Earth having its axis tilted, and which is
always set in the same direction, together with the Earth speeding in
a circle around the Sun, causes some curious things to happen and the
seasons are one of them.
To make clearer the reason the axis of the Earth always stays in one
position take a top and give it a good spin. The top, of course, turns
round its axis very fast, and this is like the Earth turning round its
axis every 24 hours.
Now, if you place the blunt end of a pencil on the upper axis of the
spinning top, as shown in Fig. 77, and try to tilt it in some other
direction than that it took when it began to spin, you will find it
rather a hard thing to do. In other words, once a body is rapidly
turning on its own axis it very strongly tends to keep its axis
pointing in the same direction.
This rule also applies to the Earth, for having been tilted at an angle
when it was thrown off by the Sun in the making, no other forces have
ever been able to change the position of its axis to any great extent,
though, the Earth spins easily on its axis and also revolves round the Sun.
To understand how the seasons are made you must first have clearly in
mind the positions of the tilted Earth in different parts of its orbit
round the Sun. The things needed for this experiment are a nice round
apple, a candle, a piece of string, a safety-pin and a knitting needle.
Fig. 78.—Circle Around Candle
Marked with Seasons.
Place the candle in the center of a table and call it the Sun; draw a
circle a foot in diameter on the table top and around the candle with
a bit of chalk. Mark one side September 22; at the next quarter of the
circle mark December 21; directly opposite the September mark chalk in
March 21, and finally between March and September mark June 21, all of
which is shown in Fig. 78.
Push the knitting needle through the center of the apple, call the
apple the Earth and call one end of the knitting needle the north pole
and the other end the south pole. Fasten the safety-pin through the
skin of the apple and tie the string to the pin so that when the string
is tied to a tack in the ceiling or some one is holding it directly
over the candle the knitting needle of the apple will be tilted to the
perpendicular, as shown in Fig. 79.
Fig. 79.—Apple to Represent Earth
Suspended in Air.
Fig. 80.—Position of the Earth
and Sun in Autumn.
Fig. 81.—Position of the Earth
and Sun in Winter.
Fig. 82.—Position of the Earth
and Sun in Spring.
Fig. 83.—Position of the Earth
and Sun in Summer.
Now grasp the top of the needle, which is the north pole, with the left
hand and hold the apple away from the candle, as shown in Fig. 80.
This is the position of the earth to the Sun on September 22, when the Sun
passes directly over the Earth’s equator, and for us autumn is at hand.
Now pull the apple by its north pole toward you and around one quarter
of the circle chalked on the table, as shown in Fig. 81, which is the
position of the Earth to the Sun on December 21. You will see that the
north pole is away from the light and heat and hence it is dark and
winter there; but the south pole on the other end is getting plenty
of light and heat and it is both day and summer there. This marks the
beginning of our winter.
Fig. 84.—Cycle Of Seasons.
Push the apple by its north pole—always being careful to keep the
knitting needle tilted in the same position—around another quarter of
a circle and this is where the Earth is in its orbit, and its position
to the Sun on about March 21. Once again the Sun is over the Earth’s
equator and all parts or our world are then lighted and heated twelve
hours out of the twenty-four, and we have the beginning of spring.
See Fig. 82.
Again push the apple around another quarter circle and June 21 is
reached. This time you will find the north pole is turned toward the
Sun and this time it gets the light and heat for six months, while the
south pole is away from the Sun and takes its turn of six months of
night and winter. To us, however, it is the beginning of summer. Fig. 83
shows the position of the Earth to the Sun at this time.
Pull the apple one more quarter of the circle round the candle and you
will have completed its orbit just as the Earth swings round the Sun in
365 days. The seasons are more clearly shown in Fig. 84.
The North Pole.—The north pole is not only one of the ends of
the axis round which the Earth turns but close to it is the north
magnetic pole as well. By magnetic we mean that the Earth
behaves like a steel bar that has been magnetized.
A steel bar magnet like that shown in Fig. 85 is strongest
at its ends. One end is positively magnetized, and we call this end its
north pole, and the other end is negatively magnetized,
and we call this end its south pole.
Magnetic lines of force stream from the south pole through the steel
bar and reaching the north pole they stream through the air to the
south pole, as shown by the curved lines, thus forming a magnetic
circuit, just as two wires joined together may form an electric
circuit.
If we place a compass needle near the steel bar magnet the needle will
turn in the same direction as the magnetic lines of force are flowing,
and it will, therefore, point to the north and to the south poles of
the magnet.
Now the Earth is a great magnet with a positive pole, which we call the
north pole at one end of its axis, and a negative pole, which we call
the south pole, at the other end of its axis, as shown in Fig. 86.
Fig. 85.—Lines of Force through
and around a Magnet.
Fig. 86.—Lines of Force around the Earth.
Like a bar magnet, magnetic lines of force stream all over the Earth’s
surface from the north pole to the south pole, and a compass needle
placed anywhere on the Earth will swing round until it is in the same
direction as the lines of magnetic force.
Fig. 87.—Watch Spring—Needle for Compass.
Fig. 88.—Compass Complete.
How to Make a Simple Compass.—Take a piece of watch spring
about 3 inches long and straighten it. Heat the middle red-hot and
let it cool slowly, when the temper will be taken out of it at this
point. Place a center punch in the middle of the spring and strike it a
sharp blow with a hammer; this will make a little dent in it. Bend it
as shown in Fig. 87. To magnetize the needle rub one end on the north
pole and the other end on the south pole of a steel magnet. Stick a
sewing needle into a large cork and lay the magnetized needle on it,
when it will point north and south, as shown in Fig. 88.
Boxing the Compass.—There are two kinds of compasses in general
use, though both kinds use a magnetized needle. The first kind is the
ordinary pocket compass, with either a pull-off cover or one of the
watch-case pattern. In this kind of a compass the magnetic needle is
fitted with a jeweled center which swings on a steel needle; the dial
is fixed in the case and is marked with the cardinal points,
that is with the chief points of a compass. Fig. 89
shows a pocket watch-case compass.
Fig. 89.—Pocket Watch-case Compass.
Fig. 90.—Dial of Mariner’s Compass.
In the mariner’s compass, which is used at sea, the compass card and
the magnetic needle are fastened together. The card is made of a
circular sheet of mica and the points of the compass, which are called
rhumbs, are marked on the edge. The needle and card float in a
bowl of mercury.
The card is marked with 32 rays, forming a many-pointed star,
and each of these points has a name, the names of the four cardinal
points being north, east, south and
west. To know all of the points by heart and be able to name
them, beginning with the north and going round the card to the north
again, is what sailors call boxing the compass. See Fig. 90.
Points on Compass Card
Names of Points
N
North
N bE
North by east
NNE
North, northeast
NE bN
Northeast by north
NE
Northeast
NE bE
Northeast by east
ENE
East, northeast
E bN
East by north
E
East
E bS
East by south
ESE
East, southeast
SE bE
Southeast by east
SE
Southeast
SE bS
Southeast by south
SSE
South, southeast
S bE
South by east
S
South
S bW
South by west
SSW
South, southwest
SW bS
Southwest by south
SW
Southwest
SW bW
Southwest by west
WSW
West, southwest
W bS
West by south
W
West
W bN
West by north
WNW
West, northwest
NW bW
Northwest by west
NW
Northwest
NW bN
Northwest by north
NNW
North, northwest
N bW
North by west
N
North
Dial of a Mariner’s Compass
How to Make a Simple Dipping Needle.—When a compass needle is
pivoted so that it can swing up and down, that is, to and away from the
earth, it is called a dipping needle.
Such a needle will dip toward the nearest pole
of the earth. At the magnetic equator there is no dip, that is, the
needle will stand parallel with the Earth’s surface.
Fig. 91.—Needle
for Dipping Needle.
At the north magnetic pole the needle will stand straight up and down
in a line with the axis of the Earth. The dip, therefore, of the needle
at any place on the Earth’s surface is just about that of the latitude
of the place where it is used. Dipping needles are also used by miners
for finding iron ores.
Fig. 92.—Dipping Needle Complete.
To make a dipping needle, slip a small cork over a knitting needle and
push a sewing needle through the cork at right angles to the knitting
needle, as shown in Fig. 91. Now lay the sewing needle
with its ends on the edges of two tumblers, and see that the knitting needle is
perfectly balanced. This done, magnetize the knitting needle by rubbing
one end on the north pole of a steel magnet and the other end on the
south pole of the magnet. Make a little wood stand as shown in Fig. 92
and place the ends of the sewing needle on the wood supports.
Fig. 93.—Protractor
Showing Degrees.
Fig. 94.—Earth Surface Divided into Degrees.
The latitude running through the middle of the United States is about
40 degrees north of the equator and if you live in this latitude the
dip of your needle will be about 40 degrees from the horizontal.
Fig. 95.—Protractor Set by
Dipping Needle Showing Latitude.
How to Find Latitude.—The latitude of a place on the
Earth’s surface is its distance north or south of the equator. This
distance is usually measured in degrees of a circle, instead of
in miles.
The equator is called 0 (zero) degrees, and the north and south poles
are 90 degrees from the equator, as shown in Fig. 93. If you are in
Philadelphia, Pennsylvania, or Quincy, Illinois, or Tehama, California,
you are in latitude 40 degrees. If you are in Bangor, Maine, St. Paul,
Minnesota, or Portland, Oregon, you are in latitude 45 degrees, or just
halfway between the north pole and the equator, as Fig. 94 shows.
(1) An easy way to find roughly the latitude of a place, that is,
its distance from the equator, is to use a dipping needle and a
protractor.
To make a protractor cut out a semi-circle of stiff, white cardboard,
just the size shown in Fig. 93, and mark the figures on the edge and
draw lines from the edge to the center point exactly as in the picture.
Fig. 96.—Two Sticks Screwed
Together.
Fig. 97.—Two Sticks Across
Bucket of Water.
Now place your dipping needle on a level board or table and set the
center of your cardboard protractor in line and on a level with
the axis of the needle, as shown in Fig. 95. Whatever line on the
protractor the dip of the needle takes the degree marked on the edge of
the protractor will be the magnetic latitude you are in.
(2) A way to obtain true latitude is to take two smooth pieces of wood,
about 1 foot long and ¼ inch thick, and hinge them together at one end
with a screw, as in Fig. 96. Now set a bucket out-of-doors in an open
space from which the North Star may be seen, fill the bucket with water
and level it up until the water is parallel with the rim all the way round.
When night falls find the North Star and set your sticks across the
rim, as shown in Fig. 97. Raise one of the sticks and sight it until it
points straight at the North Star, and having done this you are through
with the observation.
Take the sticks into the house, being very careful not to change their
relative positions, so that the angle they form can be measured
with a protractor. Tack a piece of paper on your starboard and draw a
straight horizontal line on it.
Lay the stick that was on the bucket on the horizontal line, and draw a
line along the edge of the other stick with which you sighted the North
Star, as in Fig. 98.
Now measure the distance, in degrees, between the two lines with your
protractor and the number of degrees you get will be roughly the latitude.
Shooting the Sun.—Another and very exact way to find the
latitude, and which is also used to help find longitude when at sea, is
by means of an instrument known as a sextant, so called from the
fact that it is formed of a sixth part of a circle.
Fig. 98.—Protractor and Sticks
on Drawing Paper.
It is made with a metal frame A and having the degrees marked on its
curved edge B like a protractor. On one end of a thin strip of metal,
or arm, C (see Fig. 99), a mirror, D, called an index mirror,
is rigidly fastened, and right under the center of this mirror the arm
C is hinged to the frame A. The other end of this arm slides over the scale B.
To the left side of the frame also rigidly fastened is a second glass
E called a horizon glass, and half of which is clear and half
silvered. A telescope is also rigidly fastened to the frame A
directly opposite but in a line with the horizon glass E.
Now to find the latitude by taking the Sun, or as sailors
sometimes call it, shooting the Sun, in order to learn the
position of the ship at sea, the sextant is held in both hands firmly,
and the horizon which is sighted through the telescope is brought into
view through the clear part of the horizon glass E.
The arm C, carrying the index mirror D, is now moved over the scale A
until the light from the Sun just as it crosses the meridian at noon is
reflected by its polished surface into the silvered part of the horizon
glass E, and this reflects the sunlight into the telescope right in a
line with the line of sight to the horizon. This forms an angle of the
two beams of light just as an angle is formed of the two sticks of wood
in the pail experiment and the number of degrees the end of the arm C
points to on the scale B is the latitude in degrees or the distance of
the ship north or south of the equator.
Fig. 99.—Sextant in Use. Shooting the Sun.
How Longitude is Found.—To find the longitude at sea, that is,
the position of a ship east or west of a given place, is just as simple
a matter as finding the latitude or its position north or south of the
equator. Two instruments are used to find longitude, and these are the
sextant, which has just been described, and a very accurate clock,
called a chronometer (pronounced chro-nom´-e-ter).
As you know, imaginary lines running from the north pole to the south
pole are called meridians of longitude. Now the Earth has been
divided into 24 of these lines, the zero meridian, from which distances
east and west are measured, running through Greenwich, England.
There are 24 of these standard meridians and hence they are 15
degrees apart—since there are 360 degrees in a circle—and they are 1
hour apart—since there are 24 hours in a day, and therefore 15 degrees
equal 1 hour. (See Chapter X, The Time o’ Day.)
Now, since it is 12 o’clock noon when the Sun passes over any one of
these standard meridians, it will be 11 o’clock A. M., 15 degrees west
of it, and 1 o’clock P. M., 15 degrees east of it, and consequently
there will be an hour’s difference in the time, either fast or slow,
for every 15 degrees, depending on whether you count east or west from
the noon meridian.
The purpose of a sextant in finding longitude on shipboard is to know
when it is exactly noon by the Sun, and in this way the local
time is found. The purpose of a chronometer is to carry exact
Greenwich time, and the difference between the local time
found each day by taking the Sun, and Greenwich time shown by
the chronometer gives the distance in degrees the ship has traveled
from Greenwich.
By knowing the latitude and longitude of a ship the distance in miles
north and south and east and west from any port can be figured out
without much trouble.
The reason that a very accurate clock has to be carried is that a
difference of a few seconds either too fast or too slow will affect
the calculations just that much, and this means that the ship will be
thrown out of its calculated position by several miles.
To correct the observations with the sextant and the inaccuracy of
the chronometer, etc., are a part of the business of the navigating
officer, and he is provided with tables and things to make this work
as easy and certain as is possible.
How to Know When You Are at the North Pole.—If you should ever
reach the north pole where overhead is north and every other direction
is south how would you know it?
Suppose you were standing on the exact top of the world during one of
its long polar nights, then the North Star would be directly over your
head and the Big Dipper and Cassiopeia would serve to mark the passing
of days as well as of nights, that is, if you were at the north pole in
the wintertime.
Fig. 100.—Shadows at the North Pole.
But if you were there during a long Arctic day, that is, in the good
old summertime, you could see the Sun making a circle, or seeming to,
once in 24 hours, parallel to the horizon, and never going higher or
getting lower.
Explorers use a sextant to find out when they are at the north pole,
and they sight the Sun’s height above the horizon at morning, noon and
night. If the angle the Sun makes with the horizon is the same every
time he is observed, the explorer knows he is standing on the very
point round which the Earth turns. Then he plants a stick in the snow
and ice on the north pole, hoists the American flag, and hurries home
as fast as dogs and ships and trains can carry him to tell about it.
If you ever reach the north pole you can know it, too, even though you
haven’t a sextant with you. All you need to do, when you think you are
standing on the north pole, is to notice the length of your shadow five
or six times in 24 hours. If the length of your shadow is exactly the
same every time you look at it, as shown in Fig. 100,
you are really and truly at the north pole.
Difference Between the True North Pole and the Magnetic North
Pole.—The compass and dipping needle do not point to the true
north pole, for the magnetic north pole and the true north
pole are not located at the same place.
The magnetic north pole was found by Captain Ross in 1832. At that time
the magnetic north pole was northwest of Hudson’s Bay in about latitude
70 degrees north and longitude 96 degrees and 45 minutes west, that is,
west of the zero meridian which runs through Greenwich.
CHAPTER VI THE MOON, THE EARTH’S DAUGHTER
How the Moon Was Made.—There was a time away back in the
beginning of the planets when the Earth did not have a Moon.
Two ideas among others have been worked out to account for the birth
of the Moon and these are somewhat alike, for both agree that just as
the Earth was once a part of the Sun and was separated from the Sun and
became a planet so the Moon was once a part of the Earth and was thrown
off and became her daughter.
Fig. 101.—Moon and Earth Joined
Together Like a Dumbbell.
The first idea as to how the Moon was made is that a smaller core was
formed in the gaseous matter of the Earth and that this core and the
core of the Earth, which were at first joined together like a dumbbell,
as shown in Fig. 101, began to spread apart like a pair of balls
fastened together with a piece of elastic when they are whirled rapidly
round each other, as shown in Fig. 102.
So, too, the high speed with which the Earth turned on its axis when it
was in the making caused the smaller part to slowly move away and it
became the Moon.
Fig. 102.—Balls Connected
with an Elastic.
Fig. 103.—Map Showing Pacific Ocean.
The second idea is like the first, except that the Earth is thought to
have cooled down until it was a melted mass, and it was then that a
great upheaval took place in which a part, one-eightieth as large as
that of the world itself, was torn out of its side and, whirling away
by centrifugal force, the Moon was born.
To throw off such a mighty part of its bulk as the Moon, it has been
figured out that the Earth must have made a complete turn on its axis
every 2 hours, instead of one turn in 24 hours, as it now does; and it
was while the Earth was turning at this terrific rate of speed that the
centrifugal force overcame the force of gravitation and tore the Moon
from the Earth’s side and formed a little world of its own.
It is believed by some astronomers that the Moon was once that part of
the Earth which is now filled up by the waters of the Pacific Ocean and
there are several reasons why this seems very likely.
First, if the waters which form the Pacific Ocean were rolled into a
big ball it would be just about the size of the Moon; second, the space
between the coasts of North and South America on the east, and Asia
and Australia on the west, will be seen by referring to Fig. 103
to be roughly circular in form; third, there is a marked likeness between the
volcanoes in California, in the Hawaiian Islands and in Japan to those
on the Moon.
Fig. 104.—Imitating the
Volcanoes in the Moon.
It was, doubtless, at this long ago time that the great volcanoes of
the Moon, as well as those of the coasts of and on the islands in the
Pacific Ocean were made, but what caused them can only be guessed
at. There are two ideas, also, to account for them; one is that the
pent-up gases inside the Earth and the Moon exploded and so threw up
the volcanoes; the other idea is that showers of gigantic melted masses
fell on the surface of both the Earth and Moon and so caused them.
An experiment to show how the volcanoes might have been formed by
showers of meteors can be made by covering the surface of your
starboard with a layer of soft clay about 4 inches thick, and then
throwing clay balls against it. Artificial volcanoes with craters and
all will result. Compare your artificial volcanoes with Fig. 105,
showing the real volcanoes on the Moon, and you will see they are quite alike.
Fig. 105.—Real Volcanoes.
The volcanoes of California, Japan and the Hawaiian Islands are, many
of them, still active, while those on the Moon have long since become
extinct. This is easily accounted for, since the mass of the Moon is
very small compared with that of the Earth, and hence, the Moon has
cooled off more quickly than the Earth. The result is that while the
Earth is yet hot and teeming with life and activity, the Moon is cold,
and dead and silent.
Seeing the Moon With the Naked Eye.—If you look at the full
Moon with the naked eye it will appear as a great, silvery-bright disk,
and about the same size as the Sun.
Look again and you will see that some parts of it are much brighter
than others, while another and closer observation will show you that
the light and shaded parts take on the expression of a man’s face, as
shown in Fig. 106. This is the famous Man in the Moon, and once
you make out the likeness you will never again be able to look the full
Moon in the face without seeing the man in it.
Fig. 106—Naked Eye Drawing
of Full Moon.
When we look at the Moon we always see the same side of it, which will
be readily understood when we come to the turning of the Moon on its
axis. As the Moon revolves about the Earth, you will see, if you look
toward the west at the right time of the month, just at dusk, a pale
crescent of light, and very soon after the Sun sets it drops out
of sight below the horizon.
A few nights later the Moon will be seen, over in the sky toward
the east; its crescent shape grown into the first quarter, and the
Moon looks as if it was split in two. As the nights go by the Moon
waxes until it is gibbous and finally the full Moon—with
the man in it—stands out round and clear and bright.
It is a good idea at this time, that is, when the Moon is full, to make
a drawing of her face, and the best time to do it is shortly after
twilight, for later in the evening the Moon is so bright it is hard to
see the details. After this the Moon begins to wane; it again
becomes gibbous; then reaches its last quarter later only a crescent
can be seen, and she finally disappears.
At times when the crescent is bright the whole dark disk of the Moon
can be seen glowing dimly with a reddish, copper color, and this is
called the old Moon in the new Moon’s arms. This copper-colored
glow is the Earth-shine on the Moon, that is, the sunlight on
the Earth, which is reflected to the Moon and back again to us.
On one side of the Moon you may be able to see a dark oval spot which
is marked Grimaldi on the maps of the Moon. Grimaldi is a great
plain, having nearly 14,000 square miles in it, with mountains flanking
it on the sides. This is another good eyesight test, for it takes a
mighty sharp eye to see it without a glass.
These and a dozen other interesting things on the Moon can be seen
without a telescope.
The Motions of the Moon.—The Moon turns round on its axis once
every month and it also revolves round the Earth once every month, so
that the Moon’s day and year are of the same length just like Mercury
and Venus, and this is the reason that one side of the Moon is always
turned toward the Earth, as you will see if you look at her through a glass.
Fig. 107.—The Experiment Showing How One Revolution of the
Moon round the Earth Makes it Turn Once round its Axis.
A simple experiment will show the cause of this: Place an apple, which
we will call the Earth, on the bottom of an inverted glass on a table,
and draw a chalk circle a foot in diameter around it. Next, take a
tablespoon to represent the Moon, and hold it upright with the point of
its bowl on the chalk line and with the bowl turned toward the apple,
as shown in Fig. 107. Now, draw the spoon round the circle, turning it
in your fingers so that the bowl is always toward the apple.
It is easy to see that in order for the bowl of the spoon to be turned
toward the apple during all of its travels round the chalk circle the
spoon must also turn once round on its own axis, and this is the reason
we always see the same side of the Moon.
The Moon’s Phases.—Since one side of the Moon is always turned
toward the Earth, it is clear that this is the only side we can ever
see, and, further, we are only able to see as much of this side as is
made bright by the Sun’s light.
Fig. 108.—Apple Cut to Show Crescent.
The different aspects we get of the Moon as it revolves round
the Earth are called the Moon’s phases; and each phase has a
name, as the new moon; the first quarter; the full
moon, and the last quarter.
Between the new Moon and the first quarter, and between the last
quarter and the new Moon only a crescent, or sickle-like edge of the
Moon, can be seen; while between the full Moon and last quarter the
Moon is gibbous (pronounced gib´-us and meaning swelled, or shaped like
a football).
If you will look at the picture, Fig. 108, and the
diagrams, Figs. 109 and 110,
and do the experiment which follows, the way the phases of the
Moon are made will be perfectly clear.
The picture, Fig. 108, shows an apple from which a thin sector
or slice has been cut. The lower picture shows the stem end of the
apple and from this point of view the part where the slice was cut out
looks wedge-shaped. This is the view of the Moon shown in Fig. 109,
if we could look down on it.
Fig. 109.—Diagram Showing
How the Moon’s Phases Are Made.
Now turn the apple on its side and the place where the slice was cut
out can be seen from the stem to the blossom end of the apple when it
takes on a crescent form. This is the view of the Moon we really get
between new Moon and its first quarter, as shown in Fig. 110.
The diagrams, Figs. 109 and 110,
show the Earth in the center of the Moon’s orbit and the Moon is pictured
in eight positions, as it moves round the Earth, one for each phase,
while the sunlight falling upon the Earth and the Moon is shown by
streamers of light from the Sun above.
The diagram, Fig. 110, shows how the sunlight falls on
the Moon, but you must always keep in mind that only that part of the Moon which is
in the sunlight and which is also inside of the line of its orbit can
be seen from the Earth.
Fig. 110.—Diagram of the Moon’s
Phases as We See Them.
Starting now with the new Moon, Fig. 109, it will be seen that the
Moon is directly between the Earth and the Sun and hence that part of
the Moon toward the Earth is in the shadow. Now, since the eye can see
nothing in the sky which is not shining, and since the Moon rises and
sets at the same time as the Sun, we cannot see it. As the Moon moves
on round the Earth in the direction of the arrow and while half of it
is in the light and half of it is in the shadow as before, from our
position we are now able to see a narrow strip of its bright surface
which in Fig. 109 is shown as a wedge, but since
we are looking at it from an angle we see it as a crescent, as shown
in Fig. 110.
The Moon having reached its first quarter sets at midnight and from the
Earth half of its bright surface can be seen, which of course is only
one quarter of the Moon’s whole surface. The next phase of the Moon is
when nearly all of its bright side can be seen. This is the gibbous
phase and the Moon then seems to be about the shape of a football.
After the gibbous phase the full moon appears and this takes place in
that part of the sky opposite the setting Sun. When the Moon is full it
shines all night and does not set until sunrise.
From this time on the bright part of the Moon which we can see grows
less and the gibbous phase again takes place. Soon the Moon reaches its
last quarter and gradually the straight rough edge is hollowed out and
another crescent is formed. The Moon is now in the east and the horns
of the crescent point to the west, just opposite to the direction the
horns of the new Moon pointed. The horns of the new and old crescents
always point away from the Sun and this also is a good thing to remember.
To show how the Moon changes its phases perform the following simple
experiment: Peel half an orange and push a knitting needle through its
center and let this be the Moon. Your eyes will serve for the Earth and
a lighted lamp will make a very good Sun, all of which is shown in
Fig. 111.
Hold the orange by the knitting needle well out from your body with the
peeled side toward you, and in such a position that the orange will be
between your eyes and the lamp. The side of the orange toward you will
be in the shadow and this represents the new Moon.
Now slowly turn your body round to the left and always hold the orange
with the peeled side toward you. You will see that the light from the
lamp striking the orange forms a crescent with its horns pointing away
from the light.
Keep on turning, a little at a time, and soon a quarter of the orange
will reflect the light and this is like the first quarter of the Moon.
When you have turned nearly halfway round nearly half of the orange
will shine by the reflected light of the lamp and you will have a fair
example of the gibbous Moon.
When you have turned your back to the light hold the orange above your
head so that your shadow will not hide it; now half of the orange—the
half that is peeled—reflects the lamp-light and represents the Moon
when it is full.
Fig. 111.—Boy, Lamp and Orange
Showing Phases of Moon.
As you keep turning round the amount of light reflected by the orange,
which you can see grows less and less, the bright part at first being
gibbous, then the last quarter is seen, after that a thin crescent,
and finally when you have turned completely round the orange is again
between your eyes and the light, hence it can no longer be seen, and
the new Moon phase is again at hand.
The Harvest and Hunter’s Moon.—You will remember that on
September 21 the days and nights are equal and this is called the
Autumn Equinox. The full moon that falls nearest to September 21
is called the Harvest Moon as it rises at nearly the same hour
for several nights in succession and this makes several long moonlight
evenings in succession. The Hunter’s Moon follows the Harvest Moon.
How the Moon Makes the Tides.—When we are at the seashore we
soon see that there is a regular rise and fall of the ocean.
This rise and fall of the waters is called the tide, and if
we note the time when the waters have reached the highest point—which
is called high tide—we will find that a little over six hours
later the waters have reached their lowest point—or low tide.
Before the tide has reached the high point again another six hours and
some minutes have passed so that from one high tide to another high
tide 12 hours and 25 minutes have elapsed. These tides are chiefly
caused by two forces acting on the oceans, one being the attraction of
the Moon for the Earth, and the other being the centrifugal force set
up by the Earth’s motion round its axis.
The effect of the Moon’s attraction for the Earth is to pull the water
of the ocean on the side of the Earth nearest it, and this forms a
bulge, or great wave, while on the other side of the Earth the Moon’s
attraction is smaller for the water than it is for the solid Earth,
so the Earth is pulled away from the water. Thus two tidal waves are
formed at the same time, one on each side of the Earth, as shown in
Fig. 112.
Fig. 112.—Attraction of the
Moon Causes the Tides.
Since the Earth revolves round its axis once in 24 hours these tidal
waves go round the Earth and as there are two tidal waves each day
there are two high tides and two low tides at every place on the ocean,
but these are chiefly noticeable on the coasts. Fig. 112
shows the position of the Moon and the Earth, while the wavy lines around the
Earth represent the oceans.
Spring Tides and Neap Tides.—Not only does the Moon’s
attraction cause the tides, but the Sun’s pull on the Earth also
produces tides.
When the Sun and Moon are in a line with the Earth they pull together
and the tides are raised very high and they fall very low, and these
high and low tides are called spring tides.
Since we have either new Moon or full Moon, when the Sun, Earth and
Moon are in a line, the spring tides occur at these times, or twice
every month. Figs. 113 and 114
show how the spring tides are formed.
Fig. 113.—How Spring Tides
Are Formed.
Fig. 114.—How Spring Tides
Are Formed.
When the Moon is at its first quarter, as in Fig. 115,
or in its last quarter, as in Fig. 116, the Sun’s pull and the Moon’s pull oppose
each other and the high tides are lowest. These low high tides, which take
place twice a month, are called Neap tides.
A Trip to the Moon.—Many stories have been told about imaginary
trips to the Moon and what the adventurers saw after reaching their
destination.
Our story is made up of facts and the only thing we shall imagine is
that we have made the trip and set foot somewhere on the Moon. Having
performed this mental somersault we shall carefully leave out all the
hard questions about living there without air and water, for this is a
pleasure trip and we don’t want to spoil the fun with details.
On landing after our 240,000-mile trip we find that there is not only
neither air nor water, but that the Moon is stone cold; even when the
Sun shines on it, it is freezing cold, while the temperature drops to
perhaps 300 degrees below zero when the Moon’s night comes on.
Our next observation will probably be that we feel much lighter than
we did on Earth and we are lighter in the very nature of things, for
the weight of bodies on the Moon is only one-sixth as much as they are
on the Earth. This is due to the Moon being so small and light that
gravity has only one-sixth as great an attractive force there as it has
on the Earth.
Supposing we still retained on the Moon as much strength as we had on
the Earth; then every time we took a step we would cover a distance
of 15 or 20 feet; if we jumped we would sail through space with the
agility of a Harlem goat, and if we played ball and batted the sphere
fairly it would shoot off a quarter of a mile and go twice as far from
the home plate.
Fig. 115.—How Neap Tides Are Formed.
Fig. 116.—How Neap Tides Are Formed.
Since there is no air on the Moon, in order to see one another the Sun
would have to shine directly on us, and if by any chance we should
get into a shadow we would be as completely lost to view as if we had
fallen into one of the craters, for a shadow on the Moon is as deep and
black as the darkest night you ever saw on Earth. Shadows as we know
them on the Earth are always softened, for the air scatters the light.
Nor would it do us any good to cry out or whistle, for, since sound
waves are carried by the air, and since there is no air on the Moon,
all our efforts to make ourselves heard would be useless, even if we
were only a few feet from each other. The Moon is just as silent and
cold and still as it looks, for, though it serves the Earth well as
a mirror to reflect the Sun’s light, it is, after all, only a great,
burned-out cinder.
Looking at the sky at night from the Moon, we are surprised to find how
much bigger and brighter the stars seem, and how many more of them can
be seen, than from the Earth. Here we see as many with the naked eye as
we could see from the Earth with a three-inch telescope.
The Earth itself is seen like a mighty Moon—a Moon as bright as 40 of
the Moons we are calling on, and so large is it that we can see, not
only the continents and oceans, but the polar ice caps and the plains
and the mountains as well, as we see objects of same size on Moon, as
shown in Fig. 117.
Fig. 117.—View of the Earth from the Moon.
Watching the Earth from this new viewpoint, we see it turn on its axis
every 24 hours and going through all the phases—crescent, quarter,
gibbous and full, and back to crescent again, just as the Moon does
when we see it from the Earth.
More curious than the Earth is the view we get of the Sun from the
Moon, the lack of air making the seeing so good that the spots on the
Sun, the fiery prominences and the thin corona can all be easily seen
with the naked eye.
When the Moon is new the whole half of the Earth that is turned toward
the Moon is sunlit and by its reflected light we can easily read our
time-card—for we must get back to Earth again and either write a book
or lecture about the wonders we have seen.
The Moon and the Weather.—We have seen in Chapter III
that our weather is entirely dependent on the Sun. Still it is believed
by many persons today that the Moon has also something to do with the
changes in the weather, just as it is the cause of the tides.
Fig. 118.—Telling Time by the Moon.
Hence there have been handed down to us a large number of old sayings
to show what the weather will be during certain phases of the Moon. But
it has been proved by records kept of the weather that the Moon has
nothing whatever to do with it. For this reason no reliance is to be
placed in any forecast of the weather which is founded on changes of
the Moon.
How to Tell Time by the Moon.—After having learned how to tell
the hour of the day by the Sun you should learn to tell the hour of the
night by the Moon.
On some nights this is a very simple thing to do, for when the Moon is
full it is due south at exactly 12 o’clock midnight, as shown in Fig. 118.
Every night before the Moon is full you will find it due south 55
minutes earlier, so that you must subtract 55 minutes from 12 o’clock
for each day; that is, one day before full Moon it is due south at
11:05 P. M.; two days before full Moon it is due south at 10:10 P. M.;
three days before full Moon it is due south at 9:15 P. M., and so on.
After the Moon is full it will be due south 55 minutes later every
night and then you must add 55 minutes to 12 o’clock; that is, one day
after full Moon it is due south at 12:55 A. M.; two days after full
Moon it is due south at 1:50 A. M.; three days after full Moon it is
due south at 2:45 A. M., and so on.
The Moon’s day is 27½ of our days long.
The Moon’s year is 27½ of our days long.
The Moon’s diameter is 2,160 miles.
The distance from the Moon to the Earth is 240,000 miles.
CHAPTER VII OTHER THINGS IN THE SKY
Seeing an Eclipse.—The word eclipse is taken from the
Greek and means to fail to appear.
In starcraft, when the Earth passes across the Sun, and the Moon is
hidden in its shadow, we say that it is an eclipse of the Moon; or when
the Moon passes across the Sun and covers it we say that there has been
an eclipse of the Sun.
How eclipses of the Sun and of the Moon are caused can be shown by a
very simple experiment and you ought to make it.
An Eclipse of the Moon.—First let us suppose it is the Moon
which is eclipsed by the Earth. All that is needed to show how this is
done is a lighted lamp on a table and an apple with a knitting needle
through its center. Let the flame of the lamp represent the Sun, your
head the Earth and the apple the Moon.
Fig. 119.—Eclipse of the Moon
by the Earth (Experiment).
Hold the apple by the knitting needle in a line between your eyes and
the flame and turn round just as you did in the experiment showing the
phases of the Moon. When you have turned halfway round the apple will
be in the shadow of your head, when the apple is eclipsed, as shown
in Fig. 119.
This is just what happens when the Earth gets between the Sun and the
Moon and all these bodies are in a straight line, as shown in Fig. 120;
the Moon will then be in the shadow of the Earth, and thus it is that
the Moon is eclipsed.
Fig. 120.—Moon Eclipsed
by the Earth (Diagram).
If the Sun, Earth and Moon were always in the same plane with each
other, every time the Earth passed between the Sun and the Moon the
latter would be plunged into the Earth’s shadow and the Moon would be
eclipsed. But the Moon does not revolve round the Earth so that it and
the Earth make a straight line with the Sun every revolution for the
reason that the Moon’s orbit is tilted a little and hence it is only
once in a while that all of these bodies get in a straight line with
each other, and when these times do happen then eclipses are produced.
Fig. 121.—The Moon as Seen When in Eclipse.
Again when the Moon is eclipsed it is not always entirely hidden from
view by the great shadow of the Earth, for the air on the Earth sends
the sunbeams round it so that the shadow is never very deep, and for
this reason the Moon can still be seen, as shown in Fig. 121.
So, then, some of these bent sunbeams fall on the Moon and are reflected from its
surface back to us and it is then that we see the Moon in an entirely
new light.
Sometimes during an eclipse of the Moon the man can still be seen, but
instead of having a bright silvery face he will have changed it to the
copper color of a red Indian. The whole eclipse of the Moon often lasts
longer than six hours and sometimes the moon is in the deep shadow of
the Earth as long as two hours.
Fig. 122.—Eclipse of the Sun
by the Moon (Experiment).
Fig. 123.—The Sun Eclipsed
by the Moon (Diagram).
A total eclipse is one in which the Moon passes completely into
the shadow of the Earth, while a partial eclipse is one where
only part of the Moon is in the shadow of the Earth and part of it is
in the sunlight. Eclipses of the Moon occur quite often and you can
look up the time of the next one in your almanac.
Eclipse of the Sun.—When the Sun is eclipsed it is caused by
the Moon passing between the Earth and the Sun and so the light is cut
off from the former.
To show how this is done all that is needed is to continue the
experiment with the lighted lamp and the apple which you used for the
eclipse of the Moon. You will remember in that experiment you were turned
with your back to the lamp and with the apple held in front of you.
Now to show how the Sun is eclipsed by the Moon keep on turning round
until you face the lighted lamp with the apple in between and in a
straight line with your eyes and the flame, as shown in Fig. 122.
Again you will find that the side of the apple nearest you will be in
a deep shadow, though usually it can still be seen, and though you can
see the light all round the apple yet you cannot see the flame.
This is exactly what takes place when the Moon gets between the Earth
and the Sun and all of these bodies are in a straight line, as shown
in Fig. 123; the Moon will then cover up the Sun
and the shadow of the Moon will fall upon the Earth in a circle about
100 miles in diameter, as shown in Fig. 124. It is
thus that the Sun is eclipsed.
Fig. 124.—Total Eclipse of
the Sun, Showing Path of the Sun.
Fig. 125.—Total Eclipse of
the Sun, from Photo.
Fig. 126.—Annular Eclipse of the Sun.
Fig. 127.—Partial Eclipse of the Sun.
As the Moon is traveling round the Earth and the Earth is turning round
on its own axis, the Moon’s shadow moves across a path or trail that is
only about 100 miles wide, and it moves very fast, too, for it usually
takes less than five minutes for the Moon to sweep over the face of the
Sun.
There are three kinds of eclipses of the Sun. The first is called a
total eclipse, and this takes place when the Moon covers the
entire face of the Sun, as in Fig. 125.
The second is called an annular eclipse and this takes place
when the Moon does not completely cover the Sun but leaves a bright
ring exposed, as shown in Fig. 126. The reason the Moon
covers the Sun completely during a total eclipse and does not cover all of it
during an annular eclipse is because the orbit of the Moon around the Earth
is not a perfect circle, and so sometimes the Moon is nearer the Earth
than at other times and this makes the Moon seem larger or smaller, as
the case may be.
The third kind is called a partial eclipse. If we are not in the
direct path of the shadow of the Moon we may see the Moon pass over
only a part of the Sun, as shown in Fig. 127.
The only total eclipses of the Sun which can be seen in the United
States in the next 30 years are the following:
Date of Eclipse
Time of Total Phase
Course of Moon’s Shadow
1918, June 18,
2 minutes
Oregon to Florida
1922, Sept. 2,
6 minutes
Pacific Ocean, U. S. & West Indies
1923, Sept. 10,
3 minutes
U. S. & Atlantic Ocean
1930, April 28,
2 seconds
U. S. & Canada
1945, July 9,
1 minute
U. S., Canada, Scandinavia and Russia
Note: The eclipse of 1930 will be an annular eclipse.
Finding a Comet.—To the naked eye a great comet looks
like a bright star with a long, glowing tail. In the long ago a comet
was called a hairy star, for the early Greeks pictured the tail of a
comet as being made of long hair and so from their language we get the
word comet, which means hair.
Fig. 128.—Comet Showing Nucleus, Coma and Tail.
A comet is really made up of three parts, which are, (1) a bright head
or core, called a nucleus, and this is covered with (2) a layer
of hazy light, called a coma, to which there is attached (3) a
luminous tail, all of which is shown in Fig. 128.
The nucleus of a comet is formed of a bunch of stones and pieces of iron, all
widely separated and which are held together by attraction as they speed
through space. As a comet nears the Sun it begins to get hot and to
throw off burning gases, which make up its coma, and these bright gases
streaming along form its tail.
There are several ways in which a comet can be told from the planets.
In the first place, new comets, that is, comets which have never been
discovered before, appear suddenly and in any part of the sky, though
they may be very dim at first, and after a while they fade away,
sometimes never to return again.
Fig. 129.—An Ellipse,
Parabola and Hyperbola.
Second, they shine chiefly with their own light like the stars; third,
they do not travel in small circles around the Sun like the planets;
but the paths they take are either long ovals, called ellipses,
or great curves whose ends never meet, called parabolas and
hyperbolas, as shown in Fig. 129; fourth, they do not travel
through space in a line with the planets and Sun, but shoot in and out
of our solar system from and to every direction; and fifth and last,
they travel at enormously high speeds.
Now, a comet, however great it may grow to be, never bursts into view,
big, bright and beautiful, but when one is found it is usually seen as
a little, dim patch of light, and it would quite likely be mistaken for
a nebula, if it did not move along so swiftly.
Fig. 130.—Head and Tail of
Comet Do Not Obey the Same Laws.
A comet can be told by its movement and its movement can be plotted in
the same way I have described for plotting the position of a planet
in Chapter IV; and so, if you see a dim, little ball of light in the
sky and find that it changes its position when compared with the fixed
stars near it you may guess that you have discovered a comet.
The next thing you should make sure of is, that you have not found one
of our old familiar friends, the planets. If it is really a great comet
coming toward the Sun, it will grow larger and brighter every night,
and you will soon be able to see its tail, which is the real earmark of
a really truly comet.
When a comet is nearest us its head may shine far brighter than any of
the planets, and its great tail may be millions of miles in length, and
spread out in a glowing arc and light up the whole sky.
When this time comes a comet is by far a greater sight to the naked eye
than it is when seen through the largest telescope. You should observe
the comet often and carefully, for another one may not appear for a
long time.
Fig. 131.—Halley’s Comet, from Photo.
The nearer a comet gets to the Sun the faster it travels; some comets
have been known to move a thousand times as fast as a rifle-ball, and
this is the more surprising when we consider that the great, flaming
tail goes along with it at the same terrific rate of speed.
The tails of comets do some very strange things; for example we should
rather expect the tail of a comet to always follow its head like a
skyrocket, but while it does so when the comet is headed toward the
Sun, when the comet is passing round and shooting into space the tail
turns away from the Sun, and this causes it to move ahead of the comet,
as shown in Fig. 130.
This shows that while the head of a comet obeys the laws of
gravitation, the tail does not do so, but acts as if it was electrified
like the Sun, when of course it would be repelled by it. Fig. 131
is a picture of Halley’s comet of 1910.
Although a great astronomer once said that there are more comets in the
sky than fishes in the sea, there have only been 1,000 comets recorded
since the beginning of written history.
Fig. 132.—Meteorite of Iron Etched with Acid.
Meteors and Meteorites.—If you will look at almost any part of
the sky on a clear night when there is no Moon you will no doubt see
a bright flash like a rocket. But if you will scan the sky during the
dark nights of August and November you will be very apt to see dozens
of these shooting stars or meteors.
Now, meteors, fireballs, shooting stars and
meteorites are all one and the same thing to start with and they
have their beginnings when some comet goes to pieces.
After a comet breaks up, the pieces of stone and iron which form it
still travel round in the same orbit. Some of these pieces may get
within range of the Earth’s force of gravitation when they are drawn to
it, and on striking the air they are intensely heated by the friction,
and if they are small they burn up before reaching the ground.
The smaller meteors burn up almost instantly and the shining tails
they leave last only a few seconds. Fireballs, which are simply large
meteors, leave burning trails which can sometimes be seen for several
minutes. Shooting stars are merely meteors which are not very bright,
while meteorites are meteors which have fallen to the Earth before they
have had time to burn up.
Many meteorites have been found, but ninety-five out of every hundred
are of the stony kind, the others being of the iron kind. The way to
tell a meteorite from a common stone is by examining its surface. A
true meteorite is covered with a black, shiny, burnt crust, caused by
the intense heat to which it was subjected as it fell through the air.
The test for an iron meteorite is to grind and polish a part of its
surface and then cover it with a dilute solution of nitric acid, when
markings like those shown in Fig. 132 will be etched upon it.
Fig. 133.—The Milky Way.
The Milky Way.—You have, no doubt, often seen on a clear, dark
night, a wide, ragged band of light stretching from the northern sky
across the celestial equator and beyond. This band of light is the
famous Milky Way.
If, as you were looking at the Milky Way, the Earth could be moved from
under you and you were left standing in space alone so that you could
see in every direction, you would find that the band formed a complete
ring round the sky.
To the naked eye the Milky Way seems to be made up of mists of matter
as thin as the stuff of which comets’ tails are made. There are some
patches, though, that are very bright, but look at them as long as you
will with the naked eye nothing more can be seen than just a milky
patch of hazy white, as shown in Fig. 133.
With a very small telescope, however, this band of luminous matter
will be instantly changed into thousands of stars, all separate and
distinct, and some of these stars will look about as large as the stars
of the Pleiades when these are seen with the naked eye, while others will
shine as brightly as Venus or Jupiter when they are nearest to the Earth.
These bright patches, then, which form the Milky Way, are really
groups of stars or star-clusters, and when some of these clusters are
photographed through a telescope as many as 15 or 20 thousand stars can
be counted, while the real number of stars that lie beyond and which
cannot be seen is past all calculation, and, just think of it, every
one of these stars is a Sun as large or larger than our Sun!
Those who have made a deep study of starcraft tell us that our Sun is
one of the stars of the Milky Way, and since the other fixed star that
is nearest to us, which is Alpha Centauri, is 25 trillion miles
away, and Sirius, the Dog Star, which is the brightest star in the
whole sky, is three times as far away as Alpha Centauri, we may gain
some slight idea of the enormous distances of the fainter stars that
make up the Milky Way.
The Nebulæ.—Unlike the bright, cloud-like patches in the
Milky Way, and which the telescope shows to be formed of separate
and distinct stars, are the faint misty spots in the sky called
nebulæ (or nebule).
Now the nebulæ give us a clew as to how the stars were made, and how
other stars are now being made, for it is believed that the nebulæ are
the raw material which, when set in motion, produced heat and took on
form and became Suns and planets like our own solar system.
The nebulæ are formed of luminous gas. Some of them are great irregular
clouds of gas, many are more or less spiral in form, others are
condensed so they look like fuzzy stars.
There are a few of these nebulæ which can be seen with the naked eye;
one of these is the Great Nebula of Orion, and if you will look
at Orion some night and draw an imaginary line a little below his belt
and toward the east you will be able to find it. Another nebula that is
bright enough to be seen with the naked eye is the Great Nebula in
Andromeda. Both of these nebulæ are good tests for eyesight. Fig. 134
shows some of the different forms of nebulæ.
Fig. 134.—Different Forms of Nebulæ.
The Making of the Stars.—To explain how our Sun and the planets
were made, as well as all the other stars in the universe, two ideas
have been worked out, and although these are quite unlike in many ways,
yet both start out with the nebulæ. The first of these is called the
nebular hypothesis and the other and later one is called the
planetesimal hypothesis.
The Nebular Hypothesis.—We have found out what nebula
is believed to be and we should next understand exactly what the word
hypothesis means. An hypothesis is an idea worked out so that
there is a fairly good chance of its being true.
The nebular hypothesis, then, is an idea that has been worked
out from what nebulæ are believed to be and what is known of the
mighty forces of nature, and these when taken together seem to show
that all the things in the sky—stars, planets, moons, comets and
meteors—are made of nebular stuff.
The nebular hypothesis says that when the nebular matter, or star stuff
of which the planets were made, was separated from the parent nebula
by centrifugal force, they were all whirled away in the same plane,
turning on their own axes and traveling round the Sun in the same direction.
The Planetesimal Hypothesis.—A later idea, is called the
planetesimal hypothesis. Planetesimal means little
planet, and as we know already what hypothesis means, by coupling the
two words together we may easily guess that it is an idea worked out
which accounts for the making of solar systems out of little planets.
The planetesimal hypothesis assumes that the sun, planets, and moons
comprising the Solar System were formed from a star which was torn to
pieces by another star which passed close by. The star was left in
the form of a spiral nebula rather lumpy and with little particles of
matter scattered all around.
The meteors, or little planets, making up the nebula, attract each
other, like all other bodies, and when they get close enough they are
drawn together and dense masses of matter, or cores, are built up.
The largest core is seen in the center of a spiral nebula, and as it
becomes more compact it grows hotter and a Sun is made, while the other
and smaller cores turn round it and attract little planets to them. And
so the cores grow in size, and with more and more weight bearing toward
their centers the gases are forced out and these make the air and water.
It is in this manner that the planetesimal hypothesis explains how the
Sun, planets and Moons of the solar system are made.
CHAPTER VIII SEEING THE STARS
How the Stars Shine.—A burning match, a candle, an oil or gas
flame, the Sun, comets and meteors all give out light and heat in
exactly the same way, but the heat and light are made differently.
When you strike a match the friction makes enough heat to light the
chemicals of which the head is formed and the burning gases light the
splint which in turn generates more gases from the wood and these give
out more light and heat.
When you light a candle the heat melts the wax which is then drawn up
the wick, the burning gas around the wick produces more gas and the
gas keeps the flame going. In the case of an oil lamp the oil, which
is already a fluid, is drawn up by the wick, where it is changed into
gases, and light and heat result as in the candle. The oil lamp is,
then, a step ahead of the candle, for the solid wax is replaced by the
fluid oil.
In the gas light the gas, which is made of coal or other matter, is
forced out of the jet under pressure and this gives a bigger and better
flame than the oil lamp; and, as the oil lamp is better than the
candle, so the gas jet is an improvement over the oil lamp.
Now the Sun, and this is also true of most of the stars, is so large
and hot that if any solid matter, such as iron and other metals could
be thrown into the Sun they would not only be melted but instantly
changed into gases. Further, the Sun is so hot that the materials
cannot combine with Oxygen—in other words they cannot burn. The
intensely hot gases of the Sun radiate the light and heat and we
suppose that they keep themselves hot largely by contraction.
When a comet comes close enough to the Earth to be seen it is then
close enough to the Sun so that the light and heat of the Sun cause
some of the gases of which the nucleus of the comet is formed, to
become white hot; as a comet gets closer to the Sun the solid matter of
the nucleus, such as sodium—which is a kind of salt—iron and other
things are changed into gases and these burn fiercely.
While we can see the light of a comet we cannot feel its heat, for a
comet is too small to send its heat waves through such a great distance.
Just as a match is lit by striking it, so meteors are set on fire by
striking the air. Meteors are made up of the same kind of matter as
comets and when these shooting stars come within the attraction of the
Earth the friction caused by the meteor rubbing against the air is so
great that an intense heat is produced and the gases burst into flame.
If a meteor is small it is entirely burned up before it reaches the
Earth and all we see of it is a bright streak of light. If a meteor
is large enough only the outside of it is burned and it will, in
consequence, reach the Earth, when it becomes, as explained in the last
chapter, a meteorite.
Meteors and meteorites produce a very bright light, burning as they do
in the oxygen of our air, and though they are very close to us they are
so small we cannot feel any heat sent out by them.
We have said that when a match is struck the friction produces heat and
that when the wax of a candle, the oil of a lamp or the gas of a jet
is burned they produce light and heat, and this is also true of the
blazing Sun, the fiery comets and the burning meteors.
Where there is light there is usually heat and turn about where there
is heat there is light if the temperature is high enough. Heat is
produced before light, but the two are nearly always found together and
they are so much alike they might be called the Siamese twins.
What Heat and Light Are.—We know that both heat and light are
caused by burning gases, but let’s get a little closer and find out
just how and why gases which are burning send out heat and light.
Now gases are formed of particles of matter called atoms and
these atoms are very small but they have a certain size and weight
according to the substance they form. When these gases are cold
the atoms are comparatively quiet, but when they are heated to a
high temperature they are thrown into a violent state of motion and
vibrate to and fro a given number of times per second, or
frequency, as it is called, according to the substances they
are made of.
The next question in order is what makes the particles, or atoms
move, or vibrate and the answer is heat, which sometimes
produces burning. Combustion, or burning is a chemical action and can
be explained by saying that it is the combining of a substance with
oxygen, or other substance with the production of heat and light.
The only difference between heat and light is that of wave
length as we shall see presently, and the length of heat waves and
of light waves depends entirely on the rapidity with which the atoms
vibrate, or the frequency of vibration, as it is called. If the
atoms of gas move slowly heat is sent out and if the atoms move rapidly
the heat grows more intense and light is radiated.
When the atoms of a burning gas vibrate just fast enough to produce
light the color of the light is red; when the atoms vibrate still
faster the color of the light is green and when the atoms vibrate very
fast the light sent out is violet, so we see that not only do the
vibrating atoms send out light but that the rapidity, or frequency with
which they vibrate makes, or determines, the color as well of the light
which is sent out.
One thing more: the rapidity of the motion, or vibration, of the atoms
of a gas depends entirely on the substance which is being burned, so
that certain substances when burning always produce certain colors.
(See Chapter XII, What the Stars Are Made Of.)
How Heat and Light Travel.—While the little motions or
vibrations, of the particles, or atoms, of gas forming the flame of a
candle, the Sun, and other heat and light givers could go on just the
same we could not feel their heat or see their light without something
or some kind of a substance which would connect them with our bodies
and our eyes, like a wire connecting a push button with an electric
bell. And there is something which connects us with the most
distant stars and that something is called the ether.
Fig. 135.—Ripples or Waves on Water.
To show how these little movements, or vibrations set up by the atoms
of a flame impress us as heat or light do at a distance we will begin
with a simple experiment to show what the ether is and how it acts.
If you will stand on the edge of a pool of water and throw a stone
into the middle of it you will see a little ring-like ripple, or wave
start out from the point where the stone struck the water; this ripple,
or water wave will continue to grow larger and larger in diameter and
weaker and weaker until it reaches the edge of the pond, as shown in
Fig. 135, or if the pond is very large the waves
will die out before they reach the edge.
Again, if you toss a number of stones into the middle of the pond one
after another a series of ring-like waves will follow from the center
of the pond where the stones strike the water to the edge of the pond,
or until they die out.
In the same manner if a bell is struck by a blow of its tongue,
ripples, or waves in the air will be sent out all around the bell.
These waves in the air are called sound waves, but they are,
after all, only air waves.
When a bell is struck the rim of the bell moves forth and back, first
in one direction and then in the other, as shown in the diagram, Fig. 136,
and we call these little movements of the bell vibrations.
The movements are so small that you cannot see them, but if you put
your finger on the bell you can feel them.
Although the vibrations of a bell are very small they are powerful
enough to set up ripples, or waves in the air as shown in Fig. 137,
and when these air waves or sound waves strike the drum of the ear it
vibrates just like the bell and the auditory nerve of the ear
carries the waves on to the brain and we hear the bell ring.
Fig. 136.—Vibration of a Bell.
It must be plain now that if there was no air connecting the bell with
our ears the bell might keep on ringing and yet we could not hear it.
When the air is set in motion by the vibrations of a bell, or any other
device for producing from 32 to 40,000 vibrations per second, we can
hear it, and when the air moves as a mass, as when the wind blows, we
can feel it. Air forms a layer around the Earth that is between 200 and
300 miles thick, but out in the great space beyond there is no air.
Yet the space is not empty, but it is filled instead with a substance
called the ether.
Just as the air is finer than water so the ether is a million times
finer than the air. It is so fine that it fills up all the little
spaces between the particles or atoms of water and of the air, and it
penetrates in between the atoms of the densest metals and the hardest
glass, and further, and still more wonderful, it fills all of the great
space in which the planets and the stars are placed.
Now when the particles, or atoms of gas are set in motion, or vibration
by a flame of any kind, be it a candle or the Sun, little ripples or
waves are started in the ether and if these waves are very short they
affect the eye and cause the optic nerve to vibrate exactly like
the vibrations which are sending out the ether waves and these waves
are carried to our brains and we see the light. The way in which
a flame sends out waves in the ether and is received by the eye, is
shown in Fig. 138.
Fig. 137.—Sound Waves in
the Air Set up by Bell.
It takes a ripple, or wave on the water started by the impact of a
stone about one-half second to travel one foot. A sound wave, set up
by the vibrations of a bell, or other sound producing device, travels
through the air at the rate of 1,090 feet per second, while light and
heat waves set up by the vibrations of a flame, the Sun or other hot
body, travel through the ether at the rate of 186,500 miles per second.
It must be plain now that if there was no ether connecting the flame,
or the Sun with our eyes the flame, or Sun might continue to send out
light and yet we could not see it.
How the Eye Sees.—If it was not for our ears we could not hear
a bell ring nor any sound, for though the waves in the air might still
be sent out we would have no means of receiving them; again if it was
not for our eyes we could not see a flame, the Sun or any other source
of light and, what would be worse, we could not see an object by its
reflected light, for though the waves in the ether would still be sent
out we would have no means of receiving them.
Fig. 138.—Waves in the Ether.
The eye is simply a camera on a very small scale, but what it lacks
in size it makes up by the excellence of its operation. If you will
set up a sheet of white cardboard on one end of your starboard, place
a lighted candle at the other end and then hold your burning glass
between the flame of the candle and the cardboard, as shown in Fig. 139,
and do all this in an otherwise dark room, you will see a picture
turned upside down, called an inverted image, of the candle
flame on the cardboard.
To get a sharp picture, or image of the flame on the cardboard screen
you will have to move the lens toward and away from the cardboard, and
this process is called focusing. If you will fix the lens in the front
of a light-tight box and place a sheet of ground glass in the back of
the box you will have a simple, though crude, camera.
The eye has all of the things which the highest priced camera has and a
good deal more, for all of its adjustments are automatically made, and
you don’t even have to think about them.
Fig. 139.—Forming an Image
with a Lens.
The eye is almost as round as a ball and it can be turned a little in
its bony socket in any direction. The outer part of an eye which takes
the place of the box of a camera, is stretched round the whole eye like
the cover of a baseball, as shown in Fig. 140. The front part
of this cover forms the white of the eye, and fitting into the cover and over
the lens, like a watch crystal in its rim, is the cornea, which
is a tough, but transparent film and protects the iris and the lens.
Fig. 140.—The Human Eye.
Between the lens and the cornea is a thin disk, or diaphragm with a
hole in its center and this is the iris; the purpose of the iris is to
let in only a certain amount of light, just like the shutter of a good
camera. The hole in the iris forms the pupil of the eye, and you
can see the hole, or pupil, grow larger or smaller, just as the eye
needs more or less light.
The lining of the eye is called the retina and this forms a
screen at the back of the eye on which the light waves in the ether
project the image of the object at which the eye is looking. Instead of
being white like our cardboard screen the retina is very black.
The retina upon which the image is formed is connected with the optic
nerve; in fact, the retina is a part of the optic nerve and is covered
with a lot of little nerve ends or filaments called rods and
cones.
Now when the waves in the ether sent out by the flame of a candle, or
by the Sun, reach the eye, they pass through the cornea, then through
the pupil, or hole in the iris, and finally through the lens which
focuses the waves on the retina and forms the image there.
The different colors of light are caused by waves in the ether of
different lengths; when very short waves strike the retina we say the
color is violet; waves a little longer we call green and the longest
waves which the eye can see form in our brains the sensation of red.
Waves in the ether which are longer than the wave-lengths the eye can
see produce heat and when these waves fall on any part of the body the
nerves detect them and we call the sensation heat. On the other hand
waves in the ether which are too short to affect the nerves of the eye
will impress a photographic plate.
The iris of the eye acts as a self-regulating shutter, which makes the
hole, or pupil in front of the lens larger or smaller according to the
amount of light which is needed to see an object well. If the light
is strong the iris contracts, which means that the hole gets smaller
and so cuts off some of the light. If the light is weak the hole gets
larger and we say the pupil expands and this lets more light through
the lens.
There must also be some means of adjustment to make a sharp image, or
picture, on the retina, however near or far away the object may be from
the eye. In a camera this is done by moving the lens and the screen
closer together or farther apart and this is the purpose of the bellows
of a camera.
But the eye has a much finer and quicker adjustment than this for
distance. The lens is so made that the front part of it can bend just
as the distance changes. You have only to look at an object and the
lens is adjusted without the slightest effort or knowledge on your part.
You may wonder how light waves can pass through a substance as solid
and as hard as glass or through the eye. You will remember I told you
in the beginning of this chapter how ether got into every little space,
even in metals and glass, as well as that it filled all the great space
between the stars.
We think of glass as being very solid, and it is solid enough to keep
water or air in a bottle from getting out through its pores. But glass
and the substance of which the eye is made are just about as full of
holes as a sieve, but the holes are so very, very small you couldn’t
begin to see them even with the aid of a high-power microscope, yet
they are large enough for the ether to run through just as water runs
through a sieve.
When I tell you that waves in the ether which are sent out by the
light of a candle or the Sun are only about 15 ten-millionths to 30
ten-millionths of an inch in length, and that the holes, or pores, in
the glass and the cornea and lens of the eye, and which are full of
ether, are much larger, you can readily understand that the ether waves
which we call light can merrily pass through either glass or the eye
and that there is nothing in the way to stop them.
To sum up briefly how the stars shine, how light travels and how the
eye sees we will start with the light of the Sun and say
(1) That the Sun is made up largely of gases, and
that
(2) These gases are formed of various substances,
and that
(3) The gases produce terrific heat, which means
that
(4) The atoms or particles which form the gases
are in violent motion or vibration.
(5) These vibrations start out waves in the ether
which travel out into space at a speed of about 186,500 miles per second.
(6) On reaching the eye the waves pass through
the lens and form a picture or image
(7) On the retina, or screen of the eye, which is
made up of the ends of nerves, and these vibrate just as the atoms of
the gases in the Sun which sent out the waves vibrated, and finally
(8) These nerve vibrations are sent over the
optic nerve to the brain, where they take on the shape, size and colors
of the Sun.
Reflection of Light.—The flame of a match, or a candle, an oil
or a gas lamp, or Sun, comet or meteor, produces its own light, and for
this reason these bodies are called self-luminous—that is, they
are themselves the source of light.
All other objects which do not produce light, such as an apple, a
stone, the Earth and other planets and moons are called non-luminous
bodies.
Yet these non-luminous bodies can send out light if they are lighted
up by some self-luminous body. It is well that this is so, or else we
could never see anything that was not in itself giving out light.
If you will hold an apple or a stone in your hand and let the light
of a candle or the Sun fall on it you will be able to see the apple
or stone, and, although you will hardly be able to notice it, you
will see them by the light which strikes them and is turned back, or
reflected from their surfaces, as shown in Fig. 141.
If a rubber ball is thrown on the sidewalk it will bounce back and
this is just the way light acts when it strikes most objects—it
bounces back, or, to use the right word, it is reflected.
When we look at the surface of the Earth by daylight we see the sand
and stones, grass and trees, houses and other objects by the light
which is reflected, or thrown back from the surface of these things by
the Sun.
When we look at the surface of the Earth by the light of the Moon we
also see the objects by reflected light, but in this case the light
is twice reflected, for moonlight is the light of the Sun falling on
the Moon and which is then reflected to the Earth, where it is again
reflected to our eyes from the objects it falls on. This is the reason
moonlight is so pale when compared with sunlight.
Fig. 141.—Light Reflected
by an Apple.
Fig. 142.—Light Refracted. Spoon
in Glass of Water.
Refraction of Light.—When a beam of light passes through glass,
water and other transparent substances, and is bent out of a straight
line it is said to be refracted.
Place a spoon in a glass of water, as shown in Fig. 142
and it will look as if the spoon is broken in two at the point where it touches the
water. The bending of the beam of light will be more clearly understood
from the drawing in Fig. 143.
If you will look at a star squarely through a thick piece of glass and
the star seems to change its position a little you will know that the
sides of the glass are not quite parallel.
A prism is a three-sided piece of glass, if we except the ends,
as shown in Fig. 144. When a beam of light passes through
a prism the prism affects the light in two ways: first, it bends the beam, and
second, it separates the ether waves, or light waves, as they are
called, according to their lengths, and as color depends on the length
of the waves in the ether a prism will show the different colors on a
screen and this is called the spectrum. It is shown in Fig. 145.
Fig. 143.—How Light is Refracted.
Fig. 144.—Prism.
Lenses are pieces of glass having curved surfaces. When a beam of light
passes through a lens it is also bent out of its original direction, or
refracted.
A convex lens, see Fig. 146, is a lens which is
thicker in the middle than it is at the edges. A convex lens is used for magnifying
an object; or for forming an image so that it can be magnified by
another lens as in a telescope, for forming an image on the screen of a
camera, and for bringing the heat waves of the Sun to a focus, as with
a burning glass.
The point where the rays of light are brought together is called the
focus. You can easily find the focus of a lens by holding a
sheet of paper, or the hand under the lens and letting the sunlight
pass through it; where the spot of light is smallest and brightest
there is the focus. The distance of this point from the lens is called
the focal length.
Fig. 145.—Prism Forming a Spectrum.
Fig. 146.—Convex Lens.
A concave lens is a lens which is thinner at the middle than it
is at the edge, as shown in Fig. 147. It is used in small telescopes
and opera glasses to turn the inverted picture formed by the convex
lens around so that the object can be seen in its right position, as
shown in Fig. 151.
Shadows.—Shadows are useful as well as sunshine, but
shadows are such common, everyday things it seems almost useless to
talk about them; still you may or may not know that there are different
kinds of shadows.
Fig. 147.—Concave Lens.
Of course we all know that when a candle or a gaslight or the Sun
shines on an apple or any other opaque object—that is, an
object that will not let the ether waves go through it—the light is
cut off back of it and this dark space is called a shadow; this is also
true when the Sun shines on the Earth, or on any of the other planets
or their moons.
There are always two parts to the shadow of an object unless the light
is a mere point or the object is very close to the screen, or surface
on which the shadow falls. The dark part of the shadow is called the
umbra. The edge of the object where the light and shade run
together and form a partial shadow is called the penumbra and
during a total eclipse this partial shadow surrounds the dark shadow,
or umbra of the Earth or Moon.
CHAPTER IX THE SPYGLASS OR TELESCOPE
The Boy Who Discovered the Telescope.—Spectacles have been made
and used for nearly a thousand years and the art of making lenses is
very much older.
A little over three hundred years ago there lived in Amsterdam,
Holland, a spectacle maker named Lipperhey, and it is said of him that
he made good lenses.
There was apprenticed to this lens grinder a Dutch boy, and I am sorry
I cannot tell you his name, for he was a boy who did things; but his
name is not recorded, which is a shame, for if it had not been for this
boy Galileo might never have had a telescope.
One day while the boss was out this Dutch boy was standing before a
window of the shop and he held a lens before his eye with one hand and
another lens before the first lens with his other hand, as shown in
Fig. 148. Imagine his surprise when the church he was looking
at seemed to move much nearer to him, that is to say, the image of the church was
greatly enlarged.
The boy had made a wonderful discovery—he had discovered the
telescope. When his master returned the boy showed him what he
had done and it was not long before the great Galileo had a telescope
and was startling the world by his wonderful discoveries of the moons
of Jupiter, the rings of Saturn, the phases of Venus, the spots on the
Sun and a hundred other wonders of the sky.
A telescope is an arrangement of lenses in a tube for making the image
of a distant object larger on the retina of the eye, or, as in the case
of the fixed stars, for making them brighter.
Fig. 148.—Lipperhey’s Boy
Discovers the Telescope.
The word telescope comes from two Greek words, the first, tele,
which means afar, and the second, scope, which means to see, so
that telescope means just what we should expect it to mean and that is
to see afar.
There are several kinds of telescopes, but there are only two kinds
I want to make clear to you here; in the first kind the eye sees the
object just as it is, that is, standing right side up, or erect.
This kind of a telescope is called a spyglass, and is used to
look at objects on the surface of the Earth.
In the second kind of telescope the eye sees the object upside down,
or inverted, and this kind of telescope, which is called an
astronomical telescope, is just as good as the other for looking
at the stars.
A Pinhole Telescope.—Before describing how to make and use real
telescopes which have lenses I want to tell you of a little scheme to
see afar, and though it does not magnify the image of the object that
is seen through it, yet it aids the naked eye when you are looking at
the Sun and Stars.
To make a pinhole telescope get a pasteboard tube about 1¼ inches in
diameter and 5 or 6 inches long. A paper tube for mailing papers and
sheet music is just the thing and can be bought at any stationery store.
Fig. 149.—Disk of Cardboard for
Pinhole Telescope.
Fig. 150.—Cross Section
of Pinhole Telescope.
Cut out a disk, or circular piece of cardboard just large enough
to fit the tube, see Fig. 149, and push a pin point or needle
through the center to make a small, clean hole. Next, glue this cardboard disk
in the tube ½ an inch from one end. The disk must be glued in the tube
so that no light can leak around the edge.
If, now, you look at the Sun through the pinhole telescope, as shown
in Fig. 150, you will get a better view of it than if you look at it
through a pinhole in the cardboard alone, for the tube shuts out all
the other rays of light from the eye.
To improve the seeing qualities of the pinhole telescope make the hole
in the cardboard disk ¼ inch in diameter and cover this hole with a bit
of tinfoil. Now make a hole in the center of the tinfoil with the point
of a needle; this makes the edge of the hole sharp.
A pasteboard tube without the pinhole will also aid the naked eye
in seeing the Moon and stars, for it shuts out all the rays of light
around the eye and limits the sight to a certain part of the sky;
together these things are very good helps in observing especially if
there are gas and electric lights nearby.
Fig. 151.—The Telescope (Galileo).
How a Telescope Works.—A real telescope has at least two lenses
in it; the larger lens is placed in the end of the tube nearest the
object to be viewed and is called the object glass because the
light from the object is received by it.
The smaller lens is placed in the end of the tube nearest the eye, and
is called the eyepiece, for it is this lens which enlarges, or
magnifies the image of the object that is thrown upon the retina of the eye.
There are two simple kinds of telescopes; the first is the kind that
Galileo used for making his great discoveries. The kind of lenses used
and the way they are placed in the tube is shown in Fig. 151.
In this telescope the object glass is a double convex lens and the beam
of light which strikes it is brought to a point as in the case of a
burning glass, but before the light reaches this point it is caught up
by the double concave lens which forms the eyepiece, when it is carried
to the eye in an erect position.
Fig. 152.—Opera Glasses.
An opera glass is simply a pair of these little telescopes, joined
together so that they can be focused at the same time by means of an
adjusting screw, as shown in Fig. 152.
Another simple telescope is formed of two double convex lenses. As
in the telescope just described the larger lens, or object glass, is
placed in the end of the tube nearest the object to be viewed and the
smaller lens, or eyepiece, is placed in the tube nearest the eye.
In this telescope, though, the eyepiece is a double convex lens and
while a larger image is formed in the eye it is inverted, or upside
down, so that this kind of a telescope is of no use as a glass to spy
things with on the surface of the Earth.
How to Make a Cheap Telescope.—Lenses are absurdly cheap. If
you live in a large city you will find lens grinders who will sell you
the kind of lenses you need for either kind of telescope for a dollar
or so.
Telescope No. 1.—This telescope is fashioned after an opera
glass, that is, it has a concave lens for an eyepiece.
Fig. 153.—Pasteboard Mounting of Lens.
Fig. 154.—Pasteboard
Lens Mounting.
Get two pasteboard tubes of the kind described for the pinhole
telescope; the bore, or hole, of the first tube should be 1¾ inches in
diameter and it should be 2 inches long. Have the second tube a little
smaller than 1¾ inches in diameter on the outside so that it will slide
easily into the larger tube and yet not leak light, and have this tube
1½ inches long. Paint the inside of both tubes with black paint to keep
the walls of the tube from reflecting any stray rays of light which may
strike them. The outside of both tubes can be covered with bookbinders’
cloth to give them a neat appearance.
The next step is to mount the lenses. The larger lens for the object
glass is a double convex lens 1½ inches in diameter and having a 4-inch
focal length, or focus, as it is called for short. A lens of
this kind can be bought for 25 or 30 cents. The smaller lens for the
eyepiece is a double concave lens 1 inch in diameter and having a focus
of 2 inches. This lens can be had for about 40 cents.
Fig. 155.—Opera Glass Telescope.
Cross Section.
Cut a strip of thin, tough cardboard ½ inch wide and 6 inches long; on
this strip glue a strip of heavy pasteboard ½ inch wide and 5⅜ inches
long, and have one end of both pieces even, as shown in Fig. 153.
Set a flatiron on the pieces and let them dry. When dry make a groove down
the middle of the heavy pasteboard by slicing out a very thin strip
with the point of a sharp knife, being careful not to cut through the
thin cardboard. Now bend the strips around the lens with the lens in
the groove, glue over the thin end as shown in Fig. 154, and slip a
a
rubber band or tie a string around it to hold it in position until it
has dried.
The small concave lens, or eyepiece, is mounted in the same way, but
since the lens is only 1 inch in diameter, cut the strip of cardboard ½
inch wide and 4¼ inches long and the strip of thick pasteboard ½ inch
wide and 3½ inches long; this done glue them together, cut the groove
and mount the lens as before.
Fig. 156.—Telescope.
Cross Section View.
The next and last thing is to smear glue on the cardboard mounts and
push the convex lens in the end of the large tube and the concave lens
in the end of the small tube. Now slide the tubes together and you will
have as good a telescope as the boy who invented it. It is shown in
cross section in Fig. 155.
You should, however, make two caps, one for each end of the telescope
to cover the lenses when not in use. This little telescope is very
handy to carry along on your scouting trips, as it takes up so little
room, being only 2 inches long when closed up.
Telescope No. 2.—This telescope is very much better than the
one just described for seeing the stars as it magnifies about 4 times.
It is made exactly like the first one except that the larger tube is 14
inches long and the smaller tube is 5 inches long. In this telescope
both lenses are double convex, the large one, or object glass, having
a diameter of 1½ inches and a focal length of 12 inches, while the
smaller lens, or eyepiece, has a diameter of 1 inch and a focal length
of 3 inches. It is shown in cross section in Fig. 156.
A spyglass usually has four or five plano-convex lenses in it and these
not only magnify the image but they also erect it so that you see the
object as it really is.
While the homemade telescopes which I have described will not magnify
as highly as a cheap telescope which you can buy, yet you ought to make
one, for it will let you into the secret of combining lenses, and this
is as interesting as seeing the stars. By all means make your first
telescope and then if you want a better one buy it and get one as large
as you can afford.
Fig. 157.—Magnifying Power
of Telescope.
To Find the Power of a Telescope.—In the last chapter, I
explained what the focal length of a convex lens is, see Fig. 146,
and how to measure it. To repeat, it is the distance in inches between
the center of a lens and the point where the rays come together.
You can find exactly what the magnifying power of your telescope
is, when both lenses are convex, by dividing the focal length of the
object glass by the focal length of the eyepiece, or lens.
For instance, suppose the focal length of the convex object glass of
your telescope is 12 inches and the focal length of the convex eye lens
is 3 inches, then 12 ÷ 3 = 4 and the quotient 4 is the magnifying power
of your telescope.
To find the focal length of a concave lens is a little harder, but
Garrett P. Serviss tells us in his good little book on Astronomy
with an Opera Glass of an easy way to judge the magnifying power of
an opera glass and it is just the same for a telescope. Look at a brick
wall through one of the tubes with one eye while the other naked eye
sees the wall direct.
Now notice how many bricks which the naked eye can see, are needed to
equal the thickness of one brick as seen through the glass. The number
of bricks seen with the naked eye represents the magnifying power of
the glass. Fig. 157 shows how the bricks are compared.
The Stars Seen Through a Spyglass.—The Moon.—When Galileo
lived the people believed that the Moon was a ball as smooth and bright
as a glass marble and they also thought that the dark spots on its
surface were the continents of our Earth reflected by it.
So the first thing Galileo did when he got his telescope was to turn it
on the Moon, for he wanted to know about these dark spots, and you can
imagine his surprise and delight to find that they were really great
mountains and extinct volcanoes.
You cannot do better than to point your little homemade telescope at
the Moon, stop, look and rediscover the mountains on it and be as
surprised and delighted as Galileo was, three hundred years ago. To see
the mountains at their best do not wait until the Moon is full, for the
sunlight then shines directly on top of the mountains and there are no
shadows to help the eye to gauge breadths and heights.
The best time to see the mountains is when the Moon is in its first
or its last quarter, for then they are well brought out by the bright
sunlight shining on them from the side and the black shadows which they
cast on the other side.
The great smooth stretches seen on the Moon are called seas. It may be
that in the long ago they were really seas, but it is more likely that
Galileo and the early observers whose telescopes were little better
than yours thought they were seas. Then there are huge cracks or gorges
on the surface of the Moon, which start from some of the craters and
run for hundreds of miles in every direction. A number of these gorges
start from a volcano named Tycho (pronounced Ti´-co) and make
the Moon look as if it is cracked; and it is likely that when the Moon
cooled down from its melted state after having been shot off from the
Earth it did crack in many places. Fig. 158, which is a good
telescopic view of the Moon, shows some of these great cracks radiating from Tycho.
Fig. 158.—Full View of Moon.
To show on a small scale how the Moon cracked on cooling down Nysmith
filled a glass globe with cold water and then sealing the globe he
plunged it into hot water. The slow expansion of the cold water by
the hot water caused the globe to crack as shown in Fig. 159,
and by comparing the pictures it will be seen that the cracks on the Moon and
in the glass globe are very much alike.
There is a mountain called Aristarchus[1]
(pronounced Ar-is-tar´-cus) which is believed to be formed of pure
metal because it shines brighter than any other mountain on the Moon.
Its position is shown on the map, Fig. 160.
Fig. 159.—Glass Globe Cracked.
The instant you look through your glass at the Moon the man which
shows so plainly to the naked eye vanishes like a coin in a magician’s
fingers and instead you will see a new world covered with plains and
mountains.
But if you will look at the Moon when it is nine or more days old, you
will see with the aid of your glass and a little imagination the Moon
girl, as shown in Fig. 161. You should have no trouble in
finding her, for the Apennines form her crown while Tycho shines upon her
breast like a great yellow diamond.
Fig. 160.—Map of the Moon.
Fig. 161.—The Moon Girl.
There is another crater mountain which you should by all means know
and that is Copernicus[2]
(pronounced Ko-per´-ni-kus). Look through your glass at the
southeastern end of the Apennines and you will see a crater that
is larger in diameter than Tycho, though it is not so deep. Tycho,
Copernicus and the Apennines will serve you well as landmarks if you
follow up the explorations of the Moon which you have so well begun.
The Sun.—You can see the spots on the Sun quite well with your
glass, and sunspots are always interesting.
Do not try to look at the Sun through your glass without covering the
eyepiece either with a thickly smoked or dark-colored glass. You must
also use smoked or colored glasses over your eyepiece when you are
looking at an eclipse of the Sun.
You should look for sunspots this year, 1920, for they are decreasing
in number and size and in a few years there will be scarcely any. After
that there will be more of them again.
The Planets.—After you have seen the mountains on the Moon and
the spots on the Sun you should next turn your glass on the planets.
While you will probably say that the planets loom up very small—the
largest, Jupiter, appearing about the size of the head of a large
pin—yet they are wonderful to look at even through the smallest telescope.
Mercury.—This is a planet not easy to see even with the aid of
a glass so if you see it you can think that you are lucky or skillful
or perhaps a little of both.
Venus.—Venus can be seen very much better with your small glass
than Mercury, but you will only be able to see it as a little disk and
not as a crescent for your glass is of too low a magnifying power. It
is a brilliant object though even through the smallest glass.
Mars.—While you cannot see the canals of Mars with your glass
you can see it as a bright disk of light and this is well worth while.
Mars is believed to be peopled and the thought that it may be makes it
a mighty interesting object to look at. Look at it through your glass
and think it over.
Jupiter.—On account of his great size you will be able to see
Jupiter better than any of the other planets. His disk will show clear
and distinct and if you have good eyesight and your glass is fairly
good you will be able to see one and perhaps two of his nine moons
which will appear as little points of light close to the planet.
Saturn.—The rings of Saturn cannot be seen with a glass
magnifying less than four times. His rings are at this writing (1915)
in the best position to be seen as the flat side of the rings is toward
us now. In 1921 the edge of his rings will be in a line with the Earth
and then it will be very hard to see them even with a much larger telescope.
Uranus.—Although Uranus is so very far away, it can be seen
with your glass, though you may not be able to see it as a disk of light.
You can tell when you have found Uranus by watching it for a few
nights. If it changes its position among the stars around it you will
know you are looking at Uranus.
Neptune.—Neptune is farther away than Uranus and your glass
will show it as a mere point of light. Like Uranus you will know it if
you see it, by its motion among the stars.
The Stars.—After you have looked at the Sun, Moon, and planets
to your hearts’ content turn your glass on the Big Dipper and you will
see about ten times as many stars as you can see with the naked eye.
The Big Dipper is full of starry surprises as you will find to
your pleasure on looking at it with your glass: for instance, instead
of the handle being formed of three stars, it blazes with dozens of them.
Take a look at Alcor, which is the middle star in the handle of the
Dipper. You may remember I told you in the first chapter that it had
a little companion, Mizar, which only sharp eyes can see. Now look at
Alcor through your glass and you will see that it and Mizar are quite
widely separated.
The North Star is also a double star as these twin stars are called.
Just as Mizar is a good test for the naked eye so the twin of the North
Star is a good object on which you can try out the seeing power of your glass.
Another double star which some boys can separate with their keen naked
eyes is Epsilon, named after one of the Greek letters (See
Appendix C). This star together with Vega, a very bright and beautiful
blue star of the first magnitude, and Zeta, another Greek letter star,
form a triangle, which is the constellation of Lyra.
Whether or not you can separate Epsilon into two stars with the naked
eye, you will see them stand out separate and distinct through your
glass. If you had a more powerful glass you would see that each of the
stars of Epsilon has a faint companion star, so that it is really a
quadruple star, that is, there are four stars right together.
Then there is the Milky Way, always a wonderful sight to the naked eye,
but still more wonderful when viewed through a glass however small;
there are the stars of the Pleiades of which the eye sees not more than
six or seven without help, but which bursts forth like a skyrocket into
a cluster of many-colored lights when seen through a glass; these are
only a few of the hundreds of other things which you can see in the sky
with the help of your little telescope.
CHAPTER X THE TIME O’ DAY
What Time Is It?—This is a question everybody is always asking
everybody else.
Did you ever stop to think what a curious thing time is? No
one knows when it began nor can anyone tell when it will end, yet we
measure off a little bit from that which has gone or from that which is
yet to come, so that we may know when to eat, to start to work, or to
quit, and when to go to bed or to get up.
We know that, roughly, a year is the time it takes the four seasons to
come and go, and that this is done when the Earth travels once round
the Sun; that the month is based on the time it takes the Moon to
travel once round the Earth; that the week has nothing to do with the
Sun, Earth, Moon or Stars, but is a pure invention, and, finally, that
the day is the time it takes the Earth to turn once round on its axis.
But when we want to know what time it is we mean, of course, what the
hour, the minute and, sometimes, even the second of the day is, and
these are the small measured parts of time we want to find out about.
The time it takes the Earth to make one complete turn on its axis is
divided naturally into two parts, more or less equal, depending on
where we live, and these parts are daytime and nighttime.
This general division of time, marked by alternate daylight and
darkness, may have served every need of the cave man at first, but just
as he came to have sense enough to crawl into his cave to get out of
the rain so the blazing Sun must finally have driven into his awakening
brain its use to him as a means of marking time.
As his savage mind grew less animal and more human, ideas were formed
in it either by instinct or by the first vague glimmerings of reason
and he began to think. He saw that when the light of the Sun fell on
the trees and the rocks, long, strange, black marks, which we call
shadows, were cast by them, and he must have noticed that the shadows
swung round the trees and rocks in the opposite direction to the way
the Sun was traveling.
To mark off with his eye and place a stone at a point somewhere near
the middle of the shadow cast by the rising Sun and that cast by the
setting Sun, and which would mean that the day was half done was the
next great step.
These things were, quite likely, the first feeble efforts of the human
race to measure time, and out of which the sundial came, as well as the
crude beginnings on which the science of astronomy is based.
Solar Time, or Time by the Sun.—To make a sundial which would
give correct Sun time was so hard a problem that men had to think about
it for a million years before they could solve it and the chances are
that then it was invented by a boy. You will find directions for making
a simple sundial in Chapter III.
Now let’s find out how we can know when a day begins and when it ends.
On first thought this would seem to be an easy thing to do and it is if
we are not particular about being exact. You will remember that a day
is measured by the time it takes the Earth to turn once round on its
axis and what we want to know, now, is how to tell when the Earth has
made one complete turn, no more and no less.
We can tell this, you may say, by a clock or a watch, but the best
of clocks and watches are always a little fast or a little slow, and
time today is measured by the fraction of a second. So we get the
apparent time from the Sun, change it into mean time and
set our clocks and watches by it.
There are several ways by which we can obtain Sun time, but all of them
are based on the same principle. The way that was used by people who
first began to think about these things, and it is also a good way for
you to try, is like this:
Fig. 162.—Diagram Showing
How to Find Solar Noon.
First you must have a good horizon, that is, you must be able to
see the Sun rise and set without any mountains or other things in the
way.
When you begin your observations for getting solar time note exactly
where the Sun rises and where it sets on the horizon. You can easily do
this by using hills, houses and trees for marking the places. Now with
your eye draw a line between these two points.
Notice also where you are standing and let your line of sight meet the
imaginary line which joins the places where the Sun rises and sets just
as near the middle as you can, and all of which is clearly shown in
Fig. 162. Now this line will run due north and south and
hence it is a meridian line which you are to use to observe the Sun.
When the Sun reaches that point in the sky where it is directly over
the middle of the imaginary line, joining the places where it rises and
sets, it is exactly noon, Sun time.
The next day observe the Sun in the same way and when it crosses the
meridian line again the Earth will have turned round once and you will
have a part of time measured off called a Sun or solar day.
When the time is taken between two succeeding crossings of a meridian
by the Sun a day so measured is called by astronomers an apparent
solar day, and when the Sun is on the meridian it is called
apparent noon.
Now the word apparent means to seem, that is, something which is
obtained by observation. An apparent solar day is then the length of
a day measured by the Sun, and while we might suppose that the Sun at
least would always give a day of the same length, this is not the case
for the reason that the Earth does not travel in all parts of its orbit
round the Sun at the same rate of speed, and, further, it is tilted on
its axis; together these things make the days as measured off by the
Sun unequal and hence they are called apparent solar days.
Mean Solar Time.—Apparent solar days which are of unequal
length were all right as long as sundials were the only timepieces, but
when clocks and watches came into use days which were equal in length
were needed and needed badly, for a clock couldn’t be made which would
keep Sun time.
So astronomers who watched the stars by night lay awake during the day
wondering how they could make the Earth travel round the Sun at the
same speed every day in the year and just as though it was not tilted.
At last they solved the problem.
And how do you think they did it? It was as easy as rolling off a
log—when you know how. They simply imagined that the Earth
traveled at a uniform speed and that it stood straight, as shown in
Fig. 74. In other words they took the mean length, which is
another way of saying the average length of all the apparent solar days
which make up a year, and divided it up equally. Further, the men who
got up this scheme said that every day should have not only the same
length, but that it should have 24 hours, and of course you know that
hours are divided into minutes and minutes into seconds. Mean solar
time, then, is really imaginary Sun time and this is the
time used everywhere and watches and clocks are set by it.
Equation of Time.—To get the exact mean time each day you have
to know just what the apparent solar time is, and then you have to know
what the difference in time is between the apparent solar time and the
mean time, that is how many minutes and seconds to add to or subtract
from the solar time of each day to get the mean time.
This difference of time is called the equation of time. A table
prepared by Professor Todd of the Amherst College Observatory is given
in Appendix M and can be used for all ordinary purposes.
Standard Time.—A meridian, as you know, is an imaginary line
running due north and South and hence we can have a meridian whenever
we want it and as many as we like.
When the Sun crosses the meridian of those who are on it, it is noon to
them, but to no one else, for the Sun has already crossed the meridians
to the east of it and has yet to cross those to the west of it. When
the Sun crosses the meridian which passes through New York City it is
noon there and when the Sun crosses the meridians which pass through
St. Louis, Denver and San Francisco, it is noon at those places, and
this is true of every other place and of every other hour of the day.
This is the reason why every place had its own, or local time,
before the year of 1883.
As an illustration it takes the Sun about three hours to cross the
United States from the Atlantic to the Pacific coasts.
Now as long as people traveled on foot, or by horse, they moved so
slowly that local time did not worry them, but when railroads came into
use there was all kinds of trouble for the traveler; if he was going
west his watch was faster than the local time of the towns he passed
through and if he was going east his watch was always slower than the
local time. If he wanted the right time he had to set his watch at
every town he passed through; of course he couldn’t very well do this
and he was always in a stew.
The railroad companies were just as much put to for it was next to
impossible to make a timetable to fit the local time of each town and
still keep up a running schedule; and the result was that the railroads
finally got up a system of their own which they called railroad
time. This was all well enough for everybody but the poor traveler,
who, not knowing the difference in time between local time and railroad
time, nearly always found he was either an hour too early or—as it
usually happened—a minute or two too late to catch his train.
As new towns sprung up and railroads multiplied, things had come to
such a pretty pass in 1883 that nobody but the astronomers knew what
the real time was, and they wouldn’t tell; then a new time scheme was
tried out, and as it is still used we must conclude it is a fairly
good one. It is called the zone, or belt system of standard
time; the time used is called standard time because the towns and
cities and railroads all use it and there is no confusion.
To understand what standard time means we have to know first
what a standard meridian is. A meridian, as we have said, is an
imaginary line running due north and south anywhere we want it, but
while a standard meridian is also a line running due north and south it
has a fixed position.
The first fixed or prime meridian, as it is called, passes
through Greenwich (pronounced Gren´-ij), which is a part of
London, England. The reason this meridian was chosen by geographers to
reckon distance east and west from is because the Royal Observatory at
Greenwich is one of the oldest in the world and it was the first from
which exact time was sent out.
If a circle is divided into 360 degrees, as shown in Fig. 163,
and it is also divided into 24 parts, each part will be a space equal to
15 degrees or 1 hour. Now geographers have divided the Earth into 24
equal parts by meridians separated by 15 degrees, and each space, or
belt, between them represents 1 hour, as shown in Fig. 164.
These fixed meridians start at the first, or prime meridian, at Greenwich and all
the other meridians are measured in degrees east or west of Greenwich
as the case may be.
Fig. 163.—Circle Divided
into 360 Degrees and 24 Hours.
Starting west from the first, or prime meridian, which passes through
Greenwich the time at the second standard meridian, which is called the
15th meridian because it is 15 degrees from the first meridian, will be
one hour behind Greenwich time.
At every standard meridian the mean solar time is used as the standard
time and every place on it and halfway to the meridian on both sides
uses it, and so local time and standard.
This makes it very convenient for the traveler, for instead of setting
his watch at each station he does not need to set it until he has
traveled 15 degrees east or west, which is about 700 miles in our
northern latitudes, and then he turns it exactly one hour ahead or one
hour back, depending on the direction he is going.
Fig. 164.—The Earth Divided
into 24 Standard Meridians.
There are four standard time meridians running through the United
States, as shown in the map in Fig. 165. The one running
through New York, Pennsylvania, New Jersey and Delaware is the 75th meridian,
meaning of course that it is 75 degrees west of the prime meridian
which passes through Greenwich. Time on this meridian and halfway to
the meridians on both sides of it is called Eastern Time. It is
just five hours slower than Greenwich time.
Fig. 165.—Standard Time
Meridians in U. S.
The next is the 90th meridian and this one passes through Wisconsin,
Illinois, Missouri, Tennessee, Mississippi and Louisiana. Time on and
around this meridian is called Central Time.
The one after this is the 105th meridian and passes through Montana,
Wyoming, Colorado, New Mexico and Texas. Time on and around this
meridian is called Mountain Time. The last of the four
meridians, the 120th, passes through the States of Washington, Oregon
and California and time on and around this one is called Pacific
Time. It is three hours slower than Eastern time and 8 hours slower
than Greenwich time.
Although these meridians are just one hour apart the time is not
changed on them nor exactly in the middle of a belt but at some
well-known town or city between two of the meridians, as you will see
by looking at the map, Fig. 165. Fig. 166
shows the standard time at different cities around the world north of the equator.
Star or Sidereal Time.—Besides all the different kinds of time
described above there is still another and a very important kind of
time, and this is obtained by the stars.
Just as Sun, or solar time is obtained by noting when the Sun crosses
a meridian, so star, or sidereal time is obtained by
observing when a star crosses a meridian. Now there is a difference
between the length of a day when formed by the Sun crossing the
meridian twice in succession and when formed by a star crossing the
meridian twice in succession. This difference in time, between a solar
day and a sidereal day, as they are called, is nearly four minutes.
But the point is this: an astronomer can obtain the time from watching
a star cross the meridian much more accurately than he can from the
Sun, because a star is a mere point of light, and it is easier for him
to calculate the mean solar time from the transit of a star than
it is for him to go to bed, and besides he would rather do it, too.
How Time Is Distributed.—In this country the correct standard
time is sent out by the United States Naval Observatory at Washington
to all cities east of the Rocky Mountains, by wire telegraph,
and all over the Atlantic ocean and seaboard by wireless telegraph.
Fig. 166.—Standard Time at
Different Cities.
When time is received over the wires from Washington it is distributed
by local telegraph or by time balls to various jewelry stores
and to private citizens who always want to be set right.
How an astronomer gets the correct time; how it is sent out over the
wires and by wireless and how it is distributed to the common people is
a mighty interesting piece of business. Briefly it is like this:
How Correct Time Is Obtained.—Every observatory has, besides
its big telescopes, a transit instrument, a wonderfully accurate
clock, and a clockwork device called a chronograph. The
transit instrument is nothing more than a telescope with a thin piece
of clear glass with a number of lines ruled on it with a diamond, about
⅛ inch apart, and this ruled glass is set between the eyepiece and the
object glass, as shown in Fig. 167.
Fig. 167.—Ruled Glass in
Transit Instrument.
This telescope, or transit instrument—so called because it is used to
observe the transit, or passage, of a star across a meridian—is
set on an axis so that the telescope can be pointed to any place on the
meridian but it cannot be moved east or west.
Sometime before a star is due to cross the meridian the astronomer sets
his transit instrument so that the star will pass right across the line
of sight of his telescope.
The purpose of observing the transit, or passing of a star is to see
how much his wonderfully accurate clock has lost or gained during the
past 24 hours. So his clock is right at hand.
The chronograph is another accurate clockwork which revolves a cylinder
about the size and shape of a phonograph cylinder, and around which
is wrapped a sheet of white paper. This cylinder makes one revolution
every minute. A fountain pen marks a spiral line on the paper when the
cylinder is revolving but at every second the pen is thrown out of
position and this makes a notch in the line.
After starting the chronograph the astronomer takes an electric push
button, which is connected with and controls the lever which holds
the pen of the chronograph that makes the notches, and takes up his
position with his eye at the end of the transit instrument.
The instant he sees the star on one of the lines in the telescope he
presses the button and this closes the electric circuit and makes a big
notch in the line traced on the paper of the chronometer.
From the position of the big notches which he caused to be made on the
paper as the star crossed the ruled lines, and the little notches made
regularly every second, he can dope out just how much his clock is in
error—that is, how much it is too fast or too slow.
The next thing he does is to change this absolutely correct star time
into mean solar time, when it is ready to be sent all over the United
States east of the Rocky Mountains by telegraph. The Pacific Coast
folks get their correct time from a Government observatory at Mare
Island in San Francisco Bay.
How Time Is Sent by Telegraph.—The wires of the Western Union
Telegraph Company run into the United States Naval Observatory at
Washington, and for a few minutes each day all of this company’s wires
are controlled by the Government.
About five minutes before 12 o’clock noon, standard time at Washington,
each day the wires all over the country east of the Rockies are
cleared and all business and other messages are cut off for the
time signals.
At five minutes of 12 sharp the United States Naval Observatory
begins to send the beats of every second of the wonderfully accurate
observatory clock, which are ticked out on telegraph sounders in all
the cities and towns.
But no, not every beat, for the 29th second of each minute, the last 5
seconds of each of the first 4 minutes, and then the last 10 seconds of
the last minute are not sent. The first click of the sounder after the
10 second rest is the noon signal, and all local clocks are set by it.
In many cities the telegraph company has special wires running to
various jewelry and other stores and these subscribers get the correct
time direct by telegraph from the Naval Observatory for their sounders
are connected in the regular line circuit.
The Time Ball.—The Bureau of Navigation got up what is known as
the time ball for the benefit of sailing masters in particular
and the townsfolk in general.
Fig. 168.—The Time Ball.
In New York and other cities along the seacoasts and lake ports a great
ball, weighing in the neighborhood of 100 pounds, having a diameter of
over 3 feet and with a hole in its center, is slipped over a pole or
flagstaff some 20 feet in height, which is mounted atop of some high
building where it can be seen to the best advantage.
The ball is held in position at the top of the pole by an
electro-mechanical trigger, which is placed directly in the electric
telegraph circuit that runs into the Naval Observatory at Washington.
When the time signals are being sent out from the observatory and the
telegraph key is closed at exactly noon the trigger which holds the
ball in place is released by the current and the ball drops. Fig. 168
shows a time ball atop of the old Western Union Building in New York.
Fig. 169.—Receiving Time Signals
by Wireless.
How Time is Sent by Wireless.—At Arlington, Va., just across
the Potomac River from Washington, is one of the most powerful wireless
stations in the world, having a sending range of at least 3,000 miles.
Every day at noon time signals like those sent over the wires on land
are sent out so that every navigation officer and sailing master whose
ships are fitted with wireless apparatus can get the correct time.
All over the Atlantic seaboard boys, as well as jewelers (see Fig. 169),
have wireless receiving sets and they receive the correct time
every day by wireless free of charge. No license is required to
receive wireless signals, the cost of the apparatus is little and the
experience immense. Are you in on it?
CHAPTER XI THE STARS OF THE ZODIAC
Zodiac!—It sounds to the untrained ear like the password of a
bomb-thrower or a first cousin to a dish of Hungarian goulash.
It is enough, albeit, to scare even a Scout away from the stars, but be
not afraid, for it can’t hurt you and you can’t eat it.
On the other hand, if you are on speaking terms with the zodiac
(pronounced zo´-di-ak), it will help you to find the planets and at the
same time you will add enough new constellations to those you already
know to give you a high passing mark for a merit badge in the Boy
Scouts if you want one. Besides, the signs and constellations of the
zodiac will aid you to use the almanac and help you in many other ways.
You have often noticed that the Sun seems to travel through the sky
over a path or belt that is always the same from west to east; you must
have noticed, too, that the path of the Moon is almost the same as
that of the Sun, but you may or may not remember that the planets also
travel over the same path as the Sun and Moon.
It is just as though the Sun, Moon and planets moved at different
speeds on an endless belt in the sky which runs round the Earth nearly
in a line with its equator, though tilted at a slight angle to it, and
this line is called the ecliptic. The way the ancients thought
it was and the way it really looks to us is shown in Fig. 170.
The ancients called this apparent path of the Sun, Moon and planets
with the stars for a background the zodiac, so it is not such a
horrible specimen after all.
We know, of course, that the Sun is the center of our solar system
and that the planets, including the Earth and Moon, are at various
distances from the Sun and that each moves in a path, or orbit, of its
own, making a small angle with the ecliptic. What we call the Zodiac
takes in all these orbits and is, therefore, a belt of considerable
width through the center of which runs the ecliptic.
Fig. 170.—The Zodiac
as Invented by the Ancients.
Fig. 171.—The Zodiac
as We Know It Today.
Suppose we draw a little circle and call it the Sun, as shown in
Fig. 171, and draw an ellipse around it and call
it the Earth’s orbit, putting on another little circle for the Earth;
now suppose we draw a much larger ellipse round the one representing
the Earth’s orbit, divide it into 12 parts and put a constellation in
each part.
Knowing now that the Sun, Moon and planets are very near the Earth
when compared with the fixed stars it must be plain that these bodies
when seen from the Earth, which is always changing its position in
its travels round the Sun, would appear to move in and across the
constellations.
Take a look at Jupiter some night when he is moving across any of the
constellations and he will seem to be a part of it; this is the reason
we speak of the Sun or a planet as being in a certain constellation at
a given time.
The stars forming the background of the Moon and the planets can always
be seen, for we are then looking at them from the dark side of the
Earth, but they cannot be seen when they form the background of the
Sun, for the stars are on the other side of him when he gets between us
and them and he shines in our eyes.
These constellations through which the Sun, Moon and planets seem to
pass, or as the almanacs say are in, lie in a belt formed by the
path of the Sun and neither the Moon nor the planets ever get farther
from the path of the Sun than 8 degrees on either side of him and this
belt is called the zodiac.
The belt, or zodiac, is divided into 12 equal parts, or spaces, which
were called signs by the ancients and they are still called
signs. This makes the length of each sign, or space, 30 degrees, and
hence the 12 signs, which are called the Signs of the Zodiac,
equal 360 degrees or a complete circle. (See Chapter X, The Time o’
Day.)
The Signs of the Zodiac and the constellations of the Zodiac have
the following names: Aries, the Ram; Taurus, the Bull;
Gemini, the Twins; Cancer, the Crab; Leo,
the Lion; Virgo, the Virgin; Libra, the Balance;
Scorpio, the Scorpion; Sagittarius, the Archer;
Capricornus, the Goat; Aquarius, the Water Bearer, and
Pisces, the Fishes. It is in one of these constellations that
the Sun, Moon and planets are always to be found.
A good way to find any one of the constellations is by knowing the time
when it will be on your meridian, that is the line over your head due
north and south, during a given month. Any constellation of the zodiac
will be on your meridian at 9 o’clock P. M., during the month given
opposite its name in the following table:
Astronomical Names
How Pronounced
Common Names
Time Constellation will Appear on Your
Meridian at 9 p. m.
Aries
A´-ri-es
The Ram
December
Taurus
Tau´-rus
The Bull
January
Gemini
Gem´-i-ni
The Twins
February
Cancer
Can´-cer
The Crab
March
Leo
Le´-o
The Lion
April
Virgo
Vir´-go
The Virgin
May
Libra
Li´-bra
The Balance
June
Scorpio
Scor´-pi-o
The Scorpion
July
Sagittarius
Sag´-it-ta´-ri-us
The Archer
August
Capricornus
Cap´-ri-cor´-nus
The Goat
September
Aquarius
A-qua´-ri-us
The Water Bearer
October
Pisces
Pis´-ces
The Fishes
November
To find any constellation during any other month than that given in the
last column above subtract two hours for each following month. Suppose
you want to find Aries, the Ram, in January instead of December, look
for it on your meridian at 7 P. M.; in February look for it at 5 P. M.,
and so on.
You will of course come to a month where the constellation will run
into daylight and then you won’t be able to see it again until the
Earth has traveled round the Sun to a point where the Earth is again
between the Sun and the constellation.
The constellations of the zodiac are shown in Fig. 172;
also the symbol for each sign and the month in which the sun enters the
sign. As we shall later explain, the constellation is no longer in the
sign of the same name.
If you look southward at the sky some night for any particular
constellation you need not expect the stars which form it to stand
out separate and distinct, as shown in Figs. 172
and 174; if you do you will be sadly
disappointed, for many of the constellations of the zodiac are hard to
recognize compared with the Big Dipper, or Orion, or Pegasus.
Fig. 172.—Constellations
and Signs of the Zodiac.
Nor are the constellations of the zodiac as equally spaced in the sky
as in Figs. 172 and 174.
Some of the stars are very scattered and stretch over part of two signs
of the zodiac, while others do not take up nearly all the space allowed
them; Figs. 172-174 are but rough sketches. To
recognize these constellations you will have to use a good star map.
The heavy black line drawn lengthwise through the middle of the strip
in Fig. 172 represents the line of the ecliptic which
is the yearly path the Sun seems to take. The planets also take the
same course, though they may be on one side or the other of the Sun’s
path by 8 degrees, thus making the zodiac 16 degrees wide; hence, the
lighter parallel lines on either side of the black line, or path of the
Sun, is the farthest away that the planets ever get.
If you were to cut the strip of paper, Fig. 172,
out of the book and paste the ends together, you would have a band, or circle
representing the zodiac more nearly as it is; but instead of cutting the book
you had better draw the signs and constellations on a strip of cardboard
2 inches wide and 24 inches long and glue the ends together, as shown
in Fig. 173; you will now have a zodiac
with which you can do a little experimenting.
Fig. 173.—Cardboard Zodiac.
Place a candlelight in the center of the cardboard ring and suspend a
marble from a thread, by means of a drop of sealing wax, and let the
marble hang between the light and the cardboard zodiac. As seen from
the marble, which represents the earth, the candle, representing the
sun, is in the constellation directly opposite the one in which the
shadow of the marble falls.
In the almanacs our year begins with January and as the Sun is then in
the sign Aquarius, this month is represented by a picture of Aquarius,
the Water Bearer; but in marking out the signs of the zodiac on a flat
strip of paper we begin with Aries, which the Sun enters in the month
of March, and read them from right to left.
The reason for this is because the Earth travels round the Sun
counter-clockwise as seen from the north and this makes the Sun appear
to move eastward through the constellations of the zodiac.
Fig. 174.—Constellations
of Zodiac in Circle.
This makes all the months follow each other in the proper order when
the strip of paper is glued together, as shown in Fig. 173,
or when the constellations are arranged in a circle, as shown in
Fig. 174.
This latter diagram shows plainly that when the Earth is at that part
of its orbit marked A the constellation of Taurus is back of the Sun.
If we are on that side of the Earth which is toward the Sun of course
we cannot see Taurus for the Sun, which is shining in our eyes.
Still Taurus is the background of the Sun just the same, and so when
the almanac says the Sun is in Taurus you will know that the Sun is
directly between the Earth and Taurus.
The same thing is true of all the planets. Take Mars, for example;
whenever Mars is in that part of its orbit so that we can see it at
night, as shown at B, Fig. 172, we also see the
constellation back of it—in this case it is Libra, the
Balance—and since a planet and a fixed star look exactly
alike to the naked eye it is easy to think of Mars as being in that
constellation; and it is the same with all the other planets.
The Constellations of the Zodiac.—The Constellations of
the Zodiac and the Signs of the Zodiac are two very different
things. Long ago, when the zodiac was invented, the constellation
of Aries, the Ram, was in the first of the 12 spaces and he and the
sign of this space were of course at that time the same.
Owing to a peculiar motion of the Earth, called precession, the
signs of the zodiac have moved backward during the last 2,000 years and
the sign of Aries, which used to be in the constellation of Aries, is
now in the constellation of Pisces, the Fishes.
Aquarius, the Water Man.—A constellation of autumn: Aquarius is
always pictured in the almanacs as pouring water from a pitcher.
All the stars of this constellation are faint and scattered and none of
them are in a line with the ecliptic. Aquarius got his name from the
Romans, who called him the Waterman because when the Sun enters
the sign Aquarius in January there are usually heavy rains in Italy
and in the long ago people thought the stars had a lot to do with the
weather, and everything else on Earth, for that matter.
Fig. 175.—Constellations
of Aries the Ram.
Pisces, the Fishes.—This constellation is now in that part
of the zodiac whose sign is ♈ (Aries). It is not an interesting
constellation to look at with the naked eye, for its stars are faint
and they stream out in two lines over nearly two signs of the zodiac.
But Pisces is none the less a very important constellation because it
is at one of the points where the line of the equator crosses the line
of the ecliptic.
When the Sun crosses the point where the equator and the ecliptic meet
the days and nights are then equal at all places on the Earth, and
hence we call this time of the year, which is about the twenty-first
of March, the equinox, which means equal days; or the vernal
equinox, which means equal spring days.
Aries, the Ram.—This constellation used to be in that part of
the zodiac whose sign is ♈ (Aries) but is now in that part whose sign
is ♉ (Taurus).
The position of Aries in the sky is shown in Fig. 175 and
you can easily find him by drawing a line from the North Star to Alpha
in Pegasus and another line at right angles to the first line until you
come to two bright stars quite close together and a third one not quite
so bright. These are the chief stars of the constellation of the Ram.
Taurus, the Bull.—This constellation is now in the sign ♊
(Gemini), of the zodiac. In Chapter II you will find
directions for locating Taurus. You will remember that the red star Aldebaran
forms the right eye of the Bull. The little group of stars called the
Hyades is the Bull’s face and the Pleiades are in his shoulder.
Gemini, the Twins.—It is easy to see why the ancients called
this constellation of the zodiac the Twins, for its two chief stars,
Castor and Pollux, are quite close together and while of
different colors they are of about the same brightness.
These two stars are the heads of the Twins and four other stars are
their feet and these stand forever on the Milky Way. The Twins are
easily found since they are next to Taurus, the Bull.
Gemini is an important constellation, as the Sun reaches its most
northern point in it in summer; this is called the summer
solstice, and takes place about June 21. When the Sun has reached
this point it casts the shortest shadow at mid-day and it seems to
stand still for a few days before it takes its downward course. The
summer solstice is halfway between the two points of the equinox.
Cancer, the Crab.—This is a small constellation of dull stars
that is chiefly interesting because it once contained the point of the
summer solstice, but that was ages ago.
The only thing about Cancer to attract attention is a hazy patch of
light called the Manger. On each side of the Manger is a fairly
bright star and this pair of stars is called the Ass’s Colts;
they will help you to find Cancer.
The Manger has often been mistaken for a comet by those who lit upon it
with the naked eye, but it is really a cluster of small stars.
Leo, the Lion.—There are two separate groups of stars that
make up this king of beasts. The first group takes the shape of a
sickle and the other the form of a square. The sickle,
which is formed of six bright stars, is Leo’s head and shoulders, and
the four stars of the square make up his hindquarters.
Two lines, drawn from the Big Dipper across the sky, as shown in
Fig. 176, will meet the sickle and the square.
The very bright star in the end of the handle of the sickle is
Regulus, which means little king, and far to the other side of
the constellation right in the end of the Lion’s tail is another bright
star called Denebola.
Fig. 176.—Constellations
of the Lion and Big Dipper.
Virgo, the Virgin.—This constellation is of interest, because
the Sun again crosses the point where the equator and ecliptic meet,
and the days and nights are again of the same length everywhere on the
Earth, just as they were at the spring, or vernal equinox.
But this time, when the Sun is in Virgo, it crosses the equator from
north to south about September 21 and so this equinox is called
the autumnal equinox, which means equal autumn days.
By drawing a line from Polaris through Mizarin through the handle
of the Big Dipper and producing it beyond Arcturus, and on until it
reaches a big, bright, white star you will have reached Virgo, as shown
in Fig. 177. This big, white, bright star is Spica,
and it is the chief star in Virgo.
The ancients always represented Virgo, the Virgin, with a sheaf of
wheat in one hand and a sickle in the other. The Virgin and the harvest
always went together in the minds of the ancients and this accounts for
the pictures of Virgo in the almanacs of the present time.
Libra, the Balance.—A small constellation named for the ancient
Roman pound weight.
The constellation of Libra is not nearly as old as the others in
the zodiac, in fact it is thought that there were only eleven
constellations in the zodiac when they were first mapped out thousands
of years ago, although there were twelve signs or spaces in the zodiac.
Its position is shown in Fig. 178.
Then in the days of the Roman Empire, about 300 years before Christ,
some genius clipped the claws of the Scorpion and made its stars into a
pair of scales. This was a very clever idea, for the autumnal equinox
then took place in this sign of the zodiac, and the stars in this sign
were given the name of Libra, as the equal days and nights called to
mind the balance.
Fig. 177.—Constellations
of Virgo the Virgin.
Fig. 178.—Libra,
Lion, Scorpio, Virgo.
Scorpius, the Scorpion.—A summer constellation. If Libra takes
up only a small part of one sign of the zodiac Scorpius makes up for it
by nearly covering two signs.
To the old astrologers, Scorpius was the “power of darkness” and the
“accursed constellation,” and when they cast their horoscopes
they attributed to it “woe and discord, war and disease.”
The constellation of Scorpius is one of the very few which really looks
its part. In the end of its curved tail there are two stars which are
ready to sting if he ever strikes, but he has never struck yet.
The heart of the Scorpion is a big, bright red star called
Antares, which means the rival of Mars, and when Mars is in the
constellation of Scorpius it is hard to tell them apart.
Antares will prove useful in finding the Scorpion as there are no other
bright stars in that part of the sky. The position of Scorpius is shown
in Fig. 178.
Sagittarius, the Archer.—A summer constellation: It is made
up of many stars which can be seen with the naked eye and is always
pictured in the almanacs as a centaur, or man-horse, shooting an
arrow from a bow at the heart of the Scorpion.
Sagittarius is a fine constellation, right in the path of the Milky
Way, and this makes it easy to find. There are several interesting
things in this constellation and among them are the clusters of stars
and nebulæ.
Then there are seven stars in Sagittarius, which make a little dipper
turned upside down, and because it is in the Milky Way it is called the
milk dipper; when you once find it, you will never be able to
see Sagittarius again without seeing the milk dipper.
Fig. 179.—Lyra,
Aquila, Capricornus.
The winter solstice, that is, the most southern point which the
Sun reaches, lies halfway between the constellations of Scorpius and
Sagittarius and also between the two stream lines of the Milky Way.
When the Sun reaches this point, which is the 20th of December, the
noonday shadows are the longest and the Sun seems to again stand still
until Christmas, when he will begin to move north once more.
Capricornus, the Sea-Goat.—A constellation of autumn: On the
same plan that the ancients made Sagittarius a man-horse, so they made
Capricornus a goat-fish.
Though Capricornus is a small and poor constellation when viewed with
the naked eye, the early astrologers thought more of him than all the
other constellations of the zodiac put together.
While the stars of Capricornus do not look anything like a sea-goat, he
can be easily found by drawing a line from Vega in Lyra to Altair in
Aquila and producing it until you come to the zodiac as shown in
Fig. 179.
The two brightest stars of Capricornus are in his head. One of these
stars is a naked eye double, but to many people it will seem merely a
single star. As a matter of fact it is a fine sight test, for it takes
a pair of mighty good eyes to separate them. Another bright star of the
sea-goat is in his fishlike tail.
We have journeyed clear around the great circle which the Sun travels
every year, and we are back again to Aquarius, the constellation we
started from, having covered all the constellations of the zodiac.
The Signs of the Zodiac.—Where the signs of the zodiac are
used in almanacs they do not mean the constellations of the same name at
all, but the spaces or parts of the great circle which form the zodiac.
Two thousand years ago the constellations and the signs of the same
name were in the same spaces or parts of the zodiac, but the signs, by
precession, have shifted over one space to the west since that time,
while the constellations have of course remained unchanged, and this
has made a good deal of confusion.
It’s a pretty skillet of fish, this mixing of the signs and
constellations of the zodiac, but you will get used to it just as
easily as you get used to carrying water when in camp or washing dishes.
How to Read the Almanac.—If you were asked to find the date
of any day of any month of the year you would simply look at a calendar
and find it in a jiffy.
Now, long before calendars came into general use the almanac was
freely consulted, not only for learning days and dates, but for much
more useful information, such as finding the dates of eclipses, the
beginning of seasons, the rising and setting of the Sun, Moon and
planets and the conjunctions and oppositions of these
bodies, planting potatoes and the year the father of your country was born.
To read an almanac easily you should learn the following signs:
☉
The Sun
☿
Mercury
○
Full Moon
♀
Venus
☾
Last Quarter
♁
The Earth
●
New Moon
♂
Mars
☽
First Quarter
♃
Jupiter
☌
Conjunction
♄
Saturn
☍
Opposition
♅
Uranus
♆
Neptune
Conjunction.—When this sign is
used it means that two planets, or the Sun and a planet, or the Moon
and a planet, are on the same side of the Earth.
Opposition.—When this sign is used it means that two planets,
or the Sun and a planet, or the Moon and a planet, are on opposite
sides of the Earth.
To see how these signs work out suppose you look up the month of
January, 1915, in an almanac.
The first line, besides showing that it is the first day of the year,
the first day of the month and that it is Friday, also shows that the ○
(Moon) is full. It further gives the time the ☉ (Sun) rises and sets,
the length of the days in hours and minutes, the ○ (Moon’s)
age in days, and when it rises and sets.
Then on the same line the following signs are given: ♂ ☿ ☌ and this
means that a conjunction of Mercury and Mars will take place on this
date; that is, that they will be nearer to each other from our line of
sight than at any other time for a long while.
On the next line, which is the 2nd of January, the following signs are
given: ♀ greatest brilliancy; ♁ in perihelion☌ ♆ ☾;
the first of which means that Venus has reached its greatest brightness;
the second, that the Earth is the nearest to the Sun that it will get,
and the third, that there is a conjunction of Neptune and the Moon; and
so on for every day of the year.
Note: A good almanac for daily star information is the Old
Farmers’ Almanac, a copy of which you can get by sending 11 cents
to William Ware and Company, Boston, Mass.
CHAPTER XII VALUABLE INFORMATION
Photographing the Stars.—There are some interesting things you
can do with an ordinary camera in the way of photographing the stars.
A camera is made up of three principal parts, and these are (1) a
convex lens, which forms the image of the object to be photographed;
(2) a light-tight box, which keeps out all the light except that which
passes through the lens, and (3) a plate, or film holder, which holds
the sensitive plate, or film, in the camera and keeps it perfectly dark
until you are ready to have the image formed on it.
The instant the lens is allowed to form an image on the sensitive
plate, or film, we get out of the optics of
photography and into the chemistry of it.
The sensitive plate, or film, is coated with a thin layer of salts of
silver and bromide, heated with gelatine and a little water, and when
these substances are thoroughly mixed, an emulsion results,
and this is spread on glass plates or on celluloid films. When the
plate is exposed, that is, when the image has been formed on it, it is
developed. The developing is done by placing the plate in a solution of
pyrogallic acid, or hydroquinone and water.
The plate, or film, is now put in the fixing bath, which is
simply a solution of hyposulphite of soda and water. This fixing
bath prevents any further action of the light on the plate, or film.
But the picture on the glass plate, or celluloid film, looks all
same like a Chinese chromo, for the light and dark parts are just
the reverse of that of the object which was photographed; in other
words, where the picture should be white, it is black, and where it
should be black, it is white, and this is the reason it is called a
negative.
Fig. 180.—Camera
Pointing to North Star.
To get a picture of the object, as it looks to the eye, a sheet of
paper, also coated with salts of silver, is laid flat on the negative
and held close to it in a printing frame when it is exposed to
the light of the Sun.
When the paper is printed dark enough by the Sun, it is toned to
give it a pleasing color and fixed to make it last a long time,
and when washed and dried the image of the object, true to life, is
there, a wonderful record for all time, nearly.
This then, briefly, is how the Sun, or other source of light, makes
an image, how the image is fixed on a dry plate, or film, and how a
picture is printed from the negative, and having found out this much
let’s see how we can make it do a little star work for us.
There is not much we can do in the way of making pictures of the
things in the sky with a small camera, but the few things we can do
are mighty interesting, and show the stars in a way you can never see
them with the naked eye.
To make star trails is one of these interesting things. First,
set your camera on a tripod, or other firm support, and focus
it on a tree or something as far off as you can see it in the daytime.
Now, on a dark night, when there is no Moon, set your camera so that
the lens is pointing directly at the North Star, as shown in Fig. 180.
Set the shutter of your camera for a time exposure and open it.
Fig. 181. Star Trails.
You can go to bed now and let the stars work for you while you sleep,
that is if you can get up before daylight the next morning, but if you
cannot do this stay up as long as you can, three or four hours, anyway,
before you close the shutter.
Now, when you develop the plate, or film, and make a print from it
you will have a record of the apparent path of the stars, as shown in
Fig. 181, but which is, of course, due to the Earth turning
round on its axis. If you set your camera with the lens pointing toward the
ecliptic, that is, the path of the Sun, the star trails will be long,
straight lines, and this will make another interesting record.
By pointing your camera toward that part of the sky and during that
time of the year when there are showers of meteors, and opening the
shutter of your lens, you stand a chance, though it is not a very fat
one, of catching one of these wily shooting stars on your plate, and if
you do succeed—well, you will have a picture that is a curiosity.
You can photograph the Sun with an ordinary camera and make his disk
as large as you want to, but you will get nothing more on your plate
than a white spot. The Moon can likewise be photographed, but if you
focus it sharp on the plate it will not be much larger than a mere
point of light, and if you get a disk large enough to see there will
only be a small white spot on your finished print.
To make good photographs of the Sun, Moon and planets, a big telescope
driven by clockwork to offset the turning of the Earth is needed.
Such a telescope is called an equatorial telescope, and when
it is set so that an object in the sky is in the field of view, it
will remain right there as long as you want it, and when you make a
photograph of the object it will be as sharp and as clear as though
both it and the Earth were standing perfectly still.
If you think enough of the stars to try to photograph them with your
little camera, I should say there is a very good chance of your being
able to photograph them sometime through an equatorial telescope for
all things come to the boy who wants them hard enough.
What the Stars Are Made of.—To know what the stars are made of
is to know more about them than men knew of the Earth a few hundred
years ago.
But just think of looking at a star like Aldebaran, which is so far
away that it takes 45 years for its light to reach the Earth—light
travels eleven million miles a minute—and then saying it is made
of iron, and mercury and hydrogen and sodium and half a dozen other
substances!
Now you ask, “How is it done?” And I’ll say with a glass prism,
and then we’ll have made a flying start. Now a glass prism is a
three-sided piece of glass—the ends don’t count—as shown in
Fig. 144, and it is just as wonderful in its way
as a lens is wonderful in its way.
If you will hold a prism to your eye and look at the flame of a candle
through it, you will see the flame in all the brilliant colors of the
rainbow, and these bright colors form what is called a spectrum.
Now make another experiment; cover a window, on which the Sun shines,
with a sheet of cardboard, in the middle of which you have cut a
horizontal slit with a sharp knife, about 1 inch long and ¹/₂₅ inch
wide. Make the room perfectly dark except for the light which comes
in through the slit in the cardboard, and set a prism in front of the
slit, as shown in Fig. 145. The beam of sunlight which passes
through the prism will be split up, or decomposed, as it is called, into
the seven colors of the rainbow, but the colors will be much brighter.
If you will fix another sheet of white cardboard in a vertical
position so that the colors will shine on it in a band, the colors,
beginning with red at the bottom, next orange, then yellow, green,
blue, indigo and violet, will follow each other to the top bright and
beautiful. These rainbow colors, spread out in a band on the screen,
form what is called the solar spectrum, that is, the spectrum
which is produced by sunlight.
This beautifully colored spectrum is really made up of a great many
images of the slit in the cardboard, one for each wave-length of the
light. If the slit is made very narrow, the images of the slit will
not overlap much and you can tell whether any of the wave-lengths are
missing by looking for fine black lines crossing the spectrum. Such
dark lines are very important in finding out what the Sun and Stars
are made of.
Fig. 182.—Boy Looking
through Prism at Slit in Cardboard.
All you have to do is to stand away from the slit five or six feet and
look at the beam of light through a prism just as you did at the flame
of the candle. This is the simplest form of a spectroscope, that
is an instrument for splitting up the light of any object which is
self-luminous, into a spectrum, as shown in Fig. 182.
When you look at the sunlight streaming in through the slit in the
cardboard you will see a number of dark lines crossing the colored
band. These dark lines are called Fraunhofer’s lines, because
Fraunhofer, who was a German telescope maker, was the first to show
how important they are. The chief dark lines of the Sun’s spectrum are
known by the letters of the alphabet, and, like the colored images of
the slit, they are always in the same place. They are shown in
Fig. 183.
Having found out a little about the spectrum and how it is formed by
the Sun, let’s find out next how it tells us what the Sun and the stars
are made of.
Fig. 183.—Fraunhofer’s Lines.
Now, in the Sun’s spectrum there are a pair of lines close together and
near the middle which are called the D lines—see Fig. 183—and
when a beam of sunlight is split up by a spectroscope, or rather by the prism
of a spectroscope, these D lines always appear in the yellow part of the spectrum.
There was a time, and not so very long ago, when no one had the
faintest idea why the Sun’s light did not contain these two
wave-lengths, when the spectrum from a candle flame was a continuous
band of light without dark lines. Then two experimenters, Kirchhoff
and Bunsen, found that various substances when converted into luminous
gases in a hot flame always produced spectra which consisted only of
certain bright lines. Thus it was found that sodium gas gives
two bright lines in the exact positions of the D lines of the Sun’s
spectrum. This made it look as if the Sun contained no sodium. But
the experimenters did something else: they placed a very brilliant
light back of the sodium gas and on looking through their spectroscope
they saw a continuous spectrum with black D lines. This meant that
the sodium gas had absorbed from the light passing through it the
wave-lengths which it had given out when shining by itself. We now
know that the Sun is surrounded by a layer of gases which is somewhat
cooler than the interior of the Sun and that each substance in this
“reversing layer,” as it is called, takes out some of the light which
is characteristic of it and thus produces the Fraunhofer lines.
In the same way iron and other metals and sodium and other substances
which are heated until they become gases, and hydrogen and other gases
which are aflame, produce spectra consisting of certain bright lines,
and as the light from the Sun also produces black lines in the same
identical places, it is known that the Sun contains these different
substances which are heated up in it to a white heat.
Fig. 184.—The Spectroscope.
It’s the same thing with the stars. It makes no difference if the light
is made by burning some substance a few inches away from the slit of
the spectroscope, or whether it has traveled 90 millions of miles from
the Sun—which takes about 8½ minutes, or 45 years for the light to
reach it from Aldebaran, it always acts exactly in the same way; and so
we know a good deal about the stuff the stars are made of.
Let’s see now, how a real spectroscope is made, for it isn’t always
convenient to have a pitch dark room, nor is it a very exact way to
hold the prism to your eye when examining the light of burning sodium,
or hydrogen gas, or other substances.
The spectroscope is an instrument made so that the light of a
substance burned at one end will pass through a prism and will form a
spectrum on the retina of the eye at the other end. It is usually made
up of two tubes mounted on a stand at an angle with the prism between
them, as shown in Fig. 184.
In the end of the first tube, which is called a collimator, a
very narrow slit is cut, and it is at this end that the substance is
placed which is to be burned and whose light is to be split up and examined.
A convex lens is fitted in the other end of the collimator, or first
tube, so that the light after passing through the slit will then
pass in a beam through the prism. The other tube—the one you look
through—is called a telescope and in this one is fitted a
convex object glass and an eyepiece which magnifies the spectrum made
by the prism.
When a camera is used to photograph the spectrum the eyepiece is taken
out of the tube of the spectroscope and a little camera is put in its
place. In this way the camera and the spectroscope are combined and
this helps chemists to compare the spectra of different burning
substances far better than they could do with the naked eye alone.
To photograph the spectrum of the Sun the eyepiece of the big telescope
is taken out and the end of the tube of the spectroscope with the slit
in it is fitted in its place. In making a photograph of the spectrum of
a star the slit is not needed, for the light of the star itself is but
a mere point.
In photographing the spectrum of the Sun and stars three wonderful
instruments are combined, namely, the telescope, the
spectroscope and the camera; perhaps I should have said
four wonderful instruments, for without the brain of a genius
using them the Sun and stars never would have given up their secrets.
APPENDICES — APPENDIX A — APPENDIX B — APPENDIX C THE GREEK ALPHABET — APPENDIX D STAR TESTS FOR EYESIGHT — APPENDIX E MAGNITUDES OF STARS — APPENDIX F FIRST MAGNITUDE STARS — APPENDIX G CONSTELLATIONS HAVING FIRST MAGNITUDE STARS — APPENDIX H COLORED STARS — APPENDIX I DOUBLE STARS — APPENDIX J VARIABLE STARS — APPENDIX K INVISIBLE OR DARK STARS — APPENDIX L THE EQUATION OF TIME — APPENDIX M THE KULLMER STAR FINDER — APPENDIX N THE ELLIS SEASONAL TWILIGHT CHART — APPENDIX O THE CAMP FIRE SKY MAP
According to the official Handbook of the
Boy Scouts, if you are a Scout and want to win a merit badge for
starcraft, you must
(1) Have a general knowledge of the nature of
the stars and planets.
(a) By the nature of the stars and planets is
meant their colors and what they are made of. Their sizes and their
distances from the Earth in a general way may also be included.
(b) It is easy to tell the color of both the
stars and the planets by looking at them, or by looking them up in the
foregoing chapters.
(c) The spectroscope shows that the stars are
made of metals and gases and other substances which we have on Earth.
The planets are probably made of the same kinds of metals, gases and
substances as those which form the Earth, but there is no way of
proving this, for the planets shine by reflected light, and in this
case the spectroscope is of little use.
(d) The stars are known to be suns as large
or larger than our Sun; while the planets are about as large as our
Earth—some smaller and some larger.
(e) All of the planets are within 2,800 millions
of miles of the Earth, while the nearest star, except our Sun, is 25
trillions of miles from the Earth, or 8,000 times as far away.
(2) Have a general knowledge of the movements
of the stars and planets.
(a) While all the stars revolve in orbits and
are moving through space at high speed, they are so far away from us
that they seem to be fixed and for all practical purposes they may be
considered to be fixed in their positions.
(b) All the planets turn on their own axes and
travel in orbits round the Sun.
(3) Point out and name 12 principal constellations.
(a) Twelve easy constellations are: (1) The
Big Dipper; (2) The Little Dipper; (3) Cassiopeia; (4) Pegasus; (5)
Orion; (6) Auriga and (7) Taurus, all of which are shown in Chapters I
and II; (8) Gemini; (9) Leo; (10) Virgo; (11) The Scorpion, and (12)
Sagittarius, which are constellations of the zodiac, and are shown in
Chapter XI.
(4) Find theNorthby means of
other stars than the Pole Star (which is the North Star)
in case that star is obscured by clouds.
(a) This can be done by finding the constellation
of Cassiopeia, see Chapter I; and also by Pegasus;
Auriga and Orion, as explained in Chapter II.
(5) Have a general knowledge of the positions
and movements of the Earth, Sun, Moon, and the Planets; and of tides,
eclipses, meteors and comets.
(a) By reading the chapters on the Sun, Planets,
Earth and Moon and
(b) Other things in the sky carefully, you will
be able to pass the requirements named in No. 5.
(6) Plot on at least two nights per month for
six months the positions of all naked eye planets visible between
sundown and one hour thereafter. The plot of each planet shall contain
at least three fixed stars with their names or designations; colors of
planets and stars are to be recorded as observed.
(a) How to plot the position of a planet is fully
explained in the chapter on Planets, but you should also read the one
on The Stars of the Zodiac, and have a good star map (App. O).
Figures.—When explaining the positions and forms of things, it
is often necessary to use certain terms and figures, that is to say,
lines which are either real or imaginary, but which can be drawn on
paper. See Fig. 185.
(1) A straight line is, of course, a line which runs uniformly
in the same direction, and which is regular and without curves. A
straight line is the shortest distance between two points. (2) When
we say that lines are parallel, we mean that they lie so that
every part of each is equally spaced from the other. (3) A line is
horizontal when it is parallel with the level surface of the
Earth under it. (4) A line is perpendicular to the surface
of the Earth when it is plumb, that is, in a line with the
center of the Earth. (5) A vertical line generally means a
plumb line. (6) A right angle is formed when a vertical, or a
perpendicular, line meets a horizontal line. (7) A circle is a
curved line, all points of which are equally distant from its center.
Circular means round like a circle. (8) By diameter is
meant a straight line drawn from one side, or half of a circle, to the
opposite side through its center. (9) The radius of a circle is
a straight line drawn from the center of a circle, or a ball, to its
circumference. (10) A ring is a disk or object having a circular
hole cut in its center. (11) An arc of a circle is a part of a
circle. (12) A quarter circle is, of course, the one-fourth part
of a circle. (13) A tangent is a line which touches a curve but
does not cut it. (14) An ellipse is an oval figure, drawn on a
plane surface. (15) The equator is a circle which divides the
Earth or other ball into equal parts, and is 90 degrees from the north
and south poles. (16) The ecliptic is a circle round the Sky in
whose plane lies the orbit of the Earth.
Fig. 185.—Geometrical Figures.
Many of the brighter stars have names, as Aldebaran, Capella, Sirius,
etc., but astronomers now indicate the stars of a constellation by
the letters of the Greek alphabet. The usual method is to call the
brightest star of a constellation α, that is, Alpha, the next brightest
β which is Beta, and so on, but sometimes the stars are lettered in
order of position in the sky.
The following is the Greek alphabet:
α
Alpha
ν
Nu
β
Beta
ξ
Xi (Zi)
γ
Gamma
ο
Omicron
δ
Delta
π
Pi
ε
Epsilon
ρ
Rho
ζ
Zeta
σ
Sigma
η
Eta
τ
Tau
θ
Theta
υ
Upsilon
ι
Iota
φ
Phi
κ
Kappa
χ
Chi
λ
Lambda
ψ
Psi
μ
Mu
ω
Omega
There are a number of stars which are considered to be good tests for
the seeing power of the eyes. The faint stars of the Pleiades are a
fine test of this kind; but usually these tests are double stars and
while one will be bright and easily seen its companion will be very
faint. The test is to see the faint one, and if you can see it you may
consider you have very good eyesight.
Eyesight tests are given on the following pages:
Page
11—
Mizar and Alcor
34—
Spots on the Sun
94—
Grimaldi on the Moon
119—
Nebula in Orion
150—
Epsilon in Lyra
150—
Pleiades
182—
Alpha and Beta in Capricornus
There are not nearly as many stars in the sky as you might at first
suppose. The stars are divided into magnitudes, that is, according
to their brightness. Stars of the first magnitude are the brightest
stars; stars of the second magnitude are second brightest, and so on.
The total number of stars which can be seen with the naked eye on any
one night in the United States is probably not more than 3,000. The
following table gives the number of stars of the different magnitudes
up to and including the sixth:
Magnitudes
Number of Stars
1st
20
2nd
about
65
3rd
about
200
4th
about
500
5th
about
1,400
6th
about
5,000
The brightness of a star is known by its magnitude. A star of the first
magnitude is one of the 20 brightest stars, and is 2½ times as bright
as a star of the second magnitude; a star of the second magnitude is
2½ times as bright as a star of the third magnitude; and so on. A star
of the sixth magnitude can just be seen with the naked eye on a clear
night when there is no Moon.
Fifteen of the twenty first magnitude stars can
be seen in our latitude, and these are:
NAME OF STAR
NAME OF CONSTELLATION
1.
Sirius, the Dog Star,
in
Canis Major
2.
Capella
“
Auriga
3.
Arcturus
“
Bootes
4.
Vega
“
Lyra
5.
Rigel ( β )
“
Orion
6.
Procyon
“
Canis Minor
7.
Betelgeux ( α )
“
Orion
8.
Altair
“
Aquila
9.
Aldebaran
“
Taurus
10.
Spica
“
Virgo
11.
Antares
“
Scorpius
12.
Pollux
“
Gemini
13.
Regulus
“
Leo
14.
Deneb
“
Cygnus
15.
Fomalhaut
“
Piscis Australis
The following important constellations are not described in the
foregoing chapters of this book. They can be found, though, without
trouble, since a star of the first magnitude is located in each.
Canis Major, the Big Dog, is a winter constellation, and can be
seen on your meridian at 9 o’clock P. M. in February. Look for it in
the southern sky and you will quickly find it because of the dazzling
brightness of Sirius, the Dog Star.
Bootes (pronounced Bo-ō´-tes), the Bear Leader, is a summer
constellation, and can be seen on the meridian at 9 o’clock P. M. in
June. It is to the north of the ecliptic, or path of the Sun. It lies
between a crown of stars and Virgo. You can’t miss it, for midway is
Arcturus, a red star of the first magnitude.
Lyra, the Lyre.—Is a summer constellation, and can be seen on
the meridian at 9 o’clock P. M. in August. Look for it almost overhead,
and you can’t mistake it, for three bright stars, of which Vega
is one, form a triangle.
Canis Minor.—The Little Dog: is a spring constellation, and can
be seen on the meridian at 9 o’clock P. M. in March. It lies to the
south of the constellation of Gemini, the Twins, and Cancer, the Crab.
In it you will see Procyon, the Little Dog Star.
Aquila, the Eagle.—Is a summer constellation, and can be seen
on the meridian in August. Look for it south of Lyra, and far to the
west of Pegasus. The star that put Aquila on the map is Altair.
Cygnus, the Swan.—Is also a summer constellation, and can
be seen on your meridian at 9 o’clock P. M. in September. You will
find it north of Pegasus and east of Lyra, and in it you will see
the Northern Cross clearly traced out with seven stars, the
brightest one being Deneb, a first magnitude star.
Piscis Australis, the Southern Fish, is an inconspicuous constellation
far south of the Equator. Fomalhaut, its brightest star comes only 20
degrees above our horizon and must be looked for when it is near the
meridian—about 9 o’clock P. M. in October.
You can easily notice that the stars differ in
color. The following list gives the colors of a few of the brighter stars:
White Stars: Sirius, Regulus, Vega.
Blue Stars: Rigel and Spica.
Red Stars: Aldebaran, Antares, and Betelgeux.
Green Stars: B Librae.
Yellow Stars: The Sun, Arcturus, and Capella.
When two stars are very close together they form what is called a
double star, but double stars of which the two components are
really near together in space and revolve around each other usually
cannot be resolved, that is separated, into two stars without the aid
of a telescope.
The North Star; Rigel, Castor; Procyon and Sirius, are all famous
double stars.
A variable star is one whose brightness changes from time to time.
A great many variable stars are known, but very few of them can be
seen with the naked eye. There are different reasons given for a star
varying in brightness. Our Sun is a variable star, and we are told that
this is due to his spots. Another type of variation is perhaps produced
by pulsations—the star periodically expanding and contracting. Again a
double star formed of two bright stars which revolve round each other,
as many double stars do, may eclipse one another, and this would cause
a change in brightness. Here, then, are three good reasons for a star
being variable.
The following are a few of the variables which can be seen with
the naked eye:
Betelgeux, in Orion.
Alpha Cassiopeia, that is, the brightest star in Cassiopeia.
Beta Lyra, that is, the second brightest star in Lyra, and
Beta Pegasus, that is, the second brightest star in Pegasus.
Mira, in Cetus.
Algol, in Perseus.
Stars are born, live and die, just like human beings. All the stars,
including the Sun, are either in the process of making, are at their
brightest brilliancy, are dying out, or are cold and dead or have not
yet become bright.
Procyon and Sirius is each attended by a comparatively dark companion.
Procyon and Sirius both move slowly back and forth a short distance in
the sky and this motion was attributed to the pull of satellites long
before these bodies were discovered with the telescope.
TABLE OF THE EQUATION OF TIME
Day of Month
January
February
March
April
May
June
m
s
m
s
m
s
m
s
m
s
m
s
1
S 3
31
S 13
44
S 12
37
S 4
6
F 2
56
F 2
30
6
S 5
49
S 14
15
S 11
33
S 2
37
F 3
27
F 1
41
11
S 7
59
S 14
27
S 10
19
S 1
14
F 3
45
F 0
44
16
S 9
49
S 14
19
S 8
57
F 0
4
F 3
48
S 0
18
21
S 11
24
S 13
52
S 7
28
F 1
12
F 3
28
S 1
23
26
S 12
39
S 13
10
S 5
56
F 2
10
F 3
15
S 2
27
31
S 13
35
S 12
13
S 4
24
F 2
56
F 2
39
S 3
38
Day of Month
July
August
September
October
November
December
m
s
m
s
m
s
m
s
m
s
m
s
1
S 3
28
S 6
10
S 0
6
F 0
8
F 16
18
F 11
3
6
S 4
24
S 5
46
F 1
31
S 11
41
F 16
17
F 9
3
11
S 5
11
S 5
8
F 3
13
F 13
4
F 15
56
F 6
51
16
S 5
46
S 4
15
F 4
58
F 14
16
F 15
13
F 4
30
21
S 6
9
S 3
9
F 6
45
F 15
13
F 14
10
F 2
2
26
S 6
11
S 1
51
F 8
29
F 15
54
F 12
45
S 0
28
31
S 6
12
S 0
24
F 10
8
F 16
16
F 11
3
S 2
55
As we have seen in Chapter X every day of the
year is exactly 24 hours long by our clock time. The time by the Sun is
usually either ahead or behind local clock time. The difference between
clock time and Sun time is called the equation of time, and a
table to show how many minutes and seconds the Sun is fast or slow,
according to clock time, is given above, taken from “The New
Astronomy,” by Professor Todd, who has kindly permitted me to use
it here. In the table S means that the Sun is slow, that is,
that the Sun does not cross the meridian until after the clock shows
noon, and F means that the Sun is fast, that is, that the Sun
has crossed the meridian before the clock shows noon. m means
minutes, and s means seconds above the figures.
The table gives the average values of the equation of time, which may
differ by a few seconds from the values for any particular year.
The star finder shown in the picture was invented by Dr. C. J.
Kullmer, of Syracuse, N. Y., and has been highly praised by many great
astronomers.
Fig. 186.—Kullmer Star Finder.
You should own one if possible, for you do not need to know anything
about the stars to operate it. It is mounted on the principle of a big
telescope, but it is a naked eye instrument, an arrow taking the place
of the telescope.
The finder is placed on a table, or other level surface, with the
dial facing north. Then the pointer and dial are set for the day
and hour when you want to find the position in the sky of a certain
constellation. The indicator is turned to the name of the constellation
on the dial, and this also tells the direction to set the arrow.
This is all there is to it and the arrow points right at the group of
stars you want, whether they are above the horizon or not.
The finder can be used for many purposes, and it is a wonderful aid in
making out in the sky the path of the stars, Sun, Moon and planets,
and when they rise and set. In fact, it is a complete observatory on a
small scale. Its cost is only $5.00.
A useful chart, designed by Miss E. Rebecca Ellis, of Wellesley
College, Wellesley, Mass. It makes clear the changes in the lengths of
the day, the phenomena of the seasons, etc. Its price is $1.00.
This map, prepared by Prof. R. S. Dugan of Princeton University, shows
the constellations as far south as the Southern Cross and is adjustable
for the time of night, date, and for the latitude. Full instructions
are given for its use. It is used in many schools and colleges. It is
sold by the Camp Fire Stores Co., price 19 cents.
DEFINITIONS OF SOME WORDS AND TERMS USED IN THIS BOOK
Action. The way in which a thing works.
Affect. To act upon; to change; to be moved
or influenced by.
Almanac. A pamphlet or book containing
tables showing the days of the year; also the time the Sun and Moon
rise and set; the conjunctions, eclipses and other information
concerning the things in the sky. The word almanac is supposed to be
derived from the Arabic article al and the verb manac,
which means to count.
Aphelion. The point where a planet or a
comet is farthest away from the sun.
Apparent. To seem real. The daily motion
of the Sun round the Earth is only apparent, for we know it is the
Earth which turns round on its axis instead.
Aspect. (1) Any curious appearance of an
object, especially if the object changes in appearance. (2)The figure
formed by a planet with the stars of the constellation which it is in.
Astrologer. One who forecasts the life of
a person on the supposition that the stars control it.
Astronomer. One who is skilled in seeing
the stars and who knows them.
Atom. A very small particle of matter. See
Molecule; Matter.
Attract. To pull toward. The attraction of
the Sun and the Earth for each other is due to gravitation.
Attraction. A force which pulls one body
to another.
Attraction of Gravitation. A force which
pulls all bodies to each other.
Auditory nerve. A nerve that carries the
impressions of sound which reach the ear to the brain.
Aurora borealis. The Northern Lights.
A glowing light effect which takes place in the Arctic Circle.
It can often be seen from our Northern States and sometimes from
the Southern States. The same kind of lights appear in the Antarctic
Circle. These Southern Lights are called Aurora Australis.
Axes. Plural of axis.
Axis. An imaginary line on which a body
turns.
Axis of rotation. An imaginary line round
which anything turns or spins.
Axle. A wood or metal rod on which one or
more wheels turn, or it may turn with the wheel or wheels.
Badge of merit. A badge
awarded by the organization of Boy Scouts to members who can show a
certain amount of skill in doing certain things. See Appendix A.
Band. (1) A flat strip of any material,
or (2) such a strip whose ends are joined together.
Beam. Rays of light which are parallel.
See Ray.
Bearing. (1) A piece of metal, or a bit of
agate or other jewel, on which a pivot, spindle or shaft turns. (2) A
direction as found by the Sun or stars, or by the compass, sextant or
other means.
Body. Any separate and distinct amount of
matter when held together. The Sun and Moon are heavenly bodies.
Degree. (1) The 360th part of
a circle. (2) Indicated by this sign °.
Device. (1) An apparatus or
instrument or any part thereof. Any arrangement for producing a given
result.
Diagram. A sort of shorthand picture of an
apparatus or part of an apparatus. It is used to show in the simplest
and clearest manner the construction of an apparatus.
Disk. (1) A circular plane or flat
surface. Since the Sun, Moon and planets seem to be flat their surfaces
are called disks. (2) Flat and circular like a coin.
Dog days. So called from the fact that
Sirius, the Dog Star, rises at the same time as the Sun.
Equatorial. Having to do with or affected
by the equator.
Equatorial telescope. A telescope so
mounted that its principal axis is parallel with the axis of the earth
and moved by clockwork so that it will follow a star.
Evening Star. A planet which can be seen
in the west just after the sun sets.
Fixed. (1) Fastened securely.
(2) The stars are called fixed because they never seem to change their positions.
Forecast. A prediction of some future
event. A forecast may be founded on fancy or on fact. A horoscope of
a person is a forecast based on the fancy of an astrologer. A weather
forecast is founded on the action of a barometer, and even then the
forecast is uncertain enough. Forecasts of the time of eclipses, the
return of comets and the like are founded on cold scientific facts and
hence come true at exactly the calculated time.
Frequency. How often an event occurs.
Gas. That form of matter
which is like air. Some gases remain in the gaseous state at ordinary
temperatures. Gases have a tendency to expand without limit. See
Vapor.
Generate. To produce. To set up; as a
battery generates a current; the Sun generates power.
Gravitation. The force which attracts all
bodies near the Earth to it and all bodies to each other.
Heavens. The sky. The space
as far as the eye can see about the Earth. The space in which the stars
and their planetary systems move.
Horoscope. A forecast of the future of a
person made by an astrologer who pretends to read the future from the
aspect or position of the planets and stars.
Idea. A notion of a plan or
scheme which may be more or less vague. Supposition. A clearer
conception of a plan or scheme which is based on such facts as may be
thought of. Hypothesis. A plan or scheme assumed to be true and
carefully reasoned out from all the facts obtainable. Theory. A
plan or scheme which has been proved true by experiment, examination or
comparison.
Illusion. An image which deceives the eye. The
other senses can also be deceived by illusions.
Impact. Coming together of two objects.
Impress. To form on, or to affect, as light
waves impress a dry plate.
Indicate. To show. To point out.
Indicator. That which points out or shows
something.
Limb. The edge of the Sun, Moon or Planets.
Lore. Learning on any subject.
Lunar. Of, or having to do with the Moon.
Magnetic lines of force. The
direction of the force of magnetism acting in and around a magnet.
Magnetic storm. The Earth is a great
magnet and sometimes when sun spots of unusual size or numbers appear,
the magnetic lines of force of the Earth are violently affected. This
is called a magnetic storm.
Mass. (1) Amount of matter. (2) A lot of
molecules or particles of matter brought and held together.
Matter. The substance of which a thing is
formed. A molecule of matter is made up of atoms, and a mass is a lot
of molecules held together by some attractive force.
Mercury. (1) The name of the planet
nearest the Sun. (2) A silver white liquid metal.
Molecule. The smallest part of matter that
can exist separately without the substance it forms being destroyed.
Morning Star. A planet which can be seen
in the east just before the Sun rises.
Morse code. A telegraph code of dots and
dashes invented by Samuel F. B. Morse. The Morse Code is used for
telegraph and heliograph signaling.
Motion. Anything that changes position.
There are two kinds of motion (a) simple motion and (b) compound
motion. Simple motion can be either translated or
rotary, while compound motion is both translated
and rotary, so that while a body is being translated, or moved
through space, it is also rotating on its axis. The Sun and planets,
then, have compound motions.
Nature. Everything contained
in space that has not been shaped by human hands.
Nautical almanac. The American Nautical
Almanac is a book of the stars published by the Bureau of Navigation of
the United States. It is published three years in advance and is sold
by the Superintendent of Documents, Washington, D. C., at 30 cents per
copy. This is designed chiefly for the use of navigators of ships. It
gives the exact positions of the Sun, Moon and planets and much other
astronomical information. It is based upon the calculations made by
the United States Naval Observatory; these are printed in the Nautical
Almanac, and on this all other almanacs are based.
Northern lights. See Aurora Borealis.
Obscured. Hidden from sight.
Official Handbook of the Boy Scouts. A
book published by the organization of Boy Scouts and which contains the
rules and regulations of that organization and the requirements they
must meet in order to win merit badges.
Particle. A bit of matter. A particle may
be a bit of matter which can be seen or it may mean an amount so small
that it cannot be seen.
Pencil. A group of rays from the same
source of light. See Beam. See Ray.
Pendulum. A body suspended from a fixed
point and free to swing.
Perihelion. The point where a planet or
a comet is nearest the Sun. As the orbit of a planet is an ellipse
and the Sun is in one of the foci—that is near one end—a planet comes
nearest to the Sun when at this end of the ellipse; and when the planet
is at the other end of its orbit, it is farthest away. See Aphelion.
Period. A certain interval of time which
is marked by a repeated occurrence. The period of the Earth round its
axis is about 24 hours. Its period around the Sun is 365¼ days.
Periodic. Recurring regularly; as a
periodic comet.
Phase. One of the peculiar aspects of a
heavenly body; as the phases of the Moon, or the phases of Venus.
Pivot. A pin, spindle or shaft on which a
wheel, lever or device rotates or is rotated.
Plane. A level surface, as a table top.
Point. A sharp end. A starting place.
Pores. Minute spaces which separate the
molecules of a substance.
Position. The place of a thing when
compared to the places of other things.
Precede. To go ahead of. That which is
before.
Precession. The act of going ahead or
preceding. When a revolving body such as a spinning top or the Earth is
acted upon by forces which tend to change the direction of its axis.
This change in the direction of its axis is called precessional
motion. The pole of the equator of the Earth makes a complete
turn round the pole of the ecliptic in a little over 25,000 years and
this change in the direction of the axis of the Earth causes the points
of the equinox, that is the places where the ecliptic and
the equator cross each other to move slowly from west to east
and this is termed the precession of the equinoxes.
Prediction. To foretell; to forecast.
Predictions may be
based on fancy or founded on fact.
Principal. The chief one; the most
important.
Principle. The cause of a result. That on
which a thing is based.
Process. (1) The way of working. (2) The
course of procedure.
Produce. In astronomy the word produce
means the lengthening of a line. It is a mathematical term.
Rise. To come into sight above the
horizon, as the Moon rises.
Rotate. To turn completely round on an
axis like a top or the Earth.
Rotary. Turning completely round on an
axis, like a top or the Earth.
Roughly. Not exactly; nearly enough for
practical purposes.
Schedule. (1) A tabulated
statement giving items concerning a subject. (2) A timetable of any kind.
Seeing. To look at. The word seeing
in starcraft means to observe the stars. Good seeing is
to observe the stars when the atmosphere is perfectly clear.
Seems. Something which apparently is true
and yet is not necessarily true.
Sensation. The action of one of the senses
when excited by some change in matter. Light falling on the retina of
the eye produces the sensation of light and color in the brain.
Set. To sink from sight below the horizon;
as the Sun sets.
Sight. The power to see. See Sighting.
Sighting. To get the eye and two other
objects, such as a telescope and a star, in a line, as to sight Jupiter
with a telescope.
Sign. A mark, figure or letter which
astronomers have agreed to use to represent certain stars, aspects
of stars, parts of the zodiac, etc.
Solar. That which is of, or has to do
with the Sun.
Spring stars. The stars which can be seen
best during the spring months.
Star chart. A map of the positions
of the stars.
Starcraft. Useful knowledge of the stars.
Skill shown in making the stars serve useful purposes.
Star finder. A device of any kind which
will enable an unskilled person to find the planets or constellations.
Star-lore. Learning concerning the
mythology of the stars.
Summer stars. The stars which can best
be seen during the summer months.
Thumb tack. A short, thin, sharp-pointed
tack with a large flat head which permits it to be easily pushed into
a board with the thumb. It is used by draftsmen for fastening paper to
drawing boards.
Tilting. Leaning from a vertical or plumb
line. The axis of the Earth is tilted from the perpendicular 23½
degrees; this throws its equator out of plane with that of the sun, and
the circle through the Earth that is in plane with the Sun is called
the ecliptic.
Transparent. Said of any substance through
which light can pass easily. Anything that may be seen through.
Twinkle. To blink. To flash with varying
brightness. The twinkling of stars is caused by the atmosphere.
Uniform. Being the same all
through or all along.
Vapor. A gas produced from a
liquid or a solid and which returns to its original form at ordinary
temperatures. See Gas.
Vibration. A to-and-fro movement, as the
vibration of a particle of matter. A constant to-and-fro movement over
the same line.
Visible. That which the eye can see.
Wane. To gradually grow
smaller. Said of the Moon.
Wax. To gradually grow larger.
Said of the Moon.
Winter Stars. The stars which can best be
seen during the winter months.
Wireless Messages. Messages which are sent
and received by wireless telegraph stations.
Wireless system. An apparatus for sending
and receiving messages by wireless telegraph.
Your meridian. The line
running due north and south in the sky directly over your head. A
meridian of this kind is called a celestial meridian.
Zodiacal lights. A faint
glowing light which may be seen above the western horizon just after
twilight during the clear evenings of winter and spring. It can also
be seen just before daybreak during the clear mornings of summer and autumn.
[1]
Aristarchus was a Greek who lived 200 years before Christ.
He taught that the earth was round.
[2]
Copernicus—Polish, astronomer. Born 1473. Before his time it was
believed that the Sun, Moon and stars revolved round the Earth.
Copernicus showed that the Earth was a planet and, with the others,
that it revolved round the Sun.
Transcriber’s Notes:
The illustrations have been moved so that they do not break up
paragraphs and so that they are next to the text they illustrate.
Typographical and punctuation errors have been silently corrected.