Badly worn washers make faucets noisy, hard to operate, and
wasteful of water. Moderate force on the handle of a faucet in good
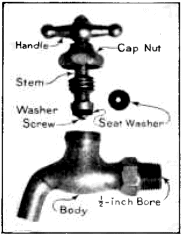
repair should stop all flow and drip. Figure 1 shows an ordinary
half-inch T-handle compression faucet which closes against the pressure
of the water. To replace the seat washer, shut off the water to
the faucet. Unscrew the cap nut with a monkey wrench. (Placing
cloth or thick paper between the jaws of the wrench saves marring
the cap nut.) Take hold of the faucet handle and unscrew the
stem from the body of the faucet. With
a screw driver remove the washer screw
at the bottom of the stem. This screw is
often hard to start. Applying one or two
drops of kerosene and lightly tapping the
head of the screw may help to loosen it
in the stem. Use strong, even force on
the screw driver, the blade of which
should have a good square edge to fit the
slot. The head of the screw often splits
before the shank of the screw turns in the
stem, because it is already corroded and
weakened. If it splits, deepen the slot in
the head with a hacksaw, cutting a little
into the shank of the screw. No harm
is done if the saw cuts slightly into the
stem of the faucet. The washer screw may
now be turned with a small screw driver. Replace the old washer
with a new one, replace the washer screw, screw the stem into the
faucet, and screw down the cap nut. Rubber and fiber composition
washers for hot- or cold-water faucets cost 10 to 15 cents a dozen.
A "floating" washer, costing 15 cents, is
very serviceable. A few washers of the
needed sizes should be kept in the home.
If none are at hand, a temporary washer
may be cut from a piece of leather, rubber,
or sheet packing. Leather is preferable on
cold-water faucets and rubber on hot-water
faucets.
 |
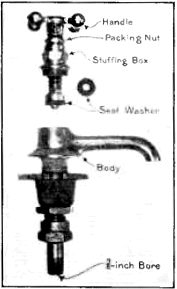 |
Figure 1.—Compression faucet. |
Figure 2.—Compression faucet for a washstand. |
Figure 2 shows an ordinary 3/8-inch,
4-ball-handle compression faucet for a
washstand. To replace the seat washer,
shut off the water to the faucet and open
the faucet one or two turns of the handle.
With a monkey wrench on the hexagonal
part of the stuffing box unscrew the stuffing
box from the body of the faucet. Lift
out the stem, replace the old washer with
a new one, as previously described, and
screw the stuffing box into the body.
A worn washer with constant leakage
over the seat of a compression faucet,
together with grit lodging there, often causes the seat to become
cut, nicked, and grooved. The trouble occurs more often in hot-water
than in cold-water faucets. Such seats can easily be reground
or squared with a simple seat dressing tool, two types of which are
shown in figure 3, A and B. A seat dresser with four cutters for
different-sized faucets costs about $2, and its use saves buying new
faucets. To dress the seat of a faucet, unscrew the stem from the
body to the faucet, as above described. Screw the adjustable, threaded
cone of the tool (see fig. 3, A) down into the body of the faucet, as
shown in figure 3, C, thus centering it over the seat. With the hand,
as shown in figure 3, D, gently rotate the wheel handle at the top of
the tool several times, and the cutter on the bottom of the stem squares
the seat. Turn the faucet bottom side up and shake out the cuttings.
Reassemble the faucet and turn on the water to wash out any
remaining cuttings.
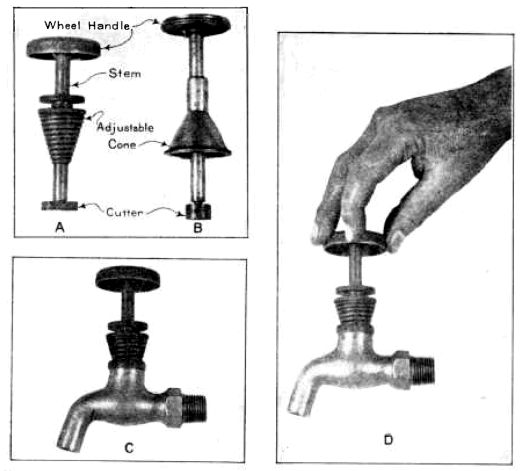
Figure 3.—Faucet seat dressers: A, dresser with inside adjustable cone; B, dresser with
outside adjustable cone; C, dresser A screwed into a compression faucet; D, rotating
the wheel handle and cutter.
Seat washers are subject to damage from metal filings left in newly
installed water pipes. A good plumber, before screwing up a piece
of pipe, always stands the pipe on end and raps it with a hammer
to clear the bore.
Figure 4, A, shows an ordinary half-inch lever-handle Fuller faucet
which closes with the pressure. As shown in figure 4, B, the bottom
of the spindle is eccentric, so that slight turning of the handle
moves the rubber ball to and from the beveled seat. To replace the
ball shut off the water to the faucet. Unscrew the body from the
tailpiece with the hands or with a monkey wrench on the hexagonal
part of the body of the faucet. It may be necessary to apply a
wrench to the hexagonal nut on the tailpiece and press the wrench
downward to prevent unscrewing the tailpiece. Unscrew the stem
nut, which holds the brass cap and rubber ball on the stem. Put on
a new ball and replace cap and nut. Red rubber balls are considered
to be better than black balls for hot-water faucets. Avoid
using too large a ball, as swelling of the rubber may hinder the
flow. Screw the faucet into the tailpiece. Just before the joint
closes or "makes up", wrap a little string packing or candle wicking
around the thread on the faucet to make the joint water-tight.
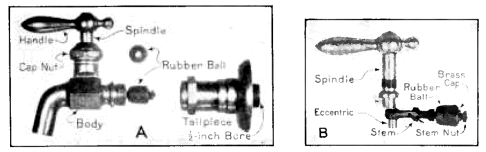
Figure 4.—Fuller faucet: A, body unscrewed from tailpiece; B, spindle and stem removed
from body.
A top washer or packing; snugly fitting the stem is necessary to
prevent leakage upward through the cap nut when a faucet is
opened. If the space is too tightly packed, the stem binds, nudging
it hard to operate the faucet; if too loosely packed, water spurts
from the top of the cap nut. Figure 5, A, shows a soft rubber-and-fabric
top washer suitable for the compression faucet shown in
figure 1. This washer is one-eighth of an inch thick and rests on the
top of the body of the faucet, making a water-tight joint when the
cap nut is screwed down. Just below the soft washer and inside
the top of the body a thin brass washer is placed to take the wear
when the faucet is fully opened. These washers are separated in the
illustration but are together when placed in a faucet.
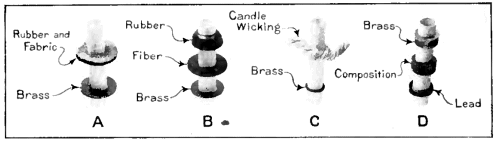
Figure 5.—Top washers and packings:
A, top washers commonly used in ordinary compression
faucets (
fig. 1);
B, top washers which fill the space beneath the cap nut (fig.
1)
C, candle wick packing and brass washer for washstand faucet (
fig. 2);
D, spindle
packing for Fuller faucet (
fig. 4).
New faucets of the kind shown in figure 1 usually have the top
washers shown in figure 5, B. The rubber washer fills the space
beneath the cap nut, and the thin fiber and brass washers are for the
purposes described above. If no top washer is available, the space
may be packed with candle wicking or soft twine, to which a little
mutton or beef tallow should be applied to lubricate the stem, to
preserve the packing, and to make it more impervious to water.
When placing the top washer or washers on a compression faucet
of the kind shown in figure 1, it is unnecessary to shut off the
water provided the faucet is closed. With the right hand keep the
faucet closed and with a monkey wrench in the left hand unscrew
the cap nut. Unscrew the handle screw and remove handle and cap
nut. Put on new washers as shown in figure 5, A, or 5, B, and reassemble
the parts.
Figure 5, C, shows the stem packing for the washstand faucet
shown in figure 2. The packing space is very small and is filled
with candle wicking lubricated with tallow. There is a thin brass
friction washer in the bottom of the stuffing box, and a hexagonal
packing nut screws into the top of the box. To renew the candle
wicking, keep the faucet closed. Unscrew the packing nut with a
monkey wrench, wrap a little wicking around the stem, and screw
the packing nut down against the wicking and into the stuffing box.
Spindle packing for a Fuller faucet (see fig. 4) is shown in figure 5,
D, and consists of three collars or rings obtainable from plumbing
dealers for a few cents. A lead ring or packing about one-eighth
of an inch long goes first (lowest) on the spindle; then a rubber-and-fabric
composition packing about one-fourth of an inch long; then a
brass packing about one-fourth of an inch long. Screwing down the
cap nut compresses the composition packing, and the metal packings
take up friction and wear. To put in new packings, shut off the
water from the faucet and remove the handle and cap nut, as described
in connection with compression faucets.