Flowers
- Material required:
- Tie wire, green
- Gum tissue, brown and green
- Cotton batting
- Milliner's glue
- Yellow stamens
- Dark green tissue paper
Flowers may be made from almost any fabric—satin, velvet, georgette,
maline, ribbon, soft leather, oilcloth, yarn, and chenille. A scrapbag
for odds and ends should always be kept for small pieces of materials.
Any piece two inches square may be used for flowers or fruits. Such a
bag of pieces will prove a veritable gold mine to use in making flowers
and fruit trimmings. Each year brings out novelties in trimmings, but
hand-made flowers are always worn more or less on hats, gowns, suits,
and muffs. They are especially beautiful on evening gowns. A generous
number of the best examples are given here with illustrations.
To prepare the petals of any flower is not difficult, but to arrange
them is another matter. Study the face of any blossom which you are
making and try to make it look as natural as possible. Pinning the
petals in place before sewing them is of great value, otherwise they are
apt to slip back on the stem as they are being sewed.
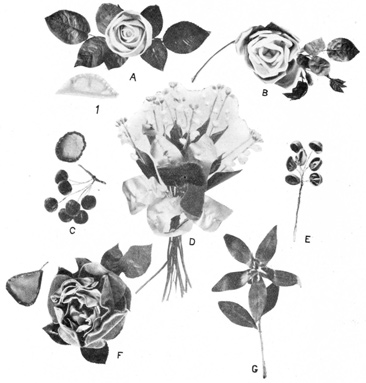 A. AMERICAN BEAUTY ROSE WITH DETAIL. B. RIBBON ROSE. C.
CHERRIES WITH DETAIL. D. ORCHIDS WITH LILIES OF THE VALLEY. E. RAISINS.
F. WIRED ROSE WITH DETAIL. G. POINSETTIA.
A. AMERICAN BEAUTY ROSE WITH DETAIL. B. RIBBON ROSE. C.
CHERRIES WITH DETAIL. D. ORCHIDS WITH LILIES OF THE VALLEY. E. RAISINS.
F. WIRED ROSE WITH DETAIL. G. POINSETTIA.
American Beauty rose—
This rose may be made of silk or satin; it may have as many petals as
desired. Each petal is cut from a piece of folded material like the
diagram (1). It is highly important that the folded edge be on a true
bias. Begin the rose by cutting three petals like the illustration, with
the bias edge one and one-half inches long. Run a gathering thread
one-eighth of an inch from the curved edge, leaving a thread one inch
long so that the petal may be adjusted as it is pinned in place. Make a
loop one inch long on the end of a piece of wire six inches long. Cover
this loop with a small circle of the material like the rose. It is
sometimes found to be advantageous to fill this circle with cotton to
make a soft center for the rose.
For an ordinary-sized rose there should be eighteen petals. The first
three are already described as having a one and one-half-inch bias. The
next larger in size should have a two-inch bias and be correspondingly
wider; the next five should have a two and one-half-inch bias, and the
next five a three-inch bias. The three small petals should be arranged
around the covered loop of wire and pinned in place before sewing. Sew
securely. Each row, as it is arranged according to size, should be
pinned in place and scrutinized carefully to see that it is placed
effectively. Each row should be placed a little higher than the
preceding one. See that the face of the flower looks as nearly like a
real rose as possible, allowing the back to look as it will.
With a little experience one soon becomes efficient and learns how to
adjust the different materials. Some materials being more pliable than
others, the shape of the petals may be changed slightly to meet the
need. The back of the rose may be finished by adding a sufficient number
of green leaves taken from some discarded flower or bought for the
purpose. A small green cup is also added to finish the base; these may
be bought at ribbon counters. The bud used with this rose may be made by
using the three smallest petals. Some green foliage must also be used
with this rose and the stem bound with a narrow gray-green ribbon, or
with gum tissue which should be warmed before using. The inside petals
may be of a darker shade than the outside petals.
Ribbon rose—
To make a medium-sized ribbon rose requires two yards of satin ribbon
two inches wide. There are several different methods of making the
center for this rose. A simple center for this rose may be made from a
piece of the ribbon, four inches long. Fold this in half. Sew the
selvages together along one side. Turn and fill with cotton around which
has been wound the end of a six-inch piece of frame wire. A little
rose-scented sachet powder may be sprinkled on this cotton to add
perfume to the blossom. Gather the satin down close to the wire after
rounding the corners at the lower edges. Two yards should make this
center and eighteen petals. More may be added or fewer may be used. For
the first row cut three lengths three inches long; the second row, five
lengths three and one-half inches long; third row, five lengths four
inches long; fourth row five lengths four and one-half inches long. Each
petal is finished the same before it is sewed in place Fold the two
ends together, turn each corner of the folded end down diagonally and
pin in place. Now raise the end on the back of the petal and catch the
corners down with a few small stitches. Replace the end and gather the
raw edges together, but do not draw up close. Prepare all of the petals
in the same way before beginning to sew them to the center. Sometimes a
tiny bit of cotton is placed inside each petal to make the rose look
larger. When all the petals are finished, begin the rose by adding the
three smallest petals first. Pin in place around the center, wrapping
them closely around it and letting them extend about one-eighth of an
inch above the point. Add the next row, pinning each petal in place
before sewing. Place each succeeding row one-eighth of an inch above the
preceding one. Watch the face of the blossom carefully and see that it
looks as natural as possible. The back of the blossom will be covered
when finished, either with a few old rose leaves and a rose cup, or
points of green ribbon sewed to resemble leaves. A rubber stem may be
bought to slip over the wire on which the rose is sewed, or the wire may
be wound with green floss, baby ribbon, green tissue paper, or gum
tissue. If the rose is to be full blown, it would be much better to
make the center of yellow stamens.
Wild rose of silk—
The petals for the wild rose may be cut from the same pattern as for the
first rose given. This same pattern is used for many different
flowers—the wild rose, apple blossom, sweet pea, and for foliage.
For the wild rose use the size having the two-inch bias. Gather
one-eighth of an inch from the curved edge, draw down tight and fasten
the thread off. This rose requires five petals, and will look more
natural if two of the petals are of a darker shade than the other three.
For the center wrap a piece of tie wire around several yellow rose
stamens which may be bought at a millinery store, leaving the ends of
wire five or six inches long. Arrange the petals flat around this center
and sew in place. The petals should lie out flat, or nearly so. A bud
for this rose is made by folding a petal together after having gathered
it. The bud may be effectively finished by using two leaves of foliage,
placing one on either side, partially covering the bud and then
finishing with the wire or a small green rose cup. To finish with wire,
make a loop in the center of a ten-inch piece of tie wire. To this loop
sew the bud. Twist the wire several times for an inch below the bud,
then turn one end of the wire back and twist it around the stem until
the bud is reached. Wind it several times over the base of the bud, draw
it tight and see that the wire is close together. This will make a
finish for the bud.
Foliage—
The rose foliage may be made if desired. Cut the leaves from green satin
or velvet, or color them green with water-color if a light-colored
material must be used. After cutting the pieces in the shape of rose
leaves (it will require two pieces for each leaf), lay one wrong side
up, cover with milliner's glue. Lay on the center of this a piece of tie
wire long enough for the stem. Place another leaf on this and press
together. When all the leaves are made after this method, arrange on a
long stem or wire, and if wound with brown gum tissue it will look very
natural.
Small wound rose of fabric—
Cut from a true bias a strip of material one inch wide and four inches
long. Fold lengthwise through the middle. Turn the raw edges in on one
end, and gather one-eighth inch from the edge along the raw edges. Draw
the thread up to one inch and roll, beginning with the folded end, and
sew. A piece of tie wire may be glued inside the fold before gathering,
if desired. These little roses may be sewed on a stem or sewed to a
shaped piece of buckram which has been covered with silk. It may be in
the shape of a buckle or a circle and covered with these little roses in
several colors, pink, blue, and mauve. Sewed flat against a crown or on
a brim, they would trim a hat effectively.
Wired rose—
This rose, when carefully made, is most beautiful and sells for an
exorbitant price. To make the rose as illustrated requires one-quarter
of a yard of satin cut on the bias and one-eighth of a yard of velvet
cut on the bias. If the velvet is one or more shades darker, the result
will be more pleasing.
The rose is fashioned from petals cut like the illustration. The first
three petals are cut from dimensions given in the illustration, two
inches long and one and three-quarters inches wide. The next five petals
should be one-quarter of an inch larger, and each succeeding row of five
petals should be one-quarter of an inch larger than the preceding one.
The last row of petals is to be made from the velvet. Cut a piece of the
tie wire long enough to reach around the outside edge of each petal,
plus one and one-half inches. Lay the petals down wrong side up, bend
the wire to the shape of the petal, lay the wire close to the edge and
turn the raw edge over the wire one-eighth of an inch and glue in place
with milliner's glue. Place a light weight on the petals until
thoroughly dry.
Begin assembling the flower by first making a center from some of the
scraps left from the velvet, or yellow rose stamens may be used; fold
several small pieces into bud-like shapes of about one inch in length,
sew strongly and fasten on a loop of the wire six inches long. Keep the
point where all the petals are joined in as small a circumference as
possible. Begin with the three small petals, pleat them at the bottom
into as small a space as possible, and sew to the center with the wrong
side to the center. After they have been arranged, the edges may be
crinkled down somewhat. Add the remaining petals according to their
size. The last row of velvet petals is rather pretty if one or more is
placed with the right side toward the center.
Flat pasted blossom—
A conventional flower which makes a beautiful trimming may be made from
the pattern for the wired rose first given. Cut five petals (of any size
required) from velvet, and five the same size from silk or satin. Lay
the velvet petals wrong side up and cover with milliner's glue. Lay on
this a piece of tie wire one-quarter of an inch from the edge, allowing
an extension of ends of the wire at the bottom of the petal. Lay the
silk petal on top and press firmly. When dry arrange these five petals
around a cluster of yellow stamens, which have been fastened to a loop
of tie wire. This blossom should lie out flat when finished. Of course
the shape of the petals may be changed in any way desired.
Poinsettias—
The petals of this blossom are also pasted to a lining, the poinsettia
making a beautiful ornament. While a bright red is extremely lovely, a
black poinsettia is equally effective. The petals should be made of
velvet and lined with the same color in satin. These petals being
narrow, only need a wire through the center. After the petals have been
prepared, they should be assembled around a bunch of yellow stamens or
knotted baby ribbon.
The foliage is made from green velvet lined with green silk. The
accompanying illustration shows the proportion of both the petals of the
blossom and the foliage. The stems may be wound with green or brown gum
tissue.
Poppies—
Poppies may be made from ribbon seventeen inches long and two and
one-quarter inches wide. Cut two pieces five and one-half inches long.
This leaves one piece six inches long. This will make five petals. Cut
the ends round on the five and one-half inch pieces, and cut one end of
the six-inch piece round. Beginning at the center, close to edge, gather
with a small running stitch. Turn in the raw edges and draw the thread
sufficiently to make the rounded ends curl over one inch, and fasten off
the thread. These two long pieces make four petals. Pleat them very
close at the center, sew together, finish the single petal the same and
add it to the four petals. Knotted black baby ribbon or yellow stamens
or both will make a beautiful center.
Morning glories—
Cut a circle of paper four inches in diameter. One quarter section of
this will be the pattern for a morning glory. The circle may be larger
if desired, but the size should depend somewhat upon the material used.
These dimensions are for a small blossom made of taffeta silk or
organdie. If made of velvet or heavy silk, the pattern should be much
larger.
Lap the straight edges one-eighth of an inch in and paste in place. This
makes a cone. Cut a piece of tie wire six inches in length, lap one end
over several knots of yellow baby ribbon and twist securely. Push the
other end of wire through the cone from the inside and draw the knots
down into the point. Make a short bend in the wire at the lower point of
the blossom on the outside to prevent its slipping down on the wire. The
upper edge of the cone may be rolled over a piece of tie wire and pasted
if necessary; usually it stays in place without either sewing or
pasting. The edge should be stretched slightly. Organdie or taffeta silk
will stay rolled into place without the tie wire. Water color is used
most effectively on these flowers to make the shading as true to nature
as possible. If made of velvet they may be sewed down flat on a hat at
the side joining, when a large stamen of twisted ribbon or chenille may
be made to cover the joining in the cone.
Orchid—
This blossom is especially adapted to the gown of the matron, or
wherever a touch of lavender is desired. It is effectively combined with
violets, or lilies-of-the-valley and maidenhair fern. The petals are
made of satin ribbon one and one-quarter inches wide and of the peculiar
pinkish lavender orchid shade. There are five petals in all—each calls
for seven inches of ribbon. If possible, three of the petals should be
one or two shades darker than the other two.
Fold a seven-inch piece of ribbon (one and one-quarter inches wide) in
half with the right side out. Cut into shape like the illustration.
Stitch a seam along the curved edge one-eighth of an inch from the edge.
Twist a very small loop in one end of a piece of seven-inch tie wire and
fasten up at folded end of the ribbon. Overhand this wire along the raw
edges, turn to the wrong side and sew the wire in with a one-eighth-inch
seam on the wrong side. This makes a French seam. Now spread the petal
open flat, and push it up on the wire until the petal measures six
inches in length. Gather the raw ends and wind them tight to the wire.
Finish the other four petals the same way.
No. 1 pattern for the center—
This calls for a piece of velvet ribbon one and one-half inches wide and
four inches in length. If possible this ribbon should be darker than the
darkest petal, but of course should harmonize. Roll the ends and hem
them down. Gather along one edge and draw down close around the looped
end of a piece of tie wire in which a bunch of yellow stamens have been
fastened. The blossom should be arranged with the three darker petals
pointing up at the back of the center and the other two at the front
drooping.
No. 2 pattern for the center—
This center is made from a piece of velvet ribbon three and one-half
inches long and one and one-quarter inches wide. Fold lengthwise, with
the satin side out. At one end sew straight across, making a seam
one-eighth of an inch deep and turn. Cut the other end like the diagram
and sew this with the velvet side out, leaving a tiny space at the
bottom to insert the wire. This now looks something like a “Jack in the
Pulpit.” Twist a few yellow stamens in the end of a piece of seven-inch
tie wire and push the other end down through the little opening left at
the lower point and draw the stamens down in as low as desired. Make a
small, short loop in the tie wire close to the blossom to prevent its
slipping back down on the wire.
Each year there are new developments in flower making, but the
principles are the same. If a few are mastered, there is usually very
little difficulty experienced in copying others which may appear from
year to year. Lovely flowers may be made from a few inches of hat braids
which are left over or from wool and raffia, maline or colored nets.
Blossoms of maline or net—
These may be made by using the same pattern as for the American Beauty
rose, selecting the size required. (See illustration.) Lay a strip of
tie wire inside along the bias fold. Gather along the curved edge and
draw down tight. This brings the two ends of the tie wire together, and
they should be twisted lightly. Arrange four or five leaves around a
few yellow stamens. If green tie wire is used, it is not necessary to
wind the stems; otherwise brown gum tissue may be wound around the stem.
From this pattern many different blossoms may be made, varying it
slightly, such as rosebuds, sweet peas, and apple blossoms.
Sweet peas—
Cut four petals after the same pattern, making one about one and
one-half inches and two one inch, then a small one for the center, or a
few knots of baby ribbon may be used for the center. Arrange the petals
in a natural-looking blossom.
Violets—
No flower is more popular than the violet, and a cluster of handsome
violets make a most acceptable gift at any time.
Violet-colored satin ribbon about one-quarter of an inch in width is
used. Begin by tying a knot one inch from the end, tie another one inch
from this knot; continue until there are five or six knots one inch
apart. In tying, try to keep the satin side of the ribbon out and make
as round a knot as possible by pushing the ribbon edges together on the
knot. Do not tie too tightly. A little practice is needed, but the
blossom is easily made. Hold the first knot between the thumb and
finger, bring the third knot up and place with it, then the fifth, and
so on, until the knots are all placed—usually three on one side, and
two or three on the other. Cut green tie wire six or seven inches long
for stems. Wind an inch of the end over the ribbon between these folded
knots and twist. Cut the ribbon off pointed, leaving one-half inch end.
Two shades of ribbon may be used if desired. Sometimes a few yellow
stamens are fastened in with the wire or a few French knots in yellow
added at the center after the blossom is made, but neither is needed and
add but little to the beauty of this little blossom. Shape the petals up
around the center.
The foliage for this flower can be bought, or made according to
directions given elsewhere. A spray of almost any foliage will do. A
small rosebud, a morning-glory or an orchid added to a bouquet of
violets will make it doubly charming.
Daisies—
Daisies may be made from one-quarter inch ribbon, using as many petals
as desired. Cut the ribbon into two and one-half-inch lengths. Tie a
knot in the center. Sew the ends to a small, round piece of buckram. If
two rows of petals are used, the second row may be made one-quarter of
an inch shorter. The center may be covered with ready-made daisy centers
or a few French knots. The stem of wire is tacked to the buckram on the
back and may be wound with green floss.
Geraniums—
These flowers are made of geranium-colored satin ribbon. Use the same
method as in making violets, except that yellow stamens should always be
added.
Fruit
Apples—
The material required for making apples is cut into a circle of any size
desired and from any material. The edge should be turned in
one-sixteenth of an inch and gathered all around. Place this over a
piece of cotton batting, over which a piece of wire has been twisted,
leaving ends long enough for a stem. Add a sufficient amount of cotton
to fill the material out well. Draw the thread tight and sew. A stitch
may be caught through the center and pulled down, or a little tuft of
brown embroidery thread sewed to the center to give a more realistic
look. The apple may be tinted with water-color if desired. In that case
the entire apple should be moistened first and then the color applied
and allowed to dry.
Cherries—
These are made from a smaller circle of material than the apple—satin
or velvet would make a charming cluster. The method used is the same as
for the apple, except that there would be no stitch in the center. They
should also be filled until they are hard. Use tie wire for the stems.
Plums—
These may be made from a piece of plum-colored material on a true bias,
two and one-quarter inches long and one and one-quarter inches wide. Sew
the ends together on the wrong side. Turn, gather one end one-eighth of
an inch from the edge. Pull the thread up tight and sew. This makes the
“blow” end. Turn the lower edge in one-eighth of an inch and gather.
Fill with cotton to which a piece of tie wire has been attached and
pull close to wire and sew. Add as much cotton as necessary to procure
the right shape before finishing.
Raisins—
These may be made from gathering a folded circle of plum-colored
material one-eighth of an inch from the edge, but used without filling
with cotton. Sew to the end of looped tie wire and wind the wire with
brown gum tissue. Arrange in a cluster. Always warm the tissue before
using so that it will adhere.
Grapes—
These are made the same as cherries, except a cluster would have several
sizes. They are beautiful made from black velvet. A cluster of grapes to
sew flat to hat may be made by covering different sizes of button molds
and arranging them on a hat to look like a cluster.
Mourning Millinery
Hats worn when one is in mourning are nearly always small and made of
black crêpe with a few folds of white crêpe near the face. The covering
of crêpe is always lined, preferably with sheet wadding to give the
soft appearance desired. The trimming is of milliner's folds or flat
flowers made of the crêpe.98-1 The mourning veils used may have a
simple wide hem sewed down by hand or an applied hem. The applied hem is
much the handsomer finish.
Applied hem on a veil—
For a hem three inches wide, cut a strip six inches in width and long
enough to reach around the edge of the veil plus three inches for each
corner. It takes that much extra length to mitre a corner of a
rectangular veil.
Fold this strip lengthwise in the middle and baste with fine running
stitches one inch from the fold to hold the fold flat. Measure this
strip at the edge of the veil to locate the place where the fold must be
mitred at the corners. Cut a V-shaped piece from this fold to within
one-quarter of an inch of the fold. Cut through both thicknesses. Sew
these raw edges together in a seam one-quarter of an inch deep and the
result will be a mitred corner. Each corner should be carefully planned
and mitred before sewing to the veil. Next turn both raw edges down
toward the inside one-quarter of an inch and baste separately. Slip the
edge of the veil between, pin carefully in place, baste and slipstitch
the edges to the veil. Both edges may be stitched at the same time. If
this work is carefully done, the result more than repays the time spent
upon it.
The veil is a very important part of the hat and may be adjusted in any
becoming way. It may form part of the covering of the hat, and is then
arranged in becoming folds toward the back and allowed to fall to any
desired length. It makes a becoming background for the face. Mourning
millinery is not used as much as formerly, but those who desire to
adhere to the custom will find the style little changed.