EDITED BY PAUL N. HASLUCK EDITOR OF “WORK” AND “BUILDING WORLD”
AUTHOR OF “HANDBOOKS FOR HANDICRAFTS,” ETC. ETC.
PHILADELPHIA
DAVID McKAY, Publisher 610, SOUTH WASHINGTON SQUARE 1907
PREFACE.
This Handbook contains, in a form convenient for
everyday use, a comprehensive digest of the information
on Knotting and Splicing Ropes and Cordage,
scattered over more than twenty thousand columns of
the journals it is my fortune to edit—and
supplies concise information on the details of
the subjects on which it treats.
Readers who may desire additional information
respecting special details of the matters dealt with
in this Handbook, or instructions on kindred subjects,
should address a question to The Editor of WORK,
La Belle Sauvage, London, E.C., so that it may be
answered in the columns of that journal.
Knotting is an ancient device with which very
early inhabitants of this earth must have been acquainted.
From the beginning, mankind must
always have used some kind of knot to join animal
sinews, plant fibres, or hide strips which, in ancient
days, were the prototypes of the varieties of
cordage now employed.
A large number of knots has been invented by
the skill of man, and on their strength and correct
tying depend the lives of thousands and thousands
of workmen—seamen, building trade operatives,
etc., day by day. The importance of being able to
make the knot best suited for the occasion both
rapidly and correctly may come in a new light to
some when it is pointed out that both lives and
property have over and over again been sacrificed
to ill-made knots; and this little volume is put forward
in the belief that few things better repay the
workman’s time and trouble in learning than the
manipulation of ropes and cordage.
Cordage is used almost daily by everyone in
some form or other, but comparatively few can
handle it methodically. Men break their nails and
teeth gnawing at their own knots endeavouring to
untie them, and time and material are wasted.
Time spent in learning a few of the simple bends
and hitches, reliable under strain and easy to
unbend when the strain is released, would never be
regretted. It is not necessary for a landsman to
learn all the numerous uses to which rope is put,
but a knowledge of common “bends” is an inestimable
convenience, if not a necessity.
The security of a knot ought not to be, as many
seem to think, in the number of turns or hitches
in its composition, but in the efficacy of the nip.
A “bend” or “hitch” must be so formed that the
part of rope under strain nips some portion of the
knot, either against itself or the object to which it
is attached; and in learning a bend, or impressing
it upon one’s memory, it will be found most helpful
to notice particularly the nip of each separate one
as it is studied.
Rope, though usually of hemp, is made of other
materials for certain purposes. Coir rope (cocoa-nut
fibre), being light and buoyant, is useful for
warps, rocket lines, life-buoy lines, and drift-nets.
Manilla grass is adapted for reef points, yachts’
hawsers, and wherever tar would be injurious.
Hide is required for wheel-ropes, or where great
strength with pliability and small circumference is
needed. Cotton is serviceable for fancy work, etc.
The “yarns” are formed by twisting the hemp
right-handed; the “strands,” by twisting or laying
up the yarns left-handed; and the rope, by laying
up the strands right-handed.
Three ropes laid up left-handed form what is
known as a cable-laid rope; four-stranded ropes
are laid round a heart. Ropes are sometimes laid
left-handed, but if the strands are to be laid left-handed
the yarns are laid right-handed. If the
parts of hemp, etc., be twisted more than is necessary
to hold them together, strength is lost. Upon
following the course of a yarn in a rope it will be
found that, by this alternate laying, it runs nearly
straight with the direction of the rope’s length.
A three-stranded rope will bear a greater strain
in comparison with its size than any other of the
same material; cable-laid ropes and four-stranded
ropes are, roughly speaking, about one-fifth
weaker. Rope is measured by its circumference,
and is laid up in lengths of 113 fathoms, sizes varying
up to 28 in.; but it is not usually made up in
coils when the size exceeds 5 in. Very small ropes
are distinguished by their yarns rather than their
size; thus sailors speak of nine-, twelve-, and
eighteen-yarn stuff, which is commonly called
“seizing stuff.”
If the fibres of which a rope is composed were
laid parallel to one another and fastened at the
two ends, the combined strength of these fibres
would be utilised to the full; in other words, they
lose strength by being twisted or “laid up.” But,
on the other hand, the length of the fibres being
at most but a few feet, their usefulness in this state
is very limited, and the inconvenience of using
them so is prohibitive. For this reason the fibres
are first twisted into “yarns”; these, again, are
laid up into “strands,” a strand being formed of
several yarns; and, finally, three or more strands
are formed into a rope. As twisting diminishes
the strength of a rope, it is important that the
yarns be carefully laid up, so as to bring an even
strain on every part. It should not be laid up too
hard—that is, it should only have sufficient twist
in it to prevent the fibres from being drawn out
without breaking.
“Hawser-laid” ropes are made of three strands
laid right-handed, or “with the sun,” as it is
termed. “Shroud-laid” are made of four strands
laid right-handed. A “cable-laid” rope is made
of three hawser-laid ropes laid up left-handed,
and therefore contains nine strands. Obviously
the size of a rope is regulated by the quantity of
yarns composing the strands, and not by the
number of strands that it contains.
With regard to the weight of ropes, it may be
said that ropes of all kinds are usually measured
by their circumference. The weight of clean, dry,
hemp rope in pounds per fathom is one-fourth
of the square of the circumference in inches; for
example, a 3-in. hemp rope (about 1 in. in diameter)
weighs ¼ × 32^2 = 2¼ lb. per fathom (6 ft.).
A flat hemp rope, with a width of about four times
the thickness, weighs in pounds per fathom about
twice the square of the circumference in inches;
for example, a 3-in. by ¾-in. flat hemp rope will
weigh about 2 × 7 = 14 lb. per fathom.
Round wire ropes weigh in pounds per fathom
seven-eighths of the square of the circumference
in inches; for example, a 3-in. wire rope weighs
about ⅞ × 3^2 = 7⅞ lb. per fathom. A flat wire
rope weighs in pounds per fathom ten times the
sectional area in square inches; for example, a
flat wire rope, 3 in. by ¾ in. = say 2 sq. in. area,
will weigh about 10 × 2 = 20 lb. per fathom.
The maximum safe load on a rope depends on
many circumstances, such as quality, age and dryness
of rope, nature of load, mode of lifting, etc.
Approximately, the safe load on a new hemp rope
in hundredweights with direct lift is three times
the weight in pounds per fathom. On a sound old
rope fall one-half the square of the circumference
is sufficient load. A Bessemer steel wire rope will
safely carry in hundredweights three times the
square of its circumference in inches, and a
crucible steel wire rope four times the square of
its circumference. For hemp ropes the minimum
diameter of sheave should be circumference of
rope + 2, and for wire ropes the diameter of
sheave in inches should be equal to circumference
of rope in sixteenths.
The principle of rope making is very readily
shown by holding the ends of a piece of twine or
whipcord, about a foot long, in the hands and
twisting it so as to increase the lay. If the twine
be now slackened by bringing the hands nearer to
one another, a loop will first form in the middle
of the twine, and it will continue to twist itself up
into a compact cord which will not unlay, as the
tension to which the strands have been subjected
causes friction between them, which holds them
together. In other words, the tendency of each
part singly to unlay, acting in opposite directions,
is the means of keeping them together when
joined.
Some very interesting experiments were made
by Réaumur, the purposes of which were to ascertain
the loss of strength occasioned by laying
up the fibres of various substances, one or two of
which are given.
1. A thread, consisting of 832 fibres of silk,
each of which carried 1 dram and 18 grains, broke
with a weight of 5 lbs., though the sum of the
absolute strength of the fibres is 104 drams, or
upwards of 8 lbs. 2 oz.
2. Three threads were twisted together, their
mean strength being nearly 8 lbs. They broke
with 17½ lbs., whereas they should have carried
24 lbs.
These experiments prove that though convenience
and portability are gained by twisting
the fibres, there is a great loss in the strength
of the resultant rope.
In speaking of the size of a rope, the circumference
and not the diameter is alluded to. Thus,
a three-inch rope would be slightly less than an
inch in diameter.
In practising knotting it is as well to use a
tolerably firm material, such as whipcord, for small
common knots, or, still better, line used for sea
fishing. Either can be tied up and undone over
and over again without injuring it, which is not
the case with twine; it is also more easy to see
which way the parts of a knot lie in the harder
material, and then to find out whether the turns
are properly made or not. For more complicated
knots, particularly those where the strands of the
rope have to be unlaid to form the knot, such as
a wall knot (p. 66) or a Matthew Walker (p. 70),
it is advisable to use three strands of fishing line,
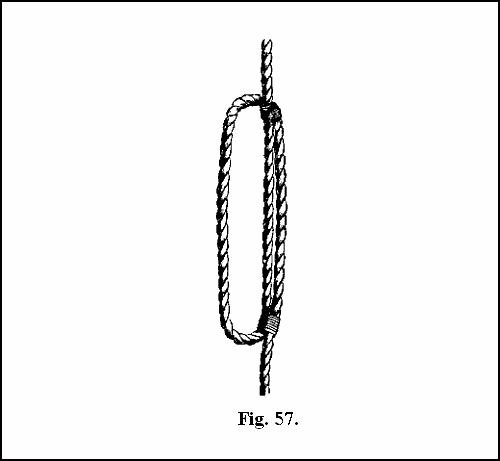
each about a foot long. If a “seizing” (a seizing
is shown in Fig. 57, p. 51) be put round them in
the centre, so as to hold them firmly together, a
good representation of a rope with the strands unlaid
ready for working is obtained. A knot can
be made and unmade as often as required in this
way, without detriment to the strands; but the
strands of a rope, owing to their loose nature, will
seldom bear knotting more than once or twice.
If desired, the knots can be made as above
described and kept for future reference. In string
also it is better to use hard laid stuff at first, but
when these matters are thoroughly understood
knots can be made on any sort of cordage without
difficulty.
CHAPTER II. SIMPLE AND USEFUL KNOTS.
Fig. 1.—Overhand Knot.
Fig. 2.—Fourfold Overhand Knot, Loose and Taut.
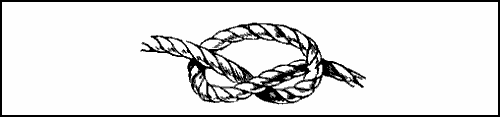
The simplest knot that is made is the overhand
knot (Fig. 1). It is very useful, and forms a part
of many other knots. To make it, the standing
part of the rope—that is, the main part in opposition
to the end—is held in the left hand, and the
end of the rope is passed back over it (whence its
name) and put through the loop thus formed. It
is used at the end of a rope to prevent the
strands unlaying, and sometimes in the middle of
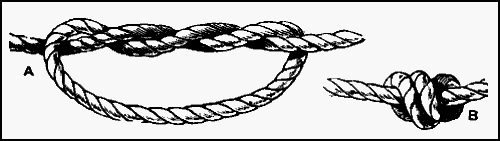
a rope as a stopper knot. If the end of the rope
is passed through the “bight” or loop two, three,
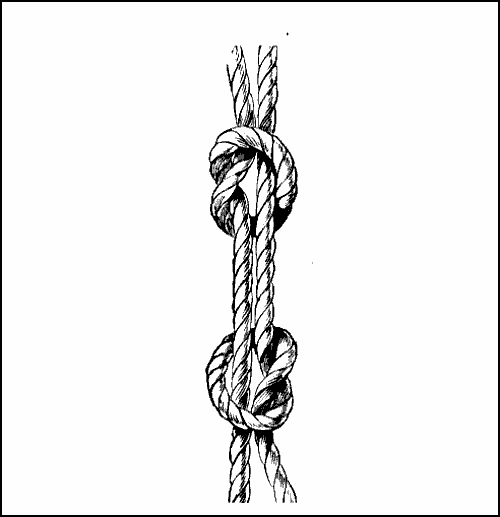
or more times before hauling it taut, the double,
treble, or fourfold knot, A (Fig. 2), is obtained.
This is a larger knot than Fig. 1, and is often used
on the thongs of whips, being then termed a blood
knot. B (Fig. 2) shows the knot hauled taut. Fig. 1
also goes by the name of the Staffordshire knot,
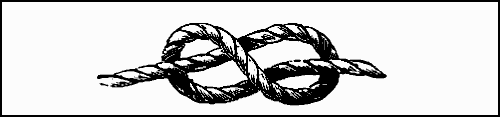
as it forms the insignia of the county. A Flemish
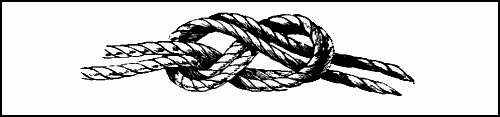
or figure-of-eight knot is shown by Fig. 3. To
make it, pass the end of the rope back, over, and
round the standing part, and up through the first
bight. The Flemish knot is used for much the
same purposes as the preceding knots, but is
rather more ornamental.
Fig. 3.—Figure-of-eight Knot.
The bight of a rope is the loop formed when a
rope is bent back on itself, in contradistinction
to the ends.
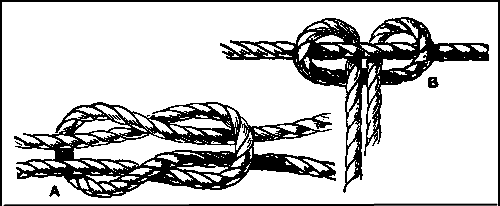
Fig. 4.—Sailor’s Knots or Reef Knots.
The conditions under which the ends of two
pieces of cordage have to be joined together are
various, and several methods are brought into
requisition; but it is always of considerable importance
that the most suitable knot be employed
in each case. The value of some knots consists
in the rapidity with which they can be made, of
others in the readiness with which they can be
undone; but it is an essential that the knot holds
firmly and does not slip when once hauled taut.
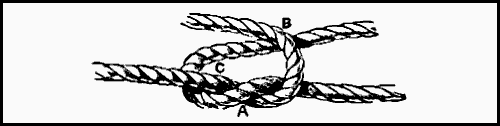
Fig. 5.—Reef Knot, Half-made.
The commonest knot for joining the ends of two
ropes, and probably the knot that is most often
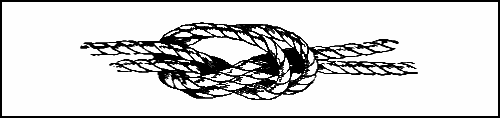
made, is the sailor’s, true, or reef knot (Figs. 4
and 5). When correctly made it is as perfect as a
knot can be. It can be made and undone with
equal rapidity, and is very secure when taut. Its
one disadvantage is that it will not answer when
made with ropes of different sizes, as it then slips
and comes adrift, but where the two pieces of
cordage are of the same size it is most secure and
reliable, the strain being equally distributed on
every part. It requires a little practice to make
it properly. To do this, take an end in each hand
and lay one over the other, the right end being
undermost; bring the left-hand end under the
standing part of the right end, as shown at A
(Fig. 5), and over the end at B, round it, and up
through the bight at C. The key to the knot
is the putting of the right end under the left when
the two ends are crossed at the beginning of the
knot, as the left-hand end then comes naturally
first over and then round the other rope, and the
ends lie parallel with the standing parts, as at A
(Fig. 4).
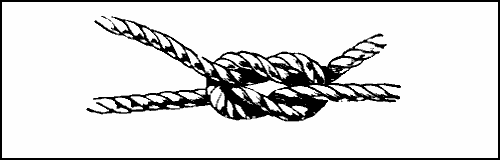
Fig. 6.—Granny or Lubber’s Knot.
If the ends are not passed correctly, a granny,
lubber’s, or calf knot results. This is shown in
Fig. 6. Though at first sight this seems to be a
good knot, yet it is not so in reality, and when
any strain comes upon it, it slips and becomes
useless. Fig. 7 is a granny knot, as it appears
when hauled upon. It is considered a very
lubberly thing to make a granny knot, and readers
should practise until they can make a true knot
rapidly and with certainty in any position.
The sailor’s knot is invariably used for reefing
sails, the ease with which it can be undone making
it very valuable for this purpose. It is only
necessary to take hold of the two parts on each
side just outside the knot and bring the hands together,
and the loops slip over one another, as in
Fig. 4, and the knot can be opened at once.
Fig. 7.—Granny Knot, Taut.
This knot has a curious peculiarity which is not
generally known. If the end of one of the ropes
is taken in one hand and the standing part of the
same rope in the other, and both are hauled
until the rope is straight, the knot becomes dislocated,
so to speak, and the rope not hauled
upon forms a hitch, B (Fig. 4), round the other
part. This property was the secret of Hermann’s
celebrated trick, “the knotted handkerchiefs.”
After the handkerchiefs, knotted together at the
corners, were returned to him by the audience,
under pretence of tightening the knots still more,
he treated each knot as has been described.
The knots seemed firm, but really were loosened so
that a touch with his wand separated them easily.
The common bow or rosette knot is a modification
of the sailor’s knot. The first part of the
process of making it is the same, but instead
of passing one end singly over and under the other,
as in the sailor’s knot, both ends are bent back
on themselves, and the double parts worked as
before. Care must be taken to pass these doubled
ends exactly as those described in the sailor’s
knot, or a granny bow will result. Some persons’
shoes always come untied, the reason being that
they are tied with granny instead of true bows.
Fig. 8.—Overhand Rosette Knot or Bow.
Another way of joining the ends of two pieces
of cordage is shown in Fig. 8. This is merely an
overhand knot, made with two ropes instead of
one. Sometimes it is called an openhand knot.
It can be made very quickly, and there is no fear
of its slipping, but if there is much strain put
upon it the rope is very apt to part at the knot,
in consequence of the short “nip,” or turn, that it
makes just as it enters the knot.
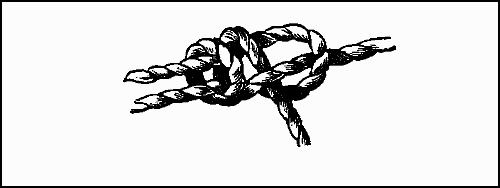
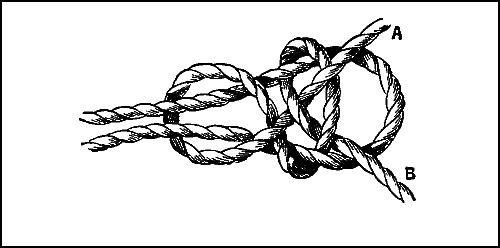
Fig. 9 shows the weaver’s knot partly made,
and Fig. 10 the same knot completed, but not
hauled taut. Weavers call this the “thumb
knot,” as it is made over the thumb of the left
hand, and is used by them in joining their “ends”
as they break. The rapidity with which they
make the knot, snip off the ends, and set the loom
going again is wonderful. Netters use this knot
to join their twine, and it also forms the mesh of
the netting itself, though, of course, it is then
made in a very different way. In making the
weaver’s knot, the two ends to be joined are
crossed in the same way as in the sailor’s knot,
placing the right end under, and holding them with
the thumb and finger of the left hand at the place
where they cross. The standing part of the right-hand
rope is then brought back over the thumb
and between the two ends, as shown in Fig. 9.
The end A is then bent down over it, and held
with the left thumb, while the knot is completed
by hauling on B.
Fig. 9.—Weaver’s Knot, Half-made.
An excellent way of joining two ropes is
illustrated by Fig. 11. The ends are laid alongside
one another, overlapping each sufficiently to give
room for the knot to be made. The double parts
are then grasped in each hand and an overhand
knot is formed, which is made taut by hauling on
both parts at once, as if the knot were single.
Fig. 10.—Weaver’s Knot, Closed.
Though the above is the easiest way to make
the knot, it is not available where the ropes are
fast. In this case a simple knot is made on the
end of one rope, but not drawn taut. The end
of the other rope is passed through the bight of
the first, and a second loop formed with it alongside
the first. The knot is closed by drawing the
two ropes as before. This is in every way an excellent
knot, and very secure.
Fig. 11.—Overhand Knot Joining Two Ropes.
Fig. 12 shows the ends of two ropes joined by
means of a Flemish knot. It does not require
much description, and is made after the manner
of the knot last described.
Fig. 12.—Flemish Knot Joining Two Ropes.
Fig. 13.—Fisherman’s Knot.
The fisherman’s knot (Fig. 13) derives its name
from the fact that it is always used for joining
silkworm gut for fishing purposes. In making it,
the strands are made to overlap one another, and
an overhand knot is made with one end round the
other strand. The strands are turned round, and
another overhand knot made with the other end
round the first strand. When the knot is tightened
by hauling on the standing parts, one knot jams
against the other and holds securely. The knot is
improved by putting the ends twice through their
respective loops, as at A (Fig. 2, p. 15). The size
of the knot is increased by this means, but it will
stand a much heavier strain, so that it is advisable
to do this whenever the size of the knot is not of
paramount importance.
The whipcord knot (Fig. 14) is used to fasten
the lash to a whip. The lash B is laid across the
ends of the thong A which are turned up over it.
The lash is brought completely round the thong
and through the loop it makes, which secures the
ends of the thong firmly. If a silk lash is used,
the short end is cut off, but if whipcord, the two
ends are generally twisted together for a few
inches, as at B, and an overhand knot made with
one end round the other, to secure them. The
remaining part is left somewhat longer, and
another overhand knot at the end prevents it from
unravelling.
Fig. 14.—Whipcord Knot.
CHAPTER III. EYE KNOTS, HITCHES, AND BENDS.
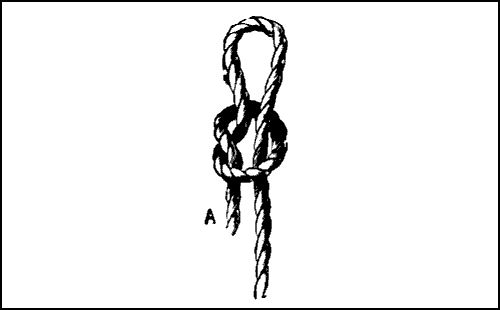
One of the simplest eye knots is shown by Fig.
15, and is known as the “running” or “slip knot.”
A bight is first formed, and an overhand knot made
with the ends round the standing part. The last
named may be drawn through the knot, and the
eye made to any size required. There is less
chance of the knot coming undone if an overhand
knot is made on the end A. With this knot a sailor
ties his neck-handkerchief.
Fig. 15.—Running Knot.
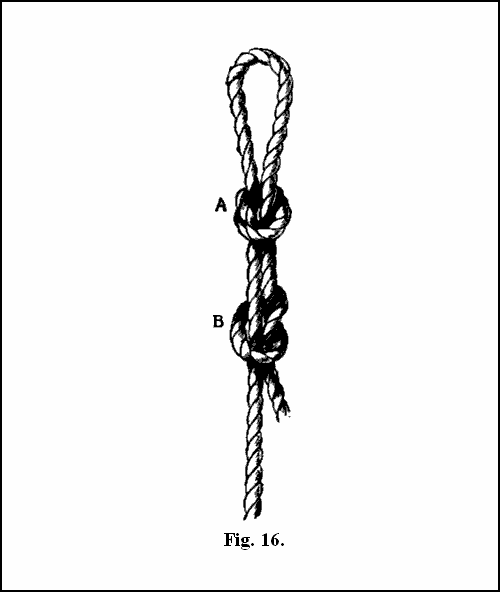
Fig. 16 is the “fisherman’s eye knot.” A bight
is first made of sufficient length, and an overhand
knot formed with the standing part round the other
strand; the end is now passed round the standing
part, and knotted as before. Thus there is a
running knot A, with a check knot B, which, when
hauled upon, jam tight against one another, and
hold securely. This is one of the best knots for
making an eye in fishing, as the strain is divided
equally between the two knots.
Fig. 16.—Fisherman’s Eye Knot.
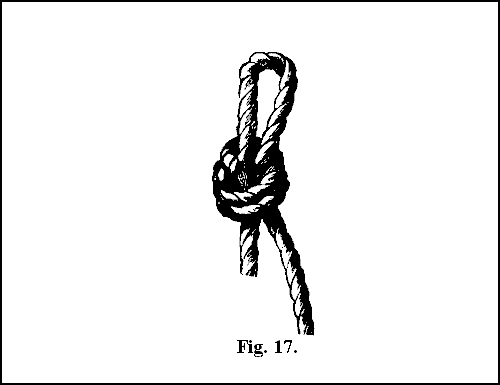
Fig. 17.—Openhand Eye Knot.
A common way of making an eye on the end
of a piece of cord is illustrated by Fig. 17. It is
practically the same knot as Fig. 8 (p. 19), except
that only one rope is used. The end is brought
back along the rope to form the eye, and an overhand
knot made with the two parts. This knot,
from being so easily made, is often used, but it
lacks strength, like the openhand knot (Fig. 8),
and should not be used where it is required to bear
much strain. It will have been noticed how very
often openhand knots form the component parts of
other knots.
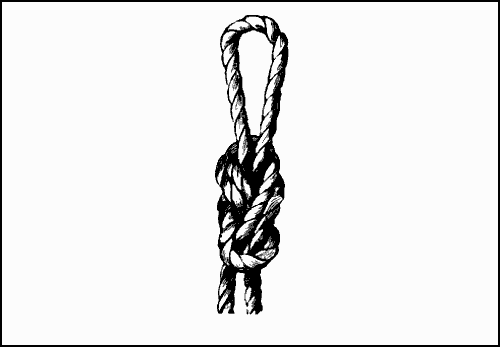
Fig. 18.—Flemish Eye Knot.
Fig. 18 is an eye made with a “Flemish” knot.
It is worked just the same as a single Flemish
knot (Fig. 12, p. 22), the only difference being
that two parts are used instead of one. It is
stronger, but clumsier, than the one just described,
and is not much used.
Fig. 19.—Crabber’s Eye Knot.
The “crabber’s knot” (Fig. 19) is a curious and
not very well known knot, but it is unlikely
to part when strained. To make it, bring the
end back to form a loop, taking it first under and
then over the standing part, up through the main
loop, over the standing part again, and up through
its own bight. Before the turns are hauled into
their places, the knot will slip on the part A, as
in an ordinary slip knot; but if the part B is
hauled upon, the strand A, which passes through
the centre of the knot, rises, and the coil which
goes round it jams, making the knot secure: so
that it may be used as a running knot or otherwise,
as desired. This is also called a running
knot with crossed ends.
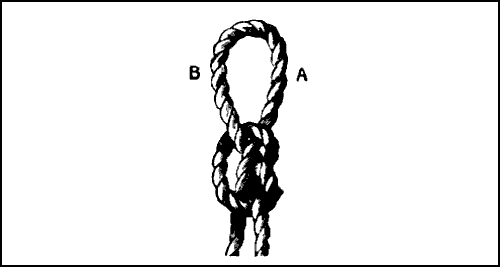
Fig. 20.—Bowline Knot.
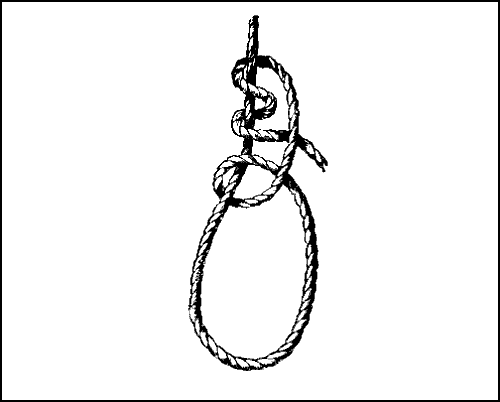
The “bowline knot” (Fig. 20) cannot slip, and
is therefore always used for slinging a man for the
purpose of doing some particular piece of work;
the workman sits in the sling. The end is first
laid back over the standing part, so as to form a
loop; the end is then passed up through the loop,
round the back of the standing part, and down
through the loop again. Hauling on the end and
the standing part makes the knot taut.
A modification of this knot, called a “Bowline
on a Bight,” is shown by Fig. 21. The loop is
made as in the previous knot, only with the two
parts of a doubled rope; the bight is then passed
up through the loop, opened, and turned backwards
over the rest of the knot, when it appears
as illustrated. To untie it, draw the bight of the
rope up until it is slack enough, and bring the
whole of the other parts of the knot up through
it, when it will readily come adrift. If the standing
parts of the rope are held fast, it puzzles the
uninitiated to undo it.
Fig. 21.—Running Bowline on Bight.
A “Running Bowline” has the knot made on
the end after it has been passed round the standing
part, thus forming a loop through which the
main rope will run. Two ropes may be joined together
by making a bowline in the end of one of
them, and putting the end of the other through
the bight, and forming with it another bowline on
its own part. This is often used to join hawsers
together.
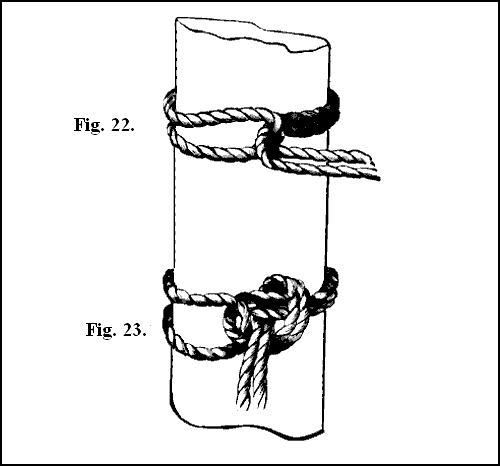
Figs. 22 and 23.—Running Knot with Two Ends, Loose and Fastened.
Fig. 22 shows a method of making a rope fast
to a post or pillar. The rope is doubled and passed
round the post, and the ends put through the
loop. For greater security, the ends may be
passed round the standing part and through the
bight thus formed, as in Fig. 23; or, instead of
passing the cords through the bight, a loop may
be formed by doubling the ends, and this loop put
through the bight, thus forming a slippery hitch.
This knot has the advantage of being more readily
undone than the other one, as it is necessary
merely to pull at the ends, and the rope is released
at once. The ends may also be secured by making
a Flemish knot on them, instead of an overhand
knot.
Fig. 24.—Two Half Hitches.
The remainder of this chapter will discuss a
different class of fastenings. It is not easy to
state, however, where knots end and bends and
hitches begin; indeed, a tie that, in certain circumstances
and made a particular way, is called a
“knot,” differently constructed, and under other
conditions, is called a “bend” or “hitch,” though
the result is the same in both cases. As an
illustration, take two half-hitches (Fig. 24), which,
if made in another way round a pole, are called
a “builder’s knot.” If readers will analyse the
knots illustrated throughout this book, they will
find several other similar instances. A (Fig. 24)
is a single hitch, being merely a loop formed in a
rope. This is readily done by holding the rope
in the left hand, and giving it a twist with the
right; the loop then forms itself, as it were.
When a tightly laid piece of cordage is twisted,
these loops are apt to rise and form “kinks,”
which are very objectionable, as the cord is sure
to part at the kink when a strain is put on it.
It is still worse in the case of wire, which breaks
readily when kinked. Tight, hard cordage should
always be well stretched before it is used, to avoid
kinking.
Two half-hitches (Fig. 24) are a useful knot for
a variety of purposes, as they are quickly made,
and will not slip, no matter what strain is put
upon them—indeed, the more they are hauled upon
the faster they hold. They are the best means
of making a rope fast to a hook. First one hitch
is slipped on, and then the other on the top of it,
and the rope is fast in less than two seconds.
This knot is used by surgeons in reducing a dislocation
of the thumb joint.
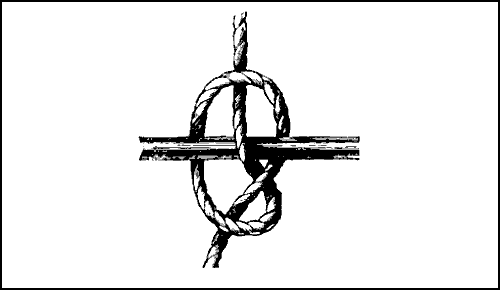
Fig. 25.—Builder’s Knot.
Fig. 25 is the builder’s knot, merely two half-hitches, but as it
is used in places where the hitches cannot be passed over the ends of
the timber it is made by holding one end in the left hand, passing the
rope round the pole, under the end, round the pole again, above the
first part, and under its own part; from its non-liability to slip
laterally this knot is always used to fasten one pole to another in
fitting up scaffolding, from which circumstance it has acquired its
name. If, instead of beginning the knot as in Fig. 25, the end is
passed, after it has gone round the pole, two or three times round the
other part, as in Fig. 2 (p. 15), the remainder of the knot is rather
more easily made, as it holds itself taut, and will
not slip while the end is put round to complete
the fastening.
A “builder’s double knot” is made in the
same way, except that the end goes round again,
as before, and underneath its own part, so making
it much stronger. When a builder’s knot is made
on a rope for the purpose of securing a small
line to a stout rope, it is called a “clove-hitch.”
The “timber hitch” (Fig. 26) is a rough and
ready way of securing a piece of timber or anything
similar; it is made by bringing the end of
a rope round the timber, then round the standing
part, and then, taking two or more turns, round
its own part. The pressure of the coils one over
the other holds the timber securely, and the more
it is hauled on the tighter it holds. It can be
cast off readily.
Fig. 26.—Timber Hitch.
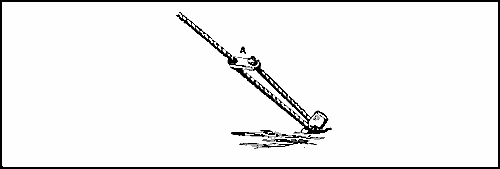
Fig. 27 is the “killick hitch,” a modification of
the timber hitch, used for fastening a stone to the
end of a rope. After making a timber hitch and
hauling it taut, a single hitch is made, and slipped
over the end of the stone alongside of it. Some
of the best fishing grounds are on rocky coasts
where an anchor would not hold; and if it did,
there might be considerable risk of losing it altogether,
from its jamming in the crevices of a
rock. In these places a killick, or large stone,
slung as shown in Fig. 27, is used, which holds
the boat by its own weight, without any risk of
getting fast to the ground.
Fig. 27.—Killick Hitch.
Fig. 28.—Magnus Hitch.
The “magnus hitch” (Fig. 28) is a method of
securing a rope to a spar, as there is but little
tendency to slip endways along the spar. In
making it, take the end of the rope twice round
the spar, in front of the standing part, round the
spar again, and then through the last bight.
Fig. 29.—Fisherman’s Bend.
Fig. 30.—Rolling Hitch.
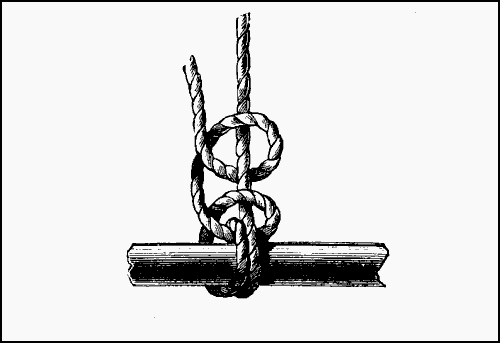
The “fisherman’s bend” (Fig. 29) consists of two
round turns round a spar, and a half-hitch round
the standing part, and through the turns on the
spar, and another half-hitch above it, round the
standing part. It is used for bending studdingsail
halliards to the yard, and, in yachts, for bending
on the gaff topsail halliards.
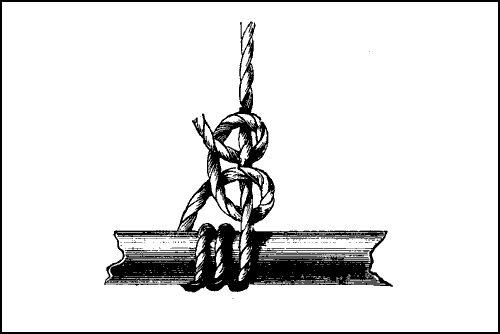
A “rolling hitch” (Fig. 30) is made by taking
three round turns round a spar, and then making
two half-hitches round the standing part of the
rope, and hauling taut.
Fig. 31.—Topsail Halliard Bend.
Fig. 32.—Racking Hitch.
The “topsail halliard bend” (Fig. 31) is used
chiefly on board yachts, and is made by bringing
the rope twice round the spar, back round the
standing part, under all the turns, over two turns,
and under the last. This hitch is shown open for
the sake of clearness, but in practice it is usual to
jam the coils close together, and haul them all
taut.
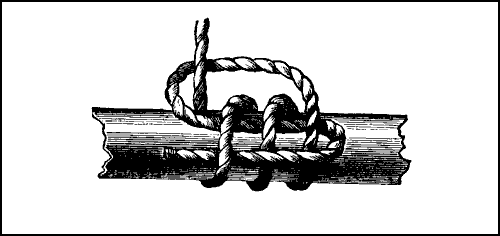
Fig. 32 is a “racking hitch,” for hitching a
rope on to the hook of a block. Two bights are
made in a rope, these are turned over from the
operator two or three times, and the two loops
are put on to the hook. This is sometimes called
a “cat’s paw.”
Fig. 33.—Slippery Hitch.
Fig. 34.—Carrick Bend.
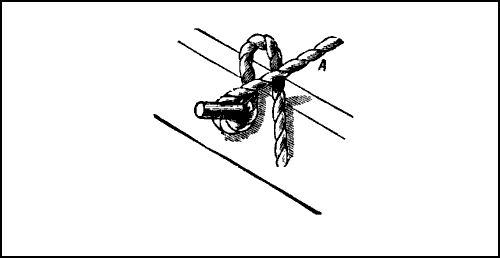
The value of the “slippery hitch” (Fig. 33)
consists in the readiness with which it can be cast
off in case of emergency; at the same time, it holds
securely while there is a strain on the rope A. If
the mainsheet of small boats is made fast at all,
always a more or less risky proceeding, a slippery
hitch should always be used as a start. A sharp
pull at the end of the rope lets the sheet go at
once.
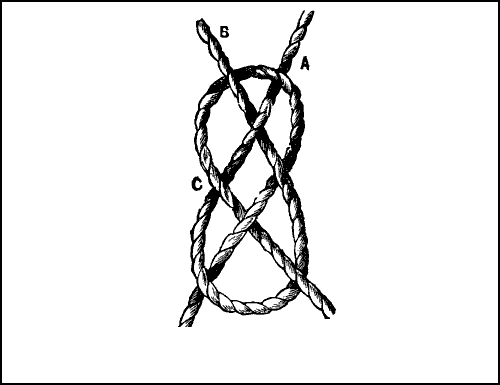
For the “carrick bend” (Fig. 34) lay the end
of a rope over the standing part to form a loop;
put the end of another rope under the bight over
the standing part at A, under the end at B, over
the rope again at C, under its own part, and over
the rope B, and haul taut. The parts A and B
form the first loop made. This bend generally
is used for binding hawsers together, to increase
their length for warping or towing. It can be
undone readily without the aid of a pricker or
marlinespike, which would have to be used for
many knots after they had been in the water. As
in the sailor’s knot, it is only necessary to grasp
the ropes just outside the knot, and push the loops
inwards, and the knot comes adrift at once.
Fig. 35.—Bending Sheet to Clew of Sail.
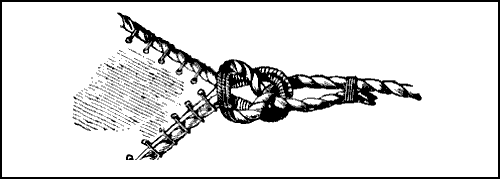
Fig. 35 shows the clew of a sail, and the method
of bending the sheet on to it. This is termed a
“sheet bend.” The sheet is not, as many suppose,
a part of the sail, but is a rope used in setting a
sail, to keep the clew or lower corner of the sail
down to its place. In making a sheet bend, the
end is passed up through the clew, round the back
of it, under its own part, and over the clew again.
The end is generally stopped to the standing part
with rope- yarn or other small stuff. The knot
thus formed is exactly the same as the weaver’s
knot (Fig. 10, p. 21). Fig. 36 shows a method of
giving additional security to this knot. The end is
passed twice round the back of the loop before
putting it under its own part. This knot is very
much used by fishermen in bending a line on to a
loop of gut.
Fig. 36.—More Secure Sheet Bend.
Fig. 37.—Bending Rope to Loop.
Another and somewhat more complicated
method of bending a rope on to a loop is illustrated
by Fig. 37. B is the standing part, and A the end
of the rope to be bent on a loop already formed.
Pass the end down through the loop, round over
its own part, and through the loop, round the
back of it, and through its own bight. When
hauled taut, this holds more securely than either
of the other methods, but, on the other hand,
takes longer to make.
Fig. 38.—Blackwall Hitch.
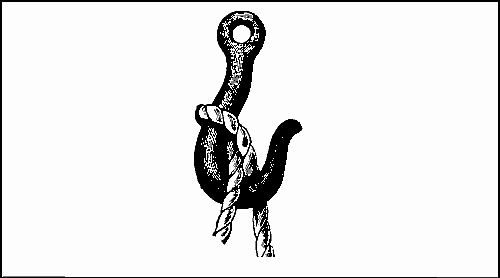
The “Blackwall hitch” (Fig. 38) is a ready way
of securing a rope temporarily to a hook. The
method of making it is evident from the illustration.
As the standing part when hauled upon
jams the end against the back of the hook, it holds
much more firmly than would be supposed at first
sight.
The “midshipman’s hitch” (Fig. 39) is an old-fashioned
hitch, used for attaching a tail-block to
a rope. A round turn is first made over the standing
part, and the end is brought up, passed twice
round above the first hitch, and then passed out
underneath its own part.
The “marlinespike hitch” (Fig. 40) is used for
getting a purchase on the seizing stuff when serving
a rope, so as to leave the turns taut. Make a
bight in the seizing stuff, and bring it back over
the standing part; pass the marlinespike under
the standing part, and over the sides of the bight.
This is practically identical with the running knot
(Fig. 15, p. 24). Seizing is described on p. 96.
Fig. 39.—Midshipman’s Hitch.
Fig. 40.—Marlinespike Hitch.
Fig. 41.—Regulating Lashing.
Fig. 42.—Stationer’s Knot.
Fig. 41 is a “regulating lashing,” used when
the tension of a rope requires altering from time
to time. Tent ropes are secured this way, as they
require easing in wet weather, and tightening in
dry. For this purpose, the piece of wood A
is slipped up or down the cord, the friction of the
cord against the sides of the hole fixing it
sufficiently.
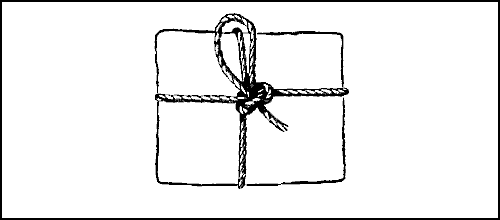
The “stationer’s knot” (Fig. 42) is handy for
tying up a parcel, as it can be made rapidly, and
undone with ease. Make a running noose at the
end of a piece of twine, and bring it to the centre
of the parcel; take the twine round the parcel
again at right angles, round the noose, and making
a bight slip it under, as illustrated. A pull at
the end releases the knot instantly, as can be
proved by experiment.
CHAPTER IV. RING KNOTS AND ROPE SHORTENINGS.
Fig. 43.—Slippery Ring Knot.
Fig. 44.—Boat Knot.
Fig. 45.—Lark Boat Knot.
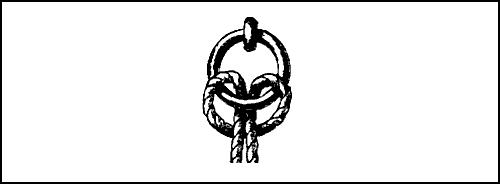
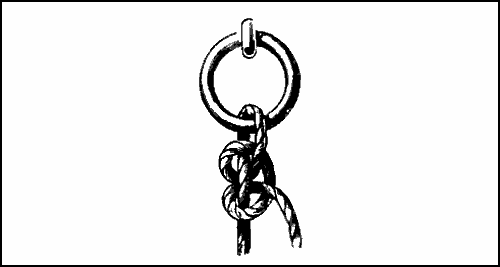
Often it is necessary to fasten a rope to a ring,
and there are a variety of methods of doing this.
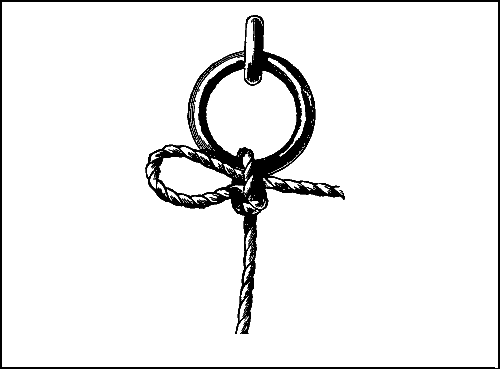
Fig. 43, for instance, shows the end to be passed
through the ring, and a bight put under the standing
part; this is a ready way of temporarily
fastening the painter of a boat to the ring of a
pier; as in the stationer’s knot (Fig. 42, p. 41),
a sharp pull at the end of the rope frees the
painter at once. This is an excellent fastening
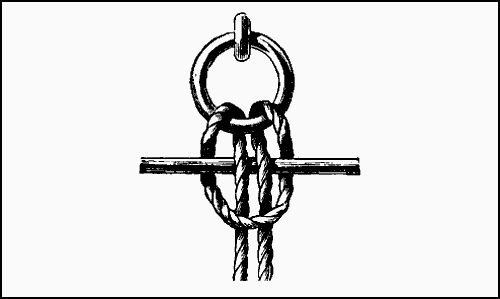
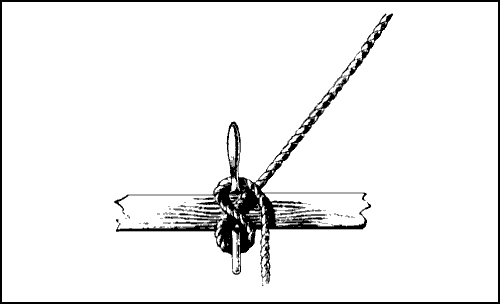
for many purposes. The “boat knot” (Fig. 44) is
another means of mooring a small boat. It is
made in the same way as a marlinespike hitch
(Fig. 40, p. 40), the only difference being that a
thowl pin or other small piece of wood is put
through the centre of the knot instead of a
marlinespike. By withdrawing the pin the knot
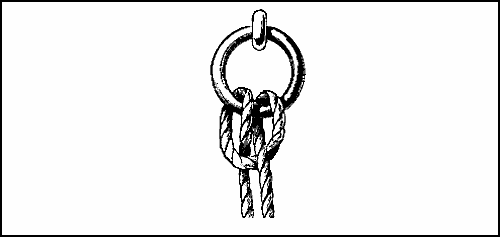
comes adrift of its own accord. Fig. 45 is another
form of boat knot, called the “lark boat knot,”
or “double boat knot.” This differs from the last
knot, inasmuch as a bight, instead of a single end
of rope, is put through the ring; a piece of wood
is used to fasten it, as in the boat knot. It is
rather the better knot of the two.
Fig. 46.—Lark’s Head.
Fig. 47.—Lark’s Head Stoppered.
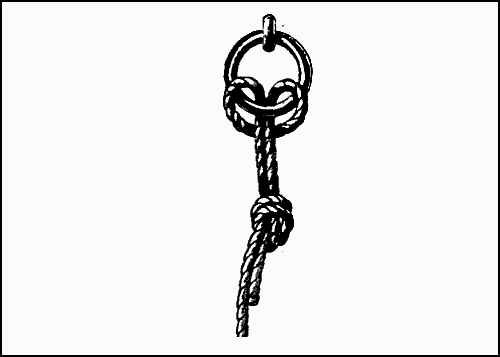
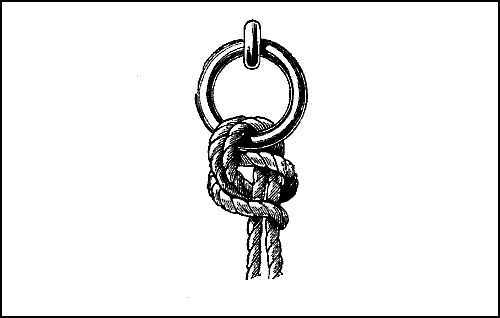
If, instead of the ends being brought down
outside the bight after it has been passed through
the ring, they are put through it, a “single lark’s
head” (Fig. 46) is the result, and Fig. 47 shows
the same knot “stoppered.” It may be made by
passing a bight through the ring, and drawing the
two parts of the rope through the bight; or where
this is not practicable by reason of one end of the
rope being fast, the end may be passed up through
the ring behind the standing part, and down
through the ring and bight again. Sometimes,
instead of stoppering this knot with an overhand
knot, as in Fig. 47, the end is seized to the standing
part with twine.
Fig. 48.—Lark’s Head with Crossed Ends.
Fig. 49.—Double Lark’s Head.
A “lark knot” with crossed ends (Fig. 48) is
made in the manner above described, except that
the end comes over instead of through the bight.
The ends are often stoppered as in the last knot.
If the standing part is taken in one hand and the
end in the other, and drawn apart, it is nothing
more than a “clove-hitch” or “builder’s knot”
(Fig. 25, p. 31) under a different name.
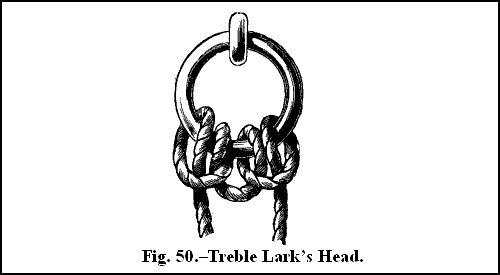
Fig. 50.—Treble Lark’s Head.
Fig. 51.—Backhanded Sailor’s Knot.
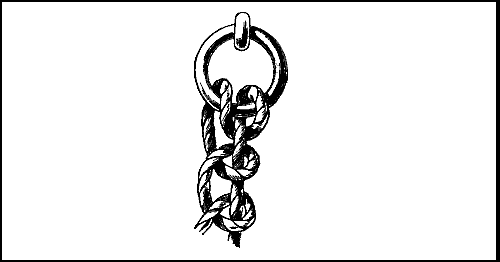
In the “double lark’s head” (Fig. 49) a bight
is first made, and the ends passed through it; the
ends are then put through the ring and through
the loop just made and hauled taut. Fig. 50 shows
the “treble lark’s head,” which is not so difficult
as it looks. First bring the bight of a rope up
through the ring, take one of the ends, and pass
it through the bight, and up through the ring,
and then down through its own bight; do the
same with the other part and the knot is formed.
Fig. 52.—Capstan Knot.
Fig. 53.—Another Form of Sailor’s Knot.
In Fig. 51 is illustrated a “backhanded sailor’s
knot,” made by passing an end through the ring
round at the back of the standing part and through
the ring again, and finishing with two half-hitches
round the standing part. It may also be made
with the end in the last turn put under the standing
part and under its own part.
Fig. 52 is the “capstan knot.” To make this,
cross the end of the rope after it is through the
ring, bring it round the standing part, through the
first bight and through its own bight, thus forming
a sort of figure-of-eight knot.
Another “sailor’s knot,” composed of two half-hitches
round the standing part of the rope, is
shown by Fig. 53. This is one of the most useful
and easily-made knots known, and is used as a
mooring knot.
Fig. 54.—Gunner’s Knot.
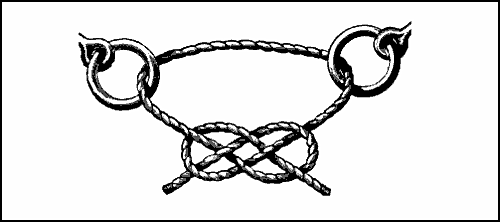
A “gunner’s knot” (Fig. 54) is simply a
“carrick bend” (Fig. 34, p. 36), made with the
two ends of a rope after it has been passed through
two rings. Gunners themselves call this a “delay
knot.”
Fig. 55.—Beginning Artillery Knot.
Fig. 56.—Artillery Knot Finished.
Fig. 57.—Bend Shortening.
Fig. 58.—Chain Knot.
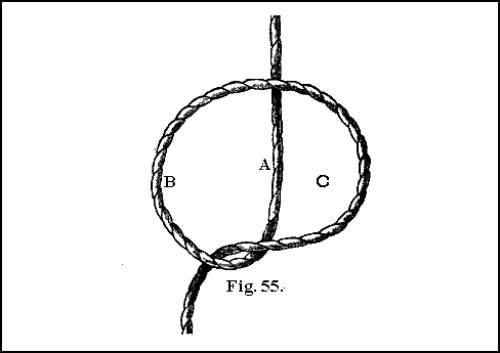
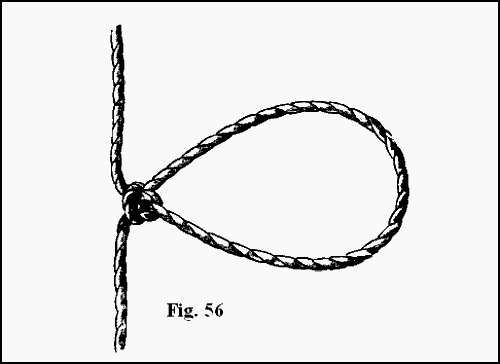
The knot shown in Figs. 55 and 56 is called
“manharness,” or the “artilleryman’s knot,” and
is used when hauling guns over a difficult country,
when horses cannot be employed. It is a valuable
knot where heavy weights have to be drawn with
ropes, as by its use a man can exert his strength
to much greater advantage than by merely grasping
the rope with his hands. To make it, form
a half-hitch, turn it round, and lay it against the
standing part. This is, in fact, a marlinespike
hitch, and is represented in Fig. 40, p. 40. Now
pass the right hand into the bight C, and going
under A, as shown in Fig. 55, grasp the part B, and
draw it through C until a loop of sufficient size is
made. When using it, the head and one arm are
passed through the loop illustrated in Fig. 56,
which shows the knot finished. A little care is required
in closing the knot, so that the turns may
jam properly one against the other, or the knot
will slip. When several men are employed, a
bowline is generally made at the end of the rope,
and as many loops as there are men to haul at
equal distances along it.
It frequently happens that a rope is too long
for its purpose, and as it is inadvisable and wasteful
to cut it, some method of reducing its length
has to be devised; hence have arisen what are
termed “shortenings.”
The “loop” or “bend” shortening (Fig. 57) is
the simplest of these. The rope is merely bent
as much as is required, so as to form two bights,
and the two parts seized together with small stuff.
This is a simple and good method of shortening
ropes.
Fig. 59.—Beginning Chain Knot.
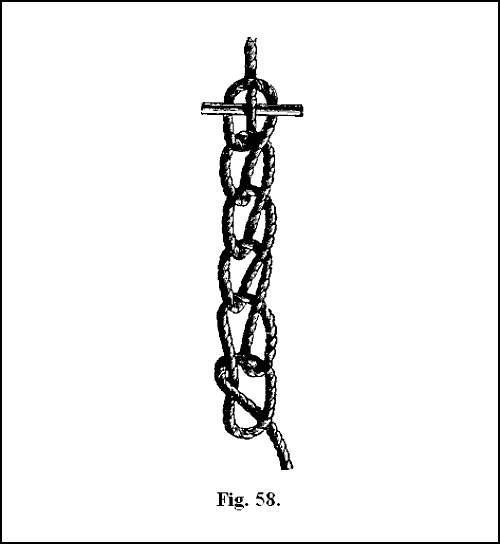
The “chain knot” (Fig. 58) is another method
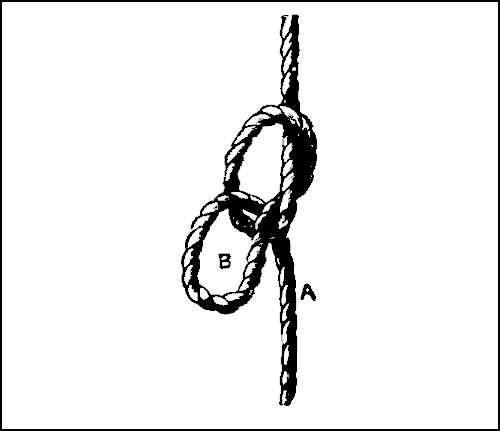
of shortening ropes. In beginning it, make a
running knot (Fig. 59), and draw a portion of the
part A through the loop B; do this with the forefinger
and thumb of the left hand. It will now
form another loop, through which a fresh piece
of A is to be passed. This process is to be repeated
until all the slack of the rope is taken up. Finish
it off by putting a piece of stick or a belaying-pin
through the last loop, or by drawing the end
itself up through the bight.
Fig. 60.—Twist Knot.
Fig. 61.—Beginning Twist Knot.
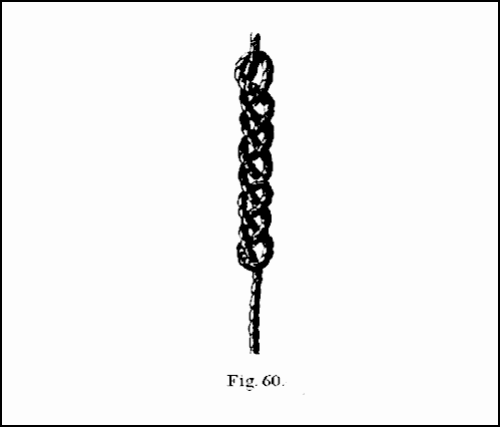
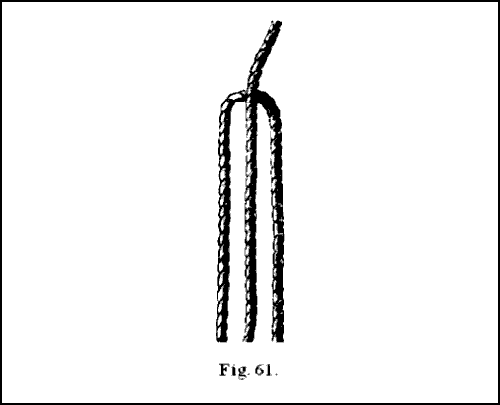
The “twist knot” (Fig. 60) is another shortening.
Place the cord to be shortened as in Fig. 61,
bring one of the outside parts over the middle
strand, and the outer strand on the opposite side
is brought over this, which is now the middle part.
This is continued as long as required, the outside
strand alternately being placed over the centre
strand, as in an ordinary three-plait. Fig. 60
shows the plait completed, and the manner of
finishing off the end. These shortenings are
ornamental as well as useful. They may be used
for thickening a piece of small cord, so as to give
more substance where it has to be hauled upon,
and thus prevent the hand being cut with the cord.
Fig. 62.—Sheepshanks.
Fig. 63.—Sheepshanks Fastened.
Fig. 64.—Sheepshanks Knotted.
Fig. 62 is the “sheepshanks” or “dogshanks”—a
common and old-fashioned method of shortening,
applicable to any size of cordage. The twist
and chain knots are not suitable for very stout
rope. Two bights are formed in the rope, as in
Fig. 61; a half-hitch is then made at each end,
and slipped over the bights. This is made more
secure if a seizing is put round the two parts, A, B
(Fig. 62). It can also be secured when ends of
rope are free by passing each end through the
adjoining bight, as shown in Fig. 63.
Fig. 65.—Sheepshanks Knotted.
Fig. 64 is a “knotted sheepshanks.” It differs
from the last in that the ends are fastened rather
differently. The two bights are made as before,
and each end, after passing through the bight
nearest to it, is put through the bight it has just
made, thus forming an overhand knot at each end.
In making Fig. 65, the parts of the rope are
arranged as before. A marlinespike hitch (Fig.
40, p. 40) is made at each end and the bight put
through it. The left side of Fig. 65 shows the knot
made, and the bight in the act of being passed
through it. It goes over the outside strand, under
the centre one, and over the next. On the right
side of the figure the loop is shown in its place,
ready to be hauled taut.
Fig. 66.—Boat Knot Shortening or Sheepshanks Toggled.
Fig. 67.—Knot Shortening.
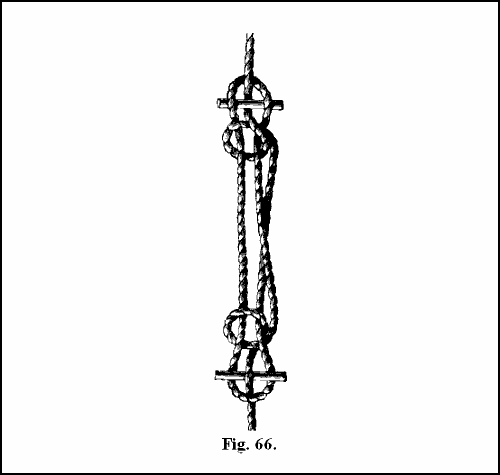
The “boat-knot” shortening (Fig. 66) is another
form of sheepshanks. The ends are secured by
bringing a portion of the loose part of the rope
through the bight at each end, and toggling it
with a belaying-pin or piece of wood, as in the
boat knot (Fig. 44, p. 44). It is loosened readily,
and can be made when both ends are fast.
Fig. 68.—Beginning Knot Shortening.
Fig. 69.—Double Chain Knot.
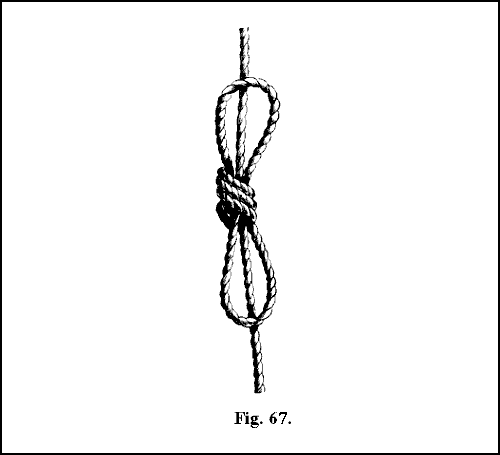
The “knot” shortening (Fig. 67) is a ready
mode of taking up the slack of a rope, though it
is not suitable for very stout ropes, and can be
made only where one end of the rope is free. The
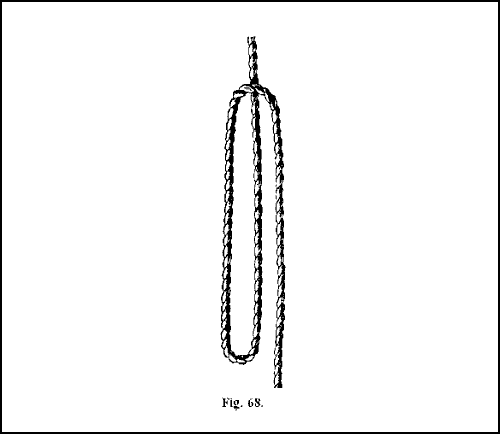
rope is laid as at Fig. 68. The three parts are
grasped with both hands near the bights, and an
overhand knot is formed with the whole of the
strands. It forms a good shortening for moderate-sized
cordage, where the strain is not too heavy.
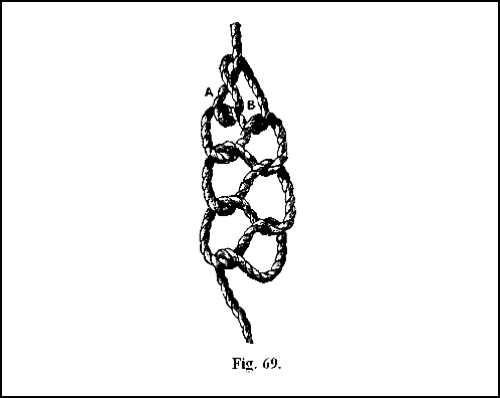
The “double chain knot” (Fig. 69) is perhaps
the most ornamental knot of this group. A turn
is first taken round the standing part, and the
loose end is then passed through the loop thus
formed at A. In doing this another loop B is
made, through which the end is brought. The
end is thus continually passed from one side to the
other through the preceding loop until the knot is
of the proper length. It may be finished, if
desired, by making an overhand knot with the end
over its own part, or merely passing it through the
last loop, and hauling on it.
CHAPTER V. TIES AND LASHINGS.
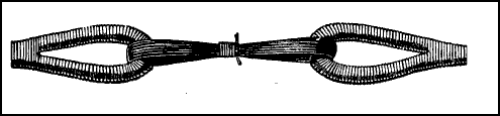
A “wedding knot” or tie, used for fastening together
the eyes at the ends of two ropes, is shown
by Fig. 70. It is made by passing rope-yarn or
marline through the eyes backwards and forwards
until strong enough, and then is fastened by taking
several turns round the middle and fastening the
ends with a reef knot. This forms a sort of hinge
between the ropes.
Fig. 70.—Wedding Knot.
Fig. 71.—Chain Knot Lashed to Spar.
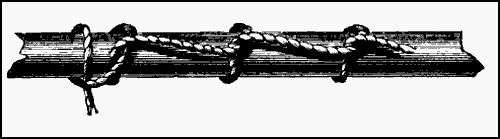
The “chain knot,” for lashing to a spar is
illustrated by Fig. 71; a clove-hitch is first formed
round the spar, and as many single hitches as required
are then made. It may be finished off with
any secure knot. Fig. 72 shows another and better
way of making the chain knot. An overhand knot
is formed at each turn, and consequently it is much
more secure than Fig. 71. This is used for bending
yachts’ sails to the gaff. As each turn forms a
knot if the cord parts, the remainder holds firm,
and does not necessarily come adrift, as it would
be almost sure to do it if fastened as in Fig. 71.
Fig. 72.—Improved Chain Knot.
Fig. 73.—Cross Lashing.
Fig. 73 is a “cross lashing,” employed when
a lever is used to a rope. After several turns
round the rope, the lashing is crossed round the
lever and fastened with a reef knot. All these
lashings are used when several men are required
to haul on large ropes at the same time.
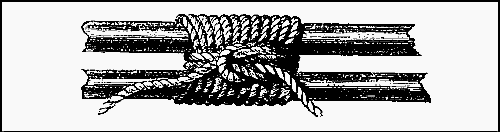
For the “necklace tie” (Fig. 74) several turns
are taken round the spar to be joined, then two
turns round the lashings, and it is secured with a
reef knot. When this is used as a lashing for
shearlegs, the crossing of the two legs puts a strain
on the knot, and effectually secures it. For this
purpose it is called a Portuguese knot.
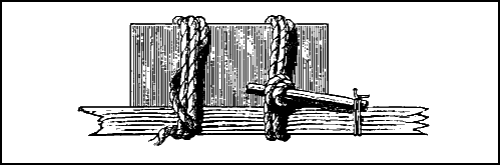
Fig. 75 shows a “packing knot,” used for
securing large pieces of timber together. It is
used near stone quarries for holding the blocks
of stone on to the carriages by which they are
moved. Fig. 75 represents a block of granite
secured to a trolley with packing knots. Two or
three turns are made somewhat loosely with cordage
round the block and its carriage; a stout piece
of wood is then inserted under the coils, and
twisted round until all the slack is taken out and
the cordage is taut. The end of the lever is then
secured with twine to the side of the carriage, as
shown in the right side of the figure. The other
lashing is supposed to be all ready for tautening
up.
Fig. 74.—Necklace Tie.
Fig. 75.—Packing Knot.
It is often necessary to lash two things together
without showing an external knot, which would
spoil the smoothness and neatness of the work—as,
for instance, in whipping the two parts of a
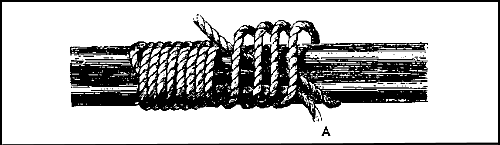
broken fishing-rod together. Fig. 76 shows a common
method of finishing off whipping without
showing a knot. Lay one end forward, as at A,
then pass the other end round and round a
sufficient number of times, hauling taut each
time; three or four loose turns are now made, and
the end passed under them backwards; these are
worked down into their places, and when the ends
are hauled taut and cut off the job is completed.
The end A need not come so far as shown in Fig.
76, but may be hidden under the coils.
Fig. 76.—Finishing off Whipping.
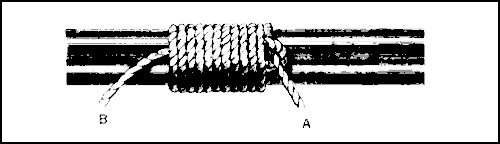
Fig. 77 is another method of accomplishing the
purpose. Instead of a single end, as in the last
case, a bight of the seizing stuff is laid along the
part to be whipped, and the turns passed over it;
when these are completed the end is passed
through the bight, as at A. The end B is now
hauled upon to bring the bight and the end of the
rope snug under the coils. There are now two
loops interlacing at the centre of the work, and
these cannot come undone. When the ends A and
B are cut off close to the turns, the whole is fair
and smooth.
Fig. 77.—Finishing off Whipping.
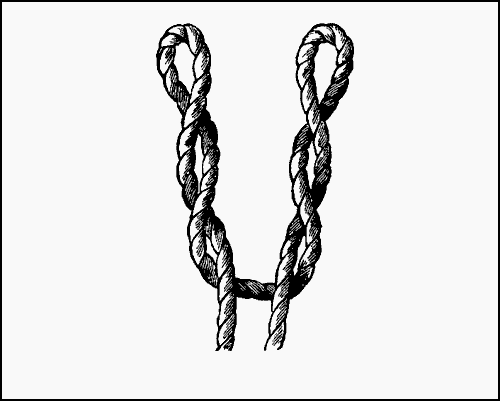
“Nippering,” or “packing,” is shown in Fig.
78. This is a method of securing two ropes together
with cross turns; these are hauled taut,
jamming the ropes together, and are further
secured by round turns over all, with a reef knot
at the ends.
The “west country whipping” (Fig. 79) is an
excellent method, and deserves to be practised
oftener than it is. Bring the middle of the
material used under the part to be whipped, raise
the ends and tie an overhand knot, lower the
ends and tie another underneath; continue tying
a single knot above and below alternately, finishing
with a reef knot; or a round turn or two may
be taken and the ends may then be secured; but
a reef knot is the most usual way of fastening off
this whipping. This is not quite so neat-looking
a method as Figs. 76 and 77, but it is very strong
and trustworthy, and is an excellent way of fastening
large hooks, such as those used for cod or
conger, on to a line.
Fig. 78.—Nippering.
Fig. 79.—West Country Whipping.
Fig. 80.—Catspaw.
Fig. 81.—Beginning Catspaw.
A “catspaw” (Fig. 80) is used for attaching a
rope to a tackle hook. Fig. 81 shows how to begin
it. A loop is made, and laid over the standing
part so as to form two bights; these are rolled
over two or three times, and the hook inserted in
them. When the standing part is hauled upon, the
hooks take the form shown in Fig. 71 (p. 59), and
will not slip.
Fig. 82.—Securing Block to Rope.
Fig. 82 shows a way of securing a block to a
rope with a selvage strop. The middle of the selvage
is placed against the rope, and cross turns
taken until the bights come together, when the
loop of the block is put through them.
CHAPTER VI. FANCY KNOTS.
Although these knots are termed fancy knots,
they are not necessarily used for ornamental purposes,
but are often of considerable utility; indeed,
they could hardly be done without aboard
ship.
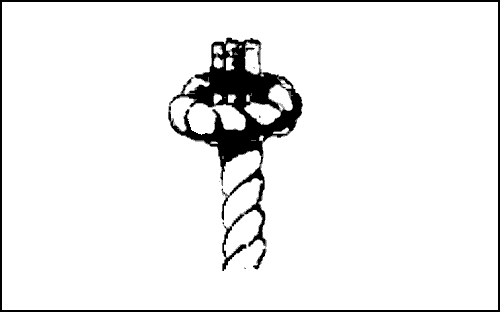
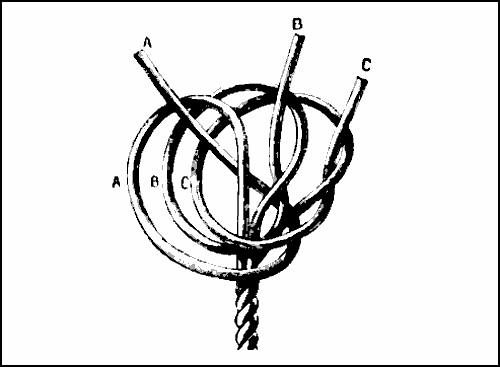
Fig. 83.—Wall Knot.
Fig. 84.—Stopper Knot.
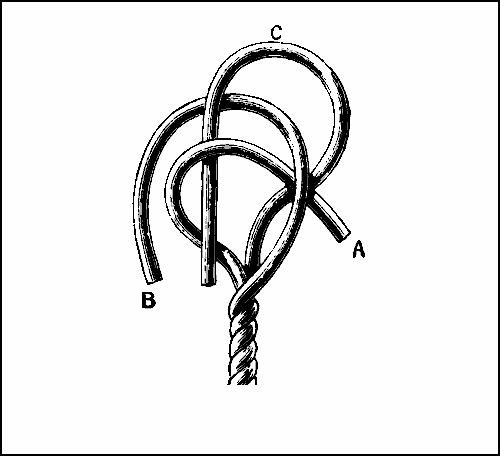
One of the commonest knots of this kind is the
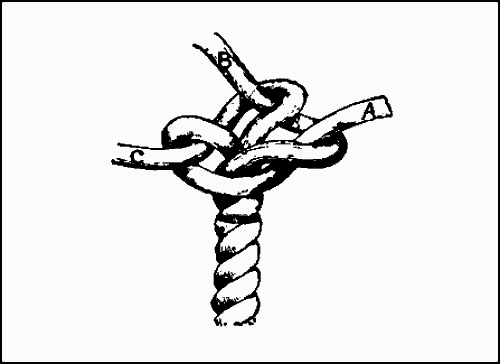
“wall knot”; Fig. 83 shows this ready for hauling
taut. First unlay the strands at the end of a
rope and make a bight with one strand A; hold
this to the standing part with the thumb of the
left hand, make a loop with the next strand B
round the end of the first strand, and bring the
remaining strand C round the end of the strand
B and through the bight of A.
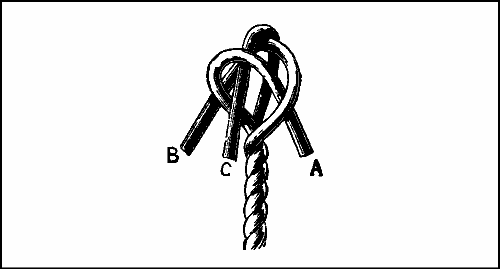
Fig. 85.—Beginning Crowning.
Fig. 86.—Crowning Complete.
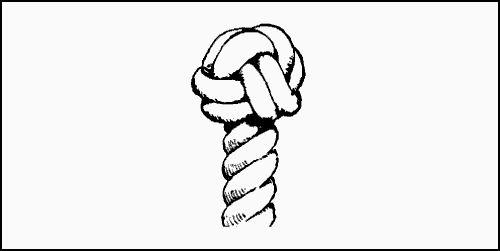
If the ends are taken round once more and
brought up in the centre of the knot, it is called
a “stopper knot” (see Fig. 84). In this case the
ends are whipped together and cut off level. Fig.
84 is the stopper knot finished. Fig. 85 shows
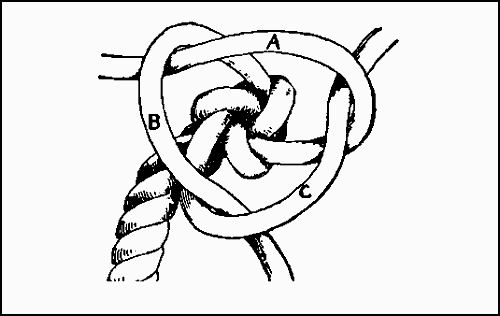
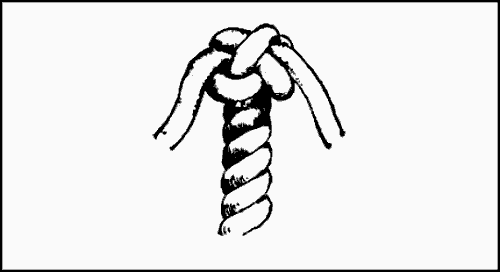
the crowning begun. Open the strands of a rope
as before, but do not put a seizing round them.
Lay the strand A down over the centre of the
rope, and then bring B down over A and strand
C over B and through the bight of A. Fig. 86
shows how the strands tie when they are nearly
taut. The strands in Fig. 85 are hardly in the
position which they occupy when the knot is
actually being made, as they are then much
snugger.
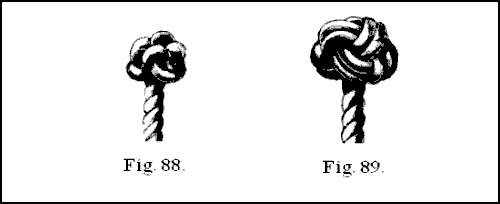
Fig. 87.—Beginning Manrope Knot.
Fig. 88.—Manrope Knot.
Fig. 89.—Tack Knot.
Crowning is used by itself as a method of preventing
the strands of a rope unlaying while in
use. In this case, after crowning as above, pass
one end over the next strand in the standing
part, and under the following one. Do the same
to each of the other strands in succession. This
may be repeated and the ends cut off. Masons,
whose ropes have to stand a good deal of knocking
about, generally use this plan; for this reason
it is called “masons’ whipping.” Though very
strong and standing hard usage well, this is not
the neatest way of finishing the ends of a rope.
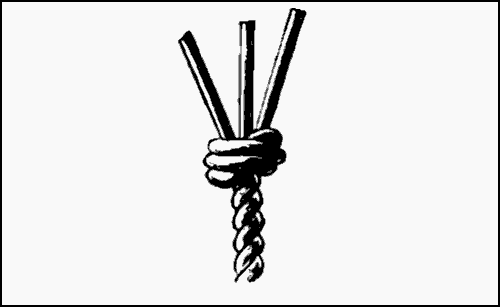
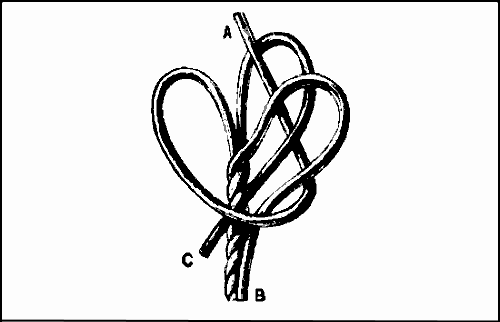
Fig. 90.—Beginning Matthew Walker Knot.
Crowning may also be used in connection with
other knots. For instance, it is possible to crown
first and wall afterwards, as shown in Figs. 87
and 88. Fig. 87 shows the crowning in the centre
of the knot hauled taut; this is made on the end
of a rope as just described. Now make a single
wall knot under the crowning. When the knot is
tightened it will appear as in Fig. 88, and is called
a “manrope knot.” A single “wall knot” may
be crowned after it is made; a single wall and a
single crown are the result. Wall again by passing
one end under the part of the first walling next
to it and bring it up through the same bight, and
do the same with the other two strands, and the
result is a knot with a double wall and a single
crown. A double-walled double-crowned, called a
“Tack Knot,” is made as the last knot—that is,
double-walled and single-crowned. Now lay the
ends by the sides of those in the single crown, and
with the aid of a pricker bring them down through
the double walling and they will be alongside the
standing part of the rope. The knot is shown
completed, with the ends cut off, in Fig. 89.
Fig. 91.—Matthew Walker Knot.
Fig. 92.—Beginning Diamond Knot.
In Fig. 90 is shown a Matthew Walker knot
open ready for being hauled taut. After putting
a seizing round the rope and unlaying the end as
before, bring one strand A round the rope and put
it through its own bight, the next strand B
underneath, through the bight of A and through
its own bight, and the last strand C underneath
through both the other bights, and lastly through
its own bight. Fig. 91 shows the knot completed.
Fig. 93.—Diamond Knot before Hauling Taut.
The “diamond knot” is an ornamental knot
made some distance from the end of a rope; it is
therefore necessary to unlay the rope considerably
more than is required for the preceding knots.
To form a diamond, bring each of the three strands
down alongside the standing part of the rope,
thus forming three bights, and hold them thus
with the left hand. Take the first strand A (Fig.
92), and, putting it over the next B, bring it up
through the bight of the third strand C. Take
the end of the second strand over the third and
up through the bight of the first. The last strand
is brought over the first and up through the bight
of the second. Haul taut and lay the rope up
again. Fig. 92 is the way the knot is begun, showing
the manner of taking the first strand. Fig. 93
shows the loops in their places with the ends
through them before they are hauled taut, and
Fig. 94 shows the knot finished. Remember that,
after the bights are formed down the standing
part, each end successively goes over the strand
next to it and up through the loop beyond. This
knot is the “single diamond.”
Fig. 94.—Single Diamond Knot.
Fig. 95.—Double Diamond Knot.
For a “double diamond” (Fig. 95) make a single
diamond as above, without laying up the strands;
the ends are then made to follow the lead of the
single knot through two single bights, the ends
coming out on the top of the knot. The last
strand passes through two double bights. When
the ends are hauled taut they are laid up as before.
The last four knots are used for the ends of lanyards,
man and ridge ropes, yoke lines, etc.
The “shroud knot” (Fig. 96) is of use in joining
two ropes together, particularly for joining a
stay or shroud that has been carried away. The
ends of each rope are unlaid, and placed within
one another as in splicing, the parts not unlaid
being brought closely together. Make a wall knot
(Fig. 83, p. 66) with the strands of one rope
round the standing part of the other rope; turn
the ropes over, and do the same with the other
set of ends, and they will appear as in the figure.
Open the strands, and taper and serve them over
if the job is to be particularly neat. Two ropes
of different sizes may be twisted in this way, and
will be quite secure.
Fig. 96.—Shroud Knot.
In making the “French shroud knot” unlay the
ends and place the two ropes with the strands
intermixed as before; bring one set of ends back
on their own rope, and make a single wall knot
with the other set of strands round the bights of
the first set and the standing part. They can then
be tapered and served as in an ordinary shroud
knot.
For a “spritsail sheet knot,” unlay the two
ends of a rope and bring the two sets of strands
together side by side; these have to be walled together
as for a common wall knot. A bight is
made with the first strand, the second is put over
the first, the third over the second, the fourth over
the third, the fifth over the fourth, the sixth over
the fifth and through the bight of the first; they
are then hauled taut. Crown it by laying two of
the strands along the top of the knot and passing
the other strands alternately over and under these
two, and afterwards hauling them taut. It may be
double-walled after crowning by putting the
strands successively under the bights on the left
of them and through the same bights, and the
ends will then come up in the right position to
be crowned again. This is done by following the
lead of the first crowning and putting the ends
through the walling as before.
Fig. 97.—Beginning Turk’s Head.
The “buoy rope knot” can be made on a cable-laid
rope only. Unlay the main strands, and take
out one of the smaller strands, of which they are
composed, from each of the large strands, and then
lay them up again. The small strands that have
been taken out are now single and double-walled
round the rope, and then laid along the divisions
after the manner of weaving, and their thin ends
stopped with spun yarn. A stop should be put
round the rope with the spun yarn where the knot
is to be made before it is begun, and the walling
should be right-handed.
Fig. 98.—Turk’s Head.
The “Turk’s Head” is a highly ornamental
knot which, instead of being made out of the rope
itself, is formed on the rope with a piece of small
stuff. A clove-hitch (p. 32) is first made on the
rope (Fig. 97); this must be slack enough to allow
of the extra strands which will form part of it.
Put part A over strand B, thus twisting the two
strands; pass the end C under and up through the
bight that B now forms, then twist again by
putting B over A and run the end under and up
through the bight of A. Continue twisting the
strands by alternately putting one over the other,
and at each twist bring the end under and up
through the bight which is underneath, A at the
beginning going over B; the bight which B makes
will be the under one, and therefore the one
through which the end C must be passed. The end
C must be much longer than illustrated as the
whole knot is made with this part, and as the
knot when finished contains three groups of three
strands each, it is obvious that the length of cord
used must be more than nine times the circumference
of the rope round which the knot is made.
Having made a sufficient number of twists (the
exact number depends on the size of the knot),
lay the end C alongside D, where it comes out of
the knot, and continue following its lead through
all its turns as it goes through the knot until the
beginning is reached again. There will now be a
Turk’s head of two parts. If the end is again
passed through by the side of the same strand as
before, a complete Turk’s head of three parts will
be formed. Care must be taken to keep the
working strand close to and on the same side of
the strand that is being followed, or a perfect
knot cannot be formed. The first time round is
the most difficult, the second is easy enough. Of
course, the knot may consist of more parts if required,
but three is the usual number. The ends
do not require fastening in any way, as in the last
round they finish in the middle of the knot under
the coils, and are quite secure (see Fig. 98).
Fig. 99.—Single Pitcher Knot.
Fig. 100.—Beginning Single Pitcher Knot.
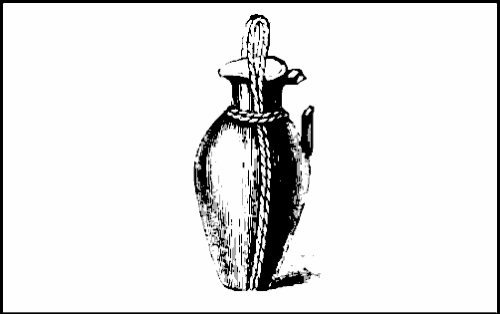
Fig. 101.—Pitcher with Rope Handle.
The “single pitcher” knot, known also as
“Tom Fool’s” knot, is shown by Fig. 99. Form
two half-hitches, as in Fig. 100, one lying half-way
over the other. With the finger and thumb of
the left hand draw the part A down through the
bight, and with the same fingers of the right
hand bring the strand B upwards through the
bight, under which it lies. Pull out the loops
thus formed to a sufficient length and knot the
ends together. When used to supply the place
of a broken pitcher handle, the centre knot should
be hauled taut, and, the pitcher being placed on
it, the loops are brought up to form handles. To
keep them in their places a lashing is put round
the neck of the pitcher, as shown in Fig. 101.
This knot is also very useful in slinging a shot
when required as a weight, or for any other
purpose. In this case the centre knot is not hauled
taut but left open, forming a large loop on which
the shot lies. If the ends are spliced instead of
knotted a three-loop knot is made.
This knot is used also as a trick or puzzle
knot, and from this arose its name of “Tom
Fool’s” knot.
Fig. 102.—Double Pitcher Knot.
Fig. 103.—Beginning Double Pitcher Knot.
Fig. 102 is the “double pitcher” knot, which
goes also by the names of “jury” knot and “true
lovers’” knot. It is used as the single pitcher
knot to sling a broken pitcher, but in this case
there are four loops by which to carry it instead of
two. In rigging a jury-mast the end of it is put
through the centre of the knot before it is hauled
taut; the stays to support and steady the mast
are then made fast to the bights of the knot.
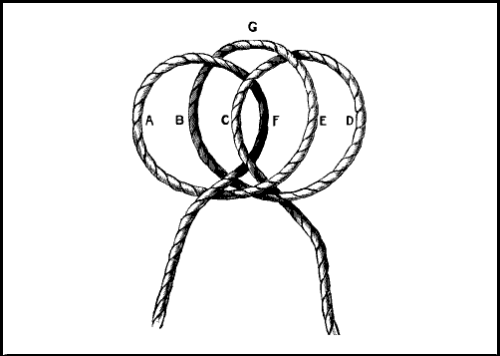
Form two half-hitches in a piece of cord, as in
Fig. 103, then make another hitch, which draw behind
the other hitches with the inner edge overlapping
the inner edge of the first hitch, as shown
in Fig. 103. Pass the forefinger and thumb of the
left hand over strand A under B and take hold of C.
Put the same fingers of the right hand under D
over E and take hold of F. Take G between the
teeth and draw the three loops out. It is better
to make G the length required at first, as the
other loops being immediately connected with
the ends can be more readily adjusted as to size
than the upper loop. When the loops are made
the right size the loose ends are spliced together
with a short splice, thus forming the fourth loop.
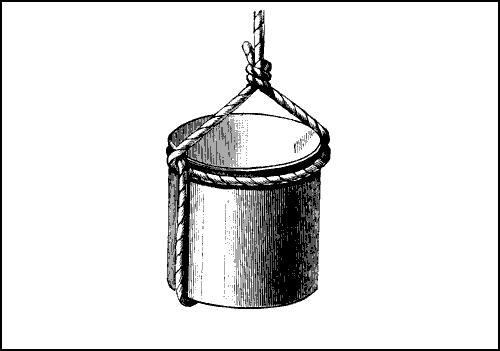
Fig. 104.—Can or Jar in Sling.
Fig. 104 shows a ready way of slinging a can
to improvise a paint pot, to dip for water, etc.
Pass the end of the cord under the bottom of the
can and bring the two parts over it, and make
with them an overhand knot; open the knot, as
shown in Fig. 105, and draw the two parts down
until they come round the upper edge of the can;
haul taut, and knot them together again over the
can, as shown in Fig. 104.
Fig. 105.—Beginning Can Sling.
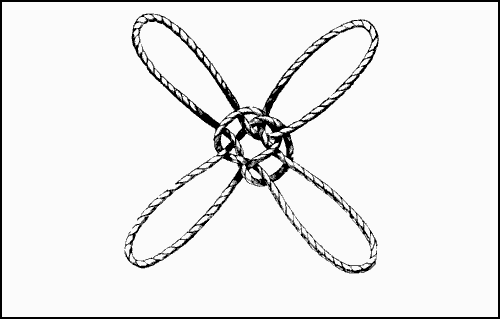
Fig. 106.—Shamrock Knot.
Fig. 107.—Beginning Shamrock Knot.
If the ends of the shamrock knot (Fig. 106)
were spliced, a four-looped knot would be formed.
Though used for the same purposes as the double
pitcher knot, it is not so good as that, being more
troublesome to make and not so strong, in consequence
of the short nip of the strands in the
centre of the knot. Fig. 107 shows the way of
making it. An overhand knot is first formed with
the ends at A; the end B is then laid across the
upper loop, brought round and under the right
loop and up through the bight C. The strand D,
after passing at the back of the upper loop, is
carried over the left loop and down through the
bight E. The loops are now adjusted for size
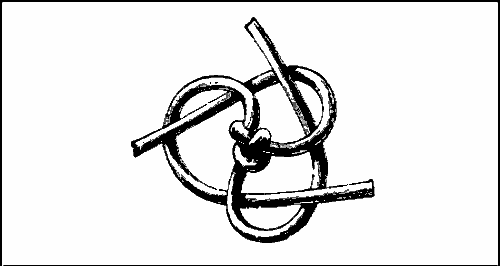
and the knot hauled taut. Fig. 108 gives another
way of making this knot. Two overhand knots
intersecting one another are made on the ends, as
illustrated; the part A is drawn up through the
bight C, and the part B down through the bight D.
These form the side loops, and the top loop being
pulled out the knot is completed. By an extension
of these methods knots may be made with
any number of loops, but the difficulty increases
greatly as the loops increase, so much so, that
many loops cannot be made except wire replaces
the cord.
Fig. 108.—Another Way of Making Shamrock Knot.
The dalliance knot whose beginning is shown
by Fig. 109 is a trick knot difficult to learn when
it is merely seen rapidly made. The object is
to make two independent double-knots at once
on a double cord. Double the cord so that the ends
lie together; bring the bight over the standing
parts, as shown in Fig. 109, and cross the strand
A over the strand B; they will now appear as in
Fig. 110. Press the part C down between the two
strands on which it lies, and bring it up through
the opening D, draw it out, and two overhand
knots will be formed on the double cord. While
the part C is being drawn out through D, the
whole of the loop E must be brought up through
the bight F; this forms the upper knot. The lower
knot is made by loop F, C forming bight at top of
double cord. The finished knot is practically
the same as Fig. 16 (p. 25).
Fig. 109.—Beginning Dalliance Knot.
Fig. 110.—Next Stage in Dalliance Knot.
Some stage performances many years ago consisted
of various rope tricks. In the principal
one the performers were shut up in a cabinet,
and when the doors were thrown open they were
found seated on two chairs tightly bound hand and
foot. After examining the knots, the doors were
closed and the men rang bells, played on the
tambourine, and threw things out of a small
window in the top of the cabinet. On the doors
being opened again directly they were found
firmly tied to their chairs as before. They were
able to do this by means of an ingenious knot,
shown in Fig. 111. To perform the trick, two
medium ropes each about 12 ft. long are required.
First the openhand knot A (see Fig. 8, p. 19) joining
the two ropes is made, the ends being passed
twice through the bight to increase the size of the
knot. Two running knots are made close up to
this knot as at B, B. The knotted end of the rope
is laid on the seat of a chair with the ropes passing
down the back of the seat and under the
chair. The performer seats himself on the chair,
and, drawing the loose ends of the ropes up in front
from under it, he passes them round and round
his legs and the legs of the chair in a complicated
manner. He draws the knotted end from under
him, and, putting his arms over the back of the
chair, passes his left hand down through one loop
and his right hand up through the other. He now
turns his right hand down until the palms of both
hands are together and the fingers pointing downwards
This produces a twist in the ropes which
takes up the slack and tightens the cord round
the wrists. The large knot being between the
hands effectually hides this, and the wrists merely
appear to be as tightly bound together as they
can be. The performer has merely to reverse this
last proceeding—that is, to bring the right hand
up again, and so undo the twist—and his hand can
be withdrawn as readily as it was put into the
loop. The trick requires some practice, and the
size of the loops must be regulated by the size
of the performer’s wrists. The knots should also
be so placed on the chair at the commencement
that the ropes are tight when the hands are in
the loops.
Fig. 111.—Davenport Brothers’ Knot.
Fig. 112.—Bellringer’s Knot.
Fig. 112 is the “bellringer’s knot,” but really
it is a hitch and not a knot. Church bells have
a large wheel on the axle on which they are hung,
round which the bell-rope passes; this is done to
obtain sufficient leverage to raise the bell mouth
upwards when it is rung. This requires a long
rope, a good portion of which lies on the belfry
floor when the bell is down. When the ringing
is over this slack is hitched up out of the way in
the manner shown. The loop A is made near the
end of the rope, laid against the standing part,
and a hitch taken over it at about the height
of a man’s head. The hitch should be kept quite
close to the standing part, and it will hold the
loop quite securely; at the same time a slight pull
at the end releases the whole thing at once. The
part B where the rope is grasped when the bell
is checked as it comes over is called the sally
or tufting. It is made by opening the strands
and inserting short pieces of worsted, which are
afterwards trimmed until they are all of one
length.
CHAPTER VII. ROPE SPLICING.
Splicing is a method of joining ropes by interweaving
together their strands. When ropes are
to run through blocks they cannot be joined by
knotting, as the knot would prevent their passing
through the block. In this case they are always
united by splicing. In driving ropes also knots
are out of the question.
Fig. 113.—Beginning Short Splice.
For the short splice, the ends of the two ropes
are unlaid for a sufficient distance, and placed
together, as in Fig. 113, the strands of one rope
going alternately between the strands of the other.
The two ropes are then jammed closely together.
The end of one rope with the strands of the other
rope is now held firmly in the left hand. Sometimes
a lashing is put round the strands to keep
them down to the rope on which they lie. Pass
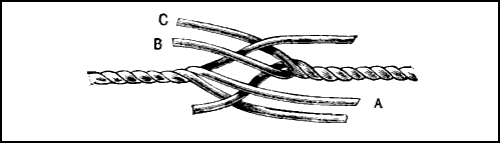
the middle strand A over the strand of the other
rope B which goes down to the left of it; then
bring it under C, and haul taut. Do the same to
each of the other strands in succession, putting
them over the next strand to them and under the
next beyond. Turn the rope round and do the
same to the other set of strands; this may be
repeated on both ropes. Care must be taken not
to bring two strands up through one interval in the
rope. Each strand should come up separately
between two strands of the rope they are passed
into. If it is desired to taper the splice for the
purpose of making it neater after the ends have
been interwoven, divide the yarns of which the
strands are composed, pass one-half as before, and
cut off the other half. To bring the rope to shape
again after splicing, roll it under the foot; if small
cord has been used, a piece of flat wood is substituted
for the foot.
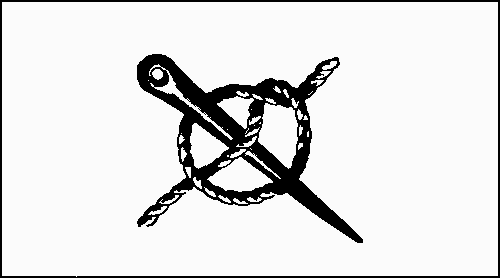
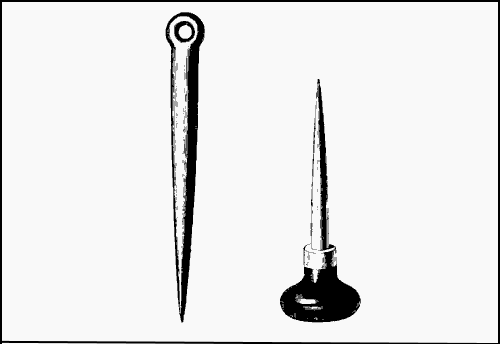
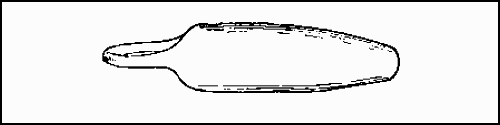
Fig. 114.—Marlinespike.
Fig. 115.—Pricker.
As the strands of a rope are tightly twisted
together it requires some force to open a passage
for the parts of one rope through the other. For
this purpose, in the case of large ropes, is used
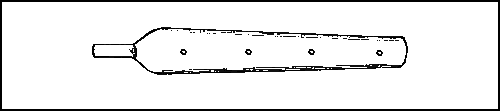
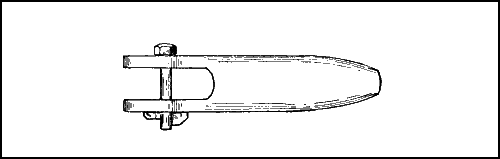
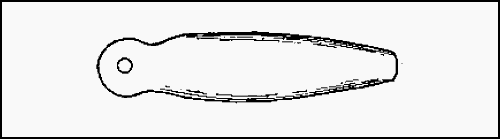
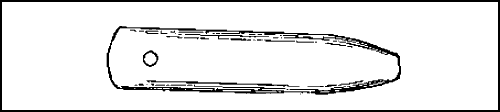
a marlinespike (Fig. 114) made of iron, copper, or
hard wood. Copper is preferable, as it does not
rust like iron or break like wood. With small
stuff a steel pricker (Fig. 115) is used. A fid is
employed for very large ropes, this being merely
a tapered wooden pin generally made of lignum
vitæ.
Fig. 116.—Long Rope Splice.
The long splice illustrated by Fig. 116 has advantages
over a short one. To make it, unlay the
ends of two ropes for a much greater distance
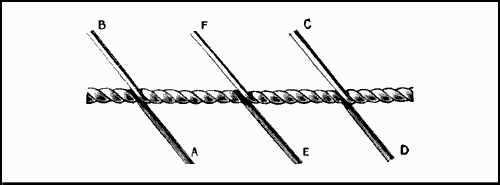
than before and put the ends together. Unlay one
strand A for some length, and fill up the space
left by its removal with the opposite strand from
the other rope, as B. Do the same with two more
strands C D; C is the one unlaid, and D the one
laid up in its place. Make an overhand knot with
the two remaining strands E F, taking care that
the ends follow the lay of the rope and not across
them. Divide both strands into halves and pass
one-half over the next strand, and under the
following one; do this two or three times and cut
all the ends off close. Work the remaining two
pairs of strands the same way and the splice is
finished. The rope should be well stretched before
the ends of the strands are cut off.
Fig. 117 is a cut splice forming an oblong loop
in the middle of a rope. The end of one rope is
spliced into the standing part of another, as at A,
A (Fig. 118), so as to form an eye. The end of the
other rope is then spliced into the standing part
of the first rope, and the spliced parts served over.
Fig. 117.—Cut Splice.
A neat way of forming an eye at the end of a
rope (it is known as the eye splice, Fig. 119) is by
unlaying the strands and placing them on the
standing part so as to form an eye, then put one
strand under the strand next to it, and pass the
next over this strand and under the second; the
last strand must go through the third strand on
the other side of the rope. Taper them as before
by halving the strands and sticking them again.
To make a cable splice unlay the ends of the
ropes to be joined for some distance, place them
together and make a short splice. Leave a suitable
length, and thence reduce each strand to
a long taper by gradually cutting away as many
yarns as necessary; neatly point over the taper
and lay the ends in the intervals of the rope.
Put a seizing at each end of the splice, an end
seizing at the beginning of the pointing and a
stop at the end of the tails. This is the best
splice for cables, as it may readily be undone.
Another method of making a cable splice is
to splice the ends in twice each way, then to pick
out the strands, worm part of them round the
cable, and taper away the rest, which should be
marled close down; then clap on a throat and two
end seizings of ratline.
Fig. 118.—Beginning Cut Splice.
Fig. 119.—Eye Splice.
Fig. 120.—Splicing Grommet.
In splicing cotton ropes on the Lancashire
system proceed as follows:—Short splicing the
ends together is the simplest, but would not answer
for running over a small pulley or through the
“swallow” of a block; in this case a long splice
would suffice. If a small strop only is needed, a
one-strand grommet is the neatest. A strand
from cotton rope will not keep its lay, or acquired
spiral form, and is therefore a very difficult
material to work into a grommet. Practising first
on hemp is advised. From a piece of rope about
a foot longer than the circumference of the intended
grommet, unlay a strand with care, to
prevent it losing its lay. Now lay up this strand
into itself, as shown in Fig. 120. The two ends
will meet each other in the same crevice. Halve
these ends, and tie an overhand knot, as shown in
Fig. 121, which must not be pulled too tight, or it
will buckle-up the grommet (this will be noticed).
When this knot is quite snug down in its place,
take about one-third of the yarns out of the ends
with which the knot was made, and tuck the remaining
two-thirds under two strands, missing
one (see Fig. 121, where the arrow D shows how
to tuck the end A, and arrowhead C shows
where end B will come out). Now halve these
ends, and, leaving one-half, tuck the other as before;
work them in nice and snug, put the grommet
on a good stretch, and trim off the ends. If the
work is well done no joint should be noticeable.
Grommets are sometimes finished off by knotting
the whole strands, then halving them, and tucking
like a common splice. This is not quite as
neat, but perhaps a trifle stronger.
Fig. 121.—Finishing off Grommet.
CHAPTER VIII. WORKING CORDAGE.
Seizing implies the fastening together of two
ropes, or different parts of the same rope, with
several closely placed coils of small rope, spun yarn,
etc. The several kinds of seizings take
their names from the positions they occupy in a
ship’s rigging. End seizing is a round seizing
at the end of a rope. Throat seizing is the first
seizing clapped on where ropes cross each other.
Middle seizing is between a throat and end seizing.
Eye seizing is a round seizing next to an
eye in the rope.
Fig. 122.—Flemish Eye.
To make a round seizing, make a small eye in
the end of the seizing stuff, and, after taking
a turn round both parts of the rope, reeve the
ends through the eye, take two or three turns,
and haul them taut with a marlinespike hitch
(Fig. 40, p. 40); pass eight or ten turns close together,
and heave taut. Bring the end back under
these turns and out between the last two coils,
and pass another series of turns on the top of the
others, which are called riders, and are not hove
so taut as the first turns. There is always one less
of the riding turns than of the lower ones. Two
cross turns sometimes are taken, passing between
the ropes to be joined and across the whole of the
seizing; the end is brought under the last turn,
hove tight, and secured, if large, with a wall knot,
crossed (Fig. 83, p. 66), and, if small, with an overhand
knot, and cut off. Other seizings are done
in a similar way.
Sennit is a flat rope, made by plaiting together
rope-yarn or spun yarn, the outside yarns being
brought over to the middle from each side alternately.
It always has an odd number of yarns,
generally from five to thirteen. French sennit
is braided with an even number of yarns passed
over and under every other time.
Fig. 123.—Grommet.
Gaskets are made of braided cordage in the
same manner as sennit, and are used for confining
the sails when furled to the yards. They are called
arm gaskets when used at the ends of the yards.
Bunt gaskets are used in the middle of the yard
to hold the bunt of the sail, and quarter gaskets
between the middle and extremities of the yards.
A Flemish eye (Fig. 122) is a form of eye made
without splicing. Unlay one strand at the end
of a rope, and bring the two other strands, just
as they are, against the standing part, so as to
form an eye of the size required. Lay up the
unlaid strand in the intervals in the rope from
which it has been taken, but in the reverse way—that
is, begin at the end and keep on laying it
round until it comes down the standing part and
lies along with the other strands. The ends are
then tapered, marled down, and served over with
small stuff.
An artificial eye is the end of a rope unlaid,
and the yarns of which the strands are composed
are separated. The yarns are now hitched round
a piece of wood the size of the proposed eye.
They are then marled, parcelled, and served over.
A grommet (Fig. 123) is a ring of rope made
by carefully unlaying one strand from a rope and
cutting it off. All the turns must be left in it.
Form a ring by laying one part over the other,
taking care that the turns coincide with one
another. Pass one end round and round, in the
lay, until all the intervals are filled up and the
ring is complete. The two ends are secured as
in a long splice, first with an overhand knot, and
then by dividing the strands and passing half of
them under the standing part, and cutting off the
remainder. Grommets are used for stropping
blocks, handles for chests, snorters for the heel of
sprits, etc. They are very often parcelled and
served to make them look neater. It is easier
to make them if the rope from which the strands
are taken is laid up hard.
Fig. 124.—Selvagee.
Selvagee (Fig. 124) is a number of rope-yarns
fastened together. To make it, drive two nails
into a piece of board at a sufficient distance from
one another to form the size of selvagee required.
Wind rope-yarn round these to form the desired
thickness, and marl them down with spun yarn.
They are used to form a neat stropping for blocks,
or to go round a spar to which a hook is to be
fixed. Fig. 125 shows how a selvagee is employed
for fastening a block to a rope. The middle of
it is placed against the rope, and the bights passed
one over the other until they come close to the
rope, when the hook of the block is inserted.
Fig. 125.—Selvagee fastening Block to Rope.
Worming is filling the intervals between the
strands of a rope by laying spun yarn or other
small stuff into them. This renders the rope more
even and smooth for parcelling and serving. The
first end of the worming is securely stopped and
passed along one of the divisions of the rope.
When it has been carried as far as it is required,
it is stopped and laid back down another interval,
and then forward along the remaining one, and
stopped at the end. To estimate the quantity of
serving stuff required for a given length of rope,
multiply the length of rope to be served by the
number of strands in the rope, and add one-third
of the product. The result is the length of serving
necessary to do the work. Thus, if six fathoms of
three-strand rope have to be served:—(6 × 3 = 18)
(18 ÷ 3 = 6) 18 + 6 = 24. Thus 24 fathoms is the
length of serving. Fig. 126 shows at A how worming
looks when finished.
Fig. 126.—Worming, Parcelling, and Marling.
Parcelling, B (Fig. 126), is done by winding
strips of old and generally tarred canvas smoothly
round a rope in spiral turns after it has been
wormed and before it is served. To secure the
canvas it is marled down—that is, some marline
or other small stuff is wound round it, which is
secured at every turn with a hitch, so that each
of the turns is secure and independent of each
other (see B, Fig. 126). The proper hitch for
securing the turns is shown on a larger scale in
Fig. 72, p. 60. In marling down, the coils are
not laid close to one another as in serving, but
always at some distance apart.
Fig. 127.—Serving.
Fig. 127 shows the way a rope is served or
covered with coils of spun yarn or other small stuff
laid on quite close to one another. The end of
the yarn is first secured by placing it under the
first two or three coils. A serving-mallet (see
Fig. 127), after being placed against the rope, has
two or three turns passed round the body of it,
and another turn or two on the handle. This
produces sufficient friction to leave the coils taut
as the mallet is worked round the rope by its
handle. Another person is required for passing
the ball of serving stuff. The service must be put
on against the lay of the rope. A rope may be
served single-handed by carrying the serving stuff
on a large reel, with a hole in its centre large
enough for the rope to run through. This is kept
just ahead of the mallet, and the serving stuff
comes off the reel of its own accord as required.
When the mallet is within a few turns of the end,
the turns are taken off it by hand, the end is put
through them, and heaved well taut.
Fig. 128.—Belaying.
A rope is belayed or made fast by cross turns
round a cleat in the way shown in Fig. 128. The
cleat is assumed to be lashed to a stay or other
rope, but it is often made fast to some part of the
vessel. Occasionally a single hitch is put over the
upper horn of the cleat to make the rope still more
secure.
Fig. 129.—Fairleader.
A rope is taken at right angles from one part
of a vessel to another by means of a “fairleader”
(Fig. 129). This is a block of wood with a hole in
it big enough to allow the line to run freely
through it. The back of it is grooved to fit the
rope it is lashed to. Where more than one line
has to be led, a piece of board or plank with holes
through it is used. A fairleader is not necessarily
fastened to a rope, but is fixed in any suitable
position.
Fig. 130.—Belaying Pin.
A belaying-pin with a rope made fast to it
(Fig. 130) is the usual way of securing running
rigging, as it can be made fast and cast off so
rapidly.
Fig. 131.—Toggle.
Fig. 132.—Another Form of Toggle.
Fig. 131 shows a method of securing ropes together
by means of a toggle, a piece of wood
turned to shape and having a groove in the centre,
round which the end of a rope is spliced. An eye
is made in another rope by any method and the
toggle slipped into it. It is undone by slackening
the ropes and putting the toggle through the eye,
end foremost. Fig. 132 is another form of toggle,
the round piece of wood being shaped like a
button. It has a hole in the centre, through which
a rope is passed and the end knotted.
Fig. 133.—Fender on Side of Boat.
A fender (Fig. 133) protects the sides of a boat
from being chafed and the paint or varnish rubbed
off. Occasionally a fender is of wood, which is
slung over the boat’s side by a lanyard reeved
through a hole in the end of it, but more often it
is of canvas, stuffed with oakum and painted.
Fig. 133 shows an easily made soft fender which
does not need painting. Take a piece of Manilla
rope double the length of the fender; unlay it,
open the strands, and comb them down until all
the yarns lie straight; double it and clap an eye-seizing
on it, marling it down as illustrated. A
lanyard of small cords, such as log-line, is then
spliced into the eye.
Fig. 134.—Fender with Ropeyarn Heart.
Fig. 134 shows a handsomer form of boat’s
fender. This is made of a centre or “heart” of
rope-yarn worked over or grafted with short pieces
of rope-yarn called “knittles” or “nettles”; this
is a kind of weaving. The nettles are first cut to
the right length, and the middle part slightly
twisted. They are then brought snugly round a
thimble, and a seizing put under it. The heart
is put into its place and the nettles laid evenly
over it. Half of the nettles, taken alternately,
are turned back over the eye, the rest lying down
the heart. Pass a turn or two of twine or marline,
called the warp or filling, round the fender where
the nettles separate, and hitch it. The turned
back nettles must now be brought down, and those
that are down turned up over the eye. The warp
is now passed again, and hitched as before. This
must be repeated until the whole of the fender is
covered with a sort of woven coat as shown in
Fig. 134. The ends of the nettles are brought
round the last turn of the warp, and interlaced
in the grafting. This fender requires a lanyard
the same as the last one.
Fig. 135.—Thimble Side View.
Fig. 136.—Thimble Cross Section.
A thimble, shown in side view and section by
Figs. 135 and 136, is an iron ring, usually galvanised,
and a rope or strop fits snugly in its
flanged rim. It may be heart-shaped or round,
and is used as a small eye on the end of a rope
to receive another rope.
Fig. 137.—Mousing a Hook.
Fig. 137 shows a method of “mousing a hook,”
that is, preventing a chain slipping off a hook.
A few turns of rope-yarn are passed round the end
of the hook and the standing part, and the ends
brought round the middle a few times, and
fastened with a reef knot.
For “stropping a block” (Fig. 138) a grommet
is neat, and a selvagee still neater, especially
when leather-covered. The block is first fixed in
one bight, so that the lower part of the block sits
on the splice, if there is one. A thimble is put
into the other bight, and a seizing put on between
the block and the thimble, each turn of which is
hove taut with a heaver. The turns are, lastly,
crossed, and the ends knotted. Fig. 138 shows the
work finished. Sometimes the stropping is made
by splicing the ends of a suitable length of rope
together.
Fig. 138.—Stropping a Block.
Fig. 139.—Pointing a Rope.
Fig. 140.—Another Method of Pointing a Rope.
Pointing a rope is done partly to prevent it
from untwisting, and partly to make it go more
readily through a block or hole. Fig. 139 shows
one method. The rope is unlaid for the necessary
length, the strands reduced gradually, and then
laid up again. The ends are finally whipped with
small twine. If necessary the end is stiffened by
inserting a piece of stick. Sometimes a “becket”—that
is, a piece of small line with an eye at the
end—is put into the end and whipped over to
secure it, as in Fig. 139. Fig. 140 gives a more
elaborate method. The rope is first unlaid, and a
stop put on it where the unlaid part begins. As
many yarns as are required are taken out and
made into nettles by twisting together the two
halves of different yarns. The remainder of the
yarns is scraped down taper with a knife. Half of
the nettles is turned back on the standing part of
the rope, and the other half allowed to lie on the
scraped part. Two or three turns of twine are
hitched round the division of the two sets of
strands, and the nettles laid backwards and forwards,
the weft being passed each time, as
described in making the fender (Fig. 134). The
end usually is whipped and a seizing put on the
upper part, which is snaked, as illustrated, by
passing twine diagonally under and over the outer
turns of the seizing alternately—that is, if it comes
out over the upper turn, it will go under the
bottom one, under the top, and so on until it is
finished.
Fig. 141 is part of a mainstay. An eye is first made in the end,
and a mouse the shape of a pear raised on the rope with spun yarn.
Each turn of the yarn is hove well taut with a large serving-mallet,
and beaten close. The eye and the rope as far as the mouse are wormed,
parcelled, and served over; the mouse and the part below it (the tail)
are parcelled with worn canvas, well tarred, and pointed over or
grafted with small stuff. The mouse is covered with nettles, and their
number diminished as they are worked into the smaller parts. Below the
pointing it is again served over.
Fig. 141.—Mainstay.
Shear-legs are fastened together as indicated
in Fig. 142. They are first laid side by side, and
a lashing of rope put round them. The ends of
the lashing are carried one up and the other down
to form a cross lashing, and are knotted in the
middle. This is called a Portuguese knot. When
the legs are separated, the knot becomes very
secure.
A neat pair of yoke lines is made and fitted in
the following manner. The length of the lines
depends upon the distance of the yoke from the
after seat; that distance added to 3 ft. will give a
good length for each line. Supposing the top of
the back-board to be 3 ft. from the yoke, two-and-a-half
fathoms of white cotton rope will be
necessary, the extra half fathom being allowed for
knotting, etc. Cut this in two equal lengths;
take one of these and “stop” with a few turns
of twine at 14 in. from one end and 6 in. from the
other, which will leave 70 in. between the stops
or whippings. Now unlay the longer end and whip
each strand close to the end, leaving a few inches
of spare twine on each, which will be useful when
finishing the manrope knot.
Fig. 142.—Shear-legs.
Fig. 143.—Wall Knot.
Holding the line in the left hand, make a single
wall knot, as shown in Fig. 143. The strand A
is first placed and held in position by the thumb;
B is next taken and passed round the end of A,
then C round the end of B, and up through the
loop formed in the first instance with A. Now
pull together evenly, but not too tightly, and with
the three ends remaining work a crown (see Fig.
144), where A is crossed over the knot, then B
over A, and C over B, and down through the loop
formed by A. After pulling this crown together
evenly, the state shown by Fig. 145 is reached;
notice that the ends lie snug against the strands
of the wall knot first formed. Keeping each end
on the same side of its partner, let it follow the
same round, using a steel pricker to open the way
between the strands. The twine ends before-mentioned
will now be found useful in coaxing
these ends through their holes. When each end
has followed its partner round the wall and crown,
the ends which will come out at the neck of the
knot may be cut off and the manrope knot (Fig.
146) will be completed. A red leather washer with
serrated edge is usually pushed up to the knot as a
finish.
Fig. 144.—Crown.
Fig. 145.—Crown Hauled Taut.
Fig. 146.—Manrope Knot.
Fig. 147.—Pointing End of Yoke Line.
The other end of the line should be pointed.
To do this, unlay and fray out the 6 in. of end,
then pick out the yarns nearest the edge—that is,
next the whipping—and make a number of 2-ply
nettles by laying up these outer yarns, scraping
them a little with a knife to make them taper
slightly. There must be an even number of nettles,
and sufficient to lay close together all round the
“heart,” which is formed by scraping away the
centre yarns to an even taper, then marling down
tight with twine as seen at D (Fig. 147). Half the
nettles must now be placed along the heart, and
half and half back over the whipping, picking
them out alternately. An indiarubber band is convenient
to keep them in place while passing the
“warp”—that is, two turns of twine hitched
round the heart and those nettles lying along it.
Fig. 148.—Fastening off Yoke Line.
The nettles must now change places; all that
were placed back must go forward, and all that
were along the heart must go back over the
whipping, and the warp is again passed twice
round and hitched; this process is continued till
the point reaches the length of 2 in., or whatever
length of point is required. Four times the
diameter of the rope is a good rule for this. To
fasten off, all the nettles are stroked down towards
the tapered end, and all those round which the
warp was last passed are doubled back as shown
in Fig. 148, three hitched turns of the warp being
passed through all the “bites” or loops of the
nettles, which are then pulled down and cut off
with the other nettle ends. The twine stop is then
taken off and a neat snake whipping put on in its
place.
A bunting fringe is generally added as a finish,
and this is very easily made by fraying out a piece
of blue or red bunting 4 in. square, and laying the
threads down together ends even, then placing
enough of these round the yoke line to encircle it
at about 1 in. from the snake whipping. Pass a
number of turns of twine round all near the centre
of the bunting threads to form a little knob, then
stroke all the bunting threads towards the point
and put round all a neat snake-thread whipping
just below the knob. This will form a little tassel,
as shown in Fig. 149, which represents one yoke
line completed. The other is, of course, made in
the same manner.
Fig. 149.—Yoke Line Complete.
Fig. 150.—Stern Ladder.
Fig. 151.—Round of Stern Ladder.
A rope ladder, owing to its portability, is for
some purposes more suitable than one made of
wood, especially where the ladder is to be hauled
up when not in use. Fig. 150 shows a rope ladder
which is made of four-strand rope; the rounds are
turned out of oak to the form shown in Fig. 151.
The groove at the ends is for the reception of the
strands of the rope. The rounds are rather more
than 1 in. in diameter, and are placed 11 in. apart.
The strands are opened with a marlinespike and
the rounds inserted between them, two on each
side: a seizing is put on below each round; a round
thimble is put into the upper bight, and an eye
seizing is clapped on below it. The lower ends
are generally spliced together, or a thimble may
be spliced in, as at the upper end, if it is intended
to make the lower end fast.
Fig. 152.—Single Rope Ladder with Chocks.
Fig. 153.—Toe Chock for Rope Ladder.
Another form of rope ladder is shown in Fig.
152. A number of oak chocks (Fig. 153) are turned,
usually about 5 in. in diameter and 5 in. deep,
bored to 1 in. diameter with the grain of the wood;
this will take a 3-in. four-stranded rope. Splice
an eye at one end and seize in a thimble for the
lashing; put on one of the wooden steps, flat side
uppermost towards the thimble and about 30 in.
down. Insert a strand of ratline stuff between
two strands of the rope, and with the two ends of
the strand work a “wall knot” round the rope,
then a “crown,” which will bring the ends down
to the first turns of the wall. Pull the parts up
tight, and follow them round once; the result will
be a neat knot looking like a two-parted Turk’s
head. If preferred, two strands may be inserted
crossing each other at right angles between the
four rope strands; then with all four ends work
a double wall knot round the rope. Between the
knots, spaced 15 in. apart, slip on the wood. Do
not cut off the ends short until the knots have got
well jammed up.
Fig. 154.—Rope Ladder with Rungs.
Fig. 155.—Wood Rung.
Fig. 156.—Pilot Ladder.
For a 25-ft. ladder of a better kind, illustrated
in Fig. 154, two dozen oval rungs of wood will be
required, having at the ends scores rasped as
shown at Fig. 155. The rungs may be 12 in. long.
Nine fathoms of 4-in. four-stranded rope must be
well stretched and the turns taken out, stretched
again, etc. Middle it and seize a thimble in the
bight, making this fast to a post. Then stretch
out both parts together, and mark off the positions
for the rungs with chalk, 12 in. apart. At every
chalk mark, and round each part of rope separately,
put a seven-turn whipping of tarred nettle stuff
(this is sold in hanks). Now begin at the end
nearest the bight or lower end, open the strands
with a fid and spike above the seizings or whippings,
and push in a rung, taking care to avoid
twisting the rope by inserting the spike between
the two strands best situated. When all the rungs
are in and the ladder hangs without much twist,
the open parts of the strands may be drawn together
with a marlinespike and a piece of sennit
or by carefully using a screw cramp above the
rungs; then a six-turn seizing of nettle stuff put
tightly on above each of the rungs keeps them in
place. The top rung should be rather stouter
than the rest to allow a deeper score. Splice a
thimble into each end, and into each thimble a
fathom of eighteen-yarn stuff for lashings. This
is a good ladder to hang down clear, and is used
over ships’ sterns and from lower booms, the
lower thimble being convenient for boats’
“painters.”
Fig. 157.—Side Piece of Pilot Ladder.
To hang against a ship’s side, where room for
the toe projecting over the rung is needed, a pilot
ladder (Fig. 156) is more comfortable, but more
difficult to make. The steps are usually of teak,
mortised into diamond-shaped side pieces (see Fig.
157) about 8 in. deep by 5 in., with a score rasped
out all round the edges. About twenty-three or
twenty-four of these steps will be required for a
25-ft. ladder, and eighteen fathoms of 2½-in. three-stranded
rope. Prepare by stretching well as before;
cut in two equal parts and mark the middle
of each length. Place one of the steps immediately
over the marks and seize it tight in place
by bringing the parts of rope round the score on
each side to meet above. If the next step is
placed on this seizing and so on, the completed
ladder is too stiff to roll up; it is therefore
necessary to put two seizings between each step,
leaving about 2½ in. of free rope between them.
When the steps are thus seized in place, the ends
on each side are made even, spliced together, and
fitted with thimbles for the lashings.
Fig. 158.—Beginning Mat.
Mats are used on board ship to prevent chafing.
In making wrought mats a piece of small cord is
stretched tight horizontally at about the height
of a man, and fastened at each end. Across this,
hanging by their middles, nettles are placed.
These are often made of “foxes”—that is, three
or more rope-yarns twisted together by hand,
and each rubbed down with tarred canvas or a
handful of rope-yarn. Beginning with the nettle
nearest the left hand, it is crossed as A (Fig. 158).
Another nettle is then brought up close to the first,
and crossed in the same way. The end B is then
passed over the strand C, and pushed to the back;
another nettle is then brought forward, crossed as
before, and one part of it put over the part D,
and pressed back. The work is continued this
way, working diagonally until a sufficient width is
obtained (Fig. 159); then, as no more nettles are
added, and the outside nettle on the right is
brought over from time to time, a selvage is formed
as on the left side. Take care not to twist each
of the nettles together at the bottom, so that they
may retain their twist until the next in succession
is brought down to interweave with them. There
is a little difficulty at starting, but afterwards
everything goes on easily. Each nettle from the
right passes over the next one to it on the left,
and is pushed back, the one that has been passed
over being taken up first over the next and pushed
back as before. Each twist should be pressed
tight as it is made. When the mat is deep enough,
a selvage is made by straining another piece of
cord along the bottom, securing both ends. As
each nettle comes down it is half-hitched to this,
and the next nettle is laid up at the back of it,
and so on alternately.
Mats are frequently thrummed; this is done by
raising the nettles lying on the top of the mat with
a marlinespike or pricker after the mat is finished,
and putting short pieces of the nettle stuff underneath.
The thrums are then cut off to the same
length, and opened out. Of course, wrought mats
may be made of any material and used for a
variety of purposes. They make most excellent
door-mats, and are of everlasting wear. For this
purpose they should not be made of tarred stuff.
Very pretty mats may be constructed of twine for
the foundation and various coloured pieces of
worsted for the thrums.
A kind of mat used aboard ship is called a
sword mat. It is woven, but a loom is not used.
Two small cords, or, better still, two small rods,
are secured horizontally and the nettle stuff
wound round them, the coils being laid close together.
A piece of wood called a “fiddle,” as long
as the width of the mat and about 2 in. wide and
⅜ in. thick, has half as many holes bored near the
lower edge as these nettles in the mat. Every
alternate nettle is secured to this by some twine
laced through the holes. Another fiddle is
fastened in like manner to the remaining nettles.
The work can now be begun. The first fiddle is
raised, and the first set of nettles consequently
raised with it. What weavers call a “shed” is
thus formed—that is, an opening between the two
sets of nettles—and along it the weft or filling is
passed by means of a netting needle (see p. 125).
The filling is driven well home with a flat piece of
wood, tapered towards the edge, called a “sword.”
The first set of nettles is now allowed to drop,
and the second set drawn up with the other fiddle.
The filling is passed again and driven home as
before. The work is thus continued until there is
no longer room to use the sword, when the filling
must be worked home with a pricker. When the
mat is long enough, the filling is fastened off,
and the mat is complete. These mats may be
thrummed in the same manner as the wrought
mats.
Fig. 159.—Mat Making.
A softer kind of mat is made on a foundation
of canvas or duck, which is very suitable for the
stern-sheets of a boat or any other similar purpose.
The material is cut to the right size and
folded a short distance from the edge. A hole is
made near the selvage with a pricker and a thrum
inserted; another hole is then made a short
distance from the first and another thrum put in,
and so on until the row is completed. Row after
row is thus worked until the mat is finished. Of
course the holes, and consequently the thrums, go
through both parts of the material. When the
canvas is pulled straight after each row is finished,
the thrums are held securely without any other
fastening.
When a pattern is to be worked on the mat,
the design must first be drawn on the material
in pencil and the canvas folded accordingly; every
fold produces two rows of thrums. White duck
thrummed with pieces of cotton rope makes very
nice, clean-looking mats for boat use, and as they
wash well they can always be kept in good order.
These mats, with a stout canvas or sacking foundation,
thrummed with pieces of untarred hemp
rope, serve very well for door-mats, though, of
course, they will not last as long as wrought mats.
Very ornamental mats are made somewhat after
the same manner as those just described. Any
suitable material, of any colour, can be used for
the foundation, on which the pattern must be
drawn. The mat is folded along the line intended
to be worked, and a common pencil laid along the
ridge of the fold. The worsted or other material
used is threaded in a large needle, and worked
over and over the pencil, thus forming, when the
pencil is withdrawn, a series of loops on the
foundation. Any pattern can thus be worked,
provided always that it consists of straight lines.
It might be possible to form curved lines by working
the loops over the first finger of the left hand,
moving the finger after each loop.
CHAPTER IX. HAMMOCK MAKING.
This chapter will describe the netting and slinging
of hammocks.
Fig. 160.—Netting Needle.
Fig. 161.—Netting Needle.
Hammock making requires a netting needle of
one of the shapes shown by Figs. 160 and 161. It
may be made from a piece of 3/16-in. pearwood,
beech, or boxwood about 8 in. long by ¾ in. wide.
In needles as shown by Fig. 161 the cord is wound
round as when filling an ordinary shuttle, and for
Fig. 160 the cord is brought round the end at A
up one side, round the pin at B, and back the
same side, the process being repeated on the other
side of the needle.
A mesh stick (Fig. 162) is made of hardwood
or bone about 5 in. long and of an oval shape
(Fig. 163); it may be about ¾ in. by ¼ in. in section.
At one end of the string to be used for the net
tie a loop A (Fig. 164), and place the knot on a
nail or hook fixed in some convenient position, as
at A (Fig. 165). Place the mesh stick under the
loop as at B, put the cord under it, then pass the
needle through the loop and pull the cord tight.
Now place the thumb of the left hand on the cord
beyond the loop as at A (Fig. 166), and with a
turn of the wrist of the right hand throw the cord
to the position shown at B, then pass the needle
under the loop C, then through the bight of B, and
down as at D, and draw the knot tight, which
should then assume the shape shown by Fig. 167.
The cord must be held firmly with the thumb at A
(Fig. 166) when pulling up the knots, as on this
depends the uniformity of the meshes.
Fig. 164.—Loop in Meshing.
Fig. 165.—First Stage in Meshing.
To continue the netting the stick is withdrawn
and placed under A (Fig. 167), and the needle is
then passed under the stick as in Fig. 165, and
brought through the loop B (Fig. 167), and the
process shown by Fig. 166 is repeated to form
another mesh, this being continued to make a
chain of meshes, say forty-five or fifty (Fig. 168),
sufficient for the width of the hammock. The loop
A (Figs. 164, 165, and 168) that was first tied is
then untied, and it will then be found that all the
meshes are equal in size.
Fig. 166.—Second Stage in Meshing.
Next the chain is opened out at right angles to
the line in which it was made, as shown by Fig.
169, and working across is begun by making a
mesh at A (Fig. 169), then at B, C, and so on,
until the length of the first lot of meshes has been
reached, when the net is turned over and another
row of meshes worked until the one under A has
been reached; then the net is turned again and
another row worked, and so on.
The meshes are worked as shown by Fig. 166,
but at first, to ensure uniformity, it will be well to
put the loops D, E, F, and G (Fig. 169) separately
on the hook or nail as the meshes under them are
made, but after a little practice a cord may be
reeved through the top line of meshes, tied into a
loop, and passed over the knee and then over the
foot, as the work progresses.
Fig. 167.—Third Stage of Meshing.
Fig. 168.—Chain of Meshes.
There are three ways of forming the ends.
An ash stick may be used at each end to which
the end meshes are looped and tied, and a piece
of codline may be passed through the side meshes
on each side and attached to the ends of the
sticks. At each end a stout cord is secured to the
stick in the form of a triangle for hanging the
hammock. The second plan is to tie a number
of cords together by doubling them in the centre
and forming a loop, and each of the free ends,
known as “nettles,” is attached to one of the
meshes of the net. The third and perhaps the
best plan is to reeve a cord about the size of a
little finger through the end meshes and splice it
into the form of a grommet as shown by Fig. 170.
A thimble A is fixed in the end to which the
supporting cords are attached, and the cords which
are reeved through the side meshes are spliced
into the eye B at C. When these “clews” are used
the net must be longer than for the sticks or
nettles.
Fig. 169.—Beginning of Cross Netting.
Fig. 170.—Hammock Clew.
CHAPTER X. LASHINGS AND TIES FOR SCAFFOLDING.
Lashings are seizings of rope for heavy
work, such as scaffolding; and the lashing of poles, ledgers, and
putlogs may be now considered with advantage. Heavy scaffolding is best
lashed with chain; and it should be noted that, while a rope lashing
is hove taut by the steady strain of a heaving bar, a chain requires
different treatment, and must be jerked tight with little tugs—an
action similar to that used when shaking out a mat—assisted by an
occasional rap with the heaver.
Fig. 171.—Rope Lashing for Poles and Ledgers.
Fig. 172.—Chain Lashing for Poles and Ledgers.
Fig. 173.—Rope Lashing for Putlogs.
The rope used for lashing all parts of scaffolding
should be fairly new, sound, and in size not
more than 1½ in. The average length required will
be about six yards, and it must be
so put on that each turn of the lashing
takes its share in the support.
To this end the tackle supporting
the ledger must not be released until
the lashing is completed, otherwise
the first turns will be subjected to
undue strain.
Fig. 171 shows the lashing of a
ledger to a pole; if chain is used a
different method is necessary, and
it is lashed as in Fig. 172.
Putlogs should be square, or at
any rate flat on the upper and lower
sides, to prevent any chance of rolling,
one end being squared down in
size to enter the building in the
place of a header brick, the other
end being lashed down to the ledger
as in Fig. 173. The planks forming
the stage are not lashed to the putlogs,
and there is great danger in
allowing them to project at one or
both ends.
Poles are generally about 30 ft.
long, and for high buildings it is
necessary to lengthen them by lashing
on an extra pole. The safest
plan is to lash a half pole to the
lower part of the first erected; this
resting on the ground will form a
footing, upon the upper end of which
the lengthening pole will stand,
being kept in position by three
plain lashings (see Fig. 174). Should
the lengthening pole be only light,
and a footing not be considered
necessary, a chain racking should
be put on besides two rope lashings.
Fig. 174.—Poles Lashed and Wedged, with Footing.
It is usual to wedge scaffold lashings tight, and,
provided the wedges are well shaped, it is a convenient
way of tightening the work after change
of weather. Badly-shaped wedges are apt to cut
the rope and sometimes work out.
Fig. 175.—Slinging Plank for use as Stage.
Stages for painting, or small repairs on a building,
may be quickly rigged up by slinging each
end of a plank on the bight of a rope. For this
make a marlinespike hitch (see Fig. 40, p. 40),
and let the end of the plank take the position
there occupied by the marlinespike; the double
part will be below and the single part above the
plank (see Fig. 175). For single-handed work a
boatswain’s chair, of which an illustration is given
by Fig. 176, is convenient.
Fig. 176.—Boatswain’s Chair.
CHAPTER XI. SPLICING AND SOCKETING WIRE ROPES.
Wire ropes are now used to such an extent, and
in such a variety of ways, that a knowledge of the
best methods of handling them cannot fail to be
useful to the many thousands who are brought in
daily contact with them. An endeavour will here be
made to give such clear and simple instructions as
will enable readers, with practice, to execute any
job in connection with the splicing of wire ropes.
The uses that wire ropes are now put to, and the
ways and occupations they are employed in, are
so various, that it is almost a necessity for a man
to be engaged in their manufacture to have a
thorough knowledge of the different methods of
handling them. For instance, it would be just as
consistent to expect a sailor, used only to eye-splicing,
to go to a colliery and put a long splice
into a rope, to withstand the enormous stress
there applied, as it would be to expect a colliery
man to go aboard ship to splice the mainbrace, or
any other brace.
Now Fig. 177 is a sketch-plan of an endless
band rope, such as may be seen at many collieries
in Great Britain. A is the driving sheave on the
engine at bank, round which the rope passes three
or four times, and leads off to the overhead pulley
B. Then it goes down the shaft, perhaps a
very considerable distance, under the pulley C,
and so on to D, whence it passes round the tightening
sheave E, which is movable and contrived with
weights to keep the rope always tight, and so prevent
surging round the pulleys and sheaves and
consequent loss of power. The rope then passes
round D′ to the sheave F, the driving of which is
the object aimed at, since that sheave in turn may
work either one or two hauling ropes, as at G and
H, working into the interior of the pit, in addition,
perhaps, to a pump. The load on this rope may
amount to several tons, and such a rope will therefore
require a splice from 60 ft. to 100 ft. long.
Further, no matter what kind of a splice it may
be, it must be made well. If it is a ship’s hawser,
at times the safety of the vessel and all it contains
may depend on a splice. Again, an awful
disaster might be the result if the splice in a crane
rope were to draw.
Fig. 177.—Colliery Band Rope Driving System.
There are three kinds of wire rope splices, the
short splice, eye splice, and long splice.
A short splice is a bulky splice, and is used only
for block straps, slings, etc. It is not suitable for
driving ropes or for running tackle, and should
never be put into a crane or hoist rope. It is
made by unlaying the two ends of the rope to a
sufficient length, from 1 ft. to 2 ft., according to
size, and interlaying them together as in Fig. 178.
Draw them close, and tuck the strands of one
under the strands of the other several times. It
is only a case of “over and under” as in splicing
a hemp rope. After the ends have been tucked a
sufficient number of times, about twice, each
strand will stand in most cases. Hammer all down
snug, and either cut off the ends with a hammer
and chisel or twist the wires off one or two at a
time, which makes a much neater job.
An eye splice may be made in two different
ways—namely, left-handed, or “over and under,”
and right-handed.
Fig. 178.—“Marrying” a Wire Rope Splice.
Left-handed splicing is undoubtedly stronger,
tuck for tuck, than the right-handed method, for
the “bite” on the strands is greater and the frictional
adhesion is more acute. The strands and
ends are practically plaited, and consequently
locked together, and, no matter how the rope unlays
itself, the splice is immovable. A splice like
this should be put into every crane rope, for frequently
the load when lifted from the ground spins
round and unlays the rope to a certain extent.
In right-handed splicing, the ends to be tucked are simply laid
several times round one strand each, and offer no resistance to any
such unlaying process. However, a right-handed splice is easier
and neater to make, and these splices are becoming general, some
splicers making it a rule to put a “lock” in by tucking the ends once
left-handed. A right-handed splice is strong enough for most ordinary
purposes, but if a left-handed splice is
tucked three times and put on a testing machine,
it would break the rope before it would draw out;
whereas, if a right-handed splice were tucked
three times and put to the same test, it would pull
out. However, if the right-handed splice, instead
of being tucked three times were tucked eight
times, it would stand any stress that could be put
on it; in fact, six times through is quite sufficient
for ordinary purposes.
Fig. 179.—Method of Serving Wire Rope.
Fig. 180.—Partly-finished Splice.
Fig. 181.—Wire Rope ready for Splicing.
The following is the method of right-handed
splicing. First fasten up the rope-end from the
vice to any convenient column or hook, and mark
off from the end, as at A (Fig. 179), the length for
the splice, which will be from 1½ ft. to 6 ft., according
to the size of rope; say 2 ft. of end for 2 in.
cir. rope. Measure with a string round the groove
of the thimble, and transfer the length to the
rope, marking it as at A B. To put a seizing on
the “neck” of the splice, as in Fig. 180, add
6 in. or 8 in. to the length of rope to be served.
Now take a narrow strip of parcelling—that is,
thin bagging—and bind it neatly round the rope
from A to B (Fig. 179). The rule is: Worm and
parcel with the lay, but serve the rope the other
way. Next take a serving-mallet D (Fig. 179), with
a bobbin full of spun yarn upon it, and, beginning
at B, serve over the parcelling to A. Cut off and
make fast the end of spun yarn, when the work
will be ready for turning in the thimble. A chalk
mark midway between A and B will serve as a
guide in getting in the thimble straight. Next
bring the end of the rope round on the double to
form a loop, with A and B exactly level. Open the
vice sufficiently to take in that loop, insert the
thimble, taking care to have it exactly straight,
and screw up the vice as tightly as possible.
Securely fasten the rope and thimble together at
the “neck” A (Fig. 181), when the rope should
appear as there illustrated. Fasten it in the vice
with the thimble hanging downwards, and the part
to be spliced held up by a line suspended from
some convenient joist or girder. Take the whipping
off the rope-end, and open out the strands
singly, to be ready for tucking. Looking at the
rope from the direction of the arrow A (Fig. 182),
drive a marlinespike through the two strands on
the extreme left, taking care, of course, always to
miss the core of the rope. Twist the spike up the
rope about half a turn, so as to make an easier
bend for the strand, then take the strand nearest
the opening, tuck it through, and haul tight.
Then, most important, force down the strand with
the marlinespike till it occupies the position indicated
in the dotted lines of Fig. 182.
Fig. 182.—Right-handed Splice, First Tuck.
At the next tuck, with the spike take in the
strand to the right, along with the two just gone
through, making an opening through three strands,
with the point of the spike coming out in the same
place as in the first tuck. Insert the next nearest
end, strand two, and work in snug as before. Of
the three strands the spike has just been through,
take the one nearest to the left, and drive the
spike in so as to make the point come out at the
same opening as before; tuck in No. 3 strand, and
that will make, as in Fig. 183, three strand ends
entering into the same opening in the rope, but
coming out between different strands. After this,
simply keep on taking the next strand and the
next end, following round to the left, till all the
ends are tucked once, when an end will come out
between each pair of strands.
Fig. 183.—Right-handed Splice, all Ends Tucked Once.
The rest is easy. Merely keep on repeating the
operation, with strand and end, until the splice is
long enough and strong enough. As Fig. 180 shows,
after the first set of tucks, it is only a case of each
end twisting and re-twisting round its own particular
strand, all the way up. It merely thickens
the strands. After the ends are tucked three or
four times, it will make a neater splice if the ends
are split and the splice is tapered at the finish by
leaving behind one-half of each end, while the
other half is tucked once or twice more. Having
finished the tucking, take the splice down from the
vice, cut off all strand ends quite close, and hammer
all down snugly. At the neck put on the
seizing wire, if any, parcel and serve, and the
right-handed eye splice is complete.
Fig. 184.—Left-handed Splice, First Tuck.
Seizing wire is really a seven-wire strand, made
of soft wire, about No. 18 or No. 19 gauge. It
is put on a splice for the double purpose of
strengthening the splice and rendering it easier
to take a weak or broken thimble out of the eye,
to be replaced by a stronger one. It is simply
bound tightly round the two ropes at the neck, and
the end is brought up and round the middle twice,
or thrice and made secure, as at A (Fig. 180).
Left-handed eye-splicing should be comparatively
easy if the preceding instructions on right-handed
eye-splicing have been carefully followed.
Although it is not essential, it makes a neater and
a closer splice if a slightly different method of
starting is adopted. In splicing a thimble into a
crane rope or a trawl-warp, two ropes in which it
is very advisable to put left-handed splices, it is
unusual to put any seizing on the neck; instead,
the rope is spliced right down to the thimble.
Serve sufficient rope to go round the thimble only,
leaving out sufficient end for the splice. Turn in
and screw up very tight in the vice, make fast at
the neck, as before described, fasten the rope up
with the thimble hanging downwards, and open
out the ends.
Fig. 185.—Left-handed Splice, all Ends Tucked Once.
Different splicers have different ways of starting,
but a very good method is as follows: Turn
to Fig. 181, and, taking the strand in the rope
nearest the point marked C, open it out with the
spike. Select the end that is nearest to it, which
will be the inside middle one of the bunch, bring
it through to the right hand, as in Fig. 184, and
force it down well. Still keeping the spike
through the same strand, select the middle strand
end, on the outside of the bunch, and put it
through the same aperture, but in the opposite
direction—that is, left-handed. Of the four strands
now remaining, first take the two at the right,
and put each end through its nearest strands,
right-handed, as at B C (Fig. 185), and the other
two at the left, and tuck them through their
nearest neighbours, left-handed. There is now an
end coming out between each strand, and if the
rope is now taken down and hammered well at this
part, a very neat starting is formed. All that remains
now is very simple; just keep working round
to the left, tucking each end as it is reached over
its neighbour and under the next one. Work
“over and under” all the way, until each end is
tucked three or four times.
The appearance of the splice will be improved
if the ends are halved before taking the final tuck.
If the strands of the rope to be spliced are
very hard and stiff, it will perhaps be difficult to
pull in the ends quite snug. To get over this difficulty,
before tucking give each strand a sharp
bend close to the rope, in the direction in which
it has to be tucked, when it will spring into its
place with comparatively little pulling. When all
the ends are tucked, hammer the splice well, as
that makes the wires knit more into one another,
and consequently increases the “bite.” All that
remains now is to cut the ends off, and serve over,
finishing at the thimble. It is a good plan to take
the splice down now and then during the process
of tucking, and hammer it well, as that serves to
drive out all the slack at the ends.
Long-splicing is undoubtedly the most important
form of splicing. By its use two pieces of
rope may be joined together, or a rope may be
made endless, without increasing its thickness at
the splice. In fact, none but a practised eye can
discern where a well-made splice is, after it has
been made and set running, as all ends are completely
hidden. Ability to splice well in this style
commands many good jobs at collieries in this
country and in South African mines.
Of course, in long-splicing, as in many other
things, different men have different styles. Suppose,
for example, a colliery hauling rope is to be
spliced, and that it works endless from a hauling
engine to a terminal return pulley, mounted on
the tension bogie; suppose also that the rope has
been put in position, with the ends left at the
most convenient place ready for splicing. If 60 ft.
of end is available for the splice, decide on that
length, and, measuring about 40 ft. from each
end, make the rope fast to the rails at one side,
and at the other side fix a block and tackle, and
haul in every bit of slack lying on the hauling
road, taking especial care that the tension bogie
is pulled right up to the top of the tension
“ways.” This is a very important consideration,
because if, through the rope stretching, the tension
pulley got down to its limit before the rope was
worn out, it would necessitate cutting the rope and
making a new splice, or opening out the old splice
and re-splicing there again after shortening the
rope.
Where practicable, have the tension of a sufficient
length that by the time it gets to its limit
there is sufficient length of rope to make a new
splice, in case the old one is found to be giving way.
Some ropes stretch more than others in working,
and it is difficult to say accurately how much per
cent. a rope will stretch, as much depends on the
way the rope has been made. However, the larger
the hempen core inside the rope or the shorter
the lay or spiral twist the more the stretch. It
is wise, therefore, when splicing a new rope never
to give any slack away.
Having got the rope hauled as tight as possible,
carefully measure 30 ft. from each end of the rope,
and there tie a strong whipping. It is important
that these whippings should be put on each rope
at a distance which shall ensure that they will
easily come quite up to each other when the two
ends are joined together. Next, take the whippings
off the extreme ends of rope and open out
the strands. Some splicers do this in pairs; others
simply halve the rope, opening it out in two
bunches of three strands each. A better way,
considering laying them in again, is to open out
one strand, then miss one and open out the next
to that, then miss another and take the next one
again.
There are now three single strands opened out
to the whipping at 30 ft. from the end, and between
each of these strands there is one strand unopened.
This work must be done at each end of the rope,
of course. Taking these two bunches of three unopened
strands, cut them off about 6 in. from the
whipping and throw them on one side. Open out
the 6 in., obtaining three strands 30 ft. long, and
between each pair is a strand 6 in. long, with the
same length of core projecting through the centre
of the rope. Join the two ends together as in Fig.
178 (p. 135), taking care in every case to have the
strands placed so that a long strand will fall in
where a short one comes out, and at the same time
pull out between the strands the two short pieces
of core A B. Place helpers on each side to pull on
the long strands, as in a tug of war, and after
cutting the two whippings C get the helpers to pull
in opposite directions, until the two ropes are
jammed close up to each other, with the strands
ready to fall naturally into the lay of the rope.
If this is not done properly, or if the rope is
allowed to slip back, the appearance
of the finished splice will be
spoiled by an unsightly long place
in the lay.
Next clamp or securely tie the
three long strands at one side
to the rope, and proceed to lay
the other three long strands into
place. Select a long strand and
the short one that touches it, open
out the short strand, and lay the
long one in its place. Keep on
doing that until all but 5 ft. of
the long strand has been laid in;
then stop and lock these two
strands together by crossing
them, so that they will not open
out. Now measure back 5 ft. on
the strand just opened out and
cut the rest off, as only 5 ft. will
be needed on each end. Open
out another short strand, at the
same time laying in a long one,
to the length of 15 ft. only, and
the next long strand must be laid
in just 5 ft. Now release the
other three strands made fast to
the rope, and treat them in the
same way, laying in a long strand
where a short one is taken out.
Make all the ends 5 ft. long, putting
a small whipping on each
before cutting to prevent opening
out, when the splice will be as in
Fig. 186.
Fig. 186.—Long Splice, all Ends ready for Tucking.
There are now twelve strand
ends, 5 ft. long, which must
be worked into the inside
of the rope and completely
hidden; but before this some
lengths of thin bagging must be prepared, about
2 in. wide, or, failing that, get some thin yarn,
which must be wrapped securely and evenly round
each strand for about 2 ft. or 3 ft. from the end.
Strips of bagging are the better, and can be expeditiously
put on by getting each helper to wrap
an end. This gives the outer strands something to
knit or bed into when the hempen core is taken
out of the centre of the rope and the steel strand
ends are worked in. After considering the difference
between the size of the hempen core and of
the outer strands, necessitated, of course, by the
spiral form of the outer strands, it will be obvious
that the “bite” of the outer on the inner strands
would be very little indeed if the ends were worked
in bare. When all the ends are wrapped and cut
to such a length that they just butt against each
other when worked inside the rope, the work is
ready for tucking. Take hold of the piece of
hempen core A (Fig. 186) and pull it out just to past
the first joint—that is, the two ends 1 and 1′. In
all probability, if the rope is large or rather hard
laid, this will be difficult, unless a tapered round
spike is driven through the two strands immediately
behind it.
Fig. 187.—Making Round Joint.
Strand 1 has now to be worked inside the rope
where the core came out. To do that, take a flat
tucking spike and drive it through the strands
1′ and the next one with the point coming out
and covering strand 1. Twist the spike round
in the lay of the rope, and, of course, towards the
original joint B in the splice; but so manipulate
the spike, or “tucker,” that strand 1 will fall into
the inside of the rope immediately the worker
starts to twist, as at C (Fig. 187).
When working a strand from the outside to the
inside of a rope it should be done short, sharp,
and at once. Good joints must be made short, for
then the twists in the strands so unite with one
another as to make it appear as though they were
blended into one strand.
The “partner” strand to the one just worked in—that
is, strand 1′—must next be tucked out of
sight, but before that can be done it will be
necessary to consider that if the wires in the
strand are spun or twisted in the opposite direction
to that in which the rope is “laid” or
“closed,” then an ordinary rope is formed. But
if the wires and the strands are both twisted in
the same direction there is formed a make of rope
commonly called a “Langs” or “Albert” laid
rope.
In Figs. 179 to 185 ordinary ropes are illustrated,
but in Figs. 178, 186, and 187 Langs ropes
are shown.
Fig. 188.—Half-round Top-Swage.
In an ordinary rope the strands are tucked
into the inside, side by side at the joint, which is
known as a “flat joint,” while in the case of a
Langs rope the strands are crossed over each
other at the joint, and this is known as a round
joint.
Fig. 189.—Wire Rope Clamp.
Fig. 187 also illustrates a good way to place
the spikes to work in strand 1′ and make a round
joint. Each spike is driven through two strands,
and, as shown, A is the leading spike which tucks
the strand into its place, while B is used simply to
combine with A in making the joint and forcing
the strand 1′ into the centre of the rope. This is
effected by placing the strand between the points
of the two spikes and twisting them up in opposite
directions. If the spike A is twisted up towards
the worker, and spike B in the opposite direction,
the obvious result is that the points of the two
spikes come down, and simply crush strand 1′ into
the centre of the rope. Then go on twisting spike
A along the lay, and spike B can be pulled out as
soon as the worker gets away from the joint.
Fig. 190.—Link Socket.
If these joints are closely and neatly made,
each in its own way, the two strands forming the
joint knit into each other’s lay or twist, and will
be scarcely noticeable. The above operation
must, of course, be repeated until all the ends are
tucked into the inside of the rope. Tuck them
in as numbered in Fig. 186, namely 1, 1′, 2, 2′,
and so on. Be very particular in seeing that the
ends exactly butt each other, or a lump results
on the splice; if they do not butt, the outer
strands will sink in. When all the ends are properly
tucked, the long splice is practically completed,
but it will improve matters to round off
all joints and uneven places with a half-round
top-swage, about the same diameter as the rope.
Fig. 191.—Side View of Socket.
Fig. 192.—Socket Opened Out.
About all the tools necessary for long-splicing
are two flat spikes or tuckers and one round one,
each say 18 in. long, a sledge and set for cutting
the rope and strands, a hand hammer for driving
in the spikes, a strong pair of cutting pliers and
the top-swage (Fig. 188). A very useful wire rope
clamp is shown in Fig. 189.
Fig. 193.—Socket in Wire Rope.
In addition to the method of fitting attachments
to wire ropes by means of splicing, as already
described in this chapter, there is the
method of socketing, shoeing, or capping, as it is
variously called. There is a great difference between
the rough product of the colliery black-smith,
in the shape of the common link socket,
and the highly finished cast-steel socket or the
turned steel socket of the engineer; and in concluding
this chapter it is purposed to deal with
them all.
Fig. 190 is a view of the ordinary link socket,
often used at collieries as a means of temporarily
repairing a broken rope. A whipping of soft wire
or spun yarn is put on each end of the rope, and a
few wires then bent sharply back over the whipping
and cut off an inch or two shorter than the
socket that fits over them. The rest of the rope-end
is cut off as close to the whipping as possible,
and the sockets, which, of course, are ready
opened, are put on, hammered down close, and
firmly clinched with three rivets.
A very common socket in everyday use is shown
by Figs. 191 to 193; this is principally used on
haulage ropes and ships’ steering-gear. The eye
may be of either round or square section, the
latter being the strongest and best. As a rule,
these sockets are fixed on the rope by means of
rivets only, but when attached to winding ropes
they are secured with strong steel hoops, which
are forged to make a close fit at intermediate
distances on the socket, as in Fig. 194.
Fig. 194.—Hooped Winding Rope Socket.
Sometimes hoops are used in conjunction with
rivets. When a hooped socket leaves the black-smith’s
shop, the hoops should be a close fit at
equal distances on the socket; and as a guide to
replacing them correctly, both socket and hoops
should be pop-marked with a centre-punch as
shown.
Fig. 195.—Preparing Bulb on Wire Rope End.
The method of preparing the wire rope for
these sockets is the same whether hoops or rivets
are used. First put a strong wire whipping on the
rope at about the length of the socket from the
rope-end. Untwist the wires of the part left over
and straighten them out (see Fig. 195); then bend
them sharply back, one or two at a time, over the
whipping and over the rope. If the rope has a
wire core in the centre, the wires forming it should
be bent back the same as the outside wires; but
if the core is of hemp, it must be cut off close to
the whipping. After hammering snug and close, all these wires have
to be cut to a different length, so as to form a tapered bulb
corresponding to the tapered cavity inside the socket. Cut the longest
wires an inch or two shorter than the length of the socket, measuring
from A to B (Fig. 193), and gradually make the other wires shorter and
shorter all the way towards the end. These wires must now be tightly
and closely served with soft copper wire or spun yarn, using the
serving-mallet already described in this chapter. For common work spun
yarn is used, and for the best class of work soft copper wire.
Fig. 196.—Finished Bulb on Wire Rope End.
Fig. 197.—Set-hammer for Tightening Hoops.
Fig. 198.—Solid Socket with Closed End.
Fig. 199.—Solid Socket with Closed End.
In bending back the wires, care must be taken
to ensure their being bent equally all round the
rope and not merely at the top and bottom or on
one side only. The object is to form on the end of
the rope a bulb which will completely fill the
cavity inside the socket. To do this, the operator
should work with the closed socket beside him and
take the measurement of the inside of the socket
at both ends with a pair of inside callipers, and
the size of the bulb as it progresses with outside
callipers, comparing the two. The socket may
have been made rather large inside, in which case
it will be necessary to put on two or more layers
of serving to bring the bulb to the required size.
The rope should then appear as in Fig. 196. The
eye of the socket must now be made red-hot.
Cool down all but the extreme back of the eye A
(Fig. 192) by the application of water, and open
the socket out sufficiently to allow of the bulb
being pushed into place. Let the end of the bulb
come just to the shoulder A (Fig. 193) of the
socket; then hammer the socket on the anvil, or
screw it up in the vice, until it is as close as it
will go. Cool it down and drive in the rivets,
clinching them well, with a big strong head on
each side, for which purpose the holes must be
well countersunk. The rivets should be made of
good riveting iron or of mild steel. A properly
filled socket should show, when finished, a ⅛-in.
opening between the jaws down its full length on
both sides (see Figs 193 and 194), which would
prove that the socket was properly gripping the
bulb.
Fig. 200.—Plan of Solid Socket with Open End.
Fig. 201.—Elevation of a Solid Socket with Open End.
Fig. 202.—Another Elevation of a Solid Socket with Open End.
When fitting a hooped socket, first pop-mark
the parts, then remove the hoops and thread them
on to the rope, the smallest first and the others
in order; they are thus easily returned to their
proper places. As soon as the hoops are replaced,
the socket should be taken out of the vice and held
end down on a block or anvil while the hoops are
driven tightly home with a set-hammer (Fig. 197)
and sledge.
To give a better finish, and to prevent the
hoops from working back or wet from entering,
they are sometimes caulked on the tapered side A
(Fig. 194) with a caulking set.
Fig. 203.—Riveted Flat Rope Socket.
Fig. 204.—Cramped Flat Rope Socket.
For crane ropes or colliery winding ropes, steel
sockets are sometimes cast solid, some with closed
eyes for the D shackle, as in Figs. 198 and 199,
and others with open ends with holes for a slotted
pin, as in Figs. 200 to 202, the two latter being side
views of alternative shapes. The form shown
by Figs. 198 and 199 is the more difficult to fit, as
it is obvious that the rope must first be pushed
through the socket and brought out at one side of
the eye before the bulb can be formed, when it
has to be either pulled or hammered back until
it is quite tight in the socket. After the bulb of
these solid sockets has been pulled or driven into
place, it is usual to drive a round tapered copper
plug into the core of the bulb, to solidify it and
increase its grip with the socket. Sometimes
molten white metal is poured in to fill up the interstices
between the rope and the socket. The
hole at the small end of these sockets is made only
a very little larger than the diameter of the rope,
so that it is impossible for the bulb to pull through
if properly made.
Fig. 205.—Socket Cramp.
Flat wire ropes, which are not much used now,
also have to be socketed, as they cannot be
spliced. There are various methods of fixing
flat rope sockets, varying with the strain and the
conditions under which they work. The most
usual method is to bend the wire ends back
equally on both sides to make the bulb fit the inside
of the socket, and to secure with a liberal
supply of rivets (see Fig. 203). For stronger work,
the rope-end, after being cut off square, is bent
round the shackle pin, and the socket made to grip
both the rope and its end, the whole being firmly
secured by means of strong iron clamps and bolts
(see Figs. 204 and 205). In order to drive the
rivets through the compressed rope after the
socket is tightened, it is necessary to make the way
easy for them by driving in tapered spikes of the
shape shown by Figs. 206 and 207. These require
a hole in the end to take the end of a stout
marlinespike, for the purpose of withdrawing
them from the hole. They must be made of mild
steel.
Figs. 206 and 207.—Riveting Spikes.
Fig. 208.—Rivet.
The best form of rivet is shown by Fig. 208; it
must be made longer than the diameter of the
socket, to allow for clinching the other head.
PRINTED BY CASSELL & COMPANY, LIMITED, LUDGATE HILL, LONDON, E.C.
30.705
Transcriber’s Notes.
1. Silently corrected simple spelling, grammar, and typographical
errors.
2. It has been necessary, in this ebook edition, for some of the
illustrations to be moved to a different page. The page numbers,
in the List of Illustrations, have been amended.