Materials and Tools—Escutcheons—Short Hinge-straps—Long
Hinge-straps—Drawer-pulls and Handle-plates—Door-plates—Large
Lock-plates—Door-knockers
and Miscellaneous Ornaments
Tools and Methods—The Technique of the Art—Glue
and Gelatine Moulds—Hollow Casting—Modelling a
Foot—Bas-relief Modelling—A Medallion Head—Coin
and Metal Casts—Plaster-casting in General—How
to Find and Mount Signets
A Light-screen—A Fire-screen—A Shoe-screen—A Bedroom-door
Screen—A Heavy Fire-screen—A Window-seat
with Under Ledge—A Shoe-box Seat—A Dressing-room
Settle—A Short Settle—A Foot-rest—A Combination
Shoe-box and Seat—A Double Shoe-box and Seat—A
Curved-back Window-seat—A Window-seat and Shoe-box
A Plate-rail—A Cup and Plate Rack—A Cup and Plate
Pyramid—A Butler’s Tray—Cup-pins and Brush-rack—Lock-shelves—A
Vegetable-bin—A Spoon-bar and
Saucepan-rack—A Medicine-chest—A Convenient Plant-tray—An
Indispensable Clothes-press—A Divan—A
Corner Dressing-table
INTRODUCTION
The success of Harper’s Outdoor Book for Boys seems
to insure a welcome for an indoor handy book, equally
practical and comprehensive, which shall show how leisure
time indoors can be spent most pleasantly and profitably.
When stress of weather, or the coming of long winter evenings,
or any other reason gives the indoor part of life a
larger importance, this indoor handy book will be found
an invaluable companion. Good books and good games
have their value always, but there is also a large place for
the joy of actual accomplishment. It is good to do things.
It is worth while to learn to use hands and eyes in the production
of working results. And when, as in the case of
the explanation of this book, achievement goes hand in
hand with amusement, it is clear that Mr. Adams and his
associates are the best of companions for an indoor day or
evening.
Expensive tools and apparatus are not called for. A boy
should have good but not necessarily costly tools, and he
should take proper care of them. Furthermore, whether
his working-place is in his room or elsewhere, he should feel
that he is put upon his honor to remove any rubbish and
to avoid injury to floor or walls. Let us understand at the
outset that the explanation in these pages can be followed
at very little expense, but in this work, as in everything else,
common-sense is necessary. To use one tool for work
to which another is adapted, or to neglect one’s implements,
or allow them to get wet and to rust or to become
hopelessly dulled or nicked, is a sign of shiftlessness. A
good workman always takes care of his tools, and he also
keeps his work-bench in order. The very mention of work
in a boy’s room, or even indoors, may excite fears of disorder
on the part of the mother; but experience has shown that
with care on the part of the boy, and some concessions from
the mother, these fears are groundless.
It is desirable that a boy should have a place, whether it
be in the cellar or attic, or a corner of his room, definitely
devoted to his own work. It is also a useful training for
him to feel that he is put upon honor both to confine his
work to his own bounds, and also to “tidy up” whenever
he leaves his task. With a little patience and oversight all
this can be adjusted to the mutual satisfaction of the household
and the boy.
In addition to the training in various directions which
we have indicated, the suggestions in these pages will help
the boy to make things which are useful—to become a contributor
to his home. A glance at the Table of Contents
shows, under “Wood-working,” an introduction to the use
of carpenters’ tools, and instructions in making picture-frames
and ornamented wood-carving. Of late years ornamental
work for lamps, sconces, hinges, and a variety of
purposes has steadily grown in favor, and the second division
of the book tells how a great variety of decorative and
useful objects in metal may be made. When so much experience
has been gained, the boy can readily take up more
advanced work, such as modelling in clay, and plaster casting;
bookbinding, and the kindred craft of extra-illustration;
pyrography, or decorative work in burnt wood; printing,
stamping, and embossing; and the construction and use
of the stereopticon. In Part IV. the young craftsman is
shown how he may employ the technical knowledge he has
acquired in the fitting up and decoration of his room; in
the building and operating of a miniature theatre; in the
installation of a home gymnasium; and in the making of
various objects of ornament and utility for the household.
Amateur photography has been purposely omitted, since
there are many excellent and practical manuals on the subject
that have been published by the various camera manufacturers
for gratuitous distribution. It is easy to see the
possibilities for usefulness, for beauty, and for amusement
in the home, which are brought within reach in these pages;
and these instructions also represent possibilities for earning
money. In, schools where manual training receives attention,
and, indeed, in any school library, this book will prove
peculiarly useful.
Here, as in the Outdoor Handy Book, it has been kept
in mind that there will be neither fun nor profit in doing
these things unless the way is made clear, and it is certain
that the desired results will follow if the directions are
carried out. Everything, therefore, has been tested, and
all the instructions are put in simple, practical form. It is
a friendly, well-tried, and reliable household companion that
comes to young Americans in Harper’s Indoor Book for
Boys.
Part I WOOD-WORKING
Chapter I CARPENTRY — Tools — The Work-bench — A Tool-rack — A Tool-cabinet — A Tool-chest — Joints — A Low Bench — A High Bench — A Step-bench — A Shoe-box — A Shoe-blacking-box — A Shoe-blacking-ledge — An Easel — A Clothes-tree — Hanging Book-shelves — A Corner Cabinet — A Chair — A Table — A Settle — A Suspended Settle — A Coal and Wood Box — A Flat-iron Holder — An Umbrella-stand — A Plant-box — A Final Word
Carpentry, or the science of making things out of
wood, is the oldest and comes the closest to us of any
of the applied arts and crafts. The earliest men made clubs
at least. Later they began to build, to construct, and it is
interesting to remember that this ability to construct is a
faculty shared with man by the animals. There are many
species of birds that build well-designed nests; the spider is
a weaver; the bee is a geometrician; the ant is a tunnel
builder; the beaver, in the construction of his dams and
breakwaters, displays engineering ability of a high order.
The vital difference between the animal and the human intelligence
lies in the fact that the latter is progressive.
The spider weaves just the same pattern to-day that he
did when the Pyramids were young; the mathematical section
of the bee cell is invariable; the mud-swallows build the
same kind of houses as their remotest ancestors. The common
explanation is that instinct and not reason guides the
animal in his work, and instinct is a reproductive faculty,
not an inventive one. It is for man alone to progress from
the crude beginnings of an art to its highest and most perfect
development.
Perhaps the first and most urgent need of all living creatures
is for shelter. The oriole weaves his hanging nest; the
beaver constructs his wonderfully domed house; primitive
man builds his hut of interlaced boughs. But it is man
alone who is not content with the first crude efforts; he is
constantly aiming after something more substantial and
better adapted to his increasing needs. So man becomes
the true builder, and as wood is the simple and almost
universally obtainable material, carpentry, or the art of
working in wood, stands at the head of the applied sciences
upon which the civilization of the race depends.
The average boy takes to carpentry as naturally as ducks
take to water, and beginning with the tacks a baby boy will
hammer in a board, the young builder goes on from the
simple to the more complex forms until he attains the full
mastery of his material and his tools. He has now obtained
the dignity of manhood; he is a maker of things.
Once proficient in the art of cutting, joining, and fastening
wood-work, and in the use and care of tools, a boy may
begin to call himself a carpenter. But he must learn to
work systematically and accurately if he is ever to become
a genuine craftsman. In the first place, he should understand
the possibilities and limitations of his tools. He
should never use a chisel for a screw-driver, nor drive nails
with the butt end of a plane. Good tools should have good
care. Inanimate things that they are, they yet resent ill-usage,
and retaliate, in their own way, by becoming dull
and otherwise unfit for their work. Indeed, a good carpenter
may be known by the condition of his tool-chest
and work-bench. Carpentry, when properly carried on, is
a most fascinating occupation for out-of-school hours, especially
in the winter season, when bad weather keeps one
indoors. Needless to say, it may be made a profitable way
of passing time as well as an amusing one.
The tools that a boy will need in order to do good joiner-work
should be the same as carpenters use, but they may
be smaller and not so cumbersome to handle. The set of
tools in a chest, put up for the use of children and sold at
toyshops, are not the sort that can be relied upon for good
carpentry work, since they are usually dull and made of
soft steel that will not hold an edge. Possibly the manufacturer
thinks that he is justified in turning out this kind
of rubbish, bearing in mind the old saying, “Children should
not play with edged tools.” But the boy who is old enough
to take up carpentry in earnest is entitled to the use of
good and serviceable implements, and without them it is
hardly worth while starting at the business.
Competition has brought down the cost of good tools to
a point where they are not beyond the means of the average
boy who is prepared to save his pocket-money. It is better
to purchase only a small kit at first, and then to add
to it from time to time, until the complete outfit is obtained.
Good tools may be purchased at nearly every hardware
shop or general store throughout the country. For ordinary
work you will require a good rip and cross-cut saw,
with twenty and twenty-four inch blades, respectively;
a claw-hammer, and a smaller one; a wooden mallet for
chisels, and to knock together the lap joints of wood; a
jack and a smoothing plane; a compass-saw; a brace and
several sizes of bitts, ranging from a quarter to one inch in
diameter; a draw-knife; a square; awls; pliers; a rule; several
firmer-chisels, and a screw-driver. There are many other
useful tools, but they may be added as they are required.
It is a difficult matter to instruct a boy, by written description,
how to handle tools; and rather than attempt it,
I should advise the young workman to watch a carpenter
at his work. Most carpenters are quite willing to have you
follow their movements, and many of them will even offer
advice, if they see that you are really interested. But remember
that a good workman never likes to have a boy
meddle with his tools, and you should not ask foolish or
unnecessary questions.
Perhaps there is a carpenter’s shop near your home in
which the owner may let you work occasionally (if you
keep out of his way), and where, in the atmosphere of the
craft, you will make faster progress than you can possibly
do at home with no one to tell or show you how things
should be done.
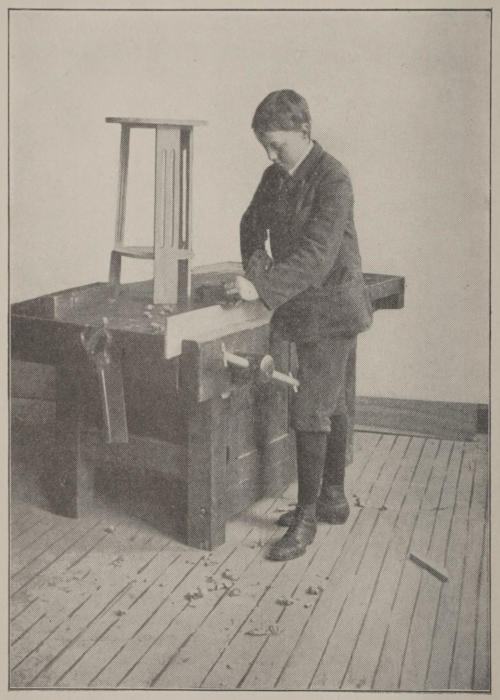
One of the indispensable pieces of equipment for the
boy carpenter is a good work-bench. The bench must be
substantially made, and provided with a planing-stop, a
vise, and a drawer in which to keep small tools, nails, screws,
and the various odds and ends that are employed in carpentry.
To begin with, obtain four spruce or white-wood sticks,
three inches square and thirty-six inches long, planed on
all sides. These are for the legs. You will also need two
pieces of clear pine, or white-wood, three feet long and six
inches wide, and two more the same length and three inches
wide. These pieces should be one and an eighth inches thick,
and planed on all sides and edges.
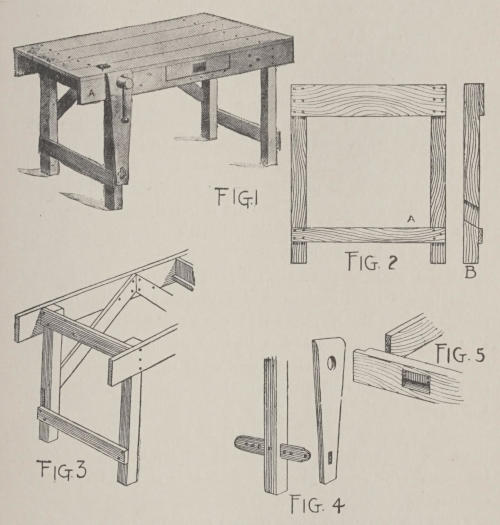
Fig. 1.Fig. 2.Fig. 3.Fig. 4.Fig. 5.
Lay two of the legs on the floor, three feet apart, and
join the ends with one of the six-inch strips. Six inches up
from the free ends fasten a narrow strip, as shown in Fig.
2 A. This finishes one of the end supports. Flat-headed
iron screws, two and a half inches long, should be used for
the unions, and a tighter joint may be secured by also using
glue.
Prepare, in similar fashion, the other pair of legs, and,
with two pieces of clear pine, or white-wood, five feet long,
eight inches wide, and seven-eighths of an inch thick, bind
the four legs together, as shown in Fig. 3. You should
allow the boards to project six inches beyond the legs at
both ends. These pieces are the side-rails, or aprons, and
they should be securely fastened with glue and screws to
the upper end of each leg.
At the back of the bench arrange two braces of wood,
three inches wide and seven-eighths of an inch thick, as
shown in Fig. 3. Bevelled laps are to be cut in the side of
two legs, as shown in Fig. 2 B, into which the ends of the
strips will fit flush. The upper ends of the strips are to
be mitred (cut at an angle), and attached to the inside of
the apron, as shown in Fig. 3.
For the top of the bench use clear pine planking not less
than one inch in thickness. This should be fitted closely
together, and fastened to the cross-pieces with stout
screws.
From hard-wood a piece should be shaped for a vise-jaw
thirty-two inches long, three inches wide at the bottom,
and seven inches wide at the top. Near the bottom of the
jaw an oblong hole should be cut to receive the end of a
sliding piece, which in turn is provided with several holes
for a peg to fit into. A corresponding oblong hole is cut
near the foot of one leg, through which the piece containing
the holes will pass. This last regulates the spread of the
jaw. This construction may be seen in Fig. 4, and its final
position is shown in the illustration of the finished bench
(Fig. 1).
Near the top of the jaw a hole is cut to receive the screw
that is turned with the lever-stick to tighten the jaw. A
bench-screw may be purchased at any hardware store, and
fitted to the work-bench. If it should prove too much of
an undertaking for the youthful workman, a carpenter will
put it in place at a trifling cost. The wood screws are the
cheapest, but the steel ones are the most satisfactory, and
will cost about one dollar for a small one.
From the apron (at the front of the bench) a piece should
be cut fifteen inches long and six inches wide. This opening
will admit a drawer of the same width and height, and
as deep as may be desired. Twenty-four inches will be
quite deep enough.
Rabbets are cut in the ends of a front piece, and the sides
are let into them, as shown in Fig. 5. The bottom and back
are fastened in with screws, and the drawer is arranged to
slide on runners that are fastened across the bench inside
the aprons, as shown in the upper corner of Fig. 3.
At the front of the drawer a cove may be cut out, and a
thin plate of iron screwed fast across the top of it, so that
the fingers may be passed in behind the plate to pull out
the drawer (Fig. 5). It will not do to use a projecting
drawer-pull, as that would interfere with pieces of work
when clamped in the vise. In planing strips, or boards,
that are too long for the vise to hold securely, a wooden
peg, inserted in a hole at the opposite end of the apron
from the vise, will be found convenient. Two or three
holes may be made for boards of different widths, and
the peg adjusted to the proper one as occasion requires.
A planing-stop, with teeth, may be purchased at a hardware
store and set in place near the vise-jaw. The complete
bench will then be ready for use.
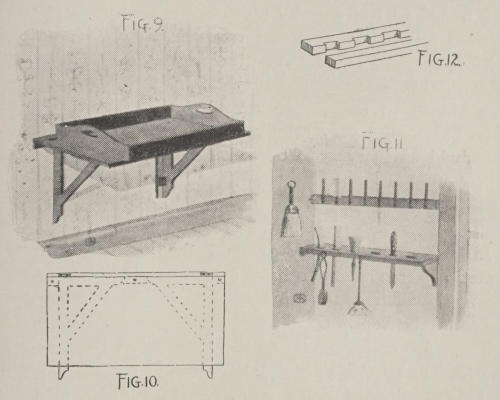
For the accommodation of chisels, gouges, screw-drivers,
awls, compass-saws, pliers, and other small tools a tool-rack
will be found convenient. It should be fastened against
the wall immediately over the work-bench.
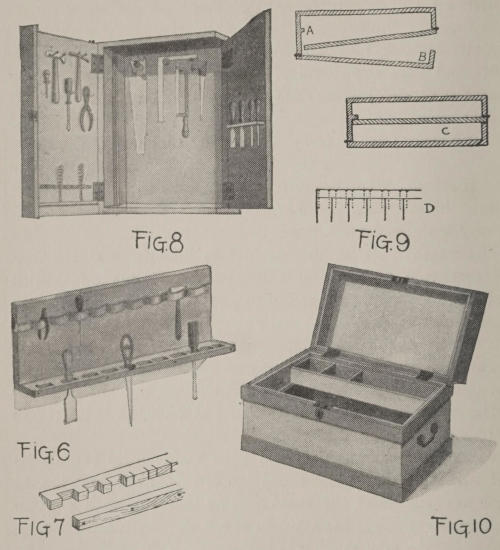
The one shown in Fig. 6 is thirty-six inches long and
twelve inches high, with a ledge projecting two inches from
the back-board. A leather strap is caught along the
upper part of the board with nails to form loops, into which
the tools are slipped.
The ledge is made from two strips of wood. One of them,
one and a half inches in width, is cut with a saw, as shown in
Fig. 7, and the superfluous wood, between the saw-cuts, is
removed with a chisel. When all the notches are cut, a
narrow strip, half an inch in width, is screwed fast to the
notched strip. The ledge is then attached to the lower
edge of the back-board with long screws, as indicated in the
illustration.
The hanging tool-cabinet shown in Fig. 8 should be constructed
with two doors of nearly equal size, so that four
instead of two surfaces may be available, against which to
hang tools.
The body part of the chest is thirty inches high, twenty
inches wide, and nine inches deep, outside measure. It is
made of wood three-quarters of an inch in thickness, fastened
together with screws and glue, and varnished to improve
its appearance.
The right side of the cabinet is but three and a half
inches wide, and to this the inner door is made fast with
hinges, so that it will swing in against a stop-moulding on
the opposite side, as shown at A in Fig. 9. A small bolt
will fasten the door in place when shut in, and on both sides
of this door hooks and pegs may be arranged for the reception
of tools. The back-board of the cabinet may be used for
hanging saws, squares, and other flat tools, as indicated in
Fig. 8.
The outer door is provided with a side-strip (Fig. 9 B)
of such size that when the doors are closed in and locked
the appearance of the chest will be uniform, with a cross-section
appearing, as shown in Fig. 9 C. With a little careful
planning and figuring it will not be a difficult matter to
construct this cabinet. Take particular care to have the
doors fit snugly and close easily. The doors will keep
their shape better if they are made from narrow matched
boards, held together at the ends with battens, or strips,
nailed across the ends of the boards, as shown in Fig. 9 D.
Two-inch wrought butts will be heavy enough for the doors,
and a cabinet-lock at the edge of the outer door will make
all secure.
Fig. 6.Fig. 7.Fig. 8.Fig. 9.Fig. 10.
On the inside of the outer door some tool-pegs may be
arranged. Near the bottom a bitt-rack should be fitted,
with a leather strap formed into loops, as described for the
tool-rack. Under each loop a hole should be bored in a
strip of wood, into which the square end of the bitts will
fit, and thus insure their orderly position. For chisels a
similar set of pockets may be designed as shown in Fig. 8.
The tool-chest shown in Fig. 10 is twenty-eight inches
long, fifteen wide, and twelve inches high. This is a good
size for the accommodation of a moderate-sized kit of tools.
The interior fittings should include two or three trays arranged
to rest on runners and to slide back and forth, so
that tools may be reached at the bottom of the chest without
removing the trays.
Obtain a pine or white-wood board fifteen inches wide,
and free from knots or sappy places. Cut two pieces twenty-eight
inches long, and two shorter ones twelve inches long.
These will form the top, bottom, and ends. Cut out the
front and back pieces twenty-eight inches long and twelve
inches wide; then with glue and screws form a box, and let
it stand a day until the glue is hard. Make the joints as
perfect and tight as possible, so as to present a good appearance;
then mark a line around the box two and a half
inches from the top.
With a rip-saw cut the cover free from the body, and
plane the rough edges of the cut, so that the cover will fit
the body snugly. Bind the lid and the top and bottom
edges of the chest with a strip of wood three-eighths of an
inch in width, as shown in the illustration; to look well,
the corners should be mitred. The lid is attached to the
chest with stout hinges, and a lock is arranged at the front.
Stout handles at the sides will be found a convenience.
Two or three coats of olive-green paint, with a slightly
darker shade for the bands, will improve the appearance of
the chest. To keep the hardware from rusting, the lock,
hinges, and handles should receive a coat or two of black
paint.
One of the first lessons for the young carpenter to learn
will be that of making wood joints. Without good joiner-work
there is no such thing as carpentry, and it is the sign-manual
of the competent artificer. There are a great
variety of joints employed in carpentry, but many of them
are too complicated for the boy carpenter to make, and
the simple forms will answer every reasonable requirement.
The easiest joint to make is the straight, or box, joint.
It is constructed by butting the end of one board against
the edge of another and nailing, or screwing, them fast.
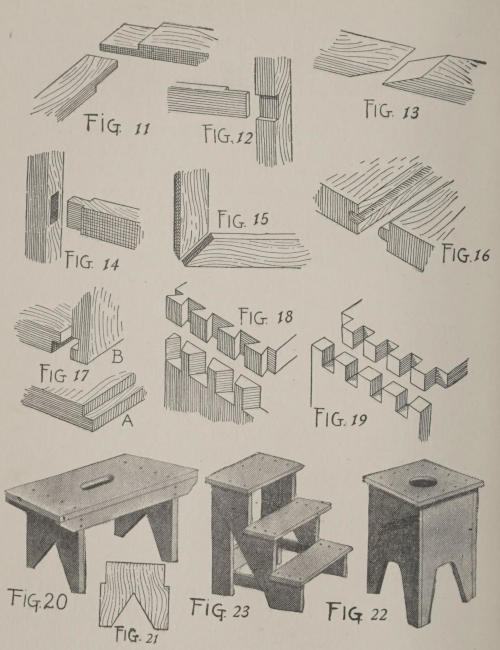
Fig. 11 shows a lap-joint made by cutting away a portion
of the wood on opposite sides of the ends which are to be
joined. When fastened the wood will appear as a continuous
piece. For corners and angles, where a mitre-box is not
available, the lap-joint is a very good substitute, and for
many uses it is stronger than the mitred-joint, and, therefore,
to be preferred.
Fig. 12 is another form of lap-joint, where the end of a
strip is embedded in the surface of a stout piece of wood.
This joint will be found useful in furniture work, and also
for frame construction in general.
Fig. 13 is a bevelled lap-joint, and is used for timbers and
posts, particularly under conditions where the joint can be
reinforced by another piece of wood at one or two sides.
Fig. 14 shows a mortise and tenon. The hole in the upright
piece is the mortise and the shaped end on the stick
is the tenon. The shaped end should fit the hole accurately,
and the joint is usually held with a pin, or nails, driven
through the side of the upright piece and into the body of
the stick embedded in the mortise. The mortise and tenon
is used extensively in framing, and for doors, window-sashes,
and blinds. In cabinet work it is indispensable.
Fig. 15 is the mitred-joint. In narrow wood it is usually
cut in a mitre-box with a stiff back-saw to insure accuracy
in the angles. The mitred-joint is employed for picture-frames,
screens, mouldings, and all sorts of angle-joints.
Fig. 16 is the tongue-and-groove joint, and is cut on the
edges of boards that are to be laid side by side, such as flooring,
weather-boards, and partitions. Before wood-working
machinery came into general use the tongues and grooves
were all hand-cut with planes, but a tongue-and-groove
plane is now almost obsolete, all this class of building
material being mill finished.
Fig. 17 A is a rabbet. It is cut on the edges of wood,
and another similarly shaped piece fits into it. It is also
useful where wood laps over some other material, such as
glass or metal. The inner moulding of picture-frames are
always provided with a rabbet, behind which the edge of
the glass, picture, and backing-boards will fit.
Fig. 17 B is a rabbet-joint made with a rabbet and groove.
It is a good one to employ for box corners, and where the
edges of two pieces of wood come together.
Fig. 18 is the dovetail-joint used for boxes, drawer corners,
chests, and sometimes in cabinet work, where the corners
are to be covered with mouldings or edging-strips.
Fig. 19 is the straight dovetail employed in the cheap
construction of small boxes for hardware, groceries, and other
wares. Since the edges are straight, this is the easier one
to make, but care must be taken to have the fitting accurate.
Small benches are useful to work upon when sawing,
nailing, and matching boards; and they are handy for many
purposes about the house. The low bench shown in Fig.
20 is fifteen inches high and twelve inches wide, and the
top is twenty-two inches long. The foot-pieces are cut as
shown in Fig. 21, and at the upper end at each side a piece
is cut out to let in the side-aprons. The aprons are three
inches wide and seven-eighths of an inch thick; they are
held to the foot-pieces with glue and screws. In the top a
finger-hole is cut so that the bench may be quickly picked
up and the more easily handled.
The high bench shown in Fig. 22 is twelve inches square
and twenty-four inches high, with a top fourteen inches
square. The wood is seven-eighths of an inch thick, and
all the joints are made with screws. A hand-hole is cut in
the top with a compass or key-hole saw, and all the edges
are sand-papered to round them off.
A step-bench will be found useful for various purposes.
It does not take up so much room as a step-ladder and affords
a more solid footing. The bench shown in Fig. 23 is thirty
inches high, fifteen inches wide, and eighteen inches deep.
The uprights that support the sides are five inches wide;
the treads of the first and second steps are six inches wide,
and that of the top step eight inches wide. The wood is
seven-eighths of an inch thick, planed on both sides, and all
the unions are made with screws. The cross-brace at the
back and near the bottom is set into laps cut in the edges
of the upright supports, and to prevent the support and side-pieces
from spreading, stanchion-bars may be screwed
fast to the sides, under the first tread, and to the foot of the
uprights.
Two or three coats of paint will finish these benches and
make them fit for use about the house.
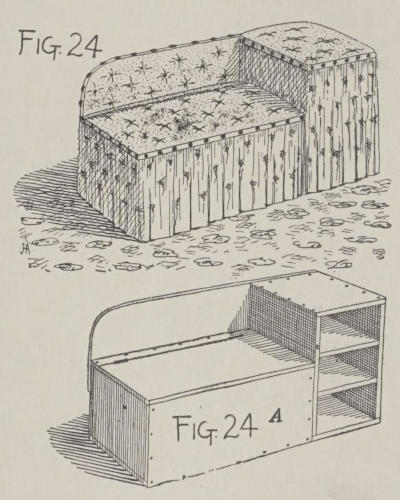
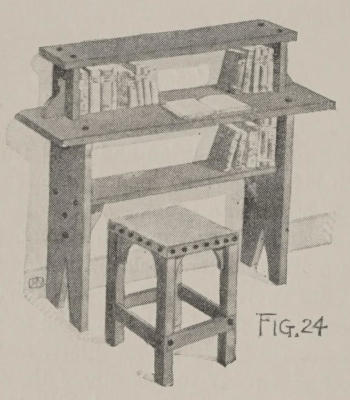
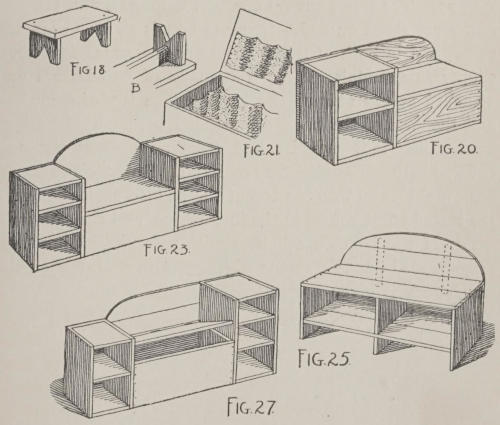
A shoe-box and seat (Fig. 24) is a useful piece of furniture
in any bedroom. Two boxes, purchased at a grocery store,
may be made to serve the purpose, but for a really neat
and workmanlike job the frame should be constructed of
boards three-quarters or seven-eighths of an inch in thickness.
A good size for the shoe receptacle is twenty-four
inches high, fifteen inches deep, and sixteen inches wide.
The seat-box should be thirty inches long, and fifteen inches
high and deep.
Fig. 24.Fig. 24 A.
These boxes are to be attached to each other with stout
screws, and a back the length of the two boxes, and having
a rounded corner is to be securely fastened to the rear of
each box, as shown in Fig. 24 A. In the shoe-box two shelves
are screwed fast, and to the lower box a corner should be
arranged on hinges so that it may be raised from the front.
The back and seat and also the top of the shoe-box should
be covered with denim, under which a padding of hair or
cotton may be placed. The denim should be caught down
with carriage-buttons and string, the latter being passed
through holes made in the wood and tied at the underside.
Around the front and sides a flounce of cretonne or denim
may be gathered, and hung from the top edge of the box
and seat. If finished with gimp and brass-headed tacks it
will present a good appearance. Where the drop-curtain
at the edge of the shoe-box meets the seat the fabric is to
be divided, in order that it may be drawn to one side when
taking out or replacing shoes.
Fig. 25.Fig. 26.Fig. 27.
A coat of shellac, or paint, will cover such parts of the
wood-work as are not hidden by the upholstery. Fig.
24 shows the finished article of furniture.
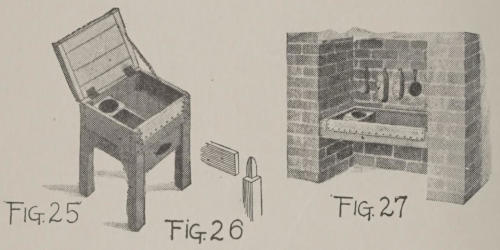
Every boy should own a shoe-blacking-box, such as is
shown in Fig. 25. Otherwise, the brushes and blacking-box
are apt to get widely separated, and are never at hand when
they are wanted. Moreover, it is a slovenly practice to use
a chair or stool as a foot-rest when engaged in polishing
one’s shoes, since the blacking is sure to discolor and dirty
whatever it touches. This shoe-blacking-box is twenty-four
inches high and eighteen inches square, the compartment
being four inches deep. Four sticks, two inches square and
twenty-four inches long, will form the legs. Each stick
should be cut away at one end three-quarters of an inch
deep for a distance of five inches, as shown in Fig. 26, so
that when the side boards are fastened to them the joints
will be flush. Two sides of each stick should thus be cut
away, and the small end of the stick may be tapered slightly.
The side boards, of three-quarter-inch wood and five inches
wide, are screwed fast to the top of the legs.
A bottom sixteen and a half inches square is cut from
boards and fastened inside the frame, where it is held in
place with steel-wire nails driven through the lower edge of
the side boards and into the edge of the bottom, all around.
Four brackets are cut and fastened with screws at each
side of the box, under the side boards. A cover is made
and hinged to the box, where it is prevented from falling
too far back by a chain attached to the underside of the lid
and to the inside of the box.
Over the front edge of the box bend a strip of zinc and
tack it fast to both the in and outside of the front board.
This will prevent shoes from chafing the wood away, and is
easily cleaned when muddied up.
With a thin piece of wood make a division in the box at
one side, where blacking and daubers may be kept. Also
a drawer may be fitted to slide in and out under the box.
It should be constructed, as described for the work-bench,
and arranged to work on runners fastened to the inside of
the legs. Screw-eyes or staples should be driven into the
ends of the brushes and daubers, so that they may be hung
up in an orderly manner on hooks set in the wall immediately
over the ledge.
A few thin coats of olive-green or light-brown paint will
add to the appearance of this shoe-blacking-box, and the
owner should take pride in keeping it clean, and the brushes
in good order.
In a cellar where one of the chimneys is built with a
recess, a shoe-blacking-ledge may be made from four boards
five inches wide. The bottom is slatted, so that dirt will
fall through. Fig. 27 shows quite clearly how this can be
done. One end is partitioned off to hold the box of blacking.
The ledge is twenty-four inches high, and the front board
is bound with a strip of zinc along the upper edge. The
blacking-brushes may be kept in the tray, but it is a better
plan to hang them up against the brick-work on steel nails.
If the brushes are to be kept inside the tray, a lid should be
made and hinged to the back strip of the tray. When the
lid is raised it may be held against the brick wall with a
wooden button.
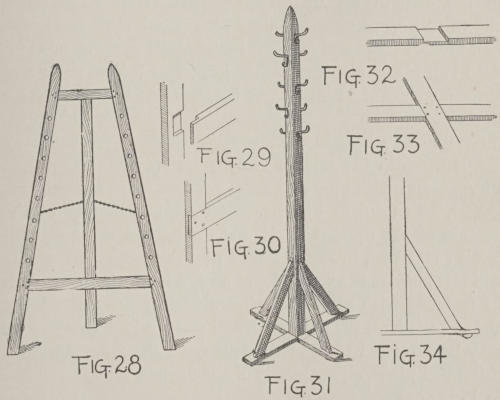
Boys who have a talent for drawing and painting would
undoubtedly like to have an easel on which to work, and a
good strong one may be made, at moderate cost, in the
following manner (Fig. 28).
Obtain four pieces of clear white pine six feet long, two
and a half inches wide, and seven-eighths of an inch in
thickness. These should be planed on all sides. Two of
the sticks should be tapered off at one end, and slightly
bevelled at the other. Nine inches from the top and
twelve inches up from the bottom laps are to be cut in the
sticks at the back, as shown in Fig. 29. Into these the
ends of cross-pieces will fit. If the concealed lap is too bothersome
to make, it can be cut clear across the sticks, as
shown in Fig. 30. Glue and screws will make a strong joint.
The remaining long stick is the back support, or leg, and
is to be hinged to the upper cross-piece. With this leg the
easel may be pitched at any angle, and to prevent it from
going back too far a guide-chain should be attached to the
leg, and the ends secured to the back of each upright with
staples. Holes are bored along the uprights at even distances
apart, and two wooden pegs are cut to fit snugly in
the holes, and so hold a drawing-board or canvas-stretcher.
A clothes-tree is a most serviceable article of furniture,
and helps a boy to form habits of neatness and orderliness
in the care of his wearing apparel. To make the one
shown in Fig. 31 obtain a clear pine or ash stick one and a
half inches square and five feet long for the upright, or staff.
Also two pieces eighteen inches long, two inches wide, and
three-quarters of an inch thick for the feet; and four braces
twelve inches long, one and a half inches wide, and three-quarters
of an inch in thickness.
Cut a lap in the middle of each foot-piece, as shown in
Fig. 32, and with glue and screws fasten them securely together,
as shown in Fig. 33. Screw this foot fast to the
bottom of the upright stick, and strengthen the four projecting
feet with braces bevelled at the ends, so that they
will rest against the upright and on the foot, where they can
be fastened with screws, as shown in Fig. 34. Under the
end of each foot, the half of a small wooden ball, or a castor,
may be arranged to raise the tree from the floor. With a
chisel and plane taper the top of the upright stick, as shown
in Fig. 31.
At a hardware store purchase eight hooks and arrange
them in alternating pairs, as shown in the drawing. The
wood-work should be shellacked or painted to give it a
finished appearance.
When hanging clothes upon this tree place the coat, vest,
and trousers on the lower hooks, the shirt and underclothing
on the hooks next above, and on the top hooks the necktie
and collar and cuffs. When dressing, the clothing needed
first will then be the nearest to hand.
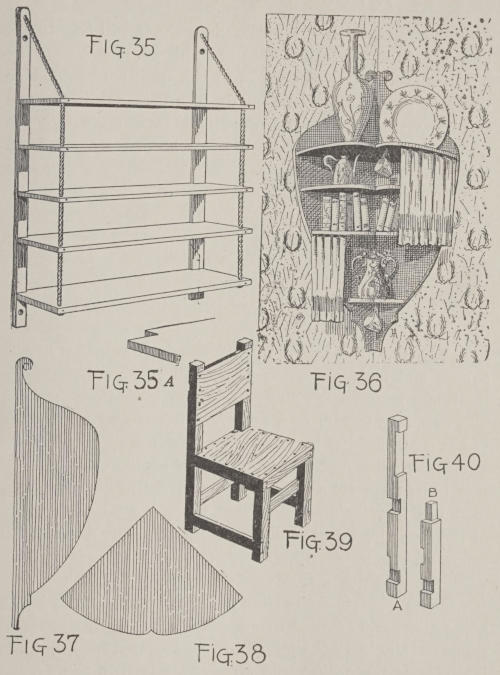
In a room where space cannot be given up to a standing
bookcase, it may be possible to arrange a set of shelves to
form a book-rack that will hang against the wall. The
construction of the hanging shelves shown in Fig. 35 is
very simple, and will require but a few boards, two wall-strips,
and a few yards of strong rope.
For the shelves, obtain five pine boards eight inches wide,
seven-eighths of an inch thick, and from three to four feet
long; also two pine strips three inches wide, an inch thick,
and four feet long. In the rear edge of each board, at the
ends, cut notches three inches long and an inch wide, as
shown in Fig. 35 A, into which the wall-strips will fit. Round
off the top of each wall-strip and screw them fast to the
notched edges of the shelves, first boring gimlet holes in
both strips and shelves to prevent splitting of the wood.
Half-inch holes at the top of each wall-strip will admit
the suspension rope, which is of manila, and half an inch in
diameter. Knot one end of the rope and pass it up through
holes made at the outer corners of each shelf, and finally
through the hole at the top of the wall-strips, and cut it off
three inches back of the hole. With a gouge-chisel a groove
should be made at the back of the wall-strip for an inch or
two below the hole, so that the rope end may be carried
down and ravelled out. It can then be glued and held fast
to the wood with staples. Where the rope passes through
the hole in each shelf, drive several long steel-wire nails into
the edge and end of the board, allowing the nails to pass
through the rope and into the wood.
Paint or varnish the wood-work, and securely anchor the
wall-plates with stout screws driven into the frame timbers,
through the lath and plaster of the wall.
A corner cabinet of odd design and simple construction is
shown in Fig. 36. The total height of the wall-plates should
be thirty-four inches, and at the top the shelf measures
eighteen inches across. Each shelf is rounded out at the
front so as to afford more surface on which to place books
and bric-à-brac. The ends of each shelf are securely attached
to the side or wall-plates with screws, thus insuring
a perfect anchorage and a strong construction.
Fig. 37 is a plan showing the shape of the sides or wall-plates.
At the widest part they should measure twelve
inches across. Fig. 38 is a plan of the top shelf, which is
followed in shape by the others. They decrease, however,
in size as they near the bottom. The notch at the middle of
each shelf breaks the long curved line in a pleasing manner.
Two light metal rods from which curtains hang may be
arranged under the top shelf and the one next the bottom.
Shellac or paint of some appropriate shade will add to the
appearance of this useful piece of furniture.
When fastening this cabinet to the wall, care should be
taken to pass the screws securely into the studding or uprights.
Otherwise the screws might pull out under the
accumulated weight, and a fall would be disastrous to both
the cabinet and its contents.
The construction of a chair is perhaps as interesting as
anything in carpentry. The one shown in Fig. 39 may be
made from either soft or hard-wood, the joints being all
open and simple to cut.
The legs are two inches square, the seat is sixteen inches
square and eighteen inches high, and the back posts are
thirty-six inches long. The front and back posts are cut
out, as shown in Fig. 40 A and B. These receive the cross-pieces
that bind the legs and back together. The posts are
two inches wide and three-quarters of an inch thick. The
side braces are set two inches up from the floor and the
back one four inches. The front brace is let into the rear
of the front legs, and is eight inches from the floor to the
lower edge.
The seat is made from matched boards, and the back,
ten inches wide, is made from a single board, all the joints
being glued and screwed together. Chairs that are made in
shops usually have the joints dowelled or mortised, but the
lap-joint is the easiest and strongest one to make. Take
care, however, that the cuts are accurately sawed, and that
the cross-pieces fit the laps so snugly that a mallet is necessary
to help drive the strips home.
The seat and back of this chair may be covered with
denim, leather, or other upholstery material, drawn over
curled hair, or cotton may be used for padding, and fastened
down around the edges with large flat-headed tacks or upholstery
nails. Shellac, varnish, or paint may be used to
give the wood-work a good appearance.
It is not so difficult as it may seem to make a good strong
table, but care and perseverance must be exercised to obtain
a satisfactory result. When constructing a table bear
in mind that every joint should be made to fit accurately;
otherwise it will quickly rack and become useless. The
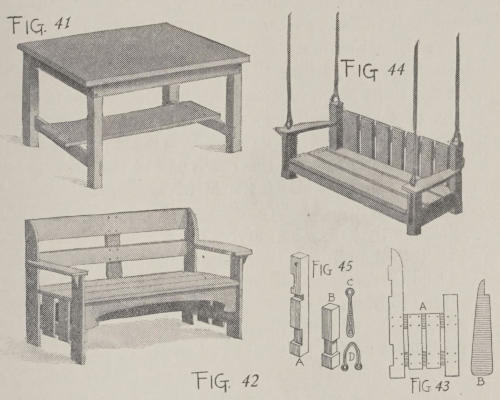
proportions and shape for a serviceable table are shown in
Fig. 41. Only well-seasoned wood should be employed, and
it should be free from knots or sappy places.
For the legs, obtain four sticks thirty-three inches long
and two and a half inches square. From two sides, near the
end of each stick, cut the wood away for five inches to a
depth of seven-eighths of an inch, as shown (at the top) in
Fig. 40 B. Now cut two boards five inches wide and forty-two
inches long, and four more thirty inches long for the
frame. Six inches from the uncut ends of the legs saw and
chisel out laps, so that two of the thirty-inch lengths will
fit into them, and with two long and two short boards unite
the legs, thereby forming a frame thirty inches wide, forty-two
inches long, and thirty-three inches high. An under-shelf
may be made twelve inches wide and long enough to
extend two or three inches over the cross-strips.
The table top extends over the framework for three
inches all around, and it is made of narrow tongue-and-grooved
boards driven together and screwed down to the
band around the top, formed by the thirty and forty-two-inch
boards. To finish this top nicely it may be covered
with felt, or with imitation leather, in old-red, green, or
brown shades, caught under the edge and made fast with
stout tacks.
A comfortable settle (Fig. 42), for the piazza or yard, may
be made from pine, white-wood, cypress, or almost any other
wood that may be at hand.
It is fifty-four inches long, eighteen inches wide, and the
seat is eighteen inches above the ground. The sides are
made from strips three inches wide and seven-eighths of
an inch thick, as shown in Fig. 43 A. The arms are twenty
inches long, six inches broad at the front, and cut the shape
shown in Fig. 43 B. The notches or laps cut in the rear
posts are to let in the strips forming the back and lower
brace.
The joints should be made with screws rather than nails,
as they hold better and do not work loose. Small brackets
support the arms at the front corner posts, and a batten at
the middle strengthens the back of the settle. A close inspection
of the drawings will show the joints clearly and
indicate how the frame is put together. A few coats of
paint will finish the wood nicely, or it may be stained and
varnished if the wood has a pretty grain. Cushions and a
sofa-pillow or two will add to the comfort of this commodious
seat.
Fig. 41.Fig. 42.Fig. 43.Fig. 44.Fig. 45.
A suspended settle (Fig. 44) is a convenient piece of
piazza furniture, and not a difficult thing for the young
carpenter to make.
The corner posts are two and a half inches square, and the
boards used in its construction are seven-eighths of an
inch thick and four inches wide. The seat is forty-two
inches long and eighteen inches wide, and the back is fifteen
inches high from the seat. The arms are cut as shown in
Fig. 43 B, and securely screwed to the corner posts. The
frame-pieces supporting the seat-boards are let into the
back and front posts, in which laps have been cut, as shown
at Fig. 45 A and B. They should be securely fastened with
flat-headed screws. Both the rail to which the backing-boards
are attached and the rear ends of the arms are let
into the corner post and fastened with screws.
The seat is suspended from the ceiling of the piazza on
four chains that may be purchased at a hardware store or
from a ship-chandler, or they may be made by a blacksmith
from iron three-eighths of an inch in diameter. If it is not
possible to obtain the chains, rope may be substituted, but
it will not look or last so well.
Two yokes bolted to the top of the back posts and eye-straps
for the front posts will anchor the chains securely to
the settle. The yoke is shown at Fig. 45 C, and the eye-strap
at Fig. 45 D. A bolt passed through the top of the
rear posts and through the holes in the yoke will secure the
latter firmly, and a nut will prevent it from slipping loose.
Holes are made in the arms, and the eye-straps are passed
down through them and attached to the front corner posts
with screws, as shown in Fig. 44. The back of the settle is
composed of boards four inches wide and placed an inch
apart.
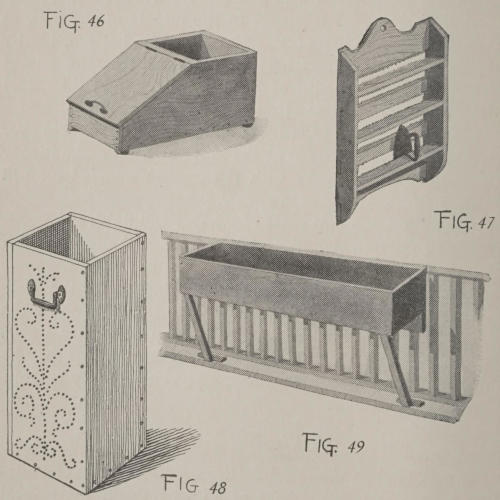
A combination box for coal and wood may be made from
an ordinary shoe-box, the sides and one end being cut down
as shown in Fig. 46; but a more serviceable one is constructed
of boards seven-eighths of an inch thick, planed on both
sides, and with the joints securely glued and screwed.
The sides are twenty-six inches long and twelve inches
high at the back. At the front they are but four inches
high. A back-piece ten inches wide and twelve inches high
is cut and fastened in place, and a front strip four inches
high is also made fast with glue and long, slim screws.
A division-board is placed in the middle of the box, as
indicated by the line of screw-heads, and a bottom, ten by
twenty-four inches, is held in place with screws passed
through the lower edge of the front, back, and sides, and
into the edges of the bottom.
A lid the width of the box is hinged to a cross-strip over
the partition. A handle at the lower end will make it easy
to lift the lid. Blocks with the corners rounded off will
serve as feet, one at each corner.
Thin stain and two coats of varnish will finish the wood-work
on the outside. A coat or two of asphaltum varnish
will be better for the inside.
Sticks of wood for the open fire or kindling for the grate
fire may be kept in the square receptacle, while under the
lid at least two bucketfuls of coal may be stowed away.
If the fuel-holder is used only at the open fire, logs may be
stood on end in the square box, and kindling may be kept
in the covered half.
A rack of shelves to hold flat-irons may be made of white-wood
or pine seven-eighths of an inch thick, the several
pieces being securely fastened together with screws. Two
side-plates are cut four inches wide and thirty inches long.
The tops are bevelled and the bottom of each piece is curved,
as shown in Fig. 47.
Fig. 46.Fig. 47.Fig. 48.Fig. 49.
The shelves are two inches wide and eighteen inches long.
They are spaced eight inches apart, having the front edge
flush with the edge of the side-plates, and leaving a space
two inches wide from the rear edge to the wall. Wall-plates
two inches wide are let into the rear edge of the side-plates
two inches above the shelves. Against these the
bottom of the irons will rest.
A top and a bottom board, cut as shown in the illustration,
are to be attached to the wall-plates, and the complete rack
of shelves should be fastened to the kitchen or laundry wall
with stout screws set firmly into the studding.
Two coats of olive-green or brown paint will finish this
holder nicely, or it may be painted any color to match the
wood-work in the kitchen or laundry.
An umbrella-stand does not occupy much space, and it is
a convenient receptacle for umbrellas, canes, ball-bats, and
golf-clubs (Fig. 48).
To make one it will require four pieces of clear pine or
white-wood thirty inches long, ten inches wide, and half an
inch in thickness. There is also a bottom board nine and a
half inches square and seven-eighths of an inch thick, to which
the lower ends of the boards are to be screwed fast. A high,
narrow box is to be formed of the boards, one side of each
board being attached to the edge of the next one, as the
illustration shows. Shellac or varnish will give the wood-work
a pleasing finish, especially if it is white-wood, cypress,
or spruce.
A design may be worked out on one side with large oval-headed
hobnails painted black. These may be purchased
at a shoemakers for a few cents a paper. The design should
first be drawn on thin brown paper and held on the wood
with pins. The nails are driven along the lines of the
ornament, but before they are hammered home, the paper
should be torn away so that none of it is caught under the
nail-heads.
A zinc tray six inches high, and made to fit in the bottom
of the box, will hold the drippings from wet umbrellas.
Rings soldered at the top edge of the tray will permit it to be
removed for cleaning.
For growing plants and flowers that always look well
around a piazza rail, the plant-box shown in Fig. 49 will
be found useful. One or more boxes may be made from
pine boards an inch thick and eight inches wide. The boxes
should be six inches deep, outside measure, and they may
be as long as desired to fill the spaces between the piazza
posts.
Straight or box joints are made at the corners and fastened
with screws. The inside of the boxes should be treated
to several successive coats of asphaltum varnish to render
them water-proof. Several small holes must be bored in the
bottom of each box to drain off surplus moisture, and the
boxes and supports may be painted a color to match the
trimmings of the house.
To anchor the boxes, screw a batten to the balustrade, on
which the inner edge of the box may rest. The outer edge
is supported by means of braces attached firmly to the
underside of the box and to the piazza floor, as shown in
the illustration. Two small brackets attached to the underside
of the box and to the batten will hold the box in place
and prevent it from slipping off the top of the batten.
The few objects shown and described in this chapter are,
of course, but a small part of the things a wide-awake boy
will think of and wish to make. The principles involved
in these examples, however, will apply to scores of other
things that may be constructed. Once these simpler forms
of workmanship are mastered the young craftsman will go
forward naturally to the higher exercise of his art. Carpentry
is a fascinating occupation, and it is well worth
while, since its results are of practical use and value.
Chapter II WOOD-CARVING — Tools — A Carver’s Bench — Chip-carving — A Frame for a Small Clock — Some Other Designs — Relief-carving — Mouldings
A knowledge of drawing and modelling will be
most helpful to the young carver, as then the outline
of ornament can be readily drawn, while to carve
objects from wood the art of modelling form is most
desirable.
If the beginner possesses a knowledge of form acquired
by drawing and modelling, the art of wood-carving may
be readily and quickly mastered; but even if these advantages
should be lacking, it is possible that considerable
progress can be made by those who will follow the instructions
given on these pages.
The most important feature of carving is the ability to
sharpen and maintain the little tools, and when this is mastered,
more than half the difficulty has been overcome.
The dexterity to handle, with a firm and sure hand, the
various chisels and gouges comes, of course, with practice
only.
It is better to begin with a soft wood. Pine, poplar,
button-wood, cypress, or red woods are all of close grain
and are easy to work. The harder woods, and those with
a very open grain—such as chestnut, ash, and oak—should
not be carved until the first principles are learned in the
softer woods.
Carving takes time, and it is not an art that can be quickly
mastered, unless it be the chip-and-line variety. But
this last can hardly be compared to the more beautiful relief-carving,
with its well-modelled form and undercutting.
A boy may learn the first principles of carving, using only
his small, flat carpenter’s chisels and gouges; but for more
advanced work he will need the regular carving-chisels.
These latter are sharpened on both sides, while the carpenter’s
chisels are ground on one side only. Nevertheless,
some very good work has been done by boys who had
nothing better than a small gouge, a flat chisel, and a penknife.
The true artist can work in any material and with
the most indifferent of implements.
At the start a numerous assortment of tools will not be
necessary, as the flat work and chip-carving will naturally
be the first department of the art to be taken up by the
young carver.
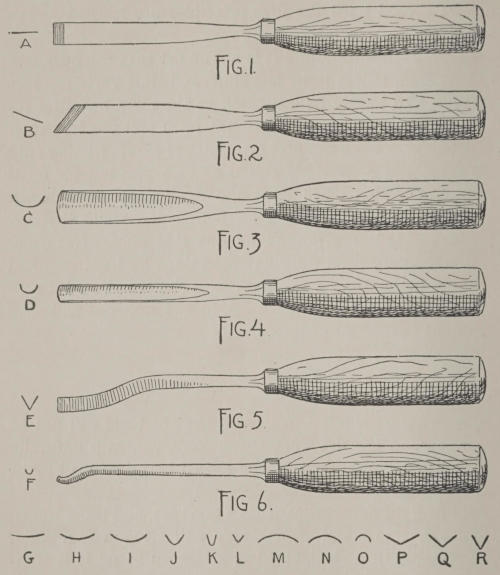
Six or eight chisels constitute a good set, and those shown
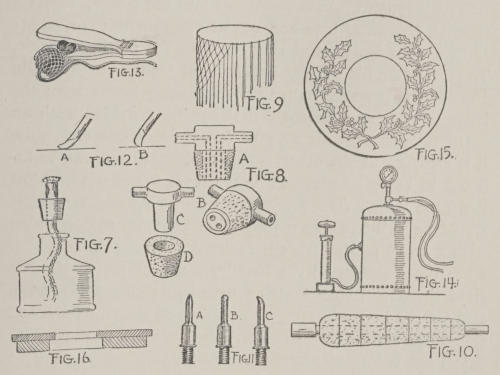
from Fig. 1 to 6 will answer very well. Fig. 1 is a plain,
flat chisel with a straight edge, as shown at A; it is commonly
called a firmer. Fig. 2 is also a flat tool, but possessing
an angle or oblique edge; it is commonly called a
skew-firmer. Figs. 3 and 4 are gouges. Fig. 5 is a V
gouge, and Fig. 6 is a grounder. G, H, I, J, and K are
gouges of various circles. L is an angle, or V, gouge. M, N,
and O are gouges of various curves, and P, Q, and R are
V gouges of various widths and angles. These last are used
for furrows, chip-carving, and lining.
A Fig. 1.
B Fig. 2.
C Fig. 3.
D Fig. 4.
E Fig. 5.
F Fig. 6.
G H I J K L M N O P Q R
A flat felt or denim case should be made for the tools, so
that they may be kept in good order. It is made of two
strips of the goods, one wider than the other. Two edges
are brought together and sewed, and lines of stitching form
pockets for the chisels. The flap left by the wider strip of
goods is folded over the chisel ends, and the pockets containing
the tools may be rolled up and tied with tape-strings.
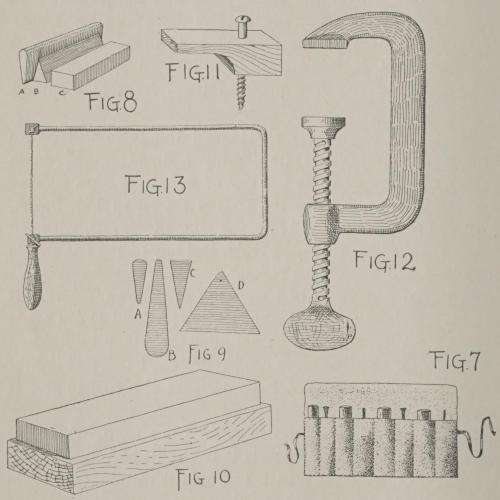
When opened it will appear as shown in Fig. 7. The edges
of chisels kept in this manner are insured against injury
and rust, since the case protects them from atmospheric
moisture.
The stones needed for sharpening the tools will be an
ordinary flat oil-stone (preferably a fine-grained India
stone), and two or three Turkey or Arkansas slips, four or
five inches long, having the shapes shown in Fig. 8. A,
with the rounded edges, is for the gouge tools; B, with the
sharp edges, is for V-shaped tools; and any of the flat chisels
may be sharpened on the regular oil-stone, C.
In Fig. 9 end views of some slips are shown. A and B
are round-edged slips for gouge-chisels; C and D are angle
stones for V chisels; while small, flat tools may be finished
on the sides. These stones are held in the hand, and lightly
but firmly rubbed against both surfaces of a tool to give it
the fine cutting edge.
In Fig. 10 an oil-stone in a case is shown. A boxed
cover fits over it and protects it from grit and dust. This
is important, for often a little gritty dust will do more harm
to the edge of a fine tool than the stone can do it good.
The other tools necessary to complete the kit will be several
clamps, similar to those shown in Figs. 11 and 12, and
a fret-saw (Fig. 13). If you happen to possess a bracket-machine
or jig-saw the fret-saw will not be necessary. A
glue-pot will also be found useful.
The first essential to good, clean cutting is that the tools
shall be absolutely sharp and in a workmanlike condition.
It is often the case that an amateur’s tools are in such a
state that no professional carver could produce satisfactory
results with them. And yet the variety of carving tools is
so limited that if the difficulties of sharpening a firmer and
gouge are mastered the task is practically ended.
If the tools should be unusually dull they must first be
ground on a grindstone, and as carvers’ tools are sharpened
on both sides, they must be ground on both sides. The
firmers may be sharpened on the oil-stone laid flat on the
bench, but the gouges must be held in the hand, in order
to sharpen the inside curve with a slip. The outer curve
can be sharpened on the flat oil-stone, or held in the hand
and dressed with the flat side of a slip. Great care must
be taken to give the tools a finished and smooth edge.
When they have reached the proper degree of sharpness
it will be an easy matter to cut across the grain of white
pine, leaving a furrow that is entirely smooth and almost
polished.
In the use of the oil-stone and slips, neat’s-foot oil, or a
good, thin machine oil, should be employed. Astral oil is
too thin, but the oil sold in small bottles for sewing-machines
or bicycles will answer every purpose. Water should
not be used, as it would spoil the stones, and not produce
the sharp edge on the tools.
The finest stones are the best for use, and although they
take longer to give the keen edge required, they will be
found the most satisfactory in the end. Avoid grit and
dust on the stones, and before using them they should be
wiped off with an oiled rag. The beginner must not consider
any pains too great to make himself thorough master
of the tools, and to keep a perfect edge on all of them.
The tools being in proper condition, the next step is to
acquire a knowledge of the best methods of handling them.
It will require some time and practice to become thoroughly
familiar with the manner in which tools are used,
and, if it is possible, it would be well to watch some carver
at work.
The chisels should always be held with one hand on the
handle, with two fingers of the other hand near the edge
of the tool. This is to give sufficient pressure at the end
to keep it down to the wood, while the hand on the handle
gives the necessary push to make the tool cut.
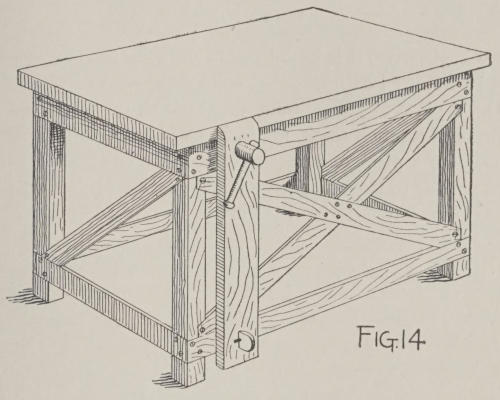
A carver’s bench is a necessity for the young craftsman,
but if it is not possible to get one, a heavy, wooden-top
kitchen table will answer almost as well. The proper kind
of a bench gives greater facility for working, since it is
more solid and the height is better than that of an ordinary
table. Any boy who is handy with tools can make a bench
in a short time of pine or white wood, the top being of hard-wood.
If the joiner-work is not too difficult to carry out, it
would be better to make the legs and braces of hard-wood
also, to lend weight and solidity to the table.
Fig. 14.
The wood should be free from knots and sappy places,
and as heavy as it is possible to get it, so as to make a really
substantial bench. The top should measure four feet long
and thirty inches wide, and not less than one inch and a
half in thickness. The framework must be well made, and
the corner-posts and braces securely fastened with lap-joints,
glue, and screws. The top of the bench should be
thirty-nine inches high, and to one side of the bench a carpenter’s
vise may be attached, as shown in Fig. 14. The
jaw of the vise is seven inches wide, one and an eighth inches
thick, and thirty-four inches long. It is hung as described
for the carpenter’s bench (see Carpentry, Chapter I.). A
wood or steel screw may be purchased at a hardware store,
and set near the top and into the solid apron side-rail.
The posts are four inches thick, and the cross-pieces and
rails should be of seven-eighth-inch hard-wood four inches
wide. The top overhangs the framework two inches all
around, thus forming a ledge, to which the plates of wood
or panels may be bound with the clamps and bench-screws.
Where a clamp cannot be used, a cleat, as shown in Fig. 11,
is screwed fast to the top of the table, and the projecting
ear catches the edge of the wood and holds it securely.
A coat of varnish or paint on the legs and braces will
finish this bench nicely, and it will then be ready for the
young workman’s use.
To begin with, it is best to work on a simple pattern that
can be followed easily.
Fig. 15 A.
Get a piece of yellow pine, white-wood, or cypress seven-eighths
of an inch thick, six inches wide, and twelve inches
long. On a piece of smooth paper draw one-half of a pattern
similar to the one shown in Fig. 15 A; or you may use
any other simple design that is free in line and open in the
ornament. Upon the wood lay a sheet of transfer-paper,
with the black surface down, and on top of the transfer-sheet
the paper bearing the design. Go over all the lines
with a hard lead-pencil, bearing down firmly on the point,
so that the lines will be transferred to the wood. Turn the
design around and repeat the drawing, so that the wood
will bear the complete pattern. Clamp the wood to one
side or corner of the bench with three or four clamps. Do
not screw the clamps directly on the wood, but place between
the jaw and the wood a piece of heavy card-board,
or another piece of thin wood, to prevent the clamps from
bruising the surface of the panel.
First, with a small V, or gouge-chisel, cut the lines; after
that the leaves, using a flat, or spade, chisel. Two curved
incisions will shape out the leaf, and the angle through the
centre describes the main vein. The chipping may be shallow
or deep, as a matter of choice, but more effect may be
had by cutting fairly deep.
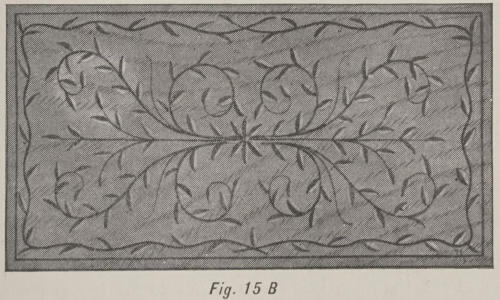
Fig. 15 B.
The finished result will appear as shown in the illustration
of the chip-carved panel (Fig. 15 B). For light ornamenting
or drawer-panels, fancy boxes, and picture-frames,
this form of carving may be made both pleasing and effective.
Moreover, its mastery leads naturally to the more artistic
relief-carving.
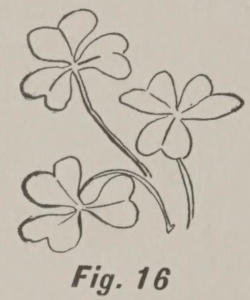
Fig. 16.
Fig. 17.
Get one of the little nickel-plated clocks (sold at sixty
cents and upwards). Lay it down on a smooth piece of
soft wood—pine or cedar—about seven by eight inches.
Mark around it closely with a lead-pencil, and cut out the
circular opening with your knife. If you happen to have
a fret-saw or suitable tools, you can make it of hard-wood.
Smooth nicely with sand-paper. The clock must fit closely
into the opening. You will find Fig. 16 very easy to do.
Cut out the lines, being careful not to let the tool slip
when cutting with the grain. Dilute the walnut stain
with turpentine, and paint the design inside the lines; the
grooves prevent the color spreading. Let it dry. The
next day, with a wad of cotton or piece of canton flannel,
rub on some varnish. Soft wood absorbs it very rapidly
at first until the pores are filled. When quite dry, sand-paper
nicely. Then rub again with varnish, a little at a
time. Keep raw linseed-oil near you in a cup; dip one
finger of your left hand in this when the work becomes
sticky, and apply to the pad; it helps to spread the varnish.
Rub briskly with a circular motion. The varnish
will dry quickly, when it must have a final polish; this
brings out the beauty of the grain. If carefully done,
your work will resemble inlaying.
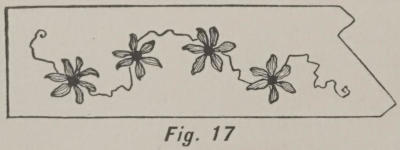
The daisy design (Fig. 17) is charming when finished,
and has the additional merit of being easy. Cut the daisy
form from a visiting-card, and mark around it. Stain the
centre much darker than the petals.
Table-tops, jewel-boxes, calendar frames, chairs, etc.,
may be purchased already polished, and outlined in some
dainty pattern. A finer tool (No. 11, 1/64) comes for this
kind of work. Of course it cannot be stained, but if desired
the background may be stamped with a star-pointed
“marker” to give the design prominence.
These patterns may be adapted for the decoration of
glove-boxes, bread-plates, knife-boxes, stools, blotting-books,
card-cases, match-boxes, music-portfolios, and many
other things, which will sell well at fancy fairs, or be highly
appreciated as presents.
Relief-carving differs from the chip work in that the
ornament is raised instead of being cut in. Solid relief-carving,
such as appears on panels, box-covers, and furniture,
is produced either by cutting the background away
or by carving the ornament separately and then gluing it
onto the surface of the article to be decorated. Of course,
this latter process is only a makeshift, and the first method
is the really artistic one.
It is best to begin with something simple and then go on
to the more complicated forms of ornamental work. A
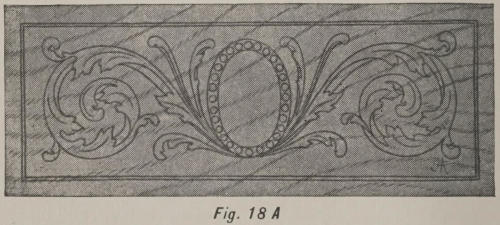
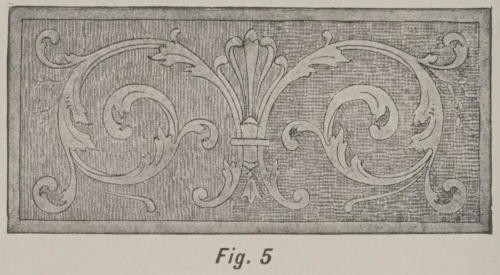
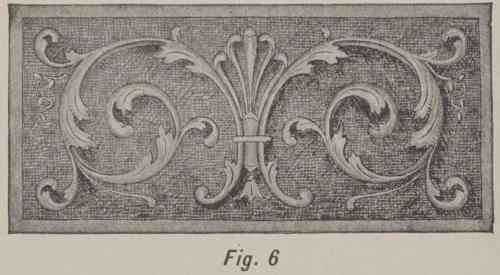
neat pattern for a long panel is shown in Fig. 18 A. This
panel is twelve inches long and four and a half inches wide.
Fig. 18 A.
On a smooth piece of paper draw one-half of the design
and transfer it to the wood, as described for the chip-carved
panel. Clamp the wood to a corner of the bench and, with
a small wooden mallet and both firmer and gouge-chisels,
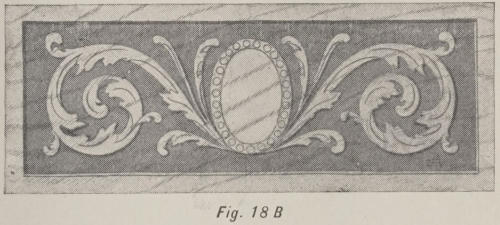
cut down on the lines and into the face of the wood. Then,
with the gouges and grounding-tool, cut away the background
to a depth of one-eighth of an inch or more, until a
result is obtained similar to that shown in Fig. 18 B. The
entire design and edge of the panel will then be in relief,
but its surface will be flat and consequently devoid of artistic
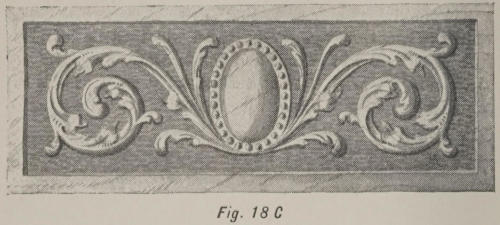
feeling. With the flat and extra flat gouge-chisels begin
to carve some life into the ornament. A little practice
will soon enable the young craftsman to observe which parts
should be high and which should be low. The intermediate
surfaces should be left neutral, or between high and low
relief. This finishing process depends for its effect upon
the good taste and feeling of the craftsman; it is the quality
that gives artistic beauty and meaning to the work. The
panel, when completed, should have the appearance shown
in Fig. 18 C.
Fig. 18 B.
As already stated, the general effect of relief-carving may
be also obtained through the “applied” method, a simpler
and less tedious process, but neither so artistic nor so substantial.
Fig. 18 C.
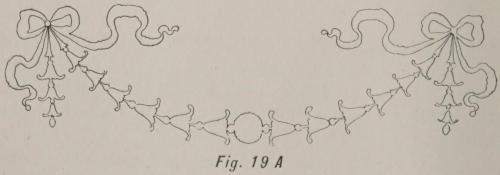
Fig. 19 A.
The design is transferred to a thin piece of wood and cut
out with a fret or jig saw. Fig. 19 A shows a suitable pattern
for this class of work. The pieces are then glued in
position on a thick piece of wood, and the “feeling” carved
in after the fashion already indicated. This “applied”
carving may be used on the panels of small drawers, cabinets,
and boxes of various sizes and shapes. The inventive
boy will be able to design patterns for himself, or they may
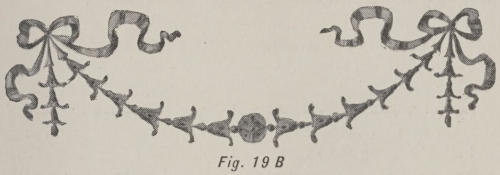
be cheaply bought. Fig. 19 B shows the effect of the finished
work.
Fig. 19 B.
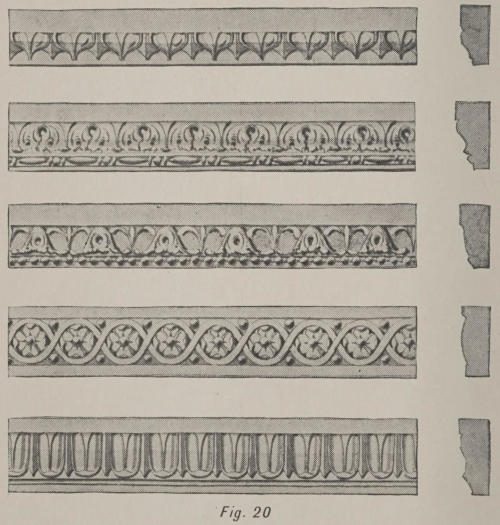
In Fig. 20 some designs are given for carved mouldings,
and at the side, end views are shown.
Plain mouldings of various shapes may also be bought at
a mill, or from a carpenter, and may be given “life” with
a little care and work. Both hard and soft wood mouldings
are available, but at first the softer woods will be found
the easier to work.
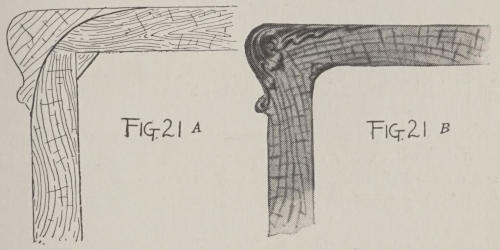
A plain corner on a wooden picture-frame may be built
up with blocks of wood glued on as shown in Fig. 21 A.
When carved this piece will have the appearance of the
finished corner shown in Fig. 21 B. The arms of chairs,
corners of furniture, and the like may be treated in this
same manner.
When flat and relief carving have been mastered, it would
be well to attempt something in figure and free-hand work,
such as animals, fruit, or heads. But it will take a good
deal of practice on the simple and conventional forms before
the amateur will feel himself competent for the more
advanced art. As improvement in the flat work is noticed,
the ornament may be “undercut” to give it richness and
boldness.
Fig. 20.
To finish wood in any desired color, stains may be purchased
at a paint or hardware shop. Over the stained surface,
when dry, several thin coats of hard-oil finish or furniture
varnish should be applied. The back and edges of a
carved panel must always be painted to protect them from
moisture and dampness; warping and splitting are thereby
avoided. Some pieces of carving need only a coating of
raw linseed-oil, while others may be treated to a wax finish
composed of beeswax cut in turpentine, rubbed in with a
cloth, and polished off. Another method of darkening oak
(before it is varnished) is to expose it to the fumes of ammonia,
or to paint on liquid ammonia, with a brush, until
the desired antique shade is obtained. The staining process,
however, is preferable.
Fig. 21 A.Fig. 21 B.
Chapter III FRETWORK AND WOOD-TURNING — The Tools — The Practice of the Art — The Preparation of the Work — A Match-safe — A Wall-bracket — A Fretwork-box — Some Other Designs — Wood-turning
Nearly every boy has had, at one time or another,
a desire to make scroll-brackets, fretwork-boxes, and
filigree wood-work of various sorts. The art is naturally
affiliated with other decorative processes in wood-working,
such as wood-turning, carving, and marquetry, or the art
of inlaying woods. Both fretwork and wood-turning are
very old crafts, and were practised by the ancient Egyptians,
specimens of their work being still extant.
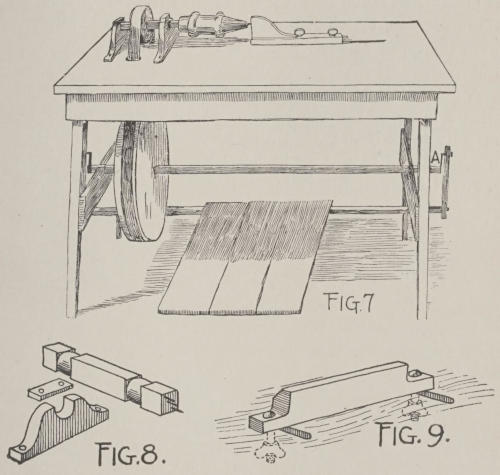
A great deal of amusement and pleasure may be had in
the possession of a scroll-saw, or “bracket machine,” as
it was commonly known among boys some years ago.
And first, as to the implements required.
To those who can go to the dealer and pay for just what
their fancy dictates, there is no trouble to procure all the
tools that may be needed for the finest work; but others
who cannot afford this luxury may get along nicely with a
very small outlay. In fact, in nearly every instance known
to the writer where the amateur has really rigged up his
own machine, he has become master of the art sooner. A
number of years ago the writer, then a school-boy, transformed
an old sewing-machine table into a scroll-saw and
lathe, and to-day this homely old stand and crudely put
together machine does as good work, with as little effort, as
the finest and most expensive outfit. This machine, all
complete, with the drilling attachment, cost: old machine,
one dollar; dozen saws, assorted, twenty-five cents; new
material, rivets, etc., sixty-five cents; drills (still in use),
fifteen cents; total, two dollars and five cents.
This money was saved from building fires and taking up
ashes, and the first time the saw was run—one cold, stormy
day in late November—there was cut up material which,
when put together and sold (playmates and school-fellows
being the customers), amounted to over three dollars in
cash, besides a few pocket-knives, bits of rare wood, and the
like that were taken in exchange.
Making a fine scroll-saw from a sewing-machine is of itself
an easy matter. The balance-wheels should be retained,
in order that all back lash can be easily overcome.
The two arms holding the saw are to be geared from some
wheel in the rear or connected with a belt. If the wrist-pin
(the crank, or pitman wrist) gives too long a motion,
it can be easily taken up by either drilling another hole
nearer the centre or using a bent crank-pin. In any event
the cut should not be over one inch.
Another method of shortening the stroke (and a very
good one if the means of making the other changes are not
at hand) is by changing the bearing of the arm. The nearer
the saw the shorter the stroke. The clamp-screws holding
the saws should be adjustable, so that either a long or a
short saw-blade may be used. Those who break their
blades (and there are none who do not) will find great
economy in using adjustable clamps, as the short pieces
can be used for sawing thin stuff, veneers, and the like.
The best kind of clamp is provided with a slit to receive the
blade and a set-screw for tightening.
The tools necessary for hand-sawing are very simple and
inexpensive, consisting of a wooden saw-frame, one dollar;
dozen saw-blades, twenty cents; one clamp-screw, twenty-five
cents; drill and stock, fifty cents; total, one dollar
and ninety-five cents.
In selecting saw-blades be careful to buy only those with
sharp and regular-cut teeth. Saws are graded by number
for hand-sawing. Numbers 0 and 1 are the best sizes, unless
for very delicate work, when finer ones should be used.
The larger blades have coarse teeth, which are liable to
catch in the work and tear it. Since, at the best, the motion
of the hand-saw is jerky, not nearly so nice work can
be done as with the treadle-saw, which has an even, steady
gait.
For all open-work it is necessary to have something to
punch holes, so that a start may be made on the inside.
Many use an ordinary brad-awl, but this is liable to split
the wood. Besides, it is not possible to punch a hole so
smooth and nice as it can be drilled or bored; hence, a drill
is included in the list, and it will be found a very handy
tool for either hand or treadle saws. The most serviceable
article of this kind is the small German drill-stock, that
can be bought with six drill-points, assorted sizes, for fifty
cents, or the small hand-drills, with side wheel and handle,
and provided with a small chuck to clutch the drill.
From what I have said, it should not be inferred that
any objections are made to any of the beautiful little machines
now to be bought at moderate cost. By all means,
when the expense can be afforded, these should be used.
The good ones will do the most delicate work, can be run
with great ease, and will cut from eight to twenty pieces
at a time, according to the thickness of the wood, leaving
the edges of the work perfectly smooth. In using treadle-machines,
insert the saw-blades with the teeth pointing
downward and towards the front of the machine, and guide
the wood easily with the fingers, with the wrists resting
firmly on the table, being careful not to feed too fast or
crowd against the saw sideways. Otherwise the blades will
be heated and broken, and they will wear away the little
wooden button set at the centre of the plate to prevent the
saw from touching the metal work-table.
Most boys know how to run a scroll-saw, or think they
do, yet a few practical hints should not come amiss.
To begin with, the machine should be well oiled, all
nuts, screws, and bolts turned up tight, and the belts adjusted
at sufficient tension to run at a high rate of speed
without slipping. Many machines, even in large mills, are
groaning and filing out their journals and bearings simply
because the belts are too tight. One of the first principles
to be mastered in applied mechanics is that of power transmission,
and right here the young workman has the best of
opportunities to solve, in a measure, a great mechanical
problem—namely, a belt tight enough to drive the machine
and do the work, and loose enough to run easy and cause
no unnecessary friction or wear on the journals and boxings.
For your first practice take some cigar-box wood (of
which a good stock should be kept), and trace upon the dark
sides a series of angles and curved lines. Never, under any
circumstances, begin sawing without a tracing, or a pattern
of some kind, to saw to, for now is the time to cultivate
habits of accuracy. With no design or objective-point,
nothing but a bit of useless board will result; besides, you
will form a habit of working without a guide, a habit that
has made more poor artisans than the love of idleness and
bad company. Lay the wood on the rest, or plate, and
see that it lies solidly. If it shakes, the wood is uneven
and should be straightened, for no one can saw a warped
board and make accurate work; besides, it is impossible
to work in such wood without breaking the saws. The
wood being level, hold it down with the left hand, fasten
securely a No. 1 blade in the frame, and begin sawing, being
careful to keep the motion very high and feeding slowly,
sawing out the tracing lines, or keeping close to one side of
them. If an ordinary hand-frame is used, work it firmly
in one direction, keeping the blade perpendicular, and turning
the wood so that the saw may follow the pattern.
After you have thoroughly learned the motion of the
machine, the cutting of the saw, feeding, etc., try sawing
a straight line, being careful not to push or crowd the blade
sideways, as this will not only make the lines crooked, but
will heat and ruin the blades, if it does not break them.
When you have become an adept in following a straight
line, and cutting the lines of a curve accurately, mark out
several Vs and squares. To saw a V begin at the upper
end and saw down to the point; now back the saw out, and
saw from the other end down to the same point. If the
line is carefully followed, this will insure a sharp, clean-cut
angle. To cut out a square hole, saw down to the angle,
then work the blade up and down in one place rapidly
until it becomes loose; then turn the wood at right angles
and saw carefully along the line to the other corner, when
the operation may be repeated. Just as soon as you can
saw straight and curved lines true to tracings, it is safe to
begin good work with little if any fear of spoiling lumber or
breaking an undue number of saws.
One of the simplest objects for a beginner to try his skill
upon is a wall-bracket such as shown in Fig. 1. A piece of
cedar—the bottom and lid of a cigar-box will answer the
purpose excellently—from seven to eight inches in length
by six and a half in width is a convenient size. The shelf
is a semicircular piece either plain or scalloped in front, and
its support must be of light, open, but strong design to
match one-half of the lower design to the wall-plate. Hinges
are sometimes placed to all parts in order to make it easy
to pack the bracket. But such additions can only be made
by the expert craftsman.
The first thing to be done is to trace the design on a thin
piece of paper after it has been drawn roughly on a smooth
sheet of brown paper. When the tracing is complete, lay
it face downward, and cover it with powdered red chalk.
The tracing is then imposed on the wood, with the red side
downward. With a blunt bodkin or lead-pencil we now
draw firmly along the lines, thus reproducing the tracing
on the surface of the wood. Having accomplished this, we
remove the paper, and with pen and ink make a complete
drawing of the outlined design on the wood.
In designing fretwork great care must be taken to get
the two sides of the pattern alike and in correct drawing.
This can best be done by drawing the design on tracing-paper,
and doubling it over when, with a little extra pressure
of the pencil, a good design can be obtained on both
sides of the paper.
When this has been accomplished pierce the wood at
various points with a drill. The holes thus made are to
allow the saw to enter. The wood may now be put in the
clamp. Then with a moderately strong saw the young beginner
can make his first attempt. The frame must be
held perfectly straight and the arm worked steadily up
and down.
Turning the saw is always a difficult point with amateurs,
but in reality there is but little in the operation that
cannot be mastered with a few moments’ practice. The
secret of turning neatly and without damaging either saw
or wood is to work very steadily up and down, but not forward,
when the turning-point has been reached. Then by
a sharp and active movement of the wrist and wood the
saw should be turned, but not jerked, and the new line
commenced. Sometimes, however, the delicacy of the pattern
makes this impossible. The saw should then be pulled
backward and forward gently until a sufficiently large hole
has been made.
It is impossible, within the limits of this chapter, to give
designs for any considerable number of the articles that can
be made in fretwork; but with the descriptions just given,
and the few accompanying patterns, a boy who has any
idea of drawing and designing can put parts of an ornament
together and so work out new and attractive variations.
Fig. 1.Fig. 2.Fig. 3.
The design for a match-safe is shown in Fig. 2, the wall-plate
measuring two inches and a half in width and seven
inches high. One side of the pattern should first be drawn
in free-hand, then traced and transferred to the thin wood
and the lines gone over with a sharp-pointed, hard pencil,
so that it will be an easy matter to see them when sawing.
The front plate of the match-safe is shown at B and one
end at C. The front is two and a half inches long and one
inch wide, and the ends are made in proportion, or about
seven-eighths of an inch wide. These parts are put together
with slim steel nails and glue, having first drilled
the holes where the nails are to be driven to prevent them
from splitting the wood.
Most of the modern scroll-sawing machines have movable
beds, so that bevel cuts can be made. This is done by
tilting the bed or table slightly, as shown in Fig. 3. As a
result the work will have a narrower face than the back, as
shown at the right side of the bracket in Fig. 1. However,
in making the front, or bracket part, there should not be
any bevel-cutting, since it would look one-sided. Keep
the bed flat in that case, and make the regular cuts for
straight work.
The simple bracket shown in Fig. 1 is an easy one to
draw, and it may be cut from holly, birch, oak, or any good
wood about one-eighth of an inch in thickness. The bracket
or front-piece is half the back-plate, omitting the top ornament.
The shelf (A) may be rounded, scalloped, or cut
serpentine, as indicated by the dotted lines, and the three
parts are put together with fine nails, or screws, and glue.
For a glove or necktie box an attractive design is shown
in Fig. 4, A being the top and B the front or back. The
ends should be made a proportionate size, and a part of the
traced ornament can be transferred to them, so as to match
the other parts.
A GLOVE-BOX AND A T BRACKET
Fig. 4.Fig. 5.Fig. 6.
A good size to make this box will be ten inches long, five
inches wide, and three inches deep. This should be the
size of the main rib or rectangle in the top, and out from it
the scallops project three-quarters of an inch all around.
Lay out one-quarter of the cover design on a piece of
smooth paper; then make a tracing of it. With a piece of
transfer-paper this quarter should be gone over with a blunt
lead-pencil, so that the lines will be transferred to the wood.
Take care when making a transfer to see that the quarter
has been accurately placed on the wood so that a perfect
rectangle will be had.
Put this box together with glue and small, slim nails,
and arrange a bottom of thin wood to fit where the lower
cross-rib of the sides is shown. If the saw leaves ragged
edges at the reverse side of the wood, they may be cleaned
off with fine sand-paper or a small file.
Another design for a bracket is illustrated in Fig. 5; and
in Fig. 6 a T is shown that may be used for a bracket or a
wall-hanger, along the top edge of which small hooks may
be arranged to hold a shoe-horn, button-hooks, scissors,
and other small bedroom accessories.
The common examples of wood-turning with which a boy
is most familiar are tops, balls, bats, dumb-bells, Indian
clubs, broom-handles, and spools. All of these objects are
made in a lathe, and this is the self-same machine that has
been in use for centuries, with but few modifications. Like
the potter’s wheel, it is simplicity itself and needs no improvement.
The object of a lathe is to cause a piece of wood or other
material to revolve from end to end, so that when a chisel
or other sharp-edged tool is held against the moving surface
it will cut away that part of the material at which the
tool is directed.
The boy who lives near a wood-working establishment,
or mill, can gain more knowledge in watching a wood-turner
at work for half an hour than he can learn from reading a
book on the subject for many days. It is a simple craft,
but a firm hand and a true cut are the important factors
in making a boy a master of the lathe.
Once the knowledge is gained, however, it is an easy
matter to turn all sorts of objects.
A simple lathe may be made from a small table, a grindstone,
a trunk-strap, and several small parts that are easily
gotten together. Read how in his boyhood days the author
constructed a small lathe.
Between the legs of a table two bars were nailed across
for supports to the shaft, which was made of oak and measured
three feet long and one inch square. This just fitted
the hole in a grindstone that was used for the balance-wheel.
Six inches from the ends of the shaft the corners
were cut away to form bearings on the cross-bars, which
were hollowed out to receive it. A leather strap was nailed
over to keep it in position. The grindstone was next placed
on the shaft, near one end, between the bearings, and wedged.
Over it two brackets, four inches high, were screwed in position
on the table top, six inches apart, forming a support
for a shaft of a small wheel or pulley made of wood. In
the end of an ash shaft, one inch square and eight inches
long, were three sharp points made by driving in nails without
heads, the projecting ends being filed to points; these,
forced against the block, held one end firmly enough to
turn. The places where the bearings came were cut in the
form of a cylinder three-quarters of an inch in diameter,
and corresponding places were hollowed in the supports
(as shown at Fig. 8) to receive it, a small piece of wood being
screwed on over each, after the shaft and wheel were put in
position.
A belt was made of an old trunk-strap, passed round the
grindstone and through two holes in the table over the little
wheel, causing the latter to revolve very rapidly when
the former was turned. This was done by a treadle put
in the following manner: Two cranks were made (A in Fig.
7) by a blacksmith and attached to the ends of the long
shaft. They were three inches long and had a knob on
the end of the handle to prevent the connecting-rods from
slipping off. The latter were of hard-wood, with a half-inch
hole bored through near one end. They were then
split six inches, allowing them to be placed on the handles.
A screw was then put in to secure them, the lower ends
being connected with a treadle made as in Fig. 7.
Fig. 7.Fig. 8.Fig. 9.
The second spindle at first was made immovable by inserting
a piece of quarter-inch wire in a wooden bracket,
which was screwed to the table; but finding it not always
convenient to use blocks of the same length, one was arranged
to slide; it could be secured in any position with
thumb-screws. A long cut a quarter of an inch wide was
first sawed in the table in the line of the short shaft; then
a bracket three inches high was screwed to a short strip
two inches wide, one inch thick, and a foot long. A similar
strip was placed beneath, through which two thumb-screws
passed. A piece of wire, filed to a point and driven in
the bracket, served for a centre. A movable block of
wood three and a half inches high was used for a tool rest,
which by means of two small bolts and thumb-screws was
held fast to the table top. Slots cut in the table top made
it possible to move this rest forward or backward, and the
thumb-screws, or winged-nuts, as they are properly called,
were tightened at the under side of the table, as shown at
Fig. 9.
A great deal of pleasure may be had at little or no cost
with a lathe of this description. All sorts of small things
may be turned, and when a boy has mastered the craft it
would be well to add an iron lathe to his stock of tools, if
the cost is at all within his means.
Chapter IV PICTURE MOUNTING AND FRAMING — A Dutch Head Mounting — A Dark Card Mounting — A Triple Mounting — Plain Framing — A Sporting Mount — A Round-robin Mounting
The modern idea in framing pictures is to have the
frame harmonize with the subject, rather than to
employ a stock moulding with set pattern made by the
mile, and cut up into frames of all sizes and for all sorts
of pictures. All the frames shown in the illustrations accompanying
this chapter were made at home, and from
such simple materials as thin boards, burlap, tea-chest
matting, denim, wire, sheet-lead, harness-rings, and brass-headed
upholsterers’ tacks.
For the study of a Dutch head a unique frame, or mounting,
is shown in Fig. 1. This is a board of thin wood of a
size in proportion to the photograph, the latter being nailed
to the board with large, oval-headed tacks painted black.
The board is covered with green denim, the edges of which
are drawn over the back of the board and glued, or fastened
with small tacks. The photograph, a platinum print, is
trimmed to an oval, and then mounted on a white card.
When the paste is dry the mount is also cut ovalwise, following
the line of the photograph, and leaving a white margin
half an inch in width. The picture is placed on the
board so that the side and top margins will be equal; it
is then fastened in place with upholsterers’ tacks driven
three-quarters of an inch apart.
Fig. 1.Fig. 3.
These nails, as well as the other metal-work, are to be
coated with a mixture of dry lamp-black and shellac before
they are driven on the board. The nails should be painted
some time before they are to be used, so that the black
coating will be thoroughly dry. After the nails are driven
in place it may be necessary to go over them with a small
brush and some of the black paint, to touch up places where
the coating has chipped off.
The ornament below the picture and the hanger-straps
are cut from sheet-lead about one-sixteenth of an inch in
thickness. The stems are of ordinary iron wire, such as
may be purchased at a hardware store for a few cents.
Each piece of the design is separate, and may be easily
cut from soft lead with an old pair of shears, and afterwards
trimmed with a pocket-knife or a small file.
Drawings of the metal parts to this frame are shown in
Fig. 2. A is the strap at the top, where the hanger is attached;
B, the scrolls forming the hanger; C, one of the
buds at the top of the stem of wire; D, the flower at the
middle of the frame under the picture; E, one of the long
leaves; and F, a shorter curved one. These are all painted
black before they are applied to the board; then they are
caught with large and small nails, the large ones for effect,
the small and invisible ones to securely attach the metal
ornaments to the wood.
Small staples made from pins with the heads cut off are
used to hold the wire stems in place, but at the outer ends
the wire is caught under the buds or flowers, where it is
held in place with an upholsterer’s tack.
The ornamental hangers are made from thin strips of
stove-pipe iron one-quarter of an inch wide, and may be
shaped with a small pair of pliers or bent with the fingers.
(See Chapter V., Venetian and Florentine Metal-work.)
The long upper part of the strap-pieces are bent over
and caught at the back of the frame, and form a staple,
into which the lower loop of each hanger is made
fast.
If the large, oval-headed nails which hold the picture to
the board cannot be had at your hardware store, imitation
heads may be cut from lead, blackened, and fastened
on with two or three fine steel-nails.
The mounting shown in Fig. 3 is constructed along the
same lines as that of Fig. 1, but the hangers are different,
and the picture, having a white edge, is mounted on a dark
card. The nails are then driven on the white band, in
order to make them more conspicuous than they would be
if fastened on the outer margin.
A line may be drawn on a piece of smooth brown paper
indicating the size of the frame, and another one to denote
the location of the picture. The design should then be
drawn on the paper with lead-pencil, and the little flowers,
buds, and leaves fitted to this plan. The wire may also be
bent to conform to the lines of the drawing, so that it will
be an easy matter to apply the accurately fitted parts to
the frame, where they are fastened with small, oval-headed
tacks.
A strip of sheet-lead five inches long and one-half an
inch wide is cut V-shaped at the bottom, and the top is
bent over a two-inch harness-ring, then drawn down and
fastened with a nail, to prevent it from releasing the ring.
These hangers are fixed at the top, midway between the
picture and the outer edge of the frame. Large-headed
wrought-iron bellows-nails are used on which to hang the
picture; they are driven into the wall, and, when necessary,
the picture may be removed from them by simply
lifting the rings over the nail-heads.
Fig. 4.
The long panel effect shown in Fig. 4 is a simple and
pleasing mounting for small photographs, or colored prints.
A board is covered with ordinary burlap, which is drawn
over the surface and tacked at the back; apparently it
is held in place by the large, oval-headed tacks driven
all around the outer edge. A card-mount the size of the
photograph is cut away at the middle, leaving the outer
edge about half or five-eighths of an inch in width. This
is laid over the photograph, and through it the nails are
driven which hold the photograph and the frame to the
board. The scroll-hangers at the top and the nail-head
decorations add to the artistic appearance of this frame.
For etchings, water-colors, or colored photographs and
aquarelles, where a wide mat is desirable, plain narrow
frames should be used. These may be made from moulding
with the rabbet cut in by machine, but the boy craftsman
may use flat rails and make his own rabbet.
First cut the joints with a mitre-box and saw; then with
glue and slim nails a good union is made, as shown at Fig.
5, the dotted lines representing the long, slim nails. If a
lap-point is preferred to a mitre, both ends of the flat rails
should be cut away, as shown at Fig. 6, the union being
made with glue and short screws driven in from the back
of the frame, taking care, however, not to puncture or deface
the face of the frame. Where a rabbet is to be made
at the back of a frame, the front inner edge should be bevelled,
as shown at A in Fig. 7, so that there will not be
too great a thickness of wood close to the glass. A quarter
of an inch out from the inner edge of the frame fasten
four square sticks with glue and small nails. These sticks
should be three-eighths of an inch square, and mitred at
the corners, as shown at B in Fig. 7. The glass can then
lie on the back of the frame within the space described by
the small sticks, and over it the picture and back-board
are placed, the nails being driven in to hold them in place.
Fig. 2.Fig. 5.Fig. 6.Fig. 7.Fig. 8.Fig. 9.
For a picture in which horses are prominent, such as a
race, a group of horses’ heads, or a driving scene, an appropriate
frame is suggested in Fig. 8.
The frame proper is made from narrow strips of wood,
the face of which is studded with oval-headed nails. This
frame is then arranged on a large board, and at the corners
blocks, or separators, are fastened, which will cause the
frame to stand away from the large board for half an inch
or so, in order that the stirrup-strap and the whip-handle
may pass under it, as shown at A in Fig. 8.
The frame is hung by means of large harness-rings caught
at the top of the frame with leather straps. These are carried
about the back-board and buckled at the front. The
stirrup is suspended from the lower middle part of the
frame on a strap, which is caught about the back-board
and runs under the small front frame.
Dark Flemish oak for the back-board, russet straps, and
brass buckles will make a pleasing combination; and if the
picture is a colored one, it will add greatly to the effect of
the complete mounting.
For one large head-picture and a number of small ones
a novel scheme for mounting is shown at Fig. 9.
This is a one-piece barrel-head covered with burlap or
denim. The photographs are cut circular and mounted on
heavy white or cream-colored card-mounts, then trimmed
so that a margin half an inch wide will be left all around.
These are to be applied to the barrel-head with oval-headed
upholsterers’ nails, as suggested for Fig. 1. The hangers are
made from thin strips of iron, and should be as long as half
the diameter of the board.
Part II METAL-WORKING
Chapter V VENETIAN AND FLORENTINE METAL-WORK — A Lamp-screen — Pattern-making — A Standard Screen — A Candlestick — A Candelabra — A Fairy Lamp — A Burned-match Holder — A Photograph-frame — A Handkerchief-box — A Sign-board — Double Doorway Grille — A Moorish Lantern
In Italy, many years ago, there originated the pretty
household art of making small objects from metal strips
bent into graceful curves and scrolls, and then banded together.
During the past few years American and English
boys have taken up this Venetian and Florentine metal-work,
and to-day the materials may be purchased at hardware
stores in all the large cities.
The tools required are a pair of flat and a pair of round-nosed
pliers, or pincers, a pair of heavy shears, and a pair
of wire-cutters; a small bench-vise will also be useful.
The materials include a few sheets of thin stove-pipe iron
of good quality (it may be purchased from a tinsmith),
several yards of fine, soft iron wire, and some heavier wire
for framework.
From the sheets of iron narrow strips are to be cut with
the shears, and for ordinary work they should be not more
than three-sixteenths of an inch in width; for heavier or
lighter work the width may be varied. If it is possible to
obtain the prepared strips at a hardware store, it will be
better than making them at home, since it is a tiresome task
to cut many of the strips from sheet-iron. Soft, thin iron
that will bend easily is the only kind that is of use, as the
hard or brittle iron breaks off and it is impossible to bend
it into uniform or even scrolls.
A little patience and perseverance will be necessary at
first until the knack of forming scrolls has been mastered,
but once learned it will then be an easy matter to make
many pretty and useful objects.
An attractive design for a lamp-screen is shown in Fig.
1 A. When completed and backed with some pretty material
it will be found a useful little affair to hang against
the shade of a lamp to shield one’s eyes from the direct rays
of a bright light.
To begin with, form a square of six inches, and at the
top where the ends meet make a lap-joint by allowing one
end to project over the other; then bind them together with
some very fine wire—about the size that florists use. Inside
of this square make a circle six inches in diameter, and wire
it fast to the square where the sides, bottom, and top
touch it.
Bend four small circles, and fasten one in each of the four
angular corners between the circle and square; then form
the centre scrolls and the hoop in the middle of the screen.
To form a scroll like that shown in Fig. 1 bend a strip
of metal in the form of a U, as shown in Fig. 2, and with
the round-nosed pair of pliers begin to curl one end in, as
shown in Fig. 3. When it has been rolled far enough in
to form one side of the scroll, it will appear as shown in
Fig. 4. By treating the other end in a similar manner the
finished result will be a perfect scroll like Fig. 1. Four of
these scrolls are to be made and banded to the circle and
to each other, and in the centre the hoop must be made
fast with little metal bands.
When uniting or binding two strips of metal together
they may be fastened with wire or bands, as a matter of
choice. If the latter mode is employed, short pieces of the
metal strips are to be cut and partially bent in the form
of a clamp, as shown in Fig. 5. Bring the two sides together
and bend one ear of the clamp over them (Fig. 6),
and if the other ear is the proper length, bend that down
in place, and squeeze all together with the flat-nosed pair
of pincers. The perfect joint will then appear as shown
in Fig. 7. When using metal clamps the ears should be of
such a length that, when pressed down over the united strips
of metal, the ends will just come together and not overlap.
Having made the body part of the screen, form the scrolls
of the top, and bind them in place with wire or the little
metal clamps. This top should measure some three inches
high from the top rib of the screen, and the end scrolls
should project about three-quarters of an inch beyond the
body of the screen at either side.
For the sides and bottom form a frill of metal and fasten
it to the screen with wire; it should not be more than three-eighths
or half an inch in width, and can be bent with the
round-nosed pincers and the fingers. Better wear gloves
for this part of the work.
When the metal-work is finished it will be necessary to
coat it with black paint to improve its appearance and prevent
its rusting. There are several good paints that may
be used for this purpose, but if they are not easy to obtain
an excellent coating may be made by dissolving a little
shellac in alcohol and adding dry lamp-black so it will
be about the consistency of cream. It should be applied
to the metal with a soft brush, and if it should become too
thick it may be thinned by adding alcohol.
Two thin coats will be all that are required for ordinary
purposes, but if the metal-work is exposed to the weather,
or any dampness that might cause it to rust, a coat of
red lead should be applied next the iron. Red lead can
be mixed with boiled linseed-oil to make a good metal
paint.
A backing of some pretty, light-colored silk is required
to complete the screen, using one, two, or three thicknesses
to properly shield the light. The backing should be attached
to the grille, or framework, with black silk, and it
may be cut to fit either the round or square portion of the
framework. The stitches should be close together, to prevent
the goods drawing away from the metal ribs.
When constructing any piece of grille-work it is always
best to have a full-sized drawing to work over. For example,
it is a simple matter to lay out the plan for Fig. 1 A,
and you may proceed as follows: Pin to a lap-board a
smooth piece of heavy brown paper, and with a soft pencil
draw a six-inch square. Inside this describe, with a compass,
a six-inch circle; then draw the four corner circles,
and divide the larger Circle into quarters. In each of these
quarters draw, in free-hand, the scroll shown in Fig. 1 A.
The top is to be drawn in free-hand, but if it is difficult to
get both sides alike you may first draw one side; then
double the paper, and transfer the design by rubbing the
back of the paper. It will then be found an easy matter
to bend and fit the scrolls, since each member may be accurately
shaped to conform to the lines, and afterwards
banded together.
For a standard screen in the shape of a banner the design
shown in Fig. 1 A may be used, leaving off the top
ornament, and suspending it from the upper end of a supported
stick with cord or wires, as shown in Fig. 8.
The stick should be about eighteen inches high, and the
scroll feet should stand seven inches and a half up from
the bottom. At the widest part they should measure six
inches across, and there should be four of these feet to constitute
a stable base. At the top of the stick (which should
be about one-quarter of an inch square) a scroll and a hook
will serve to support the screen. In a library or sitting-room,
where one large lamp is used to read by, one or two
banner-screens will keep the strong light from the eyes
and the heat from the head without cutting off the needed
illumination from the book or work in hand.
The illustration shown in Fig. 9 gives a pleasing pattern
for a small-based candlestick.
A STANDARD SCREEN AND A CANDLESTICK
Fig. 8.Fig. 9.Fig. 10.
To begin with, secure an old tin or brass candlestick
and rip off the bottom, leaving only the sheath and collar
at the top. Have a tinsmith cut the lower end away, leaving
about two inches of the top, and solder a bottom in it.
Cut a pine stick about four inches long and not more than
three-sixteenths of an inch square, or the same thickness as
the width of the metal strips from which the scrolls are to
be formed. Punch a small hole in the bottom of the socket,
and drive a slim steel-wire nail down through it and into
the middle of one end of the stick, so that the attached
pieces will appear as shown in Fig. 10. The socket will
hold a candle, and the stick will act as a centre staff against
which the four scroll sides are to be fastened.
A paper pattern should be used over which to bend the
scrolls, and across the bottom they should measure four
and a half inches, and five or six inches high. To the upper
part of one side-scroll a handle should be shaped and fastened,
as shown in Fig. 9.
The design for a four-armed candelabra to hold five candles
is shown in Fig. 11.
Cut two sticks a quarter of an inch square and ten inches
long, another one thirteen inches long, and a short piece
two inches long. At the middle of the ten-inch lengths
cut laps, as shown in Fig. 12, and bore a hole through the
centre and into an end of the long stick. Drive a slim nail
down into the hole at the end of the stick, as shown in Fig.
13, and over it place the cross-arms, as shown in Fig. 14.
In one end of the short stick bore a hole, snug it over the
top of the nail, and drive it down so that it will fit securely
on top of the cross-sticks. The completed union will have
the appearance of Fig. 15, and to this wood frame the scroll
and ornamental work is to be attached.
A CANDELABRA
Fig. 11.Fig. 12.Fig. 13.Fig. 14.Fig. 15.Fig. 16.
Lay out the plan of one side on paper, making the distance
from the stick to outer edge of the foot about four
and a half inches. At the narrowest place, near the top,
the side should measure one and three-quarter inches in
width. The scrolls should be securely bound to the wood
frame with wire, and for candle sockets five six-pointed stars
should be cut from the pattern given in Fig. 16. They
should be two and a half inches in diameter, and bent to
receive a standard-sized candle. A small screw passed
through a hole in the centre will fasten them to the wood
arms, and when placing them the wood should extend entirely
under each socket, as may be seen in Fig. 11.
Canopy shades and holders should be made or purchased,
and when complete with candles and shades this candelabra
should present a very pleasing appearance.
It will be found quite a simple matter to make a fairy
lamp similar to the one shown in Fig. 17.
The bracket should be twelve inches high and five inches
wide from the back stick to the end of the projecting arm,
on the end of which the suspending hook is located. The
arm should be placed about three inches from the top, and
both the arm and the upright are to be of wood one-quarter
of an inch square. It would be well to make a pattern of
the scroll-work over which to bend the metal in true shape.
The scrolls should be securely bound to the wood ribs
with wire instead of metal clamps, since the weight of the
candle-sconce would have a tendency to open the clamps
and weaken the support.
For the lamp part, it will be necessary to have the socket
of a candlestick arranged as described for the candlestick in
Fig. 9. The stick at the bottom should be one and a half
inches in length. Against this the scroll-work is attached.
Each side should measure two and a half inches long and
three inches high from the place where the suspension-wire
is attached to the bottom, where the pendants are
fastened. The four scrolls must be securely bound to the
socket and stick with wire, and from a screw-eye driven in
the lower end of the centre stick three drops, or pendants,
may be hung. These pendants are in the shape of bell-flowers,
and may be of any size, cut from the diagram shown
in Fig. 18. They should be strung on a wire having a knot
made in it wherever it is desired to place a flower.
From the scroll ends of each side-grille a wire is fastened
and carried up to a ring that hangs on the arm-hook. These
wires form a light and graceful mode of suspension, and
near the upper end a canopy shade can be made fast. Pink
red, orange, light-green, or electric-blue candles and shades
always look well with the black iron-work of the bracket and
sconce.
Fig. 19 gives a design for a small receptacle to be used for
burned matches or other small waste scraps.
Notice that the drawing shows but one side of a three
or four sided affair. The outside frame should measure
about three inches across at the top, two inches at the bottom,
and two and a half inches high.
Small hooks should be fastened to each upper corner.
From them small chains extend up to a single ring that
may be of wire; or a small iron harness-ring may be employed
for the purpose.
The three or four sides forming the receptacle are to be
securely bound together with wire, and for a bottom a
thin piece of wood or a sheet of light metal can be sewed in
with wire. Whether the bottom is of metal or wood, it
will be necessary to make small holes around the edge
through which the fine wire can be passed. The wire
should be caught around the bottom ribs of the sides, and
manipulated in much the same manner that cloth is attached
with needle and thread.
Each side should be backed with silk or other pretty
material, and to prevent burning or blackening from match
ends the entire receptacle may be relined with card-board,
tin-foil, or asbestos paper.
The links forming the chain are made of very narrow
strips of the metal. Fig. 19 A shows the construction of
the centre, and B that of one side. Two of the latter are
to be made for each link and banded to the centre, so that
a finished link will appear like C in Fig. 19. The links
should be connected with little wire rings, or small brass
rings may be purchased at a hardware store. The latter,
when painted black, will appear as if made of iron.
Fig. 17.Fig. 18.Fig. 19.
This same design can be carried out on a larger scale,
and adapted as a hanging jardinière in which a potted
vine may be placed. If employed for that purpose, an
outlet for the water must be provided in the bottom. Instead
of using a clay flower-pot, it would be well to have a
tinsmith make a zinc inner box, with a small pipe through
the bottom to convey the waste water into a small cup that
may be suspended underneath. As the proportions of the
box are enlarged, the links of the chain must be made
larger and stronger, so that the chain will be heavy enough
to support the weight; and instead of using wire or brass
rings, it would be advisable to employ small iron harness-rings.
Among the many pretty little objects that can be made
from thin metal strips, frames for small pictures are always
serviceable and attractive (Fig. 20). Black is not always
a desirable color for a frame, and there are several good
enamel paints on sale. They may be procured in almost
any light shade, such as pink, blue, green, brown, and the
pale yellows or cream colors. Several successive thin coats
of these enamel paints will give the iron scrolls a pretty
finish.
It is hardly necessary to lay down a size for this frame,
as it can readily be adapted to any photograph or small
picture. The proportions, however, should be followed as
closely as possible, so that the design will work out about
as shown in the drawing.
This frame may be hung against the wall, or arranged as
an easel for a table, mantel-shelf, or wall-bracket. If the
latter scheme is preferred, a support may be made from
narrow metal strips and attached to the back of the frame
with wire. This support should be of the design shown in
Fig. 20 A; it is attached by the top cross-bar to the back
of the frame. This cross-bar is of round iron, and the projecting
ends are to be caught with wire loops, which will
allow the back leg to act as if arranged on a hinge. To
prevent it from going too far back, a wire or string at the
bottom will hold it the proper distance from the frame.
Fig. 20.Fig. 20 A.Fig. 21.Fig. 22.Fig. 23.
The frame proper is made from a strip of metal half an
inch wide, and bent in angular form, showing less than
quarter of an inch on each side of an L. In the strip cut
angle-notches with a pair of shears, as shown in Fig. 21,
thus forming the corners. The notches should be made
half-way across the width of the metal, so that the point
of each angle will just reach the middle of a strip. With a
flat-nosed pair of pliers bend the strip in the form of the
oblong, so that each corner will appear like Fig. 22. Join
the frame at the bottom, allowing the metal to lap over an
inch at the ends, and make the union by punching little
holes and passing through small copper tacks that can be
clinched or riveted.
With a small bench-vise and a hammer, or with two
pairs of pliers, grasp the strip forming the frame and bend
it in the shape of an L all around, as shown in Fig. 23,
taking care to match the edges of each notch so that they
will form a mitre, as shown also in Fig. 23. Where the
scrolls are attached to the side of this frame, they may be
held in place by small copper tacks passed through holes
made in both scrolls and frame and riveted.
One of the most interesting branches of the light strap
metal-work is in making boxes of all shapes and sizes. The
variety of designs that can be employed is practically inexhaustible,
but certain general principles should be observed.
For instance, a box to hold matches should be of
small and neat design, while in a larger box the ornament
may be more open and bolder, and the strips from which it
is made should be heavier and stronger.
A handkerchief-box fashioned after the design shown in
Fig. 24 is a pretty as well as a useful article for a bureau or
dressing-table. A is the pattern for the top, and B represents
one of the sides.
It should measure eight or ten inches square and three
inches deep, or larger if desired, and the frame should be
of wire or wood. If wood is employed, sticks three-sixteenths
of an inch square must be lap-jointed at the angles,
as shown in Fig. 25, and the union made with glue and screws
or fine steel-wire nails.
Fig. 24 A.Fig. 24 B.Fig. 25.Fig. 26.Fig. 27.
If the box should be made of brass scrolls, it would be
well to obtain some brass rods about one-eighth or three-sixteenths
of an inch square, and bend them to form the
framework. Where the ends meet, lap-joints should be
cut and wired.
If the brass should be too hard to bend in a vise without
breaking, the part it is desired to work should be heated
over a spirit-lamp or in a gas flame for a moment or two;
when cool, it will be soft and pliable. If brass should be
employed for the frame, the joints must be soldered instead
of wired. To solder them it will be necessary to have some
soldering solution, a spirit-lamp, and some wire solder.
To unite the metal ends apply some of the soldering solution
to the parts with a piece of wood or an old camel’s-hair
brush, and then hold them over, or in the lamp flame, until
they are quite hot. When sufficiently heated touch them
with the end of a piece of solder, and the heat of the metal
will instantly melt the solder, so that it will adhere to the
brass. To hold the parts together while they are being
soldered, give them a turn or two of fine iron wire. After
they have been united and the brass is cold, the wire may
be removed and the rough parts of the solder filed away.
Small brass hinges may be screwed fast to the wood
ribs to attach the lid to the box, and if brass is employed for
the frame and grille work the hinges must be soldered to
the frame.
For a sign-board an idea is suggested in Fig. 26. At one’s
place of business, in front of a cottage, or on a mile-post,
it may be displayed to good advantage.
It is only a board on which sheet-iron or lead letters have
been fastened, and the edges bound with metal and large-headed
nails. A rod set at right angles to a post supports
the sign-board, and to ornament it some scroll-work is attached
at the top. Scroll ornaments decorate the sides and
bottom of the board. These are fastened on with steel-wire
nails driven through holes made in the metal and into
the edges of the board. The ornamental scroll-work should
be made of somewhat thicker and wider iron strips than
the more delicate articles for indoor use, and all the iron
should be given one or two coats of red-lead paint before
the black finish is applied. To prevent rust-marks from
running down on the wood board, it is necessary to coat the
back part of the letters and all iron straps which may lie
against the wood. It is much better to use sheet-lead for
the letters, since it cuts easier, and will not stain the wood
with rust or corrosion marks.
For a double doorway a pretty effect is shown in Fig. 27,
where a long grille is arranged at the top of a doorway, and
under it the curtain-pole is attached.
The outer frame for a grille of this size should be made
by a blacksmith from an iron rod about three-eighths of
an inch square. The inner frame may be made of strip-iron
three-eighths of an inch wide, and three inches smaller
all around than the larger one. The metal strips employed
to form the grille design should be three-eighths of an inch
wide, and cut from box strap-iron.
The full-size drawing should be laid out on paper, over
which it will be an easy matter to shape the scrolls. If
the grille should be too open when the pattern is completed,
some more scrolls may be added to fill the spaces,
taking care not to injure the general design of the pattern.
The grille may be anchored to the wood-work of the casing
with steel-wire nails or staples, and several coats of black
should be given the iron to finish it nicely.
Having gained by experience the knowledge and art of
working in strip-metal, and after successfully making a
number of the smaller objects already described, it is perhaps
time to undertake the construction of something
larger and more elaborate.
As an example of such work, a very beautiful design for
a Moorish lantern is shown in Fig. 28. It is not a difficult
piece of work, nor is it beyond the ability of any smart
boy, but it must not be attempted before a thorough knowledge
of forming frames and scrolls and of pattern drawing
has been gained through experience in making more simple
objects.
In size this lantern is not limited, and it may be made from
twelve to thirty-six inches high, not including the suspension
chain and rings and the drop of flower-pendants at the
bottom.
For a lamp twenty inches high having six sides, each panel
should be made on a wire frame. The middle panels measure
six inches high, four inches wide at the top, and three
inches at the bottom. The top panels are five inches across
at the widest place, and the lower ones four and a half
inches. One of the middle panels can be arranged to swing
on hinges, in order to place a lamp within the lantern, and
also to make it possible to line the inside of the lantern
body with some plain silk or other material.
Fig. 28.
At the top and bottom scrolls are to be formed of the
stout wire employed for the ribs or framework. Under the
crown top, at the six corners, brackets may extend out for
a distance of five inches, from which sconces for tapers or
small candles may be hung. Or these brackets may be
omitted, and in place of the hooks a small scroll may be
formed at the extending ends. Each little sconce is two
inches deep and two and a half inches in diameter, and in
them candle-holders may be placed, over which colored
glass globes will appear to good advantage. From the top
of the lower lobe six arms support flower-drops four or five
inches long, and from the extreme bottom a pendant of
flowers finishes off the whole. No matter what size this
lantern is made, the proportions should be carefully preserved,
or the effect will be spoiled.
A long chain made up of links and rings may be used to
suspend the lantern. Should a more secure anchorage be
desired, four chains may be attached at four places on the
ceiling of a room, from which anchorage they all meet at
the top of the lantern.
The illustration shows the lantern in perspective, but it
must be borne in mind that it has six sides, and the patterns
of the six sides, of the top, middle section, and bottom are
like those in the three front sections that face the reader
as he looks at the drawing.
Chapter VI METAL-BOUND WORK — A Metal-bound Box — A Wood-holder — A Plant-box — A Coal-box — A Table-lamp — A Hanging-lamp — A Hanging-plant Box
Thin sheets of various metals may be used to great
advantage in the decoration of household furniture,
either serving as artistic edgings, or representing strengthening
straps, hinges, etc. When finished off with heavy
wrought-iron or bellows nails, the effect is both striking and
pleasing. The art is not a difficult one to acquire, and the
hints and suggestions that follow should enable any smart
boy to pick it up in a comparatively short time.
As a receptacle for photographs, picture-cards, and the
other small trifles that accumulate in a library or living-room,
a box such as shown in Fig. 1 will be found most
useful.
Obtain some smooth pieces of wood, not more than three-eighths
or half an inch thick, and construct a box eighteen
inches long, ten wide, and eight inches deep, including top,
bottom, and sides. These parts are to be glued and nailed
together so as to form an enclosed box. Use a good liquid
glue and slim steel-wire nails to make the joints. When
the glue is dry, cut the box through all around the sides, one
and a half inches down from the top. The lid, or cover, is
thereby cut loose, and it will match the body of the box
much more accurately than if made separately and fitted.
Plane and sand-paper the rough edges left by the saw, and
attach the lid to the back edge of the box with hinges.
The outside of the box may be stained or painted any desirable
color, and when dry it will be ready to receive the
metal decorations.
Fig. 1.Fig. 2.Fig. 3.
From a tinsmith obtain a few sheets of thin stove-pipe
iron of good quality, or a strip of thin sheet-lead; then,
with a stout pair of shears, cut some strips about one and
a quarter inches wide to bind the edges of the box. A strip
is bent over so as to lap on both sides of a corner. A metal
band five-eighths of an inch wide will show on each side
and also on top. The metal is to be fastened on with brass
oval-headed upholsterers’ tacks, and the heads may be from
a quarter to half an inch in diameter.
It will not be possible, perhaps, to drive these tacks
through the metal strips unless a hole is first punched.
These small holes may be made with a sharp-pointed awl at
regular distances apart. This should be done before the
strip is laid on the wood, so as not to subject the box
joints to any more strain than necessary.
To bind an edge, tack a strip of the metal along one side,
bend it around the first corner, and so on along each side
until the two sides are brought together, where a nail-head
will almost hide the joint. At each corner cut a V out of
the strip, as shown in Fig. 2. The metal, when fastened to
one edge, will appear as shown at the right side of Fig. 3.
When the nails have been securely fastened in, bend
down the standing edge of metal so that it will lie flat on
the other side of the corner. This may be done by beating
it down with a light wooden mallet. Drive nails along the
strip corresponding in position to those first fixed, and the
edge will appear as shown at the left side of Fig. 3.
Where the angle, or V, was cut out of the strip at the corners,
the metal will come together and form a good mitre.
In the middle of this joint drive a nail, the head of which
will partially hide the line of juncture.
From the sheet iron or lead cut a few irregular strips of
suitable length, and fasten them to the box to represent
hinge or binding straps. The hasp and eye-plate may be
made in the same manner.
The box should be lined with Canton flannel, velour, leather,
or any good lining material. A band of webbing, or a chain,
arranged on the inside will prevent the cover from falling
back too far.
In a room where space cannot be spared for a large wood-box,
a wood-holder similar to the one shown in Fig. 4 is a
useful piece of furniture.
This holder is twelve to fifteen inches square, fifteen
inches high at the front, and twenty inches high at the
back, with the sides cut down, as shown in the drawing.
The wood is three-quarters or seven-eighths of an inch
thick, and planed on both sides and edges. Any of the hard
woods may be employed to good advantage in making the
box part, but if it is to be painted rather than left in the
natural finish, the wood-work may be of pine or white-wood
to save expense.
The metal binding is done in a similar fashion to that of
the box in Fig. 1, and if iron is used for the straps they
should be coated with black paint. The strips should be
two inches in width, and when bent around the edges and
corners one inch of metal must show on each side.
For large, growing plants, palms, and imitation trees, an
attractive plant-box is shown in Fig. 5.
It can be made almost any size to meet the requirements
of the plant that is to live in it; but for general use it should
measure twelve inches square at the bottom, eighteen at
the top, and from twelve to fourteen inches high.
The metal binding should be three-quarters or an inch
wide on each side; it need not be carried over the top edge
unless desired.
On two sides of the box ring-handles are to be fastened.
These will be made by a blacksmith at a small cost, and
should be from two and a half inches to four inches in diameter,
according to the size of the box.
Fig. 4.Fig. 5.Fig. 6.Fig. 7.
On the other sides a conventional design may be worked
out with strips of metal cut according to the required pattern.
This box should be treated to several good coats of paint
inside, and finished as desired on the outside. Quartered
oak with black metal trimmings make a good combination;
also mahogany, cherry, or redwood with brass bindings.
A zinc lining should be fitted to the box, with a vent-hole
at the bottom to drain off surplus moisture. No other
metal than zinc should be employed for the lining, since
iron or tin will corrode or rust. Copper tacks must be used
to attach it to the wood.
Fig. 6 gives the design for an old English coal-box.
It is a very simple affair to construct, since it can be made
from an ordinary box cut down at one end so as to form
a projection or nose.
The structural plan of the box is clearly shown in Fig. 7,
and in size it may be made to meet any requirement. For
regular use, however, it is fifteen inches wide, twenty inches
long from back to end of the nose, and about twelve inches
high, not counting the ball feet, which will raise it up two
inches more.
The box should be securely screwed together at the
joints, and the lid, or cover, must be fastened on with sheet-brass
hinges. Paint or varnish will give the wood-work a
good finish, and the lining should be made with several
successive coats of asphaltum varnish or paint of a dark
color.
Brass, lead, or black iron binding will look well on this
box, and with large-headed nails the effect will be bold and
pleasing.
Four balls about two inches in diameter are to be
turned and screwed fast under the corners to serve as feet.
To give a good purchase on the bottom of the box, it would
be well to flatten part of the surface on each ball. One
long screw will be sufficient to anchor each foot firmly if
driven through from the inside of the box into the ball.
A little glue between the joint will add greatly in making
the union strong.
The design for a table-lamp is shown in Fig. 8.
Any boy who is handy with tools can put this lamp together
from wood, burlap, sheet-lead, wire, some oval-headed
upholsterers’ tacks, four claw-feet, and a lamp-fount.
Fig. 8.
From boards about half an inch in thickness make a
box seven inches square at the top, ten at the bottom, and
twelve inches high. In the top of the box a round hole is
cut to receive the lamp-fount. Five inches in diameter will
be about right for the hole, since that is the measurement
of the standard oil-pot. A flange, or rim, all around the
upper edge of the fount will prevent it from falling through
the hole. If the burner has a central draught it will be
necessary to bore some large holes through the bottom of
the box to admit air for the under draught.
With burlap, bagging, or canvas cover the entire outside
of the box, the material being fastened to the wood with
glue and small, flat-headed tacks at the edges. The glue
must be spread evenly over the wood by means of a rag pad,
or, still better, a small photographic squeegee roller may be
employed. The covering material can be painted any good
shade, and when the paint is dry the box will be ready for
the decorations and trimmings.
From sheet-lead, or iron, cut some strips one inch and a
quarter wide, and bind the corners and edges of the box,
allowing about five-eighths of an inch to show on each side.
Fasten these strips on the edges of the box with large, oval-headed
upholsterers’ tacks, driven along each side at even
distances apart, as shown in the illustration.
On a piece of smooth brown paper draw the outline of
one side of the box, and then sketch in the design for the
metal torch and wreath. Over this pattern it will be a
comparatively easy matter to cut and fit each of the separate
parts of the design. These parts are to be of thin iron
or lead, but for the stems to the laurel wreath use pieces of
iron wire, and fasten them on with small staples. The
staples may be made from pins with the heads cut off.
The pieces of metal forming these side designs are to be
fastened to the wood with oval-headed carpet tacks, and
enough of them must be driven in each piece to hold it
firmly in place. When all the metal-work has been applied,
purchase at a hardware store four claw-feet, and screw
one fast under each corner of the box. They will be of
brass, but when painted black they will appear as if made
of iron.
All the metal parts of the lamp must be blacked to present
a good appearance. To make a good black finishing
paint obtain at a paint store a can of ivory black ground
in oil. Thin it to the consistency of rich milk with Japan
dryer and spirits of turpentine mixed together, one part of
the former to two parts of the latter. Place them together
in a bottle and thoroughly mix them by shaking the bottle
vigorously. A small quantity only should be thinned
at a time and as required, since it works better when
freshly mixed, and does not have the gummy appearance
that an old mixture presents. Two or three successive
coats laid on with a soft camel’s-hair brush will be sufficient
to cover the iron well and give it a good surface. When
using the black take care not to smear it on the box, as it
would produce an untidy and messy appearance.
With the addition of a pretty canopy shade, that can be
arranged on a wire frame, the effect will be most decorative
and pleasing.
For the dining-room or library, a hanging-lamp, such as
shown in Fig. 9, is both ornamental and useful.
The box that holds the lamp is eight inches square at
the top, five and a half inches at the bottom, and five inches
deep. It is covered with burlap or other suitable material,
or may be left plain or painted.
A hole is cut in the top of the box to receive the fount,
and if it is a central-draught burner a large opening must
be made in the bottom of the box, with a perforated metal
cap arranged to fit over it.
From the top of the four corners, iron scrolls, that a
blacksmith can make, project four inches beyond the wood,
and to these the suspension-chains are fastened. The
chains are made of one-inch iron harness-rings and links
three inches long, formed of narrow strips of stove-pipe or
box strap-iron less than a quarter of an inch in width, and
shaped as shown in Fig. 10.
From the under side, and fastened at each corner of the
box, hang four small chains. They are united at the centre
a few inches below the under side of the box, and are finished
off with a drop formed of metal lilies. In order to
form these flowers, cut from sheet-iron the petals, as patterned
in Fig. 11. Three different sizes should be drawn
on a sheet of iron with a piece of chalk or white crayon,
after which they may be cut out with a pair of shears and
bent into form with the fingers. They are to be hung together
one below the other by means of small wires, fastened
to the centre of each flower through holes punched
with a sharp-pointed awl.
A large paper or silk shade may be arranged on a wire
frame to slip over the chains, and to hold it in place it
should be fastened to some of the links with wire.
Fig. 9.Fig. 10.Fig. 11.Fig. 12.
For vines, small plants, or pretty blade grasses a design
for a hanging-plant box is shown in Fig. 12.
This is not a very large affair, and it is made of thin wood
not more than three-eighths or half an inch in thickness.
The box part measures eight inches square at the top, six
at the bottom, and ten inches high.
The inside of the box is to be treated to several coats of
paint or asphaltum varnish to protect the wood, and the
outside may be given two coats of paint. The corners are
then to be bound with metal strips, and the design on each
of the four sides worked out with hobnails painted black.
It is difficult to carry out such a design on four sides of
a box unless a pattern is used. To obtain the most accurate
results it would be best to draw the design with
pencil on a smooth piece of paper, then make four tracings
of it on tissue-paper. The tracing should then be fastened
to the wood with pins and the tacks driven in, following
the lines of the design.
When the tacks have been driven in part way, tear off
the paper, and with a flat-iron held against the inside of
the box to drive against, hammer the nails in so that the
heads will lie snugly against the surface of the wood.
Each side is to be treated in the same manner, so that
the four sides will be alike. If the hobnails cannot be had
at a hardware store, or from a shoemaker, oval-headed
upholsterers’ tacks may be used. Paint them black before
they are driven into the wood.
At the top of the box, in the four corners, eyes are to be
made fast, into which the ends of the suspending chains can
be caught. Four chains, made from thin strips of metal
and small harness-rings, are to be fastened in place, as
shown in the drawing.
Chapter VII DECORATIVE HARDWARE — Escutcheons — Short Hinge-straps — Long Hinge-straps — Drawer-pulls and Handle-plates — Door-plates — Large Lock-plates — Door-knockers and Miscellaneous Ornaments
Properly to complete even the simplest of cabinets or
chests some hardware will be needed, whether it be
only a pair of strap-hinges and a padlock or the most
elaborate kind of ornamental fittings. Plain hinges and a
lock will answer every ordinary purpose, but a nice chest
or case should be finished off with ornamental hinge-straps,
escutcheons, lock-plates, or handles.
These fixtures may be purchased at a hardware store
and in some large cities a very beautiful assortment of
fancy hardware is displayed. But it will be both cheaper
and more satisfactory for the young craftsman to make these
fittings for himself, and the art is not a difficult one to acquire.
Some of the accompanying designs may appear at
first sight rather beyond the ability of the average boy, and
so they would be if they were cast in brass or bronze or
cut from thick sheet-metal. But all of them can be shaped
from ordinary sheet-lead with a pair of old shears, a few
small chisels, and a light mallet.
Scraps of sheet-lead, varying in thickness from one to
three-sixteenths of an inch, may be purchased from a
plumber for five or six cents a pound. For the ordinary
fixtures of medium size the metal should be a trifle less
than one-eighth of an inch in thickness. For the heavier
hardware an old piece of lead pipe may be used by splitting
or sawing it open, and beating it out flat, on the surface of
an old flat-iron, with a hard wooden mallet. If sheet
brass, copper, or zinc are employed, they should be of the
soft kind, so as to cut easily. If too hard, the pieces may
be softened or annealed by putting them in a fire until they
are cherry-red. They should then be drawn out and allowed
to cool, when they will be found quite soft and easy
to work.
The boy who owns a scroll-saw will find it an easy matter
to jig out these designs, whether the material be lead
or one of the harder metals. Special fret-saws may be purchased
for this purpose, having finer teeth and being more
highly tempered than those used for wood-working. In sawing
metal you must be careful not to force the saw, and after
cutting an inch or two allow the blade to cool, otherwise it
will break.
If a hand jig-saw is the only tool available the metal
should be held in a vise. With very thin lead the dressing
is best done by laying the metal on a hard-wood
block and cutting out with small chisels and a light
mallet.
Three or four small wood-carving chisels, straight-edges,
and gouges will be found admirable tools for this work, and,
as the lead does not dull them, they will keep an edge for
a long time. A wood-carving chisel is ground on both
sides, which makes it better for this work than a carpenter’s
chisel, which is ground only on one side. A light mallet, a
hard-wood block, a coarse file or two, and a knife with a
small, sharp blade will be the only other tools required.
The term escutcheon, as applied to hardware, means the
ornamental metal plate that is placed over a key-hole, and
through which the key has to pass in order to reach the
lock. The name is applied also to the plate behind a
knocker, or that to which a ring or handle is attached.
In Fig. 1 a few designs for small escutcheons are shown.
Their actual size should be in proportion to that of the
drawer or door to which they are to be attached.
The design should be drawn to the proper size on a piece
of brown paper, then cut out with scissors and laid on a
piece of metal, the outline being scratched with a pin or
drawn on with pen and ink.
If the metal is sawed the edges will be rough, but they
may be dressed down with the files. If the lead is cut out the
edges can be finished with a knife-blade, as lead cuts easily
and is pleasant to work in. It sometimes happens that in
cutting out the more delicate parts of the design that the
chisels will distort the metal or force it out of shape. In
this case the trueness may be restored by tapping the edges
with a small hammer.
A small hand-drill will be found useful for boring holes in
the metal, through which screws or nails pass to secure
the escutcheons to the wood. If a drill cannot be had, a
small awl will answer very well.
Be careful that you do not make the key-hole too large.
ESCUTCHEONS AND HINGE-STRAPS
Fig. 1.Fig. 2.Fig. 5.Fig. 6.Fig. 7.
It should be only a trifle larger than the key, in order to
lead the latter easily.
A single hinge is always made like a book, with two
leaves and a back, through which a pin is run to hold the
leaves together. In door-hinges the leaves are usually
arranged so that when the door is closed the leaves are out
of sight. These hinges are called butts, while those applied
to the outside surface are called T or strap-hinges, and sometimes
plate-hinges.
Fig. 3.Fig. 4.
The short hinge-straps shown in Fig. 2 are not intended
as a part of the hinge, but only as sham straps. Where a
butt is mounted in the wood these straps are arranged on
either side of the back. Fig. 3 shows the manner in which
a butt is mounted in a door and jamb, and Fig. 4 shows
the reverse side with the back protruding, at one side of
which the lead strap is mounted. The inside, or parallel,
lines of the straps are the edges that butt against the hinge-back,
and they are to be cut to fit the width of the hinge.
The size should also correspond generally to that of the
shape and dimensions of the door or box lid. For artistic
effect large sham nail-heads may be fastened over the nail
or screw heads that really secure the hinge to the wood.
In some of the plain straps a very good imitation of
hand-wrought iron straps may be made by beating the surface
of the lead with a hammer having the face slightly
crowned or rounded. The hammer-marks will show up
distinctly, and when the straps are painted black no one
will know but what they are really iron straps beaten out
by hand.
Another good effect may be secured by beating the edges
down slightly with a small hammer instead of dressing
them with a file; this rounds or flattens them, and eliminates
the angular edge that is common in all cheap hardware.
For cabinet and chest doors, and doors that open into
rooms, some long hinge-straps are shown in Fig. 5, the proportions
being correctly indicated.
If the jamb is sufficiently wide, straps may be placed on
both sides of the hinge-back. Usually, however, the jamb
is too narrow.
These straps, if made of lead, should be thicker than the
short straps, otherwise they will look weak. For a strap
twelve to fifteen inches long the metal should not be less
than one-eighth of an inch thick, and for some designs it
would look better if quarter-inch material is used.
It is quite as easy to saw out thick metal as thin, only it
takes a little longer time. The saw must be held straight
and not allowed to bind. Never force a saw through lead,
as it will bind and check, and also will pick up a thin lead
coating, materially adding to the friction. If the saw does
not run easily, lubricate it with a little soapy water, and
afterwards wipe it off to prevent rust. When working with
a scroll-saw on which there is a table, or bed, the soapy
water should be drawn along the lines on the metal with
a soft hair-brush. As the saw cuts it will take up the water.
Small drawer-pulls and handles may be purchased at any
hardware store for a few cents each, but they are usually
very plain and unattractive. Rings in heads and handles
on plain plates are the best to purchase, as then the heads
may be mounted on fancy escutcheons, and the handles
and keepers removed from the plain plates and reset in
lead mountings of artistic design, wrought or sawed from
lead or other ductile material.
Drawer-pulls are generally arranged with a shank at the
back of the ring-head which passes into the wood, and
into which a screw is driven from the inside of the drawer.
Handle-keepers are made in the same way. In designing
fancy escutcheons and plates, care must be taken to
arrange the holes the proper distance apart to receive the
keeper-ends.
On swing and sliding doors—and sometimes on plain
doors—plates are mounted above the lock on both sides.
Their use is to protect the painted or polished wood-work
from finger-marks and similar defacements. Quite elaborate
plates are used on some doors, while others are mounted
with very plain ones. In Fig. 7 a variety of designs are shown.
The average plate varies in length from six to twelve
inches. In width they measure from two and a half
inches to three inches, and the metal should be about one-eighth
of an inch in thickness.
Door-pull plates are made to receive the ends of a handle.
The latter is bolted to the reverse side of the door with
countersunk nuts or flush screws. The upper line of drawings
in Fig. 7 are designed for this purpose, and the two
holes are spaced to line with the ends of the handle that is
to be inserted. In addition to the anchorage these plates
will get by being held to the wood under the handles, it
would be well to make a few holes at the edges, through
which small nails may be driven.
In Fig. 8 several designs for large lock-plates are shown.
In this instance the knob and key-hole are placed in the
same plate. This variety of door hardware offers a broad
field for the young designer. But be sure and space the
two holes so that the knob and key are in the right place.
In the extreme right-hand plate (Fig. 8) an effect of continued
scroll is secured around the key-hole by cutting the
ornament out of the body of the plate. This is just the
reverse of the scrolls forming the right side of the plate,
the ornament in this latter case being of the solid metal.
More “feeling” may be given to the solid scroll if an effect
of relief is worked out with some blunt tool and the mallet.
This may be done with an ordinary nail-punch or a blunt
awl. For the veining use an awl or a dull chisel, lightly
tapping the tool with a wooden mallet.
Fig. 8.Fig. 9.
Door-knockers and plates are made in a great variety
of designs. The most elaborate and richly ornamented
knockers are cast in bronze and chased by hand, but this
work is not possible for the boy craftsman to accomplish
with his small outfit and limited knowledge of the higher
grade of art metal-work.
The knocker-plates shown in Fig. 9 are cut from sheet-lead,
but the rings in the keepers (with the knob of metal
at the lower side) must be made from iron or other hard
metal. A blacksmith will make these rings and set them
in a head, or keeper, which in turn is bolted to the inside
of a door. Where the knob of metal strikes the plate an
iron nail with a large head must be driven through the escutcheon
and into the door, so that the knob will strike upon
it. Lead will not do for the ring or knob, nor as a striking-plate,
since it is too soft to sound sharply and distinctly.
Sheet-lead ornaments in a great variety of designs may
be made for panels, the sides of cases, or for the decoration
and embellishment of wood-work in general. Wall-paper,
carpet, upholstery, and other figured fabrics will offer ideas
from which to copy; but after a little practise the young
craftsman should originate his own designs, and not depend
on other people’s brains to furnish him with working patterns.
Chapter VIII WIRE-WORK — A Bird-cage Bracket — A Photograph Easel — A Match-box — A Fairy Lamp — A Picture-frame — A Glove-box — A Window-grille
There are many pretty and useful articles that can be
made for the home, using simple tools and inexpensive
materials. Who would imagine, for instance, that such
attractive objects as the ones shown in these illustrations
could be made from a few pieces of wire of different sizes?
Yet, with a little care and perseverance, you may quickly
become an expert in wire-working.
To begin with, it is necessary to obtain several yards of
soft iron wire varying in sizes from No. 12 to No. 18, also
a small roll of soft wire about the size that florists employ
to attach flowers to short sticks when making up bouquets.
The tools needed will be a flat and a round nosed pair of
pincers, or pliers (see Figs. 1 and 2), a wire-cutter, and a
tack-hammer. You will also need a sheet of smooth brown
paper, and a soft lead-pencil with which to draw the patterns.
Begin by making simple things; then as you succeed in
producing good work you will be able to take up the more
difficult patterns. A bird-cage bracket is an easy object to
start with. Enlarge the design shown in Fig. 3 so that it
will be sixteen inches high, with the hook-arm projecting
seven inches from the main upright rod.
Fig. 1.Fig. 2.Fig. 3.
The pattern is to be drawn out the full size on smooth
brown paper; then the wire should be bent and shaped over
the lines to conform to the design. Use very heavy wire
for the upright and projecting arm, and a smaller size for
all the scroll-work. The finest copper wire should be used
to bind the scrolls together, and so make tight unions where
two edges of wire come together and where the wires cross.
This bracket should be firmly secured to the window-casing
with two staples. The staples should not be driven
quite home, thus allowing the bracket to be swung from
one side to the other of the casing, as though on hinges.
This is especially desirable if the bracket is to be used for
a hanging-basket or pot of flowers, as it can then be moved
against the window or turned back to the wall, to permit
of the window being opened or cleaned.
The iron wire should be given two coats of good black
paint, or, if desired, it may be gilded or silvered. An excellent
black preparation for iron may be made by thinning
ivory-black ground in oil with equal parts of Japan dryer
and turpentine. Or you may try adding a little lamp-black
to brass lacquer or shellac.
The paint should be applied to the iron with a soft hair
brush, and the first coat must be good and dry before the
second one is applied.
If brass wire is used instead of iron the joints should be
soldered, to lend additional strength. The soldering is an
easy process and requires only a little care. To do it nicely,
obtain from a plumber a little soldering solution in a bottle,
and, with a piece of stick, place a drop of solution on
each union that has been bound with the fine brass wire.
Hold the union over a spirit-lamp flame, and when the wire
has become thoroughly heated touch the joint with a piece
of wire solder; the latter will instantly melt and adhere
to the joint. If soldering solution is not used the joint
cannot be soldered, and if the wire is not hot enough the
solder will not melt. If the wire should be too hot the
solder will melt and fall off from the joint like a drop of
water. A little experience will soon enable one to become
an expert solderer, and the process should be employed
wherever possible, as it strengthens the joints and unions,
and holds them rigidly in place. Galvanized or tinned iron
wire can be soldered in the same manner.
The brass wire should be painted black the same as iron,
but before any paint is applied the superfluous solution
should be washed off with water, as paint will not hold if
applied over the soldering solution.
Fig. 4 shows a design for a photograph easel that will
make an attractive table or mantel ornament if neatly constructed
from wire of medium size. It should not measure
more than nine inches in height, and where the lattice-work
joins the lower cross-bar two hooks should be arranged
on which the photograph can rest.
A back support, or prop, to the easel may be made of
wire, and soldered to the bar at the upper edge of the lattice-work.
The lattice need not be made of as heavy
wire as the scroll-work, and where the strands cross each
other the junctions are to be securely bound with fine
wire.
Larger easels may be made for small-framed etchings,
for panel photographs, or for other purposes, but as the
size of the easel is enlarged the thickness of the wire should
be increased to give additional strength.
By reducing the size of the lower scrolls this design would
be quite appropriate for a lamp-shade, and instead of the
lattice-work a piece of prettily colored silk or other translucent
material may be inserted to serve as the backing.
An attractive design for a match-box is shown in Fig. 5.
The total height of the back piece should be nine inches,
and the width three inches. The match-receptacle should be
an inch deep and project one and a half inches from the wall.
Fig. 4.Fig. 5.Fig. 6.
It should be lined with silk or other goods, to prevent the
matches falling through the open-work of the grille. Finished
in black, with a red or orange colored silk lining, this
match-receptacle will be found both useful and ornamental.
A hanging fairy lamp, like the one shown in Fig. 6, makes
a pretty ornament for the parlor or living-room.
The bracket part is made in a similar manner to the bird-cage
bracket, and should be of stout wire. The candle-sconce,
or lamp part, is built up of four sets of scrolls arranged
about an old tin candlestick top, and securely
bound together with strands of fine wire closely wrapped.
By using brass wire soldered at the unions a stronger
construction is possible.
The sconce should be suspended from the bracket-hook
by means of four light wires. These latter may also support
a canopy shade made over a light framework of wire.
Ordinary colored candles will look well in this fairy lamp.
To keep the colors in harmony it would be well to obtain
candles of a tint that will match the color of the silk shade.
The lamp may be fastened to a door or window casing,
or perhaps to the sides of a mantel-piece.
Fig. 7 shows the design for a picture-frame that is intended
to hang against the wall. The frame proper may
be made of very narrow picture-frame moulding around
which the grille-work is arranged. Where the latter touches
the wood-work it is to be made fast with small staples
driven in the outer edge, and the ends clinched at the inside,
or rabbet, of the frame. Or fine wire may be used in
place of the staples.
Fig. 7.Fig. 8.Fig. 9.
If an all-iron effect is desired, the rabbet should be made
of thin stove-pipe iron or sheet-brass, bent into angular
form and finally shaped to the required size. Around it the
grille-work is to be made and bound, in about the same proportion
as shown in the drawing.
A design for a glove-box is shown in Fig. 8. It should be
ten inches long, five wide, and three inches high.
The bottom should be made of a thin piece of wood, and
the entire inside, including the top, should be lined with
some handsome and substantial material in bright colors.
The four sides and the top should be made in separate
pieces, and afterwards bound securely together with fine
wire.
Fig. 9 is a grille for the upper part of a window. It will
be very effective if constructed of heavy wire, the design
being neatly carried out. Variations of this grille may be
made for doorways, transoms, and skylights, and with the
hints and drawings already given a bright boy will soon
be able to invent and work out his own designs. There are
dozens of other objects that may be made in iron-work, and
these will soon suggest themselves to the young craftsman.
Chapter IX GAS AND ELECTRIC SHADES — A Simple Gas-shade — Another Gas-shade — A Metal Shade — An Electric-light Screen — A Bell-shaped Shade — A Pear-shaped Shade — A Dome-shaped Shade — Another Dining-room Shade — A Canopy — A Panel Shade
Shades for gas and electric fixtures are a necessity in
almost every house, and by the exercise of a little inventiveness
they may be a part of its ornament as well. In
the suggestions and hints that follow the aim has been to
create from inexpensive material really artistic results. It
all depends upon the care and ability with which the
young craftsman goes to work.
Fig. 1 is a simple shade intended for a bracket gas-burner;
in shape and size it fits the rim that holds the ordinary
glass globe.
From covered hat-wire four or five forms are constructed
like the pattern, Fig. 1 A. They should be of such width
at the bottom that when attached together and bent in a
circle they will fit in the rim that is on the fixture. Each
form is then covered with China silk of some light, pretty
shade, and bent over, as shown in the drawing. Some
spangles are sewed to the outer surface to form the design,
or pattern, and the fine lines are worked out with silk or
laid on with gold thread. Between each section some glass
beads are strung, and the other details may be gathered
from the drawing.
In Fig. 2 another idea is shown for a gas-shade. Six
frames of wire are made, as shown at Fig. 2 A, and the
ornament is formed of wire, and held in place by means of
very fine wire wound round the unions. When the six
sides have been made they are bound together so as to
form a hexagon (Fig. 2 B), and with stout wires this frame
is made fast to a rim, inside of which a glass shade may
rest, if desired.
The inside of this frame is lined with light silk, and to
the lower edge a glass-bead fringe three or four inches
long is made fast, as shown in the drawing.
In Fig. 3 an odd shade is shown. It is cut from thin
sheet-lead with a small chisel and penknife blade, the metal
being laid flat, as shown at A, and the design being first
drawn out with pen and ink. The ends of the strip of lead
are caught together with small copper tacks, which should
be driven down at the ends the same as rivets.
In order to obtain the flare at the top, the lead should
be beaten out with a light tack-hammer or a round
piece of hard-wood, until the proper shape has been obtained.
The metal-work should be painted black, and to lend a
better finish the filigree shade may be lined with pink or
orange-colored China silk.
In homes where electric lights are used it is often desirable
to partly hide or subdue the harsh light from the
bright filament within the bulb. A ground-glass bulb answers
the purely utilitarian purpose, but there is no reason
why the screen should not be decorative also.
In Fig. 4 an attractive design is shown. Four or five
triangular wire frames are made and filled with wire ornaments,
as shown at Fig. 4 A, and they are caught together
at the sides so that they will form a cap, or hood,
over the bulb. A band of thin sheet-lead is run around
the edge, and to it the glass-bead fringe is sewed fast
through small holes that may be punched in the metal
with a fine awl.
The cap is lined with silk, and the beads should correspond
with it in color.
In Fig. 5 a bell-shaped shade is illustrated. It is made up
of five sections, as described for the gas-shade in Fig. 1.
The ornament may be embroidered or painted with water-colors,
or the sides may be left plain. A line of short glass-bead
fringe around the bottom will add to the appearance
of the shade.
In Fig. 6 the cap is cut from thin sheet-lead. The four
or five separate parts are caught together at the edges with
fine wire drawn through small holes, and all the metal-work
is painted black.
Long glass-bead fringe is attached to the lower edge of
the cap, and the ends are caught together at the bottom.
For a dining-room, where a cluster of lights is used, a
good idea for a dome-shaped shade is shown in Fig. 7.
This is made from a silk parasol lined with white. In
order that the ribs may hold it in shape, saw off the stick
just below the catch and pass the electric-light wire through
the silk at the middle of the top.
A number of panels are made of the same width as the
distance between the ribs; they are caught to each other
and to the end of each steel rib with fine wire. The panels
are made of wire and covered with thin China silk, which
is ornamented with garlands and ribbons, either embroidered
or painted on, as shown in the drawing. Glass-bead
fringe should depend from the lower edge of these panels,
and it should match in color the silk of the parasol and the
panels.
Another idea for a dining-room fixture is shown in Fig. 8.
It consists of two wire hoops held about six inches apart,
the edge of a band of embroidered silk being caught over
each hoop. These hoops are suspended from a circular
disk of wood, which in turn is supported by means of the
flexible wire that conducts current for the light. The bulbs
are enclosed in frosted glass globes, three or four of which are
suspended in a cluster at the centre of the hoop. A long silk
or a glass-bead fringe ornaments the lower edge of the band.
Another way of arranging this fixture is to carry the globes
to the inside of the band. From four to seven of them may
hang just inside the band, which, in that case, may be made
seven or eight inches wide instead of six inches.
The globes should be of a size to accommodate eight-candle-power
lights.
In making any of these shades it would be well to cut the
forms from card-board, and paste them together to form a
pattern from which to shape the metal parts.
In Fig. 9 a canopy of thin metal strips and silk is shown.
The strips are cut from thin stove-pipe iron, brass, or
copper. The soft metal is preferable to the hard, or spring,
brass, as it can be more easily bent and it will keep the
shape better. A paper plan may be drawn of one section,
and the small scrolls fitted over it, then banded together
with fine wire. The bottom of this canopy is round, but the
six sides are slightly flattened at the middle, half-way between
the top and bottom.
The inside of the canopy is lined with light silk, and
silk or glass-bead fringe is attached to the lower edge.
Fig. 10 shows a simple shade made of four panels composed
of covered wire and thin silk. The ornamental design
may be embroidered, or painted or cut from colored
silk and sewed on.
This shade may be suspended from the socket by means
of silk cords or wires, and the open spaces at the top will
permit some light to glow above the shade.
Chapter X RELIEF ETCHING — The Technique of the Process — The Acid Solution — Some Typical Designs
In this era of practical craftsmanship there is a field for
any unique art that savors of originality and which will
help to beautify the home and its furnishings.
Relief etching is one of these arts, and is a very old one,
having been employed by the workers on King Solomon’s
temple, and perhaps in earlier historical buildings. That
was before the time of chemical treatment, however, and
when the beautiful effects were obtained by laborious hand-work,
a modification of which is handed down in the Turkish,
Russian, and Oriental hand-etched brasses and silver goods.
Modern science and chemistry have superseded the old
method, and many beautiful pieces of relief etching are
produced by the acid process, which is much more beautiful
in some respects than the tool-work. The process is
very simple, and any boy can become master of the art in
a short time and at a very moderate cost.
The equipment necessary to the work will be a tray for
the acid bath, a small can of asphaltum varnish, three or
four camel’s-hair brushes of assorted sizes, a bottle of nitric
acid, and some pieces of sheet brass or copper less than
one-eighth of an inch in thickness.
For the acid bath a photographer’s porcelain or hard-rubber
developing-tray will be just the thing, but if not
available a good pine or white-wood tray can be made with
sides two inches high.
To protect the wood from the action of the acid, the tray
should be treated to several successive coats of asphaltum
varnish—one each day until the wood is thoroughly coated
and the joints well filled. The wood should be half or three-quarters
of an inch thick, and screws should be used at the
joints and laps. A tray of this description can be made
at home, and when finished it should appear as shown in
Fig. 1. If the varnish is too thick when applying it, a little
turpentine will thin it properly.
Small, flat subjects are best to begin with, such as hinge-plates,
panels, escutcheons, or tablets. For a drawer panel,
Fig. 2 shows an attractive and simple design that may be
drawn on the metal with pen and ink. If the ink creeps,
the surface of the metal may be roughened slightly with
fine emery cloth.
With the asphaltum varnish the design is then filled in so
it will appear as shown in Fig. 3 and allowed to dry, when, as
a precautionary measure, another coat should be given over
the blackened surface, to avoid the possibility of the acid
biting through the thin places, or where the varnish has
missed the metal. The back and edge of the metal is coated
also, to prevent the acid from eating into it.
All the surfaces of the metal not covered with the varnish
will be eaten or etched away and left with a granular
surface resembling fine sand-paper, while the painted
or protected parts will be left intact and with a smooth
surface like the original face of the plate, as shown in
Fig. 4.
With an old woollen cloth dipped in turpentine, the surface
of the plate may be rubbed, after first washing off the
acid. The black removed from the ornament will tint the
granulated surface of the background and lend relief to the
bright surface of the ornament.
Almost any objects in metal, such as door-hinges, knobs,
fireplace hoods, name-plates, vases, candlesticks, panels, and
tablets, can be decorated by this process, and if artistically
done the results will be very effective.
Sheet brass and copper may be purchased at large hardware
stores or supply houses for thirty cents a pound, and
the sheets or panels can be cut there with the shears to the
exact size required. For the average work, metal not more
than one-sixteenth of an inch thick will be found easy to
handle; but for large panels or name-plate, pieces about one-eighth
of an inch thick are preferable.
If the design shown in Figs. 2, 3, and 4 is too elaborate
for the beginners, some simple outline may be drawn, perhaps
a flower design, copied from some piece of embroidery
work, or a figure design from a wall-paper, carpet, or dress-goods
pattern. The metal should be left to dry for at least
an hour after being painted with the varnish before it is
placed in the acid bath.
The etching is done by placing the plate, face up, on the
bottom of the tray and covering it with acid. The ground-work
or unpainted portions of the metal may be bitten to
any depth, but it is not desirable to cut away too much, as
it weakens the plate and cuts under the ornament, unless
it is carefully stopped out all around the edges of the design;
and that is too much of an undertaking for the young
craftsman, since it requires a great deal of time and careful
work.
Fig. 1.
Fig. 2. THE DRAWING
Fig. 3. THE PAINTING
Fig. 4. THE ETCHING
Fig. 5.
A little practice will determine just when the plate should
be removed from the solution, either for examination or
final cleaning. Soft brass or copper corrodes much faster
than hard metal, which takes about three times longer, and
the process of corrosion will require from twenty minutes
to an hour, according to the temper of the metal and the
strength of the acid solution.
To prepare the acid solution obtain a large, clear glass
bottle and fill it quarter full of pure water; into this slowly
pour an equal quantity of nitric acid, taking great care not
to spill any of the acid, as it acts instantly and will eat a
hole in any cloth it falls upon or spatters over. Wear old
clothes and a canvas apron when mixing or handling the
acid, and never be in a hurry to get results quickly by the
reckless use of the biting fluid. If perchance the acid should
touch the clothing, apply a few drops of ammonia to the
spot immediately, to neutralize the acid and stop its action.
The spot should then be sponged with clear water and no
stain will be perceptible.
As the acid is added to the water (never add the water
to the acid), shake it occasionally to thoroughly mix it, and
let the mixture stand for a while to cool; then place a rubber
cork in the bottle, label it Nitric Acid Solution—POISON,
and place it beyond the reach of small children.
A solution that has been used should be poured from the
tray into another bottle, to be used again by adding a small
quantity of fresh solution. An old solution does not act
as quickly as a new one, but for soft metal plates it is preferable,
as it does not require such careful watching. The
fumes of the acid, when at work, are disagreeable, so if
possible it is well to carry out this part of the process in the
open air. After the plate is immersed in the acid, do not
handle it with the unprotected fingers.
Rubber gloves may be used for this purpose, but if a pair
cannot be had the plate may be raised from the tray bottom
by means of a small, sharp-pointed stick, and it should
then be grasped with a pair of pliers and immersed in water
to stop the action of the acid. A plate may be repeatedly
removed from the bath to watch the progress of the etching,
but in doing so it must be handled with care, in the manner
just described.
When the ground is etched deep enough, remove the plate
from the acid and give it a thorough washing in clean
water; then with a soft cloth dipped in turpentine rub
off the entire surface of the plate. The turpentine will dissolve
the varnish and leave a film of it on the granular surface
of the metal eaten by the acid. As a result, the ground
will be darkened or oxidized, while the parts originally protected
by the varnish will be bright and smooth. The high
parts can be brightened still more with metal polish, or they
may be buffed and lacquered by a metal finisher.
In Fig. 5 the face of a door-knob is shown in its etched
state, the pattern being drawn in varnish, as described.
In Fig. 6 the side of the knob in Fig. 5 is shown; that is,
if it should have such a flat band all around. Plain brass
knobs may be purchased at a hardware store, and if they
are lacquered the coating should be removed with alcohol
before the etching is done, as otherwise the acid would not
eat through the lacquer for some time.
For an acid bath in which an object this shape is to be
etched, a yellow earthenware bowl may be used, or a low
jar with a wide neck will answer very well. The knob
should be suspended in the acid by means of a piece of
waxed string tied about the shank.
Hinges on cabinet doors may be greatly improved by
making brass straps for them, which should be applied to
the wood so that they fit closely against the sides of the
hinges.
Fig. 6.Fig. 7.Fig. 8.Fig. 9.
Designs for hinge-straps are shown in Figs. 7 and 8, and
Fig. 9 is a brass vase on the outside of which a floral design
has been etched.
Another design for the face of an oval brass door-knob is
shown in Fig. 10. This is a simple pattern to draw on a
knob with asphaltum varnish, and its plain but bold ornament
is quite as pleasing to the eye as a more intricate
pattern would be.
A design for a short, high hinge-plate is shown at Fig. 11,
and at Fig. 12 a long, narrow hinge-plate or hasp-strap is
depicted. Many other shapes of hasps and the patterns
to ornament them may be designed by the boy with some
artistic ability, and he may be able to improve upon these
suggestions.
Fig. 10.Fig. 11.Fig. 12.Fig. 13.
When making hinge-straps, escutcheons, or any articles
from brass plates or flat brass and copper, the edges should
be shaped with a cold-chisel and mallet on the upturned face
of an old flat-iron. The uneven or ragged edges may be
trimmed off with a file and finished with emery cloth.
An idea for a name-plate is shown in Fig. 13. This is
seven inches long and three inches wide. It is appropriate
for a front door or the door of a boy’s room, changing the
name, of course, to that of the proper person.
At the left of the drawing the finished plate is shown,
while at the other side the blackened letters and marginal
line is depicted, illustrating how the plate will look before
it is etched. Or this last may be the appearance of the
plate after it is etched and before the varnish has been removed
with turpentine and a cloth.
Part III HOUSEHOLD ARTS
Chapter XI CLAY-MODELLING AND PLASTER-CASTING — The Technique of the Art — Glue and Gelatine Moulds — Hollow Casting — Modelling a Foot — Bas-relief Modelling — A Medallion Head — Coin and Metal Casts — Plaster-casting in General — How to Find and Mount Signets
The boy on whom nature has bestowed the natural
talent and liking for art-work will find clay-modelling
a fascinating and pleasing branch to follow.
To become a perfect modeller, and finally a sculptor,
requires years of patience and perseverance, but to copy
simple objects in clay is not a difficult matter, and with
some clay, a few tools, and the skeletons, or supports, the
amateur should not meet with any great obstacle if the
following descriptions and instructions are accepted and
practised.
Very few tools are necessary at the beginning, and Nos.
1, 2, 3, 4, 5, 6, 7, 8, 9, 10, and 11, shown in Fig. 5, are a full
complement for any beginner. The first four are wire tools,
made of spring-steel or brass wire, about which fine wire is
wrapped. The ends of the wires are securely bound to the
end of a round wooden handle, and sometimes, for convenience,
two ends are made fast to a single handle. These tools
are called “double-enders,” and are used in roughing out the
clay in the first stages of the work. No. 5 is a boxwood tool
with one serrated edge, and is used for finishing. The tools
shown in Nos. 6 and 7 are of steel, and are of use on plaster,
where others would not be sufficiently durable. Nos. 8, 9, 10,
and 11 are boxwood tools, a wire loop being fastened in the
end of No. 9. Any of these tools can be purchased at an
art-material store for a few cents each, except the steel
tools, which are more expensive.
THE TOOLS
Fig. 5.
A stand, or pedestal, will be necessary on which to place
the clay model, unless perhaps it should be a medallion,
which may be worked over on a table.
Fig. 6 is a stand that can be made by any boy from a few
pieces of pine two inches square and a top board one and a
half inches in thickness. It is arranged with a central shaft
that may be raised or lowered, and to the top of which a
platform is securely attached.
The movable shaft should have some holes bored through
it from side to side, through which a small iron pin may be
adjusted to hold the platform at a desired height. Clay
can be purchased at the art stores by the pound, or in the
country a very good quality of light, slate-colored clay may
sometimes be found along the edges of brooks or in swampy
places where running water has washed away the dirt and
gravel, leaving a clear deposit of clay of the consistency of
putty.
Supports which the clay models are built upon can be
made of wood and wire, as the requirements necessitate.
That for the head is shown in Fig. 1. Nearly every clay
model of any size will need some support, as clay is heavy
and settles, and if not properly supported will soon become
distorted and the composition spoiled. You will also need
some old soft cloths that can be applied wet to the clay, a
pair of calipers, and a small trowel or spatula.
Fig. 1.Fig. 6.
To model well the art of drawing is indispensable. The art
of wood-carving is also a valuable one to the clay-modeller,
but care must be taken when making any casts of wood-carving
to use glue moulds; otherwise the carving would become
firmly embedded in a plaster mould, due to the undercut
in the carved ornament. To begin with, choose some
simple object to copy, such as a vase or some small ornament;
then, when a satisfactory result has been obtained,
select something a trifle more difficult, such as a hand or
foot.
When copying a head, obtain a bust support on which to
work the clay. A very simple and strong one can be made
from a piece of board, two sticks, and a short piece of pipe
wired to the top end of the upright stick (Fig. 1).
To carry out the proportions of a bust similar to Fig. 4,
the clay should be packed about the support much after
the manner shown in Fig. 2. This will support the
clay.
With a lump of clay and the fingers form the general outline,
as shown in Fig. 2, for the head; then, with the wire
tools, begin to work away the clay in places, so as to follow
the lines of the model. With the calipers measurements
may be taken from the plaster head and used advantageously
in the building up of the clay model. Turn the plaster
model and clay copy occasionally, so that all sides may be
presented and closely followed in line and detail. Fig. 3
shows the next stage, and Fig. 4 the completed head.
Modelling differs from drawing and painting in that every
side of the model is visible, while only the face of the painting
is presented to the eye, the impression of form and outline
being worked out on a flat surface.
Having successfully mastered the head, next attempt a
foot from a plaster cast. Afterwards a more elaborate subject,
such as a whole figure, can be tried.
With the wire modelling-tools and the fingers begin to
work away the clay to obtain the general outline and form;
continue this in a rough manner, until a perfect composition
is obtained that compares favorably with the original model;
the finishing-touches may then be applied, and the detail
worked up more carefully.
Fig. 2.Fig. 3.Fig. 4.Fig. 7.Fig. 8.
Never complete one part and leave the remaining ones
until later; always work up the model uniformly, adding
a little here and there, or taking away, as may be necessary,
and so developing the whole composition gradually.
Moisten the clay occasionally with water sprayed on
with a small watering-pot or a greenhouse sprinkler, to
keep it soft and ductile. When not being worked upon it
should be covered with wet cloths, to keep it moist.
As the work progresses the clay may be allowed to harden
and consolidate, but not to dry; if allowed to dry entirely
the model may be considered ruined, as the shrinkage of the
clay around the support results in fissures and fractures that
cannot be repaired.
By the time the amateur has acquired the knowledge to
attempt a full-size figure he will be able to invent the devices
to support it.
The support, or skeleton, must of course be adapted to
line with the pose of the figure, and should be of pipe and
heavy wire or rods securely anchored to the base-plate.
The composition of flowers, fruit, foliage, animal life, and
landscape is an inexhaustible one, and some beautiful effects
can be had in flat-work. Good examples of this character
of work may be found on all sides, and to the genius the field
of modelling is a broad one—without limit.
When casting from hands, feet, or ornaments where undercut
predominates, the most successful mode is in the use of
gelatine or glue.
To cast a head similar to the one shown in Fig. 4 it will
be necessary to make a box frame large enough to hold the
head.
The cast is to be well oiled, and down the front and back,
running around under and back over the base block, strong
linen threads are to be stuck on with oil. Warm glue or
gelatine is then poured in the box and left to chill and
solidify.
When sufficiently cold the frame may be removed, leaving
the solid block of glue like hard jelly; then the ends of
the threads are to be grasped and torn through the gelatine,
thus separating it in two or three parts. The plaster head
may then be removed, and the mould put together again
and surrounded by the frame to hold it in place.
To make a plaster head this plaster of Paris may be poured
into the mould and left for a while, when, on removing the
frame and taking the glue mould away, a perfect reproduction
of the original head will be found.
When very large objects that would require a great deal
of plaster are cast, they are generally made hollow in the
following manner:
Obtain the glue mould by the process described, and into
it pour a quantity of thin plaster, having first oiled the surfaces
that come in contact with it. Turn the mould about
and upside down, so that the plaster will enter every part
and adhere to the glue form. Allow it to “set,” and again
pour some plaster into the mould. This will adhere to the
first coating, and after it has set repeat the operation several
times, until a deposit, or coating, an inch or more in thickness
has been made.
The glue mould on being removed will reveal a perfect
plaster-casting that, instead of being solid, is hollow, and
in consequence is much lighter.
To model a foot from a plaster cast, as shown at Fig. 7,
it will be necessary to lay or putty up the form in the rough,
as suggested for the bust in Fig. 2. Now rough out the
form with the modelling-tools, so that it will appear as
shown in Fig. 8. A frame, or support, should be made from
a block and a stout piece of wire, as shown at Fig. 9, so that
the mass of clay, particularly that at the back of the foot,
will not settle.
Fig. 9.Fig. 10.
For full-length figures it is always necessary to construct
a frame after a rough front and profile drawing has been
made. With this drawing in sight, it will then be a comparatively
simple matter to construct a wire or iron pipe
frame such as that pictured in Fig. 10.
Bas-relief work is another interesting department of
clay-modelling. This is one-sided in its effect, and the full,
rounded appearance of the statue or bust is reduced to a
more flattened form with lower relief. A familiar example
of bas-relief is the head on a silver dollar, or the raised ornament
on silverware and pottery. Let us now begin with
the group of pears and leaves illustrated in Fig. 11.
A small block or piece of wood is treated to a coat of
shellac or paint; then the clay is puttied on to roughly form
the parts in the group. With the modelling-tools the outline
and form is gradually worked out; then the surfaces
are smoothed down, and the few little artistic touches given
here and there to lend life and character.
Bas-reliefs can, of course, be cast any size, and from the
original plaster mould many duplicates in composition or
papier-maché may be made.
Garlands, festoons, sunbursts, panel ornaments, and cartouches
can be modelled in clay, and afterwards cast for
architectural features in interior decoration. A good example
of the garland is shown in Fig. 12. This is made up
of flowers and ribbons, and with careful and patient work
the boy sculptor should be able to obtain results quite as
pleasing in detail as that illustrated.
Fig. 11.Fig. 12.
After some experience in casting ornaments in bas-relief
has been obtained, it would be well to try a head or bust.
A simple method of doing this is to take an ordinary school
slate and make the outline of a head on it. Within this
outline you build up roughly with your finger and thumb
a cake of clay about half an inch in thickness; then with
your modelling instruments work it up as accurately as your
artistic skill will permit (see Fig. 13).
When in the progress of your work you find it necessary
to leave it for a short time, be careful to cover it over with
a wet cloth, and if for a long time, put two wet cloths over
it, and cover them in turn with a sheet of newspaper. This
is necessary to keep the clay from getting hard and unfit
for working. If at any time you find the clay getting too
stiff, sprinkle it with water shaken from a whisk-broom.
To make the moulds of your clay model you will require a
little plaster of Paris, some lard oil, and some soap, and then
your outfit is complete.
When your clay medallion is finished, build a wall of clay
around it of about an inch and a quarter in height, as shown
in Fig. 13; then get a teacupful of lard or olive oil, and
add to it a good teaspoonful of any kind of soap scraped
fine. Put this on the stove and stir until it is thoroughly
mixed; then with a soft camel’s-hair brush lay a slight coat
over your entire work.
You must now mix your plaster. If the surface of your
medallion is, say, one foot by six inches, you will require
about two pounds of plaster to about a quart of water.
Sprinkle the plaster into the water, and then watch it until
bubbles have ceased to come to the surface. When no
more bubbles appear, stir it up well with a stick. The mixture
should be about the consistency of thick cream. The
exact proportions you must find out by experiment. This
plaster cream you pour quickly over your medallion, blowing
gently with your mouth on the fluid as it spreads itself
over the face of your work; this is to prevent the formation
of bubbles. In a short time the plaster will become hard;
you then remove your clay wall, and lift the plaster mould,
or matrix, from the clay. This you do by passing a penknife
all round between the plaster and the slate, after which
it lifts easily. You have now a perfect plaster mould. If
you find any small particles of clay adhering to it, wash them
off with a soft camel’s-hair brush and water.
You now want to get a plaster cast from your matrix.
To do this you lay a coat of the soap and oil mixture with
a camel’s-hair brush all over the face of the mould, and
then pour in the plaster just as you did before, taking the
same precautions to blow upon the plaster and to build a
wall of clay around the mould.
You let this stand for half an hour until it is perfectly
set, when you can remove your casting by passing a thin-bladed
knife all round between the matrix and the casting.
If it does not then lift easily, plunge the whole thing in
water for an instant, after which you will have no difficulty
in separating the two parts.
You now have a plaster cast of your original work, which
you can touch up and finish off with sand-paper, or with
the blade of a penknife if necessary.
You can, of course, make as many casts as you please from
your mould, and thus have very pretty little souvenirs to
present to your friends.
MEDALLION AND PLAIN CASTING
Fig. 13.Fig. 14.Fig. 15.Fig. 16.Fig. 17.
This same procedure may be employed when making
moulds and casts from coins, medals, and medallions. A
narrow frame is made of wood, and at the middle of this a
medal is placed on the flat oiled surface of a board, a slate,
or a piece of marble, as shown at Fig. 14. The face of the
object is now prepared with the oil, and the plaster is poured
as previously described. If any number of reproductions
are to be cast from the mould, it would be well to give it
one or two coats of thin shellac; then oil it before each impression
is made.
It is not a difficult matter to reproduce in plaster almost
any object that has no undercut or parts that will not easily
detach from a mould. When making them, the first thing
to do is to get a piece of board about a foot square; that is
to work on, so as not to soil the table. Then you want a
lump of clay about as big as a football, five or six pounds
of plaster of Paris—it only costs three cents a pound—and
a half-dozen wooden pegs. You also want a cup of warm
melted lard, or Castile soap dissolved in hot water, to rub
over what you are going to copy, so as to prevent the plaster
sticking to it.
Now, suppose it is an egg you want to copy. You rub it
all over with your melted lard, and lay it down on the piece
of board. Pack clay around it as high up as the middle of
the egg, and as far out as half an inch from the widest part.
You must be particular about not putting clay higher than
the middle, because, if you get the clay too high, you can’t
get the egg out without breaking the mould.
When you have the clay around the lower half of the
model, smooth and level it, and push two pegs in opposite
corners, as shown in Fig. 15. Now around the whole thing
make a box or case of clay, with sides rising half an inch
higher than the model (Fig. 16). Mix plaster of Paris and
water together till you have it like molasses on a warm day;
pour that into the clay box, so that the model is covered,
and the mixture even with the top of the box.
The plaster will set, or become hard, in a little while, and
you then tear the box away, and take out the model and
plaster together, leaving the first clay mould. Next put
the plaster mould and model in a clay box just as you did
before, and pour plaster over it, first greasing the model and
upper surface of the mould. Before pouring on the plaster,
roll a small piece of clay in your fingers, and put it on the
model (Fig. 17), so that when you pour plaster over it, a
hole will be left in it through which you may pour plaster
for the final cast.
For the second time tear away the clay box, and gently
separate the two parts of plaster of Paris; take the model
out, and you will have two blocks of plaster, which, when
brought together, will contain an exact mould of the model
(Fig. 18), and one block will have an opening in it through
which you can pour plaster. Before pouring in the plaster,
however, be sure to grease the insides of the mould. Then
put the parts together, using the pegs and holes as guides
to a proper fitting, and tie firmly with a piece of twine.
Now pour the plaster in, and then shake the mould gently
in order to make the mixture settle in all the smaller crevices.
PLASTER-CASTING IN GENERAL
Fig. 18.Fig. 19.Fig. 20.
Of course when you separate the parts of the mould now
you will have a perfect cast of your model. It will have a
thin ridge running around it where the mould was joined,
but that is easily rubbed off with sand-paper.
In a mould made from a hand you proceed in about the
same way. The great thing is to find the dividing line in the
model; that is, the place where the parts of the mould ought
to join. In the egg it is easy enough, for you can divide
it into two equal parts; but you take a hand, and you have
to make the line around each finger just where it is broadest
(Fig. 19), and build the clay up to that line. The wrist-hole
in a hand-mould makes a good hole to pour the plaster in
(Fig. 20), and, after all, a hand is easy to make.
These simple directions should make it easy for the
amateur modeller to acquire the first principles of the art.
There are several good compositions in which the young
craftsman can work besides plaster of Paris, such as “Kiln
Cement,” “Carton-pierre,” “Papier-maché,” “Plaster Compounds,”
“Artificial Marble,” and “Concrete.”
There is nothing prettier or more attractive, hanging
on the walls of one’s parlor or chamber, than a group of
signet impressions in sealing-wax of various colors, artistically
arranged and handsomely mounted; while the
pleasure to be derived in seeking them is quite as keen as
that which the coin or stamp hunter enjoys, without the
expense attached to them, for our seals cost comparatively
nothing. The outfit is simple, consisting of a dozen sticks
of sealing-wax in different colors—black, brown, red, gold,
white, and green, making a charming combination with any
other shades that take the fancy of the collector. A light
wooden or strong pasteboard box to carry the articles, a
box of matches, a white taper (cut in half for convenience’
sake), and, later on, a piece of stiff white card-board
(16 × 22, 22 × 28 being good sizes) to mount them on.
Keep in the bottom of the box containing the wax a
dozen or more pieces of thick, white, unruled writing-paper
cut into ovals, circular, oblong, and square shapes, varying
in size from one-half inch in width to two inches in length.
This is all that is required. Now for our hunt. As you
meet friends and acquaintances, notice their rings and watch-charms.
When any are discovered with a figure, crest,
handsome monogram, or initial on it, borrow it, and make
your impression. This is accomplished by laying a piece of
your writing-paper, at least half an inch larger than the seal
to be used, on some smooth surface like a table. Then take
a stick of wax between the thumb and forefinger of the right
hand; with the left hand a match or taper, and bring them
together just on the paper where the wax melts sufficiently
to drop freely. Rub the end of the sealing-wax quickly over
the middle of the paper. Then moistening the seal with the
tongue to prevent the stone adhering to the burning wax,
press it firmly into the hot bed prepared for it, a second or
so, being careful to lift it straight up when taken off, thus
securing a clean edge. If this is properly done a fine impression
of your subject is secured. Repeat this operation
several times, taking different-colored wax for duplicates,
which will enable you to make exchange with other collectors,
who are unable to get these same figures, but have
others not in your collection.
Chapter XII PYROGRAPHY — A Platinum-point Outfit — The Practice of Pyrography — A Few Suggestive Designs — Leather-work
Pyrography, or fire-etching, is by no means a modern
art, but one that was practised many centuries
ago both in civilized and barbarous countries. In Europe,
during the early ages, this work was executed with a poker
inserted in the fire and heated red hot; but as the iron must
have cooled quickly, the task of embellishing a panel was
a tedious and laborious one.
A knowledge of drawing will be very helpful to the young
pyrographer, as the object can be sketched in lead-pencil
and followed with the heated iron or platinum-point.
Of the various materials that may be used on which to
etch the ornament, wood and leather have been found the
most satisfactory, since they retain the deep, rich brown-and-black
tones given by the heated iron, and yield more
readily under the tool than other materials.
If wood is employed, such as oak, birch, maple, holly, and
cherry, it should be selected with a pretty grain and as free
from knots as possible; but if leather is used, a good quality
of oak-tanned sole-leather will give the best results; although
for light work a pleasing effect can be had by employing a
stout Suède and etching on the rough side.
The etching-tools are few and simple, and are shown in
the illustrations.
Fig. 1 depicts a set of irons that can be made by a boy
from pieces of round iron a quarter of an inch in diameter
and having the points fashioned with a file. The ends of
the irons can be inserted in file-handles that may be purchased
at a hardware store for a few cents each.
Fig. 1.Fig. 2.
A is a sharp-pointed iron for outlining; B is a round-pointed
one for broader work; C is a stub for bold work,
and measures three-eighths of an inch in diameter; D is a
curved background tool, and is used for burning in the
grounds, or shading, in order to make the design stand out
boldly.
With these tools and a spirit-lamp and rest, such as is
shown in Fig. 2, some very good work can be done; and to
complete the set a sharp-edged eraser may be added to
scrape away the wood, if perchance it should have been
touched by mistake with a hot iron.
To begin with, it is best to carry out a simple design—to
decorate a panel, a drawer front, or the sides to a small
wooden box. The pattern must first be drawn out in full
size on a piece of smooth brown paper, and then transferred
to the face of the wood by the use of colored or black transfer-paper,
sheets of which can be had at an art or stationery
store for a few cents each.
To reproduce the design, lay the transfer-paper face down
on the wood, and over it the drawing face up; pin it fast,
and go over all the lines with a lead-pencil, bearing down
to impress them on the face of the wood. Having gone over
all the lines, unpin one corner and raise both sheets of paper
to see that the impression is good. If not, replace the paper
and redraw the faint or unmarked lines.
Fig. 3 is a simple and attractive design for the embellishment
of a panel, of a small drawer, or as one of the sides to
a box.
If the tools shown in Fig. 1 are used, fill the spirit-lamp
half full of alcohol and light it, then place the pointed iron
A on the rest in such a position that the point will be enveloped
by the blue flame, where, after remaining a minute,
it will become red hot. Remove it and trace the lines in the
wood with the hot point until all of them have been gone
over, and as a result the wood will have the appearance of
Fig. 4. The iron will necessarily require reheating continually,
and to save time it would be well to have two or
three irons of each shape, as they cost but a few cents, and
are easy to make.
Fig. 3.Fig. 4.
After the outlining has been done, the background should
be burned in with the curved iron D. Fig. 5 illustrates the
manner in which this may be accomplished; the left side
is partly finished, and shows the simple and effective mode
of lining or “dragging” the ground. The right side is a
finished ground, where the cross-strokes may be seen with
an occasional oblique stroke to lend added density. It is
not always possible to complete a ground until the ornament
is shaded, and what may seem to be a finished background
before the shading will sometimes afterwards prove
too weak or flat, and will necessarily require going over in
places to strengthen and darken it.
Fig. 5.
Fig. 6.
Fig. 6 is a piece of finished work where the ornament is
shaded to give it character, and where also the background
has been retouched in some places to give it a stronger feeling.
This illustration is a good example of pyrography, and
gives the relative tones of high light and shadow.
Before beginning on an ornamental piece of work, it would
be well to practise on clear pine or white-wood, and to become
dexterous in the use and manipulation of the tools,
and to find the ones best adapted to certain kinds of work.
The round-pointed tools B and C, shown in Fig. 1, are good
grounders, and where large work and bold patterns are carried
out they will be found of use.
As some very fine work is possible in fire-etching, the art
can be applied in many ways to decorate pieces of useful
and ornamental furniture about the house.
Charming pictures can be produced on holly and white
mahogany; designs of fruit and flowers and conventional
patterns may be applied to panels, tables, screens, frames,
glove and handkerchief boxes; and on maple bedroom furniture
designs in pyrography lend a pleasing and artistic appearance.
When working on leather do not cut out the form until
after the work is finished, but pin the material flat on a
board to hold it firmly while operating with the hot irons.
The entire design should be drawn on the face of the
leather with a soft lead-pencil, and afterwards gone over
with the burning-points. When the work is completed the
piece of leather should be removed from the board, and the
outline cut with a sharp penknife or a pair of scissors.
It may be desirable to varnish and polish some specimens,
and it is possible to do so by coating the surface with a thin
spirit varnish or thin furniture polish. This will bring out
the density of the burned lines, and enrich a design that on
certain woods might seem flat. Too much varnish must be
avoided, and only a very thin coat will be necessary to obtain
the desired result.
In preference to the hand-made irons, which must be
heated each time before using, the modern devotees of the
fire-etching art use the gasolene lamp and platinum-point
apparatus. These outfits may be purchased at the art shops
for a comparatively small sum, but the young craftsman may
want to make his own apparatus. With the exception of the
platinum-point and its metal holder, this is quite possible.
The parts of a gasolene outfit are the bulb, rubber tubing,
platinum-point and handle, reservoir-bottle, metal union-cork,
and a spirit-lamp. The latter may be purchased at a
drug or hardware store for a few cents; but a good-working
one can be made from a square or round bottle, a cork with
a hole through it to receive a piece of brass tubing, and a
piece of round lamp-wicking. (See Fig. 7).
Heat a piece of wire red hot, and burn a hole through the
cork large enough to slip in a piece of brass tubing a quarter
of an inch in diameter. Pass the lamp-wick through the
tubing, and allow an inch or two of wicking to rest at the
bottom of the bottle. This lamp should be filled half full
of alcohol, and it is used to heat the platinum-point at first;
after that the rush of gasolene vapor will keep the tool red
hot. The gasolene reservoir is a square bottle with a fairly
large neck into which is fitted the metal union-cork. If it
is not possible to purchase this cork, then one can be made
as shown at B in Fig. 8.
From a solid piece of lead one and a half inches long, three-quarters
of an inch wide, and one and a quarter inches deep,
cut a lug, with a knife and file, having two projecting ears
as shown at C in Fig. 8. The lower part is half an inch in
diameter and three-quarters of an inch long. With a hot
iron burn a hole in a cork so that the lower end of the lug
will fit within it, as shown at D in Fig. 8. With a small
drill bore a hole in the end of each ear. These holes should
run through towards the middle of the lug, taking care,
however, not to bore too far, since the holes must not meet.
Bore two holes up through the lower part of the lug so that
each will meet one of the holes bored through the ears, as
shown by the dotted lines at A in Fig. 8. By this construction
the air forced through a tube connected with one ear
travels through that ear and down into the bottle; then up
through the other hole and out at the opposite ear, where
another tube is attached that leads to the platinum-point.
The end of an old syringe can be used for the supply bulb,
and for the pressure bulb there is nothing better than the
inner bladder of a football, if it can be provided with an
extra tube so that air may be forced in at one end while
it is escaping at the other. This rubber balloon can be inflated
to twice its normal size if care is taken not to blow
it up too large. As a precaution against its destruction, it
would be well to make a protective net from cotton string
with a small mesh. This is easily done by making a wire
hoop the diameter of the bladder when blown to its safe
size; then loop cotton string over it, as shown in Fig. 9,
and tie the knots forming the meshes as shown at the left
side of the same drawing. Continue the work until a cylindrical
net is formed about three or four inches longer than
the size of the inflated bladder. With a draw-string the
open ends of the net can be drawn together after the bladder
is placed within it. The outlet of the bladder is connected
by a rubber tube to one ear of the cork, and another tube
leads from the opposite ear to the platinum-point and
holder.
The holder is simply a piece of brass tubing at one end
of which a coupling is made fast. This tube is pushed
through a cork handle, or the covering can be made by burning
holes through corks and slipping them over the tube,
at the same time using thick shellac to act as a glue and hold
the corks to each other and to the brass tube. The cork
covering should be heavier near the point end, because the
tube becomes hot from the superheated platinum-point.
This handle should be three-quarters of an inch in diameter,
and gradually tapered to half an inch at the back, as shown
at Fig. 10. The brass tube should be five inches long and
the cork handle about four inches in length. Half an inch
of the tube projects beyond the back, or top, of the handle,
and over this end a piece of rubber tubing is slipped. A
complete outfit should contain three points—one sharp,
one round, and one curved. These can be purchased at almost
any art store, and should appear as shown in Fig. 11,
A being the sharp point, B the round one, or grounder, and
C the curved, sharp-ended point that is used for fine work
and light lines in shading or background.
A good platinum-point can be bought for one dollar and
a half; but better ones will cost all the way from two dollars
to five. If a boy has points B and C in his outfit, he
can do some very good work; but should it be possible to
have one only, then the curved point C should be the choice,
since with that tool almost everything can be done.
The principle of the gasolene pyrographic outfit is very
simple. The reservoir-bottle is filled half full of gasolene,
or benzine (62°), which can be had at a paint store for
twenty-five cents a gallon. The union-cork stopper is then
pushed down, and the platinum-point screwed in place at
the end of the handle. Light the spirit-lamp and hold the
platinum-point in the flame until it is cherry-red; then
squeeze on the supply-bulb and fill the pressure-bag. The
air forced through the first section of rubber tubing goes
down through one hole in the cork, picks up some gasolene
vapor from the reservoir-bottle, and passes along the second
section of tubing to the point, where it escapes through a
very small hole at the side. Directly the vapor reaches the
flame it ignites, and the hot point is kept in its heated state
so long as the pressure of the bulb forces the gasolene vapor
out through the hole.
Do not bear hard on the wood when working. The heated
metal will char the wood easily if gentle pressure and several
strokes are used. Points A and B (Fig. 11) can be used on
all sides and on end, but point C should be used only on its
curved edge, as shown at A in Fig. 12; never as shown
at B.
When both hands are needed for the work of holding the
material and tool, a convenient foot device can be made, as
shown in Fig. 13. This is a pressure-jack made from two
boards, the upper one being cut and hinged, as shown in the
drawing. The boards are twelve inches long and three
inches wide, the short end of the top one being attached to
the bottom plate with glue and screws. The wood should
be three-quarters or seven-eighths of an inch thick, and it
may be given a coat of shellac or varnish to improve its appearance.
If a constant supply of air-pressure can be had without
the bothersome hand or foot bulbs, it makes it so much
easier to master the art of pyrography.
Any ingenious boy who has a foot pump, such as are used
for bicycle or automobile tires, can get an old boiler from a
plumber and rig up a pressure-tank such as is shown at Fig.
14. A small pressure-gauge should be screwed fast on top
of the boiler, and two outlets with brass cocks should be
constructed out of one-eighth-inch gas-pipe, the fittings
being purchased at a gas-fitter’s or a supply house. By
means of the pump compressed air can be stored in the
tank, and the pressure will be registered on the gauge.
Twenty to twenty-five pounds will be quite enough pressure
for an old boiler, although sixty pounds is the standard to
which most of them are tested when new. The advantage
of the two outlet-pipes will be appreciated when working,
because each can lead to a different sort of point, and this
will save the time and bother of changing points frequently
for different parts of the work.
Basswood, deal, and white-wood are the material most
commonly employed for this work, since the grain is close
and the color even. Almost any soft wood, however, can be
used, and the boy who has mastered the craft of carpentry
can make his own boxes, frames, stools, chairs, and miscellaneous
wooden objects, and then embellish them with designs
drawn in lead-pencil, the lines of which it will be an
easy task to follow with the hot platinum-point.
Small picture-frames can be made from one piece of wood,
but they are better, and will last longer, if made from two
pieces. For a small round frame a pretty pattern is shown
in Fig. 15. This can be made from six to twelve inches in
diameter, and the frame proper should be from two to four
inches wide, having an opening for the picture from two
to four inches in diameter. The easiest way to make a
frame is in two pieces, as shown in Fig. 16, the left
side representing a narrow frame and the right a wider
one.
From holly or basswood one-eighth or one-quarter of
an inch thick cut a disk six inches in diameter, and at the
middle cut an opening three inches in diameter. Strike
the circle with a compass; then use a fret-saw to do the
cutting. From pine or white-wood half an inch in thickness
cut a disk five and a half inches in diameter and at the
middle a hole four inches in diameter. Lay the thin disk
down on a table, and after applying glue to one surface of
the smaller but thicker disk place it, glue-side down, on the
larger disk, taking care to have the grain of the two pieces
run in opposite directions. See that the disks are adjusted
so that one is centred directly over the other; then impose
a piece of board on top of the frame, and put fifteen or twenty
pounds of flat-irons or other heavy weights on the board to
press the two wood pieces together. Leave them for several
hours; then remove the weights and clean off the hard glue
that may have oozed out from between the disks. Give the
back of the frame two coats of shellac to prevent the wood
from absorbing moisture, and it will then be ready for the
design and the pyrographic ornamentation. By using the
two pieces of wood, a rabbet is thereby formed for the glass
and picture. If the frame had been made from one piece
it would have necessitated the cutting of a rabbet. The
design of holly leaves and berries is a pretty one, and quite
simple to draw and burn.
A long picture-frame with three oval openings is shown in
Fig. 17. This is made from two pieces of wood, as described
for Fig. 15, and then embellished with the design and
pyrographically treated.
Fig. 17.Fig. 18.Fig. 19.Fig. 20.Fig. 21.
In Fig. 18 an idea for a stool is shown. This little piece
of furniture can be made of white-wood by the boy who has
learned to handle tools. The legs are two inches square and
fifteen inches high. The side-boards are each twelve inches
long, four inches wide at the ends, and three inches at the
middle; they are arched or crowned, as shown in the drawing.
Blocks of wood are glued and screwed to the inner
edge of each end, and these in turn are made fast to the
upper parts of the legs. The top is sixteen inches square,
with the corners cut out, so that it will fit down on the top
of the side-rails and between the tops of the legs. Strips of
wood three-quarters of an inch square should be glued and
screwed to the under side of the seat at the four sides, and
these in turn must be made fast to the top inner edges of the
side-rails.
When embellishing leather, select the quality that is best
adapted to pyrography. It must not be too thin, as the
hot point would quickly perforate and cut it. Cowhide,
Suède, calf, sheepskin, heavy kids, and binding leathers are
best adapted to this work. Purses, bags, mats, boxes,
travelling-rolls, and valises are made in leathers that are
admirably adapted to pyrography, and these should be purchased
rather than made, for leather-working is a craft that
would not interest the average boy.
An heraldic pattern for a small pigskin or cowhide purse
is shown in Fig. 19, and Figs. 19, 20, and 21 are designs
adapted to different kinds of purses, wallets, and bill-books.
It is, of course, impossible to lay down any specific sizes
for these patterns, as the sizes of leather goods vary.
To improve the appearance of floral patterns, it is desirable
to tint or stain flowers, leaves, berries, and stems in
their natural colors. This can be done on the unfinished
wood, either before or after the outlines and background
are burned. Oil or aniline stains may be used for this purpose.
If a dead finish is desired, the wood can be left
without further treatment, except for a thin coat of beeswax
and turpentine. If a glossy finish is preferred, the
wood must be treated to several thin coats of white
shellac; then a finishing coat of white dammar-varnish is
applied and left to dry for several days. The inside of
boxes should be “grounded” and shellacked, and at the top
and bottom pads made of card-board, cotton-filling, and
silk should be glued fast.
Chapter XIII BOOKBINDING AND EXTRA-ILLUSTRATION — The Tools — The Practice of the Art — Rebinding Books — How to Extra-illustrate a Book — A Circulating Library
There must be many boys who would like to know
the simple methods of binding books, so that they can
do it without the aid of machinery or costly tools. They are
probably aware that when the material of a book comes
from the hand of the printer, it consists of a number of large
sheets that are commonly twenty inches long and fifteen
broad. Eight pages of the book are printed on each side
of a sheet in such a peculiar order that when the sheet is
properly folded the pages will be correctly arranged by the
numbering. To see how this is, take a sheet of paper that
measures fifteen inches by twenty. With a ruler and pencil
draw lines across the sheet so as to divide it into eight equal
parts. Each of these parts is a page. Number them as
shown in Fig. 1. Turn them over and number the pages
on the other side as shown in Fig. 2. Now to fold the sheet,
lay it on the table with the side up that has on it 2, 15, etc.;
bring page 3 over upon page 2, creasing the sheet in the
middle. Then the four pages lying upward will be numbered
4, 13, 12, 5. Bring page 5 over on page 4, and crease
in the middle again. Pages 8 and 9 will now lie upward.
Fold 9 over on 8, and the sheet will be folded as it should be,
and is now called a signature. In a book there may be
twenty or thirty, or more such signatures, which are numbered
so that the binder will know in what order to place
them. These numbers are placed at the bottom of the first
page in each signature.
Before beginning the work of binding, a few preparations
must be made, and first of all a press is indispensable. This
is very easily made. Take two pieces of board, of some
close-grained hard-wood, about one and a quarter inches
thick and a little larger than any book you are likely to
undertake to bind. Eighteen by twenty inches will be
found the most useful size. Lay your boards together, and
with an inch auger bore through both three holes at each
end of the boards about an inch back from the edge. Now
make six pegs of hard-wood—white oak is excellent—about
six inches long, and fit them tightly into one of your two
boards, on one side of it; that is, the pegs should all stand
out at one side. (Fig. 4.) When this is done, carefully
work down the size of the pegs until they will pass freely
through the holes in the other board, so that the two
boards may be separated or brought close together as required.
The loose or movable board (Fig. 5) should be
fitted with a backstay or two, so that it will stand edgewise
on a table, and the two boards together will thus form a sort
of upright press or vise.
THE PRACTICE OF BOOKBINDING
Fig. 1.Fig. 2.Fig. 3.Fig. 4.Fig. 5.
In order to furnish your press with power, you must now
pass four large iron “wood-screws” loosely through the blank
outer edge of the movable board into holes in the corresponding
edge of the other board, where they should “bite.”
When a book is put into the press it is a very easy matter
to tighten the screws so as to hold it firmly. This simple,
inexpensive, and easily made press may be improved in
various ways; screws with winged nuts may be used, etc.,
but in its simplest form it will be found sufficient for all the
demands the amateur binder is likely to make on it.
Next in importance to the press is the hammer, and this
is the only tool you will be likely to have to buy. It should
be heavy, weighing at least twelve or fourteen pounds, and
should be rounded at the ends. This is used for beating
and compressing the books, shaping their backs, etc. If
you live near a foundry it is quite easy to make a model of
wood or clay and have a hammer cast. In any case, it is
not an expensive tool—any blacksmith can hammer one
out in a short time.
The glue-pot may be almost any little crockery dish, but
it should never be put on the stove. If you have no regular
glue-pot, you can melt your glue in an old cup placed in a
saucepan of boiling water.
Besides the press, hammer, and glue-pot, you must have
a pair of scissors and a few simple but sharp-cutting tools.
When these things are all prepared you are ready to bind
your book.
After removing everything that is not to be included in
your volume, place the “signatures” or parts together in
regular order, striking the backs gently on the table or bench
to get them even. Then place them on a block and beat
with the hammer so as to flatten and compress them as
much as possible. Then they should be put very carefully
into the press and the screws tightened firmly, so as to hold
the volume steady. The back should project about one
inch above the edge of the press. Now, with a common
hand-saw, cut four slits across the back at regular intervals,
not deeper than the teeth of the saw. Take the book from
the press, and into each of these slits or nicks lay a piece of
stout cord or twine (not too thick), and to these cords all
the signatures forming the book must be fastened with pack-thread.
A necessary aid to this sewing process is a small
square frame of light wood. The cords must be tied to this
below and above, as shown at Fig. 3, and the lower part of
the frame must be sufficiently broad and flat for the book
to lie upon it. After the cords are laid into or passed through
their respective nicks, you must open the leaves regularly
and find the middle of each signature, and then pass, with
a needle, the pack-thread along the inside, but twisting it
around each cord in succession as you go along, making it
fast at the end with a hitch or knot. This is much easier
than it sounds, and with a little practice may be done very
quickly. When you have finished the sewing cut away the
cords, leaving an inch and a half or so on each side, which is
left to make the attachment to the cover. This completes
the first stage of the binding.
The book must now be replaced in the press, and its back
covered with a good coat of glue melted in the manner already
described. Leave it in the press until the glue is
thoroughly dry. In the mean time measure the breadth of
the back and go ahead with the preparation of your cover,
which may be made as follows:
Cut two pieces of thin pasteboard a little larger than your
book. Also cut a piece of cloth—calico, linen, or muslin—so
much larger than both pieces of pasteboard either way as
to allow for the back and the turning in. Down the middle
of this paste three or four strips of the same goods to strengthen
the back. Carefully measure the length and breadth of
the back, and lay your pasteboard covers on the table, leaving
the space of the back between them. Now put on your
cloth, turning it around the edges of the covers, carefully
avoiding creasing or wrinkling, and lightly glue it fast as
shown at Fig. 10. Your cover is now made and must be
allowed to dry. Next take your book from the press, unravel
and soften the projecting ends of the cord, and wet
them with strong glue. Lay the book down carefully on its
back into the cover and glue down the cords to the sides.
The book should be supported in this position, which can
be done in any number of ways, and a slip of cloth glued
down over the cords to hold them steady. Then paste over
all this a sheet of white or fancy paper to line each cover,
and when the job is dry your work is done.
Nothing has been said about cutting the edges of the
book, as that is usually done on a machine; but if you are
able to trim them clean with a sharp knife, so much the better.
To do this, place the book into the press before putting on
the cover, bringing up each edge of the three exposed ones
successively, and while held there firmly, cut them carefully
with a sharp knife or shoemaker’s cutting-tool. Any little
inequalities may afterwards be taken down with sand-paper.
The edges when cut may be spattered with any color desired
by using a common tooth-brush and water-colors.
Fig. 6.Fig. 10.
To put on the title in gilt letters, the binder applies a little
of the white of an egg over the space where the letters
are to be. When this is dry, rub the leather with a rag
slightly greased, and then lay on the gold-leaf. Next take
common type used by printers, heat them a little, and stamp
on the letters. The heat makes the gold-leaf stick where
it is wanted, and the rest is rubbed off with a rag. All the
gilt ornamentation on book covers may be put on in a
similar manner.
To get a clear understanding of these directions the boy
craftsman should examine different kinds of books very
closely; and if he has an old and valueless one he can take
it to pieces and put it together again. Perhaps he can improve
its condition. At least he will learn some of the
minor details. He must remember that in bookbinding,
as in all other arts, patience and repeated trials are requisite
for acquiring the skill that produces neat and handsome
work.
It is not always possible for a boy to purchase cloth-bound
volumes of his favorite authors, as they cost quite
a little money. But he may often procure them in paper
covers, and if he is careful to select stitched books, rather
than those simply caught together with wire or “wire
sewed,” as they are termed, it will be possible for him to
rebind them in cloth at a slight expense.
To begin with, strip off the paper cover, taking care not
to tear the printed title on the cover, nor that at the back
of the book, if it is possible to save it. Both of these will be
useful in the rebound volume. With a penknife and sand-paper
remove as much as possible of the paper cover that
has been glued to the back of the book, taking care not to
cut away any of the stitching; otherwise the book would
fall apart. The book in this condition, ready for its “case”
or cover, is shown in Fig. 6. If the signatures have been
caught together with wire, remove the latter with a pair of
pliers; then sew the pages as already described. Get two
pieces of white paper the same thickness and quality of
which the book is made, and fold them over once, as shown
in Fig. 7. With paste or liquid glue attach one at each
side of the book by running the paste along one side of the
folded edge of paper for a quarter of an inch, as shown by
the shaded line in Fig. 7. This is called “tipping,” and
where a page or two have become detached or not properly
bound in, this method is employed to reset it.
When these pages are in place, trim them so as to correspond
to the size of the book; then glue the back of the book
well and attach a piece of crash to the back as shown in
Fig. 8. The crash should be a trifle shorter than the
height of the book, or about half an inch at each end, and
there should be at least an inch of the material on either
side of the book, as shown in the illustration. This material
is known as “crash” in the bookbinding trade, but it is
nothing more than a coarse-thread cloth with open mesh,
and it is sold in dry-goods stores under the name of crinoline.
From clay-board or stiff card-board, binders’ board, or
strawboard, cut two pieces an eighth of an inch wider and
a quarter of an inch longer than the actual size of the book.
These are for the front and back corners. Lay the binding
material—buckram, cloth, or leather—on a table or smooth
board face down. Now, with a lead-pencil, mark two parallel
lines through the middle, as far apart as the thickness of
the book plus the thickness of the covers, as shown at A A in
Fig. 9. Then mark a line across one end at right angles to
these, as shown at B. Apply glue to the covering material
and place the card-boards on the spaces C C, so that the
inner edge and top of each board will line with the pencil-marks
A and B. Press the boards down with the fingers;
then turn the cloth and boards over and press with a dry
cloth, rubbing over the surface to drive down the cloth in
any place where it does not seem to have adhered. With
scissors or a knife cut off the corners as shown at D, taking
care not to approach too close to the corner of the boards.
Leave about one-eighth of an inch of cloth beyond the
corners, so that it will cover them when the edges of the
cloth are turned over. These edges should be about half
an inch in width. After applying glue to them, lap them
over on the card-boards, as shown at Fig. 10, and rub them
with the soft cloth to drive out all air from between these
edges and the boards.
REBINDING AN OLD BOOK
Fig. 7.Fig. 8.Fig. 9.Fig. 11.
When the four sides are finished, the cover or case is ready
to receive the book. Lay the case open on a table, just as
you see it in Fig. 10, and apply glue to the space between
the card-boards, and also on the card-boards for an inch or
so from the inner edges. Now take the book in hand, and
place it so that the back will rest on the space of cloth between
the boards, leaving an equal projection of the cover
above and below the board, or about one-eighth of an inch.
With the fingers press the projecting flaps of crash down on
the glued surface of the cards at either side of the book;
then lift both covers up to the sides of the book (still allowing
it to rest on its back), and with both hands press the
covers together as hard as you can. Hold it in this position
for a few seconds; then carefully lay the book on its side
and place a flat-iron upon it for five minutes.
At the end of this time carefully lift one cover and apply
glue or paste to the first fly-leaf (that is one of the pages
you tipped in), and press it against the inside of the cover,
taking care, however, not to allow the paper to wrinkle.
Turn the book over and repeat this on the other side; then
replace the flat-iron and leave the book under pressure for
a day or two; or, better yet, arrange it in between the
pressure-boards described for Figs. 4 and 5, and leave it
there overnight.
If the first page has adhered to the glue about the edges of
the crash, it will be necessary to carefully pull it away,
taking care not to tear this first page or lining sheet, nor to
disturb the crash. If liquid glue is used, it will not set
hard enough in the five minutes to render it impossible to
remove the paper. If hot glue is employed, it will not be
necessary to close the book and press it, for the glue will
set very quickly, and the first and last pages may be pasted
and laid over the inside of the covers at once, so that when
placed under pressure and left there the crash, glue, and
paste can set and dry at the same time.
The object of pasting the blank pages to the inside of
the covers is to make a good finish to the binding, and also
to lend additional strength to the attachment of book and
case. Fancy end-papers and richly tinted or colored ones
are often used as linings, as you can see in many books.
These are always tipped in as described, so that they will
be the first and last pages in the book.
From the paper cover (which you removed from the book
before binding it) cut the title, and, with glue, apply it to
the front cover near the top, as shown in the illustration of
the finished book (Fig. 11). If the back title has been
preserved that can be pasted along the back.
Every one knows how much more interesting is an illustrated
book than one without pictures. What a satisfaction
it would be to us if we could illustrate our favorite
books ourselves! What pleasure we would take in it! This
is entirely possible. It is a comparatively easy matter to
illustrate a book, or, in the case of a book that already contains
pictures, to extend and increase the illustration by
means of old prints, engravings, and pictures gathered from
various sources, and bound in with the leaves of the book.
This is called “extra-illustrating,” and has long been a
favorite amusement of collectors.
A book that is carefully and judiciously extra-illustrated
is not only much more attractive in appearance, but its
value is greatly increased, and the amount of pleasure and
instruction to be gained by the extra-illustration of one
book is a rich reward for the trouble and time it costs.
The first thing to be done in the extra-illustration of a
book which has been selected for the purpose is the collection
of the pictures. This will often take some time, and
should never be done in a hurry. Old magazines and illustrated
papers will supply many of the necessary pictures,
while old books and the shops devoted to the sale of old
prints and engravings will furnish others.
Suppose The Three Musketeers to be the book chosen. A
portrait of the author should be selected for a frontispiece.
Other portraits, representing the author at different ages,
may be used in the book; but that which serves as the
frontispiece should be one made about the time he wrote
the book.
The other illustrations should consist of pictures referring
as nearly as possible to the scenes and incidents described
in the story. Pictures of an author’s home or portraits
of members of his family are always useful; but no
picture, however interesting in itself, should be included if
it does not bear directly upon the scenes in the book, or is
not in some way connected with the author.
When a sufficient number of illustrations have been selected,
they should be mounted ready for binding. This is
the difficult part, and must be done with great care.
Take a sheet of strong paper, as nearly as possible the
same color and weight as the paper upon which the book
is printed, and cut it the exact size of the page of the book.
Then trim your print close to the work, being careful to see
that the edges are perfectly straight. Cut out from your
sheet of paper a hole exactly the shape of the print, but an
eighth of an inch smaller on all sides. This opening should
not be exactly in the middle of the page, but a little above
the middle and a little to the left, so as to give wider margins
at the bottom and on the right. Now gum or paste the
edges of the print on the under side with great care, and
place it over the opening so that it is even on all sides. As
there is a difference of only a sixteenth of an inch on the four
sides, it is a delicate matter to place the print on the mount
accurately, but after a little practice it can be done quite
easily and quickly.
After the prints are mounted, they should be pressed until
dry. Then the cover of the book should be carefully removed
with the aid of a sharp knife. Never mind about
ruining the blank pages or fly-leaves, for they will be replaced
by the binder when he puts the cover on again; but
care should be taken to avoid cutting or tearing any of the
printed pages. When the cover is removed, it will be found
that the book is put together in sections laid one on top of
another. These sections consist of sixteen or some other
number of pages each, and a section is known in a printing-office
as a “signature.” The threads that sew the book
should be cut, and the signatures should be carefully separated
from each other.
Then the mounted prints should be laid in as nearly as
possible opposite the incidents they illustrate. The prints
should always be inserted face up, and the sidewise full
pages with the bottom of the picture towards either the outside
or inside margin of the book. Now your book is ready
for the binder. Perhaps your extra-illustration has been so
extensive as to increase the bulk of the book so much that
the original cover will not go on again, and perhaps enough
has been added to make the one volume into two, in which
case your binder can supply you with simple covers at a
very slight expense.
Books of travel, or stories of hunting, fishing, etc., may
be beautifully illustrated by photographs. Unmounted
prints are to be desired, although it is possible to take
prints off mounts by a liberal soaking in warm water. The
soft-finished photographs, such as bromide and platinum
prints, are vastly better than the shiny albumen prints.
Photographs should be mounted in the same way as other
prints, except that no openings are to be made in the
mounts. The prints should be pasted on flat and pressed
until dry. Albumen prints have a tendency to curl up,
and it will require a pretty stiff paper to keep them flat.
This is one of the reasons why platinum or bromide prints
are so much better. When albumen prints are used they
must be mounted wet, and should afterwards be burnished,
which can be done by any professional photographer. An
amateur photographer can have the fun in many cases of
making the pictures himself for the book he wants to extra-illustrate,
and the finished work will have an added interest
and value to him.
The use of photographs, especially if many are included,
will greatly increase the thickness of a book, and it will
generally be found advisable to have the binder make it
into two volumes of equal size.
In a small town, or in a residential section of a city where
most of the young people are acquainted with one another,
a circulating library may be formed at a nominal cost. This
can be done in two ways: the first plan is for the members
to contribute the books—from one to ten volumes—as may
be agreed upon. Many people hesitate to lend books, because
they “fly off and never come home to roost,” but by
the circulating-library system law and order can be maintained.
One of the most successful libraries of this kind
was carried on for a number of years in a New York town.
The young people, in due time, became married men and
women, but through the association of the library they continued
to hold together like a great big family.
A regular set of by-laws were established and lived up to.
Books could be drawn each week, on a day set for this purpose.
A librarian was selected, and in his house the bookcase
was located. There were three locks on the case. The
key of one was held by the librarian, another by the president,
and the third by the secretary and treasurer. Regular
dues were assessed on each member—twelve cents a
year at first; then fifty-two cents, and finally one dollar.
Books kept over two weeks were charged for at the rate of
one cent a week, doubling each week for four weeks. This
fine made it imperative for the subscribers to return books
at the end of three weeks or suffer a heavy penalty.
Another popular scheme was carried out by the children
in the Glenwood section of Greater New York. They held
a fair some years ago, and made quite a little money. They
then purchased paper-covered books by good authors and
rebound them in cloth. A bookcase was constructed that
held over one hundred volumes, and the same co-operative
plan was inaugurated that has just been described.
Chapter XIV MAGIC LANTERNS AND STEREOPTICONS — A Home-made Magic Lantern — A Stereopticon — Lantern Slides by Contact-printing — Lantern Slides by Reduction
Boys who have cameras, and who have made good
collections of views, portraits, and other interesting
pictures, may find a great deal of pleasure in entertaining
friends with stereopticon exhibitions of their work. The
necessary plates and materials may be purchased at any
camera or photographic supply store, and with a little
patient practice excellent lantern slides may be made. A
good magic lantern or stereopticon is a luxury, but for the
ambitious boy there is a way to make one at home with
but little outlay of money beyond the cost of the lenses and
lamp.
A box, some thin boards, an ordinary central-draught or
duplex-burner lamp, a reflector, some nails and screws, a
pair of condensing-lenses, and a projector are the materials
necessary.
Make a box of half-inch wood, twelve inches long, eleven
inches high, and seven inches wide, outside measure. Cut
a round hole four and three-fourths inches in diameter at
the front of the box, the middle of the hole being eight
inches above the inside bottom. Make a door at the back
of the box, and fasten a reflector just opposite this hole.
Cut a hole in the top of the box for a lamp-chimney to
come through. Nail a piece of half-inch wood eight inches
long to the front of the box three inches from the bottom
(see Fig. 1). We will call this the deck. Fasten a piece of
wood fourteen inches long and four inches wide on either
side of the box and deck-piece (see Fig. 2). Perforate the
bottom of the box with holes half an inch in diameter, to
afford the necessary draught to the lamp. Elevate the box
on two cross-sticks an inch wide (see Fig. 2 B B).
Fig. 1.Fig. 2.Fig. 3.Fig. 4.Fig. 5.Fig. 6.Fig. 7.
From an optician or camera supply house obtain a pair
of four-inch condensers mounted in a brass barrel, and a
quarter-size projector with a rack and pinion. Mount the
condensers in the hole in front of the box, supported by
means of a block (Fig. 3), fastened on the inside front of
the box (see Fig. 4).
In order to adapt the focus of the lenses according to the
distance the lantern is from the screen, a sliding front is
necessary (see Fig. 5). Cut a base-block scant seven inches
wide and six inches long, fastening to it, three and one-half
inches from the front, an upright piece of wood high enough
to be even with the top of the lantern-box. When the base
is resting on the deck in front of the box two small angle-brackets
will steady the upright and make it rigid (see Fig.
5). Cut a hole in this upright board so that the centre of
the projector mounted in it lines exactly with the centre
of the condensing-lenses. This is an important point; if
the lenses are not carefully mounted opposite one another
the picture will not be clear. Now fit a piece of wood one-fourth
of an inch in front of the main box, fastening it at
the top with a strip of tin. There must be a hole three inches
square cut in this board, the middle of which must line with
the centre of condensing-lens. In the opening between this
board and the box slip a thin piece of board for the slides to
rest on. Set a double-wick lamp or central-draught burner
within the box at the proper height, so that the brightest
part of the flame will be in direct line with the centre of the
reflector and the condensing-lenses.
The principle of the magic lantern is the reflection of the
light through the condensing-lenses, which pick up all the
light possible and throw it through the slide, which is located
directly in front of it. The light is then taken up by the
projector, and the pencils of light are thrown onto the
screen, at the same time magnifying the picture. This
principle is shown by the dotted lines in Fig. 6, which show
also the relative position of the lamp, lenses, and reflector.
To keep in the light that would escape through the top
opening in the box, put a piece of common stove-pipe (small)
over the lamp-chimney. Cut a cap from a piece of tin
(Fig. 7 A), the ears extending down inside the chimney to
hold the cap in place, when the cap-piece is bent in a half
circle as shown at Fig. 7 B.
To cover the space between the lantern-top and the moving
front board a piece of black cloth can be used. Or if
you have an old camera-bellows it may be made fast to the
back of the projector-lens board and to the front of the slide-board
located close to the box. It is not necessary to have an
absolutely light-tight bellows; indeed, a very good one can be
made from some wire hoops with black cloth sewed to them.
In Fig. 8 the wire hoops are shown, and in Fig. 9 the finished
bellows, with the cloth stitched in place, is ready to
be attached to the boards with small tacks or staples.
When all the parts are assembled, and the lantern is complete
(except the bellows, which has been omitted so that the
working parts may be more clearly shown), the lantern will
appear as in Fig. 10.
The cost of a good stereopticon will range from twenty-five
to seventy-five dollars, and that sum places it beyond
reach of the average boy. The following instructions and
illustrations will enable any smart boy, who is handy with
tools and light materials, to make a high-grade stereopticon
with lamp and mechanism that is capable of doing really
good work.
Fig. 8.Fig. 9.Fig. 10.
The materials needed for its construction will be some
sheet Russia iron, thin mahogany or cherry boards three-eighths
of an inch in thickness and six inches wide, some
round-headed brass screws, small hinges, a camera-bellows,
and the necessary lenses and lamp. The tools include a
light pair of metal shears, a fine-tooth saw and a compass-saw,
a small hammer, plane, and screw-driver, and a light
cold-chisel.
To begin with, obtain a board twenty inches long, six
inches wide, and three-eighths of an inch in thickness to
serve as the base-board. Treat this board to several successive
thin coats of shellac, and rub down the last coat with
fine sand-paper to give it a smooth surface. Cut another
piece six inches wide, eight and one-eighth inches long, and
in it make a round hole about four and a half inches in diameter,
through which the case that contains the condenser-lenses
may pass and fit snugly. This board is to be placed
nine inches from one end of the base-board, and fastened to
it in a standing position with long, slim screws driven into
the lower end through the underside of the base-board.
Fig. 11 shows the arrangement of these boards, also the
runners and sheet-iron hood.
From a sheet of Russia iron cut a piece nine and a half
inches wide and twenty-three inches long, and have a tinsmith
roll one edge over a piece of wire so as to stiffen it.
With a rule and piece of chalk divide and mark off the
sheet into three divisions, the end ones measuring eight and
a half by nine inches and the middle one six by nine inches.
CONSTRUCTION OF THE STEREOPTICON
Fig. 11.Fig. 12.Fig. 13.Fig. 14 A.Fig. 14 B.
Lay the sheet on a board at the edge of a table so that a
chalked line is directly over the sharp edge, and, holding it
down firmly with one hand, bend the iron down with the
other, forming a right angle. Bend the iron on the remaining
line in a similar manner, and the hood is formed.
In the top of this hood, at the middle, mark off an oblong
two inches wide and six inches long; then cut out the piece
of iron with a cold-chisel and a hammer, laying the sheet-iron
on the upturned surface of an old flat-iron. File or
emery-paper the edges of the opening to render them
smooth, then cut an opening in one side, three and a half
inches high by four inches long, for a door.
Through the top hole a lamp-chimney may project that the
surplus heat may be carried upward. For the side opening
a sheet-iron door should be made and hung in place with
small brass hinges, and a brass lever catch to keep it closed.
This catch is a simple little affair, and consists of a thin
piece of spring brass, in one end of which a hole has been
made, while at the other a little knob handle is riveted. One
end is attached to the door, and to the hood beside the door
a catch of thin brass is riveted fast, into which the lever
catch can drop.
To stiffen the door, the edges should be bound with narrow
brass strips, securely fastened with small rivets, or
escutcheon pins, that can be adapted as rivets by cutting
them to the required length.
Two runners half an inch wide and three-eighths of an
inch in thickness are to be screwed fast to the uncovered
top of the base-board, four and a half inches apart, as shown
in Fig. 11. From sheet-iron cut two strips half an inch in
width and ten inches long, and fasten a piece to the top of
each runner, using the same screens to hold them in place
that secure the runners to the base-board. One-eighth of an
inch of each strip will project over the inner edges of the
runners, as shown in Fig. 12, and this edge will serve to hold
the wooden slide-holder and objective-lens board in the
proper position on the base-board.
Make a sheet-iron door six inches wide and seven inches
high, with the edges rolled over a wire to stiffen them, and
in the bottom of the door, at the centre, cut an opening half
an inch wide and two inches high. This will allow the door
to be closed over a gas-pipe that may project for a short
distance from the rear of the enclosure. Attach this door
to the back of the hood with two small hinges riveted at
the top, as shown in Fig. 13, and across the under side of the
base-board, and two inches from either end, screw battens
of wood in which pins have been set. These battens will
raise the lantern up from a table or box on which it may rest,
and allow a draught to pass up through holes made in the
base-board inside the enclosure formed by the iron hood.
These draught-holes will be necessary for either oil or gas
light, and they can be bored about as shown in Fig. 13.
Two small wooden runners must be fastened to the base
inside the enclosure, a distance of four and a half inches
apart, and between them a lamp or gas-jet tray will slide.
From the thin mahogany cut three pieces four and a
half inches wide and seven inches long. In the middle of
these, and four inches from one end, make a centre dot, and
with a compass-saw cut a hole in one of them three and a
half inches in diameter, and in another cut a hole three and
a half inches square.
In the third board make a hole the diameter of the objective
lens; then with screws and glue fasten the first
two boards together, as shown in Fig. 14 A, so that a space
of three-quarters of an inch will remain between them. The
height of this opening should be four and a quarter inches,
and the holes in the middle of the boards should be centred.
These two boards and separation blocks are to be fastened
in an upright position to a narrow piece of three-eighth-inch
board the same length as the width of the upright boards,
as shown in Fig. 14 A; and at the outer edges a saw-cut at
the joint will allow this frame to slide back and forth between
the runners, so that the iron edge may fit in the saw-cut.
To the inside of the front board two springs should be attached
with screws at one end of each; these springs may
be shaped from corset steels, and they should be bent in a
curved position, as shown at the lower end of the opening
in Fig. 14 A. Their use is to hold the slide-carrier back
against the rear board and firmly in place. Slide-carriers
may be purchased at an optical supply house, and they are
made in several shapes; the most convenient ones, however,
are the sliding wooden holders that accommodate two
slides.
The remaining board is to be mounted on a block and
held in place by two angle strips, as shown in Fig. 14 B;
and to enable it to slide between the runners it should receive
saw-cuts also. Procure a camera-bellows four inches
square, or in its absence employ a piece of black silk or
gossamer cloth, and attach it to the frames, as shown in
Fig. 16, with small curtain tacks and glue. Having mounted
these boards on the base-board between the runners, the
box is then ready to receive the lenses and lamp.
From a manufacturer of optical goods purchase a pair of
four-and-a-half-inch diameter condensing-lenses mounted in
a tube, and a quarter-size four-inch back-focus double-objective
lens mounted in a tube with rack and pinion adjustment.
Fig. 15.Fig. 16.
The condenser-lenses should occupy the hole in the front
of the box, where the tube can be firmly held in place by
the inside edge of the hole. The objective lenses are to be
attached to the face of the front board in the position shown
in Fig. 16; and by means of the sliding-board and bellows
the lenses can be adjusted to meet any short-focus range—that
is, a distance of fifteen or twenty feet from the sheet on
which the picture is thrown.
For use in small rooms a duplex-burner, or central-draught
lamp, can be used, and a plan showing the position of lamp,
reflector, and lenses is shown in Fig. 15.
A represents the reflector placed behind a lamp having
duplex wicks. The centre of the reflector should be directly
in line with the centre of the lenses, and the lamp must be
placed so that a portion of the flame, three-quarters of an
inch above the top of the wicks, will line with centre of reflector
and lenses. The light is brightest in oil-lamps, from
three-quarters to an inch above the wicks, and, as only a
small portion of the light is of use, the most brilliant part of
the flame should be employed for projection through the
slide and lenses.
B B are the wicks of the lamp, and the fount should be
placed so that an imaginary line drawn through the centre
of reflector and lenses would pass through the forward edge
of one wick and the rear edge of the other. By arranging
the wicks at the angle shown on the plan, the greatest advantage
can be had from the light.
The positions of the condensing-lenses are shown at C C,
and D represents a slide in position at the front of them.
E E gives the position of the objective lenses, and the
dotted lines F, G, and H, drawn from the reflector edges
crossing at the light, passing through the condensers and
slides, and out through the objective lenses, show the manner
in which the rays of light are collected and thrown
through the transparent picture and lenses, and so on
through space, until it rests against the large sheet.
To complete the stereopticon an oval chimney is to be
made, and fitted with a flange so that it may be held to the
top of the iron hood with four little iron buttons or lap-hooks
riveted to the top of the hood. This chimney should
be four inches long by two inches wide at the bottom, and
one and a half inches square at the top, and eight or ten
inches high. At the top arrange a light-cap about as shown
in Fig. 16, so that the light from the lamp or gas-jet will not
throw rays up against the wall and weaken the picture on
the sheet.
Precaution must be taken to stop out all surplus light
other than that projected through the lenses, since the
useless rays tend to weaken the round disk of light on the
screen, and render the picture weak and neutral in tone,
instead of sharp and vigorous. The wood-work should be
given two or three coats of shellac, and the iron parts should
be blackened.
Dissolving views cannot be shown in a single lantern,
but if two lanterns are fitted with the same kind of lenses,
and placed side by side, so that the disks on the sheet are
uniform in diameter, it will then be possible to obtain some
very beautiful dissolving effects.
Many amateurs have an idea that it requires a great deal
of skill to make lantern slides, but any one who can produce
a good negative can soon learn how to make a good lantern
slide. The simplest way is by contact-printing.
Select a negative free from spots, scratches, or pinholes.
It must have fine detail in the shadows, and no harsh contrasts
of light and shade. The regulation size of a lantern slide
is 3¼ × 4 inches, so choose a negative which will still make a
good picture if all but the portion included in these dimensions
is blocked out. Cover the part of the negative
which is to be blocked out with black needle-paper, or paint
it with non-actinic paint, applying it to the glass side of the
negative. The negative is placed in a printing-frame, and
then by means of a red light the slide-plate is placed over
the part to be printed from, the film side towards the
negative.
If one has a lantern, the light of which is suitable for
printing slides, cover the negative, open the door of the
lantern, and then, holding the printing-frame about fifteen
inches from the light, expose from five to twenty seconds,
according to the density of the plate. A plate that prints
quickly will need but five or eight seconds, but a denser
plate will require a much longer exposure, often as long as
thirty seconds. Cover the plate as soon as it is printed,
close the lantern, remove the slide from the frame, and place
it face up in the developing-tray. Turn the developer over
it quickly, taking care that the whole surface of the plate
is covered immediately. Any developer that makes good
negatives will make good lantern slides. A weak developer
is to be preferred to one which brings out the image quickly.
Develop till the detail is well out; wash and fix same as a
negative.
As every imperfection in a plate is magnified many times
when thrown upon the screen, great care must be taken in
the developing, fixing, washing, and drying. When the
slides are washed, take a piece of clean surgeon’s cotton
and wipe the film very gently, then place to dry where no
dust will settle on the surface.
If there are any spots on the plate after washing and
before drying, they may be removed with ferricyanide of
potassium in solution. Tie a small piece of surgeon’s cotton
to the end of a glass rod, dip it into the solution, and
touch the spot very lightly. Rinse the plate at once, and
if the spot has not entirely disappeared repeat the operation.
The ferricyanide works very quickly, and must be
rinsed off as soon as applied.
If your negatives are larger than 3½ × 3½, and it is desired
to get the entire picture on the slide, then the reduction
process will have to be resorted to. For this work
you can use your camera if it has a long bellows, and the
work should be done in a room where a window is towards
the north.
Obtain a piece of board five feet long and ten or twelve
inches wide, and at one end of it erect the negative-board,
as shown at Fig. 17. The negative-board or holder should
be twelve or fifteen inches square, with an 8 × 10 rabbeted
hole at the middle of it, and supported with two brackets,
as shown at Fig. 17 B. Kits can be made or purchased to
fit in the opening reducing to 6½ × 8½, 5 × 8, 5 × 7, 4¼ × 6½,
4 × 5, and 3¼ × 4¼. With this range of sizes any negative
from 3¼ × 4¼ to 8 × 10 can be held in the board. Now arrange
two strips of wood at each edge of the long base-board,
so that the camera can slide forward and backward
on a platform built to support it, as shown at Fig. 17 D.
The camera should be made fast to this moving platform
with wood cleats and screws, and it should be mounted
high enough so that the centre of the lens will be exactly on
a line with the centre of the opening in the upright board,
as shown by the dotted line in Fig. 17. At the upper corners
of the plate-board arrange slim, steel-wire nails with
the heads cut off, and bore holes near the ends of sticks
three-quarters of an inch square so that they will fit down
over the nails, as shown at Fig. 17 E. The other ends of
the sticks should rest on the top of the camera. Over these
sticks a dark cloth should be thrown when making photographs
of negatives, to keep out light and prevent the
high light from the window affecting the action of the
lens.
To make a reduction of a large negative, fill the plate-holders
with 3¼ × 4 lantern-slide plates, having obtained kits
to fit your holders; then clamp a negative upside down on
the board, as shown at A. Mark the lantern-slide size with
a lead-pencil on the ground glass of your camera, taking
care to centre it; then move your camera forward or backward
and operate the bellows until the correct size has been
obtained. Focus as sharp as you can; then stop down
your lens with the smallest diaphragm. Experience will
dictate the proper length of time for exposures. No definite
rule can be laid down, for the varying conditions of light,
rapidity of plate, and state of the weather—all will have
to be taken into consideration.
Lantern slides made by reduction are always sharper
and better than contact slides, and whenever possible they
should be made after this fashion, even from films which
may be held flat between two plates of clear glass. A piece
of white tissue-paper should be pinned against the window
towards which the camera points, so that a blank white
light will be beyond the negative, thereby avoiding the possibility
of picking up any false lights or shadows.
Lantern slides should always be masked, so that the actual
sight-opening through which the lantern-light is projected
will be two and three-quarters inches wide and two and a
half inches high. A mask form can be purchased or made
from sheet-brass. The opening and the other dimensions
should be of the same size as the lantern-slide plate, or
3¼ × 4 inches. The masks should be cut from black needle-paper
with a rotary cutter, having first prepared a number
of the blanks of the proper size; then the openings can be
cut as shown in Fig. 18. A smaller mask for the central
part of slides can be made two inches wide and two and a
half inches high, as shown in Fig. 19, and for portraits an
oval mask is the best (see Fig. 20). Covering-glasses or
crystals are necessary in making slides. Old lantern slides
can be cleaned and used for this purpose, or some very thin,
white glass may be cut into 3¼ × 4-inch plates.
To mount slides lay a mask against the film-side of the
plate, or positive, and over this place a clean, clear covering-glass,
as shown at Fig. 21. With binding-tape (which comes
in white and black) first bind one edge, as shown at Fig. 22,
arranging the paper tape so that an equal margin will be
visible on both sides. Bind the opposite edge, and then
cut away the projecting ends of the binding. Proceed to
close the short ends in a similar manner, and as a result you
will have a finished slide, as shown in Fig. 23. Some slide-makers
begin at one corner and run a strip of binding all
around the edge without cutting it. This is a little difficult
to do at first, but if you have a clamp that has a compression-screw
and will turn on its axle, it simplifies matters
greatly. Some amateurs prefer black binding-tape, others
white. The white tape with black masks makes a neat-looking
slide, and if the margin is wide enough the title of
the picture may be written on it.
Chapter XV PRINTING, STAMPING, AND EMBOSSING — An Upright Press — A Lever-press — Stamping — Embossing
Every boy, at one time or another, gets an attack of
printers’ fever, and then he will not be satisfied until
he makes or purchases a printing-press. There are, of
course, many different kinds of printing-presses. One of
the simplest forms is shown in the drawing of the flat-bed
press (Fig. 1), which is very easy to make and to manipulate.
A flat board one and one-half inches thick, twelve
inches wide, and eighteen inches long will form a substantial
bed on which to fasten the frame and pressure-plate. The
frame is made of hard-wood strips seven-eighths of an inch
wide and three-fourths of an inch high. These are glued
and screwed fast to the bare board, forming an enclosure
five and one-half by six and one-half inches, and large enough
to accommodate a chase four by five inches. A chase is always
measured from the inside. From one-half to five-eighths
of an inch all around should be allowed for the thickness
of the metal of which the chase is made.
The pressure-plate is cut from wood one and one-fourth
inches thick, and the same size as the outside measure of the
frame attached to the bed-board. A stout lever fourteen
inches long is screwed and glued fast to the top of this
board, which is then attached to the rear strip of the frame
by means of three stout iron hinges, so that when closed
down the pressure-plate will fit closely to the top of the
frame.
The type as it is set up in the chase will stand face up
in the frame, and the card to be printed is caught with
gauge-pins to the inside of the pressure-plate, as shown in
the drawing. The type, having been inked with the roller,
gives the impression to the card when the pressure-plate
is brought down and held against the type by means of the
lever.
The gauge-pins that hold the card in place are made of
metal or of ordinary pins. Several forms of pins are shown
at Fig. 2. A is made from an ordinary pin, while B and C
are other forms cut from thin sheet-brass and then bent
into shape with small pliers.
Fig. 3 shows a chase five by seven inches, of cast-iron,
which can be purchased at a printers’ stock house for a
nominal price. When the types are set up they are blocked
into position in the chase, and two wedges, made with
bevelled edges to bear against each other, are tapped with
a light hammer on the thick ends, so as to wedge the type
in place. These are called quoins (Fig. 4).
Fig. 5 shows a small proof-roller made of glue and molasses.
It may be purchased at a printers’ shop for a few cents.
A piece of glass or marble will answer very well for an
ink-plate or slab, and after using them both the slab and
roller should be thoroughly cleaned with benzine. The
cleaning must be done directly after printing, else the ink
dries on the roller and thus spoils it.
A SIMPLE HAND-PRESS AND ACCESSORIES
Fig. 1.Fig. 2.Fig. 3.Fig. 4.Fig. 5.Fig. 6.
A composing-stick (Fig. 6) may be made from thin wood
three inches wide and nine inches long, with a sliding jaw
(as shown at A) made of thin wood and caught to the edge
with a metal strip loose enough to permit the jaw to be
easily moved back and forth.
The types, being first set up in the composing-stick, are
then transferred to the chase, and clamped in with blocks
of wood and quoins.
The upright press (Fig. 7) is on the same principle as the
flat-bed, but the chase is held in a vertical position, and the
back against which it rests is braced to the base-board. This
press can be made a little larger than the flat-bed, and will accommodate
a chase measuring five by seven inches. At the
rear of the sides of the base-board angular cuts must be
made with a saw, and corresponding cuts should be made
near the top of the upright board which supports the chase.
With a sharp chisel cut the wood away between these cuts
(Fig. 7). Cut the brace-pins also at each end (Fig. 8 A).
A lap-joint is the result, and when fastened with glue and
screws a firm anchorage and support is obtained for the upright
board.
The pressure-plate is of wood one and one-fourth inches
thick, and attached to the strip at the bottom of the upright
or chase-board by means of stout iron hinges. Care
must be taken when placing these hinges to arrange them
so accurately that not a fraction of an inch difference is perceptible
at either side or at the top or bottom. Otherwise,
uneven pressure will give unsatisfactory results. A lever
is made and attached to the pressure-plate as described for
the flat-bed press, and a block may be fastened to the base-board
for the lever to rest on, as shown in the drawing.
A perfect wooden lever-press is shown in the large illustration
(Fig. 9), which is drawn so clearly that only the
measurements will be required to understand its construction.
Fig. 9.
The base-board of this press is twenty inches long, ten
inches wide, and one and one-fourth inches thick. The
upright board against which the chase rests is ten inches
wide, eight inches high, and one and one-fourth inches
thick. The pressure-plate is the same width and thickness,
but is seven inches high, and bevelled at the bottom, as
shown in the side elevation (Fig. 12). The upright board is
placed six inches from one end of the base-board, and is
fastened in place with screws that are driven up from the
underside of the base-board, with side-braces let in to the
edges of the boards, as shown in Fig. 8.
The pressure-plate is hinged at the bottom to a piece of
wood, which acts as a platform for the lower edge of the
chase to rest on. It is seven-eighths of an inch thick and
two and one-half inches wide. Strips are glued and screwed
at either edge of the upright board to hold the sides of the
chase, and at the top the chase is held with a brass spring-clip
that can be made and screwed to the wood. Four inches
from the pressure-plate base three blocks are arranged to
support the lever, which is connected to the back of the
pressure-plate with a tongue of iron one-fourth of an inch
thick, three inches long, and one inch wide (Fig. 10). Quarter-inch
holes are bored at each end just two inches apart
from centre to centre. Two blocks of wood are screwed to
the back of the pressure-plate one fourth of an inch apart,
and a quarter-inch hole made in each, to receive a bolt,
which also passes through one hole in the iron tongue.
The wooden lever is fourteen inches long, one and one-half
inches square at one end, and at the other it is rounded,
so as to make it easier on the hands. The square end is
rounded off and cut in with a saw, as shown in Fig. 11, and
one inch in from the end a quarter-inch hole is made.
The blocks that hold the lever are set one and one-half
inches apart, and a bolt passes through the upper end of
them and through the lever near the end of the iron tongue.
The hole in the lever through which the bolt passes is two
inches from the end hole, and when spaced properly the
inside of the pressure-plate should be seven-eighths of
an inch from the face of the chase-board when the handle
and tongue are in a straight line, as shown in the side elevation
of the press (Fig. 12).
Fig. 7.Fig. 8.Fig. 10.Fig. 11.
Fig. 12. SIDE ELEVATION OF WOODEN LEVER-PRESS
Metal type, electrotypes, engravings, and printers’ plates
are always made seven-eighths of an inch high. When
making a press always bear this in mind, and if necessary
the pressure-plate can always be built up with hard paper
to meet the face of the type if sufficient pressure is not had
at first.
Type, spaces, quads, rule, blocks, ink, and a small roller
can be purchased from any printer if there is not a printers’
stock house in the town where you live. If the printer is
accommodating, he will answer all your questions about your
printing-press, and help you with any details about which
you are uncertain.
Stamping, or the process of imprinting without the aid
of a hand or power-press, is as old as the hills. Away back
in the early ages the art of stamping was carried on by means
of wooden or stone blocks, on the face of which characters,
letters, and various other signs were engraved. Patterns
or figures in colors were imprinted on fabrics, parchment,
and leathers; and in some of the walls of the ruined houses
in Pompeii and Herculaneum there are found well-preserved
examples of the stamper’s art, where figures of a running
pattern are repeated at regular intervals. Both oil and
water-color pigments may be used for stamping; but if the
imprint is to be made on paper or leather, then printers’ ink,
diluted with a small portion of benzine, should be used.
Every boy may have an imprint of his initials cut on
wood, and use it in stamping his papers, school-books, and
other property. In the Far East every prominent merchant
has his private signet, and always, when signing his name
to documents, he certifies it with his stamp, which is placed
beside or across the name, as shown in Fig. 13.
In China and Japan these stamps are called “chops,”
and are used with a red, brown, or blue ink-paste, which
dries hard and indelible on paper, leather, or soft wood.
The author’s imprint so interested a wealthy Japanese
merchant a few years ago, that when he returned to Yokohama
he had a handsome ivory, bone, and silver “chop”
cut by a good maker in that city, and sent it over the sea
as a souvenir of his visit to this country. Fig. 14 gives the
imprint, and Fig. 15 is a drawing showing the shape of the
“chop.” The body part is of ivory and the inlay of silver,
while the cap, which fits over the engraved die, is of black
bone.
Any boy can make a signet of boxwood or maple for
stamping paper and wood. For use on leather he can cut
his dies in soft copper, which, when heated, will burn the
imprint in the leather.
In Fig. 16 four ideas for imprints are shown. In B and
C the initials are combined, while A and D are arrangements
of scrolls and lines which will be understood as belonging
to a certain person, just as trade-marks are the known
marks of certain manufacturers.
In order to cut a wood-stamp, it will be necessary to have
some fine carving-chisels, a vise, and sand-paper. Maple,
boxwood, or other close-grained wood can be used, and it is
best to cut the die on the end rather than on the side of the
wood. Cut your block the size required; then draw the
reverse of the design, as shown at Fig. 15. Cut this as deep
as you need it, so that ink or marking-paste will not clog
the low parts; then, when the face is properly finished, the
die will stamp an impression as shown at Fig. 14. For large
dies it will be necessary to use the wood on the side, as
otherwise the blocks would be heavy and hard to handle.
Souvenir books or engrossed memorials may be embellished
with corner ornaments, as well as with capital letters and
borders in red, blue, or gold. Any boy who is interested
in this branch of craftsmanship can get ideas and designs
from gift books, calendars, show-cards, circulars, and the
host of illuminated and embellished printed matter that is
in circulation. When making these selections, however,
avoid the commonplace printing-house patterns, and favor
those to be found in the best magazines, art books, and
hand-books of ornament such as are shown in Fig. 17, the
several parts of which are a miscellaneous lot of ornaments
and letters that can be easily copied by the young die-cutter.
Fig. 13.Fig. 14.Fig. 15.Fig. 16.Fig. 17.Fig. 18.
Diluted printers’ ink is excellent for stamping, and
when used it should be spread on a cloth stretched over
several thicknesses of flannel and cotton cloth and made in
the form of a pad, as shown at Fig. 18. This is a block of
wood over which the thicknesses of fabric are laid, the top
layer being drawn over the edge and tacked underneath.
This block is then placed in a flat box of wood with a hinged
cover, so that the pad may be kept enclosed when not in
use, and so prevent the ink from drying out. After using
the pad a cloth wet with benzine should be laid over the
pad; then the lid should be closed and hooked down.
In embossing the ornament is raised in low relief, and so
lends a rich effect to paper, card, leather, or other ductile
material. Embossing is generally done under heavy pressure,
and with moisture or heat to facilitate the work.
Papers, thin leathers, and some fabrics can be treated
in this manner by the boy craftsman after he has mastered
the art of making dies. The mode of making bas-reliefs
was fully explained in Chapter XI, and for embossing
a very low relief is necessary, since otherwise the
paper would split or break away on the raised parts. After
a well-modelled ornament is obtained, it will be necessary
to make a hard casting from it in plaster, and then a casting
from this, so that for the work you will have a sharp,
clear bas-relief and an intaglio—one the expressed design
and the other impressed. Make these of hard plaster, and
give their surfaces a coat or two of shellac.
To press a piece of paper or leather, dampen it on both
sides with a sponge or wet cloth, and heat the dies in an
oven. Place the paper over the bas-relief, cover with the
intaglio, and apply pressure. Or place some weight on top
of the dies and leave them there for half an hour. On removing
the paper you will find a perfect bas-relief which,
when thoroughly dry, will hold its shape. Book, card, and
mounted leather-work is treated in a hot press, but only
for a second or two—just enough to drive the dies together,
heat the material, and cause it to hold its shape.
Part IV ROUND ABOUT THE HOUSE
Chapter XVI A HOUSE GYMNASIUM — Dumb-bells — Indian Clubs — Calisthenic Wands and Ball-bars — Swinging-rings — Trapeze Bars — Parallel Bars — A Floor Horizontal Bar — Striking-bags — A Medicine-ball — Pulley-weights and Exercisers — An Attic Gymnasium
All healthy-minded boys are interested in physical development;
it is the instinct which leads them to climb
high trees and scale precipitous cliffs, generally at the expense
of some anxiety to the minds of their parents and
guardians. But these amusements are more in the nature
of “stunts,” pure and simple; the logical and rational field
of athletic culture is the gymnasium. In the large cities,
and at schools and colleges and Y.M.C.A. societies, there
are opportunities in abundance for gymnastic exercises.
The purpose of this chapter is to show the boy who has to
stay at home, or who lives in a small country village, what
can be done in the way of rigging up a barn floor or a
spare room like the one shown in Fig. 1. He can also make
most of the apparatus; for, with a few exceptions, all the
principal pieces are simple in construction and not beyond
the ability of the average boy.
For indoor exercise the outfit must necessarily consist of
those pieces of the gymnasium equipment that can be used
when in a standing or sitting attitude, for the confined space
of the average room will not admit of running, jumping, or
leaping with the pole or from a spring-board. In preparing a
list of the pieces of equipment suitable for a boy’s “gym,”
some of the familiar ones have been omitted, as they are
either beyond the ability of the average boy to make or
they are too cumbersome for the home. The apparatus
that is described and illustrated is simple and practicable
and can be made at a much lower cost than the prices
charged at the shops.
Fig. 1.
Wooden dumb-bells weighing a pound each may be purchased
for about fifty cents a pair, but the boy who is interested
in making his entire equipment can use croquet-balls
with broom-handles, or one-inch curtain-pole sticks,
for handles (Fig. 2).
Fig. 2.Fig. 3.Fig. 4.
To make these dumb-bells, obtain some old croquet-balls
and clamp them, one by one, in the vise of a carpenter’s
bench. Then, with a one-inch bit, bore a hole through each
ball, as shown in Fig. 3. Cut a broom-handle or a one-inch
curtain-pole in lengths twelve or thirteen inches long, and
in the end of each make a saw-cut, as shown in Fig. 3 B.
Smear the end of the stick with glue and drive it through
the hole in the ball, keying it firmly in place by driving a
wedge into the end of the stick, just as hammer-heads are
fastened to prevent their coming off. Repeat for the second
ball. Some glue should be placed in the saw-cut, so as to
hold the wedge when it is driven home. To make the handle
easier to grip, it should be bound with linen or cotton fish-line;
then the balls may be painted or varnished, and the
line given a coat of black varnish, which will set the cord
binding and harden it. Several sets of these balls may be
made for the “gym” and hung upon the wooden rail that
extends around the room.
In the absence of iron bells, a heavy pair of dumb-bells
may be made of gas-pipe handles and flanges with screw-holes
fastened into wood blocks four inches in diameter
(Fig. 4). The gas-pipes, an inch in diameter, may be had
at a plumber’s shop or gas-fitters’, and they should be five
inches long, threaded at both ends, and screwed into flanges
which have been fitted with threads to receive them. These
flanges are bored with holes, so that ordinary screws may be
passed through them and into the wooden ends. The gas-pipe
should be bound with line and painted or varnished, or
the entire bell may be painted black to simulate iron.
A good pair of Indian clubs, weighing from two to three
pounds each, would cost at the shops about one dollar a
pair; but the boy who can handle tools may cut out a very
serviceable pair of clubs from wood four inches square or
round, with the club, or butt, ends fifteen inches high.
Two pieces of spruce, chestnut, or apple wood are to be
cut, as shown in Fig. 5. The upper end should be tapered
so that it is one and a half inches in diameter, and leaving
the base about two and a half inches in diameter.
The tapering is done by holding the wood in a vise and
gradually shaving away the wood with a sharp-bladed draw-knife
or spokeshave, turning the wood frequently so as to
cut the butt evenly and as true as possible. With a brace-and-bit
a one-inch hole is bored in the top of each club three
inches deep, and into it a broomstick-handle is driven and
held in place with glue and a few steel-wire nails. Wooden
balls are bored and glued to the top of the handles, and given
an additional purchase with small nails. The handles may
be bound with fine line and the exposed wood-work painted
any desirable color.
Half a dozen sets of these clubs will add materially to the
equipment of the household “gym”; and it would be advisable
to make them in several sizes—say from one to three
pounds each.
These wands, three to five feet long, may be cut from
any hard-wood, or the same lengths of a one-inch curtain-pole
will answer quite as well. Plain square sticks may be
planed octagonal in shape, or rounded, as a matter of choice
(Fig. 6 A).
The ball-bar (Fig. 6 B) may be made as described for the
dumb-bells, by boring croquet-balls and attaching them to
the ends of a bar with wedges.
In many schools calisthenic exercises with wands, dumb-bells,
and ball-bars are regularly taught; and the boy who
has provided his own gymnasium with the simple apparatus
required will find pleasure in rehearsing the school instructions
at his home.
Exercising and swinging rings are usually from six to ten
inches in diameter, outside measure, and they may be purchased
at the shops for one or two dollars a pair, according
to the size and finish.
A blacksmith will make you a pair of rings, eight inches
in diameter, out of five-eighth-inch round iron, for about
fifty cents; and with a fine file and emery cloth they may
be smoothed down so that they will not chafe the hands.
Some rings are nickel-plated, but they are used only by
professionals in their exhibition work.
Fig. 5.
Fig. 6. WAND A BALL-BAR B
Fig. 7.Fig. 8.Fig. 9.
The rings should give a good grip, and there is nothing
better for this than to bind them with tire-tape, or sew
leather around them, making the seam at the outside, as
shown in Fig. 7. The sewing should be done with doubled
and waxed linen thread; if this should prove too difficult, a
shoe or harness maker will help you out for a small sum.
In Fig. 8 a triangle is shown having the lower side bound
with tape or leather. This triangle is six inches across the
bottom, eight inches high, and is made from half-inch round
iron. As the lower side is a straight bar, it is somewhat
easier to grip than the segment of a circle.
The rings, or triangles, should be suspended by means
of ropes, at the lower ends of which straps are provided so
that they will hold rings, rods, or trapeze bars. A harness-maker
will make these straps for fifteen or twenty cents
each, of substantially heavy leather. They should be provided
with a stout buckle and a loop under which to slip
the strap end, as shown in Fig. 9. The rope ends, through
which the straps are caught, may be spliced or formed
into a loop-end and bound tightly with twine to make a
strong union, as also shown in Fig. 9.
For the house gymnasium a trapeze bar should measure
four feet long and one and three-quarter inches in diameter;
it should be cut with a path at each end, as shown
in Fig. 10, so that the strap may be wrapped around it and
drawn tight. The bar should be made of seasoned hickory.
The wood may be bought from a wheelwright or wagon-maker,
and then dressed down with a plane and spokeshave.
The arrangement for the suspension is shown in
Fig. 10 B.
The adjustable flying trapeze, as shown in Fig. 11, is
made from trunk-straps, provided with two extra loops,
and a four-foot bar cut from two-inch hickory and shaped
with a spokeshave. At the ends, paths are cut to receive
the straps, and, if possible, have the bar turned in a lathe
to insure a more accurate job. Small rings at the upper
ends of the ropes or straps, and hooks driven securely into
the ceiling-beams, will afford the needed suspension.
Fig. 10.Fig. 11.Fig. 12.
The regulation parallel bars are usually supported on iron
pipe-standards bolted to a heavy base, and steel heads are
provided to grip the bars. But this fitting is beyond the
ability of a boy to construct without the aid of a plumber,
and the wooden frame base and bars shown in Fig. 12 will
answer quite as well.
The bars are of hickory, five and a half feet long and
two inches in diameter. The uprights that support them
are of oak, ash, or other hard-wood, two and a half inches
square and forty-two inches long. The lower ends of the
uprights are set into bases of heavy hard-wood two inches
thick, ten inches wide, and three and a half feet long.
Square holes are cut in the middle of these bases, two feet
apart, so that eight inches of wood will extend beyond the
holes at each end, and so provide a surface on which to
screw the bracket-ends that act as braces to the uprights.
The holes should be cut with a brace-and-bit all the way
through the bases, and then trimmed with a mortise-chisel
and mallet, taking care to make them very accurate, and
so prevent any play to the uprights when once set up.
The stepping-plank is also of hard-wood, twelve inches
wide, one and a half inches in thickness, and long enough
to span the cross-planks. The distance between uprights
should be about four feet. The stepping-plank should have
a two-inch block under the middle to prevent it from springing;
it is to be attached securely to the cross-plates with
large, flat screws driven into holes that have first been bored
out with a bit. Hollows are cut out in the top of each
upright with a compass-saw, and the sides slightly tapered
to the edges of the U cuts, so as not to interfere with the
hands when using the bars. Fasten the bars to the uprights
with two slim screws at each side, driven through the uprights
and into the under sides of the bars. Do not put
a screw or nail down through the bars and into the top of
the uprights, for this will weaken the bars, and if the weight
is suddenly transferred to the extreme ends they might
snap off.
At a hardware store purchase four iron brackets with
eight-inch tops and ten or twelve inch sides. Invert them
and screw the tops to the base-boards and the sides to the
outer edges of the uprights, to insure added rigidity.
A coat or two of paint will improve the appearance of the
uprights and base; but do not coat the bars with anything.
They should be polished with an oiled rag until smooth
enough for use.
The complete apparatus is shown in Fig. 13. The hickory
bar, one and three-quarter inches in diameter and four feet
long, is supported on hard-wood uprights two inches thick,
three inches wide, and as high as the bar is desired—say
from five to six feet, according to the stature of the boys
who are to use it. At the lower end the uprights are held
in position by two half-inch iron pins driven into the bottom.
These fit into holes made in the floor in a corresponding
position, as shown at A in Fig. 14. The upper ends
of the uprights are cut with a compass-saw to receive the
bar, and the edges are tapered to meet the edges of the U
cut, as shown at B in Fig. 14. When the bar is in place it
is held with straps made of one-eighth by one inch iron.
They should be provided with screw-holes, as shown at C
in Fig. 14. The ear-plate attached to each upright under
the bar (and to which the stanchion wires are fastened) is
made of one-inch tire-iron a quarter of an inch thick; it is
bolted to the wood as shown at D in Fig. 14. A blacksmith
will make the strap and ear-plates for a small sum; and at
a hardware store staple or eye plates may be purchased
and screwed to the floor, into which the turn-buckles can
be caught.
Four turn-buckles and some stout wire form the stanchions;
and the floor-plates should be located so that they
not only brace the structure forward and backward, but
also from side to side, as may be seen at the right side of Fig.
13. If the plates are five feet apart, they should be eighteen
inches out from each upright.
Fig. 13.Fig. 14.
The particular advantage of this bar over a swinging one
lies in its absolute rigidity. Also, when not in use, it may
be cleared away by loosening the turn-buckles and unhooking
them, lifting the pins out of the floor and carrying off
the frame bodily.
There are various kinds and shapes of striking-bags to
be had at the shops, but a converted Rugby football will
answer very well for home use. Remove the bladder and
sew two large bone buttons to the leather cover at each
end, as shown in Fig. 15. The bladder should then be replaced,
inflated, and the cover laced up tightly.
Leather straps, in the ends of which button-holes have
been made, are caught over the buttons to form loops to
which the ends of the suspension and draw ropes are attached.
These straps are reinforced with a patch of leather
sewed at the middle, as shown in Fig. 16. The patches will
strengthen the straps and prevent them from stretching too
much when the ropes are drawn taut.
Between the ball and the floor a spring, or some stout
rubber bands, should be placed so as to make the ball rebound
quickly when struck.
The portable striking-bag (Fig. 17) is attached to the top
of a staff, and is made of leather or canvas and stuffed with
paper wads. Or a bladder, inflated the same as a football,
may be used. The bag or cover for a bladder should be
made of strips of leather or canvas sewed together. The
inflated bag is then covered by a stout leather cap. Straps
of canvas or leather are sewed to this cap and brought down
below the bag, where they are attached to the staff with a
thong or cord, as shown in Fig. 17.
STRIKING-BAGS
Fig. 15.Fig. 16.Fig. 17.
The regulation portable bags are mounted on an iron base,
but in our home-made apparatus a plate of hard-wood will
have to answer. From oak, ash, or other hard-wood, two
inches thick, cut a base fifteen inches square, and round off
the edges on the upper side. Make a hole in each corner
through which to pass a screw, and a large hole at the middle
to receive a spiral spring. The staff (about the size of a
broomstick) is screwed down into the top of the spring for
five or six inches, or enough to hold it securely; and at the
bottom the spring is held in the block with screws or nails
driven through the wires of the spring and into the wooden
base.
When using the bag it should be fastened to the floor
with two or three screws, so that it will not topple over.
As it is struck it bends over from the bottom, and the
spring, if stiff enough, will cause it to immediately rebound
or come to an erect position.
A striking-bag and disk, like the one shown in Fig. 18,
may be made from wood and leather, a few thumb-nuts,
and a pair of braces. To make the adjustable disk, obtain
two pieces of white-wood or pine three inches wide, two
feet long, and one and a quarter inches in thickness. Also
two other pieces, each an inch thick, three inches wide, and
thirty inches long. The first pieces are the wall-plates, and
laps are to be cut one and a half inches in from each end, as
shown in Fig. 19, to receive the upright pieces.
In the middle of each lap a bolt two and a half inches
long is to be set. This projects through a slot cut in the
upright pieces, and at the outer end of the bolt a thumb-nut
and washer will make it possible to clamp the uprights
fast to the wall-plates, so that the disk may be raised or
lowered to any required position.
Two slots, as wide as the thickness of the bolts, are cut
in each upright with a bit and compass-saw; and on the
uncut space, at the middle of the frame, a disk twenty-one
inches wide and twenty-six inches long is made fast with
screws and short angle-brackets attached to the under side
of the rear corners. This disk should be made of hard-wood
one and a half inches in thickness, and it is braced from
above with two irons that extend from the top of the disk
to the upper ends of the uprights. A blacksmith will make
these for a few cents each, and they, as well as the other
hardware, should be painted black to give them a good
appearance.
Fig. 18.Fig. 19.Fig. 20.Fig. 21.
The bag is shaped like an inverted balloon, and is made
of six pieces of leather, or canvas, five and a half inches wide
and fifteen inches long, sewed together at the edges. Each
piece should be shaped as in Fig. 17, and when they are sewed
together a round cap should be made fast to the large extremity
to secure the ends of the side-pieces. A patch is
sewed along the edges of two sides to strengthen them and
to pass the lacings through, as shown at the lower left-hand
side of Fig. 20. This method of construction gives an opening
through which to pass a filling of rubber scraps and bits
of leather. If a rubber bladder is to be inserted and inflated,
this opening will not be required, for the bladder,
when collapsed, may be pushed into the opening at the
neck.
One inch below the top of the neck some slits are to be
made in the leather, through which the throat-laces are
interwoven, as shown in Fig. 21. After the knot at the
end of the suspension-rope has been inserted in the throat
of the bag, the laces are drawn tight and tied. This is the
best means of attaching the bag to the rope from which it
is suspended; and by means of a hollow stick, which projects
down five inches below the under side of the disk, the
bag may be centred and held rigidly. As a result it flies up
at varying angles from this centre-drop when struck from
different sides.
The suspension-stick may be made from a piece of inch-and-a-half
curtain-pole, the hole being bored out with a bit.
The stick should be inserted through a hole made in the disk
eleven inches in from the outer or projecting edge. It should
be of such a size that it will be necessary to drive the stick
in with a mallet to make it fit snugly. A coat or two of white
paint will finish the wood-work nicely, or it may be given
a coat of varnish.
A medicine-ball should be ten inches in diameter, and
should weigh from three or four to six or eight pounds, according
to the size of the boys and girls who use it. The
case of a round football may be used, or a leather case may
be made of six pieces and two ends, so that it will lace up,
as shown in Fig. 22. The case is stuffed with small balls
made of pebbles or small stones wrapped in newspaper. The
newspaper makes a soft cushion, and does not allow the hard
edges of the stones to come in contact with the leather.
Larger or smaller stones may be used according to the
weight desired, or sand wrapped in paper may be used in
place of the stones.
Fig. 22.Fig. 23.Fig. 25.Fig. 26.
If the case is to be made, obtain some russet leather from
a shoemaker and cut six pieces, fourteen inches long and
six inches wide, as shown in Fig. 23. With doubled linen
thread sew the edges together so that the seam is at the inside,
as shown at the lower end of Fig. 23. Reinforce two
sides of adjoining strips with a patch of leather sewed securely
all around the edges and through the middle. Punch holes
along the patch half an inch from the edge, through which
to lace the draw-strings, as shown at the left-hand side of
Fig. 23. At the open ends of the leather case sew on
circular patches, four inches in diameter, to securely hold
the ends of the six leather sides. The case will then be
ready for the filling.
By substituting a bladder for the filling, this medicine-ball
may be used as a volley-ball. The volley-ball is played
over a net, either in the “gym” or out-of-doors, in a fashion
similar to Badminton. It may be played by any number of
persons at the same time, the object being to keep the ball
in motion over the high net.
No apparatus for home exercise covers the field so generally
and thoroughly as the chest-weights, or pulley-weights.
No instructions are necessary, for the boy who
uses the apparatus can follow his own idea for strokes, and
every muscle in the body may be easily and pleasantly
exercised, there being sufficient variation in the movements
to relieve them of monotony.
An exerciser similar to the one in Fig. 24 may be constructed
out of a piece of plank, two pulleys, a pair of sash-weights,
and some cotton rope or clothes-line.
FIG. 24.—AN EXERCISING WEIGHT
Obtain a piece of pine or spruce plank twelve or fourteen
inches wide, five feet long, and one and a quarter inches thick;
also another piece to form the foot, so that it will project
six inches from the base of the plank. Two blocks of
wood, four inches long, two inches wide, and an inch thick,
will be necessary for the pulleys to swing on. Attach these
to the upper end of the plank by means of hinges, as shown
in Fig. 25. They should stand out from the board, and in
from the edges, the distance of the width of the hinge-leaf,
as also shown in Fig. 25. Plate-pulleys are screwed fast to
the front edges of these blocks, through which the ropes
pass that raise the weights.
The foot-board should be padded with hair or excelsior
and covered with leather or burlap, so that the weights may
drop on it without making any noise.
From two old tin pails remove the handles and bend
the wires around so that a rope may be passed through
the eyes at the ends, as shown in Fig. 26. At a hardware
store purchase a pair of five-pound sash-weights, and pass
the rope ends through the eyes. They should then be
spliced or bound with fine line. When the ropes are reeved
through the pulleys, a knot should be made in each one, so
that it will chock in the top of the pulley and allow the
weights to just reach and lightly rest upon the foot-pad.
Therefore, when the handles are released the weights will
not fall about on the floor as they would otherwise do. The
ropes should be about five feet long from the eyes of the
weights to the handles. That is quite sufficient to give a
good long stroke while bending the body forward or from
side to side.
This exerciser may be screwed fast to the rail that should
extend all around the “gym,” and also into the floor at the
foot to steady it. Lighter or heavier weights may be employed,
as the strength of the boy will warrant, but light
weights are preferable to heavy ones for continued use.
In Fig. 27 a good idea is given for the arrangement of an
attic gymnasium; it shows the locations of the paraphernalia
in a room about fourteen by sixteen feet. A smaller
room may be arranged in a somewhat similar manner, but
each piece of apparatus must be cleared away directly it is
out of use.
Fig. 27.
Across the top of the room, from a window-casing to a
batten screwed fast to the opposite wall, a ladder may be
suspended. Over the window-casing it would be well to
attach a batten, so that the ladder will not spring out of
place. A rope hanging from one end will make it possible
to reach the rings.
A strip or band of wood four or five inches wide should be
nailed all around the room four feet above the floor, against
which to place parts of the gymnasium equipment, and on
which to hang dumb-bells, Indian clubs, wands, and ball-bars,
as shown in the illustration.
Under the trapeze or rings it is well to place an old mattress,
a useful thing in the event of a fall. If the room is
wide enough, double sets of hooks may be driven in the
ceiling-beams from which both a flying trapeze and rings
may be suspended. When one or the other is in use, the
extra apparatus may be drawn up or to one side of the room.
A light room is always more cheerful than a dark one, and
plenty of ventilation is necessary in the home gymnasium.
Chapter XVII A MINIATURE THEATRE — Scenery and Equipment — The Puppets
A miniature theatre, equipped with curtain, flies,
drops, wings, and several good sets of scenery, is an
unfailing source of interest and amusement. It has long
been popular in Paris even as a professional form of entertainment.
Fig. 1 gives the front elevation of a miniature
theatre; and Fig. 2, a side view, illustrates the location of
the working parts, and the manner of arranging the wings,
drops, and flies.
Fig. 1.
This theatre must be made of such a size that when it is
placed at one end of a room the audience will have a good
view of the fore, middle, and back ground. A good size for
the stage is four feet wide and five feet long over all, the
front being slightly curved, as shown at B in Fig. 3. The
proscenium should be four feet wide, three feet high, and
with a sight-opening three feet wide and thirty inches high.
The proscenium is made from three boards seven inches
wide and seven-eighths of an inch thick. The upper corners
are bevelled and mitred, so that the inner edges will be
recessed, as shown in the plan drawing Fig. 3 A A. The
top-rails are caught at the front to the top of the proscenium
with screws, and are supported at the rear and middle by
uprights, the lower ends of which are let into the sides or
edge of the stage, and then made fast with glue and screws,
as shown at C C C C in Fig. 3. Cross-braces at the back and
middle of the top are screwed to the top-rails for strength.
Bracket or brace pieces are caught at the rear of the last
rail and to the rear of the last uprights midway between
stage and top, and are made fast with glue and screws, as
shown in Fig. 4. These will hold the framework securely in
position.
Gas, electric light, or candles may be used for the footlights.
If gas is employed a small pipe should run along
under the front of the stage. Over this pipe a tin cornice
is arranged with holes made through it every three inches.
These holes should be just large enough to admit gas-jets
which project through it, as shown in Fig. 5. The supply
of gas can be controlled at one side by means of a key, so
that the lights may be lowered or turned up full. If candles
are used they should be arranged on a board, so that as
they burn lower and lower the board can be raised. If
electric lights are available, they are the best of all, since the
danger of fire is reduced to a minimum. The small sockets,
wire, and lamps used for Christmas-trees can be employed,
and will give very good results.
After the constructional work of the stage and frame is
complete, it will be necessary to make the scenery and
equipment. It will be best to have two curtains, the first
a fancy one which can be painted on muslin or a window-shade.
Window-shades come printed with pictures on
them, and these can be strengthened with oil paints diluted
or thinned with benzine. A very pretty outer curtain can
be made from a printed Japanese silk panel, such as are for
sale in the art and dry goods-stores. This can be sewed on
a plain piece of goods, and the upper end made fast to a
shade-roller, as shown in Fig. 9. The main curtain may be
of denim, stout muslin, or any suitable cloth or fabric. It
is nailed to a round stick (a curtain-pole is preferable),
which is cut at the ends as shown in Fig. 6. The draw-string
is wound in this groove, and so the curtain is raised
and lowered. The shade-roller curtain is the outer one,
and is attached to the frame at the top, and just back of
the proscenium, as shown at B in Fig. 2. The main curtain
is just inside the outer one, and is made fast to a stick near
the outer curtain-roller. When down, the roller rests on
the stage just back of the proscenium, as shown at C in
Fig. 2. When the curtain is rolled up to the top of the
proscenium-opening, a few turns of cord are taken about
each end of the roller in the groove. The cords then pass
through screw-eyes to the back of the stage-frame, where
they can be held on a small cleat. Both cords pass through
the same eyes, so that the pair of strings may be operated
by one hand. The drop-curtains at the back of the stage
are painted on window-shades, the rollers of which are hung
on blocks at the under side of the top-rails and close to the
rear uprights, as shown at A A A in Fig. 2.
DETAILS OF STAGE
Fig. 2.Fig. 3.Fig. 4.Fig. 5.
The flies are strips of muslin painted to represent sky in
out-door scenes and ceilings in interior sets. The flies are
tacked on a stick, the ends of which project beyond the body
part of the fly so that they may rest on the top-rails of the
stage-frame, as shown in Fig. 7. The fly part drops down
two or three inches below the upper framework, so as to be
visible to the spectators. The wings are of card-board or
stiffened muslin tacked on frames, the bottoms of which rest
on the stage. The upper part is held between the runners,
or cross-rails, fastened to the under side of the top-rails, as
shown in Figs. 1 and 2.
The front and back of a wing is shown at Fig. 8. The
front, A, is the smooth side on which the tree or other feature
can be painted. The back, B, shows how the frame is
made to support this piece of scenery. The frame should
be constructed of pine sticks three-quarters of an inch wide
and half an inch thick. Where they cross each other laps
should be cut out of each piece, so that one will lie flat in
the lap of the other. The surfaces of all the sticks being on
one plane, the frame offers a flat surface for the material
to back against.
An independent piece of scenery, such as the house, tree,
fence, and bushes shown in Fig. 10, will have to be built
upon a frame, and a foot must be provided so that it will
stand on the stage independent of any top, bottom, or side
braces. The manner of doing this is shown in Fig. 11, the
two feet being “loaded” with pieces of lead at the ends of
the feet so that the house cannot topple forward. Very
pretty scenes can be made from card-board and of stiffened
goods, such as crinoline, over which the painting can be
done. Books, magazines, and photographs can be drawn
on to offer suggestions for scenery and interiors, and the
smart boy, who has some idea of perspective, can design
and make some most attractive stage-settings for this miniature
theatre.
The actors and actresses should be celluloid or papier-maché
dolls, their feet being attached to thin strips of wood,
which can lie flat on the stage and be operated from the
sides. When the stage is on a line with the eyes of the
audience, these thin strips will hardly be noticed. Jointed
dolls may be used for the actors who have occasion to sit
during the performance, but it is difficult to bring about
the change of posture without destroying the illusion.
Trap doors and other pieces of stage machinery may be
added as found necessary, and there is no limit to the ingenuity
that may be exercised in equipping our miniature
stage.
SCENERY SETS
Fig. 7.Fig. 8.Fig. 9.Fig. 10.Fig. 11.
Of course the speaking parts are taken by boy and girl
performers, who stand on either side of the stage, and are
concealed from the view of the spectators by screens or curtains.
The stage-manager and his assistant stand still
closer in, so as to manipulate the puppets. A curtain-bell
arranged under the stage, and rung by a knocker or electric
apparatus, adds to the realism.
This theatre is to be mounted on two horses, and it must
so be screened off that nothing is visible but the proscenium,
fore-stage, and footlights. This curtaining may be done
with heavy muslin, or Canton flannel of dark color, or any
material through which light will not show.
Chapter XVIII FITTING UP A BOY’S ROOM — A Plain Chair — An Odd Chair — A Morris Chair — A Settle — A Box-desk — A Writing-table — A Whatnot — A Treasure-chest — Studying-table and Stool
When once a boy realizes what may be done in the way
of fitting up his den or room, he is sure to take an
interest in the subject. A certain amount of manual skill
and artistic feeling are, of course, desirable, but these qualities
may be cultivated, and to a much greater extent than
one would at first be willing to believe.
The color schemes, designs, and general suggestions in
artistic handicraft that may be carried out in fitting up a
boy’s room are almost without limit; but the following
ideas are all practical, and the illustrations and explanations
should enable the young craftsman to get satisfactory results
at the minimum of labor and expense.
In the selection of woods from which to build furniture,
the natural product of the locality in which the boy lives
must be taken into consideration. Some States grow pine,
white-wood (cottonwood), poplar, or cypress, while in others
spruce, hemlock, maple, and fir will be found easier to obtain.
In the Far West, gumwood, redwood, cedar, and
cypress form the staple supply. The cost of the wood is a
matter to be considered, and often the more artistic result
may be secured by using an inexpensive wood, since the
beautiful grain of the finer varieties can only be brought
out by the skilled and experienced workman. Many woods
have an open and broad grain that, if carefully filled and
varnished over, will give a very pleasing effect. Chestnut,
butternut, quartered oak, and ash have this quality, and
all of them are adapted to furniture construction and room
trimmings. For chairs and other furniture, spruce, apple-wood,
and cypress will give good results; and all of them
have a pretty grain when stained and varnished. Ash is
harder, and makes good, solid furniture. If not found too
difficult to work, it will prove a very satisfactory and serviceable
wood for chairs, tables, benches, and other pieces
of furniture that are subjected to hard usage.
In the construction of the various pieces of furniture illustrated,
the simple rules of carpentry are to be followed, and
only the lap, mortise-and-tenon, and tongue-and-groove
joints are employed. These joints must be well made, however,
so that perfect unions will result, for every piece of
furniture will rack in time if not properly braced. For this
reason only the plain joints are advocated for the young
workman; and nothing has been said about the dowel, key,
and other joints that are frequently employed by cabinet-makers
in the general construction of furniture. These
latter require much more care and accurate fitting, and for
the open and exposed joint the simple forms are far better.
Of all the pieces of furniture in the house, chairs are the
ones most used, and, as they are subjected to hard usage,
they should be well constructed and the joints carefully
made.
In the plain chair shown in Fig. 1 the front legs are sixteen
inches high, the back supports are thirty-four inches high,
and all of them are one and three-quarter inches square.
All the side-rails and the four that support the seat are two
inches wide and three-quarters of an inch in thickness, so
that the laps cut in the corner-posts (Fig. 2, A and B) will
correspond in width and depth. The cross-cuts are made
with a fine saw, and the wood removed with a broad firmer-chisel,
taking care, however, not to cut deeper than three-quarters
of an inch when removing the wood. Use a mallet
to help the chisel, but do not seek to take out too much
at one time; better try three or four times, and take a moderate
bite each time, than run the risk of having a large
chunk come out and bring with it some of the wood that
should be left for the rail-end to lap against.
The rail at the front is eight inches above the floor, and
those at the sides are four inches. At the back the distance
is ten inches from the floor to the under side of the cross-rail.
Take care to make the saw-cuts inside the two-inch
mark, so that the rails will fit snugly into the corner-posts
without any play. There is nothing so annoying in a chair
as to have it loose-jointed and rickety.
A wooden seat sixteen inches square, with the rear corners
cut out to fit around the back posts, is nailed or screwed
fast to the top edges of the upper rails all around; and for
the back a twelve-by-sixteen-inch piece is cut and screwed
fast in the laps cut at the upper ends of the back posts, as
shown in Fig. 2 B.
To make a comfortable back and seat, cover the wood
with curled hair from an old mattress, or some cotton and
dried moss; then tack unbleached muslin over it to hold it
in place. For the final covering use burlap, denim, cretonne,
or other stout fabric, that can be had at a dry-goods store
for fifteen or twenty-five cents a yard. Draw it down and
turn it under all around the edges of the back and seat,
fastening with small tacks driven at regular distances apart.
Large, oval-headed upholsterers’ tacks painted black will
appear to good advantage if driven about two inches apart
along the edge of the goods. If they cannot be had, or are
too expensive, a very good substitute may be made from
sheet-lead or an old piece of lead pipe split open and beaten
out flat.
From the sheet of lead cut disks three-quarters of an
inch round with a cold-chisel, on the upturned face of an old
flat-iron. With a small hammer beat the edges to resemble
a hand-wrought nail-head, similar to those you may have
seen in an old hand-bellows in a blacksmith-shop. These
are to be painted black, and applied to the wood with slim,
steel-wire nails, the heads of which will be invisible if they
are driven well into the lead. The heads of the screws that
fasten the lap-joints can be hidden with these mock nail-heads,
as shown in the drawing.
A good black paint for the metal parts of furniture is
made by adding dry lamp-black to some brass lacquer or
shellac, so it will have the consistency of cream. It is then
applied with a soft-hair brush to the surface of the metal,
on which it will dry quickly. It often requires two or three
days for oil paint to dry on metals, and it lasts no longer
than the lacquer or shellac coating. Several small nails
driven around the edge of the mock nail-heads will hold them
in place, and to all appearances they will look like the large-headed,
wrought bellows-nails.
Fig. 1.Fig. 2.Fig. 3.Fig. 4.Fig. 5.
For studying or reading, the chair shown in Fig. 3 will be
found a useful piece of furniture.
The wood is three-quarters or seven-eighths of an inch in
thickness, planed on both sides, and may be finally stained
and varnished or painted. The front posts are fourteen
inches high and four inches wide, while the back ones are
thirty-four inches high, three inches wide at the top, and
eight inches wide at the bottom. The side-rails are twenty-eight
inches long, three inches wide at the front, and six
inches across the widest place near the rear. The side-rails
are fastened outside the rear uprights and inside the front
posts, as shown at Fig. 3. At the back, near the foot, the
chair is held together with a plate of wood six inches wide
and eighteen inches long, screwed fast to the lower edge of
the high posts, as shown in Fig. 4.
The top of the rear uprights are bound together with a
piece of two-inch curtain-pole, with a saw-cut in the end
to the shoulder, as shown in Fig. 5. After it is in place,
glue-covered wedges are driven into the saw-cuts to make
a key, and so hold the joint securely. Between the front
ends of the side-rails a similar piece is placed; or a two-inch
square piece of wood, with the front top edge rounded off,
may be substituted.
The seat and back is composed of one piece of leather,
fabric, or even carpet, caught to the front and top cross-pieces,
and adjusted so as to form a comfortable support to
the body.
This chair can be made with a shifting back by rounding
off the lower ends of the back uprights and attaching them
to the side-rails with bolts and washers, one bolt to a side.
With two or three corresponding holes in the side-rail and
upright, pegs can be fitted into them, or a rod passed through
from side to side of the chair, in fashion similar to the well-known
Morris chair. The pegs must be stout, or the rod
substantially heavy, since the leverage is great and would
snap off light pegs or bend a thin rod.
One of the most comfortable pieces of furniture in a boy’s
room is a Morris chair, and if properly constructed it should
last almost for a lifetime.
Fig. 6 gives a good idea for a solid affair that can be made
twenty inches wide and twenty inches deep from outside to
outside of corner-posts. The posts are two inches square
and twenty-three inches high, and in the front and back
ones laps are cut to receive three-inch rails, with the upper
edges sixteen inches above the floor. At the lower part of
the sides, five inches above the floor, two-inch rails are let
into the posts. From these side-rails to the under side of
the arms four flat balustrades are mounted and held in position
to the lower rails with screws and glue. At the upper
end they are mortised into the under side of the arms for
half an inch. Two more rails are let into the posts at the
inside and on a line with the rails, at front and back, that
support the seat and to which the leather is to be attached.
A frame twenty-two inches high is made for the back and
covered with leather stretched tight and nailed all around
the edges with large, oval-headed upholsterers’ tacks. The
back is hinged to the rear rail of the chair, and held in position
with a cross-rod, which in turn is supported by wooden
pins driven into the end of the arms, as shown in the illustration.
The arms are wedge-shaped, five inches broad at
the front and two inches at the rear, where the ends are
rounded. They are held to the tops of the corner-posts
with long, slim screws, the heads of which are covered with
the imitation nail-heads described in the making of the
plain chair (Fig. 1).
Fig. 6.Fig. 7.Fig. 8.
For the side of a room, where there is space to accommodate
it, a settle is a comfortable piece of furniture,
and Fig. 7 gives some good lines that can easily be followed.
The back of this settle is forty-two inches long and thirty-two
inches high. The seat is sixteen inches above the floor
and eighteen inches deep. The front plates are each six
inches wide, twenty-five inches high, and seven-eighths of
an inch thick. They are attached to the front and side
rails of the settle with stout screws and glue, and a line of
screws is driven through the front plate and into the edge
of the one it laps against, as shown at Fig. 8, which is one
end of the settle frame.
The leather forming the seat is drawn over the front and
back rails (which are each six inches wide), and is nailed to
the wood, as shown in the illustration. The leather is applied
to the back in the same manner, and, to hold the edges
down, glue may be used.
A chair may be constructed in similar fashion with the
same height and depth dimensions, but twenty-four inches
wide over all, the side-plates under the arms being four
inches wide.
In the illustration of a box-desk (Fig. 9) an idea is shown
that the young craftsman can easily work out.
Obtain a box twenty-four inches long, eighteen inches
wide, and twelve inches deep. It should be made of planed
boards. At the joints drive in a few screws to make them
more secure. Cut two pieces of wood thirty-six inches long,
four inches wide, and seven-eighths of an inch thick, and
attach them to the rear edges of the box when it is stood on
end, allowing the lower ends to extend down four inches below
the bottom of the box. These will form the back feet.
For the front ones, cut two pieces of wood fourteen inches
long and six inches wide, rounding off one end, and cutting
the bottom out three inches, thus allowing the remaining
wood to be three inches wide, as shown at Fig. 10. These
are fastened to the lower edges of the box at the sides with
screws and glue.
Fig. 9.Fig. 10.Fig. 11.Fig. 12.
Two shelves, ten inches wide, and as long as the inside
width of the box, are to be cut and fastened six inches apart,
leaving a ten or twelve inch space at the bottom for high
books, or a place to put the feet when sitting at the desk.
A top twenty-two inches wide and eighteen inches deep is
made fast to the top of the box, and if a slant is desired the
back of the top board may be propped up for an inch or
two with a strip of wood. On the ends of the side-rails that
project above the desk-top a ledge six inches wide may be
made fast for ink-bottles, pencils, and other accessories.
Attached to the upper edges of the box brackets of wood
may be arranged to support the projecting edge of the desk-top.
Stain and varnish, or paint, will add the finishing touch
to this box-desk.
Two boxes, a drawer, and a broad top can be easily transformed
into the writing-table shown in Fig. 11. If well put
together and decorated with artistic hinge-straps and escutcheons,
the boxes are entirely hidden from sight.
Two boxes, each twenty-two inches long, fifteen inches
deep, and ten inches wide (outside measure), are placed on
end and made fast under a broad top forty-five inches long
and eighteen inches wide. Three inches of the top will project
beyond the boxes at the ends and front. This will
leave a space nineteen inches wide between the boxes. At
the bottom a ledge eight or ten inches wide must be made
fast to the bottom of the boxes, on which to rest the feet
when writing at the table. This ledge will also serve as a
brace, and help to hold together the bottoms of the boxes.
Legs six inches high are cut from wood seven-eighths of
an inch thick, and fastened under the four corners at the
front of the boxes. At the back, the foot-piece is a board
ten inches wide, screwed fast to the lower rear ends of the
boxes, so that six inches of it will project down to the floor
to correspond with the legs in height. A shallow drawer is
made to fit between the boxes, and a slide on runners is
attached with screws near the top.
Doors ten inches wide and twenty-two inches high are
hinged to the outer sides of the boxes, and from sheet-lead
the hinge-plates or straps and the escutcheons are cut with
a light cold-chisel and mallet, as shown at Fig. 12, A and B.
(For other designs, see Chapter VII., on Decorative Hardware.)
The front hinge-plates are eight inches long and
four inches wide across the scrolls, and the shorter ends are
four inches in length. The flat edges that butt against the
hinges must be made to correspond with the hinges in width,
but they are no part of the hinges proper, being purely for
effect. This hardware is coated with the black metal finish.
It is then fixed in place with large-headed nails or with
steel-wire nails.
A top board, with half-circular supports, can be made and
attached to the rear of the desk-top if thought desirable.
For trinkets, books, and the general assortment of odds
and ends that a boy is sure to possess, the whatnot shown
in Fig. 13 will be found useful.
It is fifty-four inches high, twenty wide, and twelve inches
deep. The cap projects two inches beyond the sides and
front. The side-boards are cut up at the bottom, the angle
of the coves being ten inches above the floor. Near the top
a corresponding effect is obtained by cutting out pieces of
wood in the form of shields. The side-ledges are thirty-six
inches above the floor, twelve inches long, and seven wide.
They are supported by two brackets at each side, five inches
wide at the top and six inches deep, cut as shown in the
illustration, and made fast with glue and screws.
Fig. 13.Fig. 14.Fig. 15.
The ledge over the drawers is forty inches above the floor,
and each drawer is five inches deep. The lower ledge or
shelf is twelve inches above the floor, and the front edge is
cut in with a compass-saw.
All the wood-work is of stock seven-eighths of an inch
thick, and the edges of the shelves are butted against the
side-boards, through which screws are passed, the real heads
being afterwards covered with the mock nail-heads. The
usual stain and varnish will treat the wood nicely and lend
a good finish to this useful bit of furniture.
For stamps, coins, minerals, and other valuable possessions,
the treasure-chest shown in Fig. 14 is just the thing.
To give the chest an appearance of strength and security,
the doors should be made of wood one and a quarter inches
thick, while the legs and feet should be of one-and-a-half
inch stock. The box is thirty inches long, eighteen inches
high, and twelve inches deep (inside measure), and the top
projects an inch and a half over the ends and front when
the doors are closed. The legs are twenty-eight inches high
and twelve inches wide. At the lower ends feet are cut
from wood the same thickness as the legs, and made fast
to them with screws. A cross-rail six inches wide and cut
in at the under edge is mortised and tenoned into the legs
twelve inches above the floor; while across the top of the
legs a board twelve inches wide is securely fastened, and
braced at the back with a four-inch rail, to prevent this base
from racking with the weight of the chest.
Shelves and divisions are arranged, according to requirement,
within the chest. To close it, two doors are swung
on stout hinges, against which lead hasps are mounted to
lend an appearance of strength. These are cut from stout
sheet-lead, and applied with large-headed upholsterers’ nails
painted black. The front hasp-ends should be ten inches
long and the return ends five inches in length. Over the
key-hole a long hasp may be placed, with a corresponding
one on the other door to complete the decorative effect.
For service and comfort when studying or writing, two
useful pieces of furniture are shown in Fig. 15.
The top of the table is twenty-four inches wide and forty-two
inches long. It can be made from three or four boards
of pine or white-wood glued together at the edges and battened
at the under side. The front legs should be twenty-seven
inches high and two and a half inches square. The
rear legs are thirty-nine inches high, and where the table-top
joins them laps are cut out on two sides for a depth of
one inch, and a corresponding notch is cut from the corner
of the ledge so as to fit into the lap. The lower rail at the
back is six inches wide, and the lower side-rails are four
inches wide. The shelf attached to the top of the rear posts
is seven inches wide and forty-two inches long. It need
not be more than seven-eighths of an inch in thickness, and
the front ends of it may be supported with short bracket
sticks which rest on the table-top close to the rear posts.
At both the front and back brace-strips are let into the
legs and the edge of the table, as shown in Fig. 15; these
pieces are eighteen inches long and bevelled at both ends.
To accurately cut the laps in the legs and table-top, lay
a strip across in the proper place, and mark the lines with
a pencil; then with a saw cut slowly and accurately on
this line to the proper depth. With a chisel cut the wood
away and let in the brace-strips, when they can be securely
fastened with glue and screws. At both ends shelves may
be attached to the posts and the braces, as shown in the illustration.
These will make good book-ledges or convenient
places for pencil and pen boxes, extra pads, and school
trappings. Books may rest on the table under the top
shelf. To prevent their falling off at the back, a rail two
inches wide is attached to the rear posts and supported at
the middle by a short upright block which also acts, as a
brace to the middle of the top shelf.
The stool is eighteen inches high, sixteen inches long, and
fourteen inches wide. The corner-posts are two inches
square, and the rails are two inches wide and three-quarters
of an inch thick. At the sides the top-rails support
the seat, which is a piece of cowhide attached with nails and
glue, over which imitation nail-heads are made fast. The
lower rails, at front and back, are three inches above the
floor, and the lower side-rails are eight inches above the
floor. Stain and thin shellac will finish this wood-work
nicely.
Chapter XIX PAINTING, DECORATING, AND STENCILLING — Decorating — Decorating a Bedroom — A Boy’s Room — Another Boy’s Room — A Nursery — Stencilling
There are very few crafts that a boy takes hold of
with so much confidence as painting. In the average
boy’s mind it merely means getting a pot full of paint, a
brush, and daubing it on. This is painting in one sense of
the word, but not painting as a real craftsman should do it.
Good painting is a skilled trade, just as are horseshoeing,
plumbing, or bricklaying. But this manual is not intended
to be an artisan’s guide; all that can be done is to lay
down certain principles, and to give the practical hints that
may make a boy’s efforts in this line worth while.
It is not necessary that a boy should know how to make
paints; that is a branch of manufacture that requires years
of experience, improved machinery, and chemical and mineral
formulæ. A boy should know, however, what paints
are made of, how prepared, and how they are mixed, so that
he will be able to work with intelligence and success.
The basis of all good paint suitable for wood-work is lead
or zinc. Some painters prefer all lead for outside work,
while others take two-thirds of lead and one-third of zinc,
and then add the coloring dust or ground colors to get the
required shade. Both white-lead and zinc are ground in
linseed-oil, and can be purchased in cans, or kegs, ranging
in weight from one-pound tins to five-hundred-pound kegs.
Zinc is sold in the same kind of packages, and the cost in
small quantities is about ten cents a pound. Inside shades
of any color are generally made of two-thirds zinc and one-third
white-lead; then the dust or ground colors are added
to tone down the white to any desired shade. Pure boiled
linseed-oil and good turpentine should be used to thin
paints. Benzine, naphtha, kerosene, or other oils should
never be used in the preparation or thinning of paints unless
for special purposes.
To make the best paint for outside use, take two pounds
of white-lead and one pound of white-zinc, and mix them
thoroughly, adding whatever oil is necessary to render the
mixture about the consistency of rich cream. If coloring
matter is to be added, it is best to use the ground colors
rather than the dry dusts, because the colors ground in oil
are much finer, and will mix better with paint than the
dusts. Colors ground in oil may be purchased at a paint
store for ten or fifteen cents a pound. A portion of the color
should be thinned first with turpentine, and then added to
the pot of mixed white, stirring the mixture while the coloring
is added.
If the paint should not be thin enough to lay on the wood,
you may add small portions of turpentine until it is the
right consistency. A little experience is the best teacher
in this matter, and to make sure, it is well to ask a painter.
Painters, and all masters of arts and crafts nowadays, are
much more easily approached than they were a few years
ago, and a boy who really wants to know, and who goes
about it in the right way, can generally get the knowledge
or advice he is seeking. When making paint for inside use,
take the proportion of two parts of zinc to one part of lead,
then mix and thin with oil to the consistency of rich milk
or thin cream.
Before new wood-work is painted, all knots or sappy
places should be given a coat or two of shellac to “set” the
sap. The priming, or first coat, should be composed of
equal parts of boiled linseed-oil and white-lead for outside,
or zinc with some turpentine for inside work. When this
is dry one or two coats are to be laid on, taking care to
apply the paint evenly and to work it into all cracks, crevices,
and corners. The secret of good work is not in daubing
a whole lot of paint on the surface to be covered, but in
laying it on evenly and in a thin coating, so that it will
neither gum nor run. Two or three thin coats are always
better than one thick one, and the extra time spent in putting
the thin coats on, and in going over the work several
times, will be amply repaid, because the work will last. The
thick coat will dry unevenly, and in time will chip, crack,
and peel off.
When painting over old wood-work, it is always best to
scrape or remove as much of the old paint as possible. Then
sand—paper everything smooth, and wash all surfaces of
painted wood-work with a sponge and sapolio, or other good
scouring soap. If there should be any glossy surfaces to
the wood-work it is best to give them a washing with a very
strong solution of washing soda. A saturated solution of
the soda is best. This is made by adding washing soda to
water (about a pound to two quarts), and mixing or stirring
it until the water has taken up all the soda it will hold.
After the soda-water has been applied to the wood-work, be
careful to wash it all off with clear water, changing the
bucket of water frequently, so that no traces of soda will
be left on the wood-work. Follow these directions explicitly,
and do not try your own way nor trust to luck to have
the new job look well and last. There is an old saying that
“A little putty and paint hide a multitude of sin,” but
get rid of as much of the “sin” as you can before the new
coat is put on. The soda bath is particularly necessary on
old furniture that has been varnished several times. Paint
will not hold on varnished surfaces unless the varnish is first
cut with soda-water or some of the prepared paint and varnish
removers.
It is always best to mix your own paints rather than to
purchase “ready-mixed” paints or “prepared paints” at a
store. There are, of course, a great many reputable makers
of mixed paints, and you may use their preparations if
you so desire. But my advice to the young craftsman is to
purchase the raw materials of a good dealer and learn how
to mix his own paints.
When you have finished using your brushes they should
be washed out—first with turpentine, then rubbed out in
kerosene oil and laid away for future use. If they are to
be used again within a few days, it will not be necessary to
wash them out, and they may be allowed to stand in water.
Bore a hole through the handle, and slip through a stout wire
so that the ends of it will rest on the top edge of a can. The
brush should then be placed in the can so that it will hang
on the wire but not touch the bottom, as shown in Fig. 1.
Then water is put in until it just covers the bristles, as shown
at A. Never drop a brush into a pail or can of water for
even so short a time as overnight. The brush sags and
causes the bristles to curve, as shown at B, and it is then
a hard matter to get them straight again. The several
kinds of brushes that a boy will need for his work are shown
in Fig. 2. A is a regular wire-bound bristle brush which can
be had at a paint or hardware store in several sizes; B is
known as a “sash tool”; C is a flat floor or varnish brush;
D is a sizing, kalsomine, or whitewash brush; and at E a
round-liner or stipple brush and a flat tool are shown. For
light work the tin-ferruled, cedar-handle flat bristle brush
can be had in sizes ranging from one to six inches in width.
Fig. 1.Fig. 2.
There is nothing that freshens up a room so much as
repainted wood-work, newly papered or tinted walls, and
kalsomined ceilings; and while it may not be possible for
a boy to become an expert paper-hanger, it is quite within
his ability to tint walls and ceilings, paint wood-work, and
varnish the floors. If he has any artistic faculty whatever
he can do a great deal of effective decorating, and this is a
subject that we will now discuss at greater length.
There is no secret in the art of decorating. Good judgment,
good craftsmanship, and common-sense, coupled with
the use of the best materials, will always bring about good
results.
The schemes that are shown in the illustrations on the
following pages are those that any boy can carry out; and
with a fair knowledge of carpentry, painting, and other
crafts he will find it an enjoyable task to change his room
into one containing characteristic features of his own invention
or creation.
A very simple effect is shown in Fig. 3, and for this room
it will not be necessary to remodel or change any of the
wood-work. After removing all old paper from the walls
with hot water and a sponge (and cleaning off the ceiling
also), the walls and ceiling should be given a coat of size.
This is made by dissolving a handful of good ground or
flake glue in a pailful of water, and then painting it on the
wall with a wide brush. Do not slop the size over the floor,
nor have your brush too wet with the glue-water when you
are using it. Try to work it in well rather than attempt to
lay it on thick. When it is dry you can kalsomine, paper,
or tint over the walls, and the size will help to hold the
covering material in place. The wood-work in this room
is painted white or a light shade of any color that is easily
washed and kept clean. If paper is to be used on the side
walls, some very good patterns can be selected at a stock
house that will not cost more than twenty-five cents a roll.
FIG. 3—A BOY’S ROOM
The pattern shown in this scheme is in stripes and running
vines. Above the picture-moulding the wall is tinted or
papered with a light-buff paper. With some apple-green
fresco-paint the laurel-bush tops are drawn in above every
other stripe, if they are wide enough apart. This makes a
good finish to broad stripes that would otherwise stop at
the moulding. A small desk can be built in one corner.
It has a hinged top, and within it writing-materials may be
kept. Above the desk a book-ledge may be attached to the
wall with two brackets. Simple curtains at the windows
and a painted or stained and varnished floor, with a carpet
rug at the centre, will complete the decorating of this room.
The cost should not exceed ten dollars.
Of the many attractive schemes for the decoration of the
bedroom, there are none so pleasing and lasting as the
plain paper and an ornamental frieze.
A full-pattern paper soon becomes tiresome, and while
there are thousands of pretty figured papers adapted to
bedrooms, at least one-half of the bedrooms in our homes
are overdone or poorly papered. Small figures and as
nearly neutral shades as possible should be used, as they
are restful to the eyes, particularly in time of sickness. In
Fig. 4 a pleasing scheme is shown, and while its beauty
lies in its simplicity, it is quite as inexpensive as it is attractive.
FIG. 4—A BEDROOM
Pink is the general tone, and the wood-work is painted
cream color or light ivory. Four feet and six inches above
the floor a rail is run around the room, and between it and
the surbase vertical strips are made fast to divide the
wainscot into panels.
Plain cartridge or ingrain paper is hung on the wall above
the surbase, and between the rail and picture-moulding a
lighter-pink paper is applied. This may be a finely figured
paper, or a narrow, satin-striped paper that can be had at
twenty-five to fifty cents a roll. A border paper with garlands
and ribbons, to match the shade of the others, may be
had by the yard or roll in several widths. Light shades of
soft green or robin’s-egg blue, with white wood-work, always
make an effective and cheerful combination.
An artistic effect for the door may be secured by making
thin panels for the upper and lower sections, and covering
them with a fabric or burlap as near the shade of the paper
as it can be matched. These are attached to the door with
a few large, oval-headed nails painted black. Sheet-lead
escutcheons and hinge-straps can be made and applied to
the wood with oval-headed upholsterers’ nails painted black.
Any other metal-work in the room is to be coated black.
Pink, black, and cream, or pale-green, black, and ivory
color make pleasing and cheerful combinations for bedroom
decoration, and they do not become tiresome.
A feature in this scheme is the mode of suspending small
pictures from the rail by means of harness-rings and large-headed
nails painted black. The larger pictures hung above
the rail are arranged so that the bottom of each is on a line
with or touches the rail.
The arrangement and scheme for one side of a model
boy’s room is shown in Fig. 5. In this attractive room the
wood-work is white, or very light in color, and the walls a
soft, light-tea or olive green. The border above the picture-moulding
is a light shade of old pink ingrain paper on
which the wreath and garland border is painted in fresco
colors or stencilled.
At one side of the room a generous chest of drawers can
be built in a corner, and three feet up from the floor a long
drop-ledge may be made fast to the wall and arranged so
that hinge-brackets will support it. When not in use for
drawing or studying, the brackets can be folded in against
the wall and the ledge dropped down. Above this ledge,
and extending from the chest of drawers to a window or
door, a compartment-nest of shelves may be made from
three boards with shorter ones for partitions. This is supported
every two feet of its length with brackets screwed
securely to the under side of the bottom shelf and to the
wall. At the top it is also secured with small strips of
metal screwed fast to the back edge of the top shelf, and
through which screws pass into the wall. Short curtains of
some light material may be hung from a wire stretched
along the under side of the top shelf and caught up to it in
one or two places with staples.
FIG. 5—A BOY’S STUDY ROOM
The floor in a boy’s room should be of stained and varnished
narrow boards over which a rug can be thrown.
This makes it possible for the outer edges of the floor to be
wiped up frequently, and does not allow dust to settle at
the corners or edges as it would in a carpet. All the metal-work,
such as gas-brackets, hinges, hasps, escutcheons, handles,
and catches, should be given a coat or two of black
finish, which will lend them the appearance of being wrought
iron.
The panelled wainscot in Fig. 6 is formed of vertical
strips of wood four inches wide and four feet high, mounted
above the surbase. On top of these a six-inch band of
wood is carried all around the room, on which a five-inch
ledge is mounted, the latter being supported on brackets
which line with the centre of the vertical strips. The doors,
door and window casings, surbase, and wainscot-rails are
painted white, and all the hardware is black.
Hinge-straps of lead are cut and fastened to the doors
and casings with large, oval-headed nails. To cover the
panels in the doors, one large panel is made from thin wood.
It is covered with burlap and nailed fast to the side of the
door facing the room, with large-headed nails, or mock nail-heads
not less than one inch in diameter. Four-inch ledges
are placed over the door and window casings. These are
supported by brackets at the ends that line with the middle
of the casing uprights.
The walls above the wainscot-ledge are papered, and the
panels in the wainscot are covered with burlap glued to
the wall. The burlap on the panels and doors may be in
a coffee or light-brown color, and the paper should then
be a light shade of old green. The ceiling is tinted light
buff.
FIG. 6—ANOTHER BOY’S ROOM
If a boy has some younger brothers or sisters, he can fix
up their room or nursery in some such manner as shown in
Fig. 7. The walls are to be cleaned and sized; then the
wood-work is painted white, and a toy ledge or rail is made
fast with small brackets, two feet and six inches up from
the floor, or about on a line with the window-sills.
The lower part of the wall is to be covered with dark-colored
burlap, and above the ledge a lighter-colored burlap
or denim is applied with heavy paste, to which a handful
of glue has been added.
Another but narrower rail is made fast to the wall about
on a line with the middle rib of the windows. Above that
the walls and ceiling are painted in imitation of the blue
sky with fleecy white clouds floating about. Paint in some
birds flying in the air, and one or two perched on the tops of
the window and door casings. If this work is well done it
will have a very realistic appearance. Pictures may be hung
above the toy ledge and under the top strip by means of
large rings painted black.
The art of stencilling, although a very old one, is constantly
being revived through the efforts of amateur craftsmen.
Many of the art textiles now to be had in the art
and dry-goods stores have printed patterns in imitation of
this style of decoration. Nothing in the way of machine-printing,
however, can equal the hand-stencilled fabrics.
FIG. 7—A NURSERY
Simple figures are easily stencilled on fabrics, papers, or
walls, and the beginner will be wise in using the small,
clearly defined figures; then, as proficiency is acquired, the
more intricate and ornate patterns and designs may be employed.
Every young craftsman should cut his own stencil-plates
from fibre or oil-board. It should be about the thickness
of two ordinary calling-cards, and stiff enough to hold
its shape. The design is drawn directly on the material,
or on a piece of brown paper, and then transferred to the
board. With a sharp knife-blade the outline is carefully cut,
taking care to leave the bridges which are necessary to hold
the parts together. This is clearly shown in Fig. 8, which is
a small stencil for a fleur-de-lis. In Fig. 9 A the effect is
shown after the pigment has been applied to the fabric or
wall. If the ornament had been printed or stamped, however,
it would have been made without any breaks, or as
shown in Fig 9 B.
Fresco colors should be employed for stencilling on walls,
but on fabrics aniline colors or diluted oil-paints may be
used to good advantage. When preparing colors for fabrics,
the tube oil-paints, or body colors ground in oil, should
be employed. They should be thinned with benzine, and
placed in the bottom of a dish or saucer, so that the stencil-brush
will take up the colors at the tip ends of the bristles.
Fresco colors for walls should be used thick, or about the
consistency of rich cream, while those of oil or aniline need
not be thicker than milk. Regular stencil-brushes must be
used for this work. Such brushes may be had at any paint
store, and will appear as shown in Fig. 10. Stencil-brushes
are round, something like a shaving-brush, but the bristles
are stiffer and are stubbed or cut square at the ends.
Fig. 8.Fig. 9.Fig. 10.Fig. 11.Fig. 12.Fig. 13.
When cutting your stencils, keep turning the oil-board
so that you always make the cut towards you. Lay the
material on a smooth piece of close-grained wood, or a
sheet of zinc, and hold your knife with the blade in a vertical
position, and not to one side or the other. Do not
make bevelled cuts. Straight ones are necessary or there
will be smeared edges.
For a stencil-plate to make the garland and ribbon border
shown in the frieze of the room (Fig. 4), a one-half section
only is necessary (see Fig. 11). The full length of a garland
is marked on the wall by indicated dots, with chalk
or pencil; then the half garlands are stencilled all around
the room. When completed, the stencil-plate is carefully
wiped off; then it is reversed and the remaining halves are
done. The stencil-plate for the wreath ribbon and garland
border shown in the room (Fig. 5) is illustrated at Fig. 12.
This is a half garland and wreath, and is used as described
for Fig. 11. The stencil-plate shown in Fig. 13 can be
used as the frieze or border in Fig. 6. This is an empire
design, and its dignity and beauty make it a fitting ornament
for any room in a house.
Chapter XX NOOKS FOR BOOKS — A Wall-rack — A Book-nest — Another Book-rack — A Corner-nook — A Book-tower — Hanging-shelves — A Book-castle — A Book-chair — A Book-table — A Magazine-rack — A Box Book-case — A Nursery Book-rack — Another Book-rack — A Handy Piece of Furniture — A Book-ledge and Stool
There is always a demand in the house for convenient
places in which books, pamphlets, magazines, and papers
may be kept, thus avoiding the necessity of scattering them
over tables and shelves that are properly reserved for other
things. Regular bookcases are suitable for a library, arranged
especially for the purpose of harboring books, but
for the sitting-room, bedroom, or hall the odd rack, shelf,
hanging cabinet, or convenient nook is an acceptable addition
to the ordinary furniture.
Among the following illustrations may be found a variety
of ideas in book receptacles. Any of them can be made
at home by the boy craftsman, of inexpensive materials
that may be at hand, or cheaply purchased from a carpenter.
All of these designs are entirely practical, and may be
constructed with the aid of ordinary tools, the joints, laps,
and matched edges being of the simplest forms. The
staining, decorating, and finishing of these pieces of odd
furniture are easily within the average boy’s ability, and if
the instructions are carefully followed the results should be
most satisfactory.
Of these designs the wall-rack (Fig. 1) is perhaps the
easiest to construct, since it is formed of but three shelves
and some narrow rails.
A convenient size will be from twenty-seven to thirty-six
inches long, twenty inches high (from top to bottom
shelf), and eight inches deep. The extreme height from
top to bottom, along the middle wall strip, is about thirty-eight
inches. The wood should be three-quarters of an
inch in thickness, planed on both sides, and free from knots
or sappy places. The strips, excepting the centre-piece at
the back, measure two and a half inches in width, and
where one crosses another a lap is cut in each, as shown in
Fig. 2. This may be done with a fine saw and chisel, and
the joint held firmly with glue. Where the shelves join the
uprights at the ends a groove is cut in the end-rails to receive
the ends of the shelves, as shown in Fig. 3. The
curved sections of the rails, the back-board, and the tops
of the upright strips at the back should be cut with a compass-saw
and afterwards sand-papered or dressed down with
a wood-file. All the edges of the wood-work should be
rounded by means of a small plane or sand-paper, since
sharp corners are not desirable on useful furniture.
Long screws should be driven through the end-strips and
into the ends of the shelves to hold them firmly in place.
To cover the screw-heads and lend them the appearance of
being large, wrought-headed nails, false heads should be
made from scraps of thick sheet-lead and attached to the
wood with slim, steel-wire nails. To make these heads,
disks three-quarters of an inch in diameter are cut from
sheet-lead with a cold-chisel and mallet, the work being
imposed on the upturned face of an old flat-iron. With
a light hammer the edges are beaten to give them the
appearance of anvil-made nails, such as were used years
ago in decorations, and on antique chests, doors, leather-covered
furniture, and walls laid in tooled leather. These
nails were hand-made, and crude but artistic in appearance;
they are always effective when used in connection with
leather and wood-work.
Fig. 1.Fig. 2.Fig. 3.Fig. 4.
The ornament under the lower shelf of the rack is drawn
on the bare wood, and tinted in colors to match the natural
flowers and leaves. Use oil-paints thinned slightly with
turpentine, so as to give the appearance of a stain or dye
rather than of an opaque color. All the wood-work is then
stained some desired shade, and the outline of the ornament
is either burned pyrographically or lined with dark-brown
paint in imitation of a burned line. A bluish-gray
is a pretty color for this wall-rack, and it can be made by
thinning Payne’s gray and adding a small proportion of
any good blue, such as cobalt, ultramarine, or cerulean.
The stain should be applied thin, with a flat brush, and
then partially wiped off with a soft rag. When dry, a coat
or two of shellac will give a lustre to the stain, hold the
color, and render an egg-shell gloss to the wood-work. (See
Chapter XII. for instruction in Pyrography.)
A book-nest of quaint shape is shown in Fig. 4. It
is formed of a back-board, two shelves, three brackets,
and two slats that connect the shelves at the ends. This
is a small piece of furniture and is intended to fill a small
space; it should be from eighteen to twenty-four inches
long. The shelves should be ten inches apart, and the
under side of the lower one is supported by a long bracket,
at the middle of which small corner shelves are arranged,
as shown in the illustration. Holes may be made in these
brackets, through which the stems of pipes can be inserted.
The curved parts of the wall-plate are cut with a compass-saw
and finished off with a wood-file.
It is not necessary that this home-made furniture should
be absolutely smooth or the lines perfectly straight. A
slight variation from the manner in which shop-made furniture
is constructed adds to the effectiveness of these
book-racks and holders, and gives them the rough-and-ready
artistic appearance that is characteristic of the “mission”
and other popular styles of modern craftsmanship.
A simple arrangement of shelves in the form of a book-rack
is shown in Fig. 5. Where there is room to accommodate
a small standing receptacle of this nature, this design
will be found both useful and ornamental.
The top shelf is about forty-two inches high from the
floor, and in width the rack may be made to fill the available
space, say from two to four feet. The corner-posts
are of wood two inches square, and where the shelves are
attached portions of the wood are cut away, as shown in
Fig. 6. The shelf corners are cut out in such a manner
that half an inch of the shelf edge enters the post, where
it is held in place by means of glue and screws.
The screw-heads are covered with false nail-heads of
lead. These, when finished, should be painted a dead black
in imitation of wrought iron. An old green or a weathered
oak color would be appropriate for this rack.
For the corner of a room where space is valuable an idea
is suggested for a corner-nook (see Fig. 7). This is nothing
more than a well-made box arranged with wall-plates that
extend down below the bottom of the box, and to which
the ornamental wood-work over the box is attached.
Fig. 5.Fig. 6.Fig. 7.
The wings, or angle-shelves, and the brackets at the sides
should be made to conform with the general proportions of
the design. The working construction is so clearly shown
that it is not necessary to minutely describe the smaller
details. The shelves should be nine inches apart, and the
width of the box must be governed by the space that can
be allotted to it. The ornament at the bottom of the wall-plate
is painted on, and then outlined with a dark-brown
paint or burned. The wood-work is tinted an olive-green,
or other desirable color, then shellacked.
An odd but useful piece of furniture is shown in the
illustration of a book-tower (Fig. 8). It is suitable
for the corner of a room where the available space is
limited.
This tower should be twelve or fourteen inches square
and about seven feet high. The corner-posts are two inches
square and the shelves three-quarters or seven-eighths of
an inch in thickness. The shelves are let into the posts (as
shown in Fig. 6) and securely fastened with long screws.
The side slats are of thin wood. They are let into the
edges of the shelves, where they may be fastened with glue
and long, slim, steel-wire nails. Each joint or attachment
should be finished with a lead nail-head, which should be
painted black.
A very good dead-black paint for metals is made by
thinning shellac to the consistency of milk, then adding
some dry lamp-black until it is about the thickness of
cream. This is applied in thin coats with a soft, flat brush.
If one coat does not thoroughly cover the metal, another
may be applied after the first one is absolutely dry.
Around the top of this book-tower a rail is arranged three
or four inches above the top shelf, to serve as a guard
for articles of bric-à-brac placed thereon. With the arrangement
of slats shown in the drawing, the books are
distributed in such a manner that the titles may be read
from both directions instead of from one side only.
A unique design for hanging-shelves is shown in Fig. 9.
For general use the rack should be thirty inches long, the
ends thirty inches high, and the shelves seven inches wide.
The space between the shelves should be ten or eleven
inches, while the total height of the middle back strip is
thirty-six inches. The other parts should be made in proportion
to the drawing, and where the shelves join the sides
mortises should be cut, through which to pass tongued ends,
the latter being fashioned on the shelf ends, as shown in
Fig. 10. With a brace and bit holes are made to receive
wooden pins, or keys, that will lock the wood-work together.
Fig. 8.Fig. 9.Fig. 10.
Olive-green will be an appropriate color for the wood-work.
When attached to the wall, care should be taken
to anchor it firmly and with heavy screws to the studs behind
the plaster.
Fig. 11.
In the design for a book-castle (Fig. 11) the shelves and
rails are arranged in such a manner that books may be
slipped in from the front and also from both sides. The
lower shelf is devoted to large volumes, portfolios, or serial
publications in large sheets. The top shelf and the one
under it are for volumes of medium size, while the small
deck above the shelves makes a convenient receptacle for
magazines.
The wood-work should be stained and varnished, or painted
to match the trim of the room.
A novel idea is shown in the illustration of a book-chair
(Fig. 12). A Morris chair may be made over on this plan,
if the side spindles are removed and the receptacle is constructed
beneath the seat. A very low Morris chair cannot
be used, however, since the available space between
the seat-rail and the floor is too cramped. Both sides of
the chair are arranged to receive books, and at the front
a wooden panel is fitted below the seat-rail, as shown in
Fig. 13.
Cushions of burlap, tapestry cloth, or canterbury cloth
may be made to fit the seat and back; they are held on
with straps. The cushions may be filled with feathers,
curled hair, cocoa fibre, moss or even cotton batting.
Javanese kapok is perhaps the best of the lower grade
material. It costs twenty-five cents a pound, and takes
about two and a half pounds for a chair.
The ornament at the front of the chair is painted on and
outlined with the pyrographic point; or a dark-brown line
may be painted on with a fine brush.
For a library or sitting-room, the book-table shown in
Fig. 14 will be found a convenient and useful piece of furniture.
A good size for this table is: length, forty-two inches;
width, twenty-four inches; and height, thirty inches. The
drop-shelves at the ends should be nine inches below the
top of the table, while the drawer need not be more than
four inches deep. The legs are two and a half inches or
three inches square. The slats at the sides of the bookshelves
are let into the table-top and the shelf (see Fig. 15)
and apparently anchored by means of large nail-heads. The
top is attached to the frame by means of cleats screwed
fast to the top inner edges of the rails. Through these cleats
screws are passed up and into the under side of the table-top,
as shown in Fig. 16.
Fig. 12.Fig. 13.Fig. 14.Fig. 15.Fig. 16.
White-wood is a good material of which to make the
table, since it takes a stain nicely. Finish with a coat or
two of shellac.
A convenient rack for magazines and periodicals is shown
in Fig. 17.
The rack has three shelves and an enclosure at the top
to hold extra large pamphlets. The two uprights and the
cross-strip at the top are three-quarters of an inch thick and
two and a half inches wide. The uprights are twenty-four
inches long, and the cross-piece measures eighteen inches
from tip to tip. Four inches from the top the uprights
are cut, as shown in Fig. 18 A, so that a lap-joint can be
formed. The uprights are spaced ten inches apart from
the inside edges, making the total width fifteen inches.
Fig. 17.Fig. 18.Fig. 19.
From half-inch wood cut three shelves fifteen inches long
and six inches wide; also two corner-posts from wood an
inch square. Cut the end of each shelf as shown in Fig.
18 B, so that one notch will fit against the upright and the
other against the corner-post. From the half-inch wood cut
two brackets three inches long and two and a half inches
wide at the top, as shown at Fig. 18 C. These hold up
the bottom shelf, and the other shelves are supported in
turn by the corner-posts and the back, to which the shelves
are securely attached with screws and glue. The corner-posts
are fifteen inches high, and near the top laps are cut
half an inch deep and one inch wide into which a cross-rail
will fit. Three thin slats one inch in width and six inches
long are made fast across the front, and above the top shelf,
to form the pamphlet or periodical rack. The nail and
screw heads may be covered with brass upholsterers’ tacks
painted black to suggest the idea of a large nail, or imitation
wrought-iron nail-heads may be made by cutting disks
out of sheet-lead and slightly beating the edges so as to
imitate the hammer-marks of wrought-iron work. These
disks are secured to the wood with slim steel nails, the
heads of which, when driven in with a light hammer, become
imbedded in the soft lead. A subsequent coating of
black paint will conceal the nail-heads completely.
Fig. 19 is an idea for a receptacle for a few books, bric-à-brac,
and some magazines to hang against the wall. Boxes
of various sizes may be used for this purpose, according to
the available wall space, but for general use two shoe-cases
should be cut down so as to make them thirty inches
high and seven inches deep. In each one two shelves can
be arranged.
The boxes are held together at top and bottom with
boards seven inches wide and thirty-six inches long. Between
the boxes a shelf may be fastened about midway
between the top and bottom boards. A wooden back is
not necessary to this case, as the wall itself will answer the
purpose; but around the top edge a strip of cornice-moulding
is to be mitred at the corners and attached with long,
slim nails or screws. Under the lower corners wooden
brackets may be fastened to the wall, or when the shoe-cases
are being cut down one side may be trimmed, with
the compass-saw, in the form of a bracket end. A rod fastened
at the top and under the moulding will support light
curtains, but this last feature may be omitted at pleasure.
A nursery is not quite complete without some receptacle
for the accommodation of the children’s scrap and picture
books. A simple and useful design is shown in Fig. 20.
A well-made box of thin boards, planed on both sides,
forms the basis for this bookcase. It should be of medium
size and not more than seven inches deep. Remove one
side or the top, so as to leave it open at the front, and arrange
a shelf in the open space. The box should be at least
sixteen inches high to accommodate two rows of books,
and it would be better to have it eighteen inches. Two
brackets eight inches high and six inches wide at the top
are placed under each end of the box. Across the top, at
the back, a wall-plate is cut and attached with two slim
screws that pass down through the narrow part near the
ends and into the back of the box at the top. Around the
top of the box a narrow strip of moulding should be mitred
and fastened with steel-wire nails. The wood-work may
then be given a coat of stain and shellac. Across the front
of the box and at the top a brass or iron rod may be attached
at the ends, from which curtains are suspended by
means of rings.
Fig. 20.Fig. 21.
When fastening this case to the wall, it would be well
to drive two or three screws through the back of the box
and into the wall-studding, otherwise the weight of books
might tear it away from its bracket anchorage.
In Fig. 21 an odd shape for a book-rack is shown.
This is also made from a box by removing one side and
resetting it closer to the other side. A portion of the
lower end is sawed off, and a part of the bottom is cut away
so as to form a small, quarter-circular bracket. The extending
upper end of the box is supported with a short
bracket, as the illustration clearly shows, and under the
box two large brackets ten inches deep and the width
of the back and side support the rack in position. Two
wall-plates four inches high at the angle are attached at
the top of the box with screws. A curtain-rod is attached
at the top of the case from which a curtain may be hung,
and the ledge formed by the top of the case and the quarter-circular
bracket will accommodate a few pieces of
bric-à-brac or a photograph frame or two. If the box is
high enough, two shelves may be arranged so that three
lines of books can be accommodated; otherwise one shelf
will have to suffice.
A place to put books and a place to keep bats, golf-clubs,
lacrosse-sticks, and other things that are always around, is
a convenient possession.
Here is a solution of the problem: The case shown in
Fig. 22 should be about five feet six inches high and three
feet wide. The shelf across the top would hold a number
of books, and underneath are two beautiful tuck-away
places. If, my friend, you are a college boy, the curtain
could be of your college colors; the rest of the case stained
a becoming color. The door is fastened by a big wooden
latch, and a pair of iron hinges would add very much to the
style of the bookcase.
If, however, you are of a studious frame of mind, and
have been fortunate enough to collect a number of books,
the second case would probably be more to your liking.
Fig. 22.Fig. 23.
We will suppose that you have already a desk. Make
two upright rows of bookshelves far enough apart to allow
the desk to be placed between them. Shut off the
lower part of the shelves, on each side, with a door, which
may be decorated with iron hinges or blackened metal.
These false hinges are of course placed against the real
ones on which the door swings, and are purely ornamental.
These little closets make fine places in which to store unsightly
books and magazines which look untidy but which
one always wants to keep. There is a shelf over the top
of the desk on which could be placed a row of plates, a
tankard, or photographs; and a poster or nice little etching
would give interest to the big panel. This panel, by-the-way,
need not be made of wood, but could be closed in by
a piece of colored burlap or buckram. The case would then
have to be braced by three slats of wood nailed across the
back behind the buckram. When completed it will appear
as shown in Fig. 23.
Two interesting and useful pieces of furniture are shown
in the drawing of a book-ledge and stool (Fig. 24), and as
the main shelf is but fourteen inches wide it will not occupy
a great deal of space in a room.
The main shelf is forty-two inches long, fourteen wide,
and one inch and a quarter thick. The side pieces, or legs,
supporting it are twelve inches wide and thirty-three inches
high, with V-shaped pieces cut from the foot of each one.
These pieces are thirty-six inches apart, and arranged between
them, and twenty inches above the floor an under
ledge eight inches wide is fastened with long screws and
brackets. Nine inches above the main ledge a top shelf
is supported on side legs, which, in turn, are propped at
the outside with wood braces, or blocks, six inches high
and four inches wide at the bottom. The side supports
are placed the same distance apart as the underside pieces,
and are held in position on the top of the main ledge with
short dowels, or pegs, driven in their under end, and which
fit into holes bored in a corresponding position in the ledge.
This upper section may be omitted, however, if the plain
ledge is preferred.
The stool is twelve inches square and twenty-two inches
high. The top is covered with a stout square of leather
caught all around the edges with nails and imitation nail-heads.
The lower rails that bind the posts together are
one and three-quarter inches wide and seven-eighths of an
inch thick. The posts are one and three-quarter inches
square, and the rails are let into them three inches up from
the floor. The top rails are the same width, and all let into
the top of the posts with the lap-joint union, where they are
glued and screwed fast. Small brackets under these rails
will add an element of support, and they can be dressed
out of seven-eighths-inch wood with a compass-saw, and
made fast with glue and screws. These brackets are comparatively
small, being two and a half inches wide and four
inches deep, but they must be cut accurately to fit well.
Fig. 24.
Chapter XXI CLOCKS AND TIMEPIECES — A Bracket-clock — A Mantel-clock — A Wall-clock — A High Wall-clock — An Odd Mantel-clock — A Shelf-clock — An Old-style Timepiece
Among the many useful and attractive pieces of furniture
that a boy can make to help furnish a home,
clocks and timepieces offer a good field for endeavor. Now,
a clock is more often looked at than any other piece of furniture;
consequently, it should be a thing of beauty rather
than a distracting eyesore. And, since it is no more expensive
to construct a clock on good lines than on poor ones,
there is no reasonable excuse for the inartistic, commonplace
designs that are displayed for sale by jewelers, department
stores, and house-furnishing shops.
Several good designs for simple and artistic cases are
shown on the following pages, and none of them are too
intricate to be made at home by the boy who has gained
some knowledge in the handling of tools. There is nothing
in their construction that requires the services of a cabinet-maker,
and the movements may be had from a clock-manufacturer,
or perhaps taken out of an old or unsightly case.
For instruction in the use of the pyrographic-point, see
Chapter XII.
Thin white-wood or pine boards, sheet-lead, stain, and
shellac are some of the simple materials needed; and the
tools required will be those that may be found in every
household, such as a saw, hammer, plane, awl, square,
mallet, compass-saw, and brace and bit. Some steel-wire
nails, glue, sand-paper, and black paint will complete the
list of necessaries, and the various small accessories may be
had at a hardware store at a nominal outlay.
A design for a simple bracket-clock is shown in Fig. 1,
and the case is so plain in construction that any smart boy
can easily make it from thin pieces of board half an inch in
thickness, half a yard of burlap, and some sheet-lead.
The box part of the clock is eight inches square and three
and a half inches deep. The brackets are extensions of the
sides, cut as shown in Fig. 2 A; they drop eight inches below
the bottom-board of the case. The dial and glass frame
measure six inches in diameter, and to fit them to the box
it will be necessary to cut a hole in the front of the case
five and a half inches in diameter, as shown in Fig. 2 B.
The shelf-top to the box is bevelled at the under side, and
is attached by means of glue and nails; it overhangs one
and a half inches at the front and ends. The sides and
front of the box are then covered with tinted burlap in a
soft, old-green, red, or tan shade, and the exposed wood-work
is stained a color to match. When dry it is given
a coat or two of thin shellac to lend a lustre to the grain
and stain.
To hide the joint between the cap and the body of the
clock, a round piece of wood, such as a dowel, should be
inserted and nailed fast; or a narrow strip of picture-moulding
can be used.
Fig. 1.Fig. 2.Fig. 3.
If it is impossible to find the large nails that bind the
corners at a hardware store, they may be made from sheet-lead.
Disks half an inch in diameter are cut from the lead
by means of a small cold-chisel and mallet. The edges of
the disks are beaten with a tack-hammer to give them the
appearance of a rough, hammer-headed nail. These disks
are painted with a dead-black paint, made by adding a
small portion of dry lamp-black to thin shellac, and applying
it to the metal-work with a soft brush. These heads
are attached to the clock, as shown in the illustration, at
regular distances apart, with thin, small-headed, steel-wire
nails, which when driven in and painted with the black
preparation become invisible.
The movement, which may be of either the spring or
weight kind, is attached to the back of the case before the
dial is made fast, and the pendulum-rod is dropped through
a slot cut in the bottom-board.
If the mounting is bothersome, however, a clock-maker
will arrange it and adjust the dial and space the hands
properly.
A metal hanger at the top and two long, slim screws
driven through the bottom of each bracket will hold this
clock in place against the wall.
A simple but artistic mantel-clock is shown in Fig. 3.
It is seven inches wide, thirteen inches high, and three and a
half inches deep. It is made from thin white-wood, pine,
cypress, or almost any soft wood.
The top, or cap, is of half-inch wood, and it projects one
and a half inches beyond the front and sides. A small
moulding, or a dowel, is cut and mitred around the top
under the cap. At the bottom the feet are made by cutting
out pieces of the wood with a compass-saw. A small
pendulum movement is mounted against the back before
the dial and glass frame are set in place.
The ornament on the front and sides is outlined with
pencil, and after the wood-work is stained a soft-brown,
an old-green, or any desired shade, the lines of the ornament
are pyrographically burned. Or they may be painted
with a dark-brown paint in imitation of pyrography.
Below the ornament a half-inch band of sheet-lead is laid
around the body of the clock and held on with large, oval-headed
upholsterers’ nails painted black.
An attractive wall-clock is shown in Fig. 4, page 327.
With a movement having a fifteen-inch pendulum, the case
should be ten inches wide, twenty-four inches high, and four
inches deep. A circular opening is made at the upper end of
the box, and an oblong one at the lower end through which
the pendulum may be seen. The box is covered with burlap
in some desirable shade; it is applied with glue and large-headed
nails, or dummy heads.
The ornamental design is cut from sheet-lead and applied
with slim, steel-wire nails. The frame around the
lower opening is cut from lead and applied over a piece of
glass which is cut and fitted to the opening. The stems to
the buds are made of thin telegraph wire, bent to the proper
shape, and applied with small staples made from pins.
The top is cut from white-wood five-eighths of an inch
thick; it overhangs the sides and front two inches. Where
the top is applied to the body of the clock, the joint is hidden
with a small strip of moulding, or a dowel mitred at the
corners, and attached with slim, steel-wire nails.
The large nail-heads all along the edges are made from
sheet-lead beaten to represent wrought-iron bellows-nails,
and fastened on with thin, steel nails, and afterwards painted
black.
The bottom of the box should be arranged on hinges, and
caught with a small bolt so that it may be dropped in order
to start the pendulum, and also to adjust the screw at the
bottom of the rod.
A pleasing combination of colors for this case will be
light, olive-green burlap, black metal-work, and old-brown
wood-work. The pendulum-ball may be of bright brass or
blackened. Equally effective are combinations of red burlap
and brass trimmings, or old-gold-colored burlap and
Pompeian-green metal-work, made by tinting all the metal
parts with a light and dark olive-green paint blended together
on the parts.
For the space over a mantel, or wherever it may be convenient
to hang it, a substantial high wall-clock is shown
in Fig. 5. It is ten inches wide, thirty inches high at the
front, and four inches deep, with the bracket-ends and the
fancy top-pieces extending five or six inches beyond the
body of the clock at top and bottom.
In construction it is somewhat on the lines of the “mission”
furniture, the pieces being tongued and pinned, with
a heavy slatted front.
The wood-work is five-eighths of an inch in thickness.
The cross-rails are two inches in width, and the upright
ones and the lattice are one and a quarter inches in width.
The ends of the cross-pieces are shaped as shown in Fig. 6.
When passed through mortises cut in front of the side boards
they are held in place with wooden pins.
At the back, near the top and bottom, two-inch cross-strips
are let into the side boards. The ends should project
two inches beyond the boards at both sides, and holes
are made in them through which screws are passed to anchor
the clock to the wall.
An eight-day movement, with a twelve-inch pendulum,
is made fast to a back-board, and on the front-board, to
cover a hole eight inches in diameter, a large dial and glass
are fastened.
HANGING AND MANTEL CLOCKS
Fig. 4.Fig. 5.Fig. 6.Fig. 7.
The ornament at the sides and on the front-board around
the dial is cut with a carving-chisel, and tinted to darken
the lines. Stain and varnish will be a desirable finish; or
the stain alone may be used should an old, dull appearance
be desired.
The design for a mantel-clock that is odd in shape and
striking in appearance is shown in Fig. 7. It is seven
inches wide at the top, underneath the cap, and ten inches
across at the base. In width it varies from three inches
at the top to four and a half inches at the base.
The case is made from three-eighths-inch white-wood
and joined with glue and nails. The top is of core-moulding
that may be had at a carpenter-shop or planing-mill.
It is mitred to fit at the front and ends.
The metal straps are of lead and the ornament is tinted
and outlined. A great deal of the beauty of this design is
in its coloring, and, unfortunately, this cannot be reproduced.
The wood-work is in light golden-brown, the buds
in orange, toning down to a deep red at the base, or similar
to the colorings of the California poppy. The stems and
leaves are in several shades of green, and the entire ornament
is lined by the pyrographic-point, or painted with a
line in dark brown. The straps, nails, and glass frame are
in dead black, and the cap-moulding is in a darker shade
of brown than that employed for the body color of the case.
A pale, old-pink dial, on which black numerals are painted,
completes this harmonious color-scheme.
A quaint clock is shown in Fig. 8, and it is quite as simple
to construct as it is in appearance.
It is fourteen inches wide, twelve inches high, and four
and a half inches in depth. A six-inch dial and glass are
mounted on the front, and in the bottom of the movement-box
a narrow slot is cut to accommodate the swing of the
pendulum-rod.
Fig. 8.Fig. 9.Fig. 10.
White-wood boards three-eighths of an inch in thickness
are fastened to corner-posts, having the two upper sides cut
away as shown in Fig. 9. Laps are cut at the lower end
of each corner-post into which the rail fits, as also shown in
Fig. 9.
The same general description given for the other cases
applies to this one, and after the ornament is stained and
lined the surface of the wood may be lightly lined from top
to bottom with the pyrographic-point.
A case of old-fashioned design is shown in Fig. 10.
The top measures eight inches square; the waist is five
inches wide and twelve inches long; and the base is six
inches high and twelve inches long. Two bars are fastened
from the top to the base; they pitch at a slight angle.
The average depth is four inches, and the top, or head,
extends out over the waist for a quarter of an inch, or
enough to make a break in the straight line of the front.
The ornamentation is carried out as described for the
other designs, and if properly constructed this clock should
present a very unique appearance.
Chapter XXII SCREENS, SHOE-BOXES, AND WINDOW-SEATS — A Light-screen — A Fire-screen — A Shoe-screen — A Bedroom-door Screen — A Heavy Fire-screen — A Window-seat with Under Ledge — A Shoe-box Seat — A Dressing-room Settle — A Short Settle — A Foot-rest — A Combination Shoe-box and Seat — A Double Shoe-box and Seat — A Curved-back Window-seat — A Window-seat and Shoe-box
Among the many convenient pieces of furniture that
a boy can make for the home, there are, perhaps, none
that are so handy and generally useful as screens, shoe-boxes,
and settles of various kinds.
Screens in particular are of so many and varied designs
that it would be quite impossible in this short chapter
to give more than a few of the simpler forms; but
they will serve as hints for others.
One of the easiest screens to make, and perhaps the most
generally useful, is that shown in Fig. 1. This is a light-screen,
which may be easily taken from one room to another.
Four rails of pine or white-wood are cut and tapered at
one end for the tops, and slightly cut away at the other for
the bottom, as shown in the illustration. The rails are
four feet six inches long, two and a half inches in width,
and seven-eighths of an inch thick. Dowels five-eighths
of an inch in diameter are used for the cross-sticks. They
can be purchased at a hardware store or from a cabinet-maker,
and should be cut twenty-four inches long. Holes
are to be bored in one edge of each strip, into which the
dowels are driven, and fastened with glue and small nails.
Four or five dowels will be sufficient for each wing, and
they should be spaced evenly, the first one four inches below
the top of the rails and the bottom one ten inches
above the floor.
The wings are fastened together with two or three hinges,
so that the screen may be folded and stood in a closet or
behind a door when not in use.
Some pretty figured material, such as China silk, silkoline,
cretonne, or printed cotton goods may be used for the
covering, which is to show on both sides of each wing. It
should be from three to five feet wide, so as to allow for
some fulness. One end of the goods is tacked to the top
dowel; then it is passed around the bottom dowel and
brought up to the top, where it is again tacked fast. Some
narrow gimp and brass nails will hide the edges of the
goods at the top, and to hold the material in place a few
tacks may be driven along the bottom dowel.
The wood-work should be painted, or stained and varnished,
before the covering material is put on. If a dull
finish is desired, some dark paint may be thinned with turpentine
and rubbed on with a soft cloth, then partially
wiped off and allowed to dry. It will not be necessary to
varnish or shellac the surface, but a little beeswax can be
dissolved in turpentine and rubbed on.
When an open fire is burning on the hearth a screen that
will protect the eyes from the glare, and yet allow the heat
to reach the lower part of the body and the feet, is a useful
piece of furniture.
A simple screen of this description is shown in Fig. 2,
and for a living-room or bedroom it should measure thirty-six
inches long, forty-two inches high, the screen proper
being eighteen or twenty inches wide.
The uprights are of wood two inches square, and the
cross-rails are seven-eighths of an inch thick and two
inches wide. The joints are mortised and tenoned, and
held with screws and glue, while the apparent fastenings
are large, round, mock nail-heads. The feet are cut from
hard-wood seven-eighths of an inch in thickness, as shown
in Fig. 3, and attached to the bottom of the upright posts
with glue and screws, the vertical edges of the feet being
let into a lap cut in the posts. Each foot will then measure
eighteen inches across at the bottom, and twelve inches
high from the floor to the top of the lap cut in the posts.
Leather, burlap, denim, tapestry-cloth, or any good covering
fabric, may be used for the screen. This material
should be tacked on the top and bottom rail with large
upholsterers’ tacks painted black.
A design may be lightly drawn on the fabric with a pencil,
and afterwards painted in oil or water colors, or the ornament
may be stencilled on with aniline colors, as described
in Chapter XIX.
For a bedroom a convenient screen is shown in Fig. 4.
This is properly called a shoe-screen, since there is a ledge
made fast to the lower part of it to serve as a rest for the
foot when lacing or buttoning shoes. There are also two
rows of pockets on the inside of the screen, into which shoes,
slippers, and sandals can be slipped.
A convenient size to make this screen is three feet six
inches high and two feet six inches wide. The foot-ledge
should not be more than fourteen inches above the floor
and six inches wide. The frame may be made from any
easily worked wood, since when it is painted, or stained
and varnished, nothing but the grain will show. The
uprights should be three inches wide, seven-eighths of
an inch thick, and three feet three inches long. Lap or
dowelled joints should be made at the top corners, and
at the foot of both pieces notches are to be cut in with
saw and chisel, as shown at Fig. 5. The foot-pieces may
then be driven up in place and made fast with screws or
slim nails driven through the projecting ends of the side
uprights and into the feet. The feet are of wood seven-eighths
of an inch thick, sixteen inches long, and six inches
high. The pattern may be drawn with lead-pencil on the
wood; then, with a compass-saw, cut the wood on the lines,
having first clamped the piece in a vise to hold it securely.
The foot-shelf is made fast to the screen after the covering
material is in place, and at both ends it is supported with
brackets, the lower ends of which are made fast with screws.
A cross-rib should be made fast in the screen-frame midway
between the top-rail and the one to which the ledge
is attached, and a line of tacks is driven through the covering
material and into the frame on both sides. This is
to give a better finish, and also to support the rows of pockets
when full of shoes.
The strip of denim for the pockets is seven inches wide
and hemmed on both edges. It is then caught to the covering
material so that generous pockets will be formed,
each one being large enough to accommodate a pair of shoes.
The front of the screen may be covered with a fancy-figured
material fastened on with small tacks; over this a
gimp to match the material can be laid and held down
with large-headed tacks, such as may be purchased at upholstery
supply stores. The painting, staining, or varnishing
should, of course, be done before the fabric, or covering
material, is made fast to the frame.
At night it is often agreeable to have a bedroom door
left open. Yet one does not want to sleep in an actual
draught, and a screen such as is shown in Fig. 6 will be
found most useful.
This screen is in one piece, six feet six inches high and
eighteen inches wide. The frame is made from pine,
white-wood, or any other wood to match the trim of the
room. Two cross-rails are fixed so as to remain equal distances
apart, thus forming three panels to the screen.
Hinges are arranged at one edge, which in turn are made
fast to the door-casing, so that when the screen is not in
use it can be thrown back against the wall; or, if thought
preferable, eyes may be driven in the casing and hooks in
the edge of the screen, so that it may swing as if on hinges,
and yet be lifted off at will and set away in a closet. An
eye on the door and a hook on the screen will serve as
a fairly secure fastening against intrusion. Any pretty
material that matches the paper of the room may be used
to cover this screen, and the edges should be bound with
gimp and large-headed tacks to give it a good appearance.
For a dining-room, living-room, or library, an attractive
design for a heavy fire-screen is shown in Fig. 7. This is
constructed of oak, ash, or other hard-wood. It is thirty-six
inches wide, forty-two inches high, and the rails and
feet are one and one-eighth inches thick. The uprights and
cross-rails are four inches wide, and the top and bottom
of each upright are cut as shown in Fig. 8.
The cross-rails should be mortised in the uprights, or
they may be made fast by butting one end against an edge
and securing the joint with dowels. The feet are fourteen
inches across at the bottom and fifteen inches high. They
are glued and screwed in the laps cut at the lower ends of
the uprights, and the screw-heads are covered with imitation
wrought-iron nail-heads beaten from sheet-lead and
attached with steel-wire nails, the heads of which are invisible
when driven into the lead.
The side of the screen which faces the fire should be covered
with burlap, denim, or other stout cotton fabric. The
outer side of the screen should be faced with leather, on
which the ornamental design is followed out with stains
and pyrography (see Chapter XII).
The leather should be caught to the frame with tacks
placed two inches apart, and also glue. Over the tacks
imitation lead heads may be secured with slim, steel nails.
In the drawing of the window-seat with under ledge
(Fig. 9) an odd but useful piece of furniture is shown. It
is made from two boards fourteen inches wide and forty
inches long, two end-pieces fifteen inches wide and twenty-two
inches high, and four brackets eight inches on the
right-angle edges. These latter are necessary to brace the
top and ends, as shown in Fig. 10 A A.
The top shelf, or seat, is eighteen inches high from the
floor, and the under ledge is made fast eight inches below
it. The fastening is made with screws and liquid glue,
and allowed to stand several hours before the drapery is
attached.
For the upholstery material the dry-goods stores offer
quite a variety of stuffs from which to choose. The least
expensive are burlap, denim, cretonne, and some of the
heavy, cotton, printed goods. Other fabrics, richer in appearance
and more lasting, are velour, tapestry-cloth, rep,
and brocade. Goods of this class will cost from fifty cents
to several dollars a yard.
Fig. 9.Fig. 10.Fig. 11.Fig. 12.
To upholster this seat, obtain some curled hair from an
old mattress, and spread it over the top board, having first
tacked a piece of unbleached muslin along one edge of the
seat. When a sufficient quantity of the hair is on the
board, draw the muslin over it, and tack it down along the
other edge and at the ends. Over this the fabric can be
drawn and tacked.
The end boards are covered with plain goods of the
same color as the seat and flounce, and the edges are bound
with gimp an inch wide, held down with large, oval-headed
upholsterers’ tacks painted black. Across the back of the
seat (the part that goes against the wall or window-base)
plain goods can be drawn and tacked, or it may be left open.
The front is provided with a flounce made by shirring
the goods on a stout cotton cord and tacking it along the
front of the top board, then covering the tacks with gimp
and nails, as shown in the drawing. A coat of paint or
shellac at the inside will finish the wood-work, and it will
then be ready for use.
A shoe-box seat is easily made and upholstered, and will
be an acceptable addition in any bedroom (see Fig. 11).
The sides are eighteen inches wide, thirty-six inches high
at the back, and twenty-two inches at the front. The seat
and ledge under it are each eighteen inches square, and the
boards forming the back extend down to the floor. The
parts are put together with screws and glue; then the seat
is upholstered with curled hair, as described for the window-seat
(Fig. 9).
The framework for this seat could be made from a box
with the bottom and one side removed. The arms should
be cut from a separate piece of wood and screwed fast, as
shown in Fig. 12 by the line along the shaded side.
Plain or figured goods may be used for the covering material.
It is drawn and caught with tacks at the edges;
then the joints may be hidden with gimp and large-headed
tacks. If it is possible to procure some English bellows-nails
they will add an artistic effect to the trimming. If
they cannot be had, very good imitation heads may be cut
from sheet-lead with a pair of old scissors or shears. After
beating them about the edge to flatten them and lend a
hand-forged effect, these disks should be attached to the
wood with long, slim finishing-nails of steel wire, which,
when driven into the heads, become imbedded in the lead
and are not seen. They should be painted black with a
solution of shellac in which some dry lamp-black has been
mixed to the consistency of cream. Apply with a soft
brush.
In the illustration for a dressing-room settle (Fig. 13) a
comfortable piece of furniture is illustrated, and in Fig. 14
its construction is clearly indicated.
The ends are three feet high and sixteen inches wide.
The back-boards extend from the top of the ends down to
the floor, and are attached with screws. The seat and
under ledge should be from thirty to forty-eight inches
long, according to the space it will occupy against the wall
or under a window.
The upholstering is done as described for the other pieces
of furniture, save that a more elaborate ornamentation is
suggested for the end-pieces. The design is drawn in free-hand,
and then embroidered on with heavy linen thread.
Mother or elder sister will have to help out with the needle-work.
Fig. 13.Fig. 14.Fig. 15.Fig. 16.
A short settle with under ledge (Fig. 15) is another comfortable
piece of bedroom or sitting-room furniture. In
Fig. 16 the constructional diagram is shown for the arrangement
of its sides, back, and under ledge.
The ends are sixteen inches wide and twenty-three inches
high. The back extends down to the floor, and above the
ends it curves or rounds over, extending up about five
inches higher than the tops of the ends. Under the seat
a strip of wood two and a half inches in width is attached
at both ends, and the front edge of the seat is screwed fast
to it. This acts as a support, and obviates the necessity
of a brace block.
When putting on shoes it is convenient to have a short
bench on which to rest the foot, and while a hassock will
answer well enough, it is not so good as a bench or so easily
handled.
Fig. 17 shows a neat foot-bench that is easy to construct
from four pieces of wood. In Fig. 18 page 345 the plain
bench is shown, while at B a view of the inverted bench is
given so that the cross-bar may be seen.
The top board is eighteen inches long, ten inches wide,
and an inch thick. The ends, or legs, are seven inches
high and eight inches wide, with a V notch cut in from the
bottom of each. These feet are set fourteen inches apart,
so that there will be two inches of overhang at each end
of the bench; that is, the top will extend two inches over
the legs at each end. The brace shown at Fig. 18 B is
two inches wide, twelve and a half inches long, and an inch
in thickness.
The four parts are put together with glue and screws;
then the top is padded with curled hair and upholstered
as already described.
From two canned-goods boxes the combination shoe-box
and seat may be made, as shown in Fig. 19, Fig. 20 being
the structural plan.
The left-hand box in Fig. 20 has the lid removed, and
a shelf is inserted so as to divide it into two compartments.
The other box is provided with a hinged lid. Instead
of making the hinges fast to the edge of the box, a
strip an inch or two wide should be attached to the rear
of the box, and to this the lid is hinged, as shown in Fig.
20. The two boxes are screwed together, and a back is
provided for the one on the right. The board forming this
back should extend the entire length of the two boxes, and
should be secured to them with stout screws. The tops of
the boxes are padded with hair, and the sides are covered
with upholstery material of any desirable color and quality,
the edges being bound with gimp and nails.
The inside of the low box and the under side of the lid
should be provided with denim pockets, as shown at Fig.
21. These pockets are formed by tacking a strip of denim
to the wood and allowing fulness enough to accommodate
a pair of shoes or slippers.
It furnishes the inside of such boxes nicely to line them
with unbleached muslin tacked at the corners and edges.
Where wood is exposed in the ledge and shelf seats a coat
of paint or shellac is desirable.
Three well-made boxes, two of a size and one longer, will
make the foundation for a double shoe-box and seat, such
as is shown in Fig. 22.
Fig. 17.Fig. 19.Fig. 22.Fig. 24.Fig. 26.
In Fig. 23 the structural arrangement is indicated. The
end boxes are provided with two shelves each, and the
middle one is fitted with a back-board, which is rounded
over at the top and projects about six inches above the top
of the end boxes.
The middle box is provided with a lid and hinges which
are made fast to a back strip, so that when the lid is raised
it will not fall again, but will stand out an inch or two from
the back-boards.
Fig. 24 illustrates a useful piece of furniture. The box
part, or frame, is thirty-eight inches long, sixteen inches
wide, and fifteen inches high, and the top of the back is
fourteen inches above the seat. The structural plan is
shown in Fig. 25.
Four inches from the bottom a ledge is arranged, and at
the middle a division-brace is placed. The unions may be
made with nails, but screws are preferable.
Fig. 18.Fig. 20.Fig. 21.Fig. 23.Fig. 25.Fig. 27.
The back is made from two boards shaped into a curve
with a draw-knife and plane and held together with battens,
as shown by the dotted lines in Fig. 25. The battens extend
down behind the back of the box, and the ends are
made fast with screws to support the back. The back and
seat are padded with curled hair and covered with unbleached
muslin, over which the upholstery material is
drawn and tacked to the edges. A valance of some pretty
figured goods to match the seat and back is made, and
tacked around the upper edge of the box. Wide gimp and
large-headed upholsterers’ tacks will finish the edge of the
seat and back, and it would be well to give the wood-work
a coat or two of paint or stain.
In the illustration of the window-seat and shoe-box (Fig.
26) a substantial and useful piece of furniture is illustrated.
It is made of three boxes screwed together, as shown in
Fig. 27. The lid of the middle box is hinged, and the end
boxes are stood on end. One end box is shorter than the
other, and in both of them shelves are arranged for shoes,
slippers, or sandals. A back is made of two boards and
attached at the rear of the boxes. The top of each box
and the face of the back are padded with curled hair or
moss filling that may be had from an upholsterer, and
covered with some upholstery material. Buttons and string
are caught down into the top of the padded surface to give
the tufted effect shown in the illustration, and the sides and
fronts of the boxes are hidden with valances. Gimp and
large-headed nails finish the edges as shown, and when the
wood-work is given a coat of paint this window-seat and
shoe-box is ready for use.
Chapter XXIII HOUSEHOLD CONVENIENCES — A Plate-rail — A Cup and Plate Rack — A Cup and Plate Pyramid — A Butler’s Tray — Cup-pins and Brush-rack — Lock-shelves — A Vegetable-bin — A Spoon-bar and Saucepan-rack — A Medicine-chest — A Convenient Plant-tray — An Indispensable Clothes-press — A Divan — A Corner Dressing-table
In and around the house there is opportunity for the
creation of a number of useful articles that can be made
by any boy who is at all handy with tools. For example,
the tops of doorways and windows in a dining-room may
be improved by the addition of narrow shelves, or ledges,
on which old plates, slim jugs, or some quaint old bottles
may rest.
These ledges may be made from pine, white-wood, cypress,
or other wood to match the trim. The wood should not be
more than half or five-eighths of an inch in thickness, as
shown at Fig. 1. The shelves should be three or four inches
in width, with a straight front, or slightly curved, as shown
in Fig. 2. This curve is called a serpentine line, and may
be shaped with a draw-knife; or, if the wood is soft, it can
easily be cut with a compass-saw and finished off with a
draw-knife and sand-paper.
Two brackets cut from wood the same thickness as the
shelf will support it at either end. These are cut three
inches wide at the top and from six to eight inches long, in
the shapes shown in Fig. 3.
It gives a more attractive finish to extend the ends of the
ledge two or three inches beyond the door or window trim,
as shown in the illustration of Fig. 1.
For cups and small pitchers a plate-rail may be arranged
around the walls of a dining-room, as shown at Fig. 4.
A wall-plate six or eight inches wide is made fast to the
wall about five feet up from the floor, and to it, at intervals
of twenty to thirty inches, brackets are screwed fast. These
are cut in one of the forms shown in Fig. 3, and are three
inches wide. The top shelf is four inches wide, and is laid
on the tops of the brackets and pushed back against the
wall, where the rear edge is screwed fast to the top edge of
the wall-plate. Where the rail meets a doorway or window-casing
the corner is rounded, as shown in the illustration.
This may be done with a compass-saw and small
plane. A narrow strip of wood is nailed fast to the top of
the rail about two inches out from the wall, to prevent
the plates from sliding off.
A narrow plate-rail may be attached to the wall higher
up, or about in the position occupied by a picture-moulding.
Shorter brackets should support it, and they may be
attached directly to the wall without the aid of a wall-plate,
since the latter would give a heavy appearance to a rail at
that height.
It is hardly advisable to give definite dimensions for the
cup and plate rack (Fig. 5), since it should be designed in
accordance with the amount of wall room that may be
available. The rack shown in Fig. 5 is intended for a wall
space three feet wide and seventy-two inches high. The
two uprights are made of white-wood thirty-nine inches
high, three inches wide, and half an inch thick. The lower
ends are tapered, as shown in the drawing, and the upper
ends are fashioned with a compass-saw. The brackets are
six inches wide, nine inches long, and half an inch from the
outer edge a depression is cut in the top to receive a half-inch
dowel.
The shelves on which the plates rest are three inches
wide and twenty-one inches long. The dowels extend
from three to six inches over each end, as shown in the
drawing. From their under-sides cups may be suspended
on hooks screwed into the wood. The front edges of the
shelves are provided with a strip of wood fastened on with
slim, steel-wire nails, to prevent the plates from, sliding
forward, as shown in Fig. 6, which is a plan of the arrangement
of bracket, shelf, and dowel. The dowels can be had
at a hardware store for two or three cents each, and from
a quarter of an inch to the diameter of a small curtain-pole.
The cup and plate pyramid (Fig. 7) is another attractive
dining-room feature and is very simple to construct. Three
of the shelves are cut with a serpentine front, as shown in
Fig. 8 A, and measure twenty-six, twenty-two, and eighteen
inches respectively; while the top one is twelve inches long
and cut as shown in Fig. 8 B. The shelves are six inches
wide at the middle, and three of them are two and a half
inches wide at the ends.
Short brackets one and a half inches wide and two and a
half inches long support the shelves at the ends. Under the
middle of the bottom shelf a large bracket five and a half
inches wide and eight inches long is cut and made fast with
long, slim screws driven down through the bottom shelf.
A notch is cut at the front of each shelf, and a corresponding
one in the staff that binds the shelves together, so that
they are spaced, from the bottom up, eleven, ten, and nine
inches apart. Slim, steel-wire nails two inches long will
secure the brackets to the wall, or long, slim screws may be
used.
For the house that is not built with a butler’s pantry, or
for the mother who does her own housework, the tray and
drop-ledge shown in Fig. 9 will be found a very convenient
piece of dining-room furniture.
Fig. 9.Fig. 10.Fig. 11.Fig. 12.
Two brackets on hinges will support the shelf when it is
up. When it is dropped the brackets fold in against the
wall, as shown in Fig. 10.
The ledge and brackets are of pine wood three-quarters
of an inch thick and planed on all sides and edges. The
tray is of white-wood five-eighths of an inch thick, and
put together securely with glue and screws. The ends and
handle-grips are cut with a compass-saw and finished with
sand-paper; then the tray is stained and varnished to match
the shelf and brackets.
Back of the drop-shelf a strip of wood two inches wide
is fastened to the wall by means of a wall-plate securely
screwed to the studding, and two vertical plates one inch
thick make an anchorage for the brackets. The latter are
attached by means of flat hinges, and the shelf proper is
also hinged to the two-inch wall-plate. All these parts
must be screwed very solidly together if the safety of the
household crockery is to be considered.
In the butler’s pantry or near the kitchen sink it is
sometimes convenient to have a brush-rack and some cup-pins,
on which cups, drinking-glasses, and small hollow-ware
may be kept.
These are easily made, as the illustration (Fig. 11) will
show. The cup-pins are dowels sawed in five-inch lengths,
and then made fast to a square pine stick with slim
screws passed through holes that have first been made with
an awl. The rack is then attached to the wall with screws
passed into the studs or uprights behind the plaster.
The brush-rack is made from two pine sticks, one of which
is cut out in places, as shown in Fig. 12. The two sticks
are then screwed together and supported on brackets.
Brushes kept in a drawer or on a shelf do not dry properly,
so that it is always best to place them where they have a
free circulation of air.
In a cellar or store-room it is often convenient to have a
portion of the shelves arranged so that their contents can
be locked up. For this purpose Fig. 13 shows a slat door
arranged in front of several shelves and hung on hinges.
At the lower edge a hasp and eye may be made fast, so as
to make a padlock available.
Fig. 13.Fig. 14.
The slats are from one-half to seven-eighths of an inch
thick and two inches wide; they are fastened to battens
with clinch-nails or screws driven from the inside. A smart
boy can make any number of these doors so as to lock up a
whole lot of shelving, but for convenience of handling they
should not be more than four feet long.
For a corner of the cellar, and where it is convenient to
the staircase, a very useful vegetable-bin may be made from
a few boards and slats (Fig. 14). The bin may be of any
width and length, but for a house of the average size, it
need not be more than six feet long and eighteen inches wide
each compartment being from sixteen to eighteen inches wide.
The front, back, and ends are ten inches high, and two
of the partitions are the same height. The partitions for
the potato and turnip compartments should extend eighteen
inches above the top of the bin, since these vegetables
bulk largely. The bin rests on two battens nailed to the
brick or stone foundation-walls of the cellar, two feet above
the floor. At the exposed corner a foot, or leg, twenty-four
inches long, supports it. The bottom of the bin is made of
long slats nailed an inch apart, so that the dirt from the
vegetables will fall through to the floor, from which it can
be easily swept up. The ventilation from the slat bottom
prevents the vegetables from decaying as quickly as they
would in a box or barrel with a tight bottom.
Across the tops of the high partitions, and propped up at
the exposed end of the bin, a shelf or ledge ten inches wide
will accommodate cabbages, lettuce, bunches of carrots
and beets, parsnips, and various other vegetables. In the
illustration only five compartments are shown in the main
part of the bin, but a bin of almost any length can be constructed
according to the space available and the requirements
of the family.
For the kitchen, a rack on which to hang spoons, ladles,
saucepans, cups, and other small accessories to the culinary
department is shown in Fig. 15.
It can be made to fit any wall space in a kitchen, but the
brackets should be twenty inches high and ten inches wide
at the top. They may be made from most any wood one
and a half inches square, and put together with lap-joints.
Three rails, seven-eighths by two inches, are attached to
the inside of the front bracket-rails or supports, with long,
slim screws or steel-wire nails. All the wood-work is painted
two coats of white enamel, or any color to match the wood-work
of the kitchen. Brass screws or galvanized nails are
driven in the bars at regular distances apart, on which to
hang the utensils, and the rack is then to be securely attached
to the wall.
Every house should contain a medicine-chest, where the
necessary boxes and bottles containing the family medicines
may always be found in time of need. Chests may
be made in any size and shape, and adapted to the spaces
they may occupy on a wall or in a bath-room closet.
A convenient chest is shown in Fig. 16, and in Fig. 17 is
given the plan of construction. For the average household
it should be made eighteen inches wide and twenty-four
inches high, with two shelves arranged so that the space
between the lower one and the bottom of the box will be
eight and a half inches. The space between the upper one
and the top should be six inches, and between shelves seven
and a half inches. The top and bottom wall-plates should
measure four inches wide, and they are attached to the top
and bottom of the box by means of screws driven into the
edge of each through the top and bottom of the box.
Fig. 15.Fig. 16.Fig. 17.Fig. 18.Fig. 19.
A door is made from three pieces of board across the ends
of which battens are made fast, as shown in the plan drawing.
This is attached to the box by means of hinges, and
a catch at the other side will keep it closed. The wall-plates
and sides of the chest should be stained and varnished,
and the door covered with burlap glued fast or tacked
at the inner side. The letters, ornament, and imitation
nail-heads are cut from sheet-lead, scraps of which can be
purchased at a plumber’s shop, shaped with a shears, or an
old knife, and light mallet, and afterwards trimmed with
a penknife blade or a file. They may be attached to the
door with slim, steel-wire nails, and painted black with a
coating made by adding dry lamp-black to thin shellac, and
applying it in one or two thin coats with a soft-hair brush.
Be careful to anchor this chest securely to the wall, as
bottles are heavy and their weight must be taken into
consideration.
In the illustration of a convenient plant-tray (Fig. 18)
an idea is suggested for a receptacle that will accommodate
several small pots in the lower tray and a large pot, or
jardinière, on the middle deck.
The tray is thirty-six inches long and twelve inches
wide and at the ends is four inches deep. But at the middle
the sides are eight inches high, and support the stage
or deck, which is thirteen inches square.
The tray is made of wood three-quarters of an inch thick
and planed on both sides.
The legs are two inches square and twenty-four inches
long, and at the bottom they are slightly tapered with a
draw-knife and plane.
They are fastened to the inner side of the tray at the
corners with long, slender screws driven down through the
bottom of the tray and into the top of the legs.
Bracket-braces are let into the legs in lap-cuts made with
saw and chisel, as shown at Fig. 19, and at the ends rails
are let in between the legs to hold them rigidly.
The screws attaching these joints may be covered with
mock nail-heads. The ornament at the side of the tray is
cut from sheet-lead with a stout pair of shears, painted
black, and applied to the wood with flat-headed tacks or
gimp-nails.
The available room in any clothes-closet can be more
than doubled by adopting clothes-hangers and a rod. Fig.
20 shows the plan of a closet seen from above.
The projections around the outer edge represent hooks,
while the bar through the middle and the cross-sticks represent
the space gained.
Fig. 21 shows the usual rail and shelf, but under them are
the bar and hangers that represent the new feature. This
is a great improvement upon the ordinary closet, even
when drop-hooks are used under the shelves for the support
of hangers carrying clothes. The work necessary for
this arrangement is very simple.
Obtain two sockets and a small curtain-rod, and fit the
rod into the sockets screwed to the wall under the hook-rail,
taking care to drive long, slender screws through the
plaster. From a hardware or house-furnishing store obtain
a number of coat-hangers composed of a wood bar and
iron hook. These can be had at all prices from two for
five cents to twenty-five cents each, or if it is impossible to
purchase them they can be sawed out of wood by any
boy and provided with iron-wire hooks. The bars are
eighteen inches across and slightly curved at the top, like
one’s shoulders. Underneath the bars, near the ends,
small hooks may be screwed into place, on which trousers
may be hung by using clamps (Fig. 22). In this manner
from four to six suits can be hung to every running foot of
the pole.
This method will keep the coat or trousers in shape.
If loops are sewn fast to the skirt-band, the skirt will hang
on the two lower hooks much better than on a single hook,
when this system is applied to mother’s or sister’s closets.
Fig. 20. PLAN OF CLOSET
Fig. 21.Fig. 22.
This device is so simple and useful that once tried it
will always be used, and where economy of space is a feature,
this idea is a valuable one for both the city and country
house.
A comfortable divan banked up with pillows is always
an inviting addition to a room, and helps to furnish it. In
Fig. 23 an idea is given for a piece of furniture that will
serve a double purpose—that is, a couch and a skirt or trousers
press, with a compartment for shirt-waists or fancy
waistcoats.
In Fig. 24 the box, or framework, is shown. It is five feet
six inches long, twenty-eight inches wide, and fifteen inches
high.
The tray is ten inches deep, and divided into a long and
short compartment. This is supported by the ends, which
are fifteen inches high, and made from several pieces of
board with matched edges. Corner-brackets at front and
back lend additional strength, and prevent the frame from
racking.
The top, or lid, is made from several matched boards held
together with two or three battens; it opens on three or
four stout hinges securely screwed into the wood of the back.
A valance is made of some good upholstery material,
and tacked all around the upper edge of the box. For the
couch proper use a mattress which is to be placed on the
lid, and covered with the cloth used for the valance. This
should be tacked securely to the under side of the lid.
This will hold the mattress in place and make a good finish
for the edges of the top.
LOUNGE AND CORNER DRESSING-TABLE
Fig. 23.Fig. 24.Fig. 26.
Make a few holes through the lid, and with a long needle
pass a string up through them, through a stout button and
down again, where the string is to be tied around a tack,
and then the tack is driven in so as to hold the string
securely. This will give a tufted effect to the cushion top,
and will make the mattress more secure.
Run a line of gimp or narrow belting around the top of
the box over the tacks that fasten the valance, and with
large, oval-headed upholsterers’ tacks make a line of heads
three inches apart all around the sides and front. This
will make an effective finish.
A very pretty dressing-table for the corner of a girl’s
room is shown in the illustration (Fig. 25). This can be
made by a boy for his sister, or by a girl with a liking for
such work. As shown in Fig. 26, it is built up on a sugar
barrel, which is thirty inches high and twenty-four inches
across at the widest place. When it is inverted, screws or
nails can be driven through the bottom to hold the triangular
ledge or table-top in place.
Three boards should be cut to form a quarter of a circle
thirty inches long on the two straight sides, as shown in
Fig. 26 A. The sweep, or curved edge, is one-quarter of a
five-foot circle. Fig. 26 A also shows how this quarter-circle
is placed on the top of the barrel.
To keep the boards together, two battens thirty inches
long are nailed or screwed underneath the straight edges.
Screws rather than nails should be used in fastening the
quarter-circle to the barrel. They will not pull out or work
loose so readily as nails.
The canopy top is supported on a framework consisting
of three sticks, each three feet long, and a triangular top
made of three short sticks, as Fig. 26 shows. At the top
the sticks are joined as shown in B, and the lower ends are
attached to the table-top with long, slim, steel-wire nails.
Fig. 25.
If the color scheme of the room is pink, pale-green, or
canary color, this same color may be carried out in the
drapery. Sateen or colored cotton goods may be overlaid
with a dotted swiss or scrim, and tacked to the framework.
At the bottom a valance is made and caught to the circular
edge of the ledge, which is covered with gimp held by
brass-headed tacks.
The upper sticks of the frame are bound with strips of
white muslin before the drapery is attached. This is to
prevent the wood from showing through the goods, and
also to make an anchorage in which some stitches can be
taken, if necessary, to hold the canopy drapery in place.
For this top it will be necessary to have two swiss or thin
scrim coverings, between which one thickness of the colored
material is laid. Both sides of the drapery will be seen,
and it is necessary to show the colored goods on both sides.
A shirred band of the goods may be arranged along the
top stick of the canopy, and bows at the corners of the top
and the edge will add to its appearance.
An oval or square mirror in a white or light enamelled
frame can be suspended by wires from the top.
The directions as to methods and the suggestions of
designs given in this book open a broader and more inviting
field, it is believed, than has been accessible in similar
form before. That there is need of a new handy-book comprehensive,
well tested, and designed on practical modern
lines seems to be indicated by the popularity of the preceding
volumes in this series: Harper’s Outdoor Book for
Boys and Harper’s Electricity Book for Boys, which, together
with Harper’s How to Understand Electrical Work, form the
modern “Boy’s Own Library.”