DESCRIPTION OF STITCHES.
Stitches Used in Plain Sewing. |
| 1. | Basting. |
| 2. | Blind Stitch. |
| 3. | Buttonholes. |
| 4. | Combination Stitch. |
| 5. | Darning. |
| 6. | Gathering. |
| 7. | Half-back Stitch. |
| 8. | Hemming. |
| 9. | Overcasting. |
| 10. | Overhanding. |
| 11. | Running. |
| 12. | Slip Stitch. |
| 13. | Stitching. |
Ornamental Stitches. |
| 1. | Bands. |
| 2. | Blanket Stitch. |
| 3. | Chain Stitch. |
| 4. | Couching. |
| 5. | Feather Stitch. |
| 6. | French Knots. |
| 7. | Hemstitching. |
| 8. | Herringbone Stitch. |
| 9. | Kensington Outline. |
| 10. | Lazy Daisy or Star Stitch. |
Miscellaneous. |
| 1. | Bias. |
| 2. | Cloth. |
| 3. | Eyelets and Loops. |
| 4. | Joining and Fastening Threads. |
| 5. | Mitered Corner. |
| 6. | Patterns. |
| 7. | Plackets. |
| 8. | Putting in Sleeves. |
| 9. | Seams. |
| | A. Bound Seam. |
| | B. Flannel Seam. |
| | C. French Fell. |
| | D. French Seam. |
| | E. Hemmed Seam. |
| 10. | Sewing on Buttons. |
| 11. | Sewing on Hooks and Eyes. |
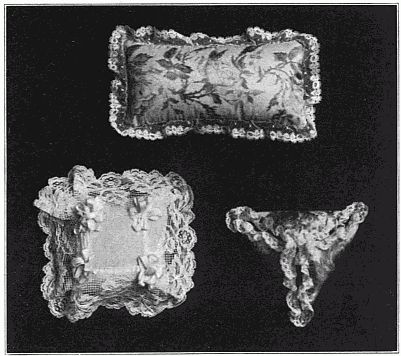
| 12. | Sewing on Lace. |
| 13. | Tucking. |
Basting.—Basting is temporary sewing used to hold the cloth in place
while putting in permanent stitches. As the basting threads are to be
removed, place the knot on the right side. Fasten the threads securely
by taking two or three backstitches. In removing basting threads clip
the threads at short intervals that they may be taken out easily. Much
of the success of the work depends upon careful basting. The extra
time required will be repaid ten-fold. One stitch at a time for beginners,
later two or three stitches may be taken. In basting hems, baste not on
the edge, but very near it. Do not baste on the line where you expect
to stitch, but as near it as possible.
A. An even basting is used on hems, seams of garments, or wherever
two pieces of cloth are to be held firmly together. Take up one-fourth
of an inch and skip one-fourth.
B. Uneven basting is used where very careful basting is unnecessary,
as in the seams of skirts, or in working on a material that clings together,
as a guide for stitching. Take up an eighth of an inch and skip three-eighths.
When only loose basting is required, as when holding the lining
and outside together, a long stitch and two short ones may be used.
Blind Stitch.—The blind stitch and slip stitch are used to fasten a
hem lightly where it is desired to conceal the stitches. To blind stitch
a hem, turn back the edge of the hem to the basting and, holding the cloth
along the edge of the finger, catch first cloth and then hem with a single
stitch that does not show on either side. A slip stitch is a long stitch on
the wrong side and a blind stitch on the hem. It is used on the milliner's
fold.
Buttonholes.—A buttonhole is a slit cut and worked to admit a
button for fastening purposes. It is much easier for beginners to commence
on the blind buttonhole. This is made by working around a line
instead of cutting the hole. The stitch, the fan, and the finishing can
thus be learned without the care of the raw edge. The directions for
making the buttonhole are as follows:
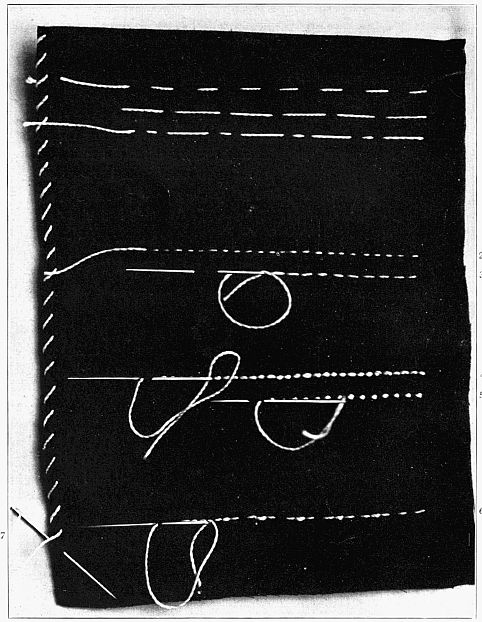 STITCHES USED ON PLAIN SEWING.
| 1—Three styles of basting. |
| 2—The running stitch. |
| 3—The gathering. |
| 4—The backstitch. |
| 5—The half-back stitch. |
| 6—The combination stitch. |
| 7—The overcasting. |
A. Preparation of the Hole.
a. Cutting—With the buttonhole scissors cut the hole one-fourth
of an inch from the folded edge and straight with the threads of the
cloth.
b. Stranding—The strand consists of carrying the thread along
the edge of the buttonhole near enough to be easily covered by the
buttonhole stitch, for the purpose of adding strength to the buttonhole.
Thread two needles, one with fine thread or sewing silk and
the other with coarser thread or twist, depending upon the kind of
buttonhole to be made. Place a knot in the coarse thread or twist,
and with the folded edge of the cloth toward the left hand, bring the
needle out just below the lower right hand end of the buttonhole,
which is the end farthest from the folded edge. At the other end
put the needle into the cloth just below the end of the cut and bring
it out just above, which will carry the thread along the edge of the
buttonhole. Repeat the same on the other side bringing the thread
out at the point of starting. Do not cut this thread, as this is ready
to begin the buttonhole stitch after the overcasting.
c. Overcasting—With the fine thread or sewing silk begin at the
lower right-hand end. The object of the overcasting is to prevent
raveling while working the buttonhole and the fewer stitches which
will accomplish this purpose the better. As the overcasting must
be covered by the buttonhole stitch do not take over two or three
threads deep and just as few stitches on each side as is absolutely
necessary to prevent the loosening of the threads. Some materials
do not require overcasting.
B. Working the Buttonhole.
a. The Stitch—Determine how deep a stitch is necessary so that
the threads will not pull out, always keeping in mind that the shorter
the stitch the better the buttonhole will look. This depends upon
the kind of material in use. The first stitch begins one thread beyond
the end of the slit. Holding the buttonhole along the cushion of
the left forefinger with the folded edge of the cloth toward the left,
place the needle into the slit under the lower edge of the buttonhole
and draw the needle half way through. With the needle still
pointing toward the chest take up the double thread at the eye of
the needle and place it under the point, passing from right to left.
Draw the needle and thread out, and from you, so that the purl
or twist comes to the edge of the slit. (This makes a firmer edge
than when the thread is carried around the needle from left to right.)
Each stitch is a repetition of the above. Place the stitches about
the width of a thread apart, as this will
avoid a crowded appearance and makes
a firm, hard edge. Do not jerk the
thread, but draw steadily and tight;
otherwise the edge will be rough. Avoid
stretching the buttonhole; the edges
should touch when finished.
b. The Fan—At the end near the
folded edge—the round end—spread
the stitches like the sticks of a fan,
drawing them closer at the top and
spreading at the bottom. Five stitches
will work nicely around the end, the
third stitch being straight with the buttonhole.
C. Method of Finishing the
Buttonhole.
a. The simplest manner of finishing
is as follows: The buttonhole stitches
at this end are at right angles to the slit,
and not rounding as at the other end.
After finishing the last buttonhole
stitch, pass the needle down between
the first and second stitch, and bring it
out between the last and next to the last stitch. Draw the thread
tight so as to bring the edges of the buttonhole together. Put in
several stitches in the same place. Pass the needle to the under side
and fasten the thread.
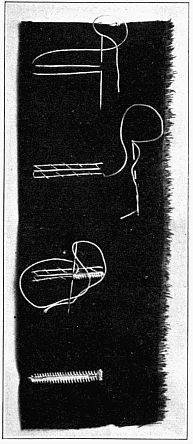 METHOD OF BUTTONHOLING.
b. The Bar—The thread being at the top of the last stitch, pass
the needle down between the first and second stitch and out at the
bottom of the last stitch. Put in three threads across the width of
the buttonhole, bringing the thread out at the bottom of the last
buttonhole stitch. Turn the cloth so that the thumb covers the
thread and the buttonhole, and work the bar by bringing the needle
out each time over the thread, as in the blanket stitch. Draw the
purl edge toward the buttonhole. Do not put in too many stitches,
as it makes the loop stand away from the buttonhole. Near the
middle of the bar take one stitch through the cloth to hold it down.
c. Caution—Be sure that the thread is long enough to work the
buttonhole, but not over-long, as the thread wears and is more liable
to break. Use care and not break the thread, but in case this happens,
take out the last few stitches, thread the needle on this short
end, pass through the last purl, and fasten the thread on the under
side. With the new thread fasten without a knot on the wrong side,
bring through the last purl at the edge of the buttonhole and continue.
On cloth that ravels badly put in two parallel rows of running
stitches and then cut the buttonhole between the rows.
Combination Stitch.—The Combination stitch consists of three
little running stitches and a backstitch over the last running stitch. Take
three running stitches on the needle and pull it through. Take up the
last running stitch for the first of the next group of three. It is a little
stronger than the running stitch.
Darning.—The object in darning is to repair a rent, if possible so that
it cannot be perceived. The warp and woof threads that have been worn
away are to be rewoven into the cloth. No knots are needed. Leave a
short end of thread to be clipped when the darn is finished.
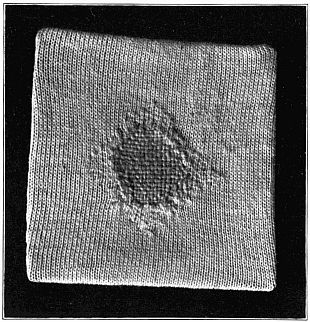
A. Stocking Darning.
Stockings should be darned on the wrong side. A square hole makes
a more symmetrical darn than a round one, and should be used wherever
there is no widening or narrowing in the knitting, as on the leg of a stocking.
A round hole is better for the heel and toe. Cut away the part
that is badly worn. First put in the warp threads, taking care to take
up on the needle all the little loops around the hole and making the darn
symmetrical in shape. Then put in the woof threads, weaving carefully
across the warp over the hole, passing over the threads that were taken
up on the preceding row. Give special attention to the edge of the hole,
passing first over and then under the edge, that there may be no ridge.
If the hole is large or stretched out of shape, draw up the edges by whipping
with fine thread. The darning stitches should extend only as far
as the worn part. If the warp threads have strengthened the worn part
sufficiently the woof threads may be extended only far enough over the
edge to fasten securely. In darning a large hole it is sometimes wise to
begin putting in the warp threads at the center first to prevent stretching.
Do not draw the threads too tight, as they will shrink when washed.
B. Cloth Darning.
This may be done with thread, ravelings or hair. In darning with
thread darn on the wrong side, with ravelings or hair on the right. Darn
at right angles to the tear or cut. Continue the darning stitches on each
side of the tear only far enough to strengthen the worn part, usually a
quarter, sometimes an eighth of an inch, is sufficient. Continue the darn
an eighth of an inch beyond the end of the tear. The repairing shows
less if the rows of darning stitches are of unequal length. In darning
take up the threads of cloth passed over in the preceding row, slipping
the needle over one edge of the tear and under the other going one way
and reversing this order going the other way. This makes the edge
smooth and does not throw it up in a ridge. If the material to be darned
is thin or stretches easily, place the rent over a piece of glazed paper and
baste around it before darning. If the cloth is worn and thin, place a
piece of cloth under and darn through the two thicknesses. Take great
care not to stretch the hole or to draw the threads tight enough to pucker.
Gathering.—Gathering is an uneven stitch made by passing over twice
as much as is taken on the needle. When the thread is drawn up this
gives the appearance of fine gathering on the right side and admits of
considerable cloth being gathered into a small space.
Gathering is used in joining a full part to a straight piece, as the skirt
to the band, etc. Gather with a strong single thread a little longer than
than the space to be gathered. Never use a double thread. If the thread
becomes knotted a new thread must be put in from the beginning. Hold
the cloth, as in the running stitch, with the right side toward you, using
the wrist motion. Make a large knot in the thread so that it cannot slip
through the cloth, and place the knot on the wrong side. At the end
of the gathering slip the needle off and make a knot in the thread, that it
may not pull out.
A. Stroking Gathers.
For stroking or placing gathers use a coarse needle or a pin. Draw up
the gathering thread just tightly enough so that the pin can be easily inserted
between the gathers and fasten by winding over a pin placed at
right angles to the last stitch. Begin at the left hand, placing the pin in
the fold of the first stitch and stroke gently downward, holding the pin
obliquely. After each successive stroke press the pleat under the thumb
of the left hand. Continue the same with every stitch.
B. Sewing the Gathered Part to the Straight Piece.
Divide both into halves, quarters or eighths, depending upon the length,
and pin the points of division together. Draw up the gathering thread
to the proper length and fasten by winding over a pin. Arrange the
gathers even before basting. Baste just above the gathers, holding the
gathered piece next to you. Stitch just below the gathering thread.
C. Gauging.
Gauging or double gathering is done by having a second row of gathering
stitches of equal length and directly below those of the first (so that
when both threads are drawn up the cloth lies in pleats). In heavy material
three or four threads may be put in. Gauging is usually used on
heavy material or on a folded edge that is to be overhanded to a band.
D. Gathering by Whipping a Rolled Edge.
Ruffles of lawn, linen or embroidery are sometimes put upon the edge
instead of into a facing or seam, and when so placed it is desirable to
avoid the raw edge on the under side. Hold the work over the left forefinger
and roll the edge toward you between the thumb and forefinger.
Place the needle under the roll on the right side, passing out at the top
of the roll. Whip about one inch and draw up the thread. It is necessary
to use a strong thread for whipping and gathering the edge of a
ruffle.
Half-Back Stitch.—Half-back stitching is similar to the stitching.
The long forward stitch on the under side is three times the length of the
backstitch on the upper side, and a space the length of the backstitch is
left between the stitches. See Stitching, page 63.
Hemming.—A hem is a fold made by twice turning over the edge of a
piece of cloth, and then sewing it down. The first fold is most important;
if that is turned even there will be little trouble with the second. Trim
the edge of the cloth before turning the hem. It is well to make and
use a gauge of the required width. If a wide hem is turned, baste along
the second fold or bottom of the hem first, and then at the top. On
woolen goods or material that does not crease easily it is necessary to
baste the first fold. Either bury the knot between the folds of the hem
or leave one-half inch of thread and hem over it.
A. Hemming Stitch.
Hold the hem across the cushion of the left forefinger and point the
needle a little to the left across the middle of the thumb. Take up a few
threads of the cloth and a few threads of the fold and draw the needle
through. Take care that the stitches are regular, of equal length and
of equal distance apart. Do not confuse the hemming stitch with the
blind stitch, or the damask hem. Join the threads by leaving a half-inch
of the old thread and a half-inch of the new to be tucked under the edge
of the hem and be hemmed over.
Teachers will find the following suggestions helpful in teaching the
hemming stitch:
Put the needle in almost straight with the hem, not at right angles
to it. Take up as little cloth on the needle as possible; bring the needle
directly through the hem, making one stitch of it instead of dividing the
stitch as in the blind stitch. Crowd the point of the needle under the
edge of the hem. Do not insert the needle a distance from the hem,
trusting to puckering it up.
B. Damask Hem.
Damask is a heavy fabric woven of heavy threads of one color in
which the pattern is brought out by a change in the direction of the
threads, and when new is stiff with much dressing. From the very nature
of the cloth it is impossible to hem well with the flat hem. The two folds
of the hem are turned the desired width and the hem is then turned back
flat to the cloth and creased. The edge of the hem and the crease thus
formed are overhanded together with fine even stitches. When laundered
this irons perfectly smooth and the stitches do not show on the right side.
Do not confuse this method of hemming with the flat hem, as each has
its own use.
Overcasting.—Overcasting is done by taking loose stitches over the
raw edge of cloth from right to left to keep it from raveling. The
depth of the stitch depends upon the material to be overcast, usually an
eighth of an inch is sufficient. The stitches should be twice as far apart
as they are deep. The needle is inserted from the under side of the
cloth and points a little to the left, making a slanting stitch. Keep the
spaces even and the stitches of equal length. Always trim the edges before
overcasting. Do not overcast a selvedge edge. Take only one
stitch at a time and be careful not to draw the edge of the cloth.
Overhanding.—Overhanding is done by sewing closely over two
edges of cloth from right to left. The cloth may have a folded or
selvedge edge. Careful basting is necessary to good overhanding. The
needle is placed at a right angle to the seam and should point to the chest.
No knot is used; a short end of the thread is left and overhanded under.
Hold the work horizontally along the edge of the cushion of the left forefinger
and the thumb. Do not wind the cloth over the end of the finger.
The stitches are straight on the under side and slanting on the top. Do
not draw the threads tight enough to make a hard seam and also avoid a
loose stitch that will not hold the edges together when the seam is opened.
A deep stitch is not necessary for strength and will not look well on the
right side when opened. To join the threads leave a half-inch of the
old and a half-inch of the new, lay them along the edge and overhand
over them.
Running.—Running is done by taking up and slipping over an equal
amount of cloth.
Running is used for seams that do not require great strength, and also
for tucking. Care should be taken not to draw the thread tight enough
to pucker. Make a small knot in the thread and conceal it on the wrong
side or in the folds of the cloth. Hold the work in the left hand between
the thumb and cushion of the forefinger; hold the needle in the work
between the thumb and forefinger of the right hand. Use the wrist
motion.
Fasten the thread by passing the needle through to the wrong side and
taking two backstitches.
Slip Stitch.—See Blind Stitch, page 63.
Stitching.—Stitching is so called because it resembles machine stitching.
It is also known as backstitching. Stitching is done by taking a
stitch backward on the upper side of the cloth and a long stitch forward
on the underside, making the stitches meet on the top as in machine
stitching. Use a small knot in beginning. Hold the work over the
cushion of the left forefinger.
Fasten the threads on the wrong side by taking several backstitches,
one over the other, through one thickness of the cloth. To join threads
in stitching fasten securely on the wrong side and begin with a small
knot, bringing the thread through at the proper place for beginning the
new stitch. It is used where strength is required, or on garments too
small to go into a machine conveniently.
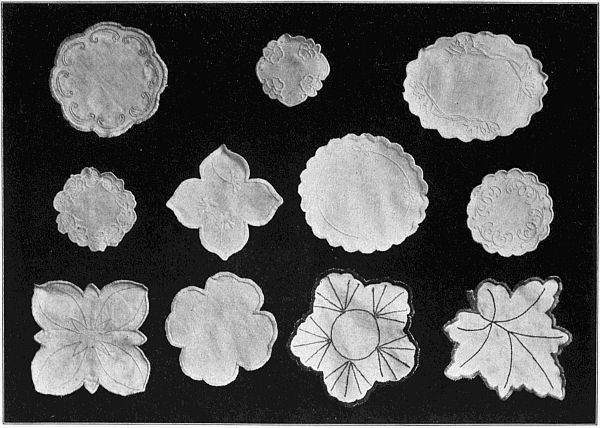
Applique.—This is an ornamentation produced by cutting a design
from one kind or color of cloth and placing it upon another. Very beautiful
effects can be obtained, with perfect harmony of color and the proper
combinations of textiles. The edge can be finished with the blanket,
couching, Kensington or chain stitch.
Blanket Stitch.—The blanket stitch, often erroneously called the
buttonhole stitch, is used for finishing raw edges. It is worked from left to
right, and the buttonhole stitch from right to left. The depth of the
stitch and the space between stitches may be varied and will depend upon
its use. If the thread is not fastened and joined carefully the symmetry
of the stitches will be broken. A new thread must come up through the
loop of the last stitch.
A. To Finish the Edge of Flannel or Heavy Cloth:
Insert the needle at a point the desired depth of the blanket stitch and
take one or two running stitches to the edge of the cloth, which will bring
the thread in position for the first stitch. Make the first blanket stitch
over these running stitches. Holding the edge of the cloth toward you
insert the needle at the same point as before and bring the needle out over
the thread and draw the loop thus made to the edge of the cloth. Repeat
for successive stitches. For a simple finish for a flannel edge the stitches
should not be placed too close together. As far apart as the depth of the
stitch is a good rule, unless greater ornamentation is desired, when three,
five or seven stitches may radiate from one point.
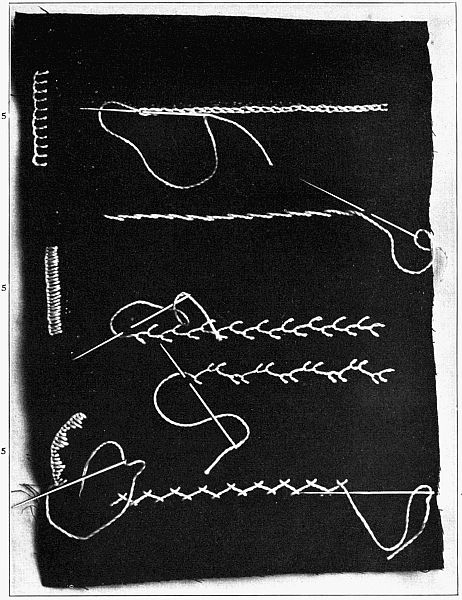 ORNAMENTAL STITCHES.
| 1—The chain stitch. |
| 2—The Kensington stitch. |
| 3—Two styles of feather stitching. |
| 4—The herringbone stitch. |
| 5—Three styles of blanket stitch. |
B. For Embroidering an Edge—Straight, Scalloped or Irregular.
The stitches are the same as in "A" but should be placed close enough
together so that the threads touch, making a firm edge. The embroidery
should be done before the edge is cut. It can then be finished in various
ways. The narrow edge can be turned back and whipped down on the
wrong side, or blanket stitched just over the edge with fine cotton thread.
On lingerie pieces the edge is not cut until after the first laundering.
If desired the edge can be padded before working with the blanket stitch.
The padding is done with a soft, coarse thread by working along the edge
with either the Kensington or chain stitch, or it may be heavily "padded"
by filling the space.
C. The blanket stitch is also used for working the loop and the
buttonhole bar.
E. See Lazy Daisy or Star Stitch,
page 78.
Chain Stitch.—The chain stitch is used for outlining a design, marking
garments, etc. Insert the needle on the line and draw the thread
through to the knot. Insert again at the same point and take up on the
needle cloth for the desired length of stitch and draw the needle out over
the thread. In placing the needle for succeeding stitches begin inside
the preceding stitch. The Half-Chain Stitch is very effective for stems
of flowers, or wherever a fine outline stitch can be used. This is made
the same as the chain stitch, except that the needle is inserted just outside
and to the right of the loop instead of in the end of the loop.
Couching.—Couching is a coarse blanket stitch done over two or
three strands of silk, linen or cotton floss. It makes an attractive finish
for a hem line and also for finishing the edge in applique.
Feather Stitch.—The principal use of the feather stitch being that
of ornamentation requires that it shall be evenly and carefully done,
or it fails in its purpose. The feather stitch consists of alternating stitches,
or groups of stitches, slanting toward a center line. The stitch may be
varied greatly by the length of the stitch, the slant of the stitch, and the
number of stitches on each side. The tendency is to gradually increase
the length of the stitch which must be carefully avoided, as well as a
change in the slant. Do not make too long a stitch, as there is danger of
catching and breaking the thread. The feather stitch can be used very
effectively in scroll designs for the ornamentation of sofa pillows, cushion
covers, collars, underwear, etc.
A. Single Feather Stitching.
Work toward you, holding the cloth over the left forefinger. With
a knot in the thread insert the needle from the under side a short distance
to the right or left of the line the feather stitching is to follow (which may
be designated the center line) and draw the thread through. Place the
left thumb over the thread to hold it down, and on the opposite side
take up a slanting stitch, the top of which is as far from the center line
as the length of the stitch, and the bottom touching the center line.
Draw the needle out over the thread which will thus form a loop of the
thread from the first stitch. On the opposite side take up another slanting
stitch the top of which is an equal distance from the center line and
even with the bottom of the last stitch. Repeat for successive stitches.
At the end of a thread fasten by passing the needle down where the thread
last came through the cloth, thus holding the loop from the last stitch
in place. Begin a new thread by passing the needle up through this loop.
B. Double Feather Stitching.
This consists of alternating groups of two, three or more stitches
instead of single stitches. The successive stitches of each group must be
placed directly under the first stitch of the group.
French Knot.—Bring the needle through from the under side.
With the needle in the right hand, take hold of the thread with the left
hand about an inch from the cloth and, holding it taut, wind it several
times around the point of the needle. Return the needle to the same hole
through which it came out, and draw it back to the under side.
Hemstitching.—Hemstitching is a method of hemming in which a few
parallel threads are drawn, the hem turned to the line thus formed, and
hemmed down with the same stitch that separates the cross threads in
successive clusters. There are several modifications of the hemstitch.
The following methods have been selected as being the best for four
reasons: (1) The thread is thrown under the edge of the hem, and consequently
wears longer and shows less. (2) The only part of the
thread showing on the right side is the loop around the cross threads.
(3) It is readily taught to children, as it is simple, easy to remember,
and can be given as two distinct parts. (4) It is the natural way to
hold the hem.
a. Drawing the threads—Measuring from the edge of the cloth,
allow twice the width of the desired hem when finished, plus the
first fold, and draw several threads, the exact number depending upon
the texture of the fabric. Draw the first thread the entire length
before starting the second, as it is liable to break where the first one
did. The first thread being drawn, the second will come more
readily. Beginners are inclined to draw too many threads. Unless
both edges are to be hemstitched the opening should be narrow
enough so that the threads at the top will not loosen.
b. The Hem—Turn the first fold of the hem and baste to the
exact line of the opening. Careful basting is indispensable to good
hemstitching, and especially so at a corner where two hems cross.
Miter all corners of hems that are more than one-fourth of an inch
in width.
c. The Stitch—Hold the cloth over the left forefinger as in
ordinary hemming. Bury the knot by inserting the needle under the
edge of the hem and drawing it through. The stitch consists of two
distinct parts, (1) forming the loop around the cross threads, and
(2) catching down to the edge of the hem:
(1) Pointing the needle toward you and holding the thread
under the left thumb, take up on the needle three or four of the
cross threads. Draw the needle out over the thread, thus forming
the loop, and tight enough to separate the cross threads.
(2) Insert the needle under the edge of the hem only and take
an ordinary hemming stitch. Repeat 1 and 2 for the next stitch.
Herringbone Stitch.—The herringbone or catch stitch is a cross
stitch used to finish the raw edges of flannel or heavy material. It serves
both the purpose of overcasting over a raw edge and that of hemming.
It is used on raw edged hems to avoid the ridge formed by the first fold
of a hem, on the flannel patch and for finishing the flannel seam, which
may be pressed open and both single edges herringbone stitched, or both
folded to one side and finished over the double edge. In most cases the
open seam looks better.
The stitch consists of single, alternating running stitches made first to
the right and then to the left, working from you instead of toward you as
in ordinary running. The thread being carried across from one stitch to
another, gives the appearance of a cross stitch. The stitches on each side
must be in straight rows, with the outer row just over the edge of the flannel.
The stitch should be no deeper than necessary to prevent pulling
out. A good rule for beginners is to make the top of each stitch even
with the bottom of the last stitch. Point the needle toward you in making
the stitch, but work away from you. The edge of the flannel must
be kept smooth. This being a cross stitch the thread of one part of the
stitch is on top and the other underneath. Be sure that this is regular,
those slanting in the same direction should be always either to the top or
to the bottom.
Kensington Outline Stitch.—This stitch is used to follow the
line of a design for ornamentation. To avoid the knot, when starting
begin half an inch from the end of the line to be followed, and put in three
or four running stitches, bringing the thread out at the proper place for
starting. Turn the cloth around, holding it over the left forefinger, and
work from you. Pointing the needle toward you, take a short running
stitch directly on the line keeping the thread always on the right side of
the needle, except on a line curving sharply to the left when the thread
will fall more naturally to the left side. The thread being carried from
one stitch to another gives the effect of a long diagonal stitch on the right
side and running stitches on the wrong. The length of the stitch will
be determined by the size of the thread, and the character of the line to
be covered, a curved line requiring a shorter stitch than a straight one.
Lazy Daisy or Star Stitch.—This is a variation of the blanket
stitch. Insert the needle at the point desired for the center of the flower
and draw the thread through. Insert again at the same place and take
up the desired length of stitch on the needle, drawing the needle out over
the thread. Pass the needle down through the cloth at the point where
it came out, but on the other side of the loop, thus forming a second loop
at the end of the petal to hold it in place, and return the needle again to
the center of the flower. Make as many petals as desired and finish with
the French knot in the center of the flower. This stitch also makes a
pretty star, using six points and finishing without the French knot.
Bands.—A band is a straight piece of cloth used to finish garments at
the neck, wrist or waist. It may be sewed to a straight, gathered or
pleated edge. A band cut with the warp is stronger than one cut with
the woof.
A. Hemmed Band.
See description of the Gathering, page 68. Gather as desired. Place
the right sides of the cloth and band together and baste just above the
gathering thread, taking care that the gathers are arranged perfectly even.
Stitch just below the gathering thread. Turn in a fourth of an inch at
the ends and along the other side of the band. Fold the band over just
covering the gathers, and baste. Hem or stitch along the edge, overhanding
the ends of the band.
B. Overhand Band.
See description of Gauging, page 69. Make the band by turning in one-fourth
of an inch all around, folding and basting the edges together.
Overhand the ends of the band. The whipping of the full part to the
band will be sufficient to hold the two sides of the band together. Turn
back the raw edges of the piece to be gathered one-half inch and gather
once, twice or three times as desired. Pin to the band and overhand,
taking a stitch for each pleat of the gathers. Fasten all bands very
securely.
Bias.—A bias is a diagonal cut. To cut a true bias, fold over the corner
of the cloth so that the warp and woof threads are parallel. A choice
bias is a true bias, having the twill of the cloth at right angles to the cut.
Great care should be taken in measuring and cutting bias strips to have
them the same width throughout the length. Also avoid stretching after
cutting.
a. To cut a bias facing, bias binding or fold, measure in the
desired width on the true bias at a number of points. Draw a line,
crease in a fold or baste where the facing is to be cut off.
b. To put on a bias facing, place the edge of the strip, right sides
together, even with the edge of the cloth to be faced, baste and stitch.
Turn the facing back exactly in the seam and baste along the edge
so that the facing will not show on the right side. Turn the fold
at the top, baste and hem.
A bias facing for a curve should be cut narrow enough so that by
stretching one edge of the facing it will lie perfectly smooth when
finished.
c. To join two bias strips—Cut the ends to be joined straight
with the threads of the cloth and place the right sides together, slipping
the top piece past the under piece the width of a seam, but having
the top edges even. Stitch where the facings cross, open the
seam and crease; or, after trimming, a seam may be turned back at
the end of each piece and the folded edges overhanded together.
Cloth.—A fabric woven of fibers, either animal or vegetable. The
edges of cloth are known as the selvedge, the threads running lengthwise
the warp, and those crossing the warp from selvedge to selvedge the woof.
The selvedge should be trimmed off, as it is hard to sew through and
draws up when wet.
Eyelets and Loops.—An eyelet is a small hole made and worked
in a garment to receive a cord, stud or loop of a button. Punch the hole
with a stiletto, pushing the threads apart rather than breaking them.
Overhand closely from right to left with short even stitches. A large
eyelet may be cut out and worked around with the buttonhole stitch.
A blind loop is made in place of the eye to receive a hook. Put three or
four long stitches in the same place beginning at the left, so that the thread
will be at the proper place for working the loop with the blanket stitch.
Joining and Fastening Thread.—When sewing, care should be
taken in joining threads. The manner in which it is done depends upon
the stitch in use. In hemming, leave a half-inch of the old and a half-inch
of the new thread, tuck both under the hem and continue hemming
over the threads. The same plan is followed in overhanding. In the
blanket stitch, feather stitch, herringbone, chain and buttonhole stitch the
new thread must come out through the last stitch. Thoughtful attention
should be given to the fastening of threads, as careful, painstaking work
may soon be rendered useless by the loosening of the thread from the end.
After fastening securely clip off all threads that the work may be not only
strong, but neat. The usual fastening consists of several backstitches
taken in the same place.
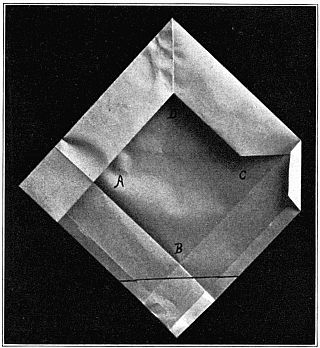
Mitered Corner.—Two hems crossing at right angles may be finished
either with the square or the mitered corner. To miter a corner, turn and
crease a quarter-inch fold on both sides. Turn the second fold of the
hem the desired width on both sides and crease. Open out the corner
and place a dot where the inner creases cross. Place a second dot a
quarter of an inch from the first toward the corner. Through this second
point draw a line passing from side to side, across the corner, being careful
that the line is an equal distance from the corner on both sides. Cut off
the corner on this line. Fold both hems again on the creases before made
and pin the hem on one side in place. Make a pin hole as near the exact
point where the hems cross as possible, passing through both hems. Fold
in the bias edge on the hem that is not pinned down, exactly from the pin
hole to the corner, causing the edges of the two hems to meet at an angle
of forty-five degrees.
Patterns.—With the varied, complex and ever-changing styles of
fashion, individual pattern drafting (except for a very simple article) is
impracticable, usually resulting in commonplace garments and involving
useless time and labor. For the trifling sum of ten or fifteen cents reliable,
up-to-date patterns can be secured which are cut to established
measurements by a fashion expert. A good needlewoman supplies herself
with a good pattern and then cuts accurately, bastes carefully, and finishes
neatly, and in nearly all cases, results will be satisfactory.
Plackets.—A placket is an opening made in a garment. There are
several ways of finishing an opening, but in all cases, except when the gusset
is used, the underside should extend some distance under the top to
prevent gaping.
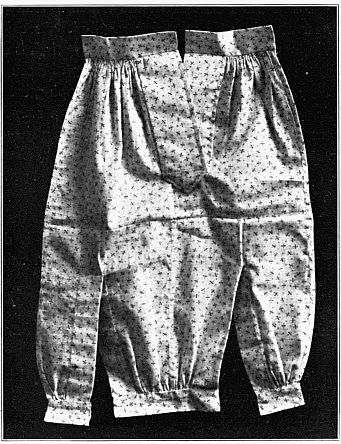
A. A Placket with a Continuous Binding.
This is the placket used on children's drawers, night shirts, under garments,
etc.
Cut the opening the desired length. Cut the facing with the warp a
little more than twice the length of the opening and twice the desired
width when finished, plus one-fourth inch, or more, allowed for seams.
The following are the successive steps for making the placket:
a. Fold the cloth, right sides together, in a line with the opening.
b. Double the facing across the warp, through the center, wrong
sides together.
c. Slip this between the folds of the cloth so that the fold of the
facing will just come to the end of the opening. This will bring
the right side of facing to the right side of the cloth.
d. Baste the facing to the cloth down one side and up the other
side of the opening.
e. Stitch with an eighth of an inch seam, which will render unavoidable
a small pleat at the end of the opening the width of the
seam.
f. Crease the facing back over the opening exactly in the seam.
g. Turn an eighth of an inch fold the length of the facing down
the other side.
h. Fold this over the seam to the stitching, baste, and hem.
i. At the top of the opening fold the right-hand facing back and
stitch along the edge to hold in place.
B. A Placket with an Extension Hem on One Side and a
Flat Facing on the Other.
This is the placket used on dress skirts, petticoats and carefully tailored
garments.
Follow the directions for the successive steps for making Placket A
through "g," as the two plackets are the same to this point.
The left side of the facing will consist of an extension hem the same as
in Placket A, the only difference in the plackets being the manner of
finishing the right side or top facing.
h. After turning the fold the length of the facing, place the edge
of this fold to the stitching on the other side of the seam, and crease
the facing through the center the long way, as in Placket A.
i. As the right side is to be hemmed down as a facing, it is desirable
to cut out one thickness of the cloth, leaving, of course, the quarter-inch
inside the long crease, and also at the cross fold, at the end
of the opening as the first fold on the facing.
j. Baste this facing flat to the cloth, and hem.
k. Stitch once across the top facing only, just at the bottom end
of the opening.
C. A Finish for a Shirt Sleeve or Nightgown Opening.
As this consists of an extra piece which extends over the opening, it is
necessary to allow for this in cutting, so that the middle of this piece will
come in the center when finished. When cutting this opening in a nightgown,
cut to the right of the center one-half the width the facing is to be
when finished. The following are the successive steps for making the
nightgown opening:
a. Cut the opening the desired length. Cut the facing in two
pieces, one a little more than twice the length of the opening, and
the other the length of the opening plus the width of the facing,
both pieces to be the desired width plus the allowance for seams.
(These two pieces will be designated the long and the short facings.)
b. Place the short facing to the right-hand side of the opening,
right sides of cloth together and even at the top. Pin in place.
c. Place the long facing to the back of this same side with the
right side of facing to the wrong side of the cloth, thus having the
three thicknesses of cloth together. Pin in place and baste a quarter
of an inch from the edge. Stitch an eighth of an inch seam.
d. The long facing is a continuous facing, the same as in Plackets
A and B. Baste up the other side and stitch, the seam being on the
right side of the cloth.
e. Crease both facings open in the seams. Turn in a fold on the
other side of the short facing and turn the end to a square point.
f. Turn a fold the length of the long facing so that it matches
the width of the short piece.
g. Baste the two facings together and the flat facing to the cloth.
h. Stitch around the short facing and twice across it at the end of
the opening. Stitch or hem the under side of the flat facing.
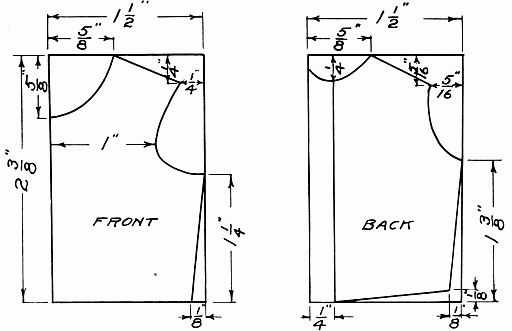
D. The Gusset.
This method of finishing an opening is sometimes used on drawers and
night-shirts instead of Placket A. The following are the successive steps
for making the gusset:
a. Cut the opening the desired length.
b. Hem both sides with a very narrow hem running to a point
at the end of the opening.
c. Cut a piece of cloth one and one-half inches square. On this
square fold down one corner three-fourths of an inch on the sides
and cut it off. Turn a fold one-eighth of an inch all around this
piece. Place the corner which is opposite
the diagonal cut to the middle of
this cut and crease.
d. To sew the gusset in, place the
apex of the triangle to the end of the
opening and overhand on the wrong
side to the crease before made.
e. Fold over the remaining part to
the wrong side, baste and hem. Stitch
along the fold of the gusset to strengthen
it.
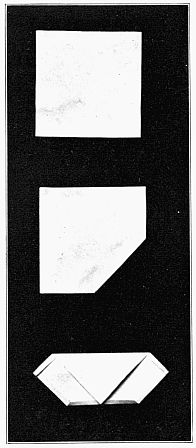 FORMATION OF GUSSET.
Putting in Sleeves.—After trimming
the arm hole, measure one inch back from
the shoulder seam and mark with a pin.
Fold the garment at the arm hole with this
pin at the top of the fold and place another
directly opposite it. Call this point A.
Remove the first pin to avoid confusion. For
a sleeve for an adult, measure from the
shoulder seam five inches on the front and
mark with a pin. Call this point B. Measure
from the shoulder seam three inches on
the back and mark with a pin. Call this
point C. With the sleeve right side out
place the under seam of the sleeve at A and
pin together at this point. The gathers are to come at the top of the
sleeve between B and C. For misses and children the measurements
should be decreased proportionately. Measure the sleeve on the arm-hole
and cut small notches at B and C. Gather the sleeve between these
notches one-fourth of an inch from the edge, with a strong thread a little
longer than the distance to be gathered. Put in a second gathering one-eighth
of an inch from the first. Put in place at points A B and C; draw
up the gathering threads to the proper length and fasten by winding
around a pin. Arrange the gathers between B and C, pushing them a
little closer together in front of the shoulder seam. Hold the inside of
the sleeve next to you and, beginning at B, baste first around the plain
part, then the gathered part. Stitch inside the basting and bind the seam.
Seams.—A seam is formed by sewing together two pieces of cloth.
There are several different methods of joining them. Those known as
the raw seams may be joined by stitching, half-back stitching, overhanding
or the combination stitch. The closed or finished seams are known as
the French Fell, French Seam, Hemmed Seam, Flannel Seam and the
Bound Seam. No garment should be finished with a raw seam, which is
only properly used when covered with a lining, or as the first step in one
of the finished seams.
A. French Fell.
Place the two pieces to be joined, right sides together, edges even and
baste one-fourth of an inch from the edge. Sew with the combination
stitch (or machine stitching) three-eighths of an inch from the edge.
Trim three-sixteenths of an inch from the under side of the seam and
crease the upper side of the seam over this. (In hand sewing there is a long
stitch on the under side. Be sure to trim from this side so that the
short stitch comes on the top.) On the right side of the garment crease
carefully and baste along the edge of the seam to prevent the fullness
which beginners are so liable to have over the French Fell on the right side.
Turn to the wrong side, baste the seam flat to the cloth, and hem.
B. French Seam.
Place together the wrong sides of the pieces to be joined, and baste one-fourth
of an inch from the edge. With the running stitch sew one-eighth
of an inch from the edge. Carefully trim off the ravelings, fold the right
sides together and crease exactly in the seam, baste and stitch the seam,
taking care that no ravelings can be seen and that the seam is perfectly
smooth on the right side.
C. Hemmed Seam:
This is used for joining thin material, lace, etc. On one piece fold an
eighth of an inch seam (or more, if necessary) to the right side of the
cloth, and on the other piece fold an eighth of an inch seam to the wrong
side. Place the right sides of the two pieces together with the raw edge
of one piece under and to the folded edge of the other. Baste this fold
down over the raw edge sewing through the three thicknesses of cloth.
Fold over in the crease and baste through the four thicknesses. Stitch,
or hem by hand, along the edge of the seam on both sides of the cloth.
D. Flannel Seam:
The flannel seam is used on material so thick that it is necessary to
finish over a raw edge, instead of with a seam involving several thicknesses
of cloth. Place together the right sides of the two pieces to be
joined and baste one-eighth of an inch from the edge. Stitch one-fourth
of an inch from the edge and remove the bastings. Trim the seams
smooth, open and baste flat to the cloth. Herringbone stitch over the
raw edge of both sides of the seam. One side of the herringbone stitch
should come just over the raw edge of the flannel. The edges must be
kept smooth, and unless the flannel ravels easily, the herringbone stitch
should be not over one-eighth of an inch deep and close together. This
stitch is used also on the flannel patch.
E. Bound Seam:
Seams may be bound with the two parts of the seam together, or they
may be pressed open and bound separately. This may be done with a bias
strip, binding ribbon or tape.
a. Binding the entire seam—Place together the two right sides of
the pieces to be joined and baste one-eighth of an inch from the edge.
Place the bias binding (three-fourths of an inch wide) with the
wrong side of the cloth up and the edge of the binding one-eighth
of an inch from the edge of the seam, and baste in place. Stitch
through the three thicknesses of cloth a quarter of an inch from the
edge. Turn in one-eighth of an inch on the other side of the binding
and hem it down just above the stitching on the other side of the
seam. This method of binding is used on the arm-holes of garments
or wherever it is not feasible to open the seam and bind separately.
b. The Open Bound Seam—Prepare the seam as above without
the bias binding. Trim and press the seam open. Double the
binding ribbon through the center and crease. Place the raw edge
of the seam to the fold of the ribbon and run along the edge, catching
through to the under fold. Tape may be used for binding, but
must be basted on first and hemmed down.
Sewing on Buttons.—There are two important requirements for
sewing on buttons—to put in sufficient thread, and to fasten this thread
securely that it may not loosen from the end. In sewing flat buttons on
coats, jackets, etc., place a small button on the under side and sew through
it to avoid having the stitches show on the under side.
a. The Loop or Shank Button—Place the button in position with
the loop at right angles to the edge of the cloth. Hold the button
with the left hand and overhand the loop to the cloth. Pass the
thread to the under side and fasten.
b. Four-Hole Button—In sewing on flat buttons insert the
needle from the right side and back in order to hide the knot under
the button. Place the button in position and hold a pin across the
button for the purpose of lengthening the stitches. Put in five or
six stitches diagonally across the button and over the pin. Change
the position of the pin and repeat. Slip the pin out, pass the needle
through the cloth only, and wind the thread around the threads
between the button and the cloth. Pass the needle through the cloth
and fasten securely.
c. Two-Hole Button—Place the button so that the stitches will
come at right angles to the edge of the cloth, with the pin across the
button. Proceed as with the four-hole button.
Sewing on Hooks and Eyes.—In sewing hooks and eyes on a
garment it is best, where practicable, to cover the ends with the lining of
the garment or with a piece of tape. In sewing them on the edge of a hem
or facing turn the edge of the hem back over the ends of the hooks and
eyes and hem it down. Where they are to be covered they should be
strongly overhanded to the garment first. When covering is not feasible
place the hook or eye in position and buttonhole around the top, beginning
at the right-hand side and inserting the needle under and up through
the hole, throwing the thread around the needle as in the buttonhole
stitch. The hook should be sewed down at the point before breaking the
thread. The worked loop is often used in place of the metal eye. For
this purpose cut a stiff pointed piece of cardboard the length of the desired
loop and work the loop over this, when the cardboard can be easily
slipped out. The loop is worked from left to right with the blanket
stitch the same as the bar of the buttonhole.
Sewing on Lace.—When sewing lace to an edge always hold the
lace next to you. Lace may be put on straight or gathered. At the top
of most laces will be found a coarse thread woven into the lace for the
purpose of gathering. Before drawing this up divide the lace and the
edge upon which it is to be placed into halves, quarters or eighths, depending
upon the length, and pin, with right sides together, at points of
division. Then draw up the thread, arrange the gathers even, and overhand
to the edge with fine even stitches. If the gathering thread is not
in the lace, put it in and proceed as above. If the lace is to be put on
plain hold it loosely to the edge and overhand.
A. Sewing Lace Around a Corner:
When sewing the lace on plain to round a corner, overhand to a point
as far from the corner as the width of the lace. (This point may be
designated A, and a point an equal distance from the corner on the other
side B.) From A measure on the lace twice its width and pin at the
corner. Allow the same fullness on the other side and pin at B. Continue
overhanding from B, leaving the corner until later, when the gathering
thread will be put in, gathers arranged and the lace overhanded to
the edge. If the lace is wide baste it in place at the corners before overhanding.
When sewing gathered lace to an edge, to round a corner proceed as
above with this exception: The same fullness must be allowed on the
corner that is allowed on the straight edge, in addition to that required
to carry the lace around the corner without drawing. For example: If
one-half the length of the lace is allowed for fullness on the straight edge,
at the corner allow two and one-half times the width of the lace instead of
twice its width.
B. Sewing Two Ends of Lace Together:
The manner of sewing two ends of lace together will depend upon the
kind of lace to be joined, the pattern, strength, etc. The first aim to be
considered is to have the joining strong enough so that it will not pull
apart. The second is to join it so that it will show as little as possible.
Several methods are suggested:
a. Lace made up of units can be easily joined by overhanding
these units together.
b. If the pattern permits, cut the lace with the pattern, lay one
edge over the other and buttonhole over each raw edge with fine
thread.
c. Sew the lace right sides together, in a narrow seam. Lay the
seam flat and buttonhole over the raw edge and at the same time
down to the lace.
d. Turn a narrow fold on one piece to the right side and on the
other piece to the wrong side, slip one under the other and hem down
the two edges as in the hemmed seam.
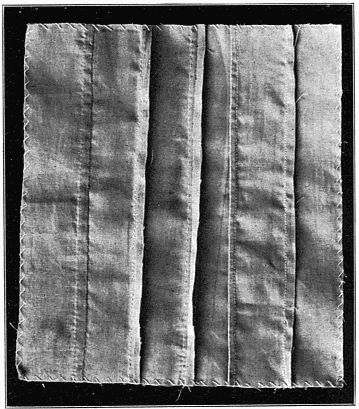
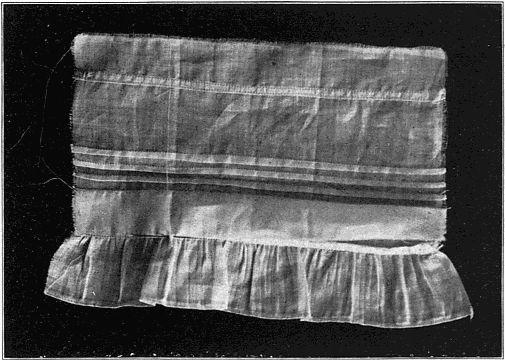
Tucking.—Crease the first tuck where desired. For the second tuck
measure from the first and allow twice the width of the tuck plus the
desired space between. Repeat for the successive tucks.
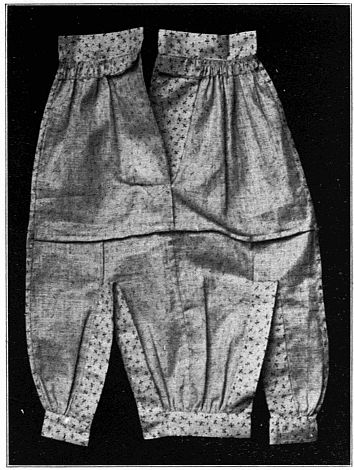
Putting a Ruffle into a Hem-Tuck.
This makes an excellent finish for the bottom of underskirts, petticoats
and drawers. Measure up from the bottom twice the width of the desired
hem plus one-fourth of an inch for the seam and crease for a tuck.
Stitch the tuck. This will leave the raw edge extending one-fourth of an
inch below the edge of the tuck. Place the ruffle along this edge, wrong
sides together, and baste in a quarter-inch seam. Baste the tuck over the
seam and stitch along the edge.