Designed for the use of those seeking either
a pleasant and profitable occupation or such
furniture for their homes as shall express
their own artistic taste, and stand for sturdy
honesty of purpose, simple beauty, comfort
and durability.
Albert G. Glidden
HAND MADE FURNITURE SHOP,
Spokane, Wash.
Copywrited 1910
by
A. G. Glidden.
GENERAL.
There is probably no home in which the comfort, convenience
or artistic appearance could not be improved by the
addition or replacing of some pieces of furniture. The reason
is simple. They are furnished with store furniture, and store
furniture is made to sell; the designs limited by the capabilities
of the machines which make it; made of the cheapest materials;
put together in the quickest, rather than the best way, and then
finished up with the crudest varnish and stain to make a fine
appearance. It is a depressing sight to see this furniture on
moving day, piled on the sidewalk, scratched, broken, dingy,
all its fine pretense of beauty gone forever. On the other hand,
the chairs, tables, sideboards and other pieces that have come
down to us through generations were all made by hand, put
together by hand and finished by hand in the days when there
was no machinery and the workman was an artist. The result
is that instead of finding its way to the scrap heap this old
furniture is as good today as ever, after two or three hundred
years of wear and tear and removal from place to place half
round the world. Hampered by no limitations of machinery
these designers set the standard for the world for all times.
Such furniture is worth while, and is an everlasting inspiration
to the home-maker and worker.
Our new style, variously known as “Arts and Crafts,”
“Mission,” “Craftsman,” etc., is especially adapted to hand
work, and while differing from the rich old oak and mahogany
of our fathers’ in form and finish, is like them in all the qualities
of beauty and durability and is far more comfortable. A
home furnished in this style not only expresses the artistic
taste of its inmates but also exerts an influence of sturdy
honesty of purpose, simplicity and absence of all gaudy pretense,
which both its frank, straight lines and freedom from
anything to hide or mar the natural beauty of the wood so
forcibly express. It is a style of which we can never tire and
of which no other can take the place. It will last for generations,
for every part is as strong as the wood of which it is
made. You can make it and make it better than you can buy
in any store, for it is made in the most natural way, after the
most natural design, of the most natural material.
Of course, it cannot be hoped that the mere reading of
any book can make an expert cabinet maker of an inexperienced
workman, but the instructions contained in this book will
enable any one to make furniture. Handsome, comfortable,
durable furniture. The length of time required on each of the
exercises will, of course, vary with the individual workman
and his aptitude for the work. All that can be said as to the
number of times the exercises should be performed is simply
to keep at each one until you are satisfied with the results,
you can judge as well as any one when your work is good.
Time spent in practice is time well spent, for you are learning
to make something which will be with you for years to come.
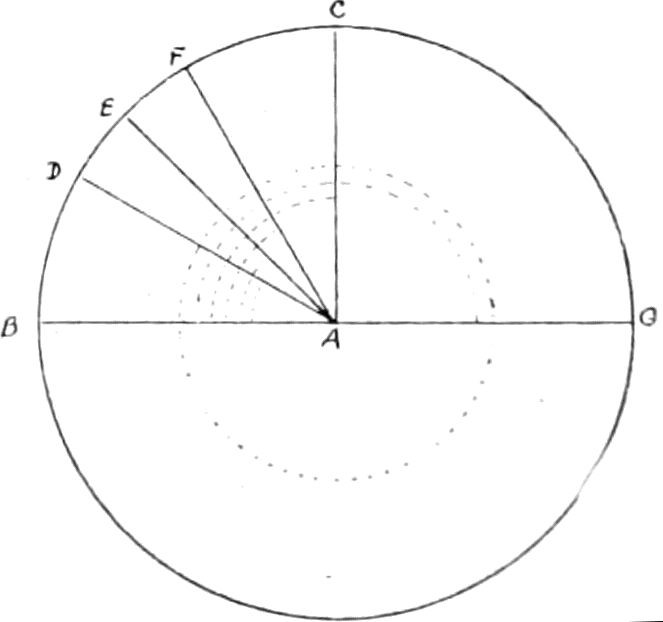
Fig. I.
Most people know more or less about the use of tools and
to some it will seem that we are unnecessarily explicit about
things which to them are matters of course, but as we are
writing for those who have had no experience whatever in
the use of tools, as well as others, we have begun with the
rudiments and taken one after another in the order most likely
to assure rapid progress. For the same reason we have
avoided, in so far as possible, technical terms and trade names,
though in some cases it has been necessary to use the customary
terms, as no others will express the meaning. For
instance, the use of the word “square,” as applied to our work,
does not always mean rectangular but oftener means at right
angles to adjoining surfaces. Thus, when we say “saw square”
or “plane square” we mean to make your surface straight and
true and at right angles with some other surface. The term
“right angles” will be easily understood by reference to Fig. 1.
Whenever two lines meet they form an angle, and having
the direction of one line and the degree of the angle we know
the direction of the other line. Thus in Fig. 1 all the lines
meet at (a). Taking the line (a-b) as our base and wishing
to find any other line of which we have the degree of angle
we draw a circle around (a). The size of the circle does not
make any difference. A circle is divided into 360 degrees,
therefore, if we are given an angle of 90 degrees, we know
that it is a quarter of the circle and drawing a line from (a)
to the outer rim of the circle a quarter of the way around we
have the line (a-c) which forms an angle of 90 degrees with
the line (a-b). In the same way an angle of 30 degrees would
be formed by a line drawn from (a) to the outer rim of the
circle ¹⁄₁₂th of the way round from (b) (a-d). Forty-five
degrees would be ⅛th of the way round (a-e), 60 degrees
⅙th of the way round (a-f), 180 degrees half way round, and
so on. The angle of 90 degrees is spoken of as a right angle
and in our work one line of the angle is said to be square to
the other. We also use the term in speaking of angles 1 in 6,
or 2 in 6, etc. You will understand this if you will take your
steel square and place your rule diagonally across it and when,
for instance, we say 1 in 6 we would mean to place your rule 6
in. from the corner of the square on one arm and 1 in. from
the corner on the other arm of the square; 2 in 6 would mean
keep the rule at 6 in. on one arm and move the other end of
the rule 2 in. from the corner on the other arm. In other words,
an angle may be said to give the degree of slant.
We have included in this book a few designs for pieces of
furniture in order to show the method of assembling the parts
and the most convenient way of laying out and beginning a
piece of work. In this connection we wish to impress upon
you the importance of laying out the whole of a piece of work
before you begin to cut it at all. You will appreciate this as
you proceed.
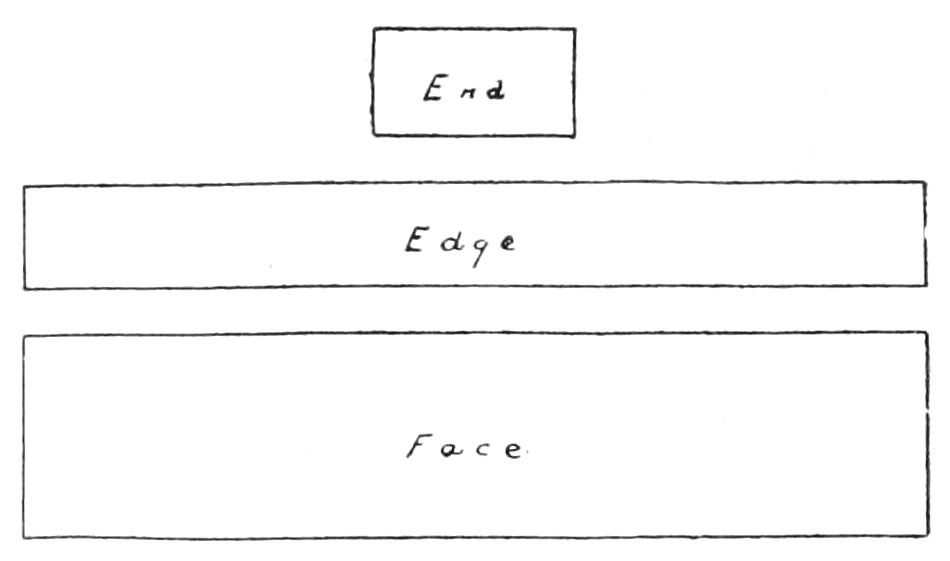
In our cuts we have made no attempt at fine drawing but
have used the fewest possible lines for the sake of plainness
and only so much shading as is necessary. Single lines usually
designate the outline of solid parts. Dotted lines show the
outlines of parts lying beneath the surface, or in other words,
as if seen through the object, and are used merely to show the
location of parts which would really be invisible. Wavy lines
are generally used where only a part of a piece is shown and
designate that the piece is really longer than drawn but the
part beyond the wavy line is not necessary in the illustration.
We have used shading to show end grain in some cases but
more often to show where a part is cut away, as in the side of
a tenon, etc. Dimensions are shown by arrow pointed lines.
Where these lines point in opposite directions with the figures
between them, or point toward each other with the figures at
the end of one arrow, they give the distance in both cases
between the arrow points.
The choice of wood depends largely on the purpose for
which it is to be used and personal taste. You will probably
have no occasion to use other woods than fir, oak and
mahogany, with possibly some pine. Fir is soft and likely to
splinter if not carefully handled, but is easy to work, the grain
is wavy and beautiful and it can be finished to equal oak in
beauty. Oak is harder but more durable and admits of a very
high polish. It is much stronger and therefore, except where
proportion requires size, the parts can be made much smaller
than when using fir. As, for instance, in chair and table legs,
braces, etc. Oak also bends better than fir but it is necessary
to steam it for this purpose and unless you have proper steam
box and clamps to hold it until dry, we do not advise attempting
to bend the parts. Mahogany has been the most highly
prized of these three woods until recently, and is the most
expensive, but oak has largely taken its place in fine furniture
of this style, as it is more in keeping with the straight lines.
Pine is soft, light and not so likely to splinter as fir, but has
little grain and is not used extensively except in concealed
parts where strength is not essential. In most lumber, and
especially that with much flake or grain, you will find that
the grain does not lay flat on the surface, but comes up to the
surface at an angle and in planing it is important to cut in
the direction of this grain, not against it, as in the latter case
it will chip up and leave nicks in the surface instead of cutting
smooth. In using the scraper on fir you have to be careful
or it will cut deeper in the soft grain of the wood than on the
flake, and make a wavy surface instead of a flat one. This,
however, can be avoided with a little care.
We trust that with these suggestions the following may
be quite clear to you, but if there is any point on which you
are not quite clear, or if there is any advice you would like
we would be very glad to hear from you and to assist you in
any way that our experience will permit.
Chapter I. — TOOLS. — THE SAW. — THE USE OF THE SAW. — THE PLANE. — TO SHARPEN PLANES. — TO USE THE PLANE. — CHISELS. — TO SHARPEN CHISELS. — TO USE THE CHISEL. — THE MARKING GAUGE. — THE SCREW DRIVER. — THE BIT BRACE. — BITS. — TO SHARPEN BITS. — THE NAIL SET. — THE HAMMER. — OIL STONES. — THE MALLET. — THE TRY SQUARE. — THE STEEL SQUARE. — THE SLIDING T BEVEL. — THE DIVIDERS. — TWO-FOOT RULE.
Right here and now we want to say, keep your tools sharp.
Many beginners are discouraged with the result of their work
when the fault is entirely with the dullness of their tools. A
dull tool cannot do good work no matter how skillful the
workman may be. Therefore, we say again, keep all tools
sharp all the time. With this in mind, let us see what tools
are necessary for our purpose and how to sharpen, use and
care for them.
The saw comes first in use and perhaps in importance.
There are several kinds, but you will need only one 24-inch
rip saw, about 7 tooth (to an inch) for sawing with the grain;
one 20-inch cross-cut saw, 10 tooth, for sawing across the
grain; one 12-inch back saw, 12 tooth, for sawing a perfectly
straight, narrow smooth cut (kerf); one 12-inch compass saw,
8 tooth, for sawing curves.
These saws are sharpened when you buy them and we do
not advise you to attempt to file your saws until you have
learned by practice how to do it properly. Have them sharpened
by an expert, for while it is very simple it requires skill,
acquired only from experience. Do not neglect it, however.
A dull saw leaves a ragged edge and takes double effort.
If you desire to file your saws get an old one to practice on.
It is not a difficult thing to learn, and while opinions differ as to
just how the work should be done there are a few essentials
which must be observed. The following is the result of long
experience and careful study and will give satisfactory results:
You will need to purchase a saw vise (one with rubber in
the jaws will prevent noise), also a slim 7-inch taper file for
7 and 8 tooth saws, 5-inch slim taper file for 10 and 12 tooth,
and a fairly long, flat mill file for jointing; a saw set of any
of the standard patterns, and then proceed as follows: Fasten
the saw vise to something steady, clamp the saw in it, teeth up,
take the steel square, or other straight edge and hold it with
the edge along the teeth of the saw. If the teeth do not all
just touch the edge of the square they are not of equal length
and require what is called “jointing.” To do this take the
flat mill file and lay it flat along the points of the teeth, filing
as if to dull them until they are all equal in length, which you
test with the square as before. The next step is to “set” the
saw. This consists in bending the points of alternate teeth to
right and left. This is done with the saw set. Have the salesman
show you how to operate whatever kind you buy. The
teeth should be bent only just enough to clear, do not set too
deep, only the point should be bent, or half the tooth at most;
set the tooth toward the side on which the point is; this will be
every other tooth one way and alternate ones the other way;
set one side first, then the other side. Your saw is now ready
for filing. Select the size of file given above for the particular
saw, commence at the butt (handle end) with the first tooth
set away from you and file every alternate tooth. Keep the
file level, that is, the handle and point at the same height
when the saw is straight up on edge. You will notice that the
teeth of your Cross-cut, Back and Compass saws are filed on
an angle. This angle is entirely at the discretion of the owner.
It is essential, however, that the bevel be filed on the front of
the tooth. It will give very satisfactory results if you make
it about 45 degrees. Keep the angle precisely the same on all
the teeth. When you have filed the teeth on one side turn
the saw around and file those on the other side. As to the shape
of the teeth there is much difference of opinion, but until you
have some reason to change keep it the same as when you
bought the saw. Now take the saw out of the vise, lay it on
a flat board and rub the sides of the teeth with the oil stone
until they are perfectly even. To file the Rip saw proceed
as above, except file straight across, not at an angle. File
every tooth exactly the same size and shape and your saw
will run true and easy.
The use of the saw is constant and important. Saw true
always, whether the results make any difference or not.
In this way you will train your eye and hand. Do not saw
without a mark. Use a hard pencil so as to make a narrow
line. In all cases when joining mark with a knife or marking
awl, remember that nearly always the sawed edge will have
to be smoothed with the plane, and allow for this in such cases.
Start your saw by a few short strokes, as it is likely to “jump”
if you use too long a stroke before the cut is started. As soon
as it is started use a full stroke. Do not saw in little jerks, but
be careful not to pull the saw all the way out of the cut, as this
will mar your work and may break the saw. Your Rip saw
and your Cross-cut saw should be held at an angle of about
45 degrees. With the Compass saw, you will generally have
to hold it straight through the board in order to follow the
curve. The Back saw is used flat down on the work, though
you may raise or lower the butt a little in starting. It will
take practice to learn to saw “square,” that is, so the cut is
at right angles with the surface of the plank. Most beginners
are inclined to tip the butt of the saw away from them as the
cut gets nearer to them. Be careful about this. It is necessary
to bring the butt in as the cut gets nearer. Of course,
this does not apply to the Back saw, as that cuts straight
down. In this case be sure to start true to your mark and
hold the saw exactly at right angles to the surface of your work
so as to cut square.
A saw properly set and filed does not require grease to
make it run smoothly but should be wiped off after using with
an oily cloth to prevent rust.
The plane may be of wood or iron or a combination of
the two. We recommend a No. 3 Bailey iron plane (block)
for smoothing; a No. 5 Bailey iron plane (jack) for heavier
cutting and jointing; a wooden plow ¼ inch; a wooden plow
½ inch; a wooden rabbet plane ¼ to ⅝ inch. If you care to
spend the money a wood and iron jointer, not less than 24
inch long is also valuable, but with care you can do this work
with your No. 5 jack plane. The dealer will also show you
Stanley Nos. 45 and 55 planes. These are expensive, but very
convenient, as they will take the place of the rabbet and plow,
and will also cut mouldings, reeding, etc. Have the dealer
show you how to take apart and put together whatever planes
you buy.
To sharpen planes use the oil stone, and oil that will
not gum. The jack and jointer have a cap iron on the blade;
remove this and rub the bevelled side of the blade on the stone
with either a spiral or figure eight motion. Some workmen
hold the bevel flat on the stone, others prefer to raise the blade
onto the edge a little so as to make a second bevel just at the
sharp edge. This gives a stronger cutting edge. We prefer
the latter method. Either way will turn up a feather edge on
the other side, and to remove this turn the blade over on the
flat or long side and rub it perfectly flat on the stone. Repeat
the process until the edge is very sharp and perfectly smooth.
Do not scratch your stone with the corner of the blade. Put
your plane together again keeping the cap iron ¹⁄₃₂ to ¹⁄₁₆
of an inch back from the cutting edge.
To use the plane sight along the bottom and set the
blade so it just shows. If you want to cut deeper you can set
it deeper after trying it. Stand back of your plane, rather than
over it, so you push it away from you instead of across in
front of you. In this way you will cut truer and with less
effort. Avoid a rocking motion. Hold the heel firmly down
with the right hand and the front with the left hand. At the
beginning of the stroke hold the front down squarely and at
the end of the stroke ease up on the front and hold the heel
down. When the plane runs off the end of the work at the end
of the stroke, as you reach the end lift the front so that it
does not drop over the end and make it low. Always plane
square, whether it makes any difference or not, for the sake of
habit.
Chisels are of several kinds and lengths. For our use
we prefer as most convenient one each ⅛, ¼ and ½ inch
butt chisels (short blade). You will have little or no use for
anything wider than ½ inch.
To sharpen chisels proceed as with the plane blade,
except hold the bevel flat on the stone. Do not raise on the
edge at all, as this should be thin and very keen.
To use the chisel keep the flat side towards the
mark. For chisel work always mark with a knife. Always
leave a margin next the line until the finishing cuts. If you cut
right to the line in the beginning you are likely to mar the
edge of your cut, and also in soft wood the bevel of the chisel
forces it a little towards the flat side. When cutting across
the grain hold the chisel very flat on the work or it will
“dig in.”
The marking gauge is made in several patterns. The
simplest will do. In its use you need little instruction. Always
tip it a little in the direction you are moving it. If held
straight up it will try to follow the grain. Hold the guide
firmly and flat against the work.
The screw driver should be of the very best. For
our work we recommend one each ⅛ and ¼ inch, fairly long.
Always bore holes for screws. The hole should be about
two-thirds the diameter of the screw. Put a little soap on the
screw and it will drive easier and be less likely to split your
work. When it is nearly all the way in and begins to go
harder loosen the screw driver after each turn by a little back
twist and it will be less likely to slip out or mar the screw head.
The bit brace should be of the ratchet pattern and
rather small. Oil the working parts occasionally.
Bits are of various patterns. For our work get one each
³⁄₃₂, ⅛ and ³⁄₁₆ inch gimlet bits; one each ¼, ⅜, ½, ⅝,
¾ and 1 inch auger bits and one counter sink.
The gimlet bits you will use principally for screw holes.
Be careful not to bend them. The auger bits are for larger
holes. When using them it is a good plan, if you intend to
bore all the way through, to stop as soon as the worm is through
and bore in from the other side. You are less likely in this
way to raise the grain around the hole.
To sharpen bits use a slip stone (a thin oil stone). Rub
the sharpened edges on the inside keeping the angle the same
as when new.
The nail set is a small steel punch, hollowed a little
on the end. It is for sinking nail heads below the surface
of the work. Always incline the nail set in the same direction
as the nail so it will not slip off and mar your work.
The hammer should be fairly light. Get one ball
pein (round face) claw hammer, rather small; one riveting
hammer (small). Use the claw hammer for all ordinary work
and the riveting hammer for small brads and welding. Always
hold a hammer by the end of the handle. It is balanced to be
held so. Make the stroke from the elbow rather than the wrist.
Never drive a nail with one or two single blows. It holds
better when driven in several blows.
Oil stones are made of composition and of natural
stone. The former is perhaps the better of the two. Clean
off occasionally with kerosene to remove the steel and dried
oil. Be careful not to scratch it. To true an oil stone when
hollowed down in the middle fasten a piece of No. 1 sandpaper
on a flat board, moisten it slightly and rub the face of the
stone on it until true.
The mallet is for driving your chisel. Never use it
on metal. Use the same stroke as with the hammer and always
hold by the end of the handle.
The try square is extremely important. Have the dealer
test it in a steel square before you buy it. It is for marking
at right angles and for testing work. In use be sure to hold
the thick end snugly against the work that is squared.
The steel square is for larger work than the try square.
It also has many uses which you will not require of it.
The sliding T bevel is much like the try square except that
it can be set at any angle and clamped with a thumb screw.
You will use it for mitring, etc.
The dividers are for marking circles or arcs and for dividing
a given space into equal parts. Be careful not to make
deep holes with them. Just enough to show is sufficient. Do
not bend the points.
Two-foot rule should be divided to sixteenths at least.
Be careful not to mar it or your accuracy will suffer in consequence.
Chapter II. — WOOD WORKING AND JOINING. — THE SAW HORSE. — WORK BENCH. — BENCH STOP.
In your work-room you will need several appliances which
you can either buy, have made or make yourself. Among
these are two saw horses; a work bench with stop and vise; a
tool chest or closet; a mitre box and a bench hook. These
may be more or less elaborate. We give below the easiest and
simplest that will do. You can improve on them if you desire.
The saw horse is merely a straight bar with four legs
on which to rest material while working it. You will want
two. To make a saw horse get two pieces of dry fir or pine
2 in. × 4 in. by 12 ft. long s4s common lumber will do so long
as it has no knots large enough to weaken it. The s4s means
sized on four sides and is the term used by the mills for planing
off the saw marks.
Using your try square, mark across one piece as near the
end as the wood is sound, with your cross-cut saw cut off the end
square at this mark. With your rule measure off four legs,
each 24 inches long, and one piece 3 feet long for the rail,
mark and saw as before. The legs must be bevelled at the tops
just like the bevels on your chisels. This will make them
spread properly at the bottom. To cut this bevel lean one of
the legs against the wall with the flat side to the wall and
the bottom end about 9 inches out from the base board. Now
place your rule, folded up, with its edge against the wall and
the flat side against the upper end of the leg and with your
pencil mark the side of the leg along the rule. Be careful
to cut square. Bevel one end of each leg. Lay your rail on
the floor on its flat side, set the bevel of the leg against it
about 3 inches from the end, with the top of the leg even with
the top of the rail. Drive in one nail and with your steel
square see that the leg is at right angles with the rail, then
put in enough more nails to make it solid. Do likewise on
other end, then turn over and put the other two legs on. Stand
the horse up on its legs, if it rocks a little put a small wedge
under the short leg and with your rule folded, its edge on the
floor and flat side against the edge of the leg, mark along the
rule. With your try square mark across the flat side of the
leg from this line and saw the leg off here on the angle given
by the two lines. If this is done carefully on all four legs your
horse will set firmly on the floor.
To make a simple work bench you will require one
piece 2 in. × 12 in. × 12 ft. long s4s; one piece 1 in. ×
12 in. × 16 ft. s4s; one piece 2 in. × 4 in. × 10 ft. s4s;
one piece 2 in. × 6 in. × 5 ft. s4s. Common lumber will do if
knots are not too large. You will also need a 1-inch bench
screw. Saw the 2 in. × 12 in. into two pieces for the top. Saw
the 2 in. × 4 in. into four pieces each 30 inches long for legs.
From the 1 in. × 12 in. saw off two pieces each 22 inches long
and nail a leg firmly on each end of both of them, with the 2-inch
side of the leg next the board and keeping the top of the
leg even with the top edge of the board, and the ends of the
board even with the outside of the leg. Saw the remainder
1 in. × 12 in. into two pieces 5½ feet long and nail the ends
to the flat side of the legs with the tops even with the top of
the leg and the ends even with the outside of the short board
previously nailed on the legs. This will make the frame of
your bench. Now stand it up and lay the top on it so that the
top projects about 3 inches beyond the frame at each end and
is flush with it in front. Nail the front top piece on first, being
careful to get the frame square at the corners, then holding
the back piece firmly against it nail that also. Set your nail
heads below the surface with the nail set. Now stand the
2 in. × 6 in. on the floor against the bench and mark it just
the height on the top of the bench. Saw it square across at
this mark for the inside jaw of your vise. Cut the outside jaw
3 inches shorter than this so it will not touch the floor. About
6 inches below the top of both jaws, and exactly in the center,
bore an inch hole for the bench screw. Most bench screws
have a bulge on the inner face of the plate and you will probably
have to cut around the hole on the outside jaw as if for
a big screw head so this plate will set down flat. Now fasten
the inside jaw to the bench near the left-hand end, one end
on the floor and the other flush with the top of the bench.
Putting your 1-inch bit through the hole in the jaw bore
through the apron, next unscrew the threaded collar from
the bench screw and set it in the center of a piece of wood
2 in. × 4 in. × 8 in. To do this bore a hole through the 2 in. ×
4 in. and ream it out with your knife large enough to take the
collar, or else take it to a carpenter shop and have it bored
with a larger bit. Now, having fastened the bench screw to
the outside jaw, put it through the inside jaw and apron and
then screw on the 2 in. × 4 in. with the collar in it. Nail the
2 in. × 4 in. to the inside of the apron. There only remains
the slide in the bottom of the vise. Three inches above the
bottom end, in the center of the outside jaw, bore an inch
hole through both jaws. Get a piece of hard wood (broom-stick)
about 18 inches long that will run easily through this
hole. Put it through the hole till the end is flush with the
outside of the outside jaw. Then wedge it tight, or nail it
from the side so that it will run easily through the inside jaw,
but hold the outside one. Bore ¼ inch holes through this
slide from side to side about 1 inch apart. Cut the head off a
20d nail and use this as a pin to hold the bottom of the jaws
as wide open when in use as the thickness of the material you
have in the vise, or as nearly so as the holes in the slide will
permit.
The bench stop is used to brace your work against when
planing, etc. You can buy an adjustable iron one or make
a simple one as follows: Six inches from the left-hand end of
the bench, and about 4 inches from the front, bore a hole
straight down through the top with a bit the size of your
broom-stick, before mentioned. Into this drive the broom-stick
tight and with the saw cut it off about ½ inch above the top
of the bench. This will answer temporarily.
You now have your bench and saw horses and can begin
work. They may appear a little crude but will answer every
purpose and you can buy or build finer ones when you have
learned to use the tools easily.
We would advise postponing the tool chest until you
have had some experience in the use of tools.
The mitre box is described later in your work and you
will not need it for the present.
Chapter III. — SQUARING AND JOINTING. — HALF TENON AND HALVING. — HALVED JOINT. — MORTISE AND TENON. — PANELLING. — DOWELLING AND JOINING. — MITRING. — DOVETAILING.
For this and other exercises we recommend 2 in. × 4 in.
kiln dried No. 1 pine s4s. This is less than 2 in. × 4 in., as
these are the dimensions in the rough and some surface is
taken off in dressing it. In speaking of lumber we give
dimensions in the rough, but in speaking of parts of a piece
of work actual measurements are always given.
Exercise No. I.
Saw off a piece of 2 in. × 4 in. 18¼ inches long. The
object of this exercise is to learn to square this block, that
is, make every surface perfectly flat and straight and exactly
at right angles to the adjoining surfaces. This operation is
necessary on almost every piece of work you will do and its
accuracy is of the utmost importance. Place your piece on
the bench with one of the wide sides up and the end against
the bench stop. Set your jack plane to cut a very thin shaving.
Plane the upper surface carefully, testing it from time
to time with the side of your plane to see that it is perfectly
straight. This is called jointing. It must also be flat. Test
this with the side of your plane laid across it and in all
directions. Next turn it up on edge and joint and square in
the same manner. To test the angle use the try square with
the broad arm against the face of the side you have already
squared. Plane the other two sides in like manner until all
four sides are absolutely square with adjoining sides and perfectly
straight from end to end. Measure off ⅛ in. from
one end and mark with try square and knife across the top.
Turn it up and mark from this line down the side next you.
With the back saw cut square to these marks. Now measure
18 in. from this and cut the other end off square in the same
manner. Put the piece in the vise end up and projecting
about an inch above the vise and with your smoothing plane
plane the ends true, testing from all four sides with the try
square. It is well in this operation to put a piece of waste
material back of your work in the vise, with its upper edge
even with the upper edge of your work. This will prevent
chipping off the further edge as you plane across it. Square
up other end in like manner. You will probably have to try
some little time before you can get this exercise perfectly,
but persist. Though simple it is perhaps as important as any
you will have and you will be called upon to repeat this
process constantly. Do not slight it, therefore, and when you
can square a block perfectly you have made a great stride
forward.
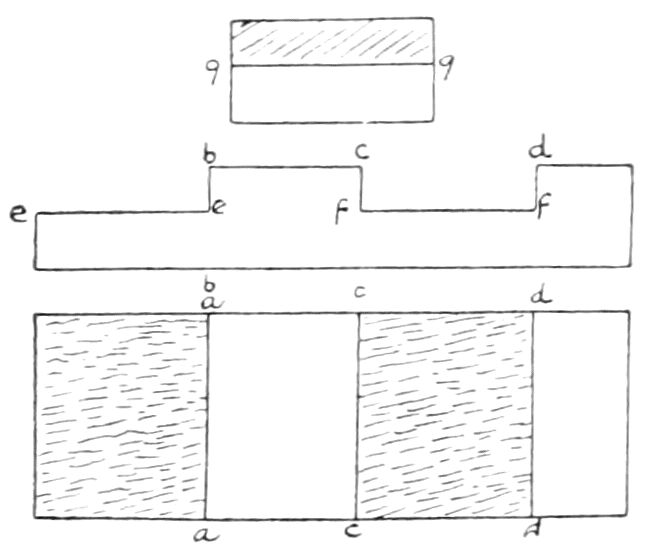
Exercise No. II.
Saw off a piece of 2 in. × 4 in. 12 inches long. Square
it up as in Exercise I. Select the wide side with the best grain,
etc., for your working side and mark it “O.” Measure off
3½ in. from the left-hand end as it lies on the bench before
you and with your knife and try square mark across the
working face (a-a). Turn up on edge and mark across from
this line (b-b). Turn on other edge and do the same. Next
measure 3 in. farther from the end and mark across the working
face and down the two edges in the same manner (c-c-c).
Then 3½ inches farther from the end mark across face and
edges as before (d-d-d). Now take your marking gauge and
set it ⅝ in. deep. Turn work on its edge, with the working
face to your right and with the gauge make a line along the
edge from (e-e-e), that is, a line ⅝ of an inch below the working
face and parallel with it. Do likewise between (c) and
(d) and (f-f). Turn the work over and mark the other side
in the same way and also carry your gauge mark across the
end (g-g). Place the work on the bench working face up with
the marked end to the right. With your back saw cut down
at (b) to the gauge mark (e), being careful that your saw cuts
just to the mark both on top and down the edge. Saw in the
same way at (c) to (f) and (d) to (f), being careful in all
cases that your saw cuts only to the middle of your mark, the
cut being in the wood to be removed, which in our case is
between (b) and the end and (c) and (d). Do not mar
corners in starting your saw. Place the work in the vise with
the gauge mark just above the jaws. With your widest chisel
cut out the parts to be removed, cutting across the grain, flat
side of the chisel down. Do not try to take out too much at
a time. Do not cut all the way across as the wood is likely
to chip off the far side below your gauge line, so cut only half
way across, then turn the piece around and cut from the other
side. When you reach the bottom (the gauge line) be very
careful to hold the chisel flat, that is, straight across, or you
will not have a flat, even bottom. Next turn the work up on
end in the vise and with your rip saw cut down the gauge line
across the end (g-g) and down the edge (e-e). Repeat this
exercise until you can get it absolutely accurate. All surfaces
should be “square” and smooth. These operations are
constantly necessary and must be accurate or your joints will
show unsightly cracks. While, on the other hand, when you
have mastered this exercise, you have accomplished a great
deal, as you will appreciate a little later.
So far we have not required our material to be of any
particular dimensions when finished. We should now be able
to square up to given dimensions, which is, of course, necessary
in most cases. It is in this exercise. Therefore, remember
to get your material out a trifle larger than the dimensions
given for the finished work in order to leave room for squaring.
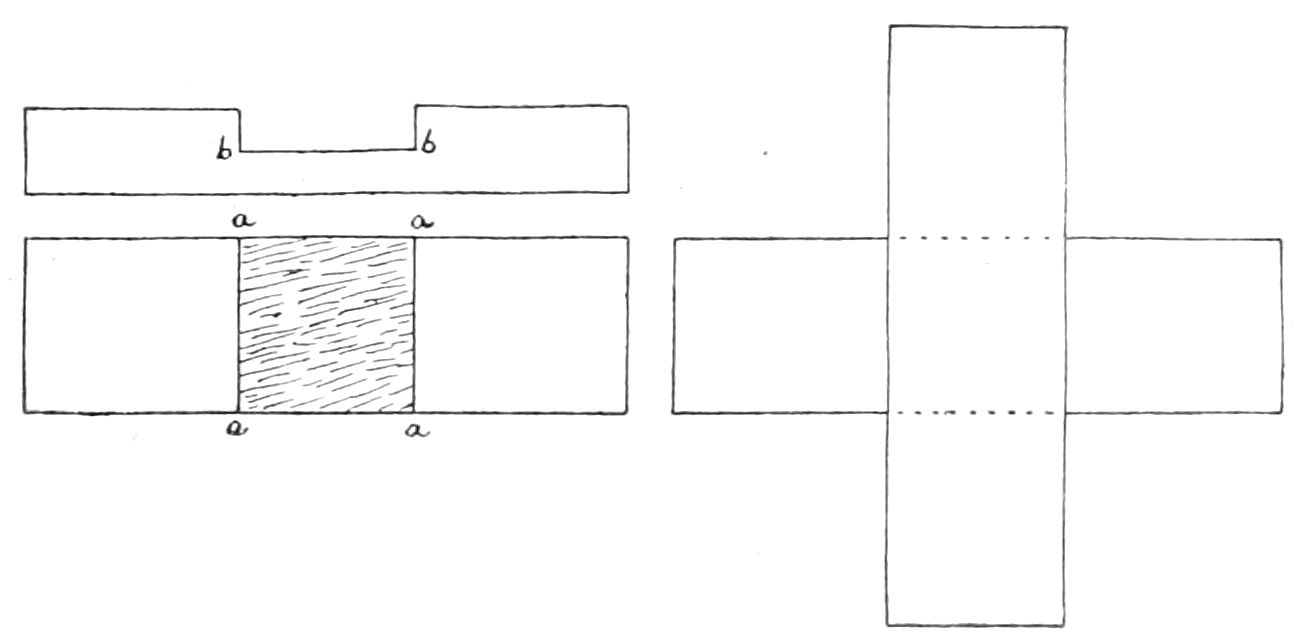
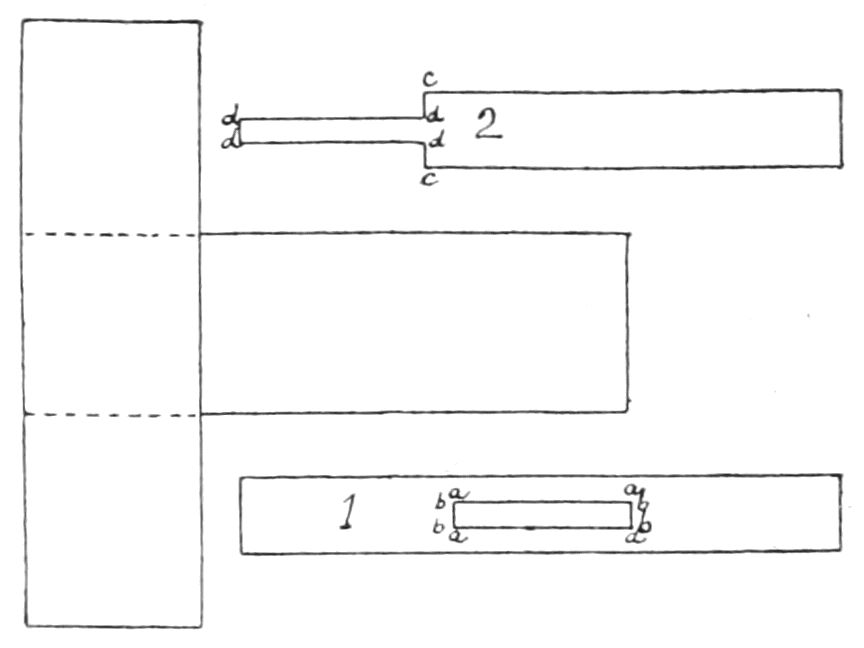
The purpose of this exercise is to join two pieces of
equal thickness which cross each other at right angles, and
have them flush top and bottom; the pieces to be of the exact
dimensions given, fitted closely on both sides, each piece
exactly in the center of the other, both sides to be perfectly
smooth and even when finished and the ends planed square.
To do this get out two pieces which square up as in Ex. I to 3½
in. wide, 1¾ in. thick and 12 in. long each. Choose and
mark working face of each. Find the center (6 in. from each
end). Measure 1⅝ in. each way from the center and mark
across the working face of one piece and bottom of the other
piece (a-a) and (a-a). Now set your marking gauge to half
the thickness of the piece (⅝ in.) and mark the bottom of
your cut as in Ex. II (b-b). Do not forget that the working
face of both pieces must be up. Therefore, the cut is made
on the working face of one piece and the bottom of the other.
Proceed to saw and chisel out as in Ex. II, when, if accurately
done, the pieces will fit together perfectly making a cross
with all four arms exactly the same length.
Exercise No. III.
You will use this joint often in furniture and can make
the pieces cross at any angle by using the sliding T bevel set
at the angle you desire for marking across the tops and
bottoms of the pieces and the try square for the edges.
Accuracy is essential both as to dimensions and work.
Exercise No. IV.
The mortise and tenon are used more than any other kind
of joint in furniture. Therefore great patience and care are
justified in learning to make them nicely. When the end of
one piece is to be joined to the side of another, the mortise
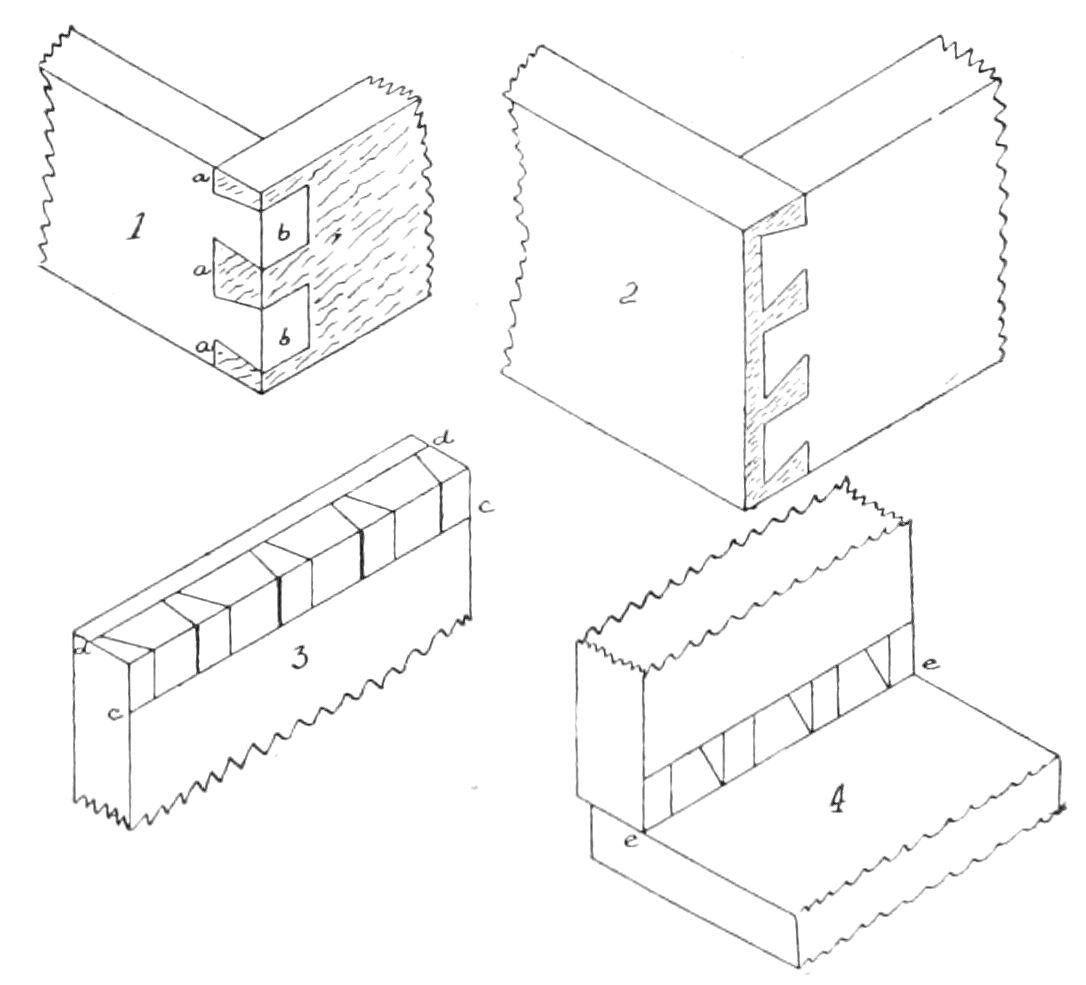
and tenon are almost always used. The mortise (No. 1) is
an opening, square or oblong, to receive the tenon and may
go part way or all the way through. When part way it is
called a “blind” mortise; when all the way a “through” mortise.
The tenon (No. 2), is a projection on the end of the other
piece, which fits into the mortise. It generally has two
shoulders, but may have three or four, made by cutting away
the sides. It should be about one-third the thickness of the
piece. In furniture it is fastened with glue, and where
advisable with a wooden pin also. The objects of this exercise
are that the pieces be straight and accurately squared to the
measurements; that the tenon be exactly in the center of the
joint; that the pieces be square to each other when joined;
that the tenon fit the mortise exactly without squeezing; that
the shoulders fit up to the cross pieces nicely and that when
joined the two pieces be perfectly flush at the joint. The
method is as follows: Square up two pieces to 1½ in. × 3½
in. × 12 in. long each, take one piece for the mortise piece, turn
it on edge and find the middle. Measure 1¾ in. (a-a) each
way from the middle and mark across with knife and try
square. As the tenon is to be one-third the thickness of the
piece set your marking gauge ½ in. deep and mark a line
parallel with the side between these two lines (b-b) and (b-b),
being careful not to run over the line. Turn around and mark
other side of the mortise in the same way. You now have
the mortise marked on one edge. To mark it exactly opposite
on the other side, mark across the flat side of the piece very
lightly at the end lines and across the other edge at these lines.
This will give you the end lines on the other side. Mark the
side lines with the gauge as before. Lay the piece aside and
take the tenon piece. Now, as your mortise piece is 3½ in.
wide, your tenon will have to be 3½ in. long and you will
want a little extra to smooth off the end, so better measure a
trifle over 3½ in. from the end, the piece being on edge and
mark across (c-c). From this line mark square across top and
bottom sides. Also across the other edge. This gives the
shoulder line for the tenon. Take the gauge, which is set at
½ in., and mark parallel with the flat sides from these shoulder
lines to the end (d-d) (d-d), and this will give the thickness
of the tenon. Lay aside the piece and put the mortise piece
in the vise edge up. With your ¼ in. chisel and mallet cut
your mortise part way through, then turn the piece over and
cut from the other side. Remember to keep the flat side of
the chisel towards the edge of the hole and leave a slight
margin all the way round. When you have cut the mortise
clear through in this way, take your ½ in. chisel and true
up to the lines, the sides first and then the ends. See that all
four sides of the mortise are straight through from side to
side or the tenon will jam. Lay aside the piece and take
tenon piece. Lay it flat side down and cut tenon exactly the
same on both sides as you did the half tenon in Ex. II. Insert
tenon through the mortise and plane off the end flush with
the mortise piece. Now look carefully over your work and
see if it fulfills all the objects of this exercise. Do it over until
it does. Do not get discouraged. It is a mighty nice operation
and when you can make this joint properly you may be proud
for it is a step beyond simple carpentering and belongs to the
Joiners’ and Cabinet Makers’ art.
Exercise No. V.
Panelling is used in doors, the ends and backs of furniture,
etc. It may be more or less ornamented with beading,
moulding and so on, but in the best modern furniture all ornament
is omitted and the panels absolutely plain. The objects
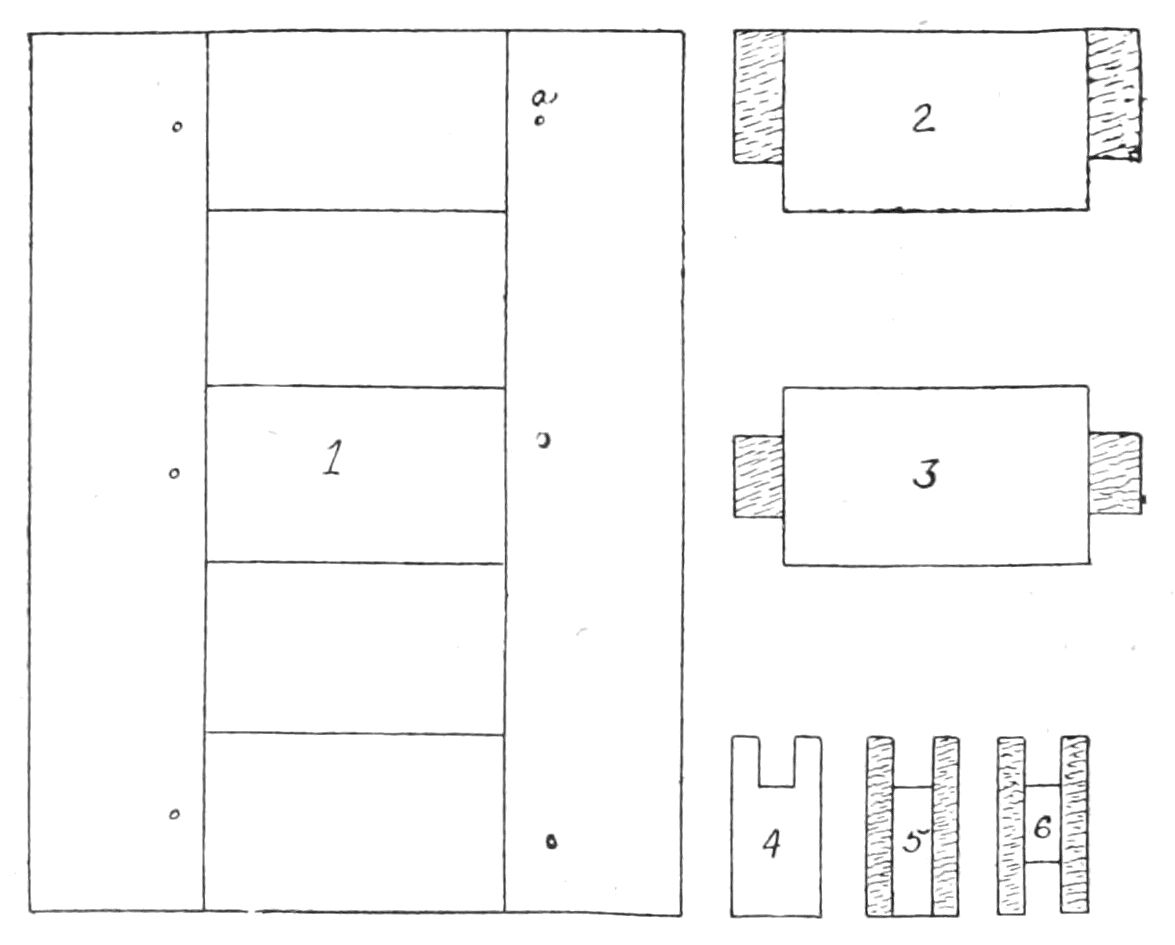
of this exercise are to make a frame 13 in. × 17½ in. × 1¾ in.
thick with two sunken panels; that it shall lie perfectly flat
when put together; be smooth and true at all joints and exact
in dimensions. The method is as follows: Get out a piece
which will finish to 1¾ in. × 3½ in. × 60 in. Joint and
square to required thickness, also square up one edge only.
Set in the vise with the squared edge up. Set your gauge
½ in. deep and mark along the top edge ½ in. from and
parallel with the side farthest from you. Then turn it around
and mark other side. This will give you the width of the
rabbet (see end view No. 4), in which the ¾ in. sunken panel
will slide. To cut this rabbet use your ½ in. rabbet plane
and plow (cut) 1 in. deep. If you have a Stanley No. 45 or
No. 55 it has a fence to guide it, but if you have only a wooden
rabbet plane you must use a straight strip of wood to guide
the plane. There are several ways of fastening this strip. The
easiest way is to brad it on to your work along the gauge
line, but this leaves the brad holes. The best way is to take
a strip a little longer than your work and fasten a block
on each end of it which will drop down over the ends of your
work, then wedge it tight at each end. In this case the strip
must be stout enough, of course, not to bend as you plane
against it. When you have plowed an inch deep, turn your
work around, move guide to other side, and with your ¼ in.
rabbet plane plow the other ¼ in. to be taken out, making
the rabbet ¾ in. wide. Be sure to plane square or the panel
will not lie flat. When plowed cut this piece into two pieces 18
in. long for the sides of the frame and three pieces 8 in. long for
the top, bottom and middle. Plow one of these 8 in. pieces,
which you intend to use for the middle bar, on the side opposite
the one already plowed, as it will have a panel on each
side of it (see No. 6). Now cut a tenon 1 in. long by ¾
in. thick on each end of all three 8 in. pieces, just as you did in
Ex. III (see Nos. 2 and 3). For the panels saw from an inch
board two pieces 5½ in. × 8 in., dress them down to ¾ in.
thick. Put one of the 18 in. frame pieces in the vise with the
rabbet up. Insert the tenon of an 8 in. piece in the rabbet
¼ in. from the end, with the rabbet in itself turned so as
to receive the panel. With your ¼ in. auger bit bore a hole
straight through the frame and tenon ½ in. from the edge
of the frame in the center of the tenon, as at (a) No. 1. Make
a round plug to fit this hole, sand paper it smooth and drive
it in gently. This will hold the tenon in place. Slide a panel
into this rabbet and down into the rabbet in the frame piece.
Next slide the center piece in so the rabbet fits over the panel
and the tenon in the rabbet in the frame. Bore and pin like
the first one, then insert the other panel and end piece in
like manner. Now take the remaining 18 in. frame piece and
fit it down snug over the tenons and panels, leaving ¼ in.
margin at each end. Pin each of the three tenons, being careful
to hold the shoulders snugly against the frame and the piece
tight down on the panel. Cut the pins off flush and sand
paper smooth. Now put the whole frame in the vise and with
your plane trim to exact size. When you can do this exercise
so that all joints are perfect, all surfaces flat, smooth and even,
and all dimensions correct and have mastered the exercises
before it you can pretty nearly make furniture. There is
one thing more, however, which is important, a little difficult
and frequently required, and that is dowelling and joining.
Exercise No. VI.
For this exercise practice will do more for you than
instruction. The object of the exercise is to join two boards
at their edges so as to make a continuous surface with no
crack or unevenness at the joint, as in table tops, etc. You
will be called upon for this operation whenever you make
any piece of furniture with a plain surface more than 8 to
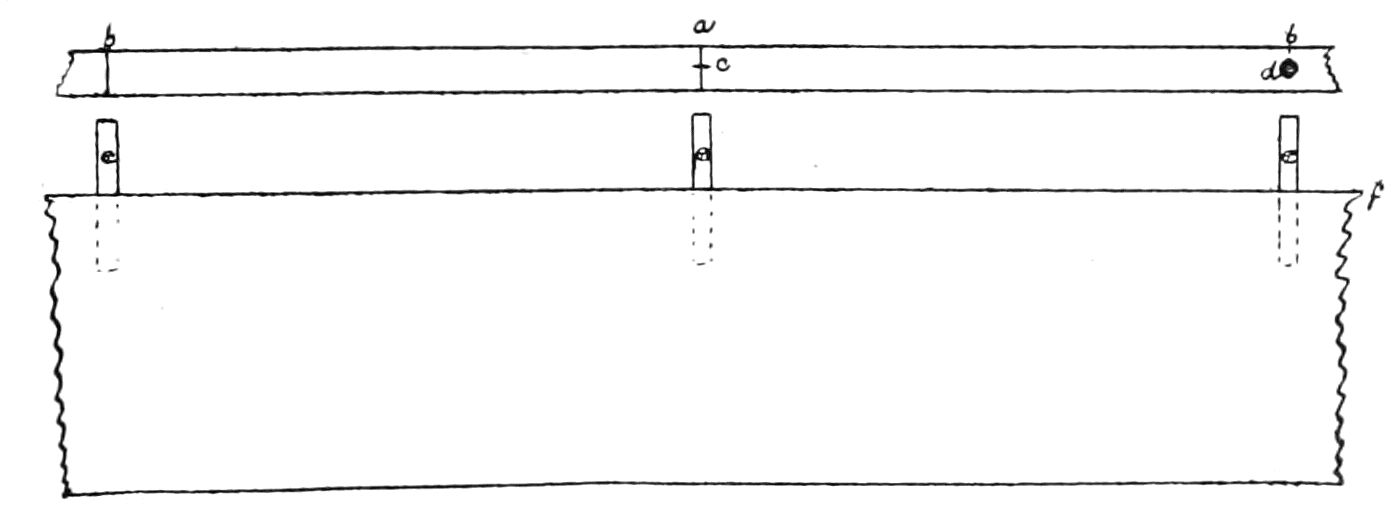
10 inches wide. The method is as follows: Take two pieces
⅝ in. × 6 in. × 36 in., select working face of each. Find
the center of each and with knife and try square mark across
the edge to be joined as at (a). Measure 12 in. each way from
center (b-b), and mark. Take your marking gauge, set it
half the thickness of the board (⁷⁄₁₆ in.) and mark a fine
point ⁷⁄₁₆ in. below the working face on the knife marks, as
at (c). With brace and ⅜ in. bit bore a hole 1½ in. deep
exactly square into edge of the board at each point, as at (d).
Repeat the process in the other board. These holes are for
the dowels (e-e-e), which are pins that keep the boards from
wabbling at the joint and also hold them together. You will
appreciate, therefore, that if the holes are not exactly straight
in, the pins will lean and not fit into the holes on the other
piece, or else tip it one way or the other. To make the dowels
square up a piece ½ in. square and 9 in. long, then round it
with your smoothing plane and sand paper to exactly ⅜
in. diameter, or, in other words, to fit the holes tight without
jamming. Cut into 3 in. lengths with back saw. Before inserting
the dowels the pieces must be jointed. To do this turn
one on edge in the vise and square up the top edge (f-f) with
your jack plane. Observe strictly directions given in Chapter
I for planing. When you have the edge precisely square
and straight lay aside and square one edge of the other piece.
When this is done, before taking it out of the vise, test it by
standing the other piece on it with the squared edges together
and working faces turned the same way. Test the surface of
the two boards by holding the back of your steel square across
the two, seeing that it touches at the two edges and at the
joint and that no least crack shows on either side. Now insert
your dowels and the joint will be true.
This is a difficult exercise and requires much practice,
but its accomplishment brings the keen delight of work well
done.
Exercise No. VII.
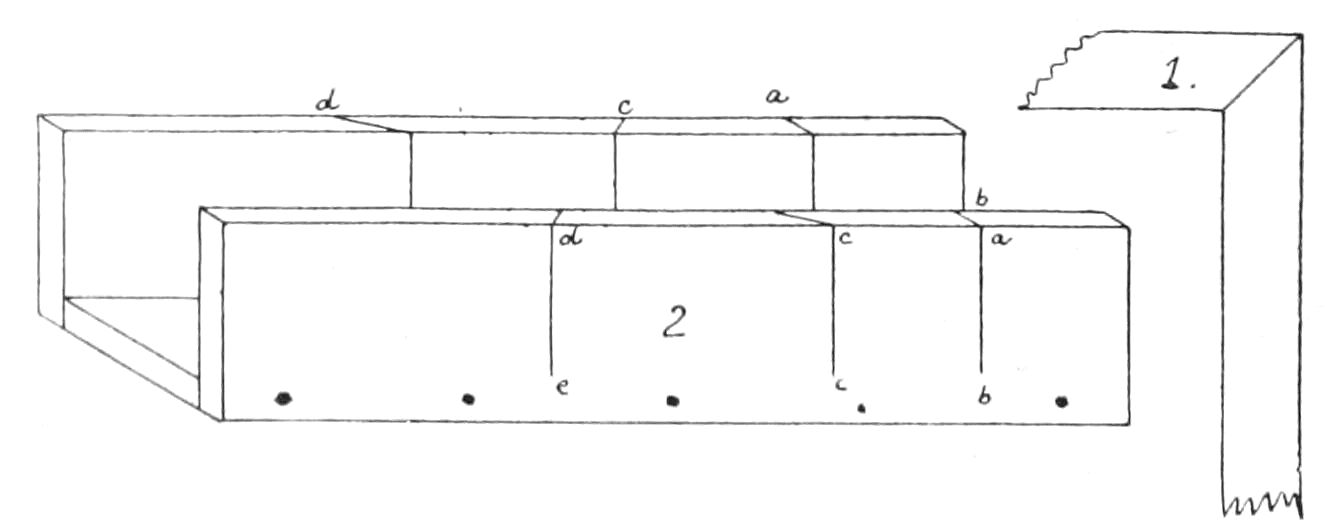
The mitre is used to form a joint where two pieces come
together at right angles and make a corner. The end of each
piece is cut at an angle of 45 degrees (No. 1). To make this
joint, you will want your mitre box which you can now make
with comparative ease. It must be precise to be of use. It
is a box without ends or lid (No. 2), and made as follows:
Get out three pieces ⅝ in. × 4 in. × 18 in. Joint and square
them. Select working face of each. Firmly nail sides to
bottom, all faces inward; 3 in. from end mark with knife
and try square across top of both sides (a-a). From this line
mark in same way straight down the outside of the side
towards you (b-b). With back saw cut down this line till
you strike the bottom of the box, starting your saw in the
mark (a-a) on top of the two sides. Now measure 4 in. farther
from same end and mark across the tops of sides (c-c). Then
4 in. farther and mark as before (d-d). Take your steel
square or other perfectly straight edge laid diagonally across
the tops of the sides from (c) to (d) and (d) to (c) just at
the points where these marks run off the insides of the edges
and mark the tops of the sides at this angle (45 degrees).
Now mark square down the outside nearest you (d) to (e),
and (c) to (f). With your back saw cut diagonally across
in the marks on top and straight down the mark on the side
to the bottom of the box. The cut straight across is for a
guide for your saw in cutting square ends and you can use
it also for the shoulders of tenons. The 45-degree cut is for
guiding your saw when cutting mitres, like the corner of a
picture frame. You will realize, then, that the sides of the
bottom piece must be carefully squared or the sides of the
box will not be square to the bottom, and it must be exactly
4 in. wide or your angle will not be true and your mitres will
not fit.
If at any time you need a mitre box to take wider material
make the bottom wider and proceed otherwise as above,
except that the space on the inside face of the sides between
the diagonal cuts must always be exactly the same as the
width of the bottom. In use, remember that if you plane anything
off the outside edge of a mitred end you make the piece
shorter and anything off the inside makes it longer, as you
will readily understand by experimenting a little. Therefore,
you must be careful to have your piece of the proper dimensions
before mitring or else allow for this in its length.
To make an accurately lifted dovetailed corner is good
evidence of a workman’s ability to use tools. There are three
kinds: First, common dovetailing (Fig. 1), where strength
is more important than appearance, as in box corners, etc.
The pins and tails should be of equal size and about as wide
as the material is thick. The pins are the parts widest on
the inside face of the piece (a-a-a) and the tails are the parts
which are widest at their ends (b-b).
Second, lap dovetailing (Fig. 2), which shows only from
the side as at the front ends of drawers. The tails are always
on the side piece and should be two to four times as large as
the pins. There is no rule for size. Use a size that is strong,
looks well and divides the space evenly. Always begin and
finish with a half pin.
Third, the mitre dovetail, not illustrated, which is hidden
altogether. It is much more difficult to make and not so strong
as the others. You will have no use for it.
Cut your pins first and mark the tails from them, then
if you make a slip you can correct it before marking the tails
and after you have had some experience you can learn to cut
the tails without marking the bevels.
Exercise No. VIII.
The object of this exercise is to make a lap dovetail joint,
as of a drawer front. Get out one piece ⅝ in. × 5 in. × 12 in.
when jointed and squared, for the front of the drawer and
one piece ½ in. × 5 in. × 12 in. for the side of the drawer. Select
working faces which will be the insides. Set your marking
gauge a shade less than the thickness of the side piece and
see that the marker is sharp. Now mark across the inside
face of the front piece, gauging from the end (c-c). This
is the length of the pin. The length of the tails (which are
on the side piece) should be about ¾ the thickness of the
front piece, or about ⅝ in. in this case, so set your gauge
⅝ in. deep and mark across the end of the front piece gauging
from the inside (d-d). Without changing your gauge
mark a line across both sides of the side piece, gauging from
the end (e-e). Place front piece in vise, marked end up and
face towards you. With a pencil, space out the tails, which in
this case will be about ⅜ in. wide, making a half pin at
beginning and end and three full ones between. Make them
even distances apart, of course, and when you have located
them set your T bevel at an angle of 1 in 6 and mark them
accurately on the end of the front, and with your try square
continue these lines down to the gauge line (c-c) on the face.
Take your back saw and cutting on the inside of the bevel lines
saw down to the gauge mark (c-c) on the face, but not beyond
the gauge mark (d-d) on the end. In other words, you can
only saw the corners. Make all cuts in one direction first, then
the others just as you would file a saw. It is easier to be
accurate this way. Next, with your chisel clean out the spaces
between the pins. These spaces will be like a mortise, open
on the end and wider at the bottom than at the surface. There
will be a little space close in the corner where you cannot get
the chisel, clean this out with your knife. Remember not to
cut quite to the line till the very last. The pins are now complete.
Lay the side piece (No. 4) on the bench face up. Stand
the end on it with its inside face just covering the gauge mark
(e-e) across the side near the end, as illustrated. Hold it
firmly and mark the side around the pins in the end piece.
Place the side in the vise, end up, and square the tails across
its end. With the back saw cut the sides of the tails (on
inside of lines), and lay on the bench and cut between the tails
with your chisel.
If you have much dovetailing to do it is worth while to
get a chisel bevelled on both sides and across the end, like a
lathe chisel. It is easier to get into the corners with this. Put
your pieces together and dress off the side till it is exactly
flush with the front.
When you can do this exercise and the preceding ones
accurately you can do about anything you will be called upon
to do. It is hard, but worth while. You will be able to make
the common dovetail easily after this. Just remember, in that
case, to make pins and tails the same size and about as wide
as the thickness of the material.
Chapter IV. — FASTENINGS.
There are many ways of fastening the parts and joints of
furniture. Among those most used are brads, screws, wooden
pins, shaping of the parts and glue. Glue is used in almost
all joints. Use brads and screws very sparingly. Any other
fastening is preferable in most cases. If you do use the latter
in any part that is visible, first bore a hole from ⅛ to ¼
in. deep, large enough to take a wooden plug to cover the head
of the metal. For fastening by shaping the parts there are
many devices. You have learned the mortise and tenon, the
dowel joint, the mitre and the dovetail. These will answer
almost every requirement, with glue in most cases, and in
some cases pins to hold them together. When using glue there
are several things to be observed. It should not be too thick
or too thin. Experience soon teaches you how thick to use
it for each kind of work. As a rule about as thick as thin
syrup will be right, but hard wood requires thinner glue than
soft wood. If the pieces are very cold they should be warmed
and the glue always used hot. When the joint is such as admits
rub the parts together, and in all cases clamp tight to force
out the surplus glue and hold the joint until the glue is dried.
It should stand 8 to 12 hours before being handled. To glue
end grain first size it, that is, put on a coat of glue, allow it
to dry and then proceed as above. Use the best furniture glue,
though the prepared glues are good and very convenient, but
if you use the latter get a small quantity, as it is better to use
it hot and it loses strength by frequent heating.
To prepare glue use a glue pot which is like a double
boiler. Put as much as you think you will use in the inside
pot and cover with cold water. Let it soak six or eight hours,
then put the smaller pot in the larger one with water in the
outside one and heat until the glue is hot.
Glue can be made to stand the weather by adding one part
boiled linseed oil to eight parts glue, stirring all the time, or
else use skimmed milk instead of water in the glue.
Chapter V. — DRESSING OFF AND SMOOTHING.
As a rule it is better to leave the final dressing off till the
joints are all made and glued or otherwise fastened, so that in
case there are any little inaccuracies the pieces can be planed
smooth. This always has to be done with a glued joint, either
with plane or scraper, or both.
The scraper is simply a flat piece of thin steel about 3 in.
× 5 in. The best ones are cut from an old saw, but you can
buy very good ones. To sharpen a scraper lay it on a flat
board and rub the side of the edge with a piece of hard steel
(your nail set is good) laid flat on it, then take it up and
draw the steel firmly along the edge. This makes it flat on
the sides and edges but turns up a little sharp edge. Use both
hands with the scraper and tip it in the direction you are pushing
it and scrape a little across the grain. It is well to scrape
all surfaces to take out any plane marks or nicks and it saves
work when sandpapering. Sandpaper with coarse, then fine
sandpaper, or steel wool, always rubbing with the grain. It
is hard to be sure that your work is quite smooth before it
has any coloring on it, as the shadows are very light. Look
across it towards the light both ways, as the shadow is always
away from the light, of course. If in doubt, rub some more.
The finish of furniture is of the utmost importance and it
should be absolutely smooth before anything is put on it.
Even the fine sandpaper will make scratches which show on
a polished surface if not always rubbed with the grain. Have
horizontal work between you and the light; vertical work
stand between light and work. With oak it is well to moisten
to raise fibre, then rub again when dry. When you are satisfied
and doubly satisfied that not a least blemish remains, and
not before, then proceed to put on your finish.
Chapter VI. — STAINING, DYEING, FILLING, POLISHING.
For coloring the wood wipe-stain is perhaps the easiest
and quickest and is very satisfactory. You can get it at any
paint store ready for use. Put it on with a brush of convenient
size for the work and immediately wipe off with old
rags or waste. It will not show brush marks and do not be
frightened if it is much darker than you expected before it
is wiped off. If the first coat does not make it dark enough,
allow it to dry 12 hours and apply a second coat. After the
last coat has dried 12 hours or more, and it is thoroughly hard,
if on fir or similar wood, you may proceed to polish. If your
material is oak or other open grain wood you will need to
apply a filler, which you can also get at the paint store. This
should be of the same color as the stain and put on in the same
way. When it turns dull, which will be in a few minutes,
wipe off all on the surface. This will leave the pores filled.
Allow filler to dry at least 12 hours before polishing.
The best and easiest polish, as well as the most beautiful,
is wax. To prepare this shave beeswax into a pan, add as much
spirits of turpentine as will moisten it through, and powdered
white resin, in proportion of one part resin to sixteen parts
wax. Dissolve on stove, being careful not to let it catch fire.
Stir it up and when cool it is ready for use. Roll some
cloths into a ball, smooth on the outside, and use to apply the
polish. Put the polish on very thin and evenly, allow it to dry
a few hours, then with a clean ball of cloth (preferably woolen)
rub at first gently with the grain, then harder in a circular
motion and finally a few strokes with the grain. After 12
hours rub again with dry cloth, and if a higher polish is desired
apply a second coat of wax as before. This polish will improve
with age and occasional rubbing.
Instead of the wipe-stains you can use wood dyes which
come already prepared. They sink farther into the wood and
do not wear off as soon, but on the other hand are much
harder to apply evenly. The filler, however, will take off some
of the dye and you can sometimes even up a little any dark
spots when rubbing down the filler. The dye does not take so
long to dry as the wipe stain, six hours being plenty. Polish
as above.
The filler in both cases will darken the color a little. Do
not forget this in applying your stain or dye, and in some cases
you will not require any other coloring than the filler itself.
Of this you can judge by the color you desire and a little
experimenting.
The hard glossy finish is not used on this kind of furniture
and is very much more difficult to handle. In case you
desire to use it on anything proceed as follows: Put into a
glazed vessel a little gum shellac, just cover with 90 per cent
alcohol. Stir till dissolved, about two hours, though not necessarily
all the time. Do not use a tin vessel. Do not allow
lumps to settle. When thoroughly dissolved take soft cloths
and make a ball about 2 in. in diameter smooth on the bottom.
Put on this half a teaspoon of the polish, then around the ball
put a piece of cloth about a foot square, holding the ends in
your hand. On the smooth side put a few drops of linseed oil
and rub your work lightly in a circular motion all over. When
it rubs harder put a few drops more oil on the ball and also
on the work. Watch carefully. If the cloth sticks to the work,
thin the polish on the ball with a little alcohol, first taking off
the outside cloth. Replace the outer cloth with the other side
out. When the work is all filled with polish and has a good
gloss, change the outer cloth for a clean one. Put a few drops
of alcohol on it and proceed as before till the oily look has
gone. Too much alcohol will wipe off the polish in splotches.
When the ball leaves little or no mark rub fast and strong with
the grain a few minutes and you are done. This finish improves
with age also, but requires practice to apply properly.
To describe the numberless methods of coloring and finishing
woods would fill a book several times the size of this
one. The above are the best, quickest and most easily learned.
— PIANO OR ORGAN BENCH. — PLANT STAND. — MAGAZINE STAND. — MUSIC CABINET. — HALL SEAT. — HAT TREE. — DINING TABLE. — CHAIR. — MORRIS CHAIR. — LIBRARY TABLE.
PIANO OR ORGAN BENCH
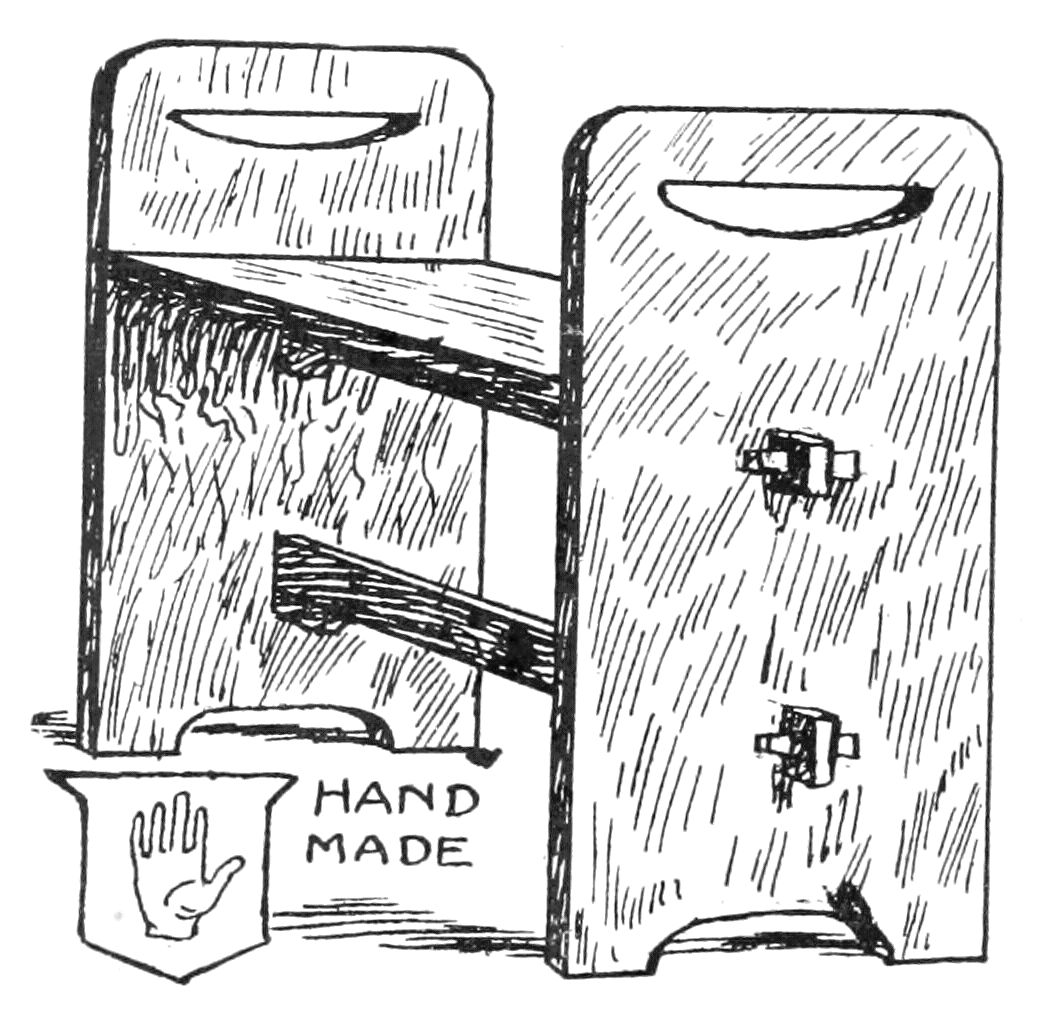
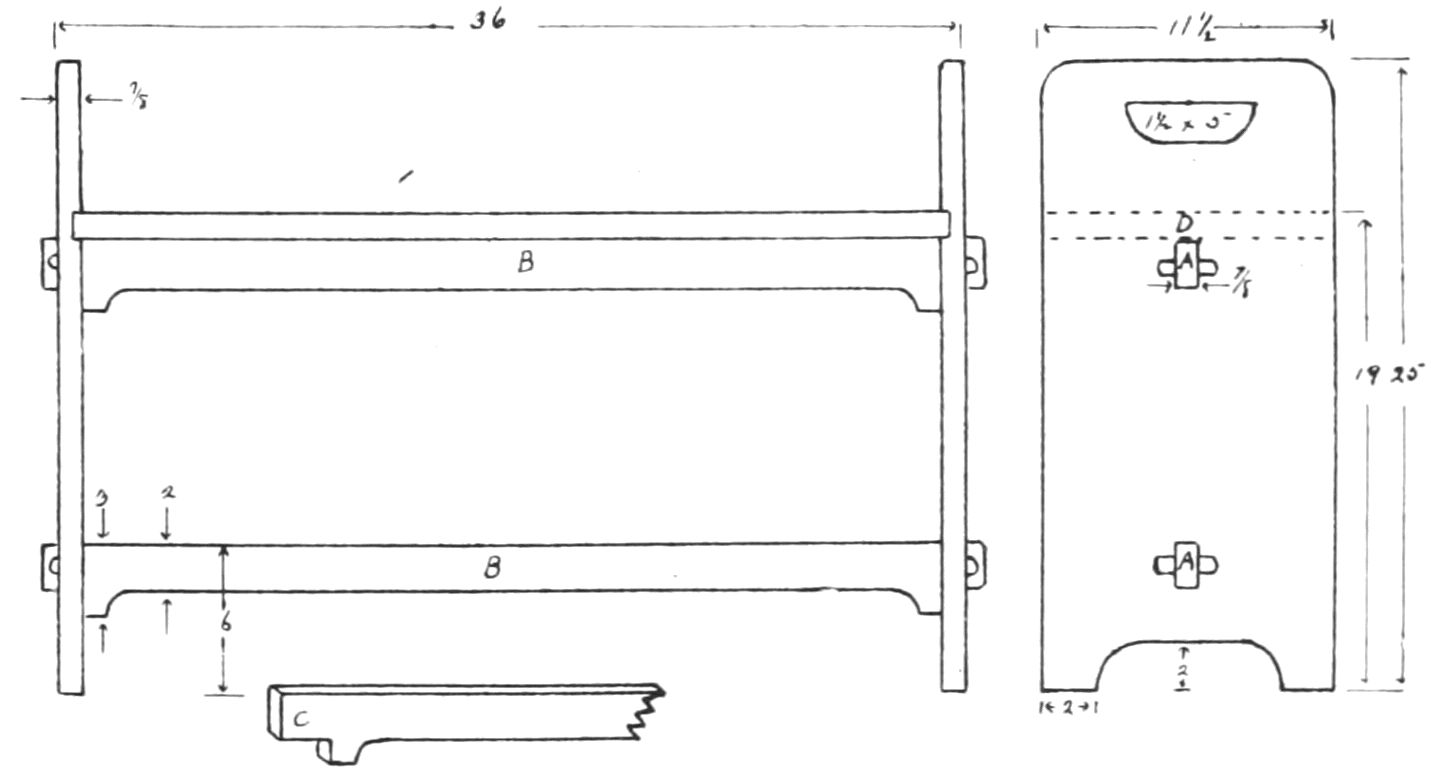
Piano or Organ Bench: This seat is very easy to make and
much handsomer than the ordinary piano stool. Lumber
required 10 ft. 1 in. × 12 in. and 7 ft. 1 in. × 3 in.
First, get out the end pieces to dimensions given. Cut the
mortises for the ends of the stretcher as shown, the top of
the lower mortise (a) 6 in. above the floor and the top of the
upper mortise (a) 18 in. above the floor. The tenon on the
stretcher has only one shoulder, as shown at (c). Next cut
a rabbet ¼ in. deep for the seat to fit in across the inside
face at each end, just above the upper mortise as shown by
dotted lines at (d). Then round the corners and cut the
handles and arches in the bottoms with the compass saw. Next
get out the seat exactly the same width as the ends and ½
in. longer than the space between the ends to allow for the
¼ in. in the rabbet at each end. The stretchers (b) are, of
course, ½ in. shorter to their shoulders than the seat for the
same reason, though 3½ in. longer including the tenons. To
cut the holes for the pins, insert the tenon through the end and
mark across it on the outside just where it comes through the
mortise, then take it out and bore a hole about ½ in. in
diameter on this line so that when the tenon is inserted through
the mortise one-half of the hole will be outside. You can thus
make your pins round and by splitting them in half have two
pins. All sharp edges should be rounded off a little with the
plane so they will not be so easily marred. Smooth thoroughly
before putting together. The seat is held in place by two
screws from underneath through the upper stretcher into the
seat. These screws should be near the ends of the stretcher
and well into the seat, but be very careful they do not go
through the seat.
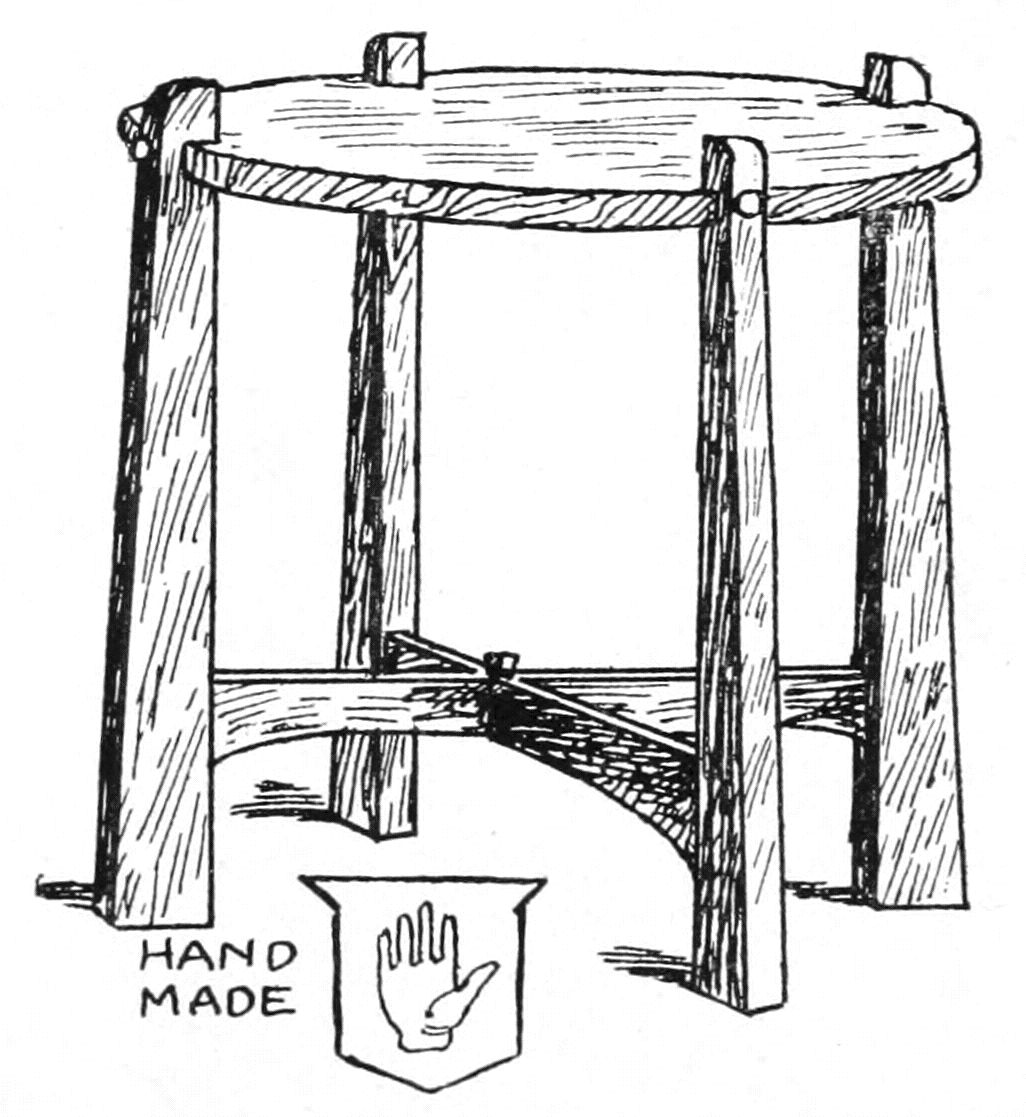
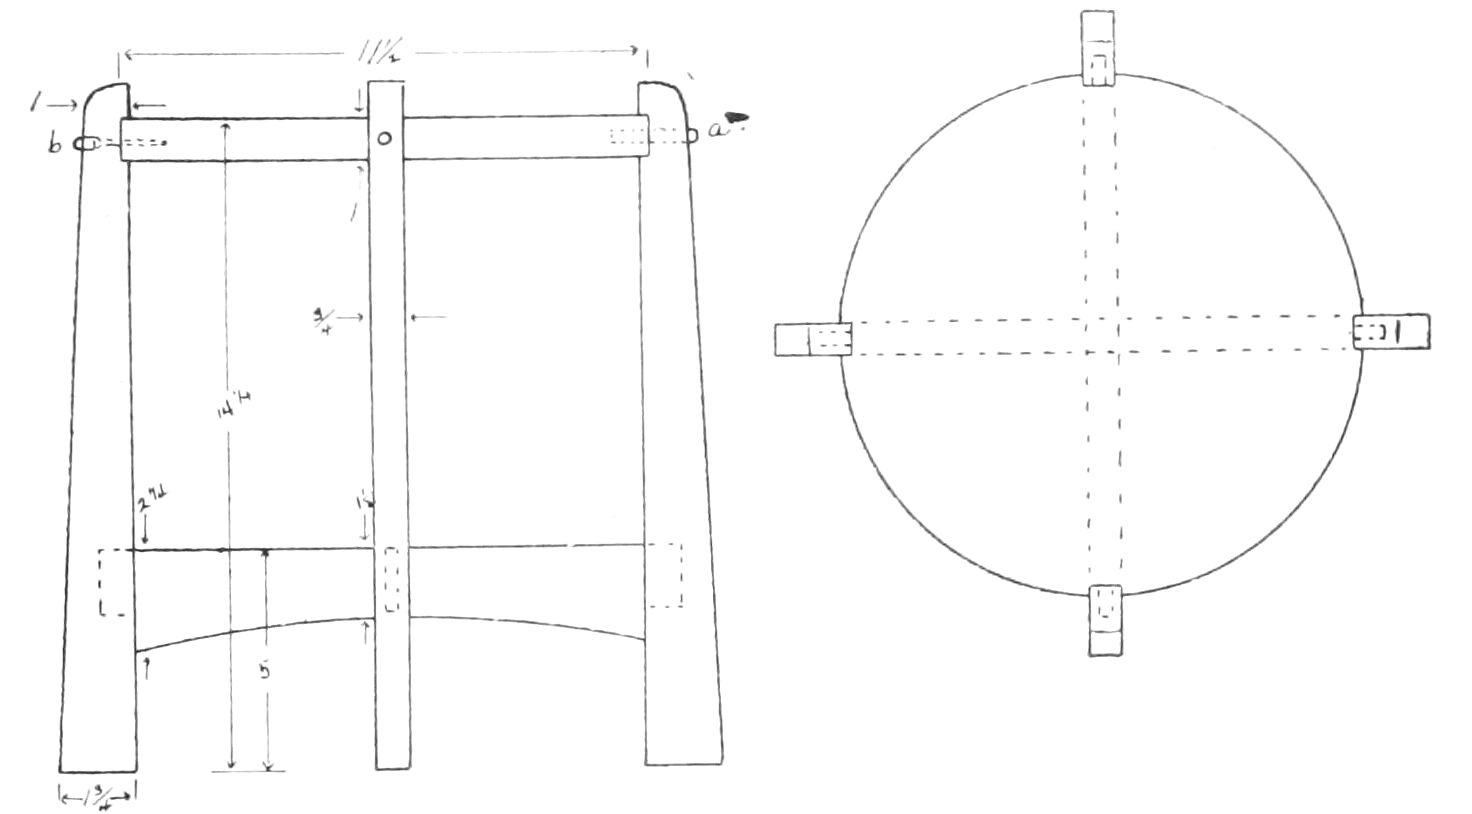
PLANT STAND
Plant Stand: Lumber required 4 ft. 1 in. × 12 in. Cut
the top from one end of your board. Then lay out the four
legs marking the top of one next the bottom of the other to
save sawing and the four will just about take up the width
of your board. The two stretchers will cut out of the remaining
lumber leaving you a piece about 6 in. wide to spare.
Smooth up the edges of the top and take off the sharp corners
with your plane. Next shape the legs cutting the rabbet ¼
in. deep for the top to fit in, then the mortises for the tenons
on the stretcher. Next shape stretchers, halving them together
where they cross and making the tenons about one-third as
thick as the material itself, and shaped as in the drawing.
Smooth thoroughly before putting together. Fasten the tenons
with glue and the top either with a plug glued in as at (a), or
with screws sunk and covered by a plug as at (b). This plug
should be about one-half inch diameter and allowed to project
about ½ in., the end being rounded as in illustration.
This stand made about 27 in. high, 23 in. in diameter,
makes a pretty tea table.
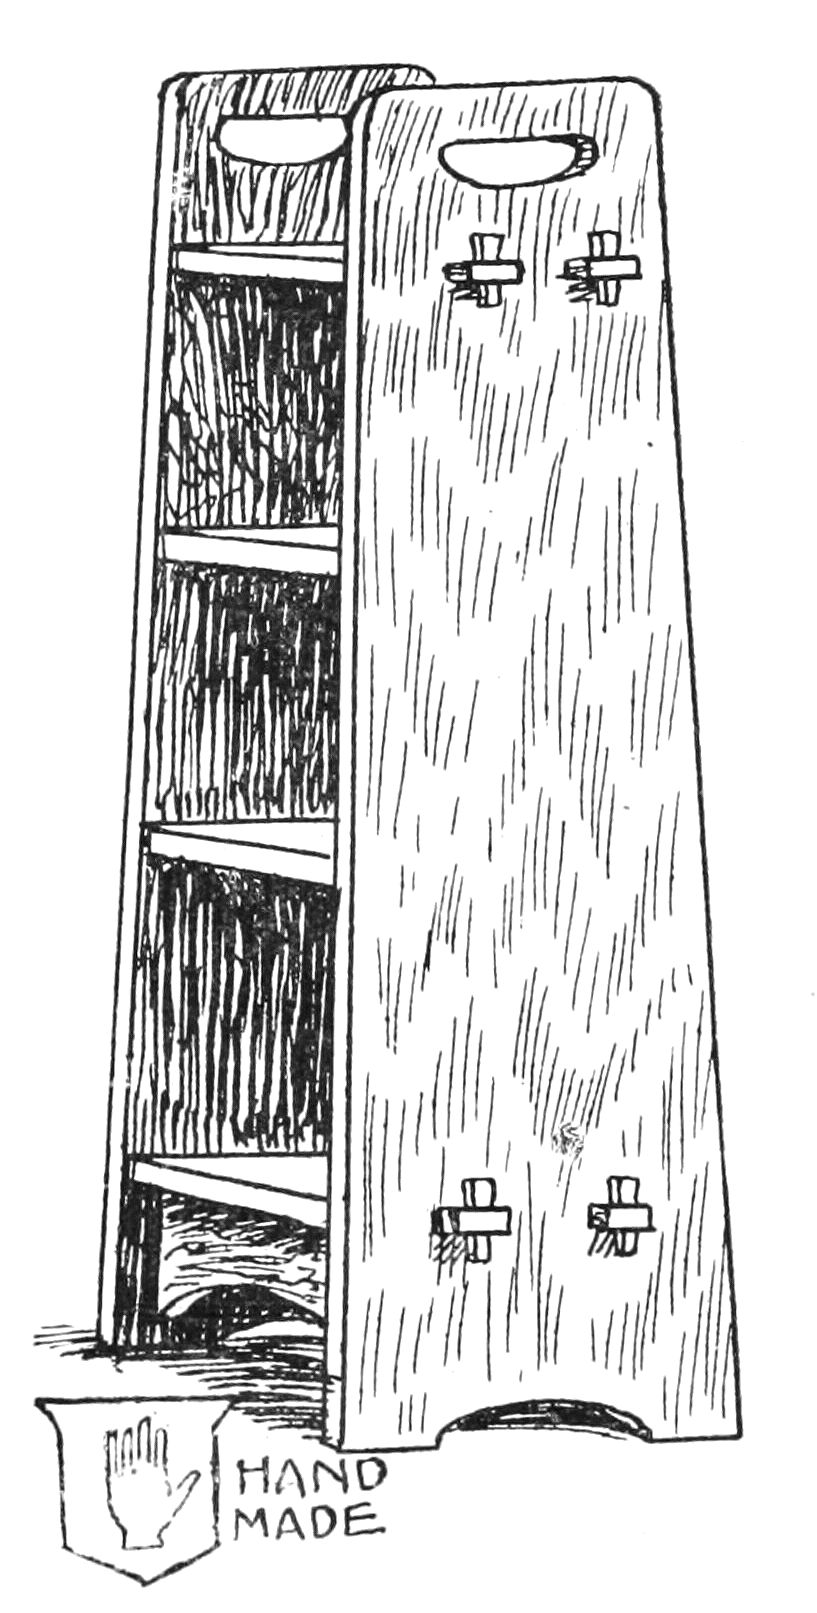
MAGAZINE STAND
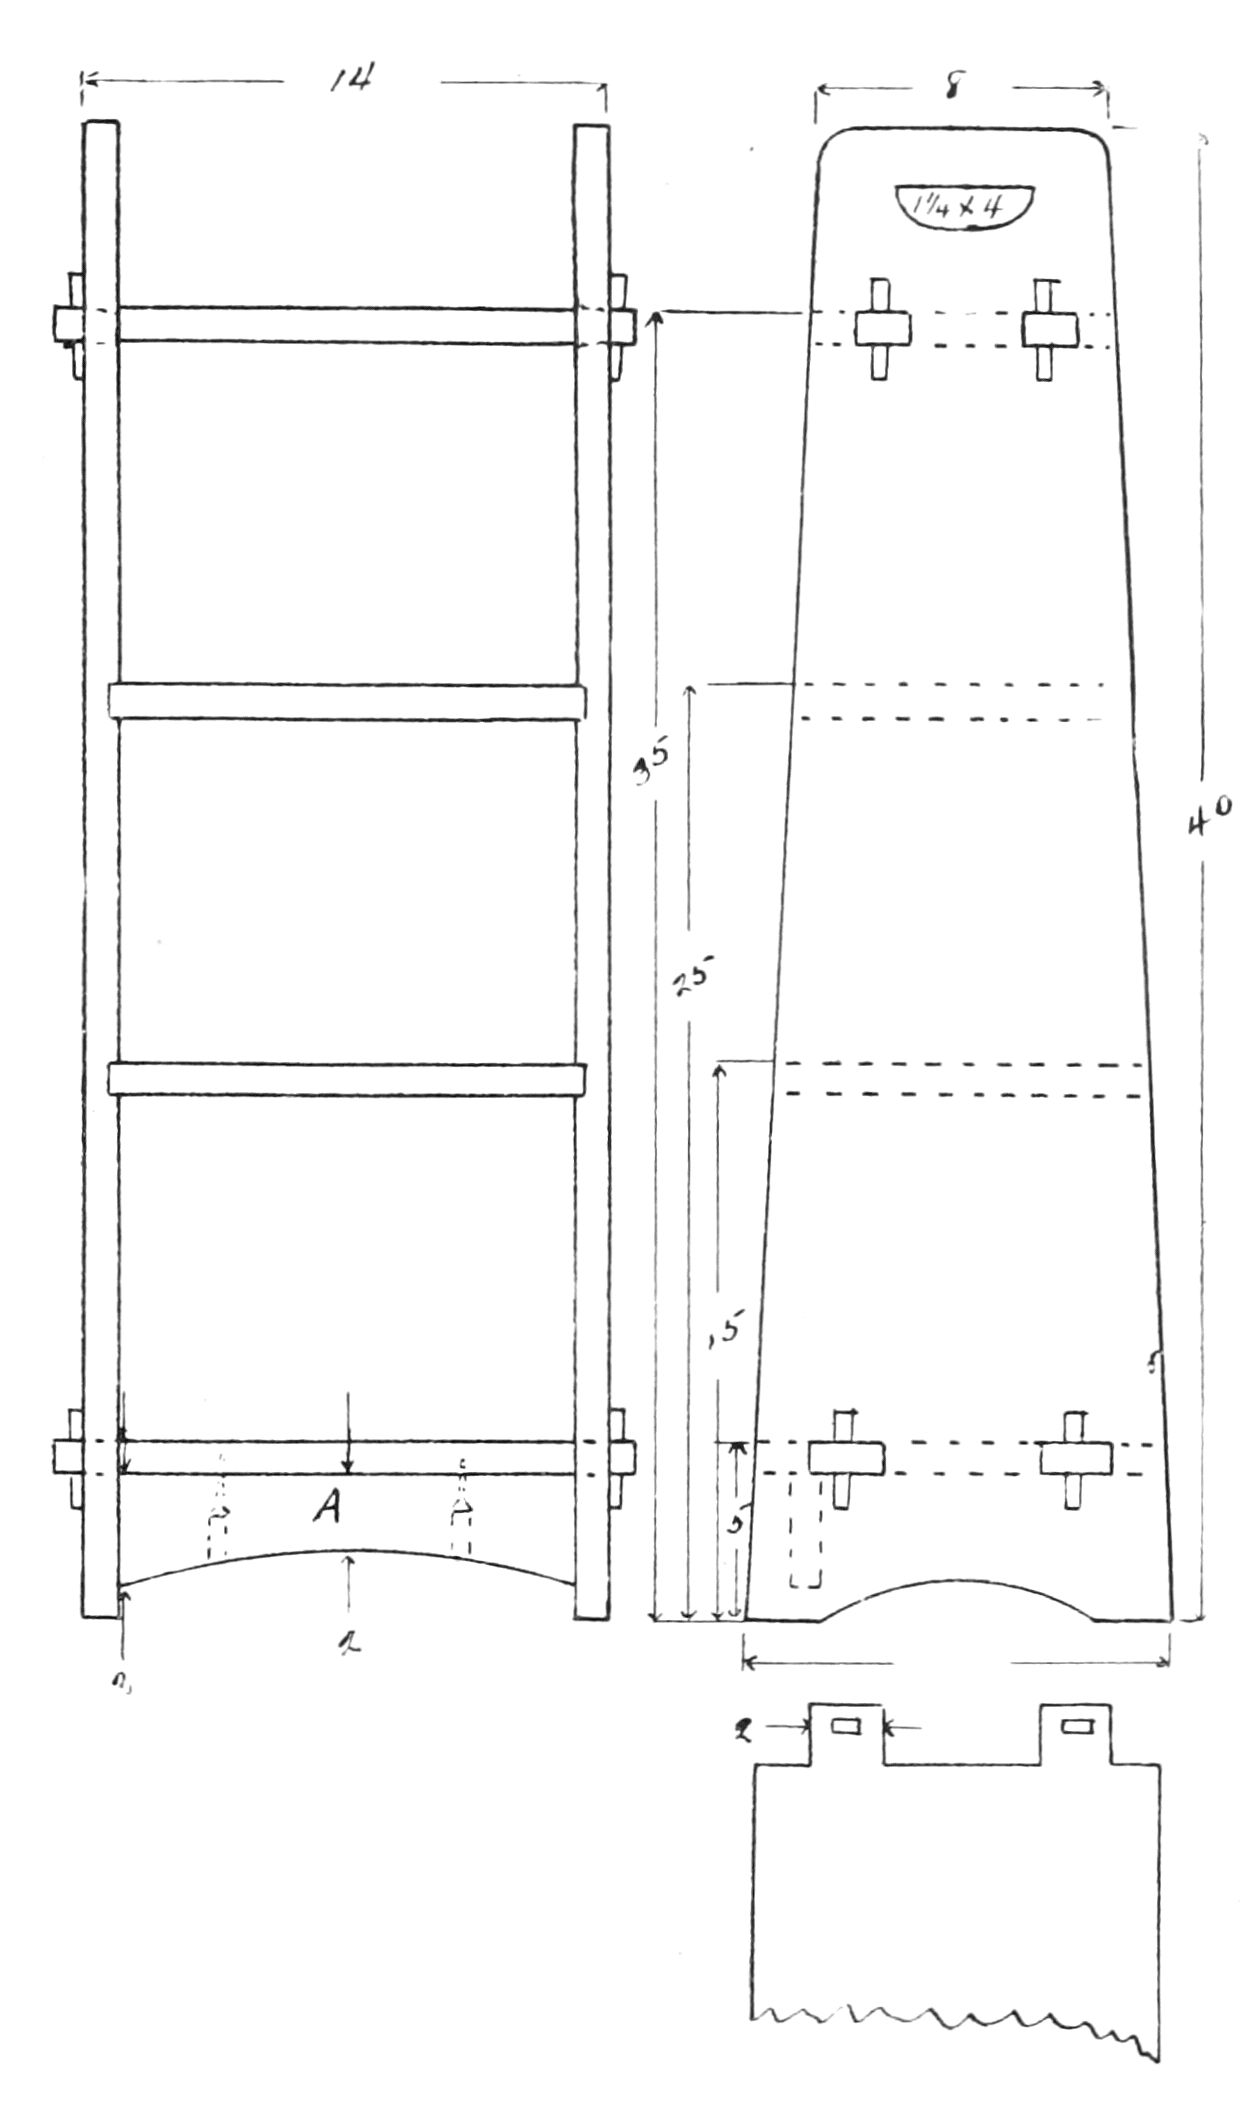
Magazine Stand: Lumber required 20 ft. 1 in. × 12 in.
Get out ends first to dimensions given. Cut mortises for the
tenons on the ends of the top and bottom shelves, the top of
the lower ones 5 in. above the floor and the top of the upper
ones 35 in. above the floor. These shelves do not fit in a
rabbet. Next cut rabbets ¼ in. deep for the other two shelves,
the top of the lower one being 15 in. and the top of the upper
one 25 in. above the floor. Cut holes for pins as described in
directions for piano bench. The brace (a), below the lower
shelf has no tenons and no rabbet but just fits snug and is set
back from the edge of the shelf about an inch, as shown by
dotted lines in end view. Is fastened by two screws from
underneath as shown. These screws need not be plugged, as
the holes will not show.
Make the tenons on the ends of the lower shelf about 2
in. wide and about 1½ in. for the upper tenon, the tenons
being full thickness of the shelves.
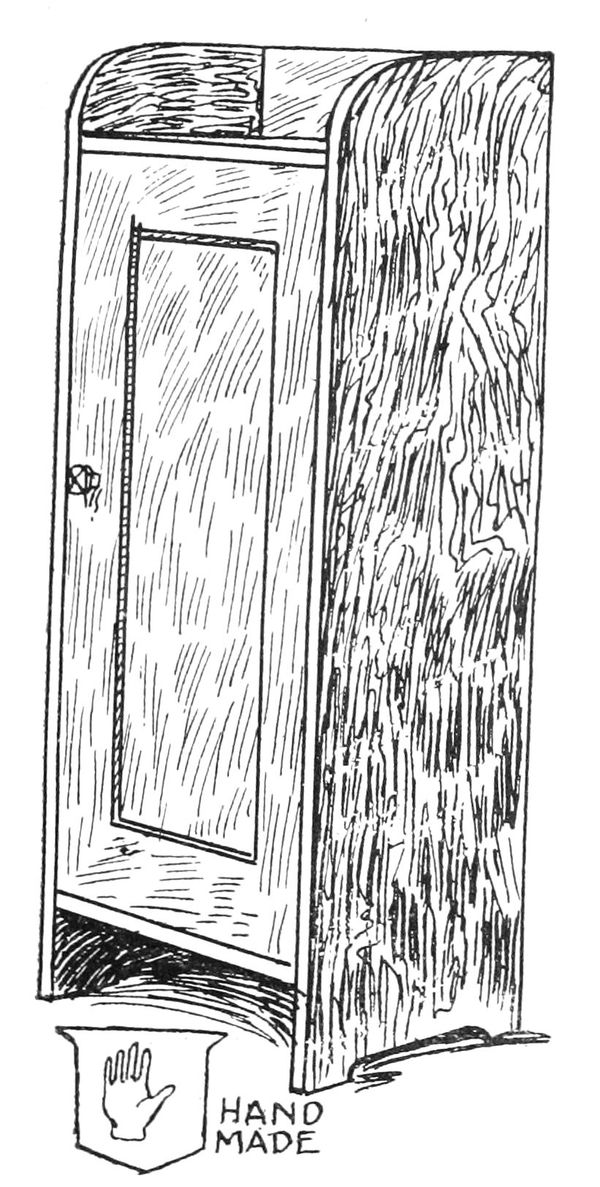
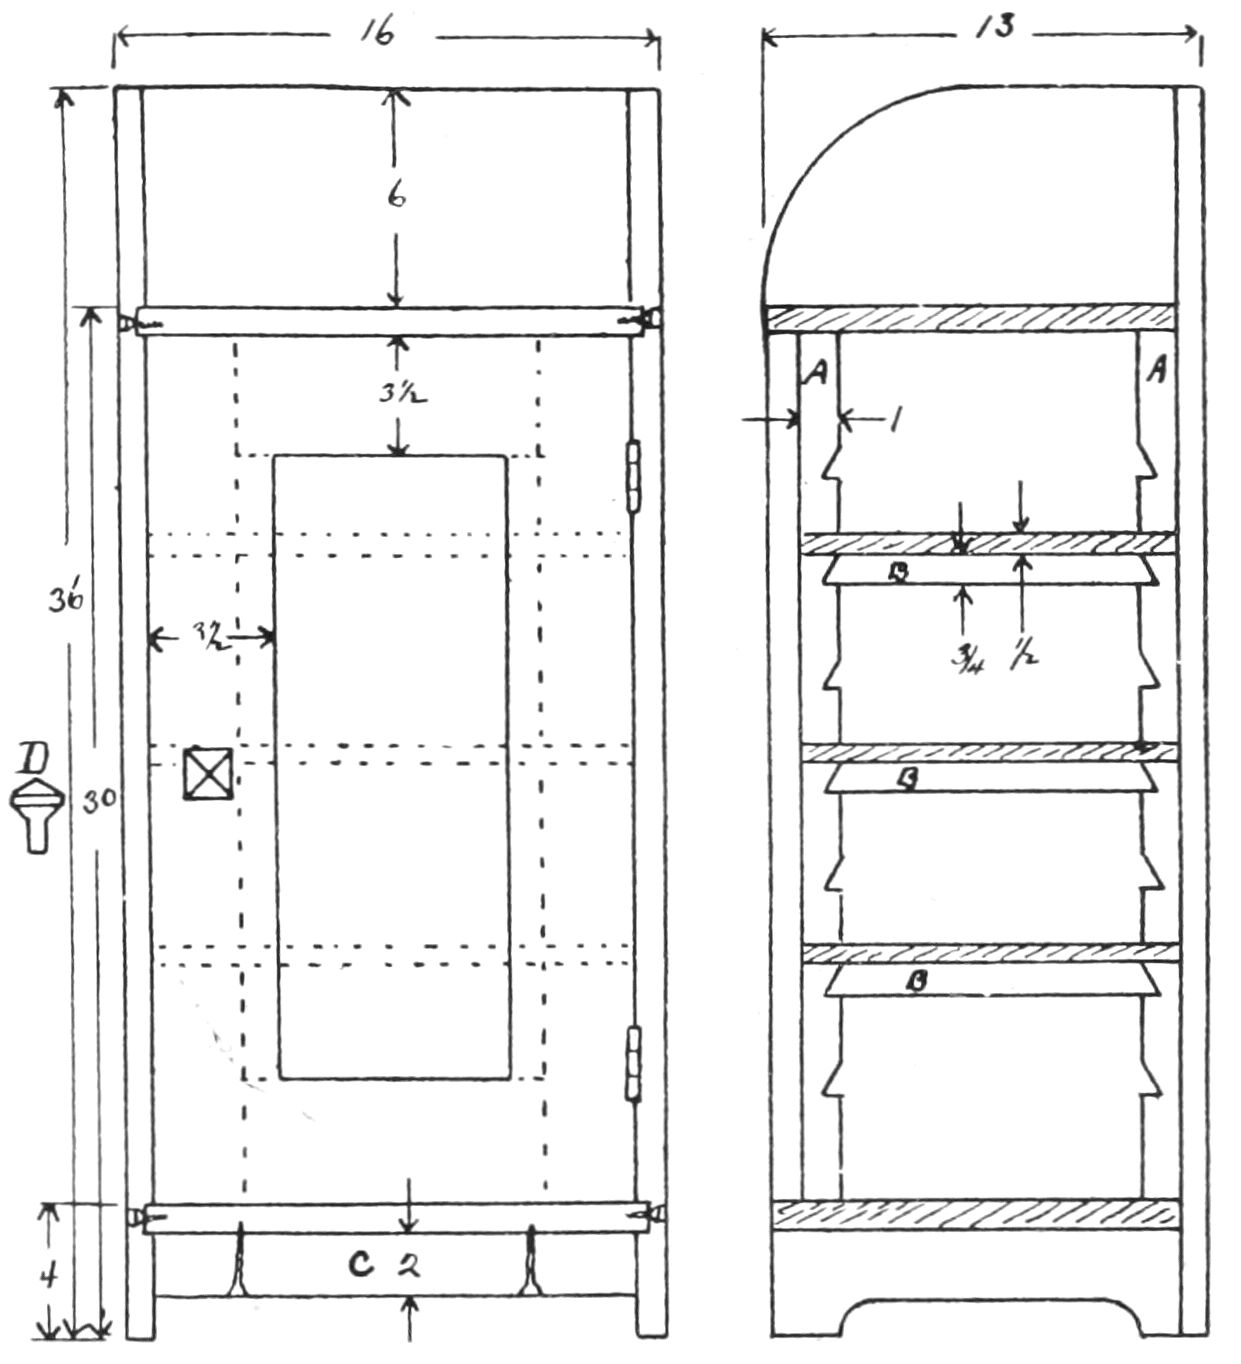
MUSIC CABINET
Music Cabinet: Lumber required 12 ft. 1 in. × 12 in.,
6 ft. 1 in. × 4 in., 2 ft. ½ in. × 9 in., 14 ft. ½ in. × 1 in. and
4 ft. ½ in. × 12 in.
Note that the top and bottom shelves are rabbetted ¼
in. into the sides, and held by screws from the outside covered
by plugs. The door is made with panel ½ in. thick. The
three middle shelves are adjustable, that is, may be set at any
height by cutting notched uprights of the ½ in. × 1 in. material
and screwing them to the sides of the case, as shown in
side view at (a), and cross pieces to fit in these notches and
support the shelves at (b). The shelves are not fastened at
all but the corners cut out to fit round these uprights and rest
on the cross pieces (b). The support under the lower shelf
(c) is simply fitted in and fastened with screws from underneath.
It will look well to set the door in about ⅛ of an inch
from the front edge of the sides and top and bottom shelves.
Piece (c) should also be set in ⅛ of an inch. The back should
be fitted between the sides and fastened with screws covered
by plugs. Any kind of catch may be used, but a square wooden
knob bevelled to a point on the outside and cut to fit a round
hole and fastened with glue in the door, as illustrated at (d),
will appear best. If this knob is used get a friction catch
and set it in the top of the door.
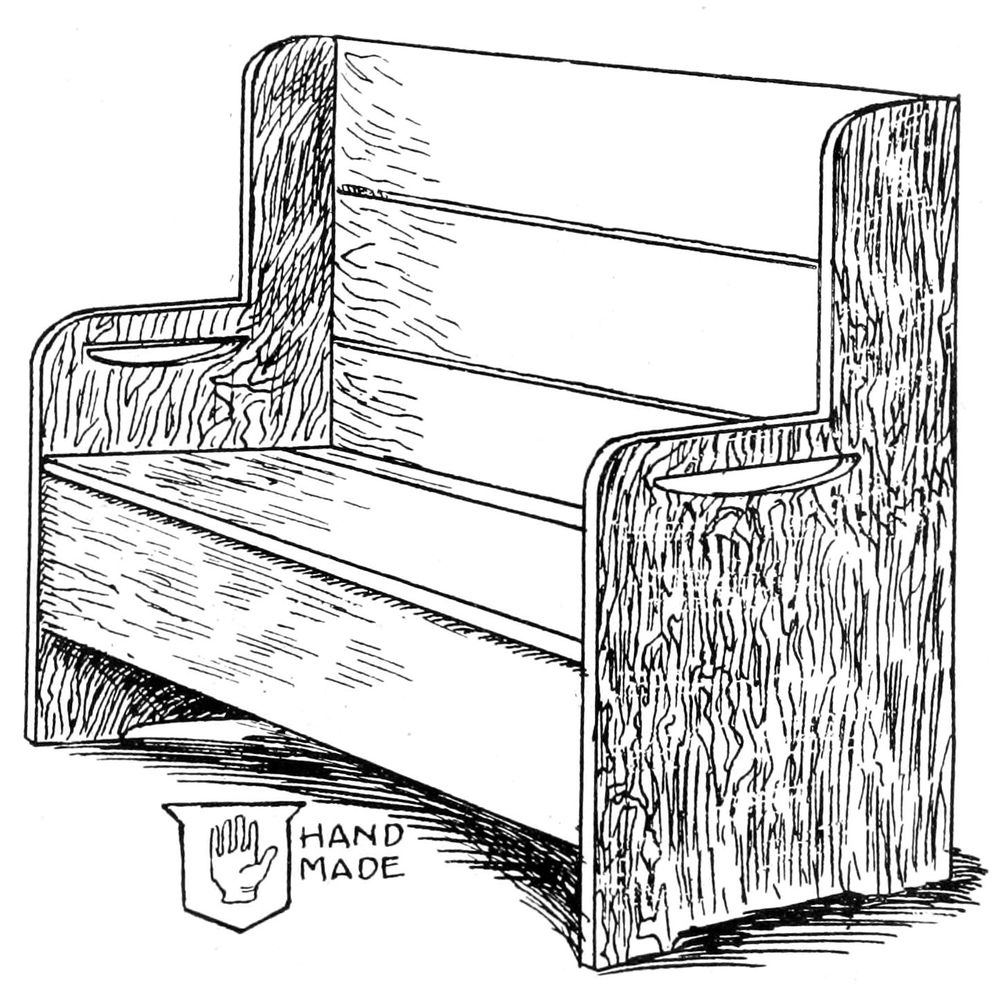
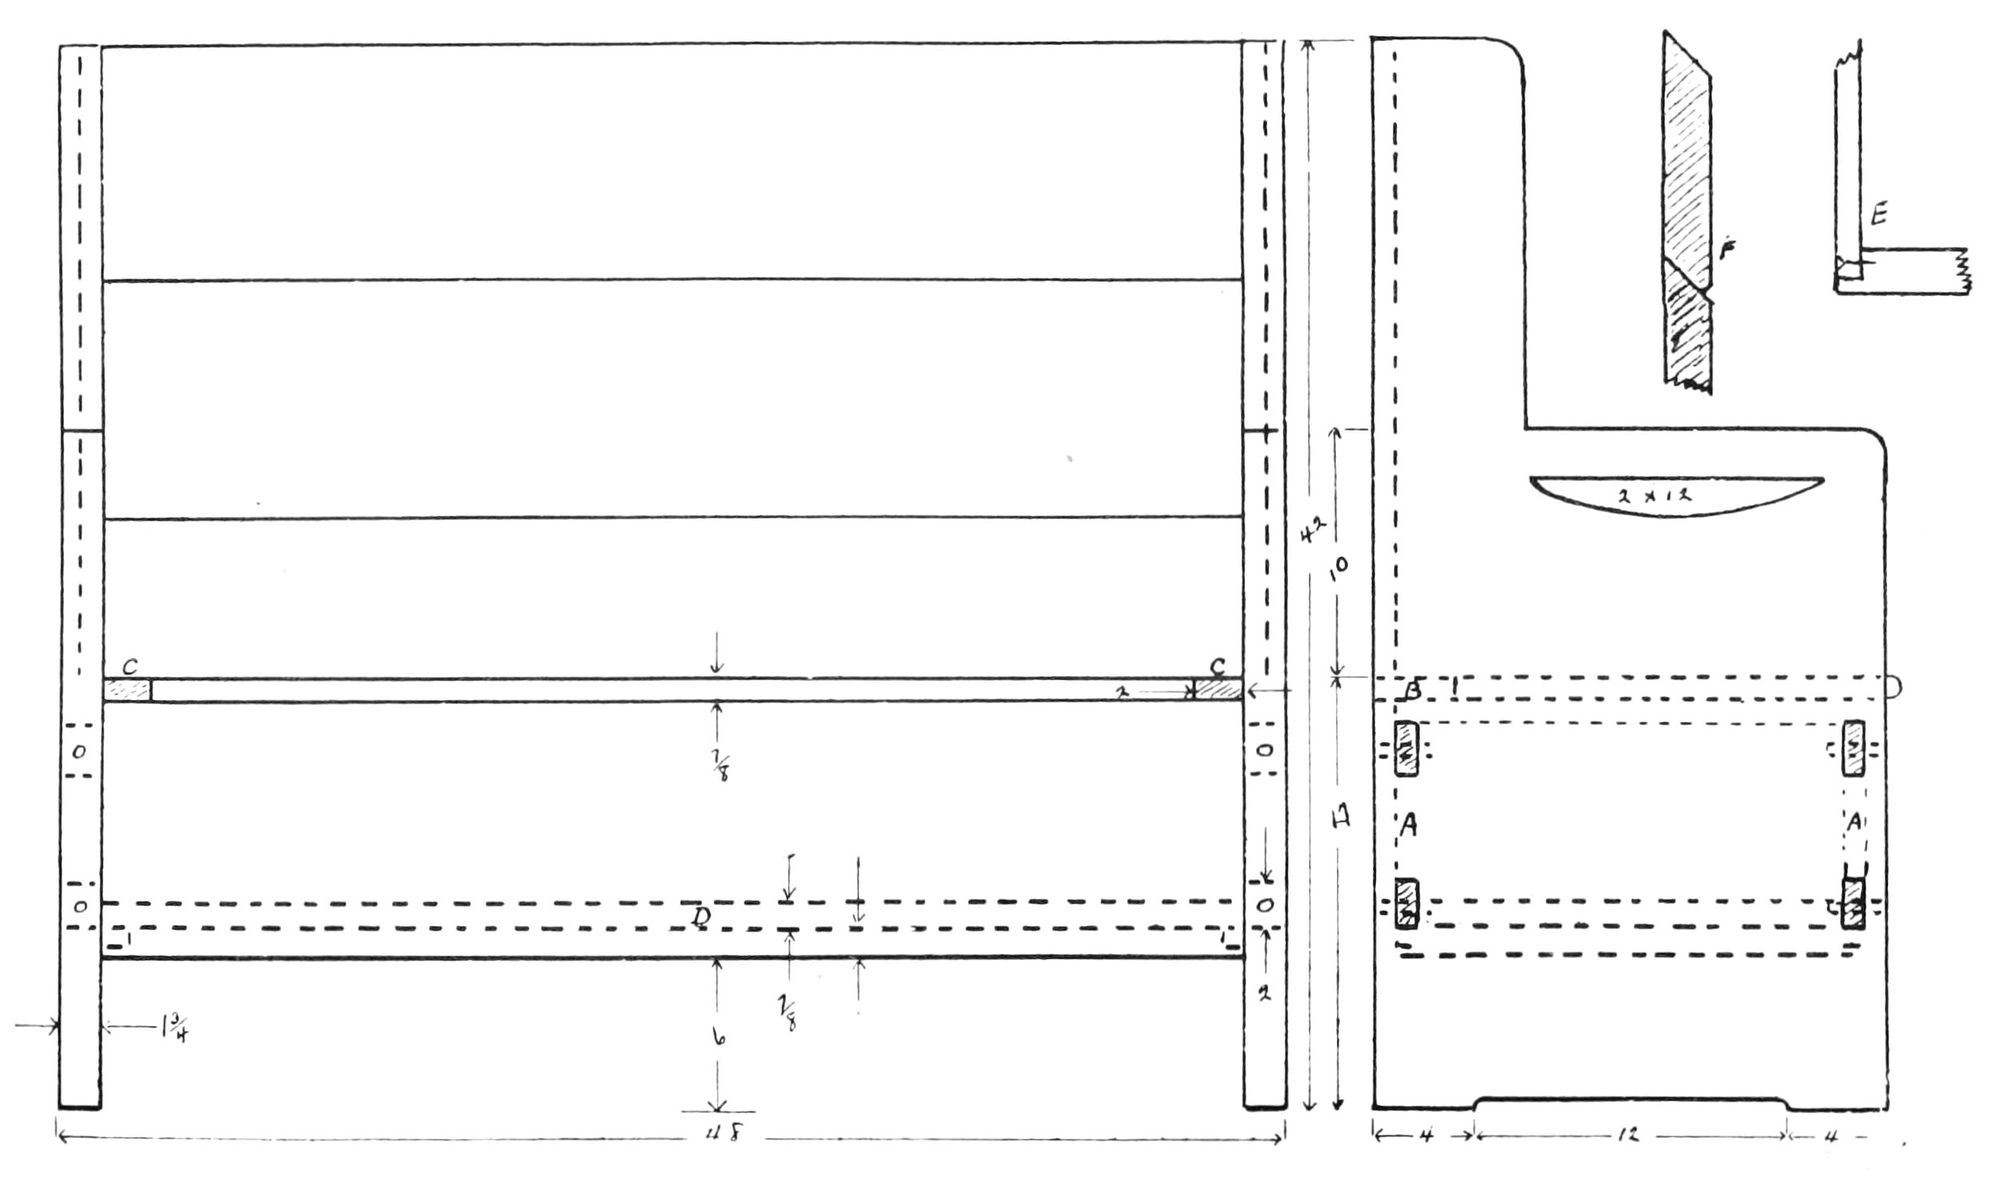
HALL SEAT
Hall Seat: Lumber required 12 ft. 2 in. × 12 in., 36 ft.
1 in. × 12 in. The ends are of the 2 in. × 12 in. material
dowelled and glued. The box under the seat has two tenons
on each end of back and front, which may either come through
flush with the outside of the ends or not quite all the way
through if preferred. These tenons should be about 2 in. wide,
full thickness of board and are fastened with glue and wooden
plugs straight in from the front and back. Note that the box
front and back (a) is set in about an inch from the edge of
the seat. The seat itself is hinged to a 3 in. strip (b) side view
at the back, and has a piece (c) across each end about 2 in.
wide same thickness as the seat and flush with it, instead of
battens underneath, to keep it from splitting. The bottom of
the box (d) fits inside resting on a square strip at each end
which is screwed to the ends of the seat. The back is rabbetted
into the sides and fastened with screws from the back as at
(e). This back is made of three boards, as at (f), and fastened
with screws. Note that the edges of these boards are planed
to an angle of 45 degrees, then the lower edge of each is just
planed off so that when put together there is a little V at the
joint. This makes an easy and good looking joint, as no crack
will be visible, while at the same time it does not require the
care and time necessary in the ordinary joined edges. This
seat will be found very convenient in the hall for rubbers, etc.,
if you have a galvanized pan made to fit in the bottom of
the box.
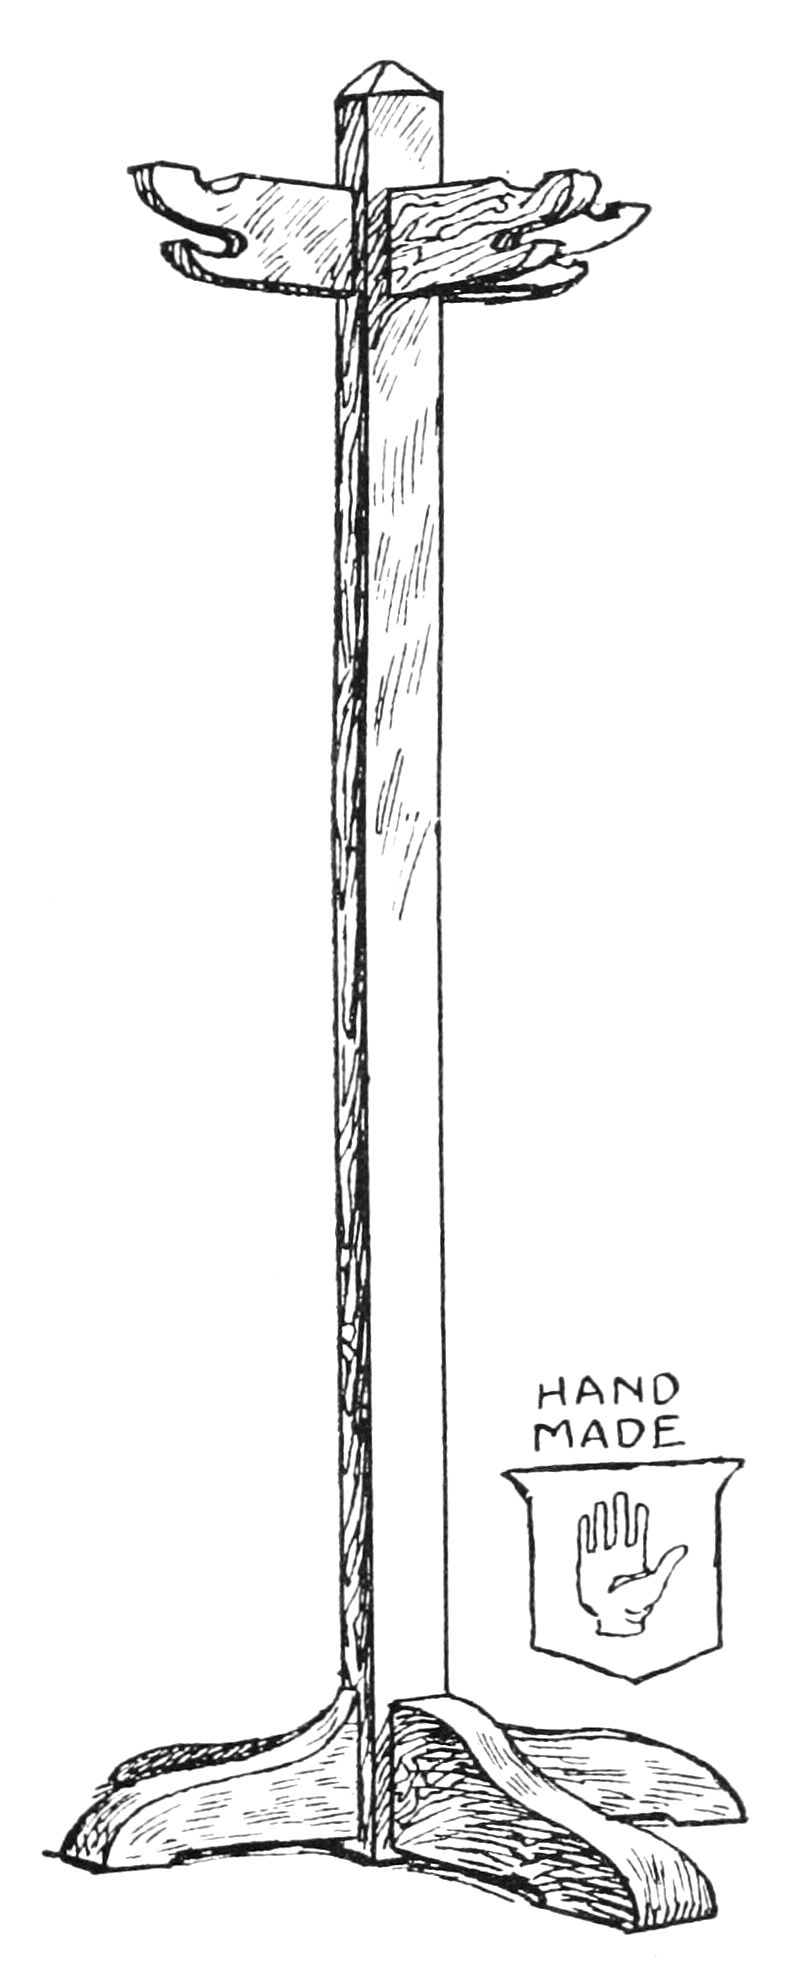
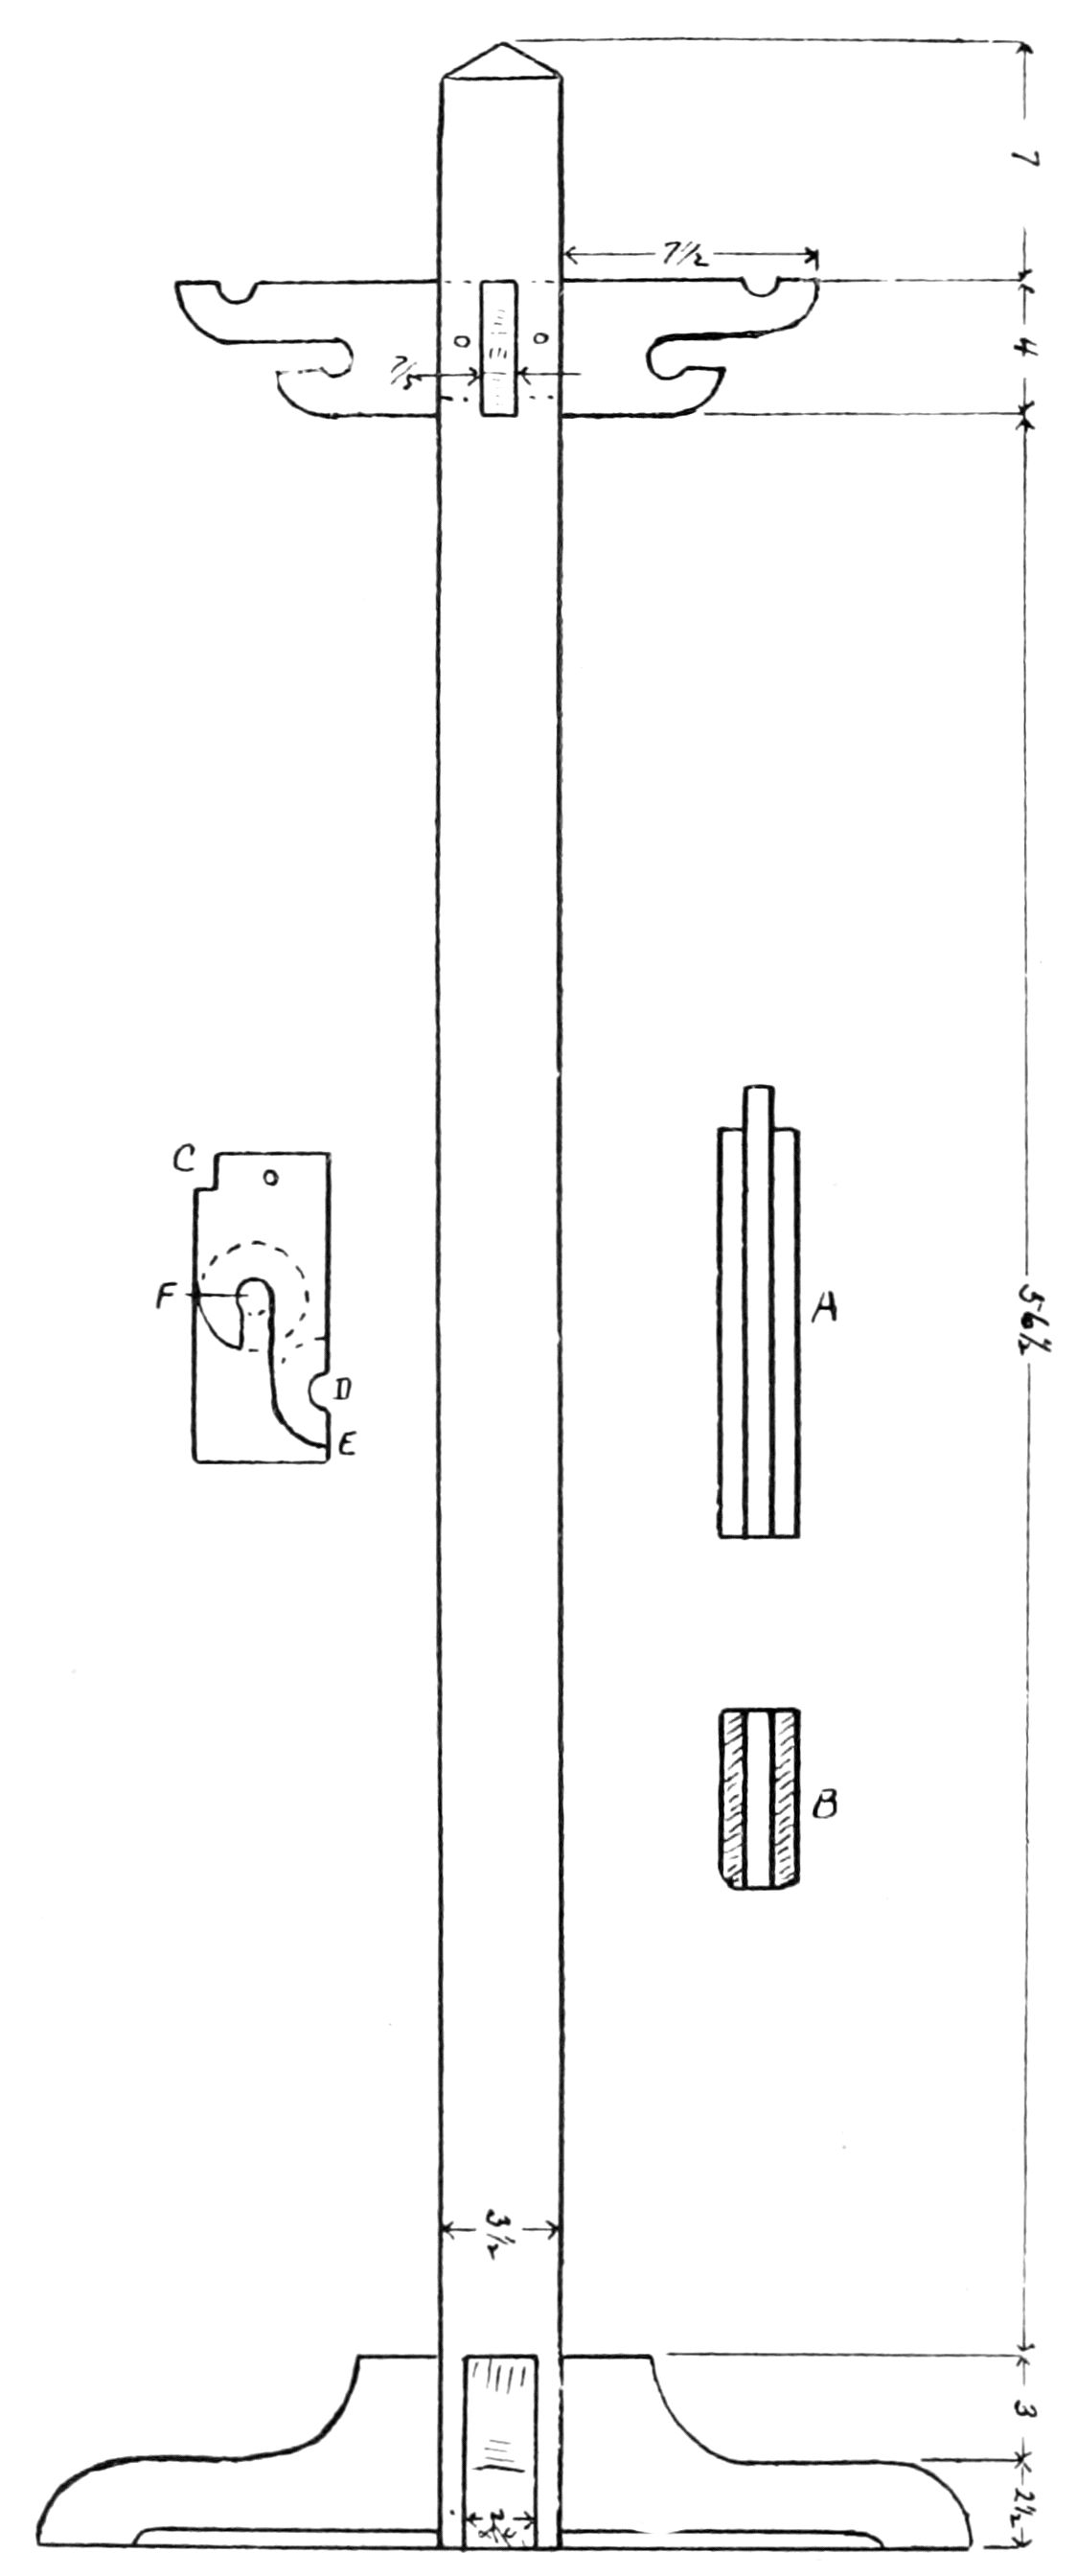
HAT TREE
Hat Tree: Lumber required 16 ft. 1 in. × 6 in., 6 ft. 4 in.
× 4 in. The 4 in. × 4 in. is, of course, for the post which should
be bevelled to a point at the top as shown. The feet are made
by gluing three pieces of the 1 in. × 6 in. together, as shown
at (a), and then sawing to shape with compass saw. It will
save work to allow the middle piece to project about 1½ in.
for a tenon to fit into mortise in the post, as shown at (a). The
arch in the bottom of the feet need not be cut all the way
across but simply take the corner off, as at (b), which shows
the inner end of a foot. This taking the corner off saves work,
gives a firm footing and has all the appearance of being cut
clear across.
To make the coat and hat hooks take a piece of the 1 in.
× 6 in., as at (c), cut a jog about 1 in. deep in the lower inner
corner for a shoulder, measure 6 in. from the inner end along
the top edge to (d). Using this as a center, with your compass
mark the half circle (e), which should be 3 in. in diameter;
4 in. from the inner end of the piece and 3 in. below the top
edge take another point (f) and describe a circle 3 in. in
diameter as before. Next bore a 1 in. hole at (d) as near the
edge of the board as the bit will work and a 1 in. hole at (f).
With the compass saw saw round the outer circle at (e) until
you come straight under (d), then saw straight to the top side
of the hole (f). From the hole (f) slightly above its lower
side, so as to leave a little hook, saw straight to the outer circle
and then follow this outer circle until directly under point
(f), then straight into the shoulder as illustrated. Fit these
four pieces into mortises in post, fasten with glue and pin as
illustrated.
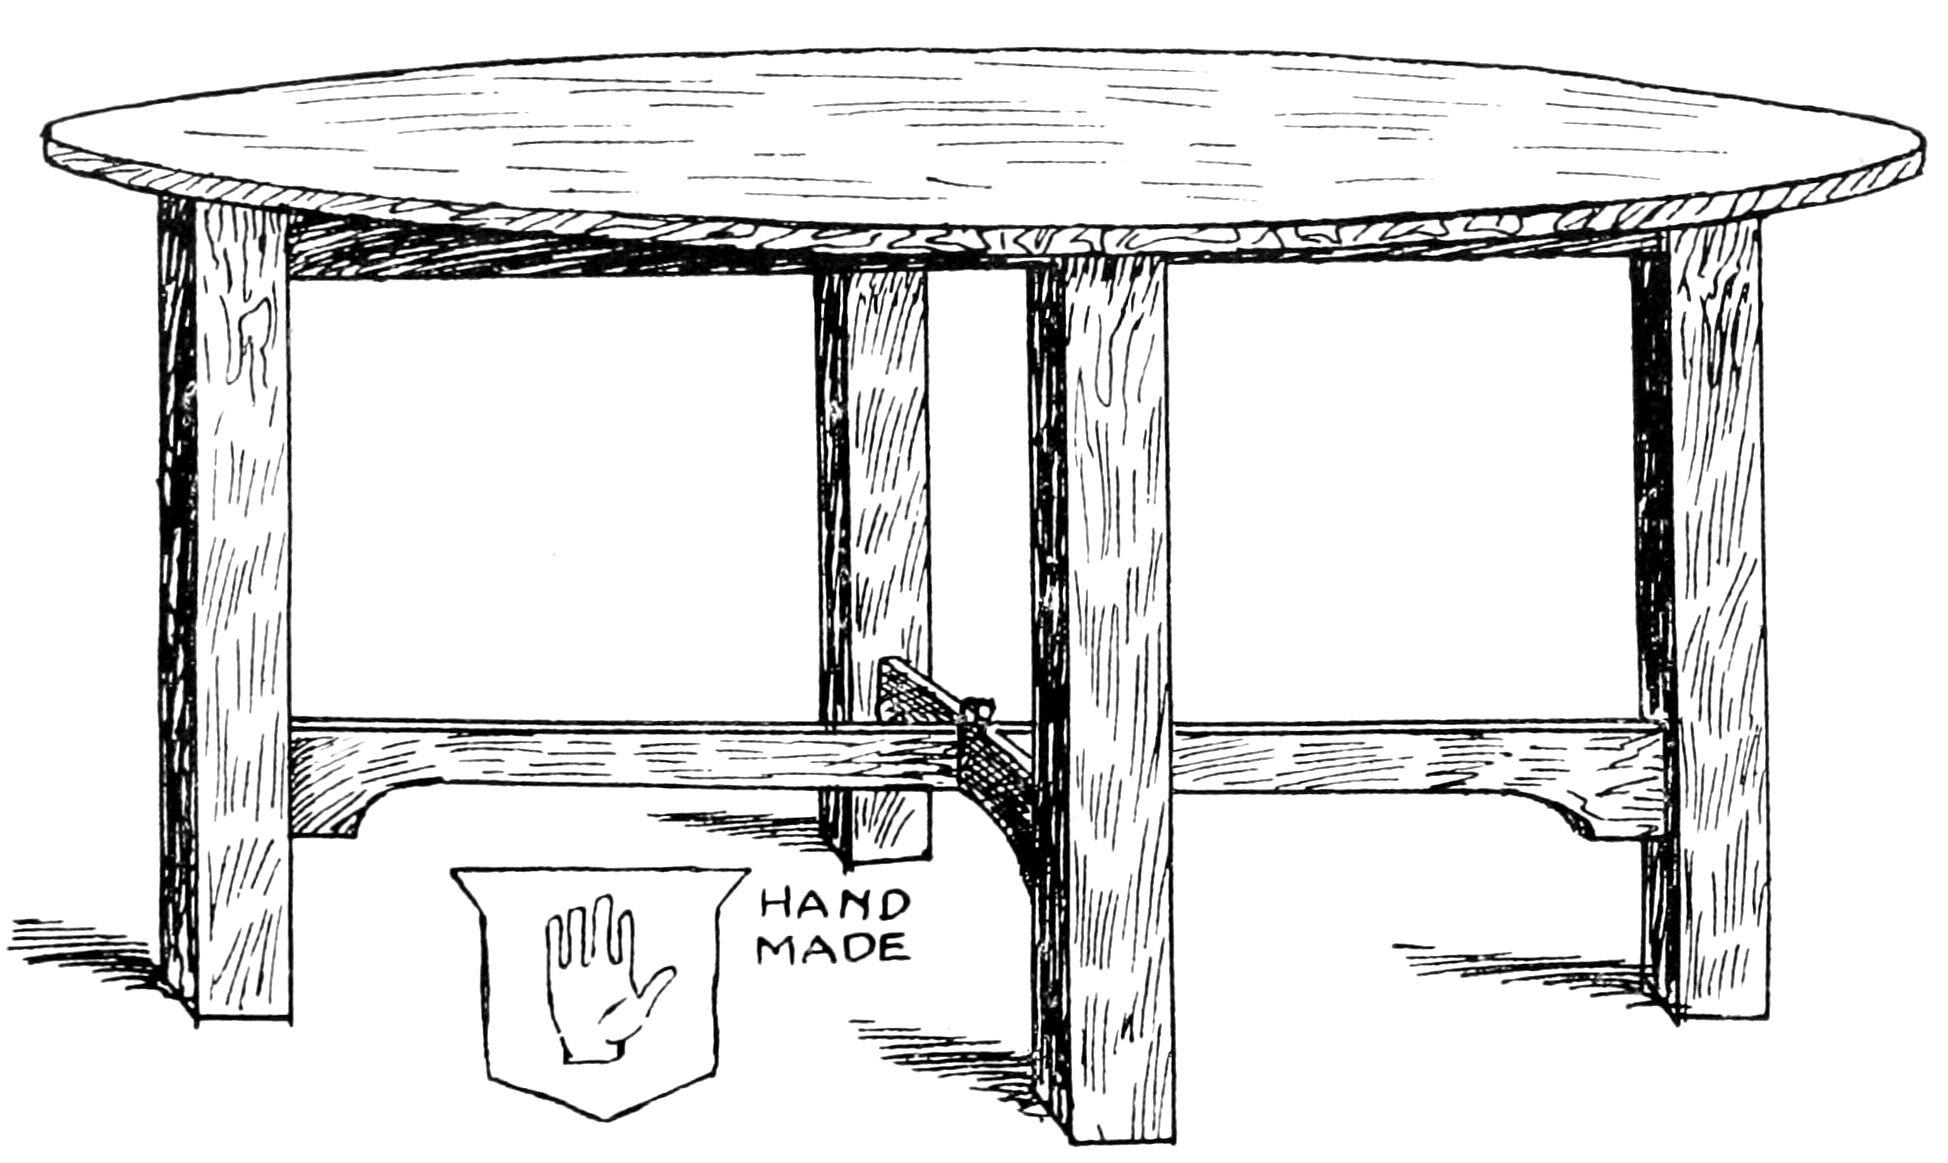
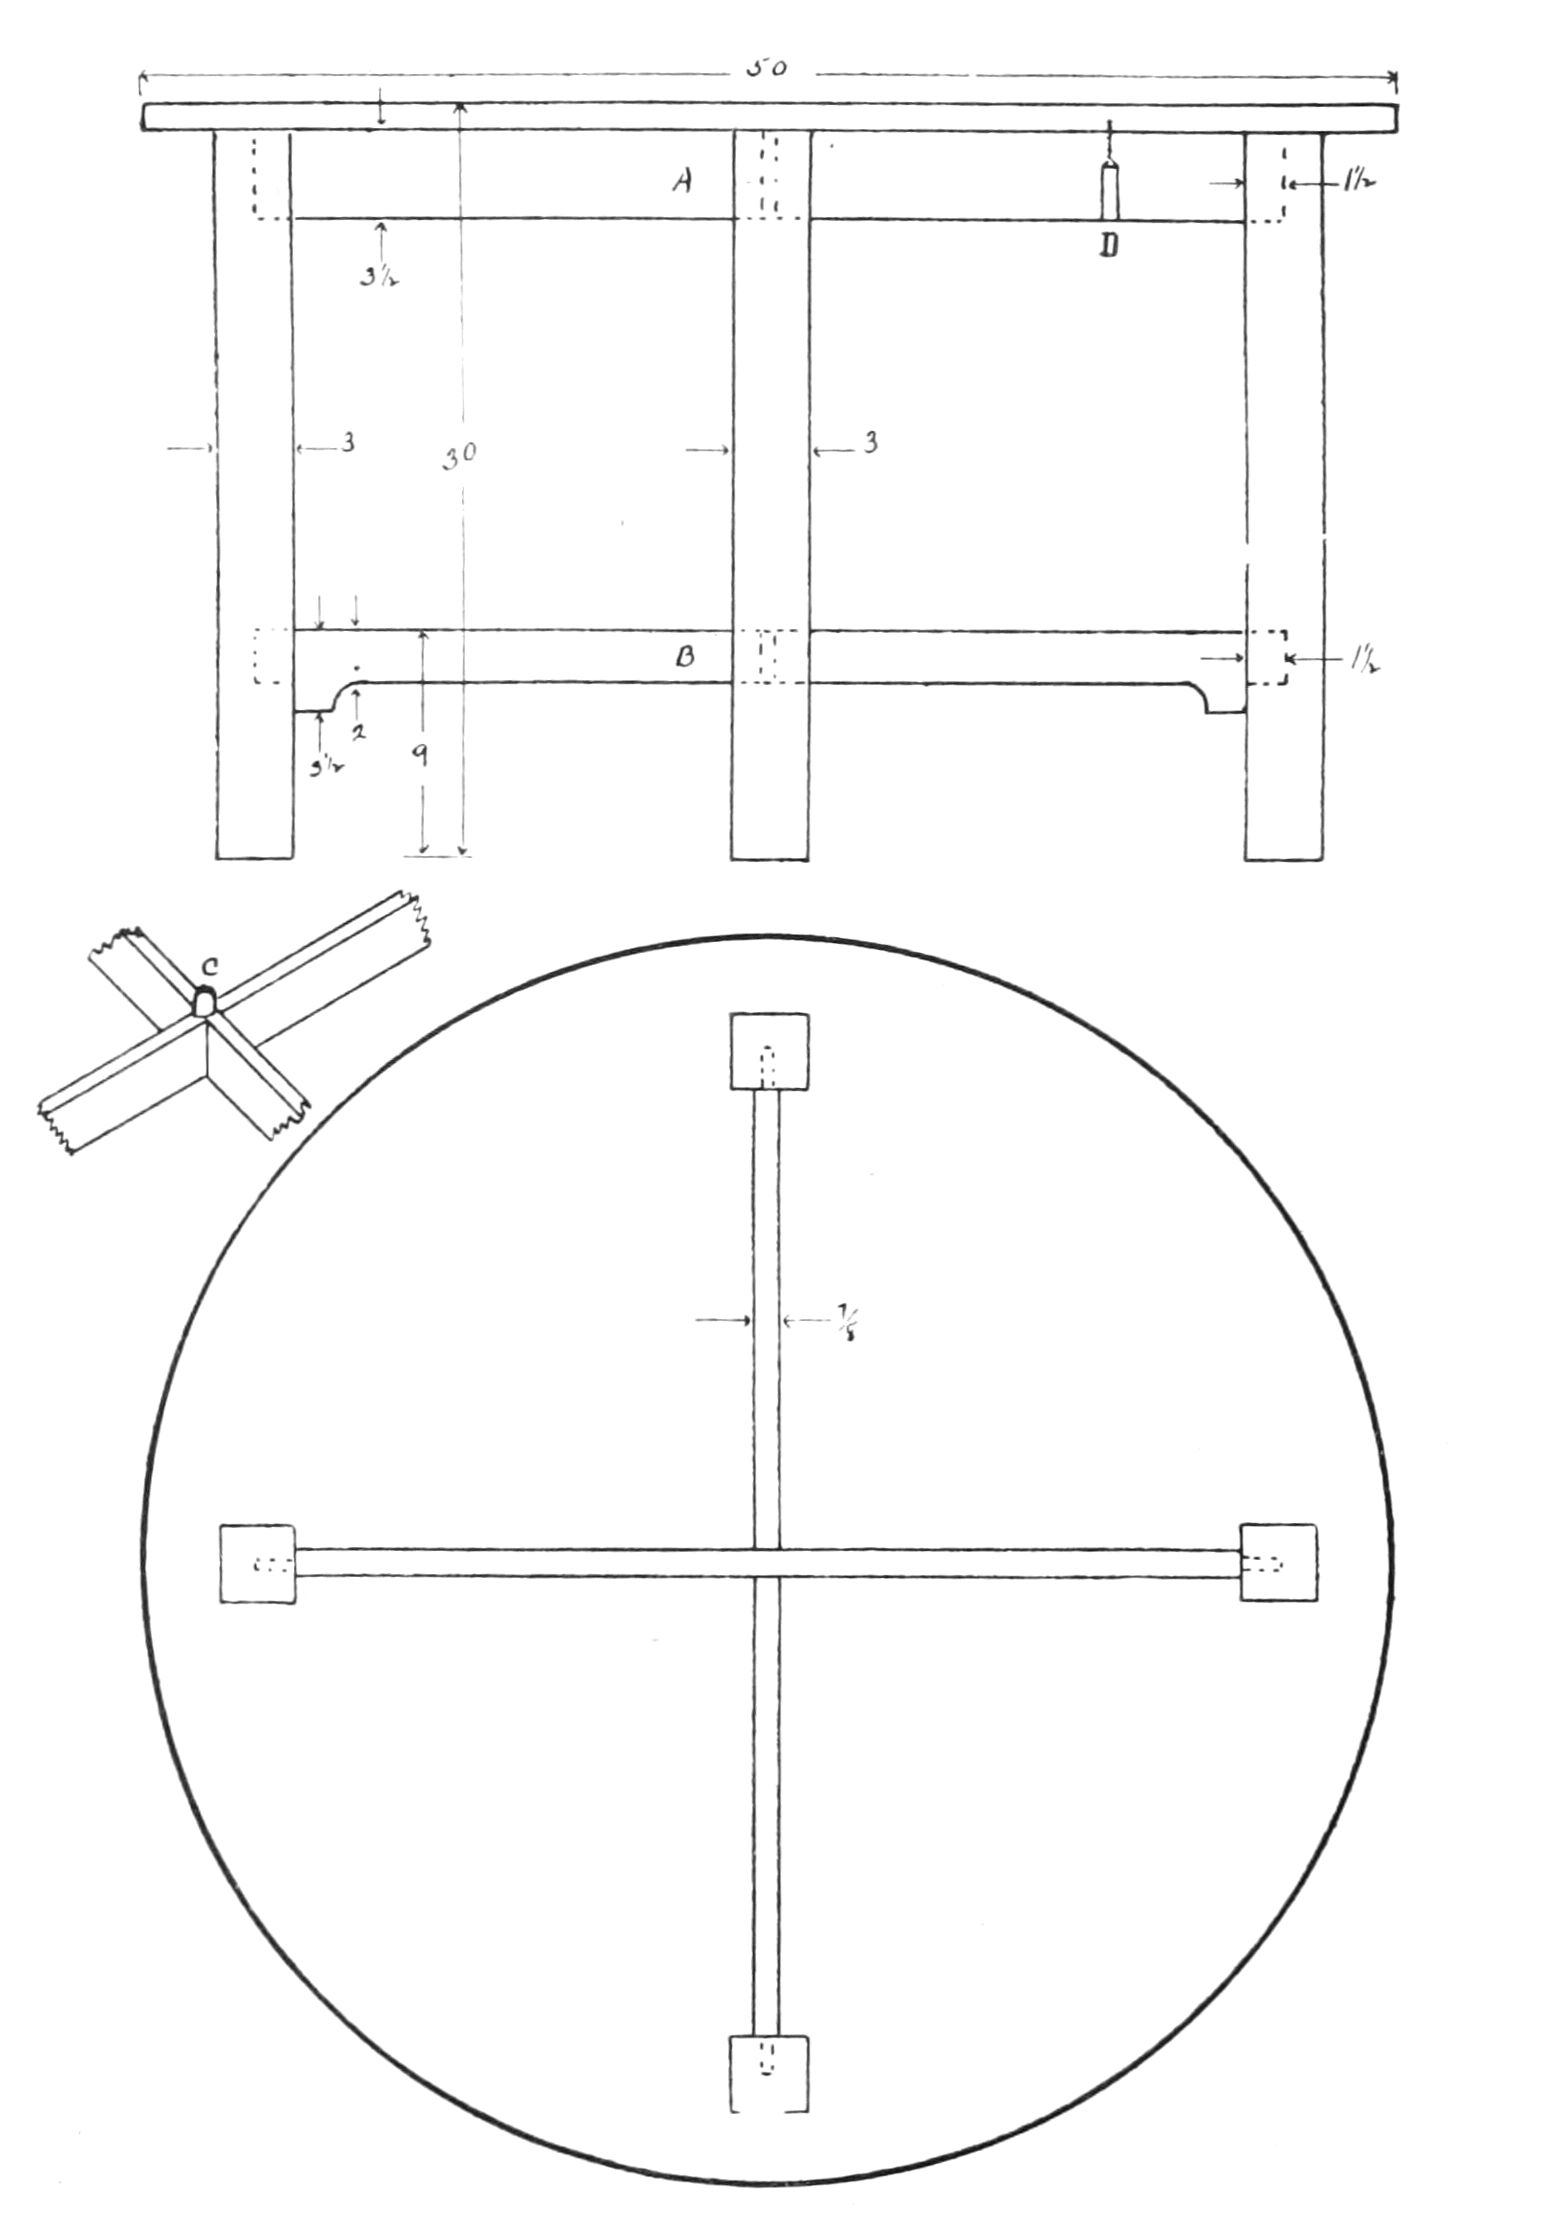
DINING TABLE
Dining Table: Lumber required 10 ft. 3 in. × 3 in., 16
ft. 1 in. × 4 in. and 18 ft. 1 in. × 12 in. For the top join four
pieces of the 1 in. × 12 in. 4½ ft. long with dowels and glue.
Allow it to stand at least twelve hours, then cut circle and
dress off the top with plane. The stretchers (a) are halved
together where they cross in the center of the table and mortised
into the legs as shown. Stretchers (b) are also halved
together at center and shaped and mortised as shown. It adds
to the appearance if you put a pin in the top of these stretchers
where they cross as shown at (c). This pin may be either
square or round. The top is fastened with screws from underneath
through the stretchers (a). These screws need not, of
course, be long enough to reach entirely through the stretcher,
but the heads may be sunk about 2 in., as shown at (d).
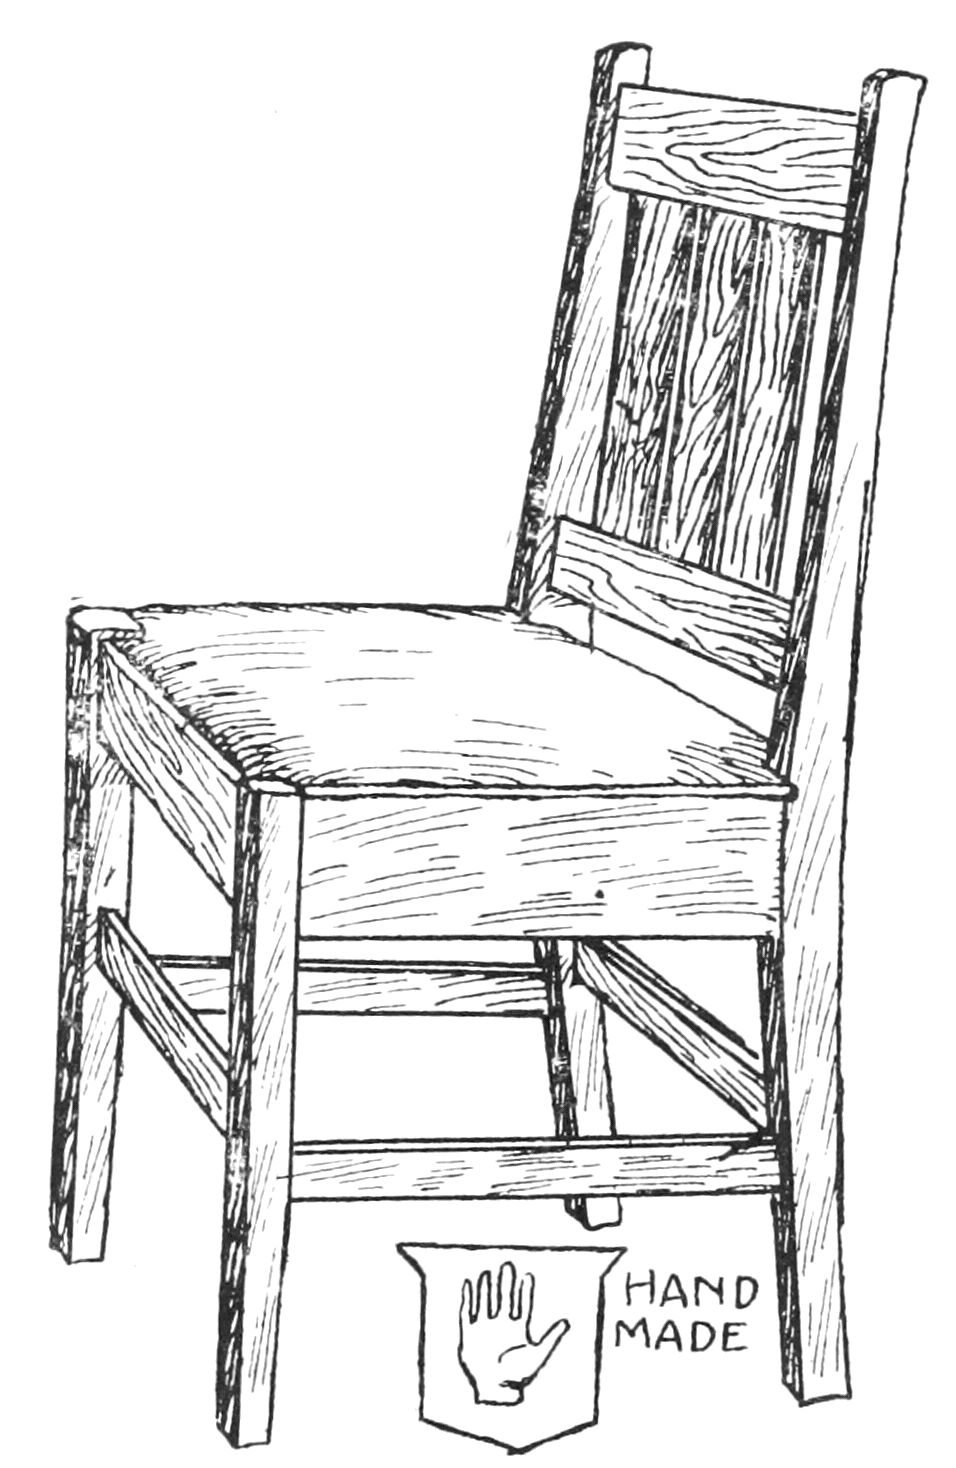
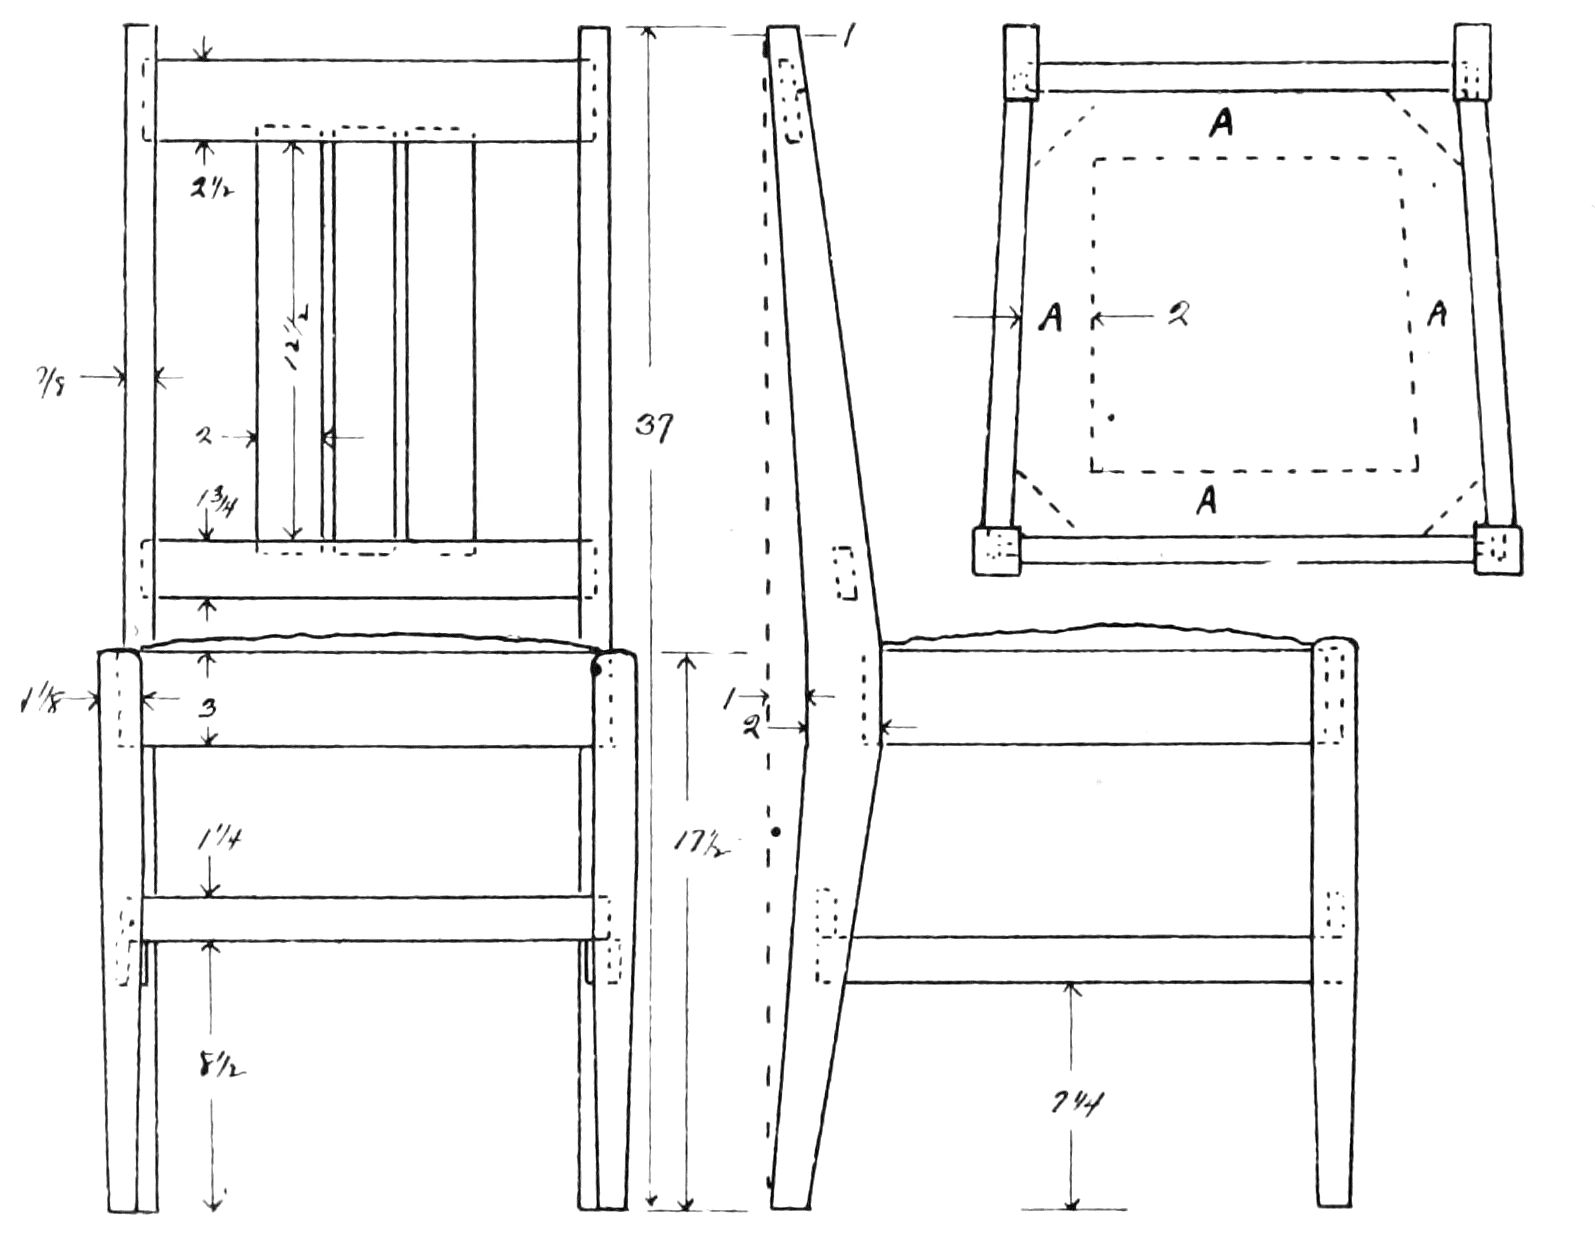
SIDE CHAIR
Chair: Lumber required 12 ft. 1 in. × 4 in., 12 ft. 1 in.
× 2 in., 4 ft. ½ in. × 2 in., 3 ft. 1½ in. × 1½ in.
First get out the back posts from a piece of 1 in. × 4 in.
to dimensions given. Cut the mortises for the back slats, seat
frame and spreaders at positions indicated in sketch. The
upper rail in the back should be about ¾ of an inch below
the top of the side posts and by following the dimensions given
in drawing you will get the position of the lower rail. The
three upright slats in the back should be mortised into the
top and bottom rail, as indicated by dotted line, but may be
mortised full thickness and so save cutting a tenon, though
if you do cut a tenon it perhaps saves more time, as you do not
have to be so careful in cutting your mortise, which is covered
by the shoulder of the tenon. When you have got out the back
posts, next make the front posts, cutting your mortises exactly
the same height from the floor as those in the back posts. Then
get out the side rails and put these pieces together. The
tenons on the side rail should be as long as possible without
going quite through the leg, as they take all the strain when
the chair is tipped back. Having glued the two sides of the
chair together next get out the top and bottom rail of the
back and fit and glue the three slats into them. Then get
out the other rails of the back and front and glue them in one
side of the chair. Then put on the other side of the chair and
the frame is complete. The seat is what is known as a slip
seat and is made and upholstered separately, then slipped into
the frame of the chair. The inner frame for this seat is shown
at (a) by dotted lines. It is made of the 1 in. × 2 in. stuff
firmly mortised and glued at the corners and rests on four
brackets at the corners of the frame, as shown by dotted lines.
It should be a full ⅛th of an inch smaller all around than
the frame in order to allow it to slip into the frame after the
leather seat has been tacked on. This leather seat is made by
tacking strips of strong webbing or canvas about 3½ in. wide
over the top of this inner frame. Interlace these strips like
basket work, leaving little or no space between them and
stretch tightly over the frame. With soft cotton, hair or other
padding laid evenly over the whole surface, being careful to
leave no hollows and making the center a little thicker than
the edges, build up your seat as thick as you want it. Then
stretch the leather or other covering tightly over both padding
and frame and tack it firmly on the under side of the frame.
To cover the webbing and ends of the leather, tack a piece of
black cloth over the whole bottom, then slip the seat into the
frame. Some workmen put a pin through the leg and tenon
where the rails are mortised into the legs. This adds strength,
but we think is hardly necessary if your tenons fit properly
and are strongly glued.
MORRIS CHAIR
Morris Chair: Lumber required 8 ft. 2 in. × 2 in., 14 ft.
1 in. × 6 in., 14 ft. 1 in. × 2 in., 5 ft. ½ in. × 10 in.
First get out the posts. Cut the mortises, as indicated, for
the seat frame. Put the sides together, fastening the arm on
top of the posts by a screw down through the arm into the top
of each post. This screw, of course, is to be covered by a plug,
or if you desire mortise the top of the post through the arm
making a square tenon mitred to a point on top of the arm.
Next put in the front and back rail. Screw a strip (a) side
view on the inside of the side rails and slats (b-b-b) resting
on these strips to hold the seat cushion. The back is made
separately and hinged on to the top of the back rail of the
frame. It rests against a bar which fits into notches in the
arms, as shown at (c), the bar itself being shown at (d). Note
that the arms project about 1 in. inside of the posts and therefore
are rounded out to the post at the back, where the back
of the chair comes up between them. We would suggest your
having the cushions made at an upholsterer’s, as it is difficult
to make good cushions yourself. In imitation leather these
will cost about $10.00 and in genuine Spanish leather about
$20.00.
LIBRARY TABLE
Library Table: Lumber required 26 ft. 1¼ in. × 12 in.,
10 ft. 1¼ in. × 8 in., 20 ft. about 1 in. or 1¼ in., square.
First select three pieces 5 ft. long of the best of the 1¼
in. × 12 in. for the top. Join these with dowels and glue. When
dry fasten four strips on the under side with glue and screws,
as shown at (a) in side view and bottom view. These strips
should be set back about ½ in. from the edge of the top and
mitred at the corners. They strengthen the top and give it a
massive appearance. Next get out the ends. The pieces (b)
and (c) are exactly the same. To mark the curve place one
point of your compass at the corner formed by the dotted lines
at (d) and with the other point mark the curve, the points
being 3¼ in. apart. The upright pieces (e-e) are mortised
into the top and bottom pieces and are made as shown at (f).
The shelf should be made before the table is put together, the
position for the tenons being marked by placing the end of
it against the mortises in the uprights after the end is put
together. The ends are fastened to the top by means of a
square strip which is screwed to the top and then the ends
screwed to the strip, as shown at (g) side view and bottom
view. The tenons in the ends of the shelf should be about 1⅛
in. wide and full thickness of the shelf, which will make them
square. The pins for these tenons are shown at (h) and should
be about ½ in. thick.
Special Designs
Use the following blank pages for pencil sketches and clippings.
We will furnish working plans, with full instructions for
any piece of furniture you may desire at 50c. each. Just send
us a rough sketch or a picture, giving your idea.
The Farm & Orchard
Publishing Co.
Spokane,
Washington.
TRANSCRIBER’S NOTE
Illustrations in this eBook have been positioned between paragraphs
and outside quotations.
Illustrations without captions have had a description added, this is denoted
with parentheses.