Materials.—The beginner should continue wiping the
vertical round joint until he is able to obtain a symmetrical
bulb. A joint should be
wiped in each of the foregoing
positions for exhibition
purposes, so that the
beginner can have before
him the best work and
strive to make the next
joint better. This next
joint, the 2-inch brass ferrule,
is wiped in an upright
position. The materials
necessary are the 2-inch
brass ferrule, 6 inches of
2-inch light lead pipe, paste
and paper, 1⁄2 and 1⁄2
solder, rosin, wiping solder,
catch pan, and supports.
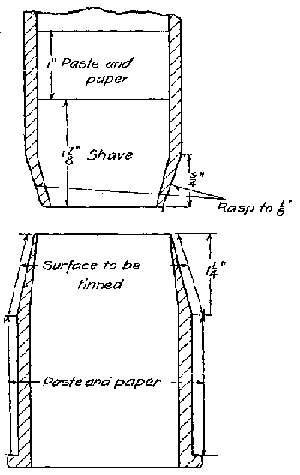 Fig. 24.
Tools Required.—The
tools necessary for this
work are as follows: the
saw, rasp, drift plug,
dresser, file, soldering iron, bending irons, wiping cloths,
shave hook, and ladle.
Preparation.—The lead pipe must be fitted into the brass
ferrule. The brass ferrule has to be tinned first. To do
this, proceed as follows: file the ferrule for about 2 inches
on the tapered end. Do not file too deep, but just enough
to expose the pure bright metal. Now measure from the
small end 11⁄4 inches down toward the beaded end. From
this point to the bead, cover the brass with paste and paper.
No paste must get on the 11⁄4-in. filed end. This end should
not be touched with the fingers. If paste gets on it, the
process of filing must be done over again as the solder will
not stick where there is paste. If the brass ferrule is filed
while the paper is on the brass, the filing will destroy the
straight edge of the paper and an even joint cannot be made.
It would therefore be necessary to re-paper the brass. Take
some powdered rosin and cover the filed end of the ferrule
with molten solder using the rosin as a flux. Do not dip
the end of the ferrule into the hot wiping solder to tin it or
pour wiping solder on the brass ferrule. This method of
tinning the ferrule will spoil the wiping solder. Always use
the soldering iron to tin the ferrule as explained above.
A little practice will develop the use of the iron in the hands
of the beginner so that this tinning process will be done very
rapidly. The iron should be put on to heat when the paper
is being pasted on the brass; the iron will then be ready
for use when needed.
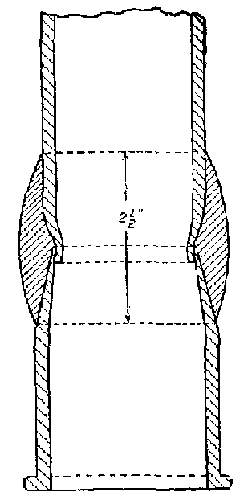 Fig. 25.—Two-inch brass ferrule.
Preparing the Lead.—The ends of the lead pipe must be
squared with the rasp. All kinks and dents are taken out
by using the drift plug and driving it through the pipe.
Take a piece of smooth pine stick and start to beat in the
end of the lead pipe to fit the brass ferrule. The pipe
should be beaten in starting about 3⁄4 inches from the end.
It should be beaten in very slowly until it fits the ferrule.
The pipe is held in the hand all the time and considerable
time should be spent on this as it is the first time the beating
in of lead pipe has been called for. The knack of doing this
comes only by slow and continued practice. The lead must
be "humored" into shape and not "driven" into shape.
The end of the pipe is tapered still more by rasping off
the end. About 3⁄4 inch should extend into the brass
ferrule. With the bending irons, the lead extending into
the brass ferrule is beaten against the inside wall of the
ferrule. A good way to do this is to wedge the lead pipe
in as much as possible at first, then lay the work flat on the
bench, in which position it is more easily worked. The
sketch should be thoroughly studied and each notation
be perfectly understood, before proceeding with the work.
Now that the lead pipe is perfectly fitted into place, it is
prepared for wiping. The joint overall will be 21⁄2 inches.
As we have already allowed 11⁄4 inches on the brass ferrule
for the joint, the lead will have to be cleaned that much
more. With the shave hook, shave the end of the pipe that
has been fitted into the brass ferrule. A space about 4
inches should be cleaned. This will give a cleaned surface
free from dirt and grease for the paste and paper to adhere
to. Next paste the paper in place. The lead pipe can be
entirely covered, or 3 or 4 inches only, above the 11⁄4 inches
allowed for the joint. The space between the paper on
the brass and the paper on the lead should now be 21⁄2 inches.
The paste and paper should now be allowed to dry.
Supporting the Pipe.—This joint is wiped with the
ferrule down on the bench. A flat pan is laid on the bench
and the ferrule stood upon it. A weight on top of the lead
pipe is all that is necessary. If this does not make the
pipe rigid enough for the beginner, then a support similar
to the round vertical joint support can be used. The
beginner is advised, however, to practice the wiping of this
joint with only the weight to hold it in position. The
beginner will then be required to wipe the joint while the
solder is hot, when it does not require a heavy pressure
against the solder to wipe it in shape. These wiped
joints should be supported in place near the furnace
that heats the solder so that the solder will be handy for
wiping.
Wiping.—Wiping this joint brings in some of the methods
of the round vertical joint. If that joint was thoroughly
mastered, this joint will be wiped considerably more easily.
The ladle is held in the right hand
and the solder splashed on the
joint. The catch cloth is held in
the left hand and some of the
solder is caught and brought up on
the top edge. The top edge cools
quickly as all the hot solder runs
down to the bottom edge and into
the pan. As the solder accumulates
on the bottom edge, it is
drawn up on the top edge, and in
this manner the top edge is kept
hot. When the solder can be
worked freely around the pipe and
the edges are hot, the joint is ready
to wipe. The ladle is laid down
and the wiping cloth is taken in
the right hand and the top edge
of the joint cleaned on one side.
Then the wiping cloth is changed
to the left hand and the other side
of the top edge is cleaned. Holding
the cloth in one hand with the index and the third fingers
spread to the outside corners of the cloth, the cloth is
passed around the joint quickly. To get an even and symmetrical
joint, it is necessary to make two or three passes
around the joint holding the cloth first in the right and
then in the left hand. The free hand is used to steady
the work. This joint should be wiped very slim to allow
room for the caulking irons to pass by it and get into the
hub of the pipe. Constant wiping on the brass ferrule will
result in the tinning on the brass ferrule coming off. The
ferrule will look black when this happens and will thus be
recognized. The wiping should then be stopped and the
ferrule filed and tinned in the same manner as it was done
at first.
Points to Remember.—
- First, material—6 inches of 2-inch light lead pipe and one
2-inch brass ferrule.
- Second, tin ferrule, using soldering iron.
- Third, use a soft pine stick for a dresser.
- Fourth, fit the lead into the ferrule.
- Fifth, clean and paper the lead.
- Sixth, secure the pipe into position.
- Seventh, using the catch cloth and ladle, splash solder on
the joint.
- Eighth, keep the top edge covered with solder.
- Ninth, wipe the top edge first.
- Tenth, shape and finish wiping with a few strokes.
- Eleventh, tools used.
- Twelfth, wipe a slim joint.
- Thirteenth, steady the work with the free hand.
- Fourteenth, re-tin the ferrule, if necessary.
The 4-inch brass ferrule joint is the same as the 2-inch,
except for size. The materials needed for this joint are 6
inches of 4-inch, 8-pound lead pipe, and one 4-inch brass
ferrule, one full pot of solder, some paste and paper, rosin,
and 1⁄2 and 1⁄2 solder.
Tools Necessary.—The tools required for this joint are
as follows: saw, rasp, file, ladle, soldering iron, dresser,
bending irons, shave hook, and wiping cloths.
Preparation.—Lead Pipe.—With the saw cut off 6 inches
of 4-inch lead pipe. This pipe comes in lengths and should
be for this work about 8 pounds to the foot in weight. The
pipe may be dented badly, but these dents can be taken out
as follows: Take a piece of 2-inch iron pipe and put it in
a vise. The lead pipe can be slipped over this iron pipe
and any dents taken out easily by beating with the dresser.
One end of the lead pipe is
beaten with the dresser until it
fits into the ferrule. The end
is then rasped a little. Then,
after the brass ferrule has been
tinned, the pipe is fitted into it
and beaten out against the inside
wall of the brass ferrule and a
tight joint is made. The lead
is next cleaned with the shave
hook and paper is pasted on as
explained under the 2-inch brass
ferrule, the description of which
should now be read over.
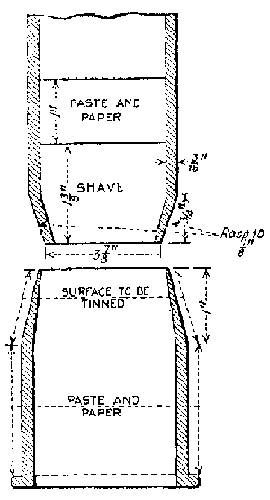 Fig. 26.—Four-inch brass
ferrule.
Fig. 26.—Four-inch brass
ferrule.
Brass Ferrule.—The first thing
to do with the brass ferrule is to
file the end that is to be wiped.
When the brass ferrule is filed,
it should be done away from
any part of the room where the
filings are likely to get into the solder. After the filing
has been done, paper is pasted on all of it except the
part that is to be tinned and no paste must get on
to this part of the ferrule. If any paste does get on
to it, the filing will have to be done over again. When
using paste and paper, neatness must be cultivated, or
paste will be spread over parts of the pipe that are supposed
not to have any paste on them. Next, take the soldering
iron and heat it. Take some rosin and put it on the exposed
part of the ferrule. With the hot soldering iron
proceed to tin the brass ferrule, as explained before, with
1⁄2 and 1⁄2 solder, using rosin as a flux. Now the lead pipe
that has previously been prepared is fitted into the ferrule.
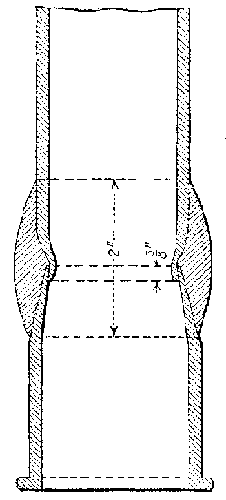 Fig. 27.—Four-inch
brass ferrule.
Fig. 27.—Four-inch
brass ferrule.
Supporting.—Set the brass ferrule on a catch pan. The
lead pipe is upright. A weight placed on top of the lead
pipe will steady the pipe for wiping.
When the joint is wiped the free hand
can hold the pipe if the weight is not
sufficient to support it.
Wiping.—Splash the solder on the
joint from the ladle, in the same
manner as was employed in the two
preceding joints. To get the proper
heat on the 4-inch joint a little more
speed is necessary, also the constant
working of the solder around the pipe.
The ladle is constantly moved around
the pipe so that all parts of the pipe
will be evenly heated and come into
contact with the hot solder direct
from the ladle. When the solder
works freely around the pipe and the
top edge is hot, the joint is shaped by
holding the wiping cloth in the right
hand, with the index and the middle
fingers spread to the opposite corners
of the cloth. The fingers are placed one on the top edge
and one on the bottom edge. The cloth is then passed
around the joint as far as possible. Then the cloth is taken
in the left hand, with the fingers spread, and passed around
the rest of the joint. If the solder does not take the shape
of the cloth readily, then the solder is not at the right
heat. This joint should be wiped very slim to allow room
for the caulking tools. When this joint is once started,
it should not be left until it has been wiped, otherwise a
large amount of solder will accumulate on the joint and
will be hard to get off.
Points to Remember.—
- First, material.
- Second, tools.
- Third, tin ferrule.
- Fourth, use the dresser to fit the lead into the ferrule.
- Fifth, clean the lead with the shave hook, and paper.
- Sixth, use the catch cloth and ladle.
- Seventh, keep the top edge covered with hot solder.
- Eighth, wipe the top edge first.
- Ninth, make a slim joint.
- Tenth, steady the work with the free hand.
Materials Required.—The materials used for this joint
are as follows: two pieces of 5⁄8-inch extra strong lead pipe
9 inches long, each; one 1⁄2-inch plug stop cock for lead
pipe; paste and paper; solder; 1⁄2 and 1⁄2 solder; rosin; catch
pan and supports.
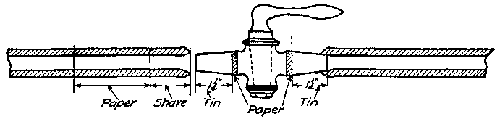 Fig. 28.
Tools Necessary.—The tools necessary for this job are
as follows: saw, rasp, file, turn plug, shave hook, bending
irons, hammer, ladle, soldering iron, and wiping cloths.
Preparation.—There are two joints to be wiped on this
job and the stop cock is supported only by the rigid fitting
of the lead pipe. Therefore the preparation must be
thoroughly done. The brass stop will be prepared first.
Brass.—The two ends of the stop cock are filed bright,
then papered and tinned. This operation is the same,
only on a smaller scale, as the tinning of the 2-inch and the
4-inch brass ferrule. The paper is pasted over the entire
stop cock, except the two ends, which are tinned for
about 11⁄4 inches.
Lead Pipe.—After the lead pipe has been cut off from the
coil, the ends are squared with the rasp. One end of each
piece is reamed out a little with the tap borer and spread
a trifle with the turn pin. With the rasp, take off the outside
edge of the end that has been spread. The sketch
will show this and give the angle at which the edge is to be
rasped. The stop cock is now fitted into the lead pipe.
The brass should enter at least 1⁄4 inch, then the lead is
beaten against the brass until a tight joint is made. The
other end of the brass stop is fitted into the other piece
of the lead pipe and a perfect fit is made. The fitting
of these two joints must be rigid as upon them depends the
stability of the joint support. When these ends of the
lead pipe have been fitted, the pipe is cleaned with the shave
hook and paper is pasted on, allowing 11⁄2 inches for the
joint. Both pieces of pipe are prepared at the same time
as both ends are wiped at the same time.
Supporting.—The three pieces of pipe should be so
wedged together that they will not fall apart when put in
position for wiping. The bricks for supporting the pipe
are placed the same as in the support of the horizontal
round joint. The lead pipe ends are laid on the bricks.
This brings the stop cock in the center without any support.
If it were not for the substantial fit between it and the
lead pipe, it would not stay in place. Solder straps can
be put over each end of the lead pipe. Weights can be
used to advantage.
Wiping.—When getting the heat up for these joints,
pour the solder over the two joints and over the stop cock.
This gets the heat properly distributed, so that both joints
can be wiped while the brass stop is heated. Get the proper
heat up on one joint and then the other. Come back to the
first joint and wipe it and then the second one. Both
joints should be wiped so as to have the same shape. The
novice will experience some trouble when wiping this joint
in getting the brass edge hot. Heating up the two joints
together will in a large degree offset this trouble. Some
mechanics take out the lever handle stop to lessen the
amount of brass to heat. This is never done by a good
mechanic as the two pieces will never fit together again
and make a tight joint. If the plug is left in place, both
the plug and body will expand equally and the pieces will
fit perfectly. When wiping is started on these joints, the
beginner must stay at it continually. When the brass is
heated, the finished wiping can be tried over and over
again. If this way is not followed, the beginner will find
that most of his time will be spent trying to get a heat on
the brass.
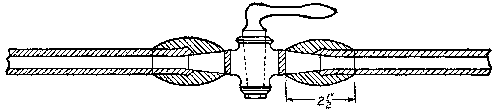 Fig. 29.—Stop cock.
Materials Needed.—The materials necessary to complete
this job are as follows: 12 inches of 5⁄8-inch extra strong
lead pipe for the run; 6 inches of 1⁄2-inch extra strong lead
pipe for the branch; paste and paper, and solder.
Tools Necessary.—The tools necessary for this job are
the saw, bending irons, rasp, tap borer, ladle, wiping cloths,
and the shave hook.
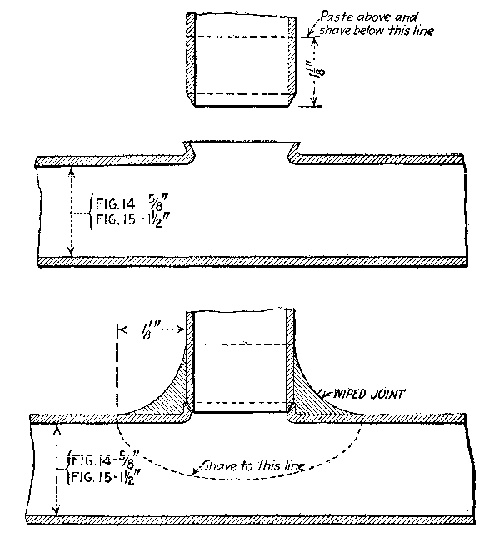 Fig. 30.—Branch joint.
Preparation.—The preparation of this joint requires
the skill of the beginner more than any of the preceding
joints. The tapping of the 5⁄8 pipe for the branch connection,
pasting and cutting the paper, require the utmost
care and precision. The 5⁄8-inch pipe is tapped with the
tap borer in the center. The tap borer is used by grasping
the handle firmly and putting the cutting point on the
mark and then pressing down on the handle. This
forces the point into the lead. Now turn the tool and
a piece of lead will be bored out. Continue this operation
and a hole will very soon appear in the lead. A
hole just large enough to allow the bending irons to enter
is made. The opening of the hole is completed with the
bending iron, working the lead back slowly into place.
Do not attempt to drive the lead back around the hole
with a few strokes. One bending iron is inserted and this
iron is struck with another iron or hammer. After a number
of strokes the opening will be of sufficient size. The
bent end of iron is inserted into the hole and the bent part
enters the bore of the pipe. This iron is struck in such a
way as to force the lead around the hole up, rather than
back. Now with the straight end of irons open the sides.
When the wall of pipe has been driven up a little the hole
can be enlarged by driving back the lead. This procedure
will form a collar around the hole to steady the branch
pipe. Good workmanship will result in having a good
substantial collar around the opening. The branch should
now be fitted. Clean the pipe with the shave hook for
about 2 inches on each side of the opening. With compasses
set at 11⁄8 inches, mark off a space on each side of the
branch on the run, or on the 5⁄8-inch pipe. On the sides of
the pipe the two lines should be joined with an even and
symmetrical curve. A good way to make this curve is
with the shave hook. Now take a folded piece of paper
and cut out the shape of one-half of the joint, then open the
fold and the entire ellipse will be made. When this paper
is cut, a sharp knife is used, otherwise a ragged edge will
be made and a good finish of joint is impossible. The paper
is now pasted and put on the pipe. The surplus paste on
the edge of the paper should be wiped off with the fingers
before the paper is put on the pipe. This prevents any
paste squeezing out on the joint. The branch is now taken
and perfectly fitted into the run. The end is cleaned with
the shave hook and paper is pasted on the pipe, leaving 11⁄8
inches of cleaned surface for wiping. The paste and the
paper should now be allowed to dry. The position for
wiping this joint is to have the run horizontal and the branch
on an angle of 45° pointing away from the wiper. Figure
30 will bring out the above explanation very vividly.
Supporting.—The run of this joint is laid flat on the table
and the branch inserted in its proper place. With one hand
hold it in place, with the other, use the bending iron, tap
the collar on the run against the branch, wedging it in
place good and strong so that no solder can leak through.
If the branch is tapered with the rasp as shown the joint
can be made very tight. The run of the pipe is now laid
on two bricks as was done with the horizontal joint. The
branch is laid over on a pile of bricks or wood at an angle of
45°. The best way to secure this joint is to pour some
half-molten solder on the ends of pipe and brick, making a
solder clamp. This branch does not need any clamp or
weight if it is properly entered into the run. A strap of
solder can be run over the end of pipe if found necessary.
Place the catch pan under the joint and then the pipe will
be ready to wipe.
Wiping.—In wiping this joint, the catch cloth is used not
only to catch the solder as it drops off from the pipe, but
also to hold the hot solder against the pipe to heat the
under side of the joint. Test the solder and see if it is the
correct heat for wiping. If so, prepare for wiping. After
heating the ladle, take some solder in it and proceed to drop
the molten solder on the joint. The ladle is moved constantly
as the solder is dropped on the run and then on
the branch to get the entire joint to the proper heat. As
the solder drops off from the joint, it is caught on the catch
cloth and brought up on the top of the joint where it is
re-melted by dropping hot solder on it. Then the hot solder
is held in the cloth against the under side of the joint to
get the under side properly heated. The solder is worked
around all parts of the joint. When the heat is got up
sufficiently and the solder works freely around the joint,
the branch cloth is taken and each edge of the joint is wiped
clean. Any surplus solder is brought up on top of the joint
and then wiped on the catch cloth. This solder is then put
on the under side of the joint. With the branch cloth
reach way around the joint and wipe each side, bringing
the cloth each time to the top and then off the joint. The
last wipe is directly across the top, wiping off any surplus
solder that may have accumulated from wiping the sides.
The difficulty with this joint is in getting the top and bottom
to have an equal amount of solder. With a little practice
and by watching each motion your faults can be noted and
remedied. If the paper starts to come off, it should be
re-papered at once. When the joint is finished, it should
be left in position until the solder has had time to set and
cool, otherwise the branch will break off and considerable
time will be lost in correcting the trouble.
Points to Remember.—
- First, the use of the tap borer.
- Second, the use of the bending irons.
- Third, do not allow the bending irons to touch the inside
walls of the pipe when stretching the opening.
- Fourth, secure the branch into the run.
- Fifth, secure the pipes into position for wiping.
- Sixth, spread the heat on the edges and the bottom of the
joint.
- Seventh, wipe with the branch cloth.
- Eighth, cut the paper.
- Ninth, mark the outline of the joint.
When the wiper has mastered the branch joint placed at
an angle of 45°, he can proceed to wipe the joint placed in
the next position, which is flat.
Preparation.—The preparation of this joint is identical
with the preceding one placed at an angle of 45°. If a new
joint is to be prepared, it would be well to pay strict attention
to the details, such as keeping the paste on the paper
only and having the edge of the paper cut perfectly smooth
and even. Before putting on the paper see that the pipe is
free from all grease and dirt. The paste and paper will
stick better if all the dirt is removed. The branch should
be well fitted into the run of the pipe so that no solder will
get into the bore of the pipe. The branch should not extend
into the run of pipe enough to obstruct the bore of it. If
the instructions for preparing the pipe are not carried out
as detailed, the wiper will experience some trouble that he
may find hard to overcome.
Supporting.—The run can be supported on bricks. The
branch can be supported on a brick placed at its end the
same height as the run. This will bring the joint in the
correct flat position. The branch should point away from
the wiper. Solder straps can now be poured over the ends
of each pipe. If weights are used to hold the pipe firm instead
of solder straps, they should be so placed that they
will not interfere with the hands when wiping.
Wiping.—The wiping of this joint is more difficult as the
beginner will experience trouble in heating the bottom and
keeping the solder on the bottom. Solder is dropped on
the joint and along the pipe so as to bring the pipe to the
proper wiping heat. Some solder will accumulate on top of
the joint. This is melted off on the catch cloth and this
hot solder held against the bottom of the joint. This operation
is repeated until the bottom as well as the top of the
joint is heated properly. When the solder can be worked
freely around the pipe, the branch cloth is taken and each
side is wiped from the bottom toward the top. Solder is
accumulated on the top where it is wiped off on the catch
cloth and put on the bottom of the joint. Now reach way
around each side and wipe the edge and body of the joint,
a wipe across the top completing the joint. The bottom
can be wiped with a cross wipe also if desired. The top and
the bottom should be identical. Notice carefully the drawing
of this joint and endeavor to have the same lines. The
perfecting of these joints comes only with patient practice.
The beginner must not get discouraged because of a burn or
two. As soon as confidence in oneself has been gained, the
possibility of burning the fingers is entirely eliminated.
The materials, tools, and preparation for this joint placed
in a vertical position are just the same, practically, as those
in the preceding branch joints. One or two points wherein
they differ are mentioned below. To rigidly support the
joint for wiping, allow the run of the pipe to rest on some
bricks as before mentioned, with the branch looking up.
Now take a piece of wood and drive a nail through one end
of it about 1 inch from the edge. Let this nail enter the
bore of the vertical branch. The wood is allowed to rest on
the back of the bench or is braced against the wall. Supporting
the pipes in this way will allow the wiper perfect
freedom. When wiping this joint, splash the solder on
from the ladle as on the upright joint. As all the sides of
this joint can be seen, it is not a difficult matter to make a
perfectly symmetrical solder bulb. When the proper heat
is gained, the top edge of the joint is wiped first, then the
lower curved edge, using the branch cloth. The body of
the joint is then wiped and the joint finished with a cross
wipe, if necessary.
The next position for this joint is to have the branch pipe
horizontal and the run vertical. The materials, tools and
preparation for this joint are the same as for the preceding
ones. The supporting and wiping differ a little.
Supporting.—One end of the run is placed on the catch
pan. The other end is held in place the same way as the
branch was held in the preceding joint. If the pictures of
this joint are carefully looked over, the methods employed
to hold the pipe will be readily noted. The branch is best
held by inserting one end of a bending iron in the bore of
the pipe and placing the other end of the iron on a brick
built up to the right height. The iron should be weighted
to keep the joint from swaying.
Wiping.—The solder is now dropped on the branch as
in the round joint, and splashed on the vertical run as in
the upright joint. Sufficient solder is put on the joint to
keep the edges covered with hot solder. Solder is worked
around the joint until all parts of it are thoroughly heated
and the solder works easily, then all the edges are wiped
clean. The top half is then wiped evenly and the bottom
half wiped to match the top half. A cross wipe in front
completes the joint. When this cross wipe is made on any
joint, a thick edge of solder must not be left. The edge
must be wiped clean. This joint should be wiped first
with the branch pointing to the right and then with the
branch pointing to the left. It will take the beginner some
time to master these branch joints, for not only must they
be wiped symmetrically for the sake of appearances, but
they must be wiped while the solder is hot to secure a tight
joint. A joint that is wiped with solder that is too cold
will be porous and will leak when put under pressure. With
care the same pipe can be used throughout for all the
positions of this branch joint.
Upon the completion of the small sized branch joint in
its various angles, the 11⁄2-inch branch joint is to be wiped.
This branch joint is wiped in the same positions as the 5⁄8
branch was wiped. The pipe being larger, there is more
solder for the wiper to handle, and the edges to keep clean
and to wipe are longer.
Materials Needed.—The materials needed for this job
are 12 inches of 11⁄2-inch light lead pipe for the run, and 6
inches of 11⁄2-inch pipe for the branch, paste, paper, solder,
and catch pan.
Tools Needed.—The tools necessary for this job are the
saw, rasp, shave hook, bending irons, drift plug, hammer,
ladle, wiping cloths, and tap borer.
Preparation.—To an experienced wiper, the procedure
of preparing this joint and wiping it are so near like the
5⁄8-branch joint that a detailed description would be unnecessary;
but for the benefit of the beginner, I will repeat
the details as they apply to this particular joint and thereby
avoid any error. We will take the preparation of the run
first. Square the two ends of the pipe with the rasp. Mark
off the center of the pipe. With the round part of the rasp,
held at right angles with the pipe, proceed to rasp down the
crown of pipe where the center mark was made. Do not
rasp through the wall of the pipe, but just enough so that
the tap borer will enter the pipe with only a slight pressure.
With the tap borer, tap a hole large enough for the bending
irons to enter. Now proceed to enlarge the hole, first
forcing the edges up and then forcing them back, making
the hole larger and making a collar around the hole at the
same time. Continue to open the pipe until the aperture
is large enough for the branch pipe to enter. The bending
irons must not come into contact with the inside wall of
the pipe, for if they do the inside bore will be marred and
be very ragged. As these joints are usually used on waste
lines, these ragged places make an ideal place for lint and
grease to collect and cause a stoppage. To make the inside
of the hole even, a piece of 1⁄2-inch pipe can be used in place
of the bending irons. To cut out the oval from a piece of
paper to fit the joint, fold the paper and cut out one-half
of the oval. Now unfold the paper and the complete oval
is obtained. The measurements of the oval are taken from
Fig. 30, 11⁄8 inches each side of the branch lengthwise of
the run. These two lines are connected with a curved line
as shown. This curved line can be made with the shave
hook. Take the large edge of the shave hook and roll it
along between the lines to be joined. A little practice
will perfect one in doing this quickly. The beginner should
make a number of these ovals so that he can get them perfect.
The graceful appearance of this joint depends upon
the neatness with which it is prepared. I do not want the
beginner to think that a graceful shape of the joint is all
that is to be desired or that it is the most essential point.
Further along, perhaps, more vital requirements will be
brought out and the beginner will be made acquainted with
them.
The ends of the 6-inch piece are now squared with the
rasp. The edges of one end are rasped off as shown in the
sketch, making a wedged fit into the run. This end is then
cleaned with the shave hook. Paper is then pasted on to
cover the pipe except the 11⁄8 inches cleaned on the end.
This cleaned part forms part of the joint, therefore no paste
or paper must be put on it. The pipe is now fitted into the
run and the collar beaten against it with the bending irons.
The run is now cleaned with the shave hook for about 3
inches each side of the center. The paper oval cut out is
now pasted on the joint. The paste and paper are then
allowed to dry before they are handled further.
Supporting.—The supporting of this joint, which is
placed with the branch on an angle of 45° pointing away
from the wiper, is not a difficult matter. The beginner can
use his own ingenuity for supporting the pipe if conditions
do not warrant the using of the methods previously
described.
Wiping.—The solder should now be tested for heat. If
the solder is at the proper heat, the ladle is taken and
heated. Take a ladle full of solder and drop the solder on
the joint. The lead of which this branch joint is made is
considerably lighter than any lead that has been used before.
Therefore, the beginner must drop the solder on
carefully, making sure that the solder is not dropped on the
same spot, for a hole can be burned through the pipe very
quickly. The ladle must be kept moving, then the solder
will not burn through the pipe. The heat is got up on the
pipe by dropping the solder on the run and on the branch,
catching the surplus solder on the catch cloth and heating
the under side of the joint with it. To form the joint, distribute
the solder and then wipe it into shape. Notice that
I said wipe it into shape. A beginner is very apt to try to
push or poke it into shape. This must not be done as it has
a tendency to make the joint lumpy. All the edges are
wiped off clean first, then the body of the joint is shaped and
wiped. When forming the joint, be sure that the bottom
and the top are symmetrical. Do not have one-half larger
than the other. The last wiping strokes are made swiftly
and rapidly. If the wiper will watch his movements and
note the results and then try to improve them, keeping in
mind that a symmetrical joint is wanted with thin edges,
perfection in wiping will come much more quickly than if
no attention is paid to the strokes made when wiping.
The materials required for this joint do not differ from
the preceding one. If the pipe used for the branch joint
at a 45° angle is in good shape, it can be used for this joint
by simply changing positions. The tools needed will not
be any different. The ladle and the wiping cloths, of
course will be required. A pair of pliers can be used to
advantage in picking up the hot solder. The wiping cloths
should receive a little more oil to keep them soft and pliable.
Oil the edges of the cloths well.
Supporting.—To support this pipe for wiping have each
end rest on a brick. Each end can be weighted to hold it in
place.
Wiping.—To wipe this joint, proceed to drop the solder
on the joint. When the pipe is thoroughly heated and the
solder works freely around the pipe the joint can be wiped.
The procedure is like the preceding one. The wiper is
cautioned to move the ladle constantly while dropping the
solder.
After a number of the previous joints have been wiped
successfully, the pipe is placed in such a position that the
branch will be vertical. The supporting of the pipe to
hold the joint in this position for wiping is very easily done
after handling the 5⁄8-in. joint in this position. The following
points may be found helpful: The solder is splashed on
the joint from the ladle. The top edge of the joint is kept
hot by keeping the solder covering it. When the proper
heat has been got up, the top edge is wiped first, then the
bottom edges both front and back. The body of the joint
is wiped last and a cross wipe finishes the joint. I have
found that the beginner in many cases, when this joint is
reached, tries to wipe it with many short strokes. The
habit is a bad one and should be stopped as soon as noticed.
Learn to wipe the top edge with only two strokes, the bottom
edge with not more than four, the body of the joint with
four, and one cross wipe to finish. This joint should be
finished as symmetrically as possible and wiped while the
solder is hot.
When the vertical branch has been conquered and the
wiper can get a good joint every time it is tried, the pipe
can be changed to a different position. The run is placed
in a vertical position and the branch horizontally to the
left. The catch pan is put under the end of the pipe.
Follow the same directions for supporting this joint as were
given under the 5⁄8-in. branch placed in a similar position.
The wiping of this joint is so nearly like the preceding
branch joints that I will not give any instructions at all.
This joint is finished at the same point that the other branch
joints are finished. However, there are one or two matters
that should be kept in mind. Some of the small matters
are often overlooked and should be called to mind occasionally.
Do not allow the solder to accumulate in the pan.
If the cloths are burned, they should be turned, or new ones
made. If the paper has started to come off from the pipe,
new paper should be put on at once. Test the solder occasionally
and see that it does not get too hot. Upon completion
of the joint in this position, the branch joint in its
various positions is finished. The beginner has found out
while wiping these various joints a number of points that
were not mentioned in my description. No amount of
detailed description will make a good joint wiper. Patience
and practice are as important in joint wiping as good preparation
and good solder.
Points to Remember.—
- First, materials—18 inches of 11⁄2-in. lead pipe.
- Second, use of tools.
- Third, keep bending irons away from the wall of the pipe.
- Fourth, make a good collar around the opening.
- Fifth, make a tight fit with branch and run.
- Sixth, hot solder will quickly burn through the lead.
- Seventh, use branch cloth for wiping.
- Eighth, cut out paper for joint even and symmetrical.
This joint is another brass to lead, and is the last single
joint to be wiped in this course of joint wiping.
Materials Needed.—The materials required for this
joint are as follows: 10 inches of 5⁄8-inch extra strong lead
pipe; one 1⁄2-inch brass sink bib for lead pipe; one pot of
solder, paste and paper, 1⁄2
and 1⁄2 solder, catch pan, and
supports.
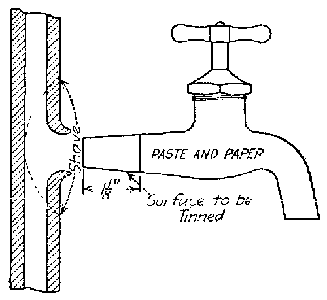 Fig. 31.
Tools Required.—The tools
required for this job are the
saw, rasp, tap borer, bending
irons, file, ladle, wiping cloths,
shave hook, knife and rule,
soldering iron.
Preparation.—To prepare
the lead pipe after cutting
from the coil and squaring
the ends with the rasp is very similar to the 5⁄8-inch branch
joint. The center of the pipe is marked and a hole is made
in it with the tap borer large enough to admit the bending
irons. The hole is enlarged with the irons. A good substantial
collar is made around the hole to hold the bib in
place. One and one-eighth inches are marked off on each
side of the branch and an easy curve connects the two.
The paper is then cut out and pasted on the pipe after it
has been scraped with the shave hook.
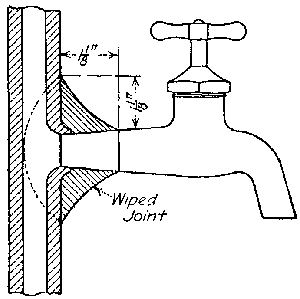 Fig. 32.—Bib.
The end of the brass bib is filed bright and tinned with
the soldering iron and 1⁄2 and 1⁄2 solder. Before the tinning
is done, paper is put on the brass, leaving only 11⁄8 inches
exposed. The tinning must be thoroughly done, or it will
come off and have to be re-tinned.
Supporting.—The bib is fitted into the lead opening and
the collar is forced against the bib to hold it in place and
prevent any solder from leaking through into the bore of the
pipe. The bib must not extend too far into the lead pipe
or it will obstruct the flow of water. The lead pipe is
laid on two bricks the same as the round joint. The bib
is laid on an angle of 45° pointing away from the wiper.
Some bricks can be piled up to the right height to hold the
bib in place and a solder strap can be made to hold it
steady. The lead pipe can be
held steady by weighting each
end. The catch pan is now
placed under the joint and everything
is ready for wiping.
Wiping.—When the solder is
hot, getting the heat on the pipe
is started. Solder should be
dropped oftener on the brass bib
than on the lead pipe. It takes
more heat to heat the brass
thoroughly than it does the
lead. If this is followed out, little difficulty will be had in
getting up the heat and in wiping. Use the branch cloth
for wiping and make sure that all edges are perfectly
cleaned before making the final strokes. As this is the
only position that the joint will be wiped in, practice should
be continued until perfect joints can be obtained.
Points to Remember.—
- First, materials needed.
- Second, tools needed.
- Third, use tap borer.
- Fourth, enlarge hole with bending irons.
- Fifth, make substantial collar around the opening.
- Sixth, paper the lead.
- Seventh, file the bib, then paper.
- Eighth, tin the bib.
- Ninth, place in position and wipe.
The making of the drum trap will bring out the skill of
the beginner. The entire trap is made of lead pipe. The
lead will require a great deal of handling. Therefore,
care must be exercised in all operations to turn the trap out
in a workmanlike manner.
Materials Needed.—The materials needed to complete
this job are: 10 inches of 4-inch 8-pound lead pipe; 18 inches
of 11⁄2-inch light lead pipe; paste and paper, support, solder,
and catch pan.
Tools Needed.—The tools required for this job are:
saw, rasp, bending irons, shave hook, bending spring, tap
borer, dresser, ladle, drift plug, and wiping cloths.
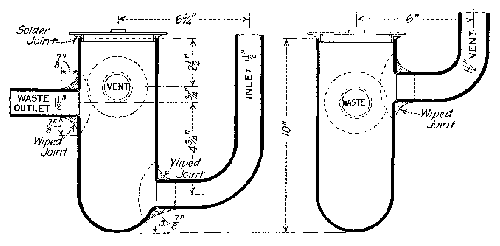 Fig. 33.—Drum trap.
Preparing.—Take the 10-inch piece of lead pipe and hold
it in one hand, in the other hand take a pine dresser.
Strike the lead pipe with the dresser. The pipe is struck
about 2 inches from the end and is beaten evenly all around.
The pipe is then struck nearer the end until finally the bore
of the pipe is almost closed. This closed end should be
rounding and symmetrical. To get this shape the pipe
must be continually moved and turned. One side must not
be forced in more than the other. If there are any dents
in the pipe or part of the pipe is forced in too much it may
be driven out as follows: Take an old piece of 1⁄2-inch lead
pipe and round one end of it with a hammer; this can be
used by hitting the inside of the closed end of the drum and
forcing out the dents. The rounded end of the trap is not
quite closed and a hole about 3⁄4 inch is left. This opening
is closed by shaping the edges of it with the knife, making
them smooth and beveled. Then a piece of lead is cut out
of some scrap, the same shape as the hole and fitted into
it. The top surface of this fitted piece should be a little
lower than the surface of the pipe. Strike a circle, using
the compasses, the center of the circle being the center of
the inserted piece of lead. The lead inside of this circle is
shaved clean with the shave hook, including the inserted
piece. Paper is then pasted outside of the circle and should
cover entirely the rest of the pipe. The inserted piece is
wiped on the pipe as follows:
Wiping End.—Stand the 4-in. pipe in a pan with the
rounded end of the pipe up. Be sure that the inserted
piece is fitted securely. The solder is now dropped on the
paper and shaved portion of the pipe. Exercise considerable
care not to burn a hole in the pipe. As the hot solder
runs off, catch some of it and draw it back on the joint.
When the solder can be manipulated freely and the pipe is
hot, the joint can be wiped. The cloth is drawn across the
joint, cleaning all the edges with one stroke. The joint
should be shaped to complete the rounding surface of the
pipe. The joint is comparatively easy and will not occupy
much time. As soon as it is wiped, cover the solder with
paper. This will preserve the freshness of the joint until
all wiping is completed.
After the above joint is completed, the 11⁄2-in. branch
inlet pipe is prepared and wiped in place. The center of
this branch is marked on the 4-inch pipe and a hole is tapped
in the pipe, using the tap borer. A hole large enough
to admit the bending irons is made. The hole is enlarged
with the bending irons, bending the lead first up, then back.
A piece of 1⁄2-inch iron pipe can be used as a tool to finish
the opening. The iron pipe is larger in diameter than the
bending irons and leaves a more finished surface. The
opening is made of sufficient size to admit the rasped end
of the 11⁄2-inch pipe. When using the irons to enlarge the
opening in the pipe, be sure not to bruise any part of the
trap. The 11⁄2-inch pipe is now taken. The ends of this
pipe are squared with the rasp. The drift plug is then
driven through the pipe to take out any bruises or flattened
places. The edge of one end is rasped off to fit the opening
made in the 4-inch pipe. The beginner must strive to make
a perfect fit. The accuracy with which these preparations
are made is what helps in a large degree to bring about a
successful job. The next operation is to paper the parts
not to be wiped. The sizes of the joint should be followed
as shown on the sketch. The pipe is first shaved with the
shave hook, after which the paper is pasted on. No paste
is allowed to get on the joint proper. The beginner should
by this time have formed the habit of being neat with his
work. Therefore the getting of paste on the joint surface
shows that he is not as neat or as far advanced as he
should be.
Supporting.—The drum is laid lengthwise on the bench
and blocks are put on each side to keep it from rolling, the
branch uppermost. The 11⁄2-inch pipe is held in position
the same way as the vertical branch was held. The catch
pan is put under the drum to catch the surplus solder.
Wiping.—Splash the solder on the branch pipe, also on
the drum. The burning through of the drum is an easy
matter. Therefore do not keep dropping the solder on one
place, but keep the ladle moving continually. With the
catch cloth draw the solder up on the branch covering the
top edge of the prepared surface. Splashing the solder on
this top edge melts the solder already on and allows it to
run down on the 4-inch pipe where it is caught with the
cloth and again brought up on the top edge of the branch.
When the solder works freely all around the joint, the top
edge is wiped clean and even. Then any surplus solder is
wiped off. The bottom edge is next wiped clean, after
which the body of the joint is wiped into shape, together
with both edges. The edges are wiped very thin so that
when the paper is removed the outline of the joint stands out
very distinctly. A thick edge on a joint gives an unworkmanlike
appearance to the work. The joint is finished with
a cross wipe.
The other joints are prepared and wiped the same as the
one just completed. The 11⁄2-inch branch connection
taken out of the bottom of the trap is bent. As this is the
first time it has been necessary to bend lead pipe in these
jobs, I will cover this operation in detail. The pipe is
first straightened and the drift plug driven through it. The
pipe is marked where the bend is to be made. The bending
spring, size 11⁄2 inches, is put into the pipe, the center of
the spring coming about where the bend is to be made.
The pipe is then heated where it was marked to be bent.
The proper heat for this pipe is just so that the hand cannot
stand being laid against it. The pipe is held in the hands
and on the end nearest the heat is hit against the floor at an
angle. The pipe, with the first blow, will start to bend.
With a few more strokes the desired bend will be obtained.
The bending spring can now be pulled out. Put a little
water in the pipe, then put one end of the spring in the
vise, twist the pipe, and the spring will come out when
the pipe is pulled away from it. The bending spring
holds the pipe cylindrical while it is being bent. Without
the spring, the pipe would be badly crushed at the bend
and rendered almost unfit for service. Another good way
to bend pipe is to plug one end and fill the pipe full of sand,
then plug the open end. The pipe is then heated where the
bend is to be made. The pipe can then be bent over the
knee. When all the joints are wiped, the paper should be
taken off and the lead cleaned with sand and water. The
trap is now complete except the brass clean-out to be soldered
on the top. The inside of the trap should not have
any rough edges or drops of solder in it.
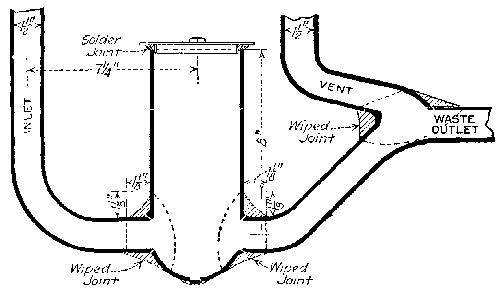 Fig. 34.—Drum trap.
There are two other drum traps to be made. The
materials needed are the same as for the above trap except
for 18 inches more of 11⁄2-inch lead pipe. The support,
preparation, and wiping are the same. The beginner by
this time should feel very well acquainted with lead and
solder. Therefore, the details of these two drum traps
can be left for the beginner to work out for himself. The
sketches are very distinct and readable and will be of considerable
assistance. The beginner should make these
traps.
Points to be Remembered.—
- First, use 4-inch lead pipe, 8 pounds to the foot.
- Second, dresser and spring are new tools. Study their use.
- Third, gradually work the trap into shape with the dresser.
- Fourth, plug the hole with a piece of lead pipe.
- Fifth, prepare and wipe the plugged hole first.
- Sixth, prepare and wipe the 11⁄2-inch branches.
- Seventh, special care should be taken to keep the work neat.
- Eighth, two ways of using the bending spring.
- Ninth, wipe thin edges on joints.
- Tenth, do not handle finished work.
- Eleventh, clean and finish the work neatly.
In the foregoing exercises, I have confined myself to the
actual work of making the various joints. Now I will
explain the practical use of them.
Soldering Iron.—The soldering iron is a tool that is used
in work that requires heat to fuse solder and the parts to
be united. Every plumber should have at least two irons
in his kit.
The Cup Joint.—While the cup joint is not employed to
any great extent in modern plumbing, yet it has its use in
the installation of some fixtures. Lavatories, bath and
toilets are sometimes connected with a short piece of lead on
the supply. The tail pieces on the faucets can be soldered
on the lead by means of a cup joint. A cup joint well made
with a deep cup and the solder well fused is as strong as a
wiped joint in a place of this kind. The evil of the cup
joint is that some mechanics will only fuse the surface and
leave the deep cup only filled with solder and not fused.
This makes a tight joint, but extremely weak. On tin-lined
pipe and block-tin pipe the cup joint is commonly
used. When making a cup joint on block-tin pipe the soldering
iron must not touch the pipe and fine solder should
be used. When tin-lined pipe is being soldered, the tin
lining must not be melted.
Overcast Joint.—The overcast joint is not commonly
used, but when there is considerable lead work to do the
plumber finds it very handy in places where a wiped joint
would take up too much room. We use it for an exercise
for the reason that it teaches the beginner very rapidly
the use and control of the soldering iron.
Flat Seams.—These seams are used in the construction
of roof flashers, tanks (Sec. 33, Chapter XVIII) and lead
safe wastes (Sec. 27, plumbing code). A hatchet iron is
sometimes used on these seams.
Wiping Cloths.—The wiping cloths made of whalebone
ticking make good, serviceable, and lasting cloths. Oil
only should be used to break the cloth in. Moleskin cloths
are very good, but they are very hard to get and cost considerably
more. A plumber should always keep a good
supply of ticking cloths on hand. The cloths are used
only for wiping.
1⁄2-inch Round Joint.—This joint is the one most often
required in actual practice. It serves to connect two pieces
of lead pipe of the same or different diameters. It is also
used to connect lead and other materials of which pipe is
made. The workman, when he gets out on the job, finds
that his work cannot be supported for wiping in such an
easy and convenient position as illustrated in the exercises.
It will be necessary to wipe the joint at almost every conceivable
angle and position. The workman must employ
his ingenuity to overcome any difficulties that may arise.
Any draught of air should be avoided as it will make the
solder cool quickly.
2-inch Brass Ferrule.—When it is found necessary to
connect cast-iron and lead pipe, it is done by means of a
brass ferrule wiped on the lead pipe. This joint is a very
common joint and is found on sink, tray, and bath connections,
as well as in many other connections that have lead
and cast-iron pipes for wastes.
4-inch Brass Ferrule.—The 4-inch brass ferrule wiped
on lead pipe is found under almost every closet. There is
generally a piece of lead connecting the toilet with the soil
pipe. Therefore, a brass ferrule is wiped on the lead and
the ferrule connected with the soil pipe. This joint is also
found on rain leader connections near the roof, connecting
the gutter with the rain leader stack.
Stop Cock.—When a shut-off is required in a line of lead
water pipe, these joints are used. Where it is necessary to
joint lead and brass, this joint is required. The art of heat
control over the lead and the brass is the essential point in
these joints.
Branch Joints 5⁄8 and 1⁄2 Inches.—Where it is found necessary
to take a branch from a water pipe, this joint is used at
the connection. In practice, this joint may have to be
wiped in positions that are rather difficult to reach, so the
wiping of joints in the positions called for in the exercises
is exceedingly good practice.
Branch Joints 1½ Inches.—These joints are very common
and are found on waste and vent pipes. They are also found
on urinal flush-pipe connections where the branch often is
brass and the run lead.
Bib.—When lead supplies are run directly to the bib on a
sink, this joint is necessary. It becomes necessary to wipe
in a piece of brass for a brass-pipe connection from a lead
pipe, in which case this joint is called for.
The Drum Trap.—The drum trap is used under sinks,
baths, showers, and trays.


