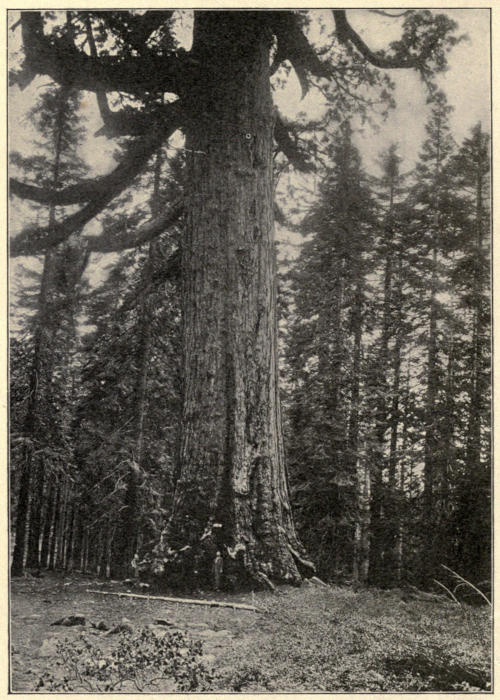
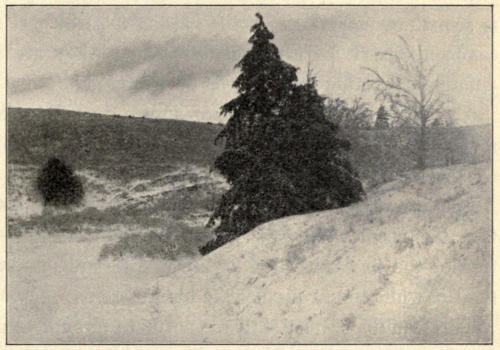
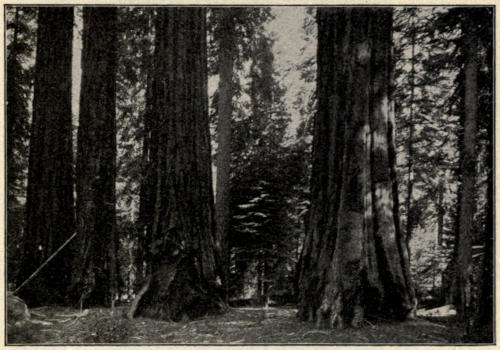
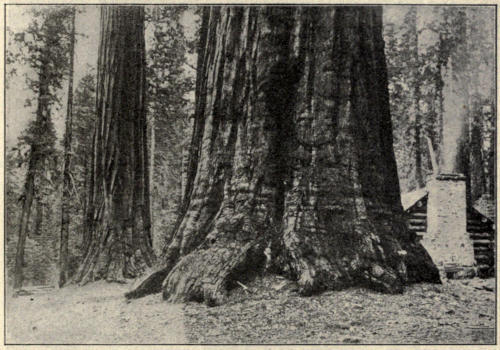
“Grizzly Giant,” a Big Tree in Mariposa Grove, California
BY
EDWIN W. FOSTER
GINN & COMPANY BOSTON · NEW YORK · CHICAGO · LONDON
Copyright, 1903
By EDWIN W. FOSTER
ALL RIGHTS RESERVED
25.1
The Athenæum Press
GINN & COMPANY · CAMBRIDGE
· MASSACHUSETTS
PREFACE
This text has been prepared for the purpose of furnishing
the pupil with the essential facts about tools
and their uses. However efficient the instruction may
be and however attentive the pupil, it is impossible for
him to fully grasp and comprehend during a demonstration
the names of tools and technical terms, most of
which are new to him. This applies with equal force
to the manner of using the tools and to the methods of
working.
The function of the text is to supplement the instruction
of the teacher. It is intended to gather up and
arrange in a logical order the facts which the pupil
has already been told. By this means these facts will
become fixed in the mind of the pupil and he will work
with a better understanding and make greater progress.
It is believed that the text can be used to the greatest
advantage by requiring the pupil to read up the subjects
presented in class immediately after the close of the
lesson. Frequent rapid reviews and occasional written
tests are very effective.
No course of study in the form of a series of models
is presented. It is hardly possible for any two schools
to follow the same series of models. Local conditions
necessarily affect the choice of a course, while new and
better designs are being brought out continuously.
The order in which the tools are described in the following
pages is the one that has seemed most natural.
They may be taken up, however, in any convenient and
logical order.
It is with the earnest hope that nature study and
manual work may be closely correlated, that Part II is
added. No better period can be selected in which to
study trees, their leaves, bark, wood, etc., than when
the student is working with wood, learning by experience
its grain, hardness, color, and value in the arts.
Occasional talks on the broader topics of forestry, its
economic aspects, climatic effects, influence on rainfall,
the flow of rivers, floods, droughts, etc., will be found
interesting as well as instructive, and such interest
should be instilled into every American boy and girl.
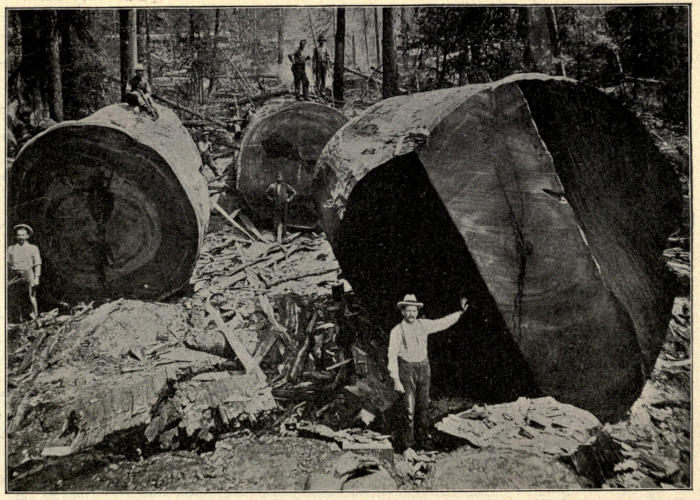
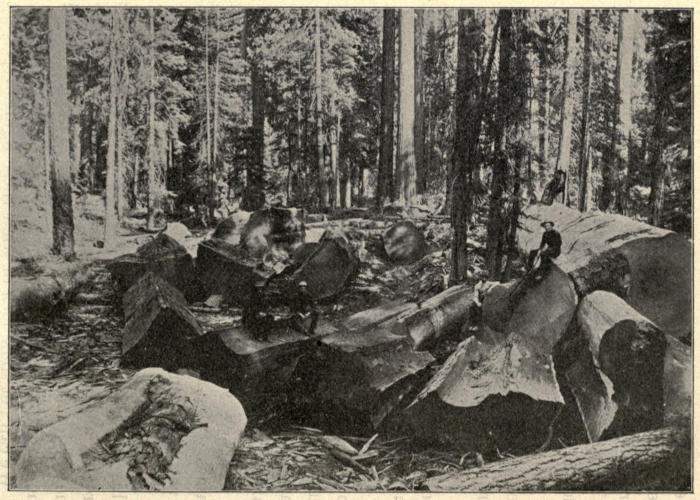
The writer is indebted to the Fish, Forest, and Game
Commission of New York state for the series of Adirondack
lumbering scenes, and to the United States Bureau
of Forestry for the views of California Big Trees.
Saws: necessity for two classes; shape of teeth; set; tapers;
method of holding. Backsaw; use of bench hook. The turning saw.
The plane: use of cap iron; names of parts. Adjustment of plane.
Use of lever and adjusting screw; positions for planing. The jack
plane. The smooth plane. Jointers; action of short and long
planes. The block plane. The wooden plane. The chisel: size of
cutting angle; effect of careless sharpening. The framing and firmer
chisels; proper positions for horizontal and vertical cutting. Sharpening
on oilstone. Brace and bit. Center and auger bits; gimlet
and countersink bits. The spokeshave.
Chapter IV. Miscellaneous Tools and Methods of Work
The hammer; use of nail punch. The mallet. The screw-driver.
Sandpaper, use of. Squaring up stock; method explained in detail.
Laying out work; method of laying out a typical joint. Securing
parts; use of glue and hand screws. Nails; method of using cut nails.
Screws; method of using round-head and flat-head screws. Mechanical
drawing. The drawing instruments explained, and method of
making complete working drawings described. Scale drawings.
The forest; felling trees and floating logs to the mill. The forming
and breaking up of log jams. The log boom and modern sawmills.
Timber and lumber defined. Annual rings; medullary rays;
formation of grain. Characteristics and defects in wood. Warping
and shrinkage.
In order to obtain good results in the using of tools
it is necessary to know their construction, how to properly
sharpen and adjust them, and the correct method
of handling them. It is also essential to know how to
lay out and work the material or stock. Carelessness
or a lack of knowledge is invariably followed by a
failure. It is more important at first to work carefully
and accurately than rapidly.
“Tools are made to be used, not abused.” They
must be kept clean and sharp and should be used only
for the purpose intended. Wipe them off occasionally
with an oily rag or waste to prevent them from rusting.
Put away all tools not in use and keep the top of the
bench clean. Do not mark it with a pencil or scratch
it with a knife. Do not cut into it with the chisel
or allow other tools to mark or deface it. When using
glue, shellac, or similar materials, cover the top of the
bench; or, better still, do the work on a table provided
for that purpose.
The plan of work in making all models is in general
the same and is as follows:
First. “Squaring up” the stock.
Second. “Laying out” the work.
Third. Cutting to the lines.
When the article is composed of two or more pieces a
fourth step may be added, namely, fitting and securing
the parts.
The tools used may be divided into three groups, as
follows:
First. Laying-out tools. These include the rule, try-square, marking
gauge, bevel, and knife.
Second. Cutting tools. In this group are the saw, plane, chisel,
spokeshave, bit, and knife.
Third. Miscellaneous tools, such as the hammer, mallet, screw-driver,
brace (or bitstock), and others not so common.
CHAPTER II MEASURING AND MARKING TOOLS
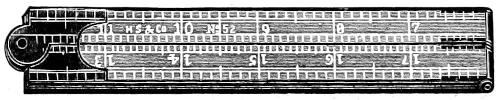
1. The Rule. The standard unit of length is the yard,
but the foot is commonly used for all measurements
in woodwork. If the rule be twelve inches long it is
known as a foot rule, and if twenty-four inches long
it is called a two-foot rule. The inches are subdivided
into halves, quarters, eighths, and in some cases sixteenths.
Rules are usually of boxwood or maple, with
brass joints, and are commonly made to fold once or
twice.
Fig. 1. The Rule
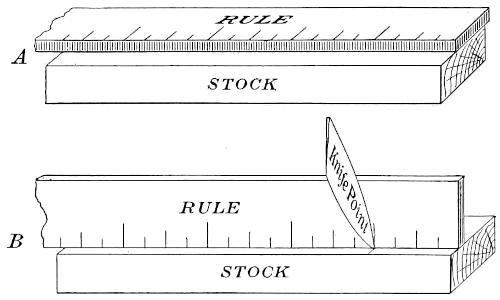
The rule is quite thick, and if laid flat upon the work
to be measured errors will usually follow. It should
be stood on edge so that the pencil or knife point may
touch the divisions on it and the wood at the same time.
The proper position when laying out measurements is
shown in the sketch (Fig. 2). Consecutive measurements
should be laid off without moving the rule.
Fig. 2. Methods of using the Rule: A, incorrect; B, correct
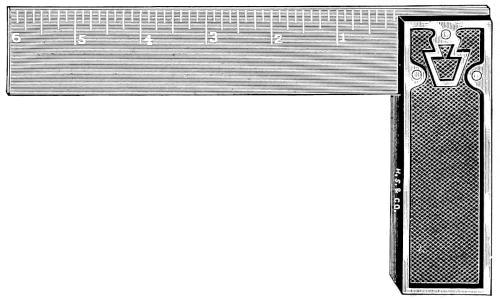
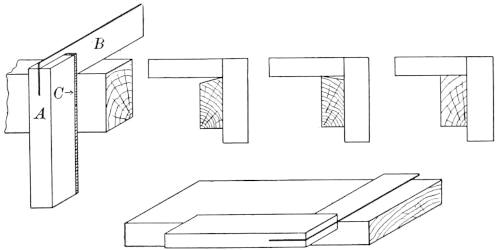
2. The Try-Square. The try-square has two distinct
uses: first, to act as a guide for the pencil or knife
point in laying out lines across the grain at
right angles to the edge, as shown in Fig. 4;
second, for testing or trying the adjoining
sides to see if they are square with each
other.
Fig. 3. The Try-Square
The try-square may be made entirely of iron or
steel, but sometimes the beam A is of wood with a
brass strip C to protect it and to take the wear. The
blade B is of steel and is divided, like a rule, into
inches and fractions of an inch. Try-squares are made
in several sizes, the most convenient for general use
being six inches.
Fig. 4. Methods of using the Try-Square
In using the try-square the beam should be held
firmly against the face or edge of the stock. When
working near the end of the piece, if the beam projects,
reverse its position. For nice, accurate work the knife
point instead of the pencil should be used for lining.
When it is desired to saw off the end of the stock it
is first necessary to mark or square clear around it with
the knife and try-square. In doing this the beam of
the try-square must be used against the work face and
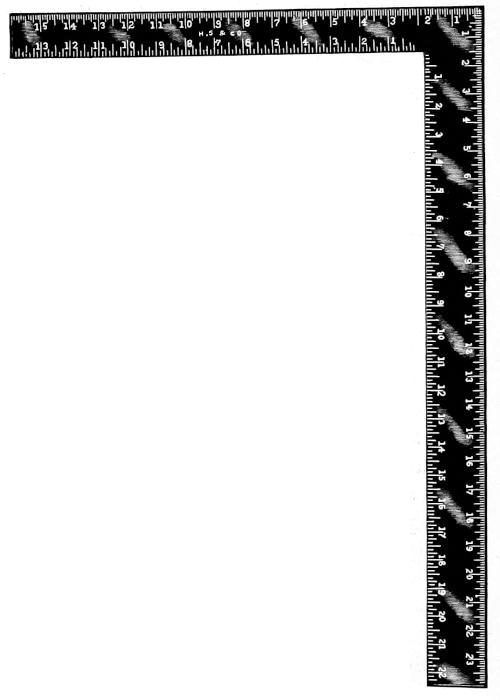
joint edge only. Large squares made of steel in one
piece are called framing squares, and are used by
carpenters and others for rough or large work.
Fig. 5. The Framing Square
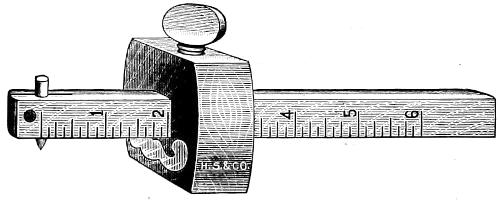
Fig. 6. The Marking Gauge
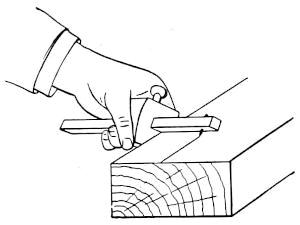
3. The Marking Gauge. The marking gauge
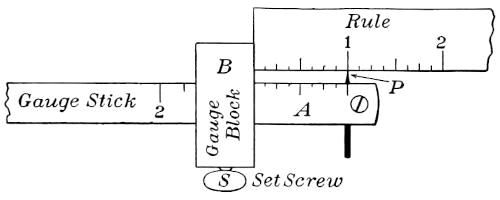
is shown in Figs. 6 and 7. A is the gauge
stick, B the gauge block, S the set screw, and
P the marking point, or spur. The gauge stick
is graduated like a rule into inches and fractions,
beginning at the steel marking point;
but as the latter is not always exactly in the
right place the graduations are not entirely
reliable. It is safer then to set the gauge
with the rule in the manner shown in Fig. 7.
Hold gauge bottom side up in left hand and rule
in right. Place end of rule against gauge block and
the measurement desired at spur. Turn set screw. The
gauge is then accurately set. In the cut the gauge is set
at one inch and is ready for use.
Fig. 7. Setting the Marking Gauge
To gauge a line parallel to the edge of a block hold
the tool firmly, with thumb and forefinger encircling
gauge block. Tip the tool
away from you until the
marking point (spur) barely
touches the wood and push
the tool away from (never
toward) you. The line
made should be as fine as
a knife line. A little practice
is needed to give the proper control, as the marking
point tends to follow the grain of the wood, which is
usually not straight.
Fig. 8. Holding the Marking Gauge
A good plan is to use a small piece of prepared stock
as a practice block, laying out lines a quarter of an inch
apart, then an eighth, and finally a sixteenth.
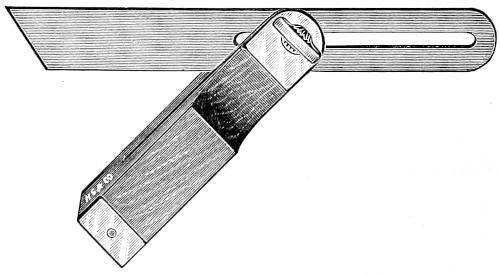
4. The Bevel. The bevel differs from the try-square in
having a movable blade.
Fig. 9. The Bevel
This tool may be used to lay out lines at any angle
from zero to 180 degrees. The blade may be fixed
firmly at any desired angle by simply turning the set
screw. The method of using it is similar to that of
the try-square.
CHAPTER III CUTTING TOOLS
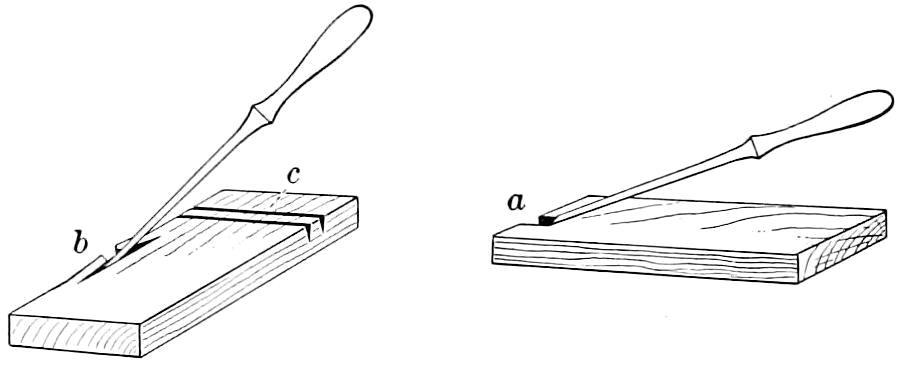
5. Saws. The saw might be described as a succession
of chisels, one back of the other. We can readily understand
the action of the saw by making cuts with a narrow
chisel along the grain of a piece of wood, as shown
in Fig. 10 at a.
Fig. 10. Cutting with and
across the Grain with a Narrow Chisel
The little pieces of wood removed in this way are
similar to the sawdust made by the saw, the only difference
being that in the saw the teeth are narrower and
the little pieces consequently smaller, and instead of one
chisel dozens are being pushed forward at one time.
A saw with these chisel-shaped teeth, and used for
cutting along the grain, is called a ripsaw.
That this tool will not cut so readily across the grain
may easily be proved by again resorting to the narrow
chisel and attempting to repeat the first experiment.
The wood will act as shown in Fig. 10 at b, splitting
along the grain in both directions. It is quite evident,
then, that a tool for cutting across the grain must be
constructed in some other way.
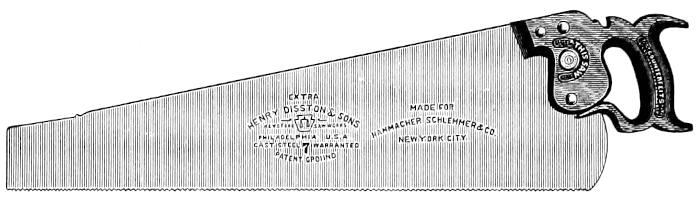
Fig. 11. The Saw
Continuing this experiment, let us cut the fibers with
a knife point in two parallel lines across the grain,
close together, as at c. It will be found that the wood
between these lines may now be easily removed with the
narrow chisel. This fact is made the basis on which
we construct the crosscut saw. Every tooth is sharpened
to a point, one on the right side, the next on
the left, giving two parallel lines of sharp points
designed to cut the fibers, as was done in our experiment
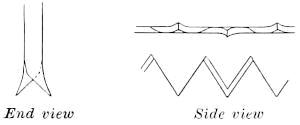
with the knife. Fig. 12 shows the end view of the
crosscut teeth enlarged. Observe that not only are
the alternate teeth sharpened on opposite sides, but
each tooth is bent outward from the body of the saw.
This bending is called set, and is designed to make
the saw cut, or kerf, wider than the thickness of the
saw, that the latter may pass easily through the wood
after the teeth have done their work. If it were not
for this set, the fibers would spring back against the
body of the saw after the teeth had passed and make
the work very laborious. When a saw is properly set
it should pass through the wood easily.
Fig. 12. Teeth of Crosscut Saw
Fig. 13. Teeth of Ripsaw
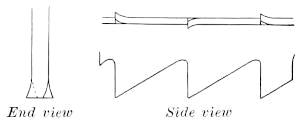
The teeth of the ripsaw are also set, but, as will be
seen in the sketch, the bottoms are flat like a chisel
instead of pointed like those of the crosscut teeth.
Beside the end views of the two kinds of teeth,
the side views, which are also different, are shown in
Figs. 12 and 13.
We are inclined to think of the saw as a very commonplace
article, yet a careful examination will prove
that the greatest care and skill are needed in its manufacture.
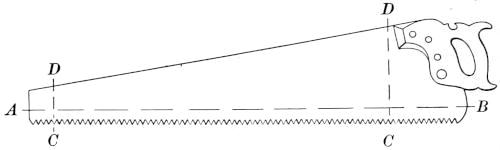
Observe that the body, which must be of
the best steel, tapers, being considerably wider at the
handle than at the opposite end. This is to give
strength, and to prevent buckling, or bending, as the
tool is pushed forward.
Fig. 14. Body of Saw, showing Tapers
Most delicate measurements must be made, however,
to discover that not only the width but the thickness
increases from A to B, and decreases from C to D.
How carefully this tapering must be done can be realized
when we know that the difference in thickness
from A to B is only three one-thousandths of an inch,
and from C to D twelve one-thousandths at end A
and five one-thousandths
at end B.
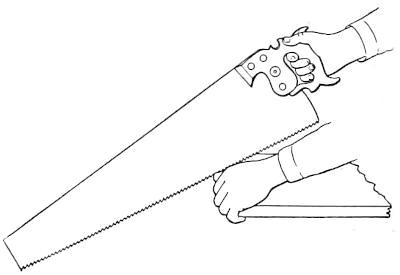
Fig. 15. Method of holding the Saw
The saw should
be held in the right
hand, with the left
grasping the board.
The thumb of the
left hand acts as
guide, the saw is tilted, as shown in Fig. 15, and drawn
toward the worker at the first stroke. This tool should
be used without exerting much pressure, in accordance
with the general rule that we do our best work with
tools when we work easily and deliberately.
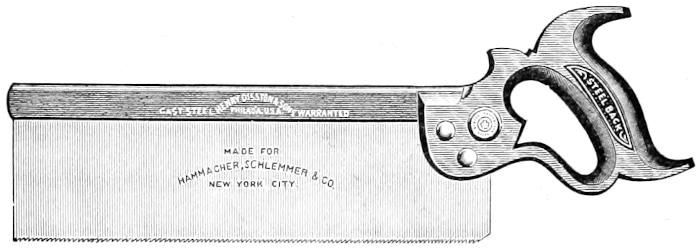
Fig. 16. The Backsaw
Many varieties of saws are designed for special purposes,
including those which cut stone and metal.
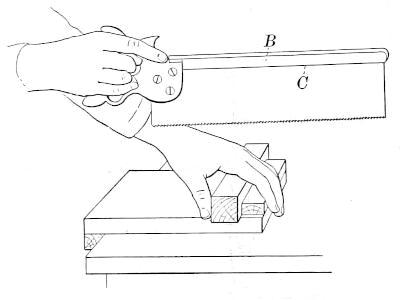
Fig. 17. Method of using the
Backsaw and Bench Hook
6. Backsaw.
The backsaw is a
crosscut saw with
small teeth, and
has a heavy steel
backpiece, Fig.
17, to prevent
bending. In this
respect it differs
from the ordinary
crosscut varieties,
which bend
readily. The purpose of the backsaw is to make fine,
straight cuts in delicate, accurate work. The steel
back B is necessary on account of the thin blade, but
on account of the thickness of B no cut can be made
deeper than the
line C. This tool
will cut in any
direction with
reference to the
grain, but is primarily
a crosscut
saw.
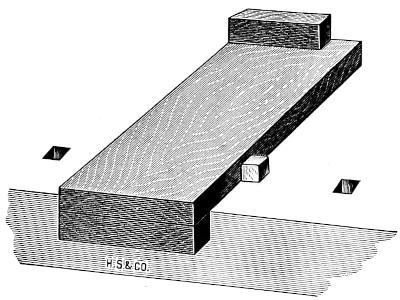
Fig. 18. The Bench Hook
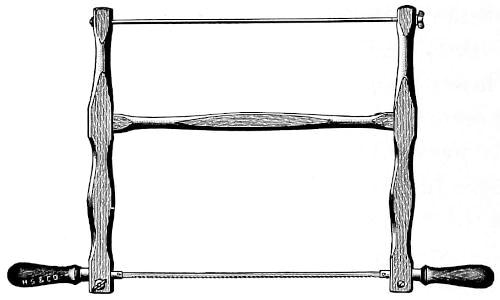
Fig. 19. The Turning Saw
7. The Turning
Saw. In ordinary
work the saw is supposed to cut to a straight line, but
there are certain classes of work where it is desirable
to follow a curved line, and consequently a special tool is
necessary. The turning saw shown in the cut is used for
this purpose. The handles holding the saw blade may
be turned in any direction with reference to the frame.
8. The Plane. The plane reduces our rough lumber
to planed, or dressed, stock. The cutting part is a
thin, wide chisel called the plane
iron.
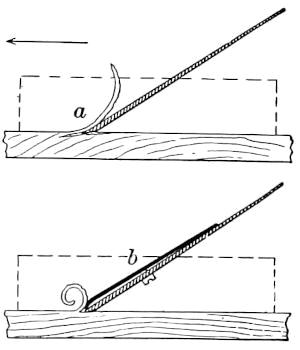
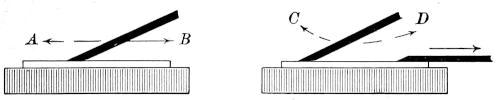
Fig. 20. The Plane Iron in Action
Fig. 20 shows the position of
the plane iron in operation. Assume
the iron to be moving in
the direction of the arrow on a
piece of wood. The sharp point
would enter the board and, should
the grain be unfavorable, start
a splitting action, as shown at a.
We wish to smooth the wood
instead of roughing it, and must
in some way stop the splitting. This is accomplished
by placing a cap iron on the plane iron, as shown at b.
The cap bends and breaks
the shaving before the
splitting action has a
chance to begin, and gives
the spiral form so familiar
in wood shavings.
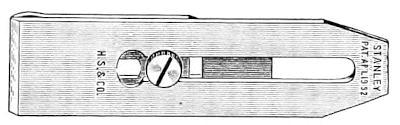
Fig. 21. Plane Iron, Cap, and Set Screw
The cap is firmly fastened to the plane iron by a
stout screw, and this whole combination is fastened in
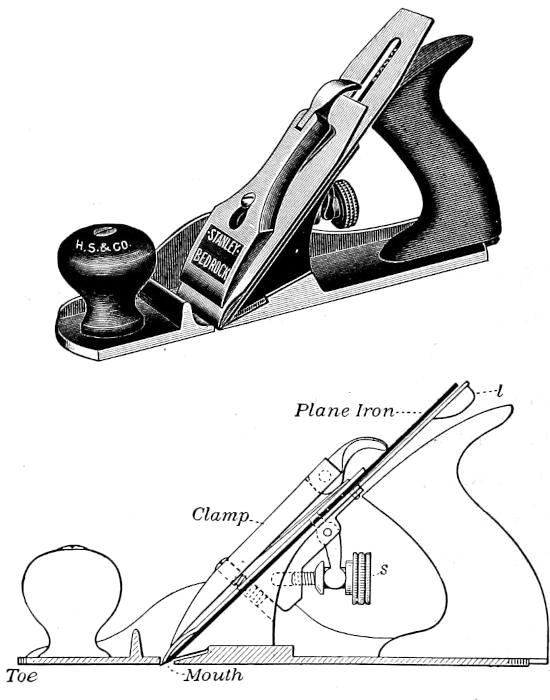
the throat of the plane by a clamp (Fig. 22). The opening
on the bottom of the plane through which the cutting
edge protrudes is called the mouth of the plane.
Fig. 22. Sectional Views of Iron Plane
9. Adjustment of Plane. There are two ways of adjusting
a modern iron plane,—by means of the set screw s,
and of the lever l.
Screw s lowers or raises the plane iron so that we
may take a thin or thick shaving, and lever l straightens
the iron, which is liable to project more on one side
than on the other, and will then take a shaving thicker
on one side than on the other.
Before using the plane always examine it carefully.
Invert the tool, holding it toward the light with the
toe toward you, and glance along the bottom. If the
iron projects, observe whether it is even, and if not,
move the lever until it is. For a thin shaving the cutting
edge should appear as a black line of uniform
thickness. For a heavy shaving turn the brass screw
until the iron projects slightly.
In using the plane avoid a stooping position. Stand
with the right side to the bench and with the shoulders
thrown back. Let the pressure of the left hand be
greater at the beginning and that of
the right hand at the end of the stroke.
The tool should rest perfectly flat on
the wood from start to finish.
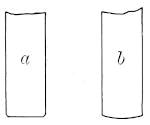
Fig. 23. Irons of Smooth and Jack Planes
10. The Jack Plane. The ordinary
plane iron has a straight edge, as shown
at a, Fig. 23, but when a large quantity
of wood is to be removed the iron is sharpened in
the shape shown at b. This curved iron will cut out
the wood in hollows, leaving ridges between, and it
is necessary to follow this jack plane with a finer one
having a straight edge in order to smooth the surface.
The jack plane might be called a roughing plane.
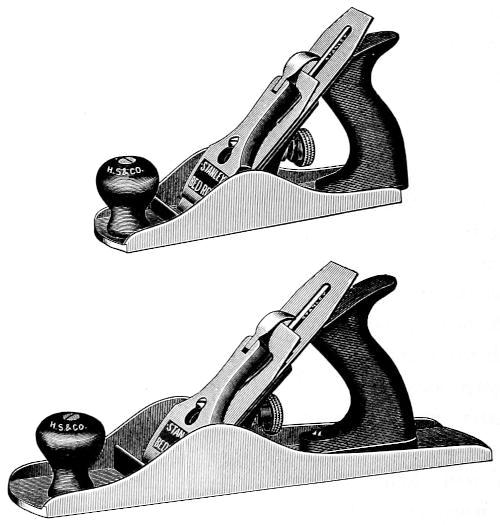
Fig. 24. Relative Sizes of
Smooth and Jack Planes
The lower figure is a jack plane
11. The Smooth Plane. The smoothing plane is shorter
than the jack plane, its object being to smooth the surface
without regard to straightening it, as it is supposed
that the straightening has previously been done. The
cap iron in the smooth plane should be set from a sixteenth
to a thirty-second of an inch from the cutting
edge of the plane iron.
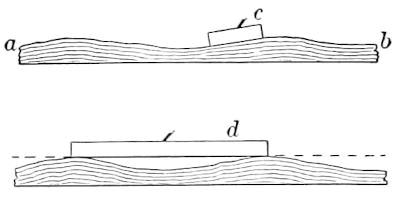
Fig. 25. Action of Short and Long Planes
12. Jointers. For straightening very rough and uneven
stock a long plane is necessary (Fig. 25). In the
illustration let line ab represent
the edge of a very
uneven board. A short
plane c would simply follow
the hills and hollows,
smoothing but not straightening
it, while a long plane,
as shown at d, would merely cut off the top of the high
places, as shown by the dotted line, and would not touch
the bottoms of the hollows until all the elevations were
leveled; in other words, until the surface was straightened.
Such planes, which
are often three feet long or
more, are called jointers.
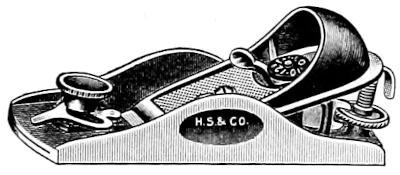
Fig. 26. The Block Plane
13. The Block Plane. To
square the end of a piece of
stock the conditions are quite different from those
just described where we were planing with the grain.
In end planing no cap iron is necessary, the plane
iron in the block plane being reversed with bevel
side up.
This tool requires more care than the others, as the
stroke is usually quite short, and if the cutting edge is
allowed to reach the farther corner,
the latter will be broken off.
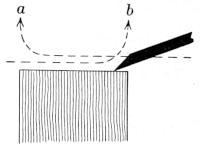
Fig. 27. Method of using Block Plane
To avoid this error the plane
must be lifted up before the end
of the stroke, as shown by the
dotted line a. The piece is then
reversed, and planed as shown by
arrow b. In this way the whole end is smoothed, without
ruining the corners.
Besides these standard planes there are many patent
and special ones for cutting tongues, grooves, beads, etc.
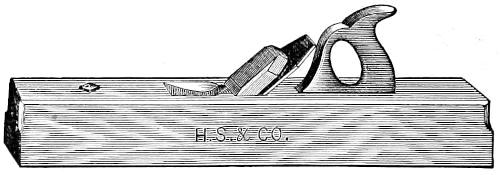
14. The Wooden Plane. Although the iron-bodied
planes just described are now in common use, the old-fashioned
wooden plane is still the favorite of many
woodworkers.
Fig. 28. The Wooden Plane
This tool, while lacking some of the adjustments of
the iron plane, was much simpler and contained a
smaller number of parts.
The iron and cap were held in position by a wooden
wedge, which was driven in by a light blow of the
hammer. The workman removed the iron and wedge
by turning the plane upside down and striking the
forward part a light downward blow on the bench,
while the thickness of the shaving was increased by
a light tap on the plane iron.
One of the chief objections to the wooden plane was
its liability to wear and warp, so that it became necessary
to straighten, or joint, the face. No such difficulty
is encountered in the
iron-bodied plane.
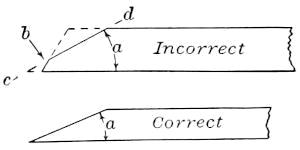
15. The Chisel. The chisel
is one of the simplest forms
of cutting tools. The size of
the angle a depends on the
kind of material to be cut.
Fig. 29. Cutting Angle of Chisel
A chisel for cutting wood must be sharpened to an
angle of from 30 to 35 degrees.
By careless sharpening an extra bevel is sometimes
formed, as shown at b.
The cutting angle is then no sharper than if the
chisel were shaped like that shown by dotted lines,
and care must always be taken when sharpening to
keep the line cd straight, so that angle a will be the
real cutting angle.
Two classes of chisels are in common use: the framing
chisel used for heavy work, such as the frames of
buildings; and the firmer chisel. The framing chisel
is strong and heavy, and has a handle capable of withstanding
the blows of a mallet. The firmer chisel is
designed for finer and lighter
work without the mallet.
Fig. 30. The Framing Chisel
Fig. 31. The Firmer Chisel
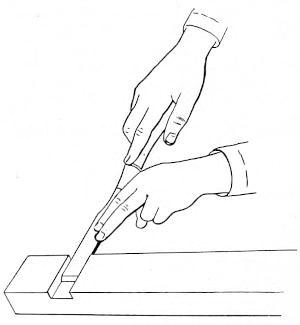
Fig. 32. Proper Position
for Horizontal Chiseling
The chisel must be sharp
if we wish to do good and
accurate work, and a cut on
the hand made by such a
sharp tool is liable to be a
deep one. Special care must
be used in handling it, keeping
both hands away from
the cutting edge, as shown
in the sketch, and placing it when not in use where it
cannot be pushed off the bench on to the floor or the
student’s feet.
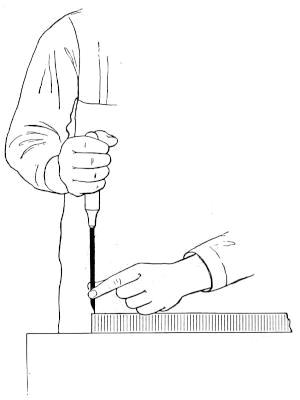
Fig. 32 shows the method of using the tool on horizontal
work, and Fig. 33 for vertical cutting. For this
kind of work only a small portion of
the cutting edge can be used, the student
judging for himself how heavy a
cut to take by the hardness of the wood
and amount of strength required. Good
work can never be done when one has
to exert all his strength on the tool.
The best results are obtained
when we work
easily.
Fig. 33. Proper Position
for Vertical Chiseling
Better work can usually
be done with the
chisel if, instead of pushing
it straight ahead or
straight downward, we incline it somewhat so as to
secure a slight paring action.
Fig. 34. Sharpening Chisel on Oilstone
When the chisel becomes dull, unless its edge has
been nicked or ruined by some accident, it is only
necessary to sharpen it on the oilstone. Hold the tool
with the bevel flat on the stone. A drop or two of oil
may be used to lubricate the stone, the tool being worked
back and forth on the face of it. Especial care must
be taken to avoid a rocking motion, which will produce
a curved edge instead of a flat one.
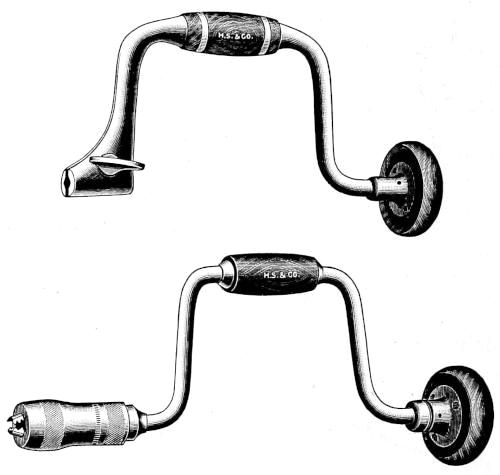
Fig. 35. Common Forms of the Brace
After the rubbing, reverse the chisel, lay the flat side
firmly on the stone, and draw toward you. This is to
straighten the wire edge which has been turned over
by the rubbing. The wire edge may then be removed
by drawing the cutting edge across the end of a block
of wood. When the chisel is nicked or very dull it
must be ground on the grindstone.
16. Brace and Bit. The old-fashioned augers and gimlets
have given way to the modern brace and bit.
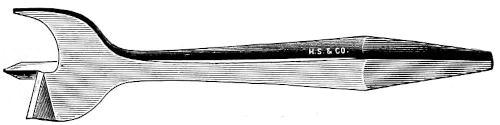
Fig. 36. The Center Bit
The brace, which is sometimes called the bitstock,
allows both hands to be used continuously, which was
not true of the old-fashioned auger. Several varieties
of the brace are in use, the ones shown in the cuts
being common.
Bits are designed for a variety of purposes, the name
being applied to a tool which is to be turned by the
brace. The old-fashioned center bit shown in the cut
possessed most of the essentials of a good boring tool.
Fig. 37. The Auger Bit
The sharp spur in the center allowed the hole to be
accurately placed. The lip on the outer edge cut the
fibers in a circle before the chisel edge began to remove
the wood, and so a smooth hole could be bored; but
considerable pressure was necessary to force the tool
through the wood.
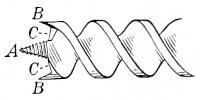
The progress that has been made in the manufacture
of tools can be easily appreciated by comparing this
center bit with the modern auger bit.
Referring to the sketch (Fig. 38), BB are two knife
points, or nibs, which cut the wood fibers before the
chisel edges, or lips, CC, can touch
the wood. The point A allows us
to accurately place the center of
the hole where we wish it, and the
screw back of A draws the tool into
the wood as it revolves. This part is known as the
spur, or worm. On this class of bits no pressure is
necessary.
Fig. 38. Details of Auger Bit
The opposite end of the bit, called the shank, fits into
the brace. Any tool with such a shank, and designed
for use with the brace, is a bit. We have screw-driver
bits, gimlet bits, auger bits, etc.
On the shank of an auger bit will be found a number.
This is the numerator of a fraction whose denominator
is 16. If we find this number to be 4, it is a ⁴⁄₁₆, or a
¼-inch bit. If the number is 16, we have a ¹⁶⁄₁₆, or a
one-inch bit, etc., always referring to the diameter of the
hole which the tool will bore.
In using the brace and bit care must be taken to see
that the bit shank is far enough in the brace to be fastened
securely, and that the tool is held at right angles
to the wood. It may appear from the front to be perfectly
vertical, yet by stepping to one side and looking
at it from another position it will frequently be found
far from vertical. When starting a hole it is well to
do this several times until assured that the tool is working
in a true upright position.
Fig. 39. The Gimlet Bit
Fig. 40. The Countersink Bit
The gimlet bit is used for small holes, such as we
make for screws. In this case the hole must be countersunk
to receive the screw head, when flat-headed
screws are used. The countersink bit is shown in the
cut, and its purpose is more fully explained in the chapter
on screws.
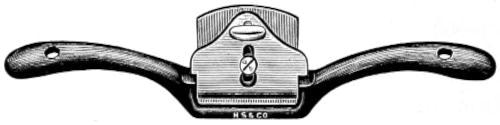
17. The Spokeshave. The spokeshave is practically a
short plane with handles at the side so that the tool
may be drawn or pushed. It may be adjusted by
means of screws to take light or heavy shavings, and
is used principally to smooth curved surfaces. The
forming of a hammer handle is a good illustration of
the kind of work it will do. It may be worked toward
or away from the worker, and is an exceedingly handy
tool.
Fig. 41. The Iron Spokeshave
CHAPTER IV MISCELLANEOUS TOOLS AND METHODS OF WORK
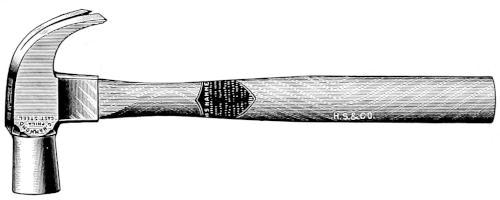
18. Hammer. The carpenter’s hammer is used principally
to drive or withdraw nails.
The various trades have hammers made specially for
their needs; thus we have machinists’, roofers’, upholsterers’,
stonecutters’, and other hammers,
but the claw hammer shown in the
sketch is the one commonly used by workers
in wood.
Fig. 42. The Claw Hammer
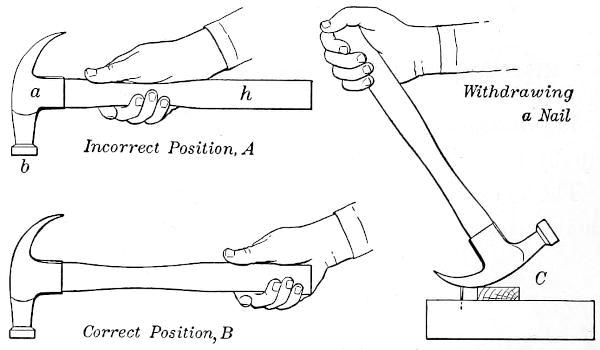
The head a (Fig. 43) is of steel, with the face b specially
hardened so that it may not be dented by the nails.
Notice the length of the handle h. This length did
not simply happen. Had it been intended to hold the
tool in the position shown at A, the handle would not
have been made so long. The proper position is that
shown at B. Position A is frequently taken by beginners,
and should be studiously avoided.
Fig. 43. Using the Hammer
A nail may be withdrawn with the claw, and be
kept straight for further use by a little care. Having
started the nail slightly, place a small block of wood
under the hammer head, as shown at C. Should the
nail be an unusually long one, the size of the block
may be increased as the nail comes out.
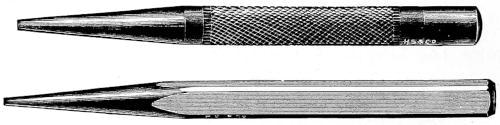
Fig. 44. Common Forms of
Nail Punch, or “Set”
In driving nails care must always be taken not to mar
the surface of the wood by striking the nail head after
it has become even with the surface, as this produces a
depression and ruins any fine surface.
If it is desirable to sink the nail head below the surface,
a nail punch, or set, is used. This is always necessary
when the surface is to be planed after the nailing.
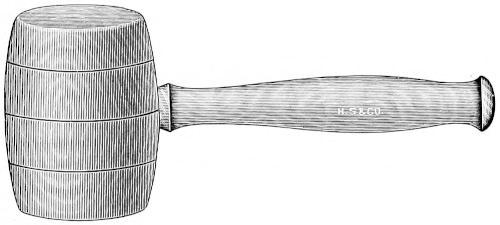
19. The Mallet. The mallet might be described as a
hammer with a wooden head, and is used whenever we
wish to deliver a blow which shall be
less concentrated than that of the
hammer. It is used in certain kinds
of heavy chiseling, such as house
framing, and gives a blow which does not shatter the
tool handle as a hammer would.
Fig. 45. The Mallet
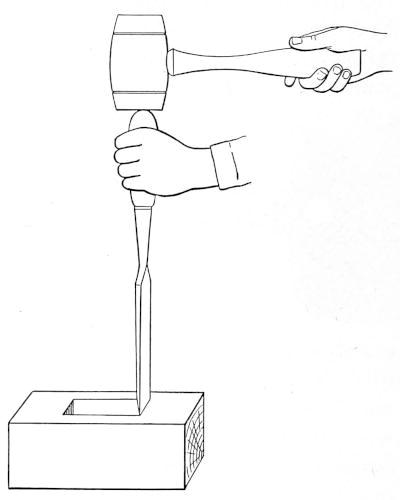
The use of the mallet is well illustrated by the making
of a mortise-and-tenon joint, the chisel and mallet
being used to cut the opening known as the mortise, as
shown in Fig. 46.
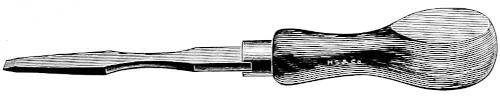
20. Screw-Driver. The screw-driver is perhaps the
most common of household tools, and is probably abused
more than any other. The handle is usually flattened
so that the hand may grip it more tightly, but occasionally
a round or fluted handle is seen.
Patent spiral screw-drivers have come into use in
recent years, but where considerable force is required
the brace and screw-driver bit are more effective.
Fig. 46. Cutting a Mortise
21. Sandpaper. “Sandpaper is the last resort of a
poor workman.” This statement has been made by
many teachers to many thousands of students, and is
true in many cases; but there are certain kinds of work
where sandpaper, if properly used, is allowable.
Fig. 47. The Screw-Driver
It must always be kept in mind that a surface which
has been sandpapered has become “gritty,” i.e. the fine
sand has come off and is more or less imbedded in the
wood. Consequently sandpapering must not be done
until all tool work has been finished, as the grit will
take the edge off the best tool,
and the finer the edge the more
quickly will it be ruined.
Fig. 48. An Exercise
involving the Use of Sandpaper
Again, a sandpapered surface
is always a scratched surface,
and the finest of scratched surfaces
cannot compare with the
perfectly smooth, satiny surface
produced by a sharp plane.
However, there are many places
where neither the plane nor
spokeshave can be used, and
here it is allowable to use sandpaper
after the tool work has been carried as far as
practicable.
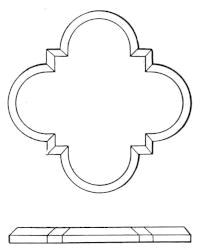
Fig. 48 is a case where sandpaper may be used with
propriety. The bevels in this lesson are to be chiseled
and then sandpapered with a sandpaper block,—the
block in this case being simply a small piece of wood
with square edges, about which the sandpaper is fastened
closely.
Curved articles, such as the hammer handle, must dispense
with the block, the sandpaper being held in the
hand.
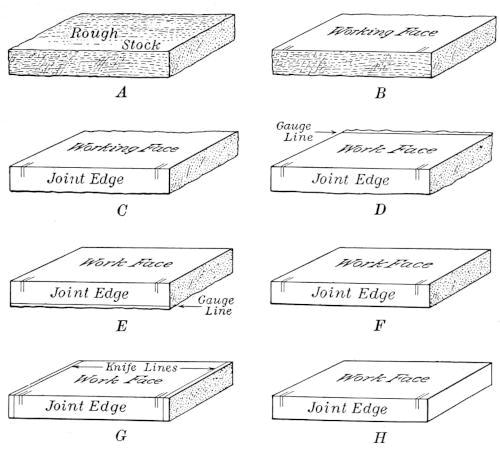
22. Squaring up Stock. This term simply means to
reduce a piece of sawed or rough lumber to one having
smooth, flat sides at right angles to each other, and of
definite length, breadth, and thickness (see Fig. 49).
Fig. 49. The Successive
Steps in squaring up Stock
First. Straighten one face with fore plane, jack plane, or jointer,
and smooth with smoothing plane. This face, called the
working face, becomes the basis from which all the other
sides are squared.
Second. Plane one of the adjoining edges and make square with
the working face. This edge, known as the joint edge, must
be thoroughly tested throughout its entire length with the
try-square, and must be square with the working face at
every point.
Third. Set marking gauge at required width and with gauge
block against the joint edge, gauge a fine line on working face.
Fourth. Plane down second edge to gauge line, just drawn,
squaring the edge with working face.
Fifth. Set gauge to required thickness and gauge line on both
edges from working face.
Sixth. Plane face parallel to working face down to the two
gauge lines. This gives the required thickness. It only
remains now to secure the required length.
Seventh. Square knife line around the four smoothed sides with
knife and try-square as near one end as possible, carefully
observing the precautions given in Chapter II.
Eighth. From the line just drawn, measure the required length
along edge of working face and square a line on the four
sides at the last point, as at first end.
Ninth. Block-plane first end to knife lines. If the second line
is more than an eighth of an inch from the end of block,
saw to the knife line with backsaw, and block-plane smooth
and square.
The above method should
always be followed in preparing
stock for laying out
the exercise.
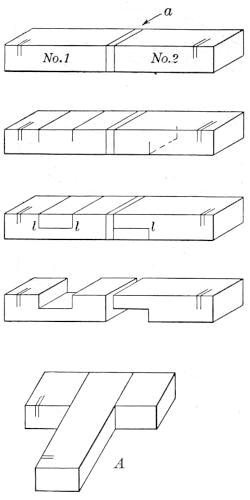
23. Laying Out. Let it be
assumed that the exercise to
be executed is the middle lap
joint shown at A, Fig. 50.
Fig. 50. Successive Steps
in laying out and making a Middle Lap Joint
First. Square up stock, leaving
ends rough.
Second. Lay off the length of each
piece, in this case 4½ inches,
with an eighth of an inch
between for sawing, as at a.
Third. Square all the lines
around four sides.
Fourth. Saw to end lines and
block-plane ends.
Fifth. Lay off width of opening
in piece No. 1 and square
lines across face and halfway
down on both edges.
Sixth. Measure length of lap on No. 2, square the line across
bottom and halfway up the sides. Gauge the horizontal
lines ll from working face.
Seventh. Saw pieces No. 1 and No. 2 apart and block-plane ends.
Eighth. Saw to the lines, chisel, and fit the pieces.
Although the above is the method of laying out a typical
joint, each problem will require special treatment and
here the student will be
guided by his instructor.
24. Securing Parts.
Many articles made of
wood consist of several
pieces fastened together.
When two pieces are
fitted together the surfaces
of contact are called
a joint. There are many
kinds and shapes in joinery,
and usually some
extra fastening is required
to hold the pieces
together. These aids are
glue, nails, and screws;
while on heavy construction still others, such as wedges,
pins, and dowels are used. The first three are commonly
used in small work.
Fig. 51. The Hand Screw
Glue is of two kinds, fish and animal. Both are made
from refuse matter,—animal glue being manufactured
from such products as bone, horn, hoofs, and hide.
The dry glue in the form of chips must be dissolved
in water and heated, being applied while hot. Liquid
glues sold in cans ready for use are now very common
and require no heating.
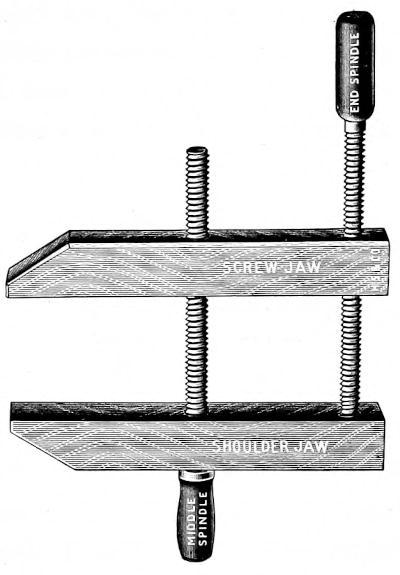
In making a glued joint it is usually necessary to hold
the pieces tightly together until the glue has set, or hardened,
and as this takes some time, hand screws built on
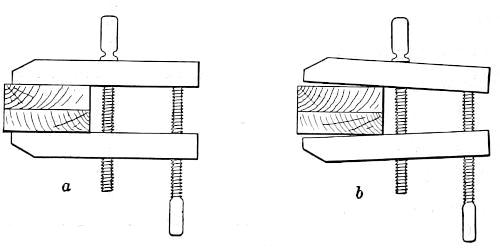
the principle of the vise are resorted to. Fig. 52 shows
two pieces glued together and fastened in a pair of
hand screws. Care must always be taken to keep the
jaws of the latter parallel. At a this is shown done
properly, while at b is shown a careless method which,
of course, will spoil the joint.
Fig. 52. Method of using the
Hand Screw
In gluing on the end grain a preliminary, or sizing,
coat of glue must first be made to fill up the pores,
which act very much like a sponge. This coat should
be allowed to dry, or partially dry, before applying the
final coat; otherwise the pieces will be held weakly,
if at all. Beginners are inclined to use too large a
quantity, and this tendency should be avoided.
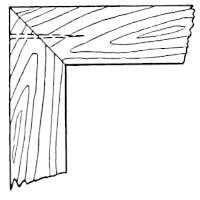
In some cases nails are used together
with the glue, as at the corners of picture
frames. It is customary in this
instance to nail in only one direction,
as shown in Fig. 53.
Fig. 53. Miter Joint at
Corner of Picture Frame
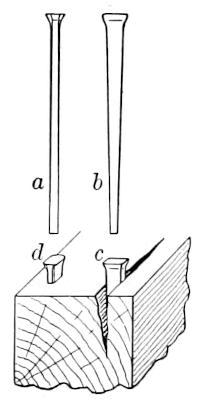
25. Nails. The nails in common use
are of two kinds, cut and wire.
Two views of a cut nail are shown in Fig. 54, a being
the side view and b the front view. Notice that in the
front view the sides converge like a wedge,
while in the side view they are parallel.
Fig. 54. Use of Cut Nails
Care must always be taken that the
point does not enter the wood as shown
at c, as the wood will be split by the
wedge action; d shows the proper method.
Steel wire nails are now in general use.
They are made from wire and are consequently
round in section, with a comparatively
sharp point. There are two distinct
kinds, named flat head and bung head.
Flat-head wire nails, as the name implies, have thin,
flat heads, which prevent the nail from being driven
beneath the surface.
Bung-head wire nails, or brads as the smaller sizes
are called, have very small heads, which allow the nail
to be sunk below the surface. This is done by means
of the nail punch, or set, and is necessary when the surface
is to be planed after the nailing.
26. Screws. Screws are much used, and allow the
pieces to be readily taken apart. They are divided
into two classes, flat head and round head, and are of
steel or brass. Steel screws are either blued or bright.
Bright screws are polished and blued screws are produced
by treating the bright ones with heat or an acid.
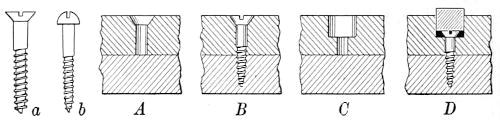
Fig. 55. Methods of using Screws
Fig. 55 shows a flat-head screw at a and a round-head
at b. Flat heads are used for the more common work
where it is desirable to have the screw head flush (even)
with the surface or below it, while round heads are used
where this is not necessary. In the latter case round
heads are used partly because they are more ornamental.
Flat heads must always be flush or below the surface,
and in all but the softest woods it is necessary not only
to bore a hole for the screw, but also to countersink it
with a countersink bit in order that it may receive the
head. Two methods of fastening with flat-head screws
are shown in Fig. 55.
Sketch A shows the two pieces of wood in position,
the hole bored in upper piece (only) and countersunk;
B shows the screw in position. In this case the screw
head is visible. It is occasionally desirable to hide the
screw entirely. Sketch C shows the hole prepared for
the screw; D shows the screw in position and a circular
wooden plug driven in over it.
The plug is then leveled with the
surface and the screw completely
hidden.
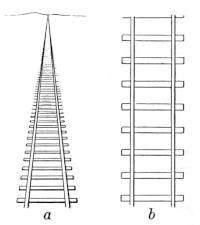
Fig. 56. The Difference
between Perspective and Mechanical Drawing
27. Mechanical Drawing. A mechanical,
or working, drawing is
quite different from a pictorial
drawing such as an artist produces.
The artist’s drawing represents objects
as they appear, while the
mechanical drawing represents
them as they really are. Things in nature do not look
as they are. For example, when we stand on a railroad
track the rails appear to converge until they seem to
meet in the distance. We know that this is not the
case, that the rails are really everywhere equally distant.
The optical illusion of the rails meeting at the horizon
is called perspective. Mechanical, or constructive,
drawing takes no account of perspective. In Fig. 56a is the perspective representation of a track, while b
shows a track by mechanical drawing.
In a working drawing more than one
view is necessary to show the true shape
of an object.
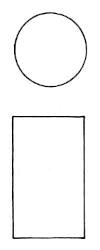
In Fig. 57 is shown the mechanical drawing
of a cylinder,—the front view, as its
name implies, being the image it would
make in a mirror held before it vertically,
and the top view the image it would make in
a mirror held directly over it horizontally.
Fig. 57. Mechanical Drawing of a Cylinder
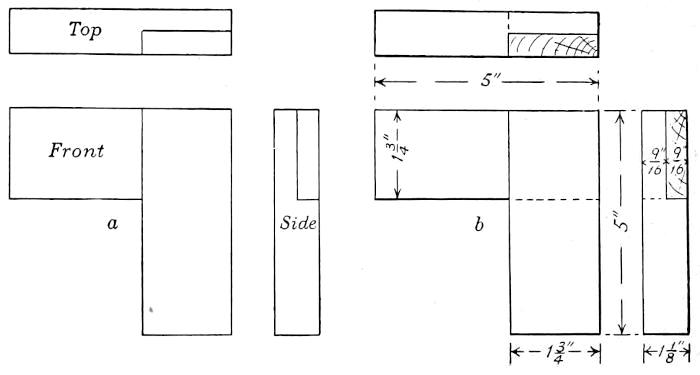
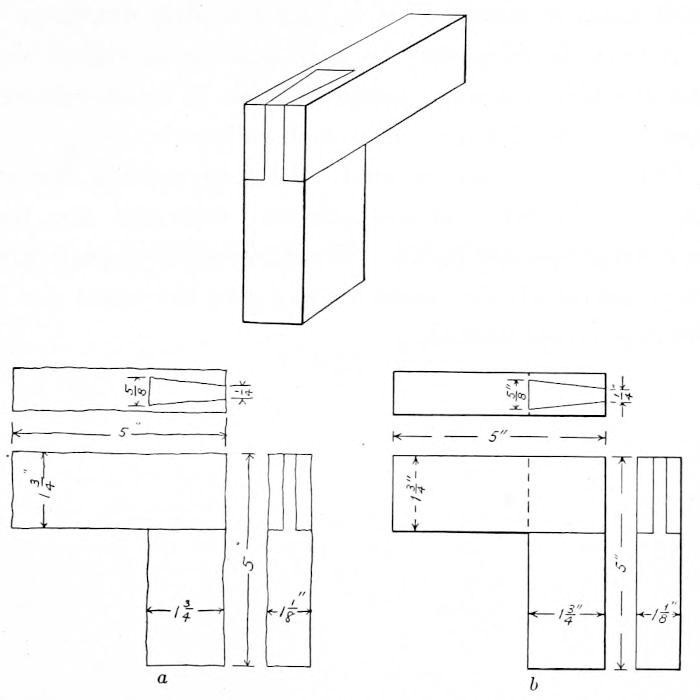
Fig. 58. Mechanical Drawing of End Lap Joint
Occasionally three views are necessary. Fig. 58a
shows the front, top, and side views of an end lap joint.
The complete working drawing of this joint, with all
the necessary dimensions, is shown at b.
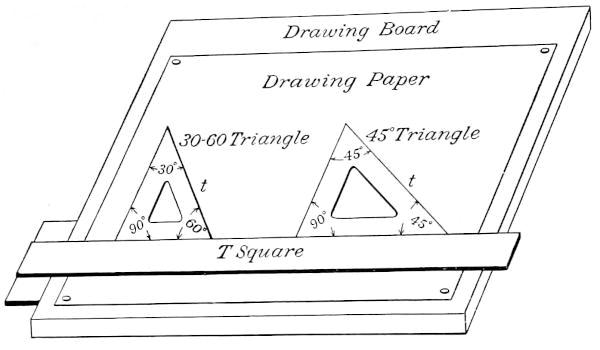
Fig. 59. Drawing Board
showing T Square and Triangles in Position
In making drawings of this kind the greatest accuracy
is required and special instruments are necessary.
The drawing board on which the paper is
fastened must be perfectly flat, with one of
its edges straight.
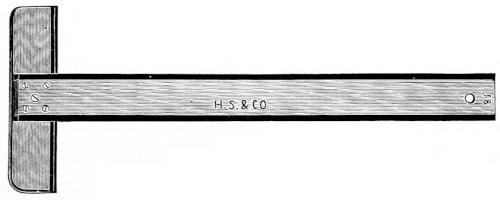
Fig. 60. The T Square
The T square is used for guiding the pencil
or pen when drawing horizontal lines.
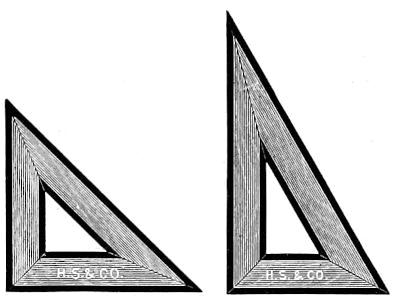
The two triangles tt (Fig. 59) are used for drawing
vertical and oblique lines, and a pair of compasses is
needed for circles and arcs of circles. Each triangle contains
one right angle, the one on the left being known
as a thirty-sixty triangle because the two remaining
angles are thirty degrees and sixty degrees respectively.
The one on the right is called a forty-five-degree triangle
because it has two forty-five-degree angles.
The position of T square and triangle when drawing
vertical lines is that shown in the sketch, the line being
drawn from the T square
upward. Horizontal
lines are drawn from left
to right.
The rule used in mechanical
drawing is
called a scale, and should
not be used for drawing
lines. Its purpose
is measuring.
Fig. 61. The Triangles
used in Mechanical Drawing
In making a drawing the first step is to determine
the spacing. The size of the paper may be measured,
the number of views are known, and also the size of
each. The views should be so arranged that the spaces
between will be in good proportion. It is a good plan
to make first a free-hand sketch, putting on dimensions
and figuring the spaces before beginning actual
work on the mechanical drawing. Fig. 62 at a shows
a free-hand sketch of a single dovetail joint, and b the
mechanical drawing complete.
Fig. 62. Drawings of a
Single Dovetail Joint
All dimensions must be given, and as far as possible
they should be so placed as not to interfere with the
clearness of the drawing. Neat, small arrowheads and
plain, clear figures add to the general appearance, just
as does careful lettering in titles and all printed words.
A drawing which is made the exact size of the object
represented is known as a full-sized drawing; but for
large objects such a method would necessitate large and
unhandy sheets of drawing paper. It is customary in
such cases to make what is called a scale drawing.
A scale drawing may be half, quarter, or eighth size,
and the fact is printed under the title in smaller letters,
thus: ½ inch = 1 inch, or ¼ inch = 1 inch.
Other scales may be used. In map making, for example,
a sixteenth of an inch may represent one, ten,
or even a hundred miles. Whatever scale is used, however,
the dimensions must always give the exact size of
the object represented.
ELEMENTARY WOODWORKING Part II
CHAPTER V WOOD
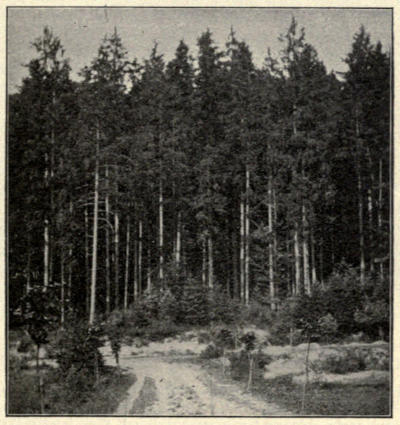
Fig. 63. The Forest,
Norway Spruce, Bavaria, Germany
28. Lumbering and Milling. It is well to remember,
when using wood for any purpose, that it was once part
of a living tree which had roots, bark, leaves, and flowers,
and that the tree began life as a little sapling, which
grew taller and larger for years before it could be called
a tree, and that it was between fifty and a hundred
years old before it was large enough to cut down for
timber.
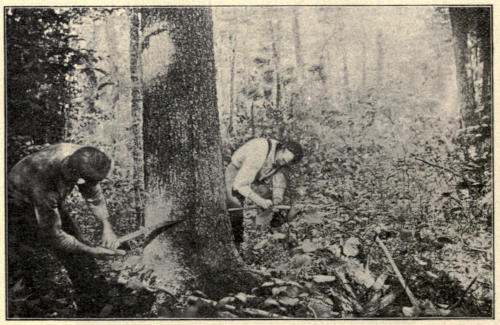
Fig. 64. Felling a Tree
The lumberman selects trees which have large, straight
trunks. They are usually cut with the ax, although the
first cut is often made partially through the trunk with a
saw. The branches are then chopped off and the body of
the tree cut into lengths convenient for handling. They
are rolled into a stream and floated down the river to a
sawmill, or, in case there is no river near by, are carted
on sleds or wagons to the railroad and thence to the mill.
The cutting of the trees is usually done in winter,
the floating of the logs, or river driving as it is called,
beginning with the breaking up of the ice in the spring.
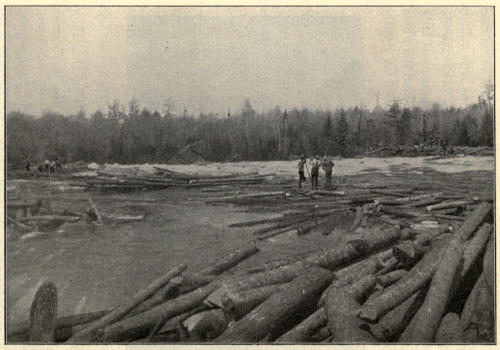
River driving is a very interesting and dangerous business.
Logs will often get caught sidewise and the whole
river from shore to shore become jammed so tightly
that hundreds of thousands of logs are stopped in their
course, forming an immense dam which the lumbermen
call a log jam.
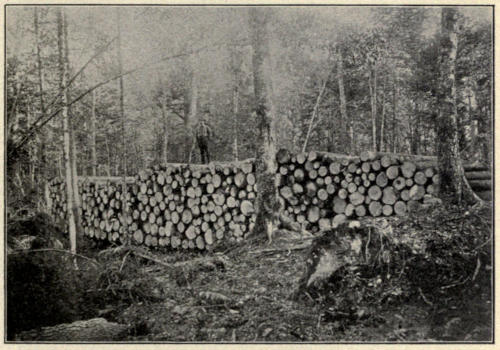
Fig. 65. A Skidway of
Adirondack Spruce
Fig. 66. River Drivers
breaking up a “Log Jam”
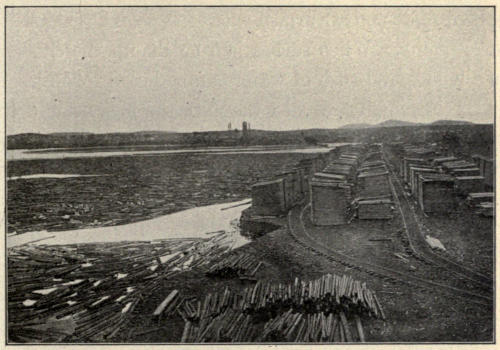
Fig. 67. Log Boom and
Lumber Piles at Tupper Lake, N.Y.
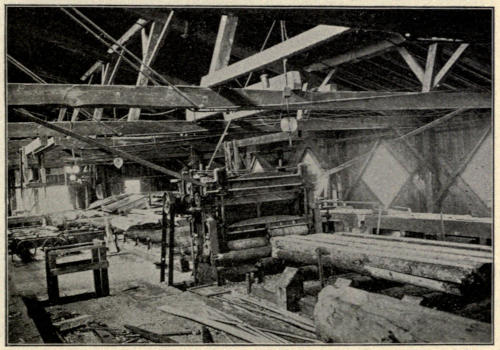
Fig. 68. A Modern Gang
Saw—Interior of Modern Sawmill
To break up this jam very often requires much labor
and great daring on the part of the drivers, who wear
spiked shoes and are armed with long poles having sharp
steel points. When such a jam breaks up, the crashing
of the logs and rush of water can be heard for miles.
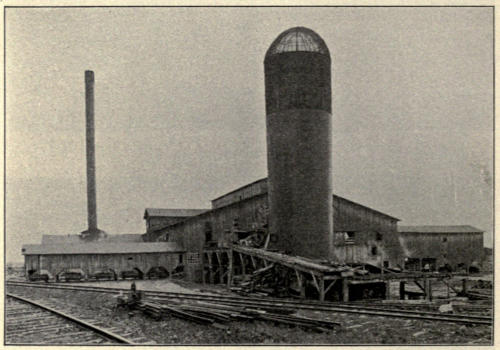
Having finally reached the mill, the logs float in the
river, inclosed in a log boom, until the mill men are
ready to saw them into planks.
Fig. 69. A Modern Sawmill
The boom consists of logs chained together and
stretched across the river just as a fence is built on
land to inclose cattle.
Fig. 70. The Circular
Saw—Interior of Sawmill
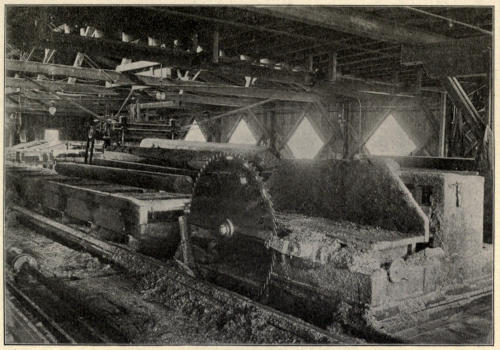
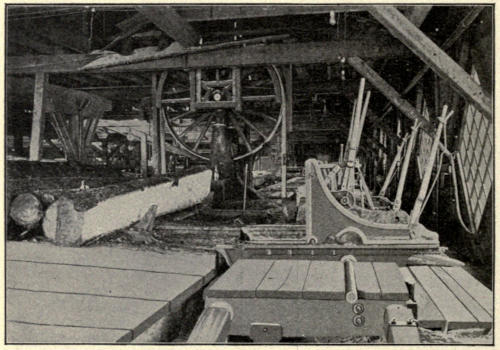
The sawmill of to-day is a mass of automatic
machinery, and after the log enters it is not touched
by human hands until it comes out as lumber of various
sizes ready to be loaded on boats or cars.
Logs are sawed into timber, planks, or boards, and
these forms are called lumber.
Fig. 71. A Large Band Saw
Timber refers to all of the largest sizes, such as beams
and joists. Planks are wide strips over one inch thick,
and boards are one inch or less in thickness, varying in
width and length. Lumber may be planed at a planing
mill, and is then known as dressed lumber. It may be
dressed on one, two, or all sides. Dressed stock which
is free from knots, shakes, and sapwood is called clear.
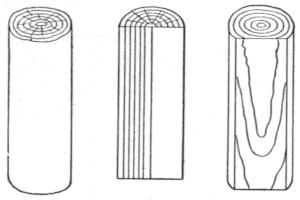
Fig. 72. End of Log,
showing Annual Rings and Medullary Rays
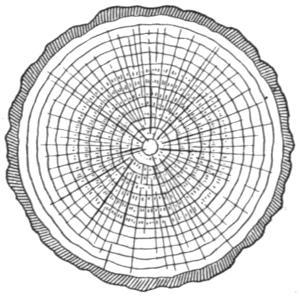
By examining the end of a log we can learn a great
deal of the life of the tree. It is made up of a number
of irregular rings and of lines
radiating from the center and
running in nearly straight lines
toward the bark.
The number of rings tells us
the age of the tree, as a new
ring is added each year.
As the tree grows, the old
wood near the center becomes
compressed and dry and is
known as the heartwood, while
that portion between the heartwood and bark is called
sapwood.
In some woods the difference
between the
heartwood and sapwood
is very marked. In
ebony, for instance, the
heartwood is coal black
and the sapwood white.
The sketch shows half
a log, the annual rings
being indicated, and also the radial lines, called medullary
rays.
Fig. 73. Log cut
lengthwise, showing how “Grain” is formed
Looking at the length of the log we see that the
lines in a board, which we call the grain, are really
the edges of the annual rings.
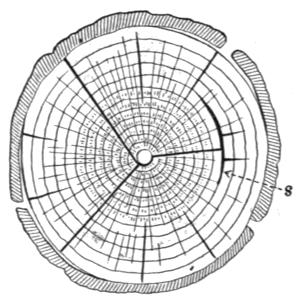
Fig. 74. Showing
Weather Checks and “Shake”
It often happens in the forest
that the wind sways the trees
to such an extent that the annual
rings separate and slide one
within the other; this produces
a defect in the wood called a
shake (see s, Fig. 74).
There are other characteristics
of wood known as warping
and shrinkage.
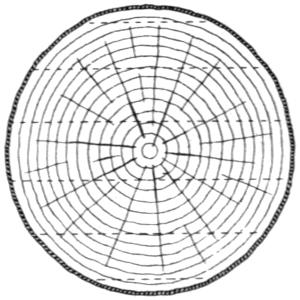
Fig. 75.
After a tree has been cut down the cut end at first
looks like Fig. 72. If it is allowed to lie for some
time exposed to the weather, its
appearance changes to Fig. 74.
This is due to the evaporation
of the sap, and as there is more
sap toward the outside, the shrinkage
is greatest there and becomes
less toward the center where the
heartwood is comparatively dry.
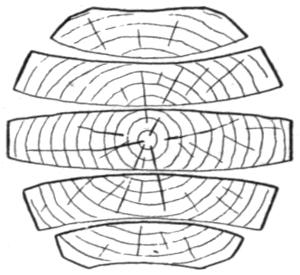
This is an important fact to
know, because if we had cut the log, while it was
still green, into planks, as shown in Fig. 75, the
boards would have curled up or warped, as shown in
Fig. 76.
Fig. 76. Showing Effect of Warping
Besides warping, the evaporation of the sap causes
the whole tree to shrink in diameter, and consequently
our planks will tend to become narrower. This is
called shrinkage, and in some woods amounts to a
quarter of an inch to the foot, which means that a
plank sawed twelve inches wide will, after a few
months, measure only eleven and
three quarter inches.
When we construct anything in
wood we must always consider how
the object will be affected by warping
and shrinkage, remembering
that the shrinkage is only across
the grain.
Let us consider the problem of constructing a drawing
board to see how warping and shrinkage may be
overcome.
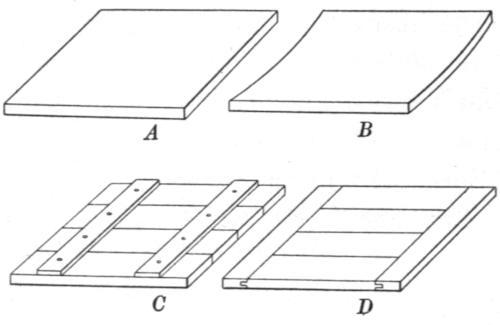
If we make it of one piece, like A (Fig. 77), the board
will soon change its shape to that shown in B, which
would make it useless for mechanical drawing, as a perfectly
flat surface is necessary. We can overcome the
warping by screwing heavy cleats on one side across
the grain, as shown at C. The cleats would need to be
heavy or the warping force would bend them.
A better way would be to build the board up of several
narrow strips glued together, as the warping of one
would be counteracted by the warping of its neighbors
in opposite directions; but to make doubly sure, cleats
fastened with tongue and groove joint should be added
at the ends, as shown at D. This has an advantage
over the first method, as the cleats in C are often in
the way and make the board clumsy to handle.
Fig. 77. A Study in
Construction. Methods of overcoming Warping and Shrinkage
The student will find many evidences about the house
of how the woodworker has tried to prevent warping
and shrinkage, as, for instance, in the paneled doors,
tables, etc.
The wood of the various trees differs greatly in hardness,
evenness of grain, durability, etc., and every boy
should know not only what our woods are used for, but
he should also know the trees when he sees them.
We are indebted to the trees for many things besides
wood. They give us delightful shade and coolness in
summer; many of them produce delicious fruit and
nuts; from them we obtain such valuable products as
maple sirup and sugar; while tar, pitch, turpentine,
rubber, and tannin are only a few of the many tree products.
The houses we live in, the chairs we sit on,—in
fact, most of our furniture, even to the frames of our
pictures, the cars we ride in, and the very pencils we
write with, are of wood which was once part of the
living forest.
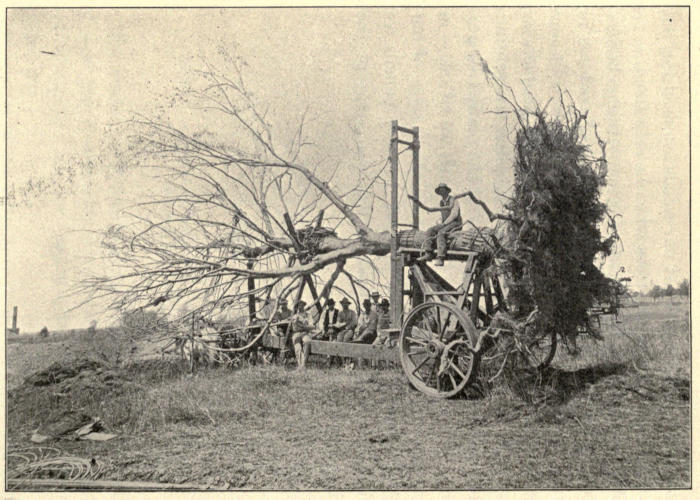
Fig. 78. A Large
Tree being moved by a Modern Tree Mover, showing Root Formation
CHAPTER VI BROAD-LEAVED TREES: THE OAKS
Our American trees may be divided roughly into two
classes: (1) those which keep their leaves the year
round, known as evergreens; (2) those whose leaves
drop off in the fall, called broad-leaved, or deciduous
trees, in distinction from the evergreens, whose leaves
are usually needle-shaped.
Among the broad-leaved family are such trees as the
oak, chestnut, hickory, maples, elms, etc.; and among
the evergreens or cone-bearing trees are the pines,
spruces, hemlocks, firs, and cedars.
The oak family is a very important one, the wood
being hard and strong and the tree a sturdy, healthy,
and well-known specimen of tree life.
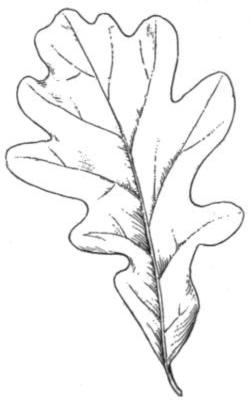
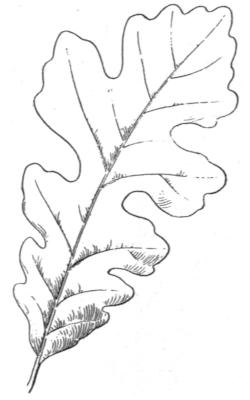
White oak is perhaps the most common member of
the oak family. It grows to a very large size and has
a leaf of the form shown in Fig. 79. Observe carefully
the outline of the leaf and compare it with the sketch
of the next form.
The white oak, like all oaks, bears acorns, and its
timber is used as a standard when comparing different
kinds of wood. If we say that the strength of white
pine is one half, we mean one half that of white oak,
and in all timber calculations white oak is the standard,
just as the yard and mile are standards of length. In
work which requires strength, such as carriage making,
shipbuilding, and cooperage,
white oak is used very extensively.
The quartered oak used so
much for furniture is obtained
by cutting the logs in a special
manner. The method of cutting
gives a beautiful mottled
effect with the silver rays
spread out in irregular white
splashes on a dark background.
We might separate the oak
into two distinct groups: (1)
those trees whose acorns ripen
in one season; (2) those which
require two years. The acorns of this latter group remain
on the tree throughout the first winter and ripen
the second summer.
To the first class belong the white oak just mentioned,
the post oak, chestnut oaks, mossy-cup oak, and
live oak.
Fig. 79. Typical Leaf
of the White Oak
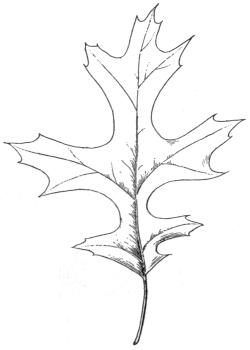
In the second class are the red, scarlet, black, pin,
laurel, and willow oaks.
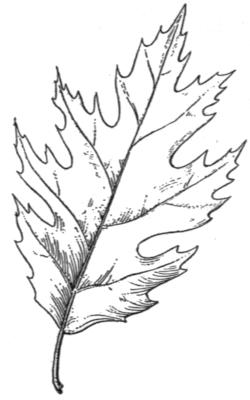
The difference in the leaves of these trees is so great
that we need never mistake one for the other. Notice the
cut of the red oak and compare it with that of the white
oak. The latter has rounded lobes, while the red-oak
leaf has sharp points and the
fingers of the leaf are indented
again with smaller teeth.
The different trees in the
white-oak family all have
leaves with rounded lobes, and
most of those in the red-oak
group have pointed ones, yet
there is a difference between
members of the same family,
just as among human beings.
We can tell at a glance
whether a man is a negro, a
Chinaman, or a white man. If
a white man, he may be a Frenchman or an American;
and again, if an American, he may belong to the Jones
family. But all the members of the Jones family do not
look alike and we know one from another.
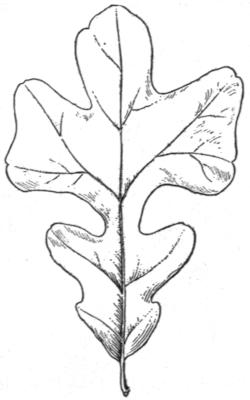
Fig. 80. Leaf of the Post Oak
This is true of trees. No two are alike, and we can
tell from observation whether a tree is an evergreen or
a broad-leaved tree, whether it belongs to the white-oak
group; and after studying trees a little we can tell
whether a member of this group is a white oak, a post
oak, or a mossy-cup oak.
Compare the post-oak leaf (Fig. 80) with that of the
white oak. There is not a great difference in form, but
the post-oak leaf is thick, leathery,
and dark green, while the
white oak has a beautiful thin,
light green leaf, which turns red
in the fall.
The post oak is a rougher and
coarser tree than the other, and
is sometimes called iron oak on
account of its very hard, tough
wood.
Fig. 81. Leaf of Mossy-Cup Oak
29. The Mossy-Cup Oak. One
of the most beautiful oaks we
have in America grows in the
South and West, and is only
rarely found in our parks in the East. It is called the
mossy-cup oak because the large acorn which it bears is
surrounded by a bushy fringe which almost hides the
nut. This acorn is a sight never to be forgotten. The
leaf is larger than that of the white oak, and although
the two leaves look somewhat alike, the divisions of the
mossy-cup leaf are not as regular as those of the white
oak, and it is not so thin and delicate.
Its wood is very strong and is valuable for many
purposes, such as boats, carriages, farming implements,
railroad ties, and cooperage.
30. Black Oak and Black-jack Oak. These two trees
are usually found growing in wild places, and the
black-jack oak is often called barren oak from the fact
that it frequents bleak and barren plains, such as the
sandy stretches of New Jersey and Long Island.
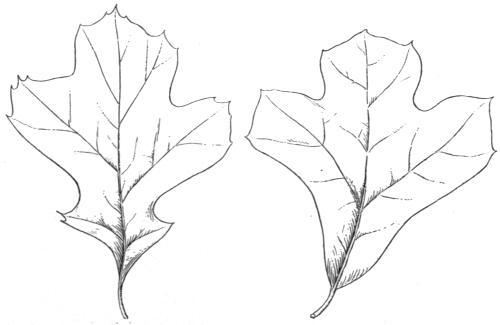
Fig. 82. Leaves of
Black Oak and Black-jack Oak (Black-jack on right)
The sketch shows the difference in the leaves, that
of the black-jack having only three main lobes, or
divisions, while the black oak
has five. However, the leaves
of these two trees vary considerably,
and one must always look
for the typical leaf, which is the
one shown in the sketch. The
black-jack is a small, shrubby
tree, with branches often twisted
and contorted, and its wood is
not very valuable except as fuel
or for making charcoal.
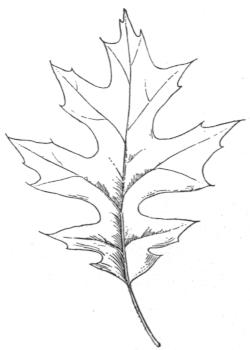
Fig. 83. Leaf of Red Oak
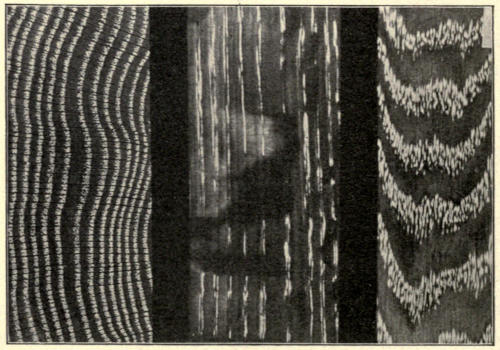
Fig. 84. Wood of the Red
Oak, showing three sections. The one on the left shows annual rings
obtained by a horizontal cut through the tree. Central view shows
vertical cut at center of tree. View on right shows vertical cut
between center and bark as illustrated in Fig. 73.
The acorns require two seasons for ripening, as do
those of the red, scarlet, and pin oaks.
31. The Red Oak. The red oak is one of our largest
and most noble trees, growing taller even than the white
oak, and may always be distinguished
by its very large,
shiny, dark green leaves.
Its bark is also much
smoother and darker than
the white oak. Its acorn is
very bitter and
can easily be recognized
by its
shallow cup and
by its large size.
It is the largest of the
two-year acorns. The
wood of the red oak is
darker than that of the
white, and is used in
the manufacture of furniture.
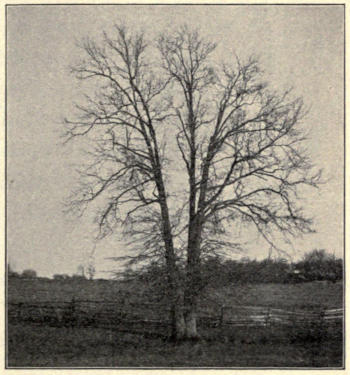
Fig. 85. Scarlet Oak
32. The Scarlet Oak. This tree is often confused with
the red, but a glance at the leaves will show a great
difference. That of the scarlet has deeper indentations
and is much more slender and skeleton-like in shape. It
takes its name from the bright scarlet or red tinge it
takes on when the leaves change color in the fall.
33. The Pin Oak. The pin-oak leaf is much more
readily confounded with the scarlet oak than that of any
other tree. In fact, no two trees have leaves so nearly
alike as these two; yet a glance at two typical leaves
placed side by side will
show considerable difference.
The pin-oak leaf is
smaller than the other,
and in proportion to its
size the indentations are
not so deep.
Fig. 86. Pin Oak
The pin-oak tree has a
great many small branchlets,
or stems, which give the tree
the appearance of a bundle
of pins, especially when the
leaves are off in winter. It
is a beautiful tree and is now
being planted very extensively as a shade tree. It is
hardy, and stands city air very well indeed. Its bark
is rich in tannic acid, which is used in tanning leather.
The oak family is such a large and valuable one that
we cannot afford to pass it over lightly. In the South
grows the willow oak, famous for its shade and its
leaves, which resemble those of the willow. A little
farther north we find, along the Ohio valley, the shingle
oak, so called from the fact that its wood is mostly
made into shingles. It is also known as the laurel
oak, because its leaves are shaped like those of the
laurel, although not
so glossy.
Fig. 87. Pin Oak in Winter
This is such an
odd shape for an oak
leaf that one would
be likely to pass it
by and not recognize
it but for the
fact that it bears
acorns. This is always
the test,—“By
their fruits ye
shall know them.”
If we meet a new
tree which seems
not to be an oak because its leaves are new to us, and
it bears acorns, we may be sure it is an oak.
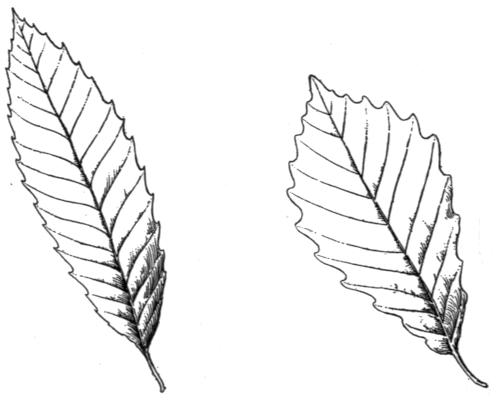
A very interesting group of trees which come under
this head are the chestnut oaks. At first glance one
would take one of these trees to be a chestnut, but it
bears acorns and must therefore be an oak. The sketch
shows the two leaves side by side.
Fig. 88.
Chestnut Chestnut Oak
Let us examine them closely. Although they slightly
resemble each other, by looking carefully we see that the
teeth on the chestnut leaf are pointed, while those on
the chestnut oak are decidedly rounded. There is also
a difference in proportion, as the chestnut leaf is long
and narrow, while that of the chestnut oak is broader.
There are several varieties of chestnut oak, but their
leaves are quite similar and they all belong to the white-oak
group and ripen their acorns in one season. They
grow to a large size, one famous from Revolutionary
times at Fishkill-on-the-Hudson measuring seven feet in
diameter. The acorns are sweet and are eagerly sought
after by the squirrels.
The wood is durable in exposed places and is used for
cooperage, railroad ties, and fencing.
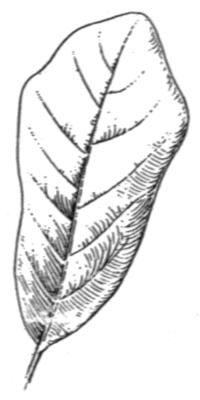
34. The Live Oak. No list of American oaks would
be complete without the live oak. This is a southern
tree and is remarkable in many ways. Its
leaf has no indentations, remains green all
winter, and is thick and leathery.
Fig. 89. Leaf of Live Oak
The wood is extremely heavy, a cubic
foot weighing nearly sixty pounds. It is
as hard as it is heavy, and although it takes
a high polish and has a fine grain, it soon
dulls the edge of a tool.
Before the age of steel, when all ships
were wooden, it was much used in shipbuilding,
and the government bought large tracts of land
where live oak grew abundantly, so that the United
States navy should never lack the necessary timber.
It grows along the Atlantic coast, south from Virginia,
and along the Gulf to Texas.
CHAPTER VII BROAD-LEAVED TREES: THE MAPLES
It is the maple family to which we are indebted for
much of the glorious coloring of our autumn landscapes.
It is true that all trees play their part in the general
color scheme, but for the brilliant reds and scarlets of
the fall foliage we must look to the maples.
When we think of the word maple we are apt to
have visions of other things besides trees. Maple and
sugar or sirup seem to go together, and in fact some of
us do not know that there are other maples besides the
sugar maple.
This fine American tree is one of which we should be
proud. Not only is it a handsome large tree, valuable
for its shade and the beautiful colors it wears in the fall,
but its wood is hard and valuable,—it is often called
rock maple,—and besides all these good qualities it furnishes
us with our maple sirup and sugar.
The process of making maple sugar is quite interesting
and may be divided into two stages,—gathering the
sap, and boiling down.
Very early in the spring, often as early as March,
the sap begins to flow up through the tree. The farmer
knows by experience when to tap the tree, which he
does by boring a three-quarter inch hole with an auger.
Into this hole he inserts a spout of wood or iron through
which the lifeblood of the tree—the sap—flows in a
steady drip, drip, drip, into a pail or bucket placed beneath
to catch it.
The sap comes in drops about as regularly as the ticks
of a clock, one a second. This continues for two or
three weeks, until each tree has yielded something like
twenty-five gallons. As it takes five gallons of sap to
produce a pound of sugar, each tree yields about five
pounds of maple sugar. In New England and New York
there are maple groves containing thousands of trees,
and one farm alone produces five thousand pounds of
sugar in a season.
Strange as it may seem, this excessive bleeding of the
trees does not kill them unless improperly done. The
farmer must not tap them at the wrong time nor in too
many places. The tree will stand a great deal if properly
treated, but harsh treatment will kill it.
The boiling process is very simple. The sap is poured
into large boilers or evaporators and boiled until it becomes
a sirup. The old-fashioned test to find out when
the boiling had been carried on long enough was to drop
a little of the hot sirup into the snow or into a cold dish.
If it hardened, the boiling was finished.
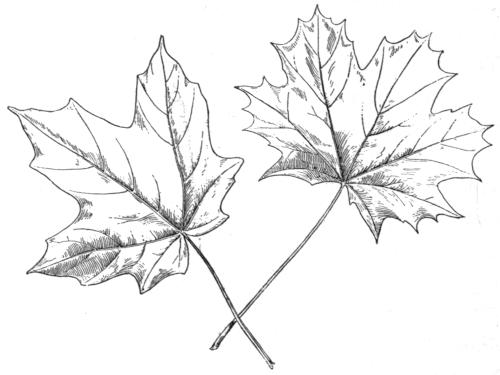
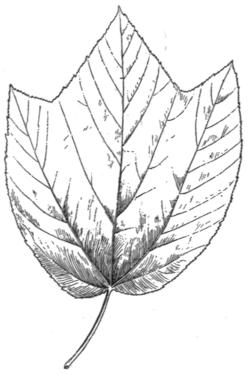
Fig. 90 shows the leaf of the sugar maple, also that
leaf which is most often confounded with it, viz., the
Norway maple. Observe the two closely. The sugar
maple has blunt, rounded points and is thick, while the
Norway has sharp points, which are more numerous,
and the leaf is much thinner and more delicate.
Fig. 90.
Sugar Maple Norway Maple
The sugar maple grows taller and does not cast so
dense a shade as the Norway, which is a low-growing
tree with close, dark foliage.
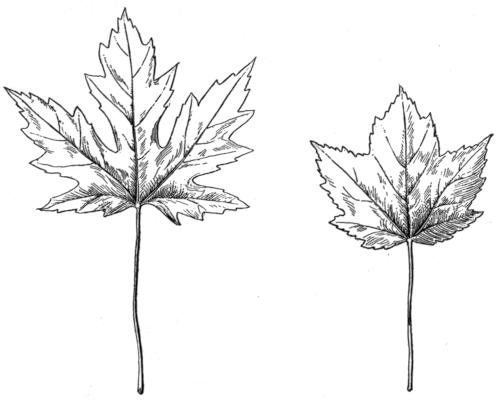
35. The Silver Maple. The one which naturally comes
next in the list is the silver, soft, or white maple, as it is
variously termed. From the ground up to the topmost
leaf the whole character of this tree suggests the word
thoroughbred. Clean-cut, refined, strong, and healthy
in every detail, the silver maple is a thing of beauty
and might truly be called
the acme of perfection in
tree life. Its name is
derived from the fact that the under side of the leaf is
silvery white. The upper side being dark green gives
a beautiful effect when the wind stirs the foliage, which
as a whole has the grace and drooping effect of the
American elm.
Fig. 91.
The Silver Maple The Red Maple
This description does not always fit, however, as it
is planted extensively in cities where horses gnaw the
fine bark; smoke, soot, and coal gas discolor the leaves;
and the caterpillars complete the work of destroying its
beauty. Yet it still lives,
even if it does not thrive
under such harsh treatment.
Its wood is white,
soft, and not very valuable.
36. The Red Maple. A
relative of the silver maple
and one which might
be mistaken for it is the
red, swamp, or wild maple.
It is this tree which
displays the brightest reds
in autumn. Referring to
the sketch it will be seen
that the leaf is smaller
and three-fingered instead
of five, as in the
silver variety. The stem of this leaf is also red during
the entire season, as if it could not wait for autumn.
Fig. 92. The Sycamore Maple
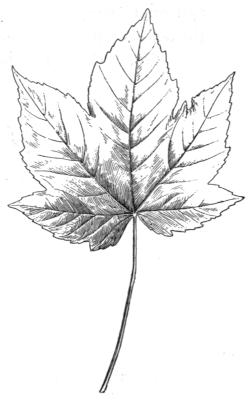
37. The Sycamore Maple. In the rows on rows of
maples so common in our towns and cities one will
often find a leaf larger, heavier, and coarser than any
of the others. This variety, like the Norway, is an
importation from Europe, known as the sycamore maple
because of its resemblance to the sycamore leaf. It is
easily identified by its large size, coarseness, the very
long, thick red stem, and by the fact that its entire
edge is finely toothed,—in
which point it differs from
all the foregoing varieties.
Its value as a shade tree is
nearly equal to the Norway,
and in Europe it is often
planted in preference to all
other maples.
38. The Striped Maple.
Growing in the shade of
other trees and forming part
of the undergrowth of our
North woods is a small tree
known as the striped maple,
from the stripes which run
up and down its bark. The New England name for this
little mountain tree is moosewood, from the fact that
the moose is very fond of the bark and twigs, which
form his chief food in winter. The leaves are quite
large, but very thin, soft, and delicate.
Fig. 93. The Striped Maple, or Moosewood
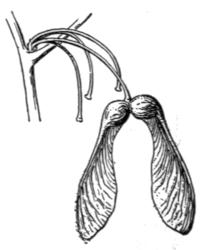
39. Maple Keys. The fruit, or seeds, of all the maples
are known as winged. The flat, thin part gives the
seed a swirling motion as it drops from the tree. This
is the way nature has of spreading the seed over a
large area so that more trees may be started in life.
Many tree seeds are winged, but the maple seed or
key is so large and so common that every one must
at some time have noticed it.
Fig. 94. Maple “Keys,” a
Common Form of Winged Seeds
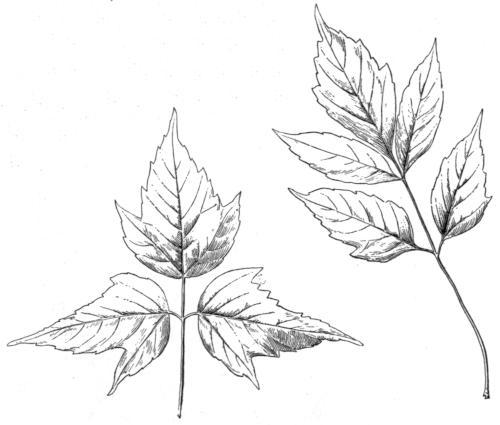
40. The Ash-Leaved Maple. The
ash-leaved maple is a leaf very common
in our parks. It has no resemblance
to other maple leaves, yet it
bears the unmistakable maple key,—“By
their fruits ye shall know
them.” It is therefore a maple.
The box elder, or ash-leaved maple,
is interesting because it is our only
maple having a compound leaf; that
is, a leaf stem with several distinct leaflets. Compound
leaves are very common (notice the hickory leaf and the
horse-chestnut), but not on maples, and our ash-leaved
maple is a curiosity. It delights in swampy places, but
grows almost anywhere. It is a small tree, and its wood
is not especially valuable except for making paper pulp.
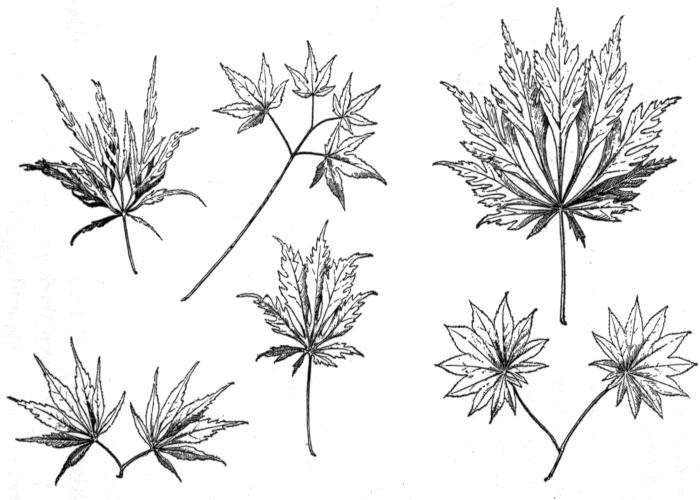
North America has only nine varieties of maple, while
China and Japan have more than thirty. Indeed, it is
to Japan, whose forests are largely made up of maples,
that we are indebted for some of the most dainty and
exquisite trees to be found. The Japan maples planted
so extensively on our lawns and in our parks have such
a variety of form and color
that no written description
can do them justice. Fig. 96
will give some idea of their
shape and delicacy. The colors, which of course cannot
be shown, range from dark purple to the most delicate
combinations of white and green. The finest of these
dainty leaves bears a stronger resemblance to an ostrich
plume than to anything in the line of tree leaves.
Fig. 95. Ash-Leaved
Maple, or Box Elder
Fig. 96. Japan Maples
CHAPTER VIII BROAD-LEAVED TREES HAVING COMPOUND LEAVES
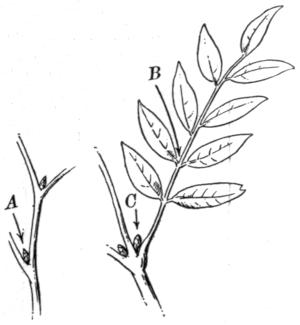
The beginner is often in doubt as to whether a twig
with several leaves is a compound leaf or a number of
simple leaves. This is a very easy thing to decide. At
the end of the leaf stem, where the leaf joins
the twig or branch, is always a little bud.
When the leaf drops off in the fall
the bud remains, and in the spring
begins to swell and finally
develops into a leaf. This
bud then is the promise of
next year’s leaf, and it is
always found at the base of
the leaf stem, as shown at
A. There is no such bud at
the base of the leaflet on the
compound leaf, as shown at
B. If then we find no bud at B, we must look farther
down until we discover it at C. This furnishes the test
and we know that our specimen is a compound leaf.
Fig. 97. Method of
distinguishing Compound and Simple Leaves
This class of leaf is very common, as our horse-chestnuts,
buckeyes, hickories, and walnuts all have compound
leaves.
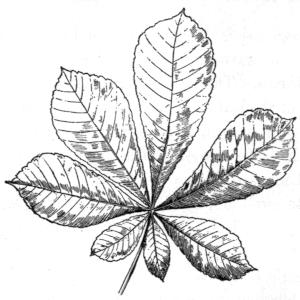
The horse-chestnut is not a native American tree, but
was imported from Europe, where it is a great favorite.
The leaflets number five or seven, always an odd number,
and they radiate from one central point, the odd
one in the center usually being the largest.
Fig. 98. The Horse-Chestnut
It is very interesting to watch these leaves as they
come out of the sticky buds in the spring. They unfold
and grow very rapidly and soon the tree brings forth
large pyramidal clusters of beautiful flowers.
The large, neat brown nuts which come later in the
season do not seem to be very useful, yet they are so
solid and shiny that every boy delights to gather them.
An American tree closely resembling the horse-chestnut
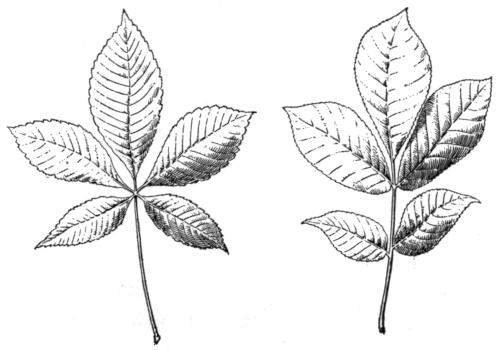
is the buckeye. The leaflets on the buckeye leaf
number five, sometimes seven, and radiate like the horse-chestnut
from a common center.
Fig. 99.
Buckeye Hickory
This tree is well known through the Ohio valley,
where it is very common, Ohio being called the Buckeye
State. The nuts are not edible, but the wood is
very tough and strong and is used extensively in making
farm implements.
Compare the leaf of the buckeye and the hickory
shown in Fig. 99. Both leaves are compound, and each
has five leaflets, but they are quite different, because the
hickory leaflets are arranged on opposite sides of the leaf-stalk
instead of radiating from one point.
There are several varieties of hickory, including the
shagbark, or shellbark, the pignut, and pecan.
The name shagbark hickory is taken from the peculiar
appearance of the bark, which hangs in loose pieces
nearly a foot long and gives the tree a very shaggy
effect. Shellbark is another common name for this tree.
The nut which this tree bears is hard and thick, but
the kernel is very sweet, and is considered by some
superior to all other hickory nuts.
The pignut hickory is so called because the nuts in
some parts of the country are used to feed the pigs. It
is also called broom hickory. The nuts are small and
become bitter after having lain awhile. The wood,
however, like all the hickories, is valuable, being hard
and tough. There is a difference between strength and
toughness. Oak is strong, but not tough. Hickory is
both hard and tough. A tough wood is one which will
stand bending without breaking. A wood which will
bend easily but is not strong cannot be called tough.
It must be both strong and elastic, and hickory has
both of these qualities.
41. The Pecan. We usually think of the pecan nut
as different from the hickory, yet they belong to the
same family. The pecan hickory is a southern tree
which delights in the warm climate south of the Ohio
River, and in Texas is found as a grand forest giant
one hundred and fifty feet high, producing an enormous
crop of the sweetest and most delicately flavored
nuts. The leaf has nine leaflets and occasionally as
many as fifteen.
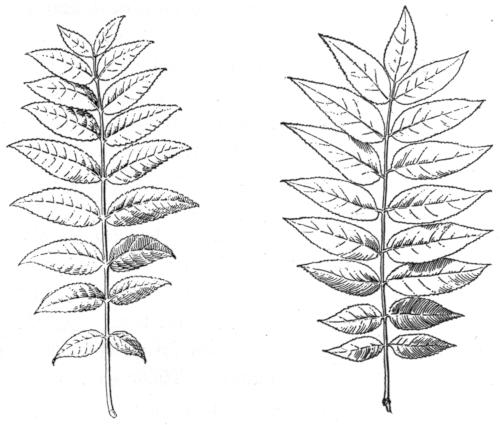
Fig. 100.
Black Walnut Butternut
42. The Black Walnut and Butternut. Perhaps no
two trees are so difficult for the city boy or girl to
distinguish as the butternut and black walnut. Both
have compound leaves, the number of leaflets varying
from nine to seventeen for the butternut and from
fifteen to twenty-three for the black walnut. A leaf
having fifteen leaflets, then, might belong to either tree
if there were no other way to distinguish them. The
teeth on the black-walnut leaflet are larger and sharper
than on the butternut, and the fuzzy stem is lacking.
The green nuts, too, are different, the black walnuts
being just about the size and shape of green lemons,
the butternuts longer and thinner; but the unmistakable
feature is the odor. Having once smelled the
crushed leaves of a butternut and a black walnut, a
person will thereafter need no other test.
The use of black-walnut lumber for making furniture
was at one time very common. The great supply of
this valuable wood has been exhausted and other woods
have become fashionable. It is still used for gunstocks,
for which purpose nothing seems better suited.
Butternut is a light-colored wood, but takes a good
polish and is occasionally used in cabinet work.
43. The Locusts. The locust family is a large one; its
members all bear compound leaves, and their fruit is in
the form of beans instead of nuts.
The common yellow or black locust is famous for its
hard, durable wood, its delicate light green leaves, and
its white flowers.
The tree is not very beautiful when the leaves are
off, but its wood is so valuable that its beauty is not
considered. The wood is yellow
and becomes very hard
after it has dried.
The honey locust is another
common member of this family.
Fig. 101.
The Locust The Honey Locust
44. The Honey Locust. Its leaves are much finer and
somewhat resemble ferns. It may always be known by
the dangerous sharp-pointed thorns which grow all over
the tree. These thorns are unusually large, sometimes
being found in great bunches and as long as six inches.
Its fruit is a long, thin, brownish pod, which is sweet and
contains little light brown beans. The wood is strong
and durable.
45. The Ash. Every boy who has owned a rowboat
knows that oars are made of wood from the ash. This
is because the oar must be elastic as well as strong,
and the timber of the ash tree supplies
these two qualities. The ash
is one of our tallest and noblest
forest trees. It is rather slim in
build, with beautiful clean shiny
green foliage. The members of
this group seem to be
fond of colors, and we
have the white ash, red
ash, green ash, blue ash,
and black ash.
There are slight differences
in the leaves and
seeds, but, as in other trees, when we have once seen an
ash seed we can always thereafter distinguish an ash tree.
Fig. 102 shows the seed of the red ash. It is a winged
seed, with the seed part inclosed by the wing.
Fig. 102. Red Ash
The compound leaf of the white ash has from five to
seven leaflets and the black ash has from seven to
eleven. The wood is hard, tough, and elastic, has a
handsome grain, and is used for many purposes besides
making oars, such as furniture, carriages, and those
farm implements which require strength. The Indian
could find no better wood for his bow, and even Cupid
is said to have first made his arrows of ash.
CHAPTER IX BROAD-LEAVED TREES HAVING SIMPLE LEAVES
46. The Elm. The elm is the well-known shade tree
of New England. Its tall, graceful form is familiar to
every visitor and native of that section of country, where
it is found along every roadway and in every city.
Fig. 103. The American Elm
Who can think of New England without its noble
elms? It would indeed be a different country. The
elm may be said to represent New England character,—dignified,
sturdy, graceful, and refined. Being tall,
with foliage well up, the general shape of the tree gives
the desired shade, yet does not obstruct the view; while
its stately dignity gives an air of comfort and repose to
the grounds, which it seems to protect from the elements.
Its wood is valuable for certain kinds
of work, being tough and strong, but it
is not suitable for cabinetwork, as it is
difficult to polish. It is used considerably
for wheel hubs and in cooperage.
Fig. 104. Leaf of American Elm
Observe the edge of the elm leaf
carefully. The teeth not only curve
gracefully toward the extreme tip of
the leaf, but they are themselves also
toothed,—a form known as double-toothed.
The leaf is coarse and rough
to the touch, in marked contrast to the
birch family, whose leaves it slightly
resembles. There are several elms famous in the history
of our country. At Cambridge is the old elm under
which George Washington drew his sword and took command
of the American Army on July 3, 1775; there are
several other “Washington Elms” in different parts of
the country, while New Haven is known as the City of
Elms. William Penn made his famous treaty with the
Indians under the branches of a magnificent elm, which
remained standing until it was over two hundred years
old, when it was finally blown down. The spot has been
marked by a marble column.
The tree is called the American, or white, elm, and we
have several other varieties growing wild, including the
well-known slippery elm, so called
because the inner bark is slippery
and edible.
47. The Birches. If the black
birch with its sweet, aromatic bark
is not known to a boy, the white, or
canoe, birch is sure to be. It seems
to be the fate of this beautiful tree
to be disfigured by every wandering
youth who has strength enough
to tear off a strip of its paper-like
bark.
Fig. 105. Leaf of Black Birch
The leaf of the black, or sugar, birch may be distinguished
from the elm by its smoothness and thinness.
Its base is slightly heartshaped, the edge is double-toothed,
the tender bark on the twigs is sweet to the
taste, and the leaves grow in pairs.
Fig. 106. Birches bordering a Canal
48. White Birch. The famous white, paper, or canoe
birch has a leaf somewhat broader than the black variety,
but without the heartshaped base. Its bark is its peculiar
feature and cannot be mistaken. It comes off in layers
and possesses a resinous quality which makes it waterproof,
a fact fully appreciated by the Indians, who constructed
their canoes of it. The wood is hard and tough.
49. Gray Birch. A
smaller tree, known as
the gray birch, also has
white bark, but it is not
as perfect as that of the
canoe birch, does not peel
in layers, and has triangular
black spots on the
trunk beneath every
limb.
Fig. 107. Leaf of Gray Birch
It loves barren, rocky
places, abandoned farms,
etc., and is sometimes
called old field birch. It
has a fine, delicate foliage,
which is not duplicated
in the forest. Each
leaf swings from a long, slender stem, and every passing
breeze gives it a trembling effect, like the aspen. The
leaf form is very odd,—a broad, flat base, and then a
long, graceful curve out to a fine point, the whole edge
being finely double-toothed.
50. The Beech. The difference in the leaf forms of
the birch and beech is very marked. Both have toothed
edges, but in the beech the spaces between the teeth are
so remarkably shallow that one has to search for them.
Fig. 108. A Remarkable
Growth of Beeches in Greater New York
There has been a common belief for generations that
the beech is proof against lightning, and recent experiments
prove that beech wood offers considerably greater
resistance to the electric current than oak, poplar, or
willow; so our ancestors were partly right. The wood
is hard, strong, and tough, and will take a high polish.
51. Hornbeam. Closely related to the beeches are two
little trees which have delicate birchlike foliage and wood
of great hardness,—the hornbeam, or blue beech, and
the hop hornbeam,
or ironwood.
Fig. 109. Leaf of American Beech
Fig. 110. Ironwood, or Hop Hornbeam
The leaves of
these two varieties
are quite similar, that of the ironwood being somewhat
the larger.
The name hop hornbeam is derived from the fruit,
which resembles the hop, and the name ironwood from
the great strength and hardness of the wood.
52. Buttonball. No list of trees would be complete
which did not include those three forest giants, buttonball,
tulip, and sweet gum. The names buttonwood,
buttonball, sycamore, and plane tree, as the same tree is
called in different parts of the country, all apply to that
fine American tree which sheds its bark as well as its
leaves, leaving a ghostly monarch of tree life, which
produces an enormous crop
of buttonballs so well known
to country boys and girls.
The leaves are in proportion
to the size of the tree, often
measuring a foot in length,
and being frequently covered
on the under side with a
white down called fungus.
Fig. 111. Leaf of Buttonwood
The wood of the sycamore,
as it is incorrectly called, is
valuable for cabinetwork, having a beautiful grain and
taking a high polish. It is, however, difficult to work,
and has a tendency to warp.
53. Sweet Gum. The sweet-gum tree also produces a
crop of balls, or seed pods, but although the same size
as the buttonballs, they need never be confused, as the
gum balls are covered with somewhat sharp points, while
the buttonballs are comparatively smooth.
The leaves of the sweet gum, or liquid amber—so
called from the amber-colored gum the tree gives out—remind
one of the starfish, being five-fingered and decidedly
different from any leaf in the forest. The tree
grows to a height of one hundred and fifty feet, and its
wood is a handsome brown color with fine and intricate
markings. It warps badly,
but is valued for wood turning
on account of its softness
and even grain.
Fig. 112. Sweet Gum, or Liquid Amber
54. Tulip. The lumber
furnished by the tulip tree,
commonly called whitewood,
is less liable to warp
than gum wood, and is somewhat
harder. Just why it
should be called whitewood
is not clear, as it is much
darker than white pine and
of a greenish-yellow color.
The leaf of the tulip tree is very peculiar, having only
four points, without any small teeth, and with an outline
so odd that one often wonders if nature did not use a
pair of scissors in cutting it out.
Each leaf stands out aggressively on a long stem.
The glory of the tree—which gives it its name—is
the mass of tulip-shaped flowers it bears in the spring.
They are large and brilliant, yellowish-green in color,
with dashes of red, and develop a narrow, light-brown
cone, which remains on the tree all winter. The
tree thrives best south of the Ohio valley, where it
is frequently found from five to seven feet in diameter.
The Indians formerly made their dugout canoes
from its trunk, and in some
sections it is still called canoe
wood.
Fig. 113. Tulip, or Whitewood
55. Basswood, or Linden. A
very valuable group of trees
for both shade and timber
are the basswoods, or lindens.
There are several varieties,
the European linden thriving
here as readily as our native
varieties. These trees may
always be distinguished by
the leaves, which are heartshaped and lopsided, i.e. one
side from the middle line being always larger than the
other, as if two leaves of different sizes had been joined
along the center.
This is a very common feature among certain classes
of trees, such as the elms. Another remarkable feature
is the seed, or bract, shown in the sketch (Fig. 115).
The tree is sugar-loaf in shape, gives a dense shade,
and has sweet flowers so fragrant that it is sometimes
called the bee tree, because the bees swarm all over it
in the summer time. Its timber is valuable, being free
from knots and of such an even grain that it is much
sought after for some kinds of carving.
Fig. 114. American Linden,
or Basswood, showing the Sugar-Loaf Form of the Tree
The familiar cigar-store Indian is usually carved from
basswood.
Among the broad-leaved trees there are still several
familiar families, all loved by some of us for some reason.
The willow is always a striking tree, not only because
of its weeping or drooping appearance, but also because
we usually associate it with water.
What is more common in the country than a stream
hidden by the willows which crowd its bank and dip
down into the clear
water!
Then, too, we watch
it for the first sign of
spring, and friends in different
states often vie
with each other to
discover the first
pussy willow, the name given to the soft, downy buds
which appear often before the snow has melted.
Fig. 115. Leaf and Bract of Linden
The willow is dear to boys, because on the green twigs
in spring the bark can be separated from the wood and a
whistle or simple flute manufactured.
The wood of the willow is not very valuable, being
used chiefly by pulp makers, but it grows where no
other trees can exist, being found nearly all over the
world, and creeping nearer to the north pole than any
other broad-leaved tree except the birch. It has over
one hundred and fifty varieties, which vary from small
shrubs up to trees a hundred feet high. Its soft and
gentle beauty is sufficient excuse for its existence.
Fig. 116. A Weeping Willow
56. The Poplars. In the poplars we have a group
of trees similar to the willows in some ways but very
different in others. The wood is weak and of little
use except for fuel and paper pulp, but there the likeness
ends.
To this family belongs the quaking aspen, whose
leaves are continually trembling,—in fact, the whole
family is a restless one, the constant motion being due
to the shape of the long stems, which are flattened.
The people of Scotland have a
superstition that it was of aspen
wood that our Saviour’s cross was made, and that the
tree shivers in constant remembrance of that fact.
Fig. 117.
Aspen Aspen Poplar, or Large-Toothed Aspen
Beside the quaking aspen is the large-toothed aspen,
the Lombardy poplar, and the cottonwood.
The Lombardy is the spirelike tree which seems to
reach toward the clouds, and its tall, narrow form is
familiar in many sections of our country, although the
tree was originally imported from Europe.
Cottonwood and balm of Gilead are two well-known
members of this family. Cottonwood is best known in
the West, where it often
constitutes the chief and
only growth along the water
courses, and balm of
Gilead is known as one
of our common city shade
trees. This latter tree, often
called the balsam, is
really an important tree
of the great northwestern
country, being found plentifully
in the Klondike,
and often forming in that
far northern country great
forests thousands of square
miles in extent. It is used as a shade tree because it
stands the smoke and gas of the city where many other
trees pine away and die.
Fig. 118. Cottonwood, or Carolina Poplar
57. Sassafras. We find many freaks in the tree
world, and nature seems to have tried to see how odd
she really could be; for instance, on the sassafras tree
we find three distinct kinds of leaves, having one, two,
and three divisions.
Fig. 119. Sassafras
This tree, which in the northern states is usually quite
small, grows under favorable conditions to a height of
fifty feet. It is noted for the pleasant taste of its leaves,
twigs, and roots, which are used considerably in flavoring
medicines.
58. Mulberry. Another tree noted for the peculiar
shape of its leaves is the mulberry. There are three
common kinds, named, from the color of their berries,
red, black, and white.
It is the white mulberry whose leaves are the food of
the silkworm. The leaves of this tree are quite regular,
but those of the red and black vary apparently as they
please. No two leaves seem to be alike either in size
or shape, and they are very soft and downy.
Fig. 120. Red Mulberry,
showing Variation in Leaf Form
CHAPTER X THE EVERGREENS
Fig. 121. White Pines
at Westbury, Long Island
The evergreen trees, so called because their needle-like
leaves remain on the tree all winter, are fully as
interesting as the broad-leaved trees. Without them
our landscapes in winter would be much more barren
and bleak, and their shade is very pleasant in summer.
A pine forest with its fresh balsam air and needle-covered
floor is a sight to be long remembered.
Fig. 122. A View showing how
Evergreens help to enrich the Landscape. Arbor Vitæ Hedges
The wood of the evergreens is usually classed among
the soft timbers, although the yellow pine is far from soft.
59. White Pine. The king among evergreens is usually
admitted to be the white pine. Its soft, bluish-green
foliage, the widespreading branches, and
the value of its fine, even-grained wood
give it the first rank.
Fig. 123. Needles and Cone of White Pine
Pines have needle-shaped leaves
which grow in groups of two,
three, or five. White pine needles
grow in groups of five and
are from three to four inches
long. The cones which contain
the seeds are about five inches
long. The tree grows tall and
straight, and formerly grew in
great forests covering thousands
of square miles; the wood is so
free from pitch and is so easily worked with tools that
these great forests have been almost annihilated by the
lumberman’s ax, and white-pine timber has become quite
expensive. It takes many years for a tree to grow large
enough for timber, and unless we are more economical in
the future white pine will be only a memory.
60. Georgia Pine. The southern yellow pine, or Georgia
pine, is a very different tree from its northern cousin, the
white pine, furnishing us with a resinous yellow wood,
much harder than white pine, and a beautiful and valuable
material for the interiors of buildings. It is also
very durable and is frequently used for exposed places,
such as the decks of ships.
The needles are very long, measuring a foot and sometimes
fifteen inches in length.
The seed cones are from six to
ten inches long, and the scales have
little prickles on their ends. The
tree grows throughout the southern
states from Virginia to Texas,
and the cutting of its timber is a
valuable industry of the South.
61. Yellow Pine. The common
yellow pine must not be confounded
with the long-leaved Georgia pine. The former has
needles growing three in a bunch, and the latter short
needles three or four inches long, growing two and sometimes
three in a group. The cone of the common yellow
pine is also very much smaller, being only two inches
long.
Its wood is very valuable and is used for flooring,
ceiling, and interior finishing.
Fig. 124. Hemlock
There are several less important kinds of pine, such
as the northern and Jersey scrub pines, and the red,
or Norway pine.
Spruce, hemlock, and fir are well-known members of
the evergreen family.
62. Hemlock is a graceful, dainty-looking tree, with
drooping branches and little needles not over half an
inch long. It is a northern tree except along the
Allegheny Mountains, where it extends as far south as
Alabama. The seed cones are the tiniest brown things
to be found among the common trees. They are no
longer than the hemlock needles.
Fig. 125. The Influence of
Hemlock on the Winter Landscape. Snow Scene
The wood is not as valuable as pine, splitting very
easily and being afflicted with shakes, a defect caused
by the annual layers or rings breaking away from each
other when the trees are swayed by the winter storms.
The bark is valuable, however, as it is rich in tannin.
63. Spruce. The tall, dark, cone-shaped evergreen
trees which ornament so many of our old farm dooryards
are usually some species of spruce. The spruce
is sometimes mistaken for the balsam fir, which is so
commonly used for Christmas trees, but they are so
different that they need never be confused.
There are several varieties of spruce, including the
red, black, white, and Norway, but they all bear a family
resemblance.
Looking at the end of a spruce twig, it will be found
that the needles completely surround it. This is not
true of the fir. Then the spruce needles are sharp at
the tip, while the fir needles are blunt.
This family is distinctly a northern group, being
found as far north as Hudson Bay and forming dense
forests, particularly on mountain sides. One may often
see on the steep slopes the dividing line between the
broad-leaved trees and the evergreens, the dark spruces
extending clear up to the summit.
The red spruce is found as far south as Tennessee,
but in that latitude it grows only at high elevations.
It has cones about one and a half inches long, and its
wood is light, soft, and close-grained. The wood is used
for the sounding-boards of musical instruments and for
the frames of buildings.
The black spruce is the northern brother of the red,
and is really a Canadian tree which occasionally reaches
down into the United States. It reaches the Mackenzie
River on the north and covers large areas in Manitoba.
It takes its name from the dark,
somber color of its foliage, which seems
almost black against the snowy hillsides.
The cones are the same size as on the
red spruce, but they persist in remaining
on the tree for several years. The wood
is soft and weak and is used for sounding-boards,
pulp, and light framing for
houses.
Fig. 126. Black Spruce
The white spruce is similar to the other two, but
lighter in color, cones a trifle longer and softer, and
needles more slender. It is a northern tree; its wood
is very white and clear-grained, and is used for finishing
the interior of houses.
Norway spruce, as its name implies, is an importation
from Europe, where its majestic height graces the
mountains from the Alps to Norway and Sweden. It
grows very tall, sometimes a hundred and fifty feet, and
flourishes as well in America as in Europe. The cones
are four or five inches long. Its wood is known in
Europe as deal.
64. Cypress. In the swamps of our southern states,
from Maryland south along the Gulf of Mexico, are
found great dark forests of
the bald cypress.
Fig. 127. Cypress
They grow directly out
of the water and are famous
for a peculiar formation of
the roots called cypress
knees,—lumpy growths
which come up out of the
water as if they were in
search of air. The cypress
is a tall, spirelike tree,
which has the most delicate,
feathery needles imaginable.
They drop off in the fall, so that the tree
is sometimes called deciduous cypress. The cones are
roundish and about an inch long. The timber furnished
by this tree is very handsome in grain and valuable for
many parts of buildings, especially inside finishing.
65. The Balsam Fir, or our famous Christmas tree, is
noted for its great healing qualities. In fact, sanitaria
for invalids, especially consumptives, are frequently
built in the midst of great fir forests, that the sufferers
may inhale the pure mountain air, laden as it is with
the odors of the balsam fir. The needles are often used
to fill pillows, which are said to soothe tired and worn-out
people to sleep.
We are all familiar with the sweet, woodsy smell of
the Christmas tree. No other tree can take its place.
It brings visions of the country, of the woods and fields
and flowers, and it will always
be dear to us.
The balsam fir can always
be distinguished from the
spruce by the fact that the
needles only come out at
the sides of the twig instead
of from all directions, as in
the spruce, and its end is
blunt, whereas that of the
spruce is sharply pointed.
Fig. 128. Balsam Fir
The bark of the tree is gray and has tiny blisters
which contain the balsam, Canada balsam it is usually
called, well known for its healing qualities.
The cones are from two to four inches long, stand
upright on the branches, and the wood is not very
valuable.
66. The Cedars. No list of evergreen trees would be
complete without the cedars. In this group is the well-known
hedge tree, arbor vitæ, sometimes erroneously
called white cedar. It is famous for its flattened, bright
green, scaly leaves, with their strong, pungent odor.
This tree is usually so trimmed that we have very
little knowledge as to its real shape and height if
allowed to grow naturally; but
it is said to reach a height of
fifty feet under favorable conditions.
Fig. 129. Arbor Vitæ
67. White Cedar. The real
white cedar has a more delicate
leaf and is fond of cool
swamps.
It has a conical shape and is
much larger than the arbor vitæ,
reaching sometimes ninety
feet. The wood is very valuable,
being soft but durable, and is used for shingles,
posts, and boats. It has the property of enduring the
changes such as posts or other structural members are
obliged to withstand in contact with the soil, and ranks
next to yellow locust in this particular.
68. Red Cedar is the tree which supplies our lead
pencils. It is remarkable for its straight, even grain,
and the ease with which it can be worked. This is the
familiar tree of our roadside, where the birds who feast
on the cedar berries have stood on the fence rails and
unconsciously planted rows of cedars for future generations
by dropping the seeds on the ground.
Fig. 130. Red Cedar growing along
Roadside from Seed dropped by Birds
The red cedar seems to grow where other trees cannot
exist, but like other trees responds to good treatment
and reaches its best development in the balmy
and luxuriant South.
It is found from Maine to Florida and from the
Atlantic to the Pacific. In the North it rarely grows
over twenty feet high, and is of compact growth, but in
Florida it reaches eighty feet.
The leaves are remarkable in that there are two
shapes, the sharp or awl-shaped, and the scale-shaped,
growing upon the same branch.
The wood is valuable for many purposes and has been
used so extensively that it is becoming scarce.
Florida has furnished the world with red cedar for
lead pencils for years, and it is said that during the
Civil War, when the whole southern coast was blockaded,
the European manufacturers were obliged to scour
the world to find a substitute for the Florida cedar.
CHAPTER XI THE BIG TREES
Fig. 131. Big Trees scarred by
Fire at the Base. Redwood Meadow, California
Each section of country has its own peculiar trees,
and those described have been mainly representative
of the eastern states; but no list of American trees
would be complete without the “big trees,” as they are
commonly called, of California. The annual rings of
these giants show them to be from two thousand to
four thousand years old.
Fig. 132. Big Trees, “General
Grant” and “General Sherman,” Calaveras County, California
Fig. 133. “General Grant,” a
Big Tree, Mariposa Grove, California
It is hard to realize this great age. It means that
for centuries and centuries before the white men came
these kings of the forests looked down on generations
and generations of Indian tribes. They may even have
seen the coming of the first Indians. What wonderful
tales they might relate if they could only talk!
Fig. 134. Redwood Logs in
Humboldt County, California
On that fateful day over four hundred years ago,
when the three little caravels of Columbus sighted the
West Indies, these hoary old trees were twenty-five hundred
years old. They should be sacred to every American,
and not one should ever be cut down for lumber.
There are two distinct kinds of big trees, the redwood
and the so-called “big trees,” which are the largest trees
in the world. They both belong to the cone-bearing
(coniferous) group, and the needles are only three quarters
of an inch long and the little cones an inch.
The wood is reddish, as the name implies, not unlike
red cedar, but is softer and is used for many purposes
on the Pacific coast.
The big trees are now carefully guarded by the
government. One grove alone which contains seven
hundred of these fine trees, called the Mariposa Grove,
has been reserved as a national park, and is watched
carefully to keep out forest fires, etc.
Many of the best known of these trees are given
names. One is called “Uncle Tom’s Cabin,” because of
a peculiar opening at the base.
The most famous perhaps is the “Grizzly Giant.”
This one is ninety-three feet in circumference at the
ground, and its first branch is two hundred feet above
the earth and eight feet in diameter. It is considered
the largest tree in the world.
Fig. 135. Redwood Logs blasted
apart for Easier Handling (a very wasteful method)
We can get some idea of what these figures represent
when we know that it takes five men three weeks to
cut one down, and that the cost of felling one of these
monsters is five hundred dollars.
A stump of one of these trees is so large that dances
have been held on it, and on one very large one a ballroom
has been built for this special purpose.
As one Californian has said, “The redwood forests
are apparently imperishable, except through the ax, as
the trees are rarely injured by fire. The redwood is
the only lumber that can take the place of the white
pine, answer as a satisfactory substitute for mahogany
and black walnut, displace oak for railroad ties, cypress
and cedar for shingles, and surpass all other woods for
durability when in contact with the earth or when
exposed to moisture.”
Fig. 136. Immense Flock
of Sheep being herded illegally in a United States Government Forest
Reservation. (They kill the young seedling trees)