| |
| |

|
|
| |
CHAPTER 3
Plain and Incised
Cement Tiles
|
|
| |
 |
|
A KNOWLEDGE IN MIXING CEMENT is the next step necessary in Color Cement
Handicraft. The steps necessary toward mixing cement are simple, the
main point being that the cement should be fresh. The student is
cautioned to test the freshness of cement by seeing that no caked or
hard lumps of cement are contained in the sack mixture. As formerly
explained the cement should have a smooth, slippery feeling when passed
between the fingers.
NEAT CEMENT is the term applied to cement mixed with water without the
addition of any sand or gravel. Neat cement produces a very smooth
surface and responds to reproducing every change in the surface of the
model. It should be used on the surface only and not for the entire tile
or pottery. If used without any sand or gravel, it is termed “too fat,”
and has the fault of cracking sooner or later. Therefore neat cement is
always backed up with a concrete mixture.
CONCRETE is a mixture of sand and cement, gravel and cement, or rock and
cement. In all instances where such a mixture is made, the two parts
should be mixed dry before any water is added. Only enough should be
mixed to meet immediate needs as it is not best to use cement that has
stood so long that it has commenced to harden.
TO SECURE A VERY FINE SMOOTH SURFACE for tiles or pottery the cement
should be used neat. It must be sifted dry through a fine sieve and
enough water added to make it of easy working consistency. Then a
mixture of two-thirds gravel or sand and one-third cement with water
added may be used on the back of the tile or the inside of a vase and
possibly again lined with a mixture of neat cement.
Cement or concrete can stand for an hour or two and again be used by
adding more water and mixing thoroughly. This cannot be done with
plaster and should be avoided with cement or concrete. If chemical
action has commenced and the cement has partly set, it naturally will
have lost much of its strength for second use.
A CONCRETE MIXTURE of one part cement and two parts sand or gravel will
give good strength. The sand or gravel must be clean. If it contains any
vegetable matter or other sediment, it should be avoided. To test your
sand quality put a four-inch layer in an ordinary quart jar, fill with
water within three inches of the top. Cover and shake well. Then permit
the sand to settle. If the sediment or loam which remains at the top of
the sand is one-half inch or more, the sand is not fit for use in
concrete.
CEMENT MIXTURES ADAPTABLE TO VARIOUS USES are given below. These may be
used for backing and reinforcing large problems, in garden pottery,
garden furniture or walls.
1. RICH MIXTURE
1 part cement
2 parts sand
5 parts gravel |
2. STANDARD MIXTURE
1 part cement
2 parts sand
4 parts gravel |
3. MEDIUM MIXTURE
1 part cement
2½ parts sand
3 parts gravel |
4. LEAN MIXTURE
1 part cement
3 parts sand
6 parts gravel |
Cement and sand mixed dry first, then with water. The gravel is mixed
wet with other mixture and thoroughly combined.
Builders use the Rich Mixture for columns and high stresses, and where
water tightness is necessary.
Standard Mixture is used for arches, for tanks and sewers, and for
machine foundations.
The Medium Mixture is used for piers, sidewalks, and heavy walls.
The Lean Mixture is used for walls, foundations and for unimportant
work.
THE FIRST PROBLEMS IN CEMENT should be the casting of cement tiles
without the use of color. As a beginning problem set the retaining bars
around a six-inch square space and mix a neat mixture of cement and pour
into the space so as to make about a quarter-inch layer. After this has
set for about fifteen minutes pull some of the neat cement up the sides
with a putty knife or strip of cardboard and then pour in the remainder
of the tile concrete mixture of one-third cement and two-thirds sand.
This will result in a tile with the top and sides surfaced with neat
cement. The surfaces of the bars and the glass or other under surface
have of course been properly oiled previous to the pouring.
BEFORE PROCEEDING WITH TILE MAKING it may be necessary to make a number
of plaster bars to use as retaining walls. These are made as follows:
Two strips of wood one-half inch to an inch thick laid parallel on a
glass or other smooth surface that has been greased with oil. The
distance between the strips of wood should be about ten inches, as the
length will then serve for producing eight-inch tiles or any size under
this dimension. The edges of the wood facing inward should always be
oiled, the wood strips are held in position by small lumps of modeling
wax pressed firmly into the outer edge of the wood so that it attaches
it to the surface of the glass. This will leave a channel between the
two wooden strips into which the plaster is poured. The two ends of the
channel may be stopped with blocks of wood or blocked with wax or clay.
As soon as the plaster is poured into the mold it should be evened by
running a straight strip of wood or metal over it spanning the width of
plaster. Run this back and forth to trim off the surplus, so that the
plaster will have an even thickness when removed from its bed.
TO REMOVE THE PLASTER first remove the wooden strips and then tap the
layer of plaster lightly on the edge with a hammer. This will loosen it.
Then with a T square and sharp nail mark off bars five-eighths inch
wide and also bars one and one-quarter inches wide. At least twelve bars
of each width should be made. After drying for three days the bars may
be sawed apart with any sharp saw, care being taken to hold the saw
within the groove made by the nail. The edges of the bars may be further
smoothed if necessary with a knife or file.
STRIPS OF WOOD WITH SURFACED SIDES can be used in the place of plaster
bars and if oiled will release very easily from the plaster when used as
retaining walls.
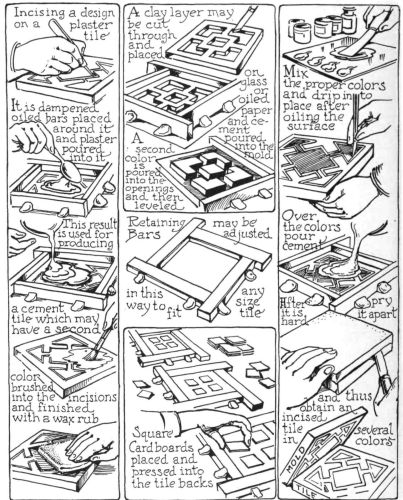
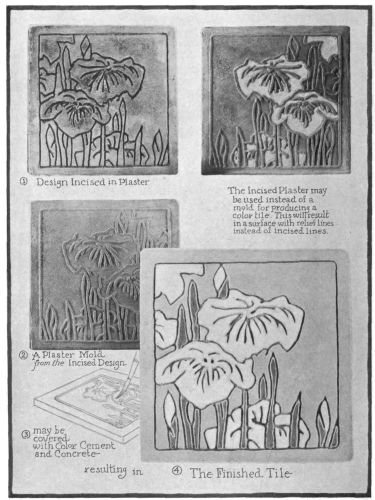
TO MAKE AN INCISED TILE in plain cement proceed as follows: Roll out
clay or modeling wax to about one-half inch thickness and cut to the
desired size of tile. Cover this smooth surface, place a design which
has been made on thin paper and trace with a pencil. The paper should be
held so as not to slip and the result should be a slight indentation of
the design on the clay. These lines are then incised over with the
incising tool to the desired depth, care being taken that no
over-hanging edges remain on the edges of the incisions. The incisions
should have sides slightly sloping inward and if the tool is correctly
shaped it will produce such lines.
THE DESIGN should be planned to be at least one-half inch from edge and
simple in construction. Avoid a tangle of ever crossing lines. A
geometrical arrangement dividing the square into pleasing spaces will
produce the best results.
Place the tile on a level surface and take four bars of the one and
one-fourth inch plaster strips or wood, soak in water for fifteen
minutes, wipe dry and oil. Now place the four bars so that the inside
edges are against the wax or clay tile and fasten so that they are
unmovable with modeling wax. The bars if placed with one end projecting
past the bar meeting it at right angles permits their adjustment to any
size tile under ten-inch dimensions. Onto this pour plaster-of-Paris,
pour into the center letting it run toward the edges forcing all air
ahead of it as it enters the incisions. Level off surface and remove the
plaster cast from the mold as soon as it has hardened.
TO RELEASE THE PLASTER CAST first remove the surrounding bars and lift
the plaster tile off the clay. The plaster tile will have the design in
relief on the surface. If any clay is adhering to these relief lines, it
is evidence that there are overhanging edges and such edges should be
trimmed with a knife before the next step. The next step is as follows:
After plaster tile is dry put it in water for a few minutes, then oil
the surface well. Place back in the bars and repeat previous operations
excepting that this time a cement mixture is used instead of plaster. A
mixture of neat cement should be used half way up and permitted to
remain for five minutes before the concrete (one-third concrete,
two-thirds sand) is poured in for the remaining half.
IN MIXING SAND AND CEMENT it should be remembered that they should be
mixed together thoroughly while dry before any water is added. After
the cement has been poured into the form, if it is to be used for floor
or wall purposes, four small squares of cardboard should be pressed into
the exposed cement which is the back of the tile. This should be done
about fifteen minutes after the cement has been poured, when it is not
too soft.
The tile may be removed after it has remained in the form for
twenty-four hours. A thin cement mixture of another color may be made
and brushed over the tile and the surplus removed, leaving the last
color only in the incisions.
AN INTERESTING VARIATION is produced by cutting away the clay or wax
between the incisions of the pattern to the depth of one-half inch or
less, making a mold of this tile and in turn casting a concrete tile.
The result will be a surface with relief section and low spaces, the
relief being concrete and rough in texture.
These low spaces are then filled with a colored cement of another color,
or neat cement, and brought to the level of the relief surface. Such a
tile secures a pattern adaptable to tile walks, or any surface which is
subjected to wear, in that the design is not only a thin surface layer,
but a thick portion of color that will not disappear with the wearing of
the surface layer.
A SIMPLE METHOD OF MAKING TILE MOLDS is to cut a design from a thick
piece of cardboard or sections of a design, and glue these in proper
position to carry out a design arrangement. These pieces should be cut
with tapering sides so as to permit of proper “draught” or releasing
conditions when the plaster cast is made for mold purposes.
The pieces of cardboard should remain glued until dried to avoid the
moisture of the soft plaster moving the parts around.
WITHOUT THE USE OF COLOR a number of pleasing and varying textures can
be secured with plain cement, as the gray color of the cement has an
artistic quality, and it is well to become well grounded in the use of
cement before combining color with it.
SEVERAL WAYS OF USING PLAIN CEMENT FOR TILES beside those already given
are explained in the following descriptions. These are termed Traced
Cement, Burnished Cement, Scraped Cement, Concrete Tile, Cement and
Concrete Tile, Glazed and Dull Cement Tile, Glazed Relief Line Tile.
THE TRACED CEMENT TILE is made by pouring a half-inch mixture of
concrete (one-third cement, two-thirds sand) into a mold made with the
usual retaining bars of any desired dimensions. Over this concrete
mixture a layer of about one-quarter of an inch of sifted neat cement
mixed with water should be placed. At a certain degree of hardness this
layer of neat cement will yield to a slight indentation or traced
outline. This condition can be tested by touching the edge of the
surface with a pencil point to see whether it is too hard or too soft.
A good plan is to pour the mixture in the evening and it is generally in
right consistency to work upon on the following morning. The surface
should be nearly hard but still sensitive to pressure with a point.
HAVING PREPARED THE DESIGN on a piece of paper about the weight of
business writing paper, the design is placed on the surface of the tile
and kept in the same location while a blunt, soft lead pencil is traced
over the pattern, pressing firmly to create a good indented line in the
cement surface. The design for this work is best where the pattern is
easily expressed in lines or outlined forms. The forms can be increased
in strength by rubbing the pencil on the outer edge of the lines to be
slightly modeled in separate appearance. When the design has been
completely gone over, the tile is placed in water for several days,
after which it is dried and a thin coating of color wash (see chapter on
Surface Finishes) may be added to it which will further the pattern by
coloring the traced lines.
THE BURNISHED CEMENT TILE is produced by casting a similar tile to the
one made for the Traced Cement Tile and proceeding in the same manner,
excepting that the spaces between the forms are burnished smooth with
the dull pointed pencil or a smooth small stick. This results in some
parts being burnished or pressed down while others remain in slight
relief. A change in this is also produced by scraping the smooth surface
off between the lines in certain places instead of burnishing it. This
results in parts of the surface being of a different texture and also of
a little different color, as the scraped parts are different in both
these respects to the cement which has dried and remains untouched on
the surface.
A SECOND BURNISHED TILE EFFECT is to pour a layer of neat cement first
in the mold and a concrete mixture last. When this is hard enough to
remove, and still soft enough to work upon (the neat cement layer having
been in the bottom will dry with a dull finish and not a glaze finish
as when flowed on as a top layer) it should be removed and the design
traced upon this neat cement surface. If a leather tool or smooth hard
point is used, certain parts as desired can be worked upon, smoothed
down or pressed in, through the paper which will create a change of
surface texture.
THE SCRAPED CEMENT TILE is where either the top neat cement or bottom
cement layer has the design in line or form scraped out of the cement,
the entire design being produced without a plaster mold being used. A
sharpened nail or nut pick will make a good scraper and this scraping
and pressing is done on the cement surface direct and not through a
paper as in the two previous problems. This direct method of working
upon cement surface is considered more thoroughly and more extensive
applications made of it in the chapter on Carved and Modeled Cement.
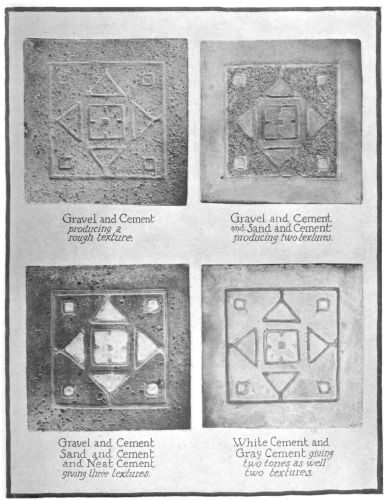
THE CONCRETE TILE. Varying finishes may be secured in casting any cement
tile by the kind of aggregate used with the cement. A rough irregular
small crushed rock will give one kind of texture, while a round small
white gravel will give another and each change will present different
effects. Without going into extremes of finishes or having too many
changes in the surface of a tile, pleasing effects can be secured by one
to three changes of texture secured by putting different mixtures in
different parts. This may be done by mixing and applying with a brush or
spoon the different mixtures into the mold, placing the mixtures each in
their proper section of the mold. The whole is then covered with the
backing mixture resulting in the surface pattern appearing with the
changes after the tile has been released from the mold.
Where a concrete mixture is to appear rough in texture, the sand or
gravel and cement should be mixed dry, just enough water added to cause
it to mix up to a damp consistency so that it can be shaped with the
hand. This can then be put in the mold and tamped slightly with a block
of wood to press it in true contact with the surface of the mold. This
will result in a porous, open texture, producing good contrast with neat
cement parts that have been previously placed or are to be added.
THE CEMENT AND CONCRETE TILE is made with plain cement producing added
interest to the design by the two textures or surface finishes that
occur between cement and concrete. The design for such a tile is best
where the parts are separated either by an incision or a relief line.
The plaster mold should therefore present separate portions, some of
which can be considered for the cement parts and others for the concrete
parts.
By mixing neat cement until it is of a thin mixture, the mixture can be
placed on the mold wherever wanted by dripping it from a brush. Care
should be taken in the use of a brush with cement that a wiping stroke
is not used as such a stroke will remove the oil from the plaster
surface and cause parts of the cement to stick to the plaster.
After the cement has been placed, a concrete mixture is made and poured
into the space up to the desired height to produce the necessary
thickness. This will at the same time fill in the remaining surface
spaces of the tile.
THE GLAZED AND DULL CEMENT TILE is produced by filling in with clay or
glued cardboard bits cut to shape, those parts that are to be glazed
gray cement. Do not use modeling waxes or artificial clays for this part
as the oil or grease in them will interfere with the glazed cement
adhering to the surface in the final finishing.
After the cardboard or clay is dry a layer of neat cement is poured in,
and backed with the usual concrete mixture. After the tile is released,
the cardboard bits or clay is removed and cleaned out, the surface under
it is roughened with scratched lines and the tile is put in water for an
hour. The spaces are then filled with a mixture of neat cement and
permitted to harden in a shallow tray of water.
TO MAKE GLAZED CEMENT SURFACE it is important that these steps be
watched:
| 1st. | That the surface be roughened wherever the glazed surface is to appear. |
| 2d. | That the tile be soaked in clean water until it has fully absorbed water. |
| 3d. | That a little dry neat cement be placed on the spaces to have glazed effect. |
| 4th. | That the neat cement should be sifted and dripped on with a brush and not gone over a second time. |
| 5th. | That the tile is taken out and dried and the glazed and dull neat cement will create the change of surface texture as planned. |
A bloom or chalk-like powder often comes on the surface of tiles, but
will disappear within a short time and need not cause any anxiety.
GLAZED RELIEF LINE TILE is made by casting either a neat cement tile or
a concrete tile with a relief line design and then mixing a neat gray or
color cement glaze and putting it onto the surface. The tile is shaken
in a level position until the entire surface is entirely covered leaving
a thin layer of the glaze in the spaces between the lines as well as
slightly on the lines. The tile is set in a shallow layer of water to
harden.
OTHER VARIATIONS IN TILE EFFECTS can be made by combining these methods
and with the use of color in these different methods described,
unlimited avenues are opened to the worker in color cement. It should be
remembered also that most of these methods of surface treatment are also
possible in other forms beside flat or tile surfaces. The student should
know these methods of working with plain cement and concrete as they are
the foundation of successful Color Cement Handicraft.
 How to Make Color Cement Tiles
 Cement Tile Textures
 The Incised Tile