New original cover art included with this eBook is granted to the public domain.
“WORK” HANDBOOKS.
“WORK” HANDBOOKS. A Series of Practical Manuals. Edited by PAUL N. HASLUCK, Editor of “WORK.”
House Decoration. Comprising Whitewashing,
Paperhanging, Painting, etc. With 79 Engravings
and Diagrams. 1s.; post free, 1s. 2d.
Contents.—On Colour and Paints. Pigments. Oils,
Driers, Varnishes, etc. Tools used by Painters. How to
Mix Oil Paints. Distemper or Tempera Painting. Whitewashing
and Decorating a Ceiling. Painting a Room.
Papering a Room. Embellishment of Walls and Ceilings.
Boot Making and Mending. Including Repairing,
Lasting, and Finishing. With 179
Engravings and Diagrams. 1s.; post free, 1s. 2d.
Contents.—Repairing Heels and Half-Soling. Patching
Boots and Shoes. Re-Welting and Re-Soling. Boot
Making. Lasting the Upper. Sewing and Stitching.
Making the Heel. Knifing and Finishing. Making
Riveted Boots and Shoes.
How to Write Signs, Tickets, and Posters.
With 170 Engravings and Diagrams. 1s.; post free,
1s. 2d.
Contents.—The Formation of Letters, Stops, and
Numerals. The Sign-writer’s Outfit. Making Signboards
and Laying Ground Colours. The Simpler Forms of
Lettering. Shaded and Fancy Lettering. Painting a
Signboard. Ticket-Writing. Poster-Painting. Lettering
with Gold, etc.
Wood Finishing. Comprising Staining, Varnishing,
and Polishing. With Engravings and
Diagrams. 1s.; post free, 1s. 2d.
Contents.—Processes of Finishing Wood. Processes of
Staining Wood. French Polishing. Fillers for Wood
and Filling In. Bodying In and Spiriting Off. Glazing
and Wax Finishing. Oil Polishing and Dry Shining.
Re-polishing and Reviving. Hard Stopping or Beaumontage.
Treatment of Floors. Stains. Processes of Varnishing
Wood. Varnishes. Re-polishing Shop-Fronts.
Dynamos and Electric Motors. How to Make
and Run them. With 142 Engravings and Diagrams.
1s.; post free, 1s. 2d.
Contents.—Introduction. Siemens Dynamo. Gramme
Dynamo. Manchester Dynamo. Simplex Dynamo. Calculating
the Size and Amount of Wire for Small Dynamos.
Ailments of Small Dynamo Electric Machines: their
Causes and Cures. Small Electro-motors without Castings.
How to Determine the Direction of Rotation of a
Motor. How to Make a Shuttle-Armature Motor. Fifty-Watt
Undertype Dynamo. Four-Hundred-and-Forty-Watt
Manchester Type Dynamo.
Cycle Building and Repairing. With Engravings
and Diagrams. 1s.; post free, 1s. 2d.
Contents.—Introductory, and Tools used. How to
Build a Front Driver. Building a Rear-driving Safety.
Building Tandem Safeties. Building Front-driver Tricycle.
Building a Hand-driven Tricycle. Fittings and
Accessories. Making a Gear Case. Brazing Cycle Work.
Wheel Building. Enamelling Cycles. Miscellaneous
Repairs.
CASSELL & COMPANY, Limited, Ludgate Hill, London.
BOOT MAKING AND
MENDING INCLUDING REPAIRING, LASTING, AND FINISHING
WITH NUMEROUS ENGRAVINGS AND DIAGRAMS
EDITED BY PAUL N. HASLUCK EDITOR OF “WORK” NEW SERIES, AUTHOR OF “HANDYBOOKS FOR
HANDICRAFTS,” ETC. ETC.
SIXTH THOUSAND
CASSELL AND COMPANY, Limited LONDON, PARIS & MELBOURNE 1898 ALL RIGHTS RESERVED
Weekly. 1d.
WORK.
The Illustrated
Journal for all
Mechanics.
“WORK is a vast and very valuable repertory
of information as to the practical and ornamental,
or minor, arts. To all devotees of such pursuits,
whether professional or amateur, this WORK
will be worth much more than its price; for there
are very few mechanical or art-technical pursuits which
are not very fully described in it here and there, ‘up to
date,’ with details of the most recent discoveries or improvements
in them. . . . The illustrations are
copious, and generally so well designed and
engraved as to merit special commendation. . . .
Something new crops up in every branch every
day, be it turning wood, photography, staining metals,
gesso-work, frames, varnishes, polishings, veneering, piano-making,
gilding, hydraulic motors, or illuminating, be it
on parchment or by electricity; and WORK gives us
not only the novelties, but in all cases solid instruction
in these arts. It is a curious reflection, but soundly
true, that there is not a person of ordinary average
intelligence and strength living who could not
learn from this . . . how in a short time to
make a living.”—Saturday Review.
WORK is also published in Monthly Parts, each
of which now contains a Coloured Plate, 6d.
CASSELL & COMPANY, Limited, Ludgate Hill, London.
PREFACE.
This Handbook contains, in a form convenient for
everyday use, a comprehensive digest of the knowledge
of How to Make and Repair Boots and Shoes, scattered
over ten thousand columns of Work, the weekly
journal it is my fortune to edit—and supplies concise
instruction in the general principles of the craft on
which it treats.
In preparing for publication in book form the mass
of relevant matter already published in the volumes of
Work, much that was tautological in character had to be
rejected. The remainder necessarily had to be arranged
anew, altered and largely re-written. From these
causes the contributions of many are so blended that
the writings of individuals cannot be distinguished for
acknowledgment.
However, it may be mentioned that a number of
articles from the pen of Mr. William Greenfield, an
acknowledged adept in the craft, are incorporated in
the text.
Readers who may desire additional information respecting
special details of the matters dealt with in this
Handbook, or instruction on kindred subjects, should
address a question to Work, so that it may be
answered in the columns of that journal.
Soling and heeling are very necessary operations; for
boots and shoes are amongst the necessaries of life, and
soles and heels will wear out. A man who does his own
repairs at once increases his income, or at least saves a
continual outlay.
For the processes of heeling and soling, not many tools
are needed to start with, and the leather can be bought
in small quantities; and all the necessary grindery (such
as rivets, brads, pegs, hemp, paste, etc.) can be bought,
also in small quantities, and at a very low rate.
Suppose gentlemen’s boots want heeling and soling,
the price at which they are done by low-priced repairers
is 2s. 6d., and then the work is inferior and the leather
nearly always foreign. Though there are some good
tannages and parts in foreign stuff, yet low-priced repairers
use only what are called first-cuts (the neck end
of the butt), which is the lightest leather both in substance
and weight, and consequently the cheapest. A
pair of soles of this material costs 4d. or 5d., the top-pieces
for the heel 1¹⁄₂d. or 2d.; so the leather does not cost
more than 7d. at the most; and if such material does not
last long in wear, it is not surprising. Besides, the soles
are often put on badly and with long rivets, so that they
cannot be got off again without pulling the boots all to
pieces.
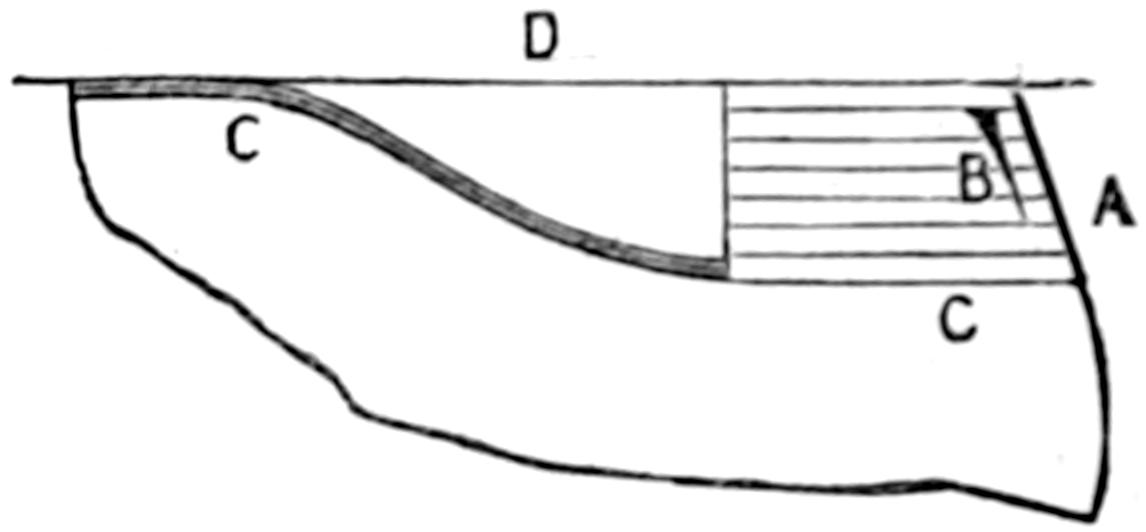
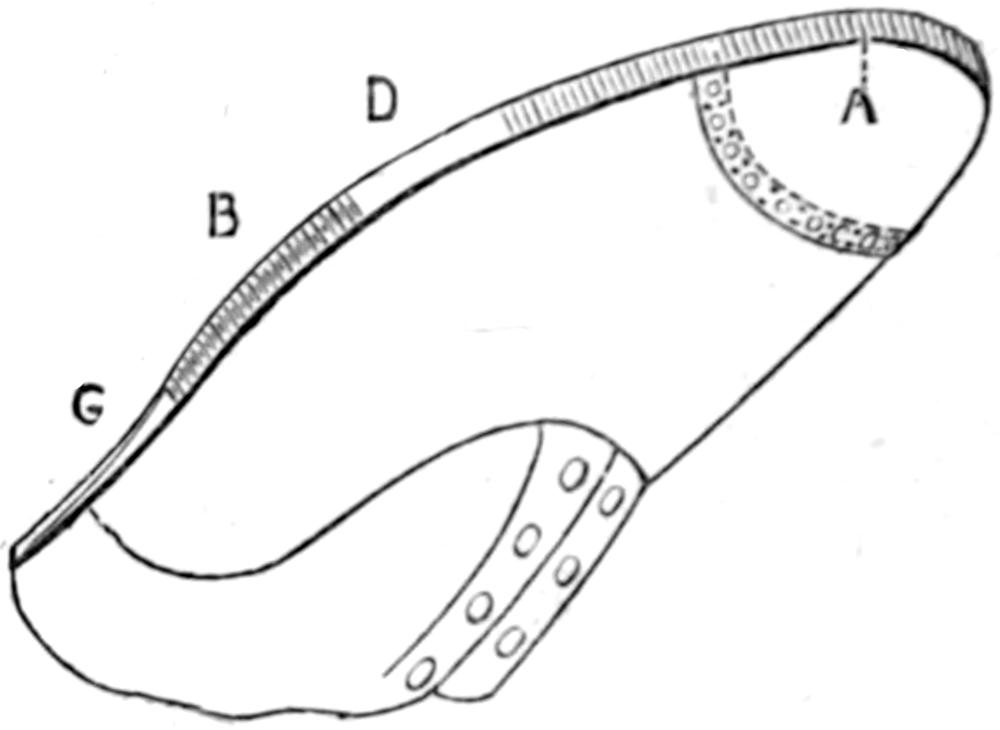
There is great importance in keeping heels level, for if
they are allowed to wear down low, the evil that is caused
is difficult to remedy; for this not only tends to throw
the heel itself on one side, but also causes the sole to
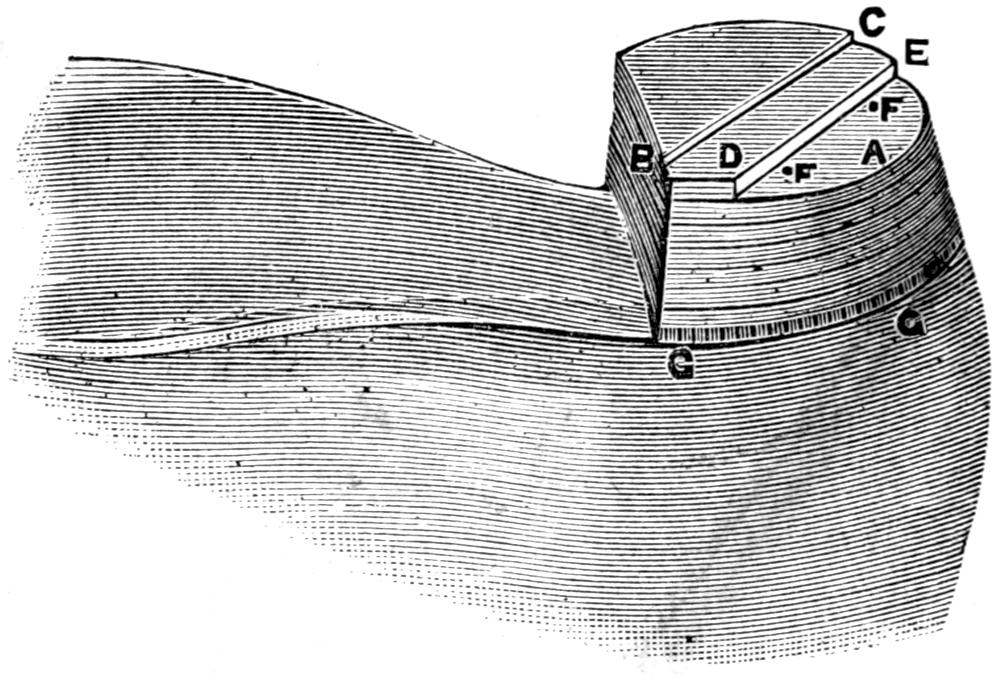
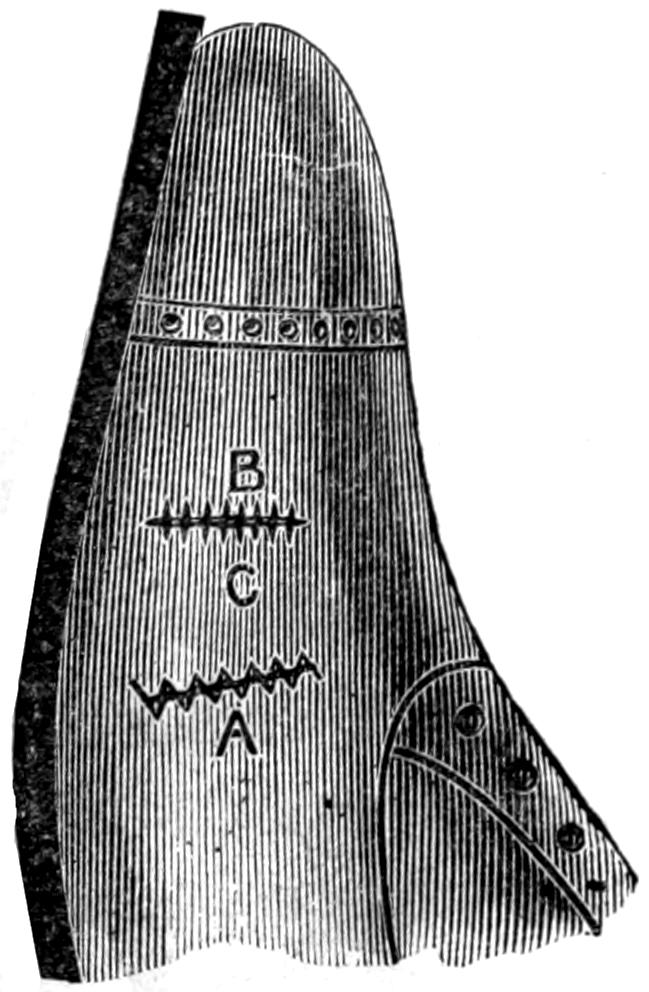
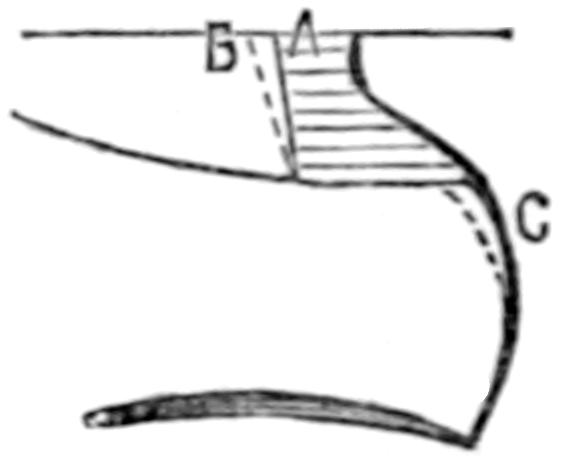
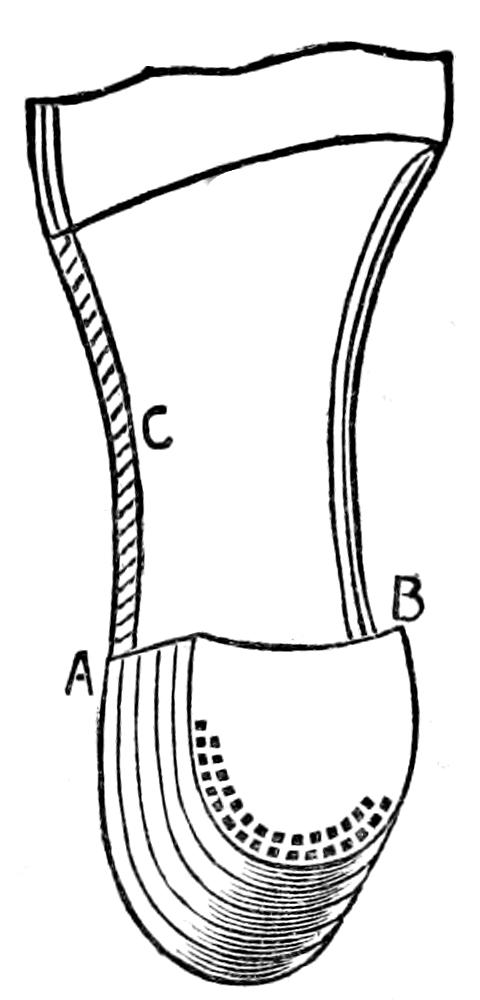
wear away much quicker, runs the stiffener down at G G
(Fig. 1), and throws the boot or shoe out of position,
generally beyond recovery.
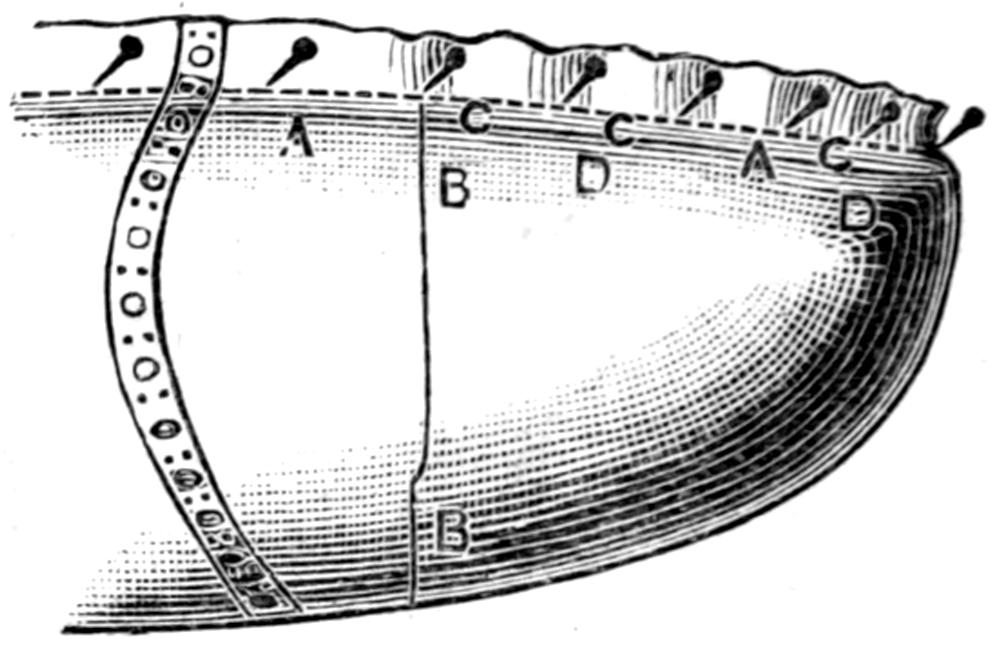
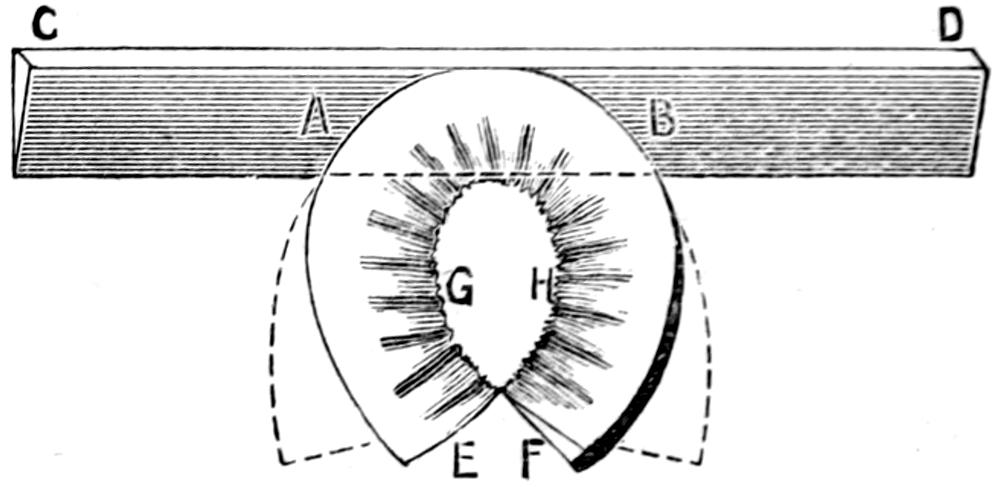
Fig. 1.—Worn Heel Prepared for Mending.
Nearly everybody in walking wears down his boot
heels at one particular spot. Usually the wear occurs
most at A (Fig. 1), though with some it is at the back of the
heel; while a few wear most on the inside. The repair
of these defects is one of the best jobs that a novice at
the craft can start upon, as the grafting in half-heeling
only means butting the new piece of leather against the
old, and there is no play or friction to cause them to
come asunder. The leather in very cheap boots and
shoes is not properly “worked”; this term meaning
wetted, dried, hammered, etc.
This explains why a new pair of cheap boots worn in the
wet are, when taken off the feet, lower on one side of the
heel than on the other, although the leather is not actually
worn away. It is because the unworked leather yields
to the pressure caused by the weight of the body in
walking, and this yielding is the first stage to ruin. To
prevent this, always have a few extra nails put into new
boots round the part where most wear occurs.
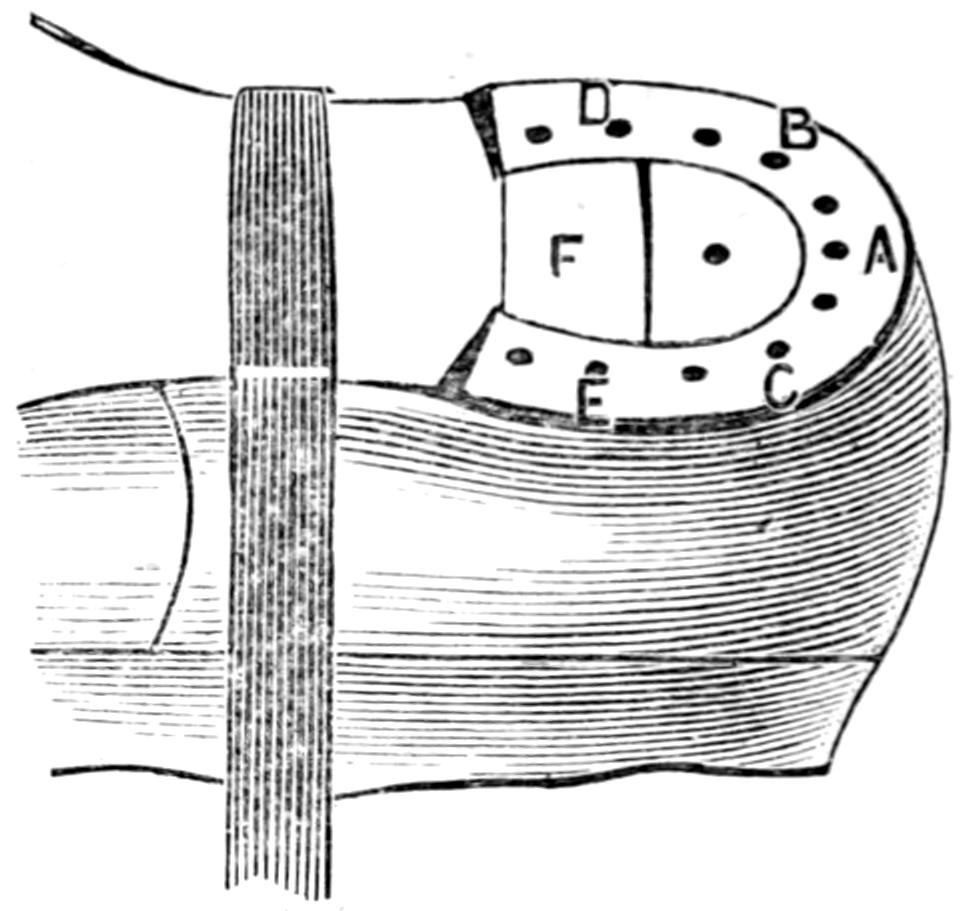
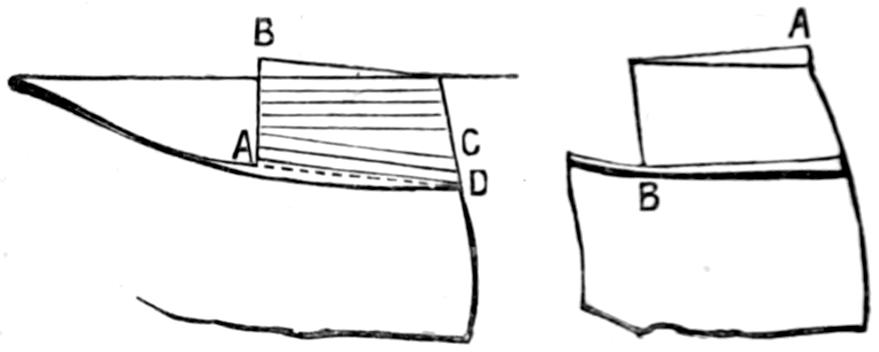
When the heel is worn down on one side only, it is not
necessary to take the whole of the top-piece off, but only
half of it, which can be replaced with any corner of hard
sole leather that would be almost useless for any other
purpose. To remove half of the top-piece, cut it across
at B C, and should the lift be worn, saw or cut that
through as well at D E; tack a piece of leather on to take
the place of the worn piece of lift, putting the tacks in
at F and F. Then trim it round, and put some odd corner
of hard sole leather on in like manner, to take the place
of the worn part of the top-piece. Trim this also, and
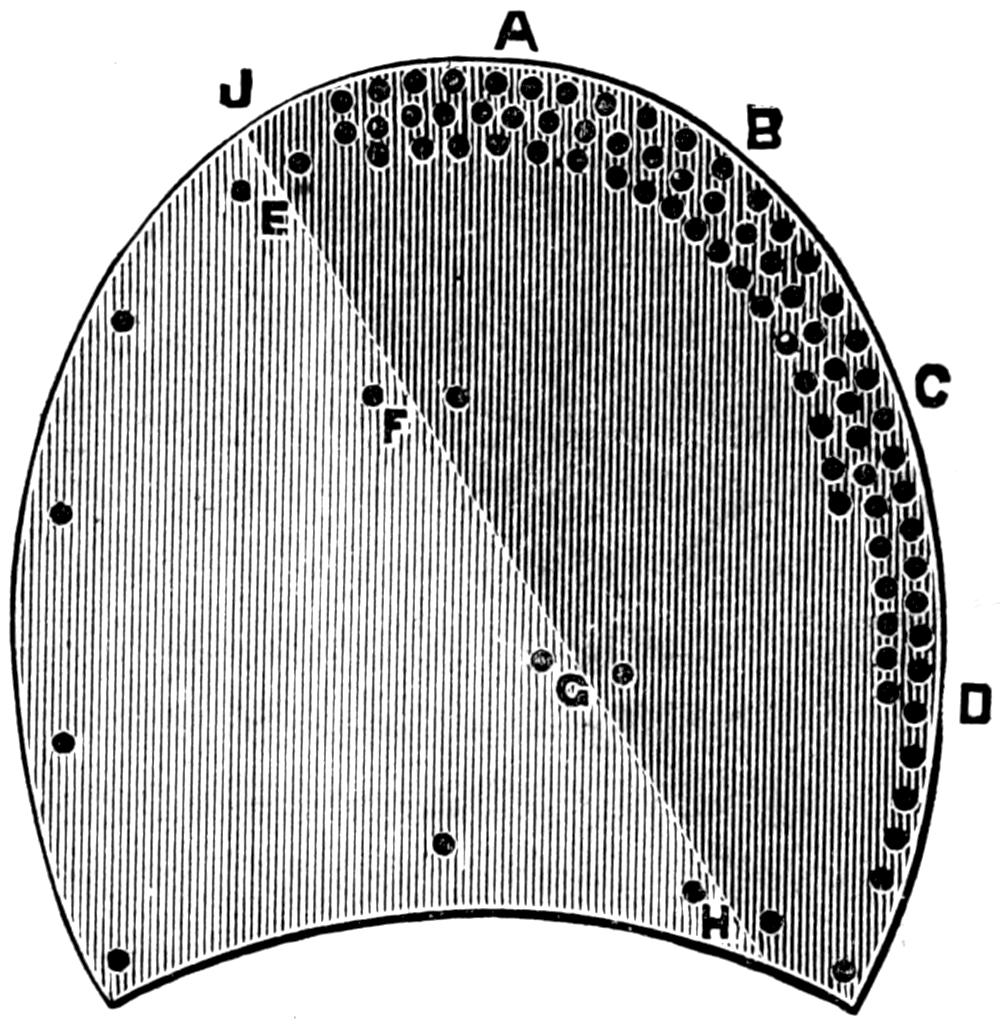
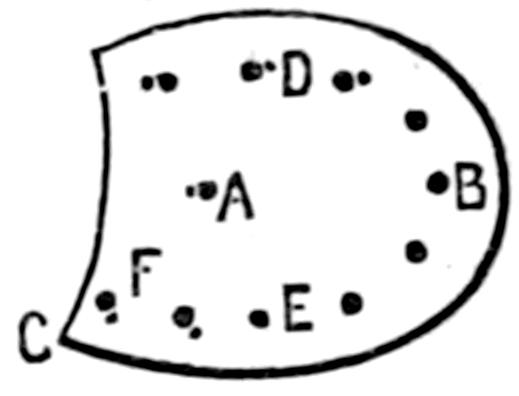
nail it as shown in Fig. 2. In this case, four of the rivets
put in at A, B, C, and D should be quite ³⁄₄ in. long, so as
to hold the lift as well as the top-piece. One, two, three,
or four rows of rivets may be put in near the edge, but
they are not much use unless close together. Rivets
should be put in as shown at E, F, G, and H. This done,
file them up, and finish in the ordinary way. Do not
neglect to keep the heel level. This is of special importance
to those who mend their own boots.
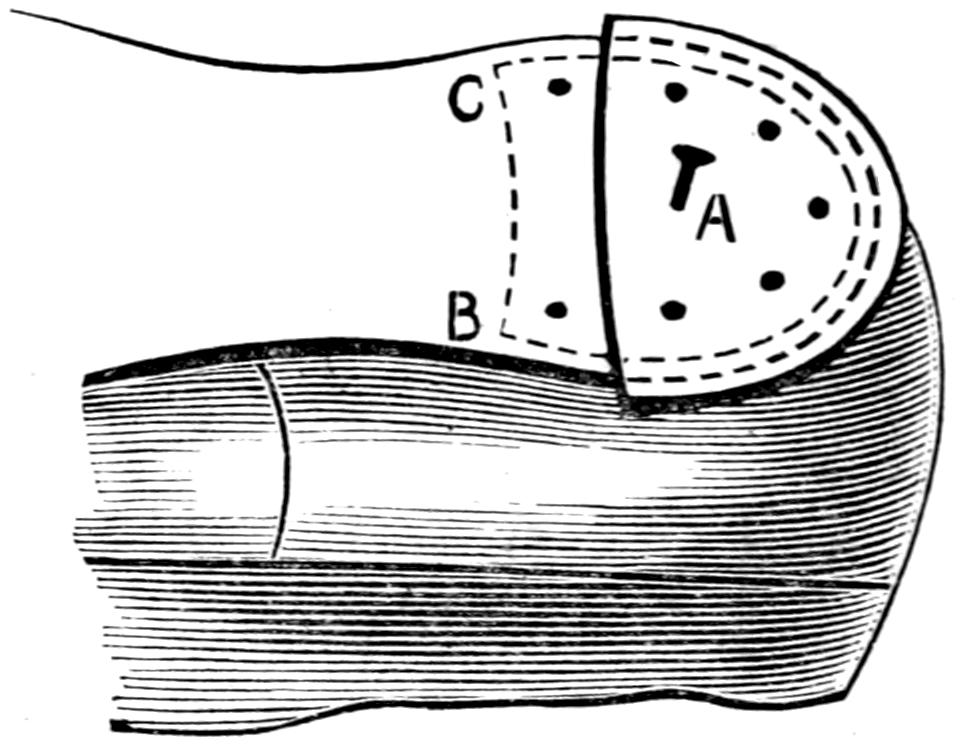
Fig. 2.—New Half Heel with Rivets to Resist Wear.
Half-heeling, with plenty of nails close together,
regularly done, will keep boot heels in proper order; but
it is not everyone who can spare his boots or who can
spare the time to do them properly in this way, and when
this job is once started, the boots cannot be worn until
they are finished. It is advisable never to wear a top-piece
quite through, for the lift is then worn away; and,
no matter how little this may be, it will need either replacing
as described above, or repairing by means of a
skived piece of leather put under.
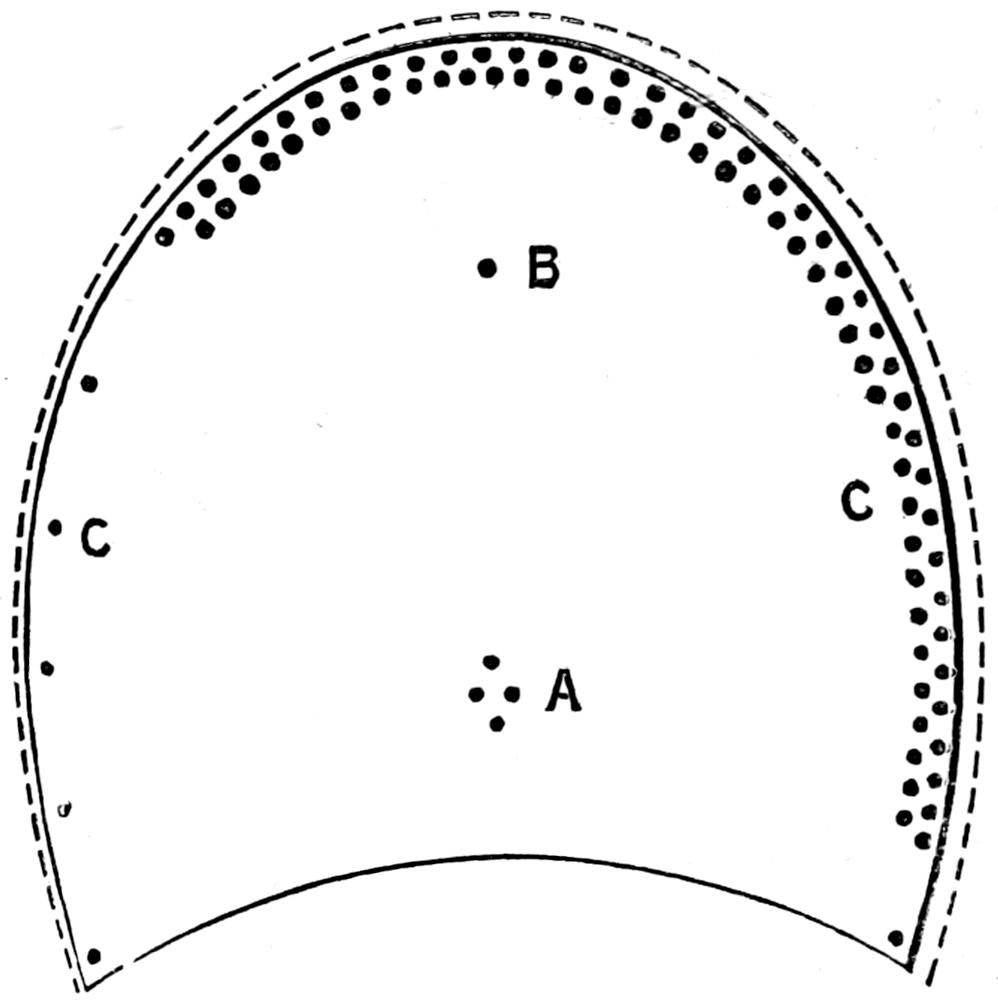
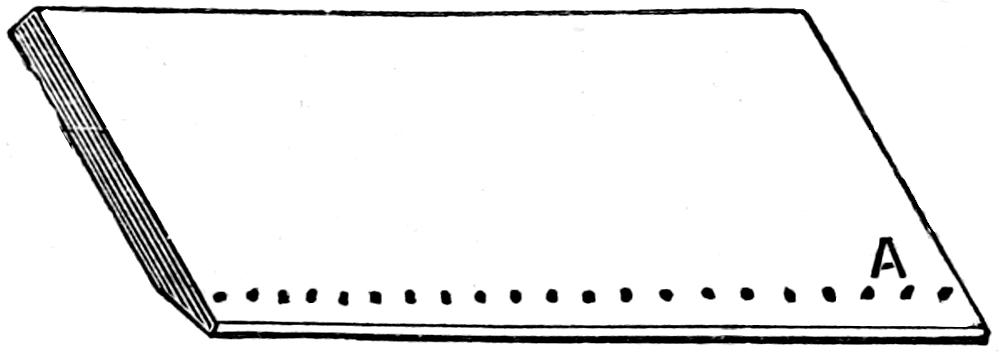
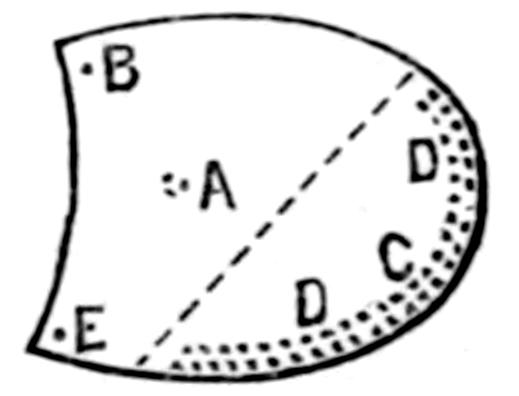
Before letting new heels wear away, take a piece of
paper with one straight line and lay this across the heel,
from J to H (Fig. 2); hold it with two
fingers of the left hand quite firm at F
and G; then with the right hand
smooth it down over the edge from J,
passing A, B, C, and D on to I; this
will leave a mark on the paper. Cut
out to this mark, and it will give a
good pattern of a half-heel piece, as
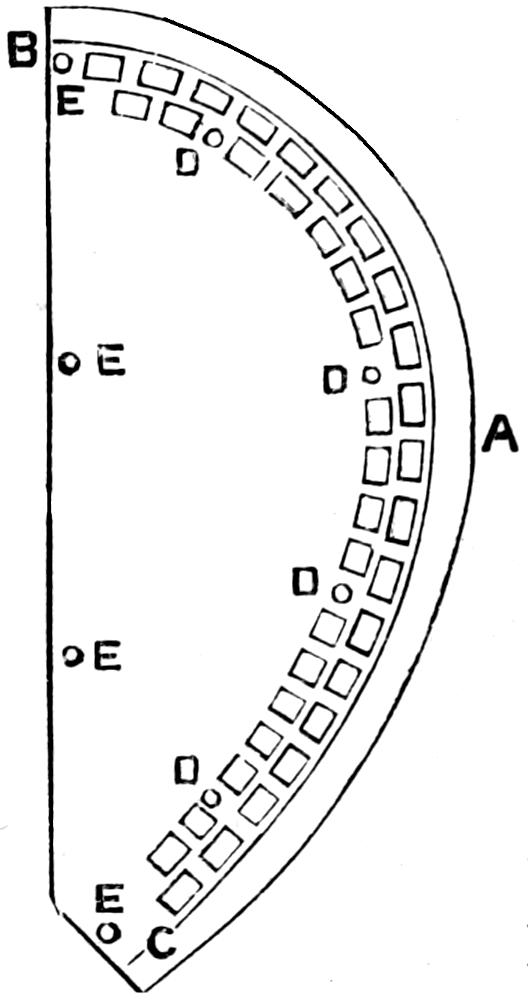
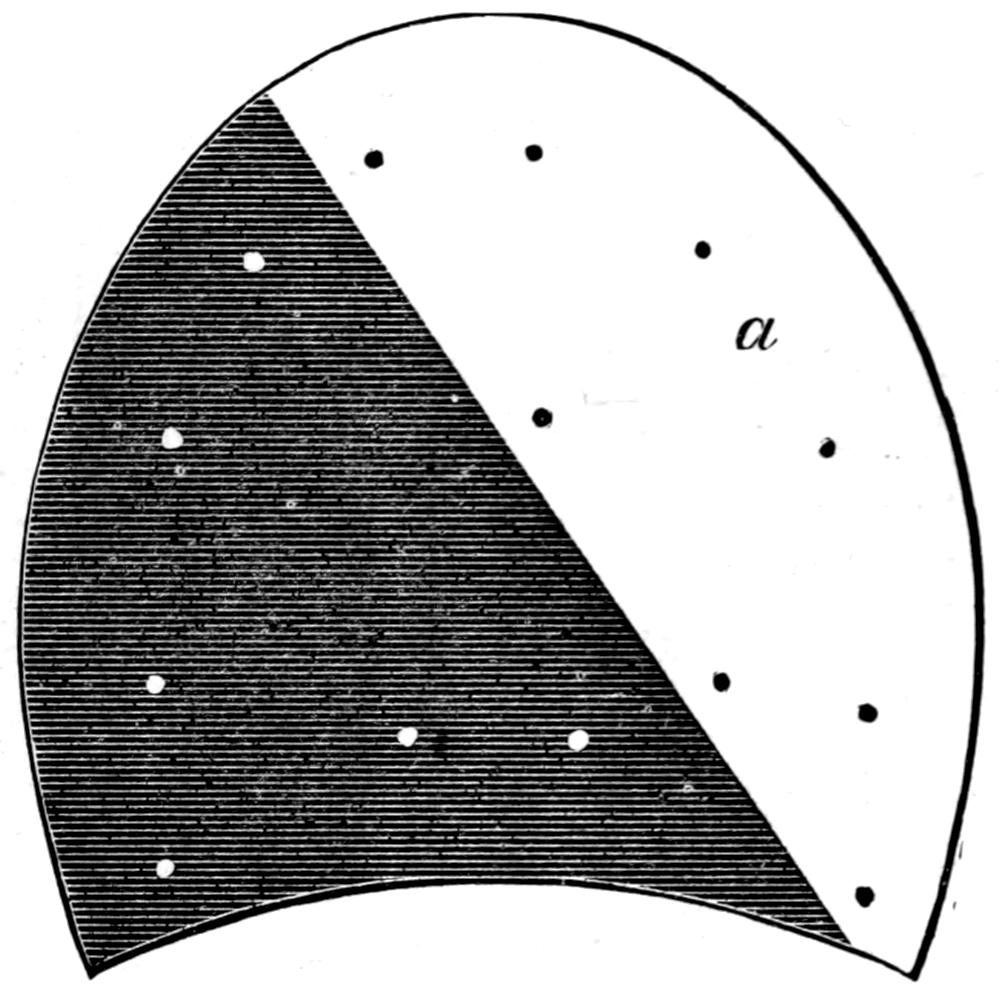
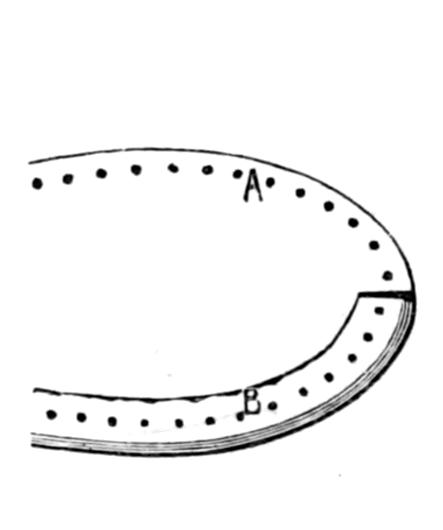
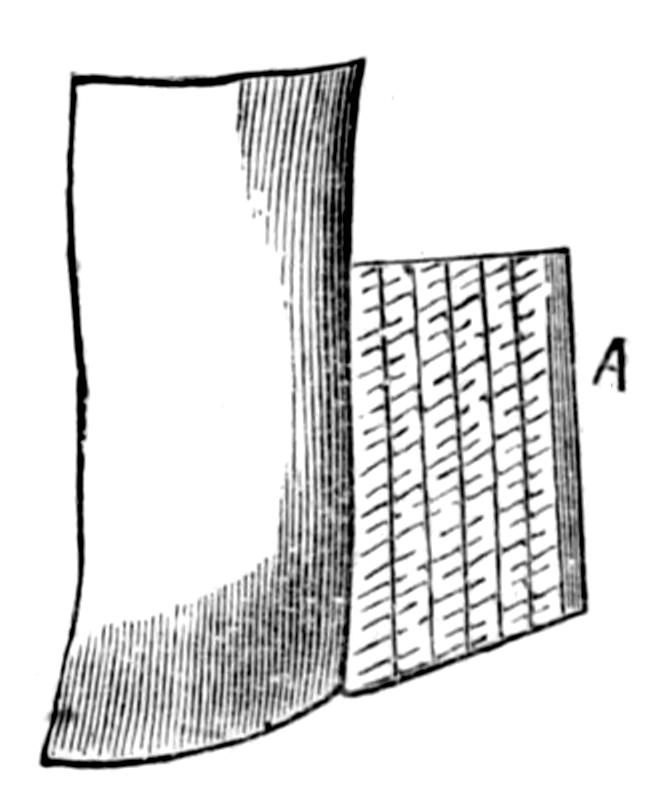
Fig. 3, without the outside line A. To
this cut another pattern out of stiff
cardboard, as it will very often be
wanted for use.
Fig. 3.—Half-Heel
Piece Holed and
Hammered.
When leisure occurs cut sole
leather to pieces of this pattern,
leaving ¹⁄₄ in. on all round the curved
side A (Fig. 3), to give room for nailing.
Here it will be necessary to
explain how to make an awl for this
purpose, as, unlike all other awls, such awls cannot be
bought ready for use, but it is a tool that saves much
time and disappointment.
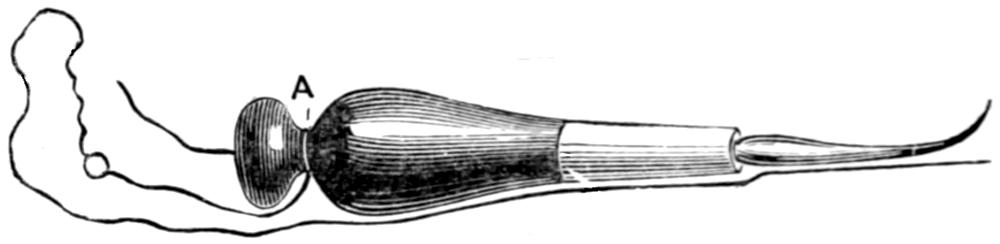
Fig. 4.—Home-made Awl.
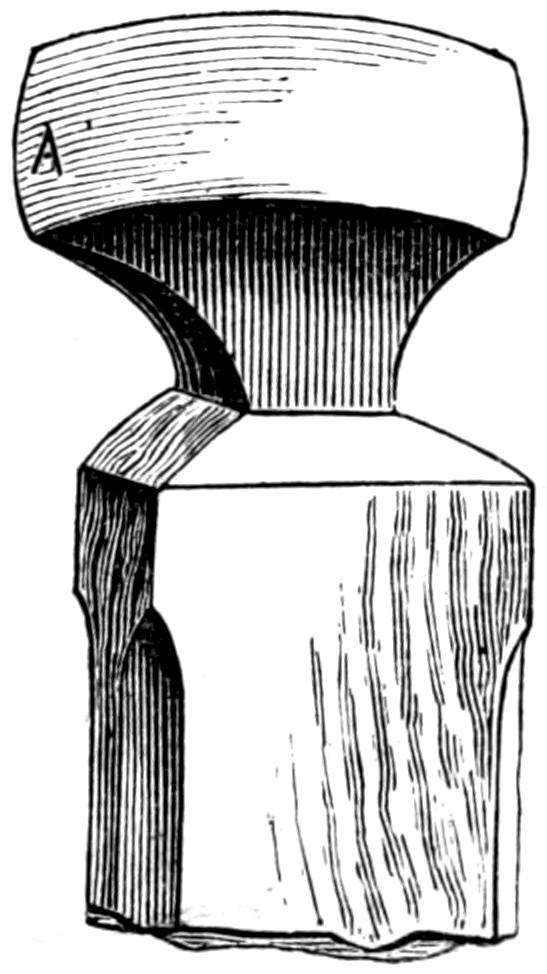
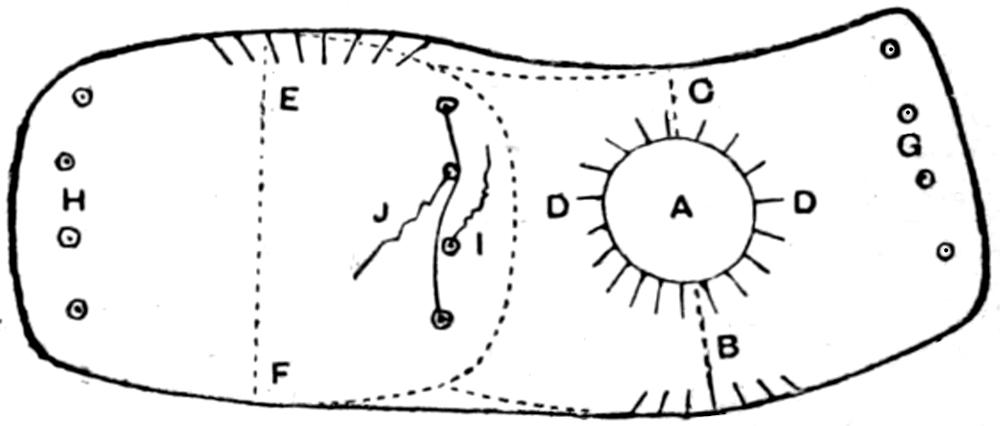
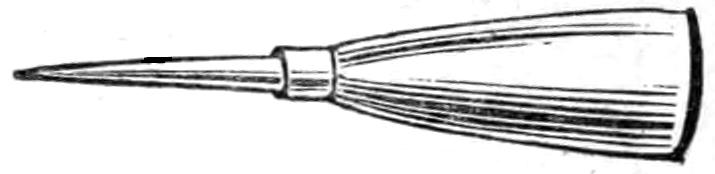
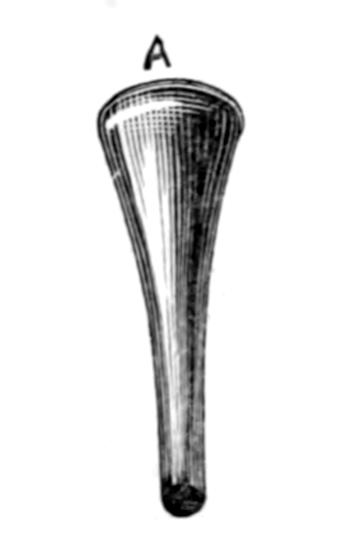
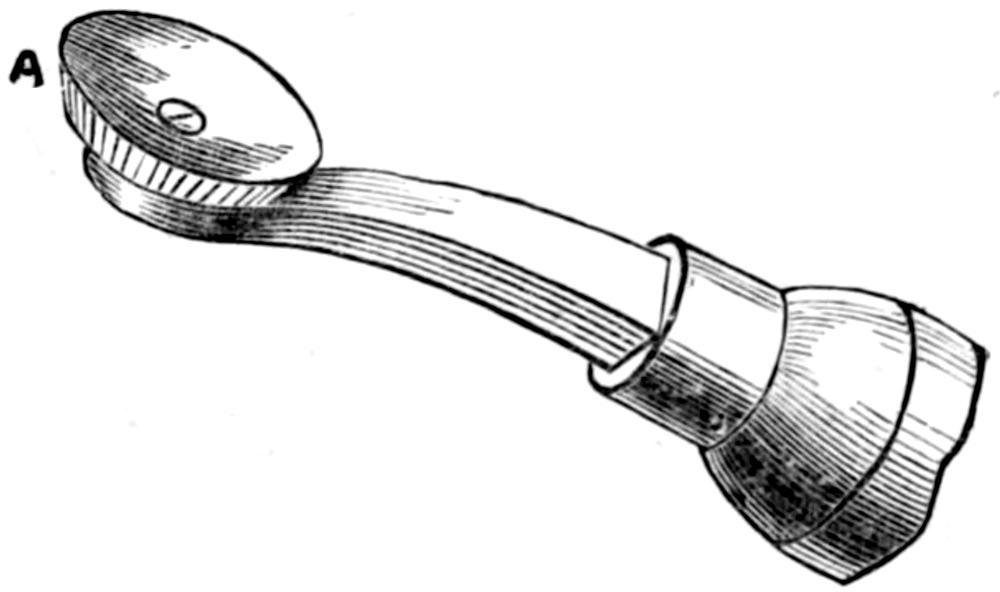
To make this tool, an ordinary handle is used for a
peg-awl, A (Fig. 4); two pieces of sole leather are put
on top, as B and C. To secure these, put one short stout
screw in the centre, and then put a third piece on, as D,
first cutting a hole in the centre, a little larger than the
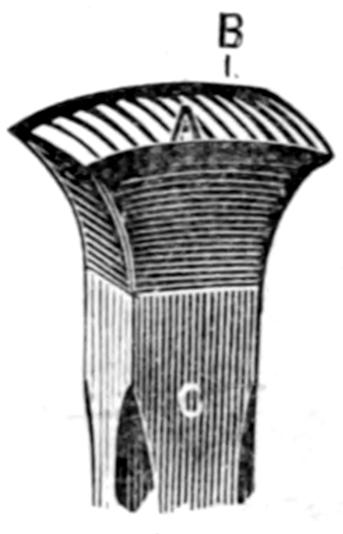
head of the screw, as A (Fig. 5), and then put about five
rivets in, as B, C, D, E, and F.
This is done because the
awl, when finished, is very stumpy, and requires such
hard blows to get it in that these would split the wood;
but by means of the leather this is avoided, and the hole
in the centre will admit of tightening the screw when
necessary. The edge is trimmed up all round, and a
carpenter’s large bradawl is put into the other end. This
awl has a shoulder to it, therefore the heavy blows will
not drive it into the handle. When the awl has been
put into the handle, break it off to about an inch from
the shoulder; then with a fine file, or on a grindstone,
taper it to a long, flat, square point, as E (Fig. 4); it
should be the shape of a French brad (Fig. 7), only
about ¹⁄₄ in. longer, and, of course, smooth.
Fig. 5.—Top of Awl
Handle.
The piece of leather in Fig. 3 should be of good
substance, and should be wet, but not soddened. On it
mark a line round the curved line from B to C, ¹⁄₄ in. from
the edge, and from these two points make two rows of
holes with the awl just described, which should be
dipped into a piece of soap each time before using. A
hole can be missed in the second line of holes at each
of the four places D, D, D, D, and a small round hole
made instead, and four more also made at E, E, E, E;
then let the leather get nearly dry before hammering it.
This hammering will make the holes smaller and more
irregular-looking than shown in Fig. 3; but this does
no harm, for so long as the awl is held in the same
position for each hole, the brads are sure to follow into
their proper places.
Fig. 6.—Cut
Bill.
Fig. 7.—French
Brad.
It has been stated above that the awl should be of
the same shape as a French brad, which is shown in
Fig. 7; but there is another kind of brad of similar
shape, only it is much shorter and a little stouter, as
shown in Fig. 6. This is called a
cut-bill, and it is this brad that must
be used to put into the holes made
in Fig. 3. Let the length of the brads
be as nearly equal to the substance of
the leather as possible; lay the leather
upon a piece of wood, and knock the
brads in the square holes one at a
time. When they are all in, take the
leather off the wood, and lay it on the
lap-iron with the points of the brads
upwards. These, if they are not too
far through, can be clenched and made
smooth by tapping with a hammer;
but if they are through far before trying
to clench them, they must be cut
off with a pair of cutting tongs close to
the leather.
Fig. 8.—Half-Heel
Piece Bradded.
This done, the half-heel is ready for use. Several
may be prepared, and then all that is necessary to half-heel
the boots is to cut the top-piece across, as shown,
from J to H (Fig. 2), take away the worn part, and
replace it with the new piece. Fig. 8 shows where it
should be bradded, and also the places for eight ⁵⁄₈ in.
rivets; these are all that is necessary to hold the piece on,
and will allow it be taken off easily when another heel-piece
is wanted.
It will be found that the small margin, A B (Fig. 8),
after the brads have been put in, has become somewhat
contracted. This is why the extra ¹⁄₄ in. of leather was
left, for it would break if nailed close to the edge. Now
you can trim up the edge of the piece to the edge of the
heel, cutting close to the brads, on the line C to D, and
finish in the ordinary way. The first time the boots are
half-heeled, it will be necessary to put four rivets in the
old leather at E, F, G, and H (Fig. 8), to keep it from
ripping off.
Fig. 9.—Snow’s Leather-plugged
Half-tip.
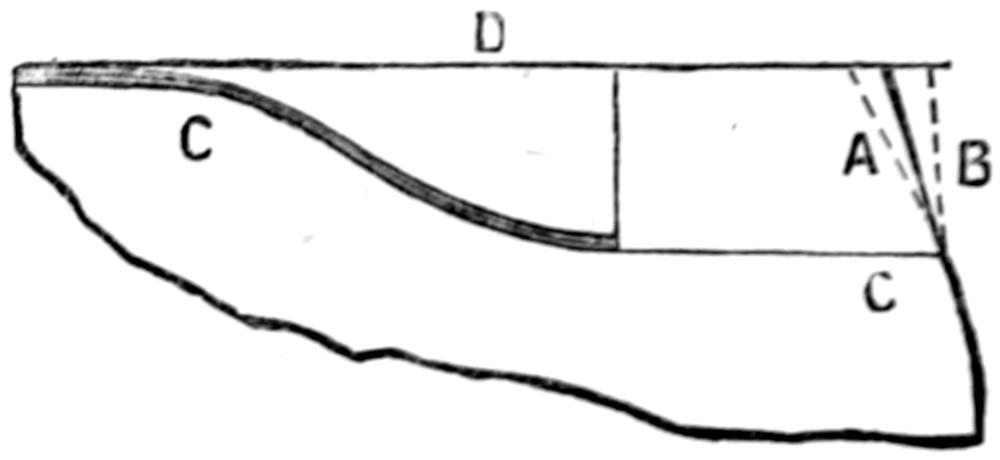
Fig. 10—Heel Prepared
for Half-tip.
Another good and easy way to half-heel boots is to
get a pair of Snow’s patent leather-plugged half-tips (Fig.
9), price 1¹⁄₂d. Put one on the heel in its proper position,
mark round the inside from A to B (Fig. 10), and cut
away the part, C, that the tip is going to replace. Lay
the tip on the lap-iron face down, and hollow it in the
centre, that it may grip well at both ends, then dip
it in water to soften the leather plugs, and put it on the
heel. With a fine awl make a hole through the centre
of each plug, and put a long rivet, which would be
supplied with the tips, in each hole. Smooth it up with
a file where rough, and you have a new lease of heel
wear for 1¹⁄₂d., and a very little trouble. If it is found
difficult to cut the curved line to fit the tip from A and
B, cut the heel straight across, as in Fig. 2, from J to H,
and after the tip is on cut a small piece, as D (Fig. 10),
and nail it in with four rivets. To get D the proper
shape, let it have one straight side, and press that against
the old leather. Hammer the leather on the tip—this
will make a mark underneath—cut through this line,
and you have the shape required.
Perhaps it is well to mention here that for beginners
heeling and underlaying—that is, placing pieces under
the soles—is better work to start upon, as by such work
the use of the tools will be gradually acquired, and
sufficient skill obtained to warrant attempting the harder
task of soling and heeling throughout.
Fig. 11.—Fixing Heel with Screws.
Suppose, as is often the case, your boots want the
heels set up on one side only, and a piece is wanted
under the side of the soles, or a toe-piece is wanted. A
job like this can be done with very few tools. But
it is well always to buy a tool when you want it, and
always to try and do the work as well as possible; for
by taking pains with the work, you will soon be making
progress. Boot repairing comes under every man’s notice,
so he has some idea how it should look when finished.
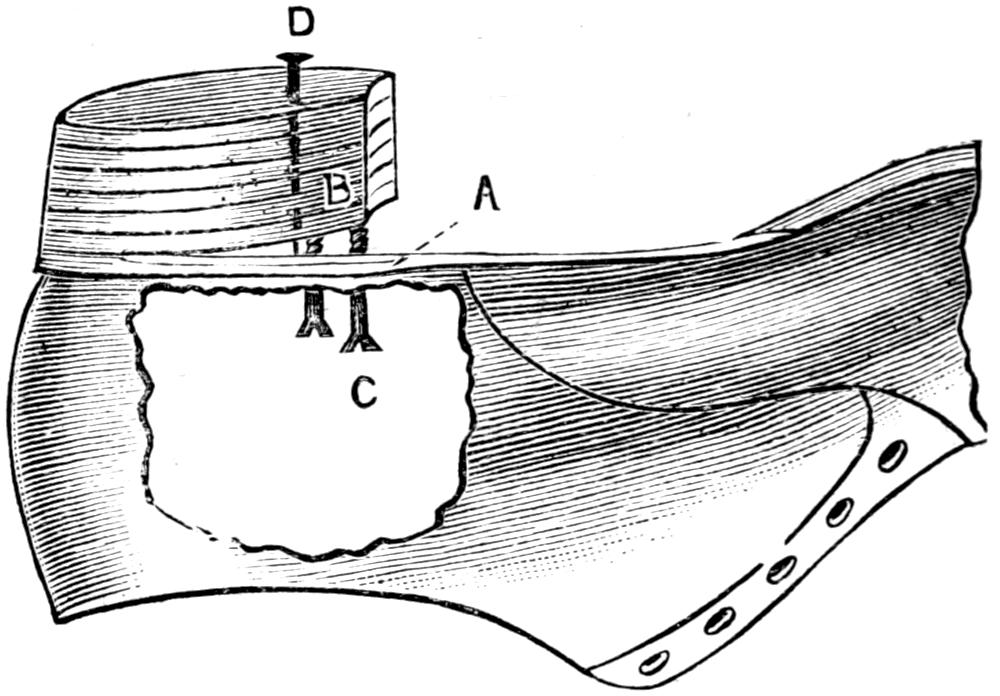
In the case of a heel that has given way by parting
from the shoe, the best way to repair it is to bore two
holes from inside the shoe, each large enough to admit a
joiner’s screw to pass though, as at A in Fig. 11, and then
make two small holes into the heel at B, as a lead for
the screws, which can be about ³⁄₄ in. or 1 in. long.
From the inside screw the two well into the heel, as at
C; then put the shoe on an iron foot, and drive in a
long French nail from the top, just behind the screws, as
at D, and the heel will be as solid as it was at first.
Perhaps, by putting in another screw the nail may be
dispensed with, and if so, so much the better, as then
nothing of the repair can be seen from the outside.
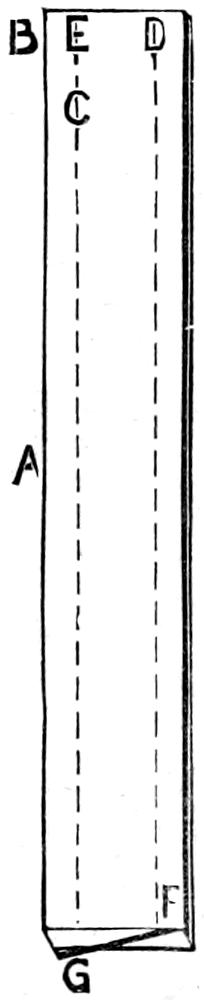
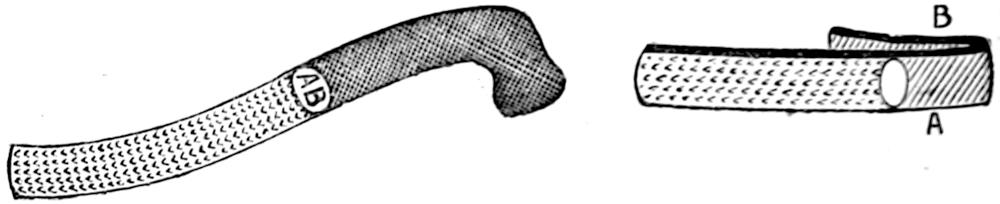
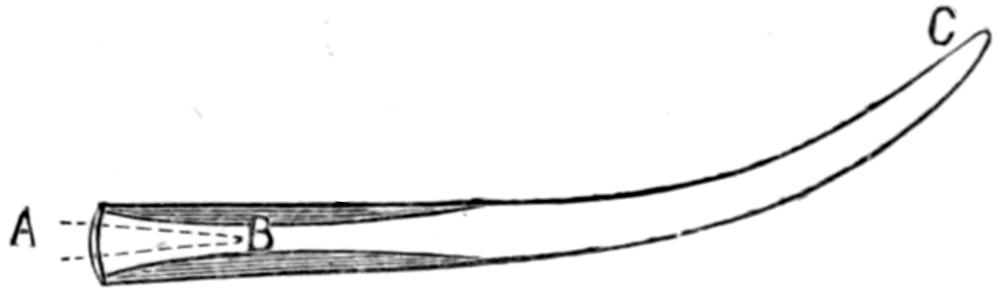
Fig. 12.—Sharpening Strop.
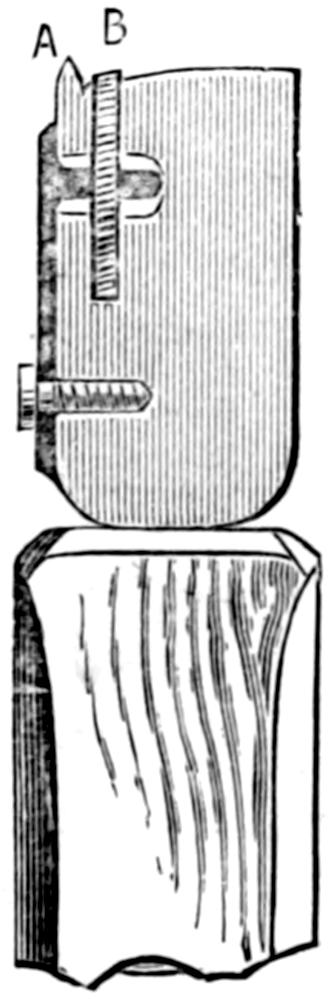
Fig. 13.—End View of
Strop.
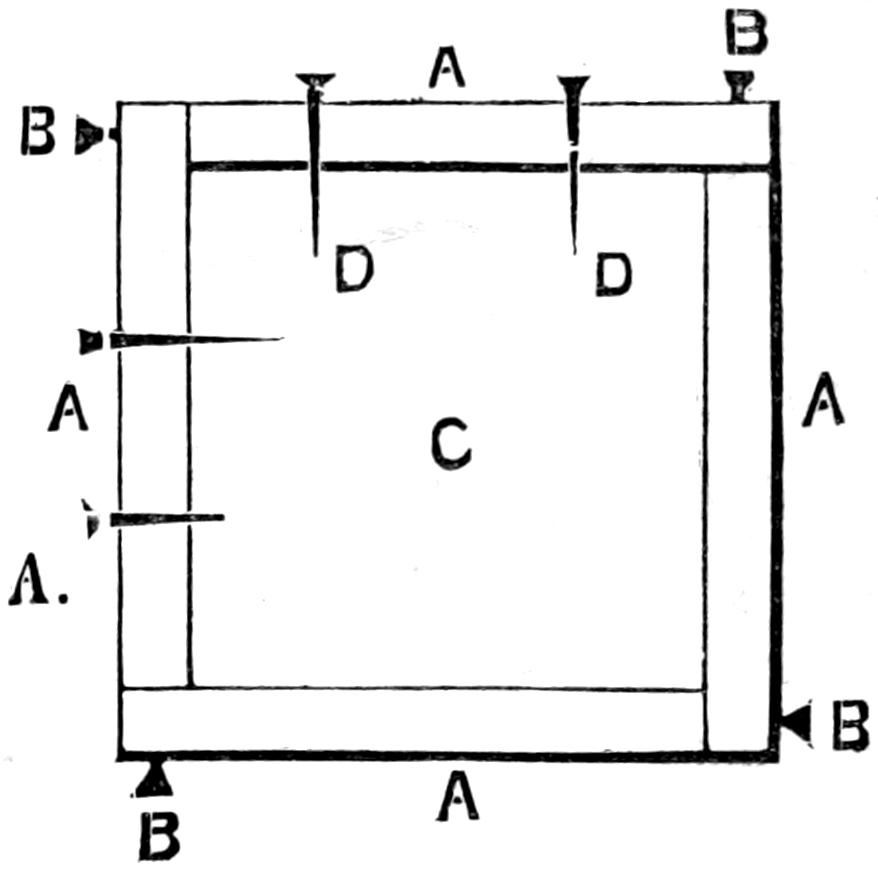
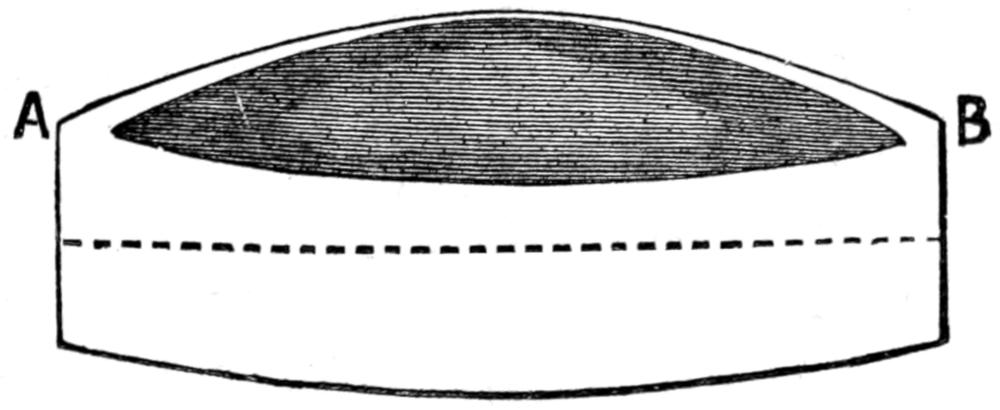
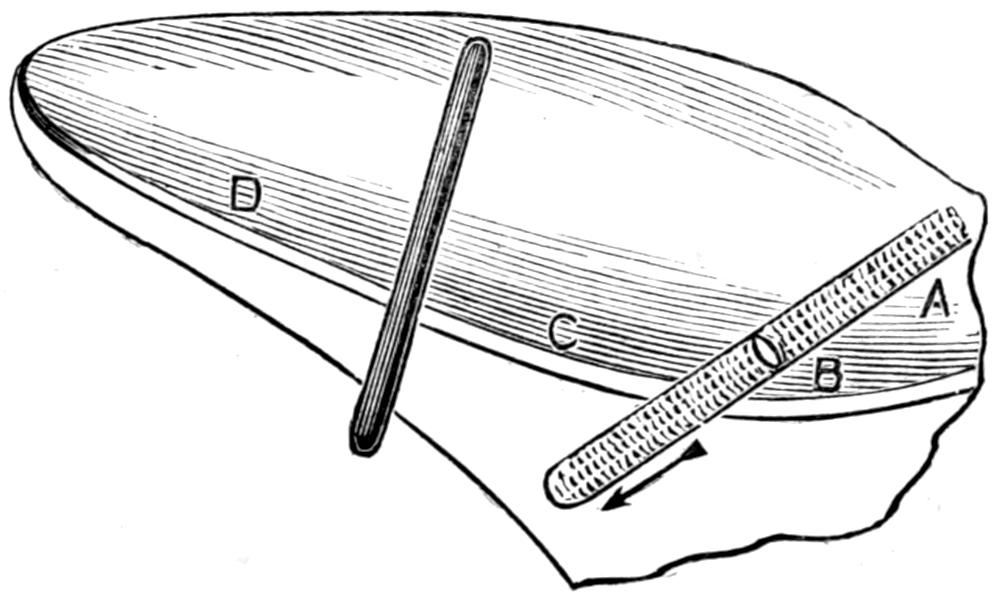
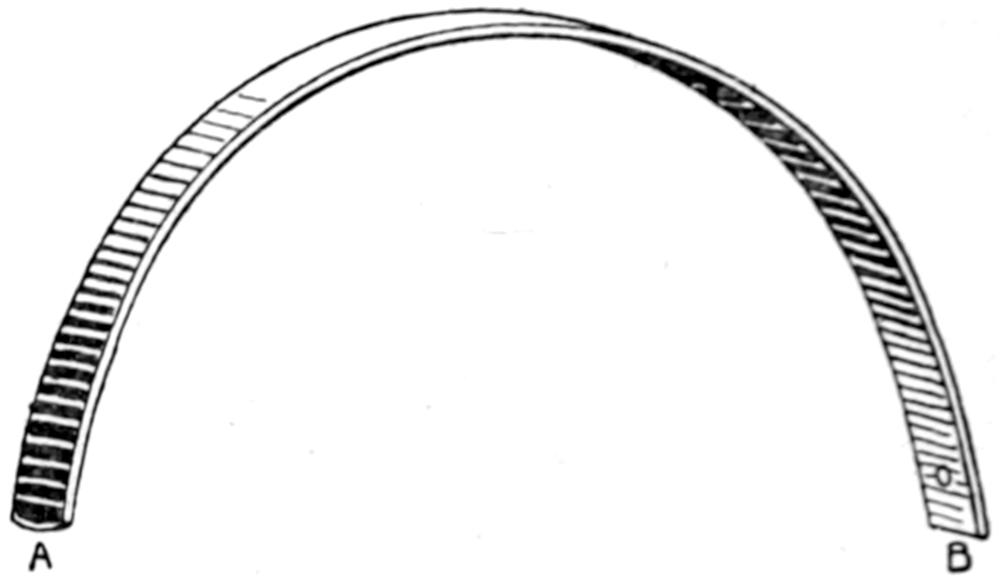
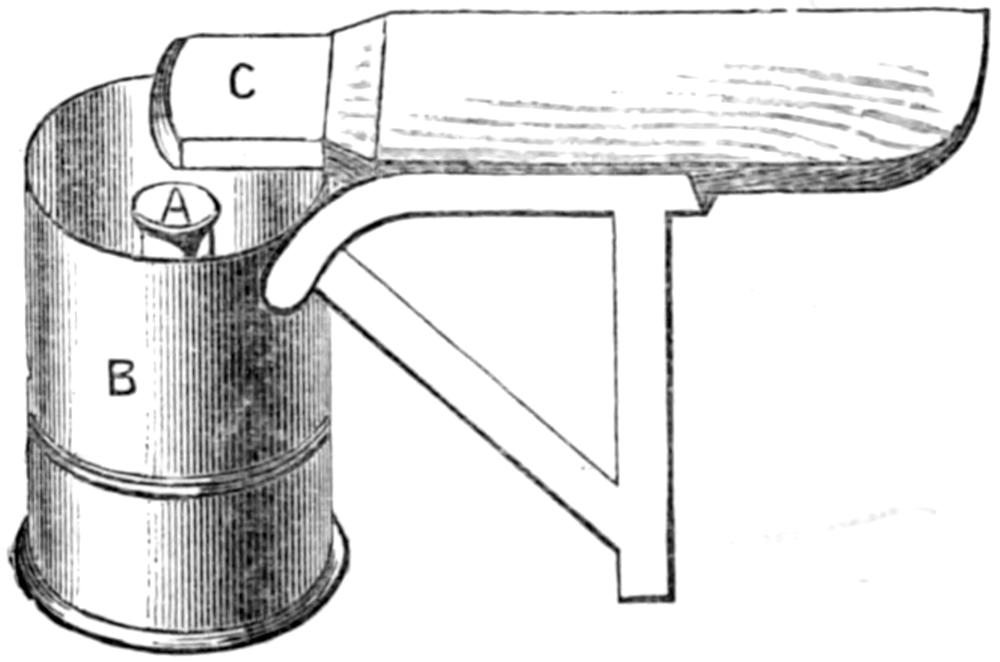
A sharpening strop (Fig. 12) is indispensable to the
shoemaker. It is generally a solid piece of square wood,
about 16 in. long, shaped at one
end to form the handle, A, about
4 in. long. A useful hollow
one may be made in this way:
Take four pieces of wood, ¹⁄₄ in.
thick, 12 in. long, and about
1³⁄₄ in. wide: place them together,
as shown at Fig. 13, and
fix them with screws, illustrated
at B, B, B, B. Then cut a square
piece, as C, and fix it with two
French nails at each side, as D D
(Fig. 13). Then have a square piece of wood, the same
substance, about 6 in. long, and shape it for the handle, as
A (Fig. 12), leaving about 2 in. square to form a stopper for
the square case, which will be found very handy to keep
spare awls in and also broken awls, the use of which will
be explained later on. It is also very convenient to keep
a sharp knife in, for if left with other tools, this gets
blunt, and when picking up another tool, you are apt to
cut your hand if the knife is lying on the bench.
When the strop has been completed, as shown in
Fig. 12, paste a piece of leather on one side, and on the
other three sides paste emery-cloth, Nos. 1¹⁄₂, 1, and
F F. For putting a fine edge to the knife use the F F, dip
the blade of the knife in water, and finish on the leather
side. In sharpening a knife, always hold the blade
quite flat on the strop, or you will produce a round edge,
which makes it hard to use.
Paste is very often wanted. A halfpennyworth can
be bought at any grindery shop. But it so soon gets dry,
and some of it is sure to be wasted. The better way is
to make paste thus: put a table-spoonful of rye-flour
into a jar, add a little boiling water to it, and well stir;
this is economical, and you can always have paste in a
few minutes.
To sole and heel a pair of boots, procure a pair of
soles of English tannage, costing from 9d., and top-pieces
from 3d.; a halfpennyworth of iron rivets, at 3d. lb.:
¹⁄₂ in. is a very useful size; sand-paper, 1 sheet, size 1¹⁄₂,
cost ¹⁄₂d.; and shoemakers’ ink, ¹⁄₂d. A better sole would
not be got at many full-priced shops.
Most important and most needed tools are an iron
foot (Fig. 17), a shoemaker’s hammer, knife (Fig. 82),
nippers, glazing iron (Fig. 30), and rasp (Fig. 27). This
list of tools does not include sufficient to turn out all
kinds of work properly, but the number is cut down so
that the first four or five repairing jobs, including tools,
shall cost no more than if they had been done by an
ordinary repairer.
Now we have leather and tools, we will start work.
If you sit on an ordinary chair, it should be cut down
to about 14 in.; or any seat that height will do. Your
tools, for the present, can be put on the floor or on the
box you keep them in; but a shoemaker’s bench is
of course better.
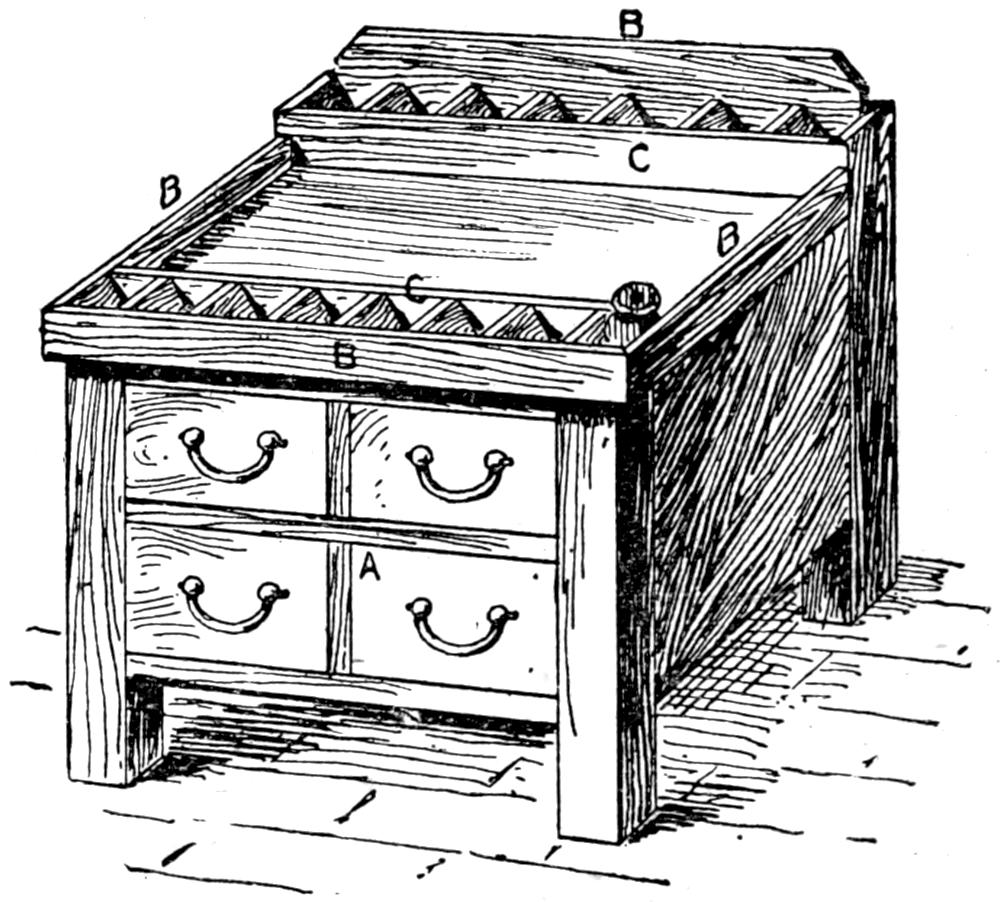
The illustration Fig. 14 shows that it is not very hard
to construct a shoemaker’s bench, though, if the one
shown is too elaborate, the drawers can be dispensed
with. Even a sugar-box will suffice, taking the lid off
and laying it on its side, the open top being A, where
one or even more drawers can be made to fit in. The
lid will make the back, and the beads for the two sides
and front marked B B B and B, which are about 1¹⁄₂ in.
above the side of the box. Compartments can be made
at C C to receive the grindery in use, one especially to fit
the ink-bottle, that it may not get knocked over.
Fig. 14.—Shoemaker’s Bench.
To tell a hand-sewn boot from one that is machine-sewn,
first take the sock out, and if there are stitches all
round inside, on the inner sole, the boots are machine-sewn.
If the inner sole is smooth, they are either hand-sewn,
standard-screw, or a combination. If they are
standard-screw, the marks of a small round disc show on
the inner sole. The screw wire is put in so that it
seldom shows on the inside, but if the centre of this
impression is scraped away, the brass screw wire will
be brought to light and prove the make. A machine-sewn
welt (the nearest approach to hand-sewn) will
show a real and good stitch all round the outside.
Machine-sewn boots or shoes are much heavier than
hand-sewn. Another guide is the inside of the heel, for
generally machine-sewn boots have heels that are put on
by a heeling machine, in which you can see either the
heads or clenched points on the inner sole of the seat.
Or the heels are nailed on by hand, which can be told
in the same way. For this reason machine-made boots
often have a whole or half inner sole in them, but if
this is taken out it can soon be replaced. Men who do
hand-sewn work do not build theirs in this way, for if not
sewn they are pegged.
Fig. 15.—Heel prepared for Repairing.
Now to sole and heel a pair of riveted or machine-sewn
boots, which require new soles to be riveted on.
First dip into water the old soles and heels of the boots
and hold them in for a few minutes; let them dry a
little, so as to have them just mellow. The new leather
must be put in water, and thoroughly wetted through;
then taken out, and allowed to get nearly dry, but not
by the fire, if this can be helped. Rasp off all rough
flaky stuff from the flesh side. Place the lap-iron—which
is simply a laundress’s iron with the handle off—on
your thighs, just above the knees, put the leather on
it, grain side down, and, commencing from the centre,
hammer it well, evenly and gently. This makes the
leather more dense and more resistive to wear, and also
more impervious to dampness. While the leather dries,
take off the old top-pieces that are worn, and if the
lifts are worn, cut or saw them through the centre,
and take away the portion that is worn, as a (Fig. 15).
This can then be replaced by a piece of new leather,
which need not be of the best quality. There are other
ways of building up heels, which will be explained as we
make progress.
Fig. 16.—Rivets in a Boot Sole.
This operation of taking off the old soles requires some
care. If the boots are wetted, they are far less likely to
fall to pieces and otherwise give trouble than if they are
worked upon in a dry state. When taking off the sole,
a last can be put in the boot, to make a solid foundation
to work on; the old sole can be prised off with a blunt
chisel when it is wet, commencing at the toe or the thinnest
part; this will enable you to catch hold of it with
nippers. By means of these pull off the sole with the
nippers in one hand, and at the same time hold down
with the other the under leather (often termed welt, or
runner). Should the under part still have a tendency to
give way from the uppers, knock back the sole, so that
it leaves the rivets sticking out; with the pincers or
nippers pull out the rivets, and repeat the processes till
the sole is got off without disturbing the boot. Before
putting the new sole on, the under part can be nailed
down with a few short rivets to make it solid. If in the
making or previous repairing very long rivets have been
used, taking off the sole will need great care to avoid
causing the boot to fall to pieces. As your own repairer,
never let your boots wear low, for here “a stitch
in time saves nine”; and the cheaper the boots, the
more applicable this adage.
For re-soling machine-sewn boots and shoes, follow
the advice given in connection with hand-sewn work.
The following is another system for sewn work:—When
the lasts are in, and the boots wet, skive off the
edge of the sole: not right through, or you may spoil the
welt, but deep enough to cut through the stitches
and cut their loops off. Then, as before, the toe can be
raised or prised up from the welt, when taking off the
sole is an easy matter.
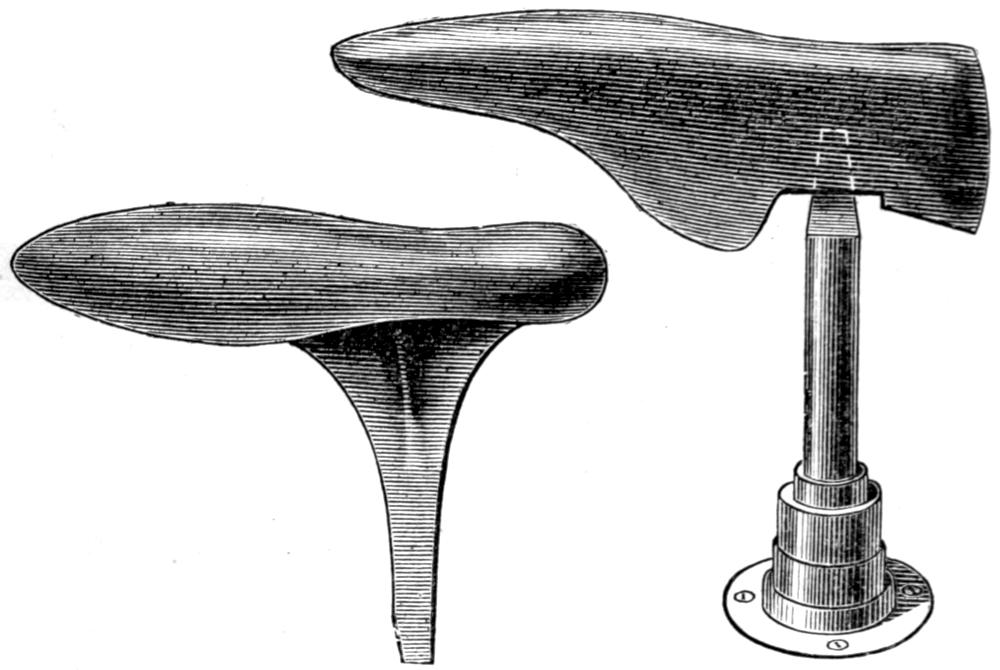
Fig. 17.—Iron Foot used in
Re-Soling.
Fig. 18.—Iron Last
and Stand.
If the under-sole should come away whilst taking off
the outer one, the damage must be made good. This
can be done in the following manner:—If you are repairing
on an iron last or an iron-bottom last, hammer
the middle or under-sole back into its place, first taking
out all the old nails; then, supposing A A in Fig. 16 to
show the line where the rivets which fix the new sole
will pass through the middle sole, put through the
line B B a few short rivets or long tingles, according to
the substance of the bottom. The dots, B B, show where
the tingle should be put. They should be only just long
enough to clench on the bottom of the last.
When repairing on a wooden last, and this under-sole
is being fixed, take the shoe off and slip it on the
iron foot to clench the tingles, for they must be clenched
before the new sole is put on. When putting the
new sole on and knocking in the rivets, put extra long
ones in, say an inch apart: just long enough to clench
through the whole thickness of the new sole, middle
sole, tops, inner sole, etc. The long rivets should be of
brass, so that when the shoe is again re-soled these will
draw out with the thin old sole, and not disturb the
middle sole in so doing.
Figs. 19, 20.—Last Stands, with Reversible Foot.
The cause of boots falling to pieces, as they sometimes
do after a short period of wear, is frequently the
want of a good solid inner sole. If not gone too far, and
if when pulling the sole off the boots are not pulled to
pieces, remedy this defect by putting a new half inner
sole in the forepart, and then re-sole the boots on the
iron foot. If they are past this, and the uppers are good
enough, re-last the forepart on a pair of iron lasts or a
pair of iron-plated ones.
To obtain the required lasts, the size of foot must
be taken in inches. Draw the tape measure just a little
tighter than you would like the boot, and then send off
the order thus: 1 pr. gent’s (boot or shoe) lasts, joint
9 in., instep 9¹⁄₂ in., as the case may be. Iron-plated
ones are the cheaper, as iron stem and stand, which
cost 2s., are wanted with the iron lasts; but an iron-plated
last, screwed to a bench, gives you the advantage
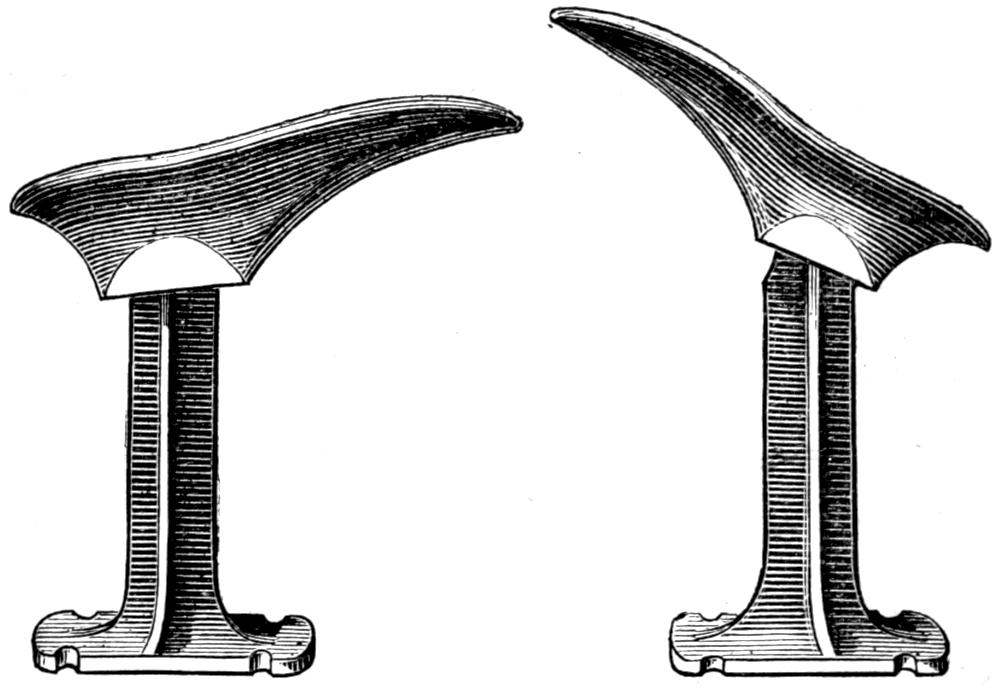
of being able to stand at work. Figs. 17 and 18 show
last and stand, which can be got at any leather warehouse.
Figs. 19 and 20 show a useful stand for repairing
purposes which allows the foot to be fixed firmly in
either of the two positions.
Fig. 21.—Old Sole Removed.
Fig. 22.—New Sole partly Fitted.
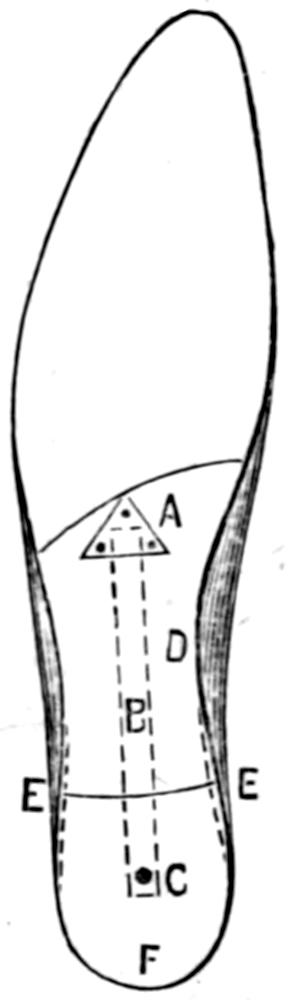
The old sole should be cut off at the waist to within
about ³⁄₄ in. from where the new sole is to come. Mark
off the exact length of the new sole, and then start to
skive off from this mark, tapered to where the old sole
was cut off. From the line scoop it out evenly with
a knife, until about one-third of the way through (as
A, in Fig. 21). Then lightly tap down the leather, right
across where hollowed out; this should be done with
the pene end of the hammer. This process hardens the
leather to receive the pegs or rivets and, without weakening
the old leather, gives an extra drop to receive the
new sole. The new sole to be spliced to this part of the
waist of the boot must be skived, but not very thin; and
it is best to skive on the flesh side for light work, and
on the grain side for heavy work. Slightly paste the
groove in the old leather, and also the new sole, where it
has been skived; this tends to make the graft sound and
firm when finished. It is all important to properly
work the leather before using—that is, by wetting, fleshing,
drying, and hammering, as explained on p. 20.
Fig. 23.—New Sole Fastened in Groove.
Fig. 24.—New Sole finally Fitted.
In levelling up for re-soling, the proper way is to
make the sole just a little rounded, putting in just
enough filling to make this difference. The bottom of a
boot, if too round, is sometimes uncomfortable, and
wears away quickly, whilst one hollow in the centre is
uncomfortable and unsolid. A last should be somewhat
round at the bottom, so that it fits the bottom or sole of
the foot. The sole of the boot will be made round enough
by placing a layer of felt in the middle, to prevent creaking,
and make it impervious to dampness as far as possible.
This applies both to making and to repairing.
To fix on the new sole, place the boot or shoe on an
iron foot. The sole should be put on with the skived
end to overlap the groove about ¹⁄₈ in., as shown at A
(Fig. 22). When riveted, it should be well into the
groove, as shown at A (Fig. 23). If the graft is well done,
the end of the new sole will project above the old
leather. This part must be pared off neatly level with
the waist, then pened with the hammer and rasped off.
When all these processes are carried out, you will have
a neat and a permanently solid seam, as shown at A
(Fig. 24).
Fig. 25.—Position for Rivets.
Fig. 26.—Edge of Sole Pened.
Before putting in the rivets, pare up the sole—not
closely, but leaving a small margin all round. About ³⁄₈ in.
from the edge, draw a line all round with a pair of
compasses or with a pencil, which will answer the purpose,
held between the thumb and finger, placing the
second finger against the edge of the sole. Then with
an awl prick on the line, all round the sole, small holes
to receive the rivets, putting them closest where most
wear comes; generally, this is at the toe and outside
joint, where it is best to use iron rivets; elsewhere brass
rivets should be used. Fig. 25 shows about the form in
which the rivets should be put in.
Fig. 27.—Shoemaker’s
Rasp.
Fig. 28.—Enlarged View of Pened Work.
Trim up the sole’s edge with the knife, being very
careful not to cut the uppers; then damp the edge, and
pene it all round with the hammer. This should be
done with the shoe on the knees, the heel being towards
you and the edge of the sole upwards, and pened by
hammering, as shown in Fig. 26 at A B, commencing at
A, and going right round the sole. This process is important,
as it hardens the edge, tends to make it hollow,
and prepares it to receive the next tool, which is the
rasp (Fig. 27). The toe end of a shoe is illustrated on
a larger scale at Fig. 28, which shows how the pening
strokes should be laid to weld the new and old leather
together, and keep the edge hollow, as at A (Fig. 28).
Then let the whole boot dry, while you proceed with
the other one.
Fig. 29.—Top Piece on Heel.
When you repair your own boots, never let the heels
wear more than just through the top-piece: then the
heels keep in shape; but if you have to repair the lifts
when putting the pieces on, let the nails be a little way
from the edge, or when the top-piece is nailed on one
set of nails will come in contact with those below, and
produce unpleasant results. When building up the heel,
ready for the top-piece, it is well to make that side
where the most wear is a little higher, as it tends to
make the wear more even. Tack the top-piece on the
heel (Fig. 29), putting a nail at A and one at B, and round
it up with the knife, leaving a little stuff on all round,
more particularly at that part which is to receive the
most nails, as shown by the dotted line. The rivets
should then be put in, as shown at C C, but first mark
round the heel and hole it, as was done for the sole,
then pare and pene, as described above; the edges of
the soles and heels should then be rasped, then buffed
with a scraper or buffing-knife.
This tool, which is illustrated on p. 126, is similar to a
cabinet-maker’s scraper, and it can be made of about
3 in. of old stay-busk. Such a tool can be bought, but it
is seldom ready for use, so you might as well make one;
and a piece of freshly-broken glass will suffice. Then
sand-paper the edges with a piece of No. 1¹⁄₂ sand-paper.
The faces of the sole and heel can be filed with the file
side of the rasp, to make the heads of the rivets smooth
and even with the leather; then buff off the grain of the
leather with the scraper, and sand-paper the sole all
over. This produces what is called a rough bottom, and
all that is needed for own work. Rub a little paste on
the edges with a piece of rag, and ink the edges and the
waist, using shoemaker’s ink, American is best. This is
allowed to get just dry, then the leather is rubbed over
with the glazing-iron (Fig. 30). This
iron must not be very hot; its proper
heat is such that if it is put into water
it should just cause a hiss. Properly,
a forepart iron should be used for the
soles, but the glazer will do for a
makeshift. This ironing process gives
a nice gloss, which is increased and
made more permanent by being repeated,
at the same time ironing on
a thin coat of heel-ball, which can be
rubbed off smooth with a piece of old
cloth, and will leave a brilliant polish.
Fig. 30.—Glazing
Iron.
Always remember that any job in
repairing can be finished much better if a last is inside
the boot; and that pening, rasping, buffing, and all
finishing, should be commenced from A for the soles
(Fig. 26), and from B (Fig. 24) for the heels. In using
the knife, the action is the reverse in both cases.
Gutta-percha makes by no means bad soles, and with
it no great difficulty will be found in either patching or
entirely re-soling boots. It is not recommended for use
on neat light boots; but many an old pair of boots which
are looked on as past wear can thus be made thoroughly
useful for winter wear; for it must be remembered that
gutta-percha is waterproof. It is also light in weight,
and is warm to the feet. It is, however, chiefly on the
grounds of economy and the ease with which it can be
used that gutta-percha is to be recommended.
The gutta-percha necessary can be got at any india-rubber
shop. It is sold in pieces about ¹⁄₄ in. thick, and
only as much as may be wanted need be bought.
The measurement roughly can easily be got. Some
cement will also be required; that used for fastening
the india-rubber tyres on cycles, etc., is excellent for
the purpose. Cuttings of gutta-percha could be used
instead, but would not be found so satisfactory, except
perhaps to stick a patch on a worn piece of gutta-percha
sole. In this case, though, a cement of any kind is
hardly necessary, as the two surfaces on being made
sticky by heat, will adhere without a medium.
The soles to be repaired must be thoroughly dry
before commencing operations; for if they be in the
slightest degree damp, the new soles, though they may
adhere for a time, will certainly come off ere long. That
any dirt or clay must be cleaned off, goes without saying.
It may be advisable to tear off the bottom layer of
leather, in which case a neater-looking job perhaps
will result; or you may just take the boot as it is, and
lay the gutta-percha on. In either case, the work is the
same. It is well to heat the soles of the boots and put the
cement on while they are warm. The cement may
be melted either in a ladle and poured on, spreading it
thinly, or be used like sealing-wax by melting it as
required and rubbing it on the boot; or pieces may be
put on the boot and melted, and spread with a piece of
hot iron—the kitchen poker, an old knife, or anything
of the kind will do very well. Perhaps this last method
is the best, as the hot iron seems to work the cement
well into the leather, which, by the way, may first be
roughened with advantage by rasping; or even scoring
and scratching with a knife will suffice.
When cement is used it should be evenly spread
upon the leather, and while hot it is extremely
tenacious. If it gets cold before the gutta-percha is
ready to apply, it may be heated by the hot iron or over
a gas or lamp flame, or at the fire. The great thing is to
bring the gutta-percha and the boots in contact while
the cement is quite hot. The gutta-percha also should
be hot: on the side of adherence hot enough to be soft
and sticky. This can easily be managed by holding it
close to the fire for a short time just before putting it on
the boot. The gutta-percha should then be firmly, but
gently, pressed to the boot. It will be flexible enough
to yield to pressure and follow the curve of the sole if it
has been sufficiently warmed.
When the new sole is firm and hard—as it will soon
become if the boot is put in a cool place—the edges may
be trimmed off. This can be done with a knife, as the
gutta-percha can be easily cut. The cuttings should be
kept, as they come in useful for re-patching the sole as it
becomes worn in places, so that there need be little, if
any, waste. The final touches may be given by drawing
a hot iron of any kind over the edges, so as to smooth
them down.
The sole as now made will wear a considerable time,
though not so long as leather, but the wear-resisting
qualities of gutta-percha may be much increased by the
use of boot protectors. These are small pieces of iron
for fastening on to the sole in parts most susceptible to
wear. They can easily be fixed. The caution that
boots with gutta-percha soles should not be placed too
near a fire may not be unnecessary, but beyond this, no
special precaution is necessary any more than in the
case of leather.
Briefly stated, the cost of the tools mentioned in this
chapter is as follows:—An iron foot may be bought at
1¹⁄₂d. per lb., and a handle for 5d; or Snow’s Handy Last
foot may be purchased for 2s. A shoemaker’s knife
costs 2¹⁄₂d., a hammer 6d., nippers 5¹⁄₂d., glazing-iron
6d., and a forepart iron 8d. These may be obtained at
any grindery shop.
CHAPTER II. PATCHING BOOTS AND SHOES.
It often happens that the uppers of boots or shoes
want some repairing, such as stitching or patching.
An explanation of some of the principal methods of
repairing defects in the uppers, with the way also of
fastening down to the sole such patches as need it, will
therefore be useful. The patch can be fastened down
to the sole by sewing; but if the boot has to be soled,
and it is not hand-sewn, the sole (or welt, as the underneath
sole is termed in machine-sewn boots) can be
prised from the upper where the patch is coming, and
the patch tucked under, as the original leather is.
When it is smooth, with no fulness, the under sole can
be tacked down with a few small tacks, to secure it till
the sole is put on. A few rivets (say, every alternate
one at this part) longer than those used to nail the sole
on with will make the boot as solid as it was at first.
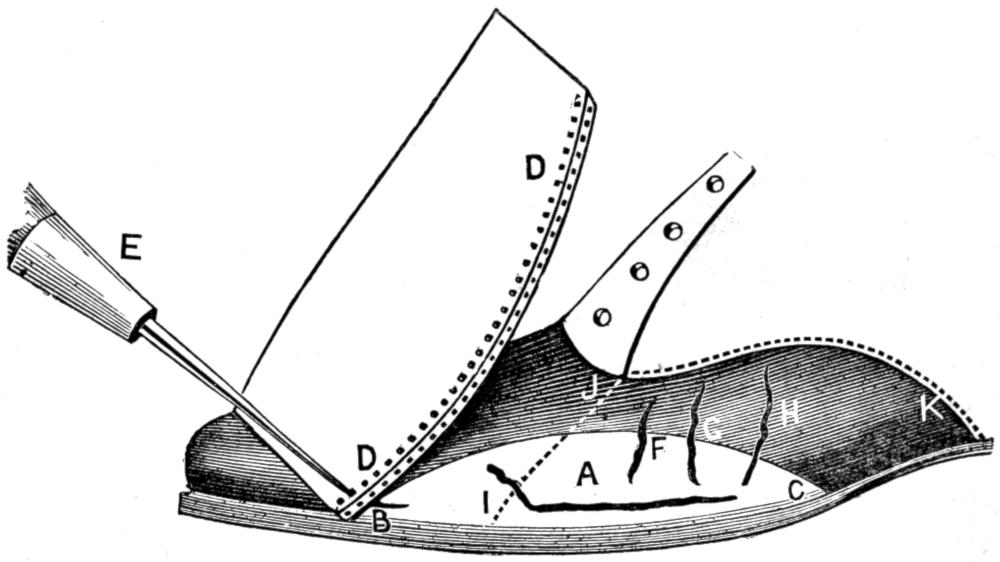
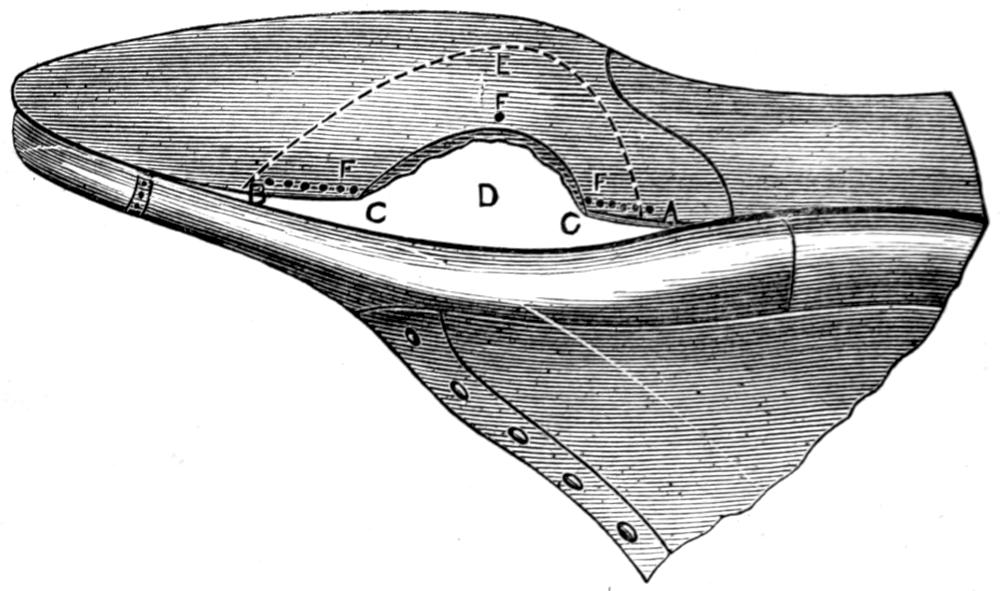
Perhaps the neatest and most solid way to put on a
patch is to close it in. This is done by cutting away the
worn or cracked part of the old leather, as shown on p. 33
(Fig. 32). The cut should not have more curve than is
necessary, for the straighter the cut from B to C, the
easier will it be to sew in the patch. In cutting out the
piece, be careful not to cut the lining; doing so would put
an unnecessary strain on the patch, as it would then be left
without protection against stress in wear. Cut the piece
away at the bottom close to the sole. Select a piece of
new leather of good quality; if the old leather is calf,
use calf again; if it is horse, or porpoise, use calf also,
as near the same substance as possible. For any other
kind of leather, such as kid, patent, etc., the patch should
match. Lay the patch cut out upon the new leather, and
cut the piece full large, as shown by Fig. 31; if it is to
be tucked under it will need to be the full size shown;
but if it is to be sewn down, it will only want to be as
large as the dotted line in the figure. It will be noticed
that the new piece has not quite so much curve as the
old. This is to give a fulness to the patch equal to that
which the foot has made in the old leather. The cut
from A to B must be even and smooth, and holes must
be made on the wrong side, as shown in Fig. 32 at D D.
Place the patch face down on a board, and at about
¹⁄₁₆th in. from the edge make a hole with a closing-awl,
E (Fig. 32), letting the point come out in the thickness of
the patch as near to the face side as possible without
actually going through. Similar holes are made the
whole way round the curved edge, putting about fourteen
stitches to the inch.
Fig. 31.—Leather Skived to form Patch.
Fig. 32.—Putting on a Patch.
The patch can now be closed to the boot, first slightly
wetting the edge of the old leather. Do not start to sew
quite at the end of the new leather, or, when turned
over, it will be deficient at the corner. The awl must
be put right through the old leather, near to the edge,
so as not to make a hard seam.
For calf or any stout leather, the wax-end or thread
will be made with three strands of fine flax, and have
bristles on each end. The way to make threads is
explained on p. 60. For kid, or any light leather,
twist or stoutish black thread will do; a tapered end is
easily made to either of these by untwisting it for about
an inch and a half, scraping it gently between the
thumb and a blunt knife. Then wet or wax the thread,
and twist it back, holding each one separately in the
left hand about four inches down, and with the right
hand twist the end on the right knee—not too hard, or
you may twist off the fine taper that is wanted to
receive the bristle.
Fig. 33.—Patch completed.
In stitching this patch, as in all stitching or sewing,
each stitch should have the same tension put upon it, at
the same time being careful not to pull too hard on the
stitch that is to lie on the old leather.
When the patch is sewn right across, again wet it,
and scrape off the rough edge, rub it down, and turn the
patch on its right side. Put a last inside the boot, and
rub the seam down lightly, but well, on the right side.
This can be done with the handle of a table-knife, or
anything hard and smooth.
Should the vamp be cracked in several places, as
F, G, and H (Fig. 32), then it will be best to put in a
new wing. It can be closed in from I to J as described
above, and blind-stabbed from J to K. In a case like
this, it is well to have the top edge a little larger all
round, to hide the old holes, and, if it is not a leather
that has the grain side out, at this part it must be skived
on the wrong side a little thinner, about ¹⁄₄ in. wide.
After this kind of seam is rubbed down, it will be made
much neater if lightly buffed, or scraped, across from
A to B (Fig. 33), and then rubbed down again. If this
sort of patch is put on well, it can scarcely be seen after
the boot has been blackened and shined.
Fig. 34.—How to hold the Boot whilst Sewing.
Previous to sewing the patch down to the sole, the
crevice where the old piece was cut off must be slightly
opened with a chisel, or piece of tapered wood or bone
and the patch tucked in, as shown at A (fig. 34). This
is to enable the stitches to be got as far back and as
much out of sight as possible in sewing the patch down.
For sewing the patch to the sole, a sewing-awl must be
used: it is similar to the closing-awl, only it has a
stouter and wider blade.
The thread for ordinary work will be about ten-cord,
or No. 9 Patent (price, 2d. per ball), and the awl,
although it has to carry the two ends, should only be
the substance of one.
The boot is laid upon the knees, patch side up, and
when the piece is on the side shown in the figures, the
boot must lay on the lap, toe from you. It must be held
very firmly on the knees by means of a strap or stout
piece of cord placed round it, as B (Fig. 34), and passing
under the ball of the foot. By this means the boot can be
held as tightly as you please by simply pressing down
the toe.
The stitching must be started from A (Fig. 33), the
point of the awl being put in on the welt side, A, and
pushed through the sole to the bottom, wriggling the
awl a little, that it may find or make its own way
through at C. In all sewing, stitching, or stabbing, the
bristle on the left side is put in first, and the one on the
right side is put in underneath it, so that when the
stitch is set it shall be between the thread (on the right
side) and the patch. This will help to lay the stitch
back, and will make the stitches look even and lay flat.
The stitching must be continued right across to B
(Fig. 33), setting about five stitches to the inch, and
tucking the patch well under before each stitch is taken.
This stitching done, and the ends of threads cut off,
the stitches must be rubbed down with the bone on the
patch side, and lightly hammered down on the sole side.
The surplus of the patch can now be cut off level to the
edge of the sole, as shown at C (Fig. 34). The edge can
be blacked with ink or blacking, and then rubbed down.
A little weak paste on the patch will, if let dry, make it
smooth to receive the blacking, and the whole, when
blackened and polished, will be a neat and a very solid
seam.
The neatest patching is called “Invisible,” and
this is stuck on with a solution of gutta-percha. Its
solvent has an unpleasant smell, but it evaporates
very quickly. This solution can be bought at 2d. per
bottle, and when not in use it must be kept well corked.
Warman’s has a scent mixed with it, so it does not
smell quite so bad; but Sand’s is preferable, for quality
if not for smell. Both can be got at most leather-sellers’
or grindery shops.
To fit the new patch on the old leather, it is of all
importance to have a last, boot-stretcher, tree, or some
such thing in the boot, so that the part to be operated
on may be quite solid. Skiving is the principal feature
in invisible patches, for it is fitting the piece to a nicety
that makes the patch invisible.
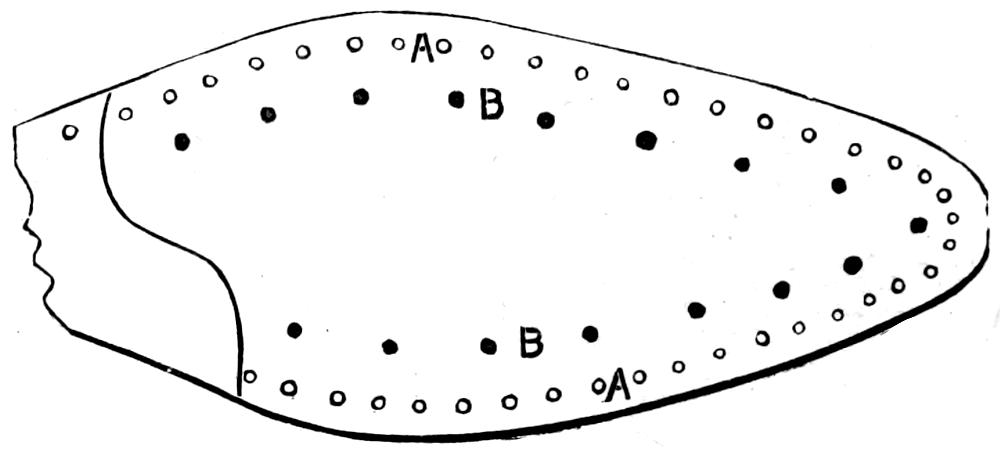
Figs. 35, 36.—Leather Skived to form Patches.
Skiving is a process so essential, that all who do
not know how to do it well are advised to try their hand
at it as much as possible with a sharp knife, using any
old odd piece of upper leather, on a piece of smooth
marble or board. Skiving means making a tapered
edge to the leather on one side or the other. Further
instructions on skiving are given on p. 45.
The safest way to get the patch the right size is to
cut a piece of paper about ¹⁄₄ in. larger all round than is
necessary to cover the worn or cracked parts. This is to
admit of the skiving. Then, seeing that this is of good
shape, cut the patch of new leather to it. This should
be calf for calf, kid for kid, etc. Kid is a leather that
has the grain side for the face, and must not be scraped.
Calf may be, as the grain side is the wrong side, and the
flesh the face. After the patch has been cut out to
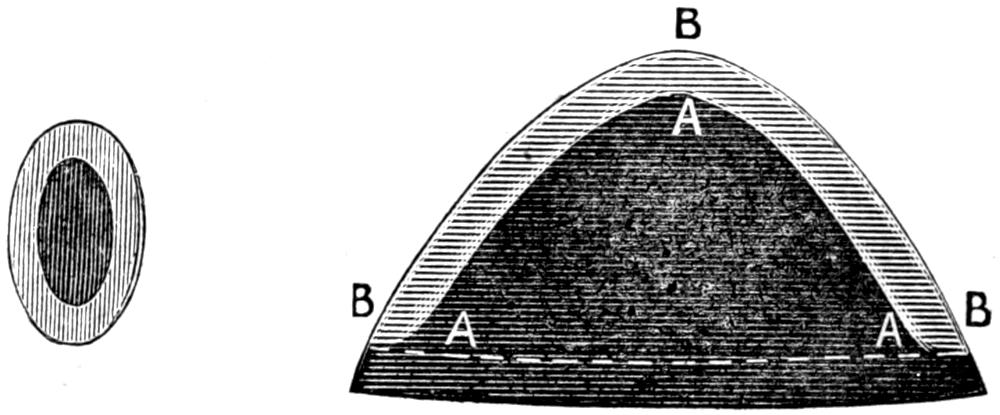
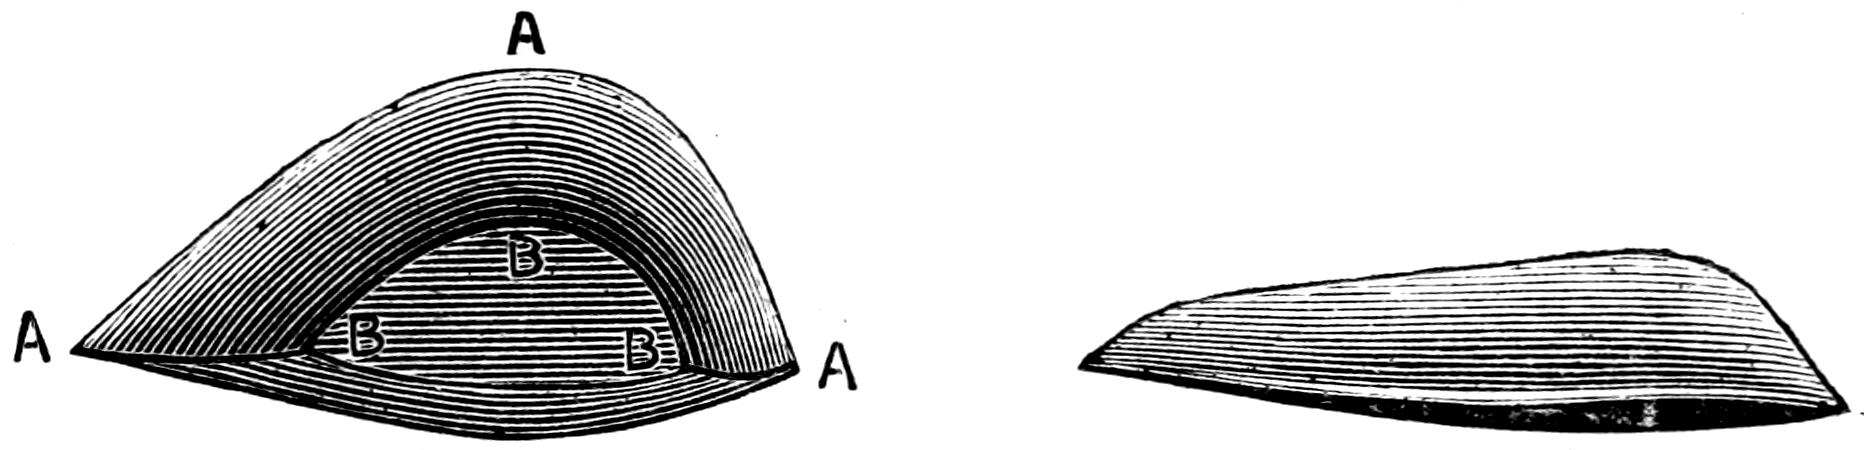
shape (Figs. 35 and 36), proceed to skive the edge. Skive
all round if oval (Fig. 35), and round the curve only if
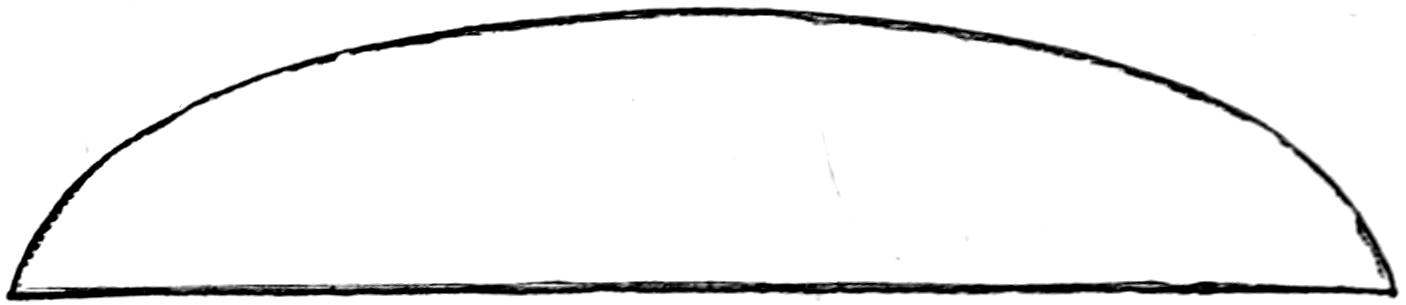
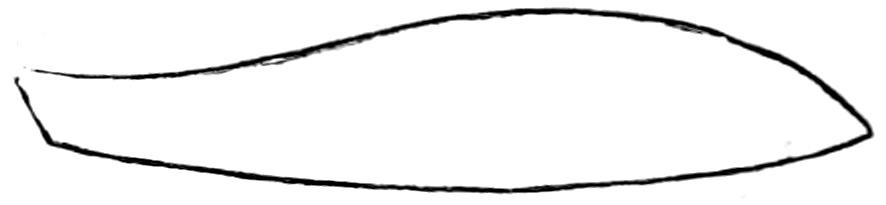
semi-circular (Fig. 36). It should be skived from the
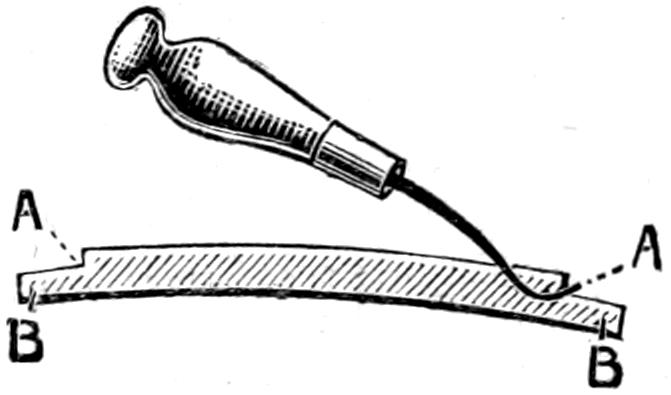
letters A A A to the edge B B B, and at this part it
should be skived to nothing.
The difference between invisible patches and those
to be closed in is that in the former the new patch is
cut first, and the old leather fitted to it afterwards, and
the old leather is not taken away,
as for closing in. In this instance,
it will only be necessary
to explain how to put on the oval
patch, for the rule is the same
in all other shapes, except where
the patch has to be sewn down
to the sole; and instructions for
doing this are given on p. 35.
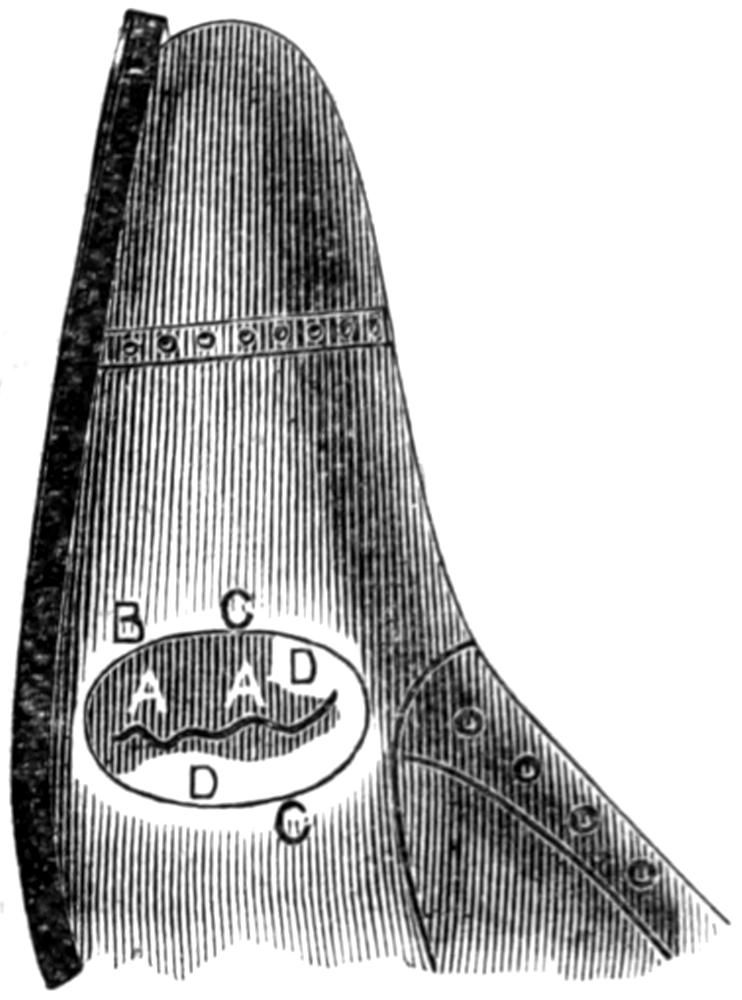
When the patch is skived, lay it
on the boot, overlapping the worn
part equally all round, as A A
(Fig. 37). Now chalk all round
the edge of the patch, and on the
old leather as well, as shown, and
draw a line right across, from C to C, so that you may
get the piece back into its proper position.
Fig. 37.—Preparing
the Boot to receive the
Patch.
Then skive the surface of the old leather to receive
the patch, starting at the edge of the chalk mark, and
skive towards the centre all round, being careful to get
the work regular. Then roughen both the new and old
leather with either a file, a piece of coarse sand-paper,
or a buffing-knife. Lightly brush out all the leather
dust, and apply the solution with the finger; shake the
bottle, and give one thin coat both to the patch and old
leather; let them dry, and then give another thin coat,
and let this dry. It should dry white; and if it does not
do so, a little more solution is needed. Care should be
taken to see that the edge of the patch has taken the
solution properly, and that the old leather has it only on
the roughened part. It may be considered that it would
be best to solution a patch like Fig. 35 all over, but it
is not so, as this would make it very stiff, so that it
would not yield in wear, but perhaps only wrinkle and
soon work off. The whole of the solutioned surface
having dried white, warm both parts before a very slow
fire, and when the whole of the white colour has changed
to brown, stick the patch on the boot, just as it was
first fitted; press it on tight, and with a warm iron
spread a little soft heel-ball all over; let the whole get
quite cold, then gently rub off the heel-ball, smooth with
a cloth, and polish with blacking, and it is finished.
If “Warman’s Solution” is used, it will be found
better to keep it in a warm place. Some shoemakers,
when using this preparation, place the bottle about their
person; this keeps it in good working condition: the
heat from the body appears most suitable to the
ingredients.
The solution will not cling to a smooth surface;
therefore, when possible, roughen it with a rasp after
skiving. This accomplished, well shake the solution
and cover the patch, and likewise the place prepared for
it; let the solution dry, and repeat until it dries white
all over. The patch is now ready for sticking, and to do
this requires a slow fire. If the fire is at all fierce, hold
the boot and the patch at a considerable distance, or
they will not hold. When the solution is melted, carefully
place the patch, taking great care not to let the
edge go beyond where skived; rather keep it a little
within; it must be kept free from puckers. Let it
stand while you get ready your wax-end thread to sew
the patch down to the sole, or if you do not intend to
sew it down, allow time to get the solution well set.
Warm a glazing-iron, and with that smooth your patch
by working it towards the edge. This has the effect of
working out from under the patch any air or superfluous
solution. When this is done, rub your finger over
the surface, and any solution that may have remained
can be pressed out. Then ink it over to stain the mark
that may be seen round the edge. In the case of brown
or other coloured leather this must be omitted.
When this operation is accomplished, you have a
patch that is invisible, and, in addition, will never come
off. This method has frequently proved successful; but
simply following the instructions given on the labels of
the bottles generally ends in failure, and craftsmen
abandon the practice on that account.
“Blind-stabbing” is another method of repairing boot
tops, so called from having to find the hole inside a boot,
where it is impossible to see. Blind-stabbing
is one of the most important
processes in the repairing of boots,
as all repairs to the tops can be done
in some form by this means—as
patches, rips, toe-caps, new springs.
It is very handy when a vamp has
a small crack in it, which is often the
case. It can be darned up in two
ways: first, by using two wax-ends
and a zigzag stitch from one side
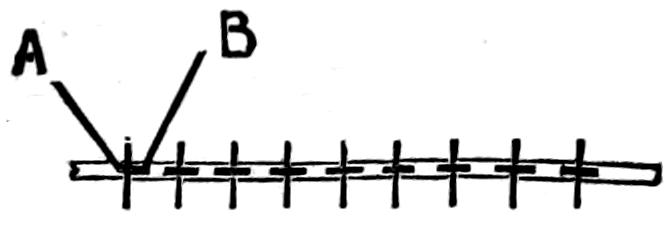
to the other, as at A (Fig. 38); or by
making the stitches with one wax-end
only, as at B. This is the neater way,
but it needs more care and attention.
Fig. 38.—Crack
mended with Cross
and Zigzag Stitches.
In either case it is well to put a piece of leather
under the crack. It will want skiving at the edge; a
piece like Fig. 35 would do nicely. It is easy to get
under if the patch is rolled up and passed through the
crack, and then levelled by putting an awl through and
unrolling it, seeing that it is placed exactly under the
crack.
In darning the patch, set each stitch from B to C
(Fig. 38), taking hold of no more leather than necessary
on either side; when this is done the whole length of the
crack, start stitching backward, making the stitches
from A to B (Fig. 39), which is a full-size sketch of
the crack and stitches. This second stitching is to
draw down the first row of stitches, and so make them
look small. A fine wax-end or piece of twist should
be used, and when this is lightly hammered down, and a
piece of soft heel-ball rubbed in, it can be scarcely seen.
Fig. 39.—Cross Stitch.
Fig. 40.—Blind Stabbing.
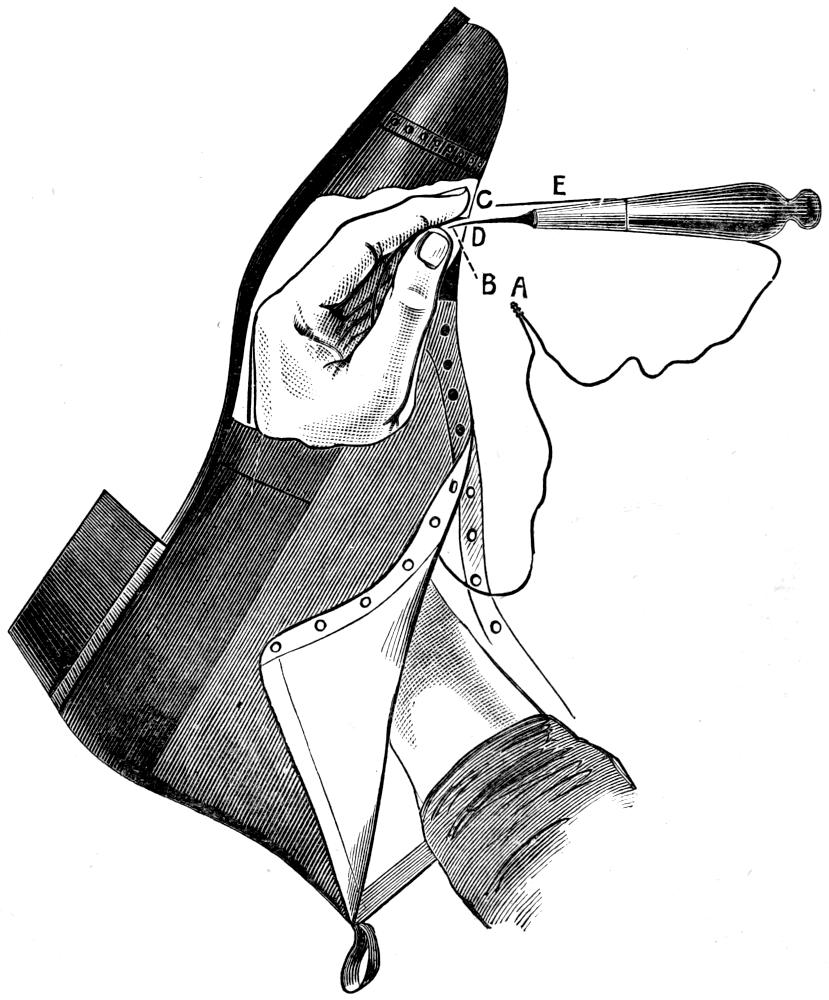
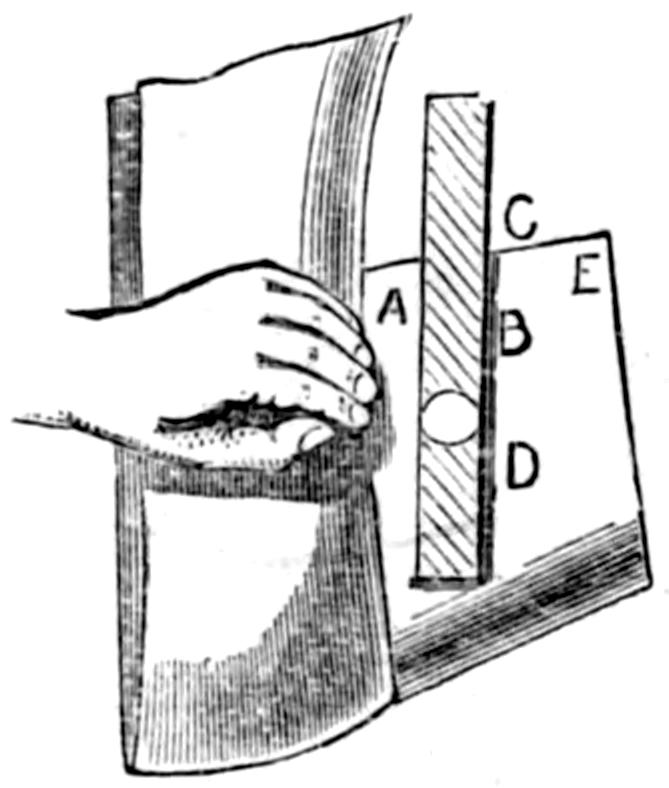
Fig. 40 illustrates the way to do blind-stabbing. The
left hand is put inside the boot, one of the bristles being
held between the thumb and finger, with the point
of the bristle about level with the tip of the finger. The
stab-awl, which has a thin straight blade, is held in the
right hand, which at the same time holds the other
bristle, E. It is well to first put the two bristles
together, and halve the thread and give it a twist, as
at A, so that both ends may be the same length in
working.
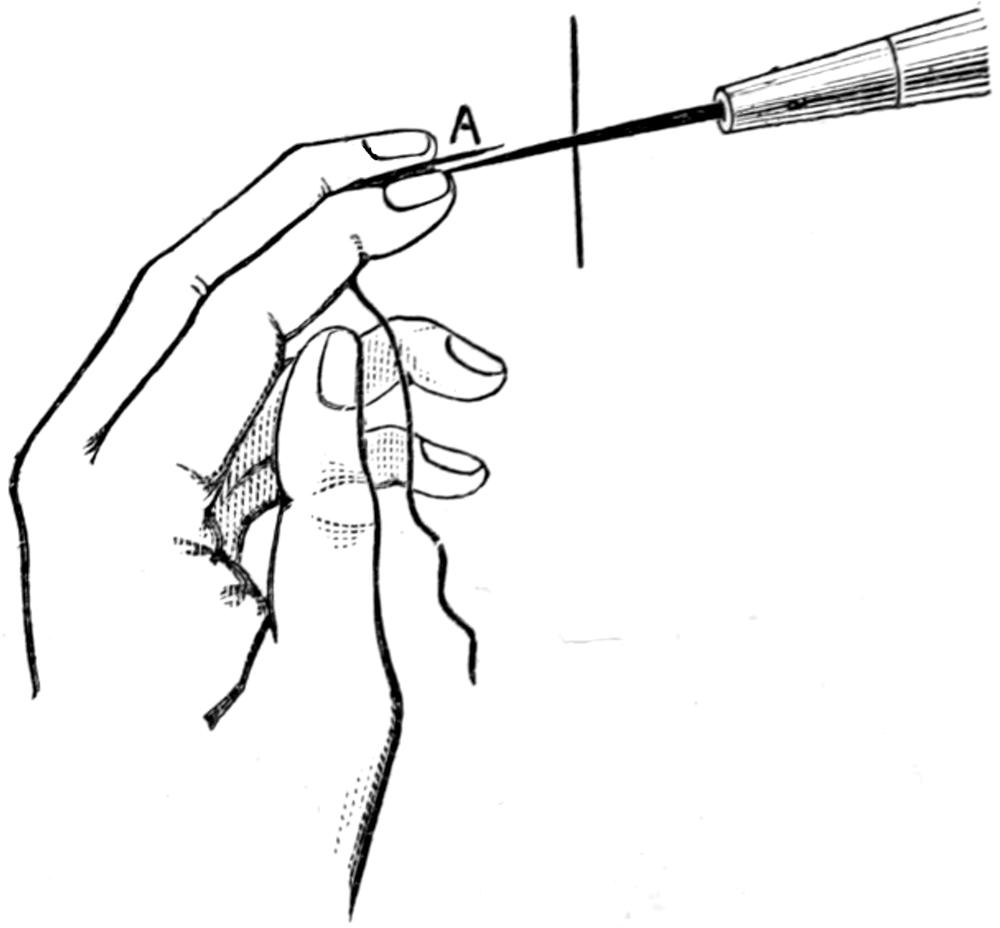
Fig. 41.—Blind Stabbing.
Fig. 42.—Upholsterer’s Needle.
The awl is then put through the leather about
half-way the length of the blade, its exact position
is felt with the finger of the left hand, and the bristle is
then laid parallel with it, as at B; to steady the hand,
place the finger against the lining of the boot at C;
withdraw the awl to within about ¹⁄₄ in. of its point,
pushing up the bristle with it, and letting the bristle lie
on the flat side of the awl; move the awl and bristle up
and down, but do not entirely withdraw it until the
point of the bristle finds its way into the hole with
the awl. It is quite easy to move the awl up and down
if the first finger of the right hand is kept on the leather
at C. When the bristle is in the hole at D, pull it
through with the right hand, and hold it in the hand
with the awl, as shown at E. Again put the left hand
inside the boot with the other bristle; make a second
hole, and repeat the operations till the bristle is passed
through. Take the right bristle, E, in the left hand, and
pull out the left with the right hand, and draw both out
together the whole length of the thread, pulling somewhat
sharply, and give a final pull to tighten the
stitch. This is continued as far as necessary, putting
from twelve to eighteen stitches to the inch.
Fig. 43.—Needle in Handle.
The position of the boot in Fig. 44 shows how it
should be held upon the knees; but while drawing out
the thread, it will have to be held fast between the legs,
according to where the repair is being made.
Fig. 44.—Makeshift Blind Stabbing.
When it is wanted to sew anywhere towards the toe
or beyond the reach of the whole hand, shown in Fig. 40,
the means of doing so is by holding the bristle between
the first two fingers, as Fig. 41. The bristle is laid
on the cushion of the second finger, and held there
with the nail of the first, as shown at A. To blind-stab
like this is more difficult, but being so useful, it pays
for the extra trouble. Boys can soon learn to blind-stab,
as their hands are small: and it is knowledge that
will always be of use to them.
A makeshift method of blind-stabbing is to get an
8 in. upholsterer’s needle (Fig. 42), which is very little
stouter than an ordinary stout awl, put it in a handle
(Fig. 43), fit the patch (Fig. 44), if stout leather, such
as kip. Make holes with awl for light leather; use
the needle carefully. Pass through with wax-end, draw
out needle; see that ends of thread are level, thread the
outside end, pass through second hole, draw out end
inside boot, thread the inside end, pull out needle;
draw both ends tight, and continue till patch is sewn
round. Work back a couple of stitches, cut off ends,
and lightly tap with hammer to make the patch lie
smooth. This method will suit a good many people
who cannot use the wax-end with bristles. With this
needle a patch can be sewn on in a quarter the time
it could be done with wax-ends by a novice.
The minor repairs that have connection with the
sole or bottom may now be dealt with.
Underlaying is putting a piece under a sole where it
is worn. Many people wear away the sole very quickly
on the outside, while a few do just the same on the
inside; and in either case an underlay in time will often
save a sole.
Fig. 45.—Sole raised to receive Underlay.
This repairing is accomplished sometimes by putting
the piece on outside. This is done because it is
less trouble, but one should spare no pains to do a small
job well, because it is that alone that will make a large
one come easy.
To underlay, a last or iron foot must be put inside
the boot to keep the part that wants repairing quite solid.
If the boot is machine or hand-sewn, rip it with a knife
from A to B (Fig. 45), and lift it up as C C. If it is riveted,
it will have to be prised up with a blunt chisel, and
the rivets drawn out from A to C and B to C. Cut out a
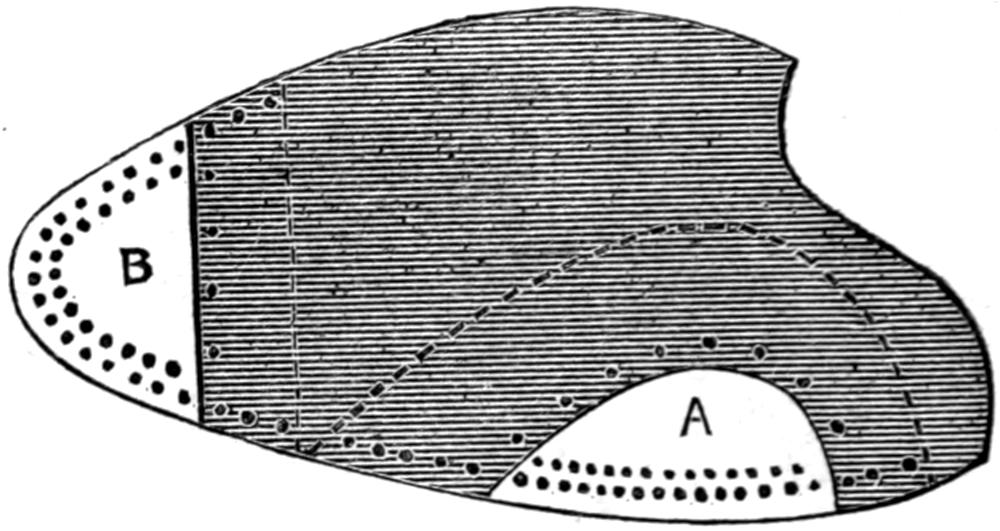
wetted piece of good sole leather to the shape of Fig. 46,
roughly skive it round the curved side, A A A, and then
push it under the old leather at D (Fig. 45), but not
quite as far as it will finally have to go; then trim
the old leather round from C to C with a knife, not
taking off much, but all that is weak and thin, and
being careful not to cut the new leather. This done,
knock the piece in to where it is wanted—that is, the
dotted line E—and draw a pencil round the curve cut
from C to C, to mark the new piece. Take out the piece
(Fig. 46), and from the line B B and B scoop it out with
the knife to A A and A, in the same way that is done in
grafting a half sole, but in that case the old leather has
to receive the new, and in this the new has to receive
the old (C C, Fig. 45). Now put the piece in again,
and put three short rivets in at F, F, F. Trim up the
edge, leaving it quite full, to allow for graving, rasping,
etc.
Fig. 46.—Leather Skived
to form Underlay.
Fig. 47.—Skiver for
Levelling.
If the boot is hand-sewn, then the underlay must be
sewn down from A to B, and it will look neater if
a channel is cut in the new piece to receive the stitch
but it may be sewn through in the same way that
a patch on the upper is sewn down. If the boot is
riveted or machine-sewn, the underlay can be riveted
down from A to B, about the same distance from the
edge, and in a like manner to that shown in Fig. 48; and
in either case the edge can be knifed, pared, rasped, and
finished as described on p. 26.
When a boot is worn very badly, the underlay is not
always enough to make up the edge to the proper
substance; then a little piece sufficiently thick to fill
that vacant place can be skived off a piece of hard sole
leather, well wetted, somewhat the shape of Fig. 47, put
under the layer, and riveted or sewn down with it.
Fig. 48.—Toe-piece and Underlay.
Toe-piecing is similar to underlaying, except that it
is at the toe end of the sole; but everything is fitted
and done in the same way as shown by A and B (Fig. 48),
which also shows how the underlays should be nailed
both on the old and new leather. It is often wise to
put both an underlay and a toe-piece as well to repair
a sole, more especially when the boot is old, as it saves
a whole sole, and uses up odd pieces of leather.
It sometimes happens that the upper leaves the sole
for some distance along the side of the boot, as from
A to B (Fig. 49). One way to sew them together again is
by loop-stitching; the loop, which is inside and draws
the upper to the sole, can be set at every stitch or each
alternate one, but take care not to make large holes in
the upper. To proceed, make a hole with the sewing-awl
through the sole from A to C, draw the thread
through, and halve it; then with a fine stab-awl make a
hole in the upper; at A put through the right hand end,
and draw it through inside the boot; make another
hole at D and draw the end through outside, as shown
by E. The hole is found inside, as explained in the
directions for blind-stabbing (p. 41). For such work as
this, however, it can be done by the stitch-draw, explained
later on. When thus far, make another hole through
the sole from D to F; put the left end (C) in first, then
the right (E), pull them tight on both sides, and the
loop-stitch is set.
Fig. 49.—Loop Stitching.
Fig. 50.—Seat Stitching.
The seat-stitch is another way. For this a row of
rather long stitches are set in the upper, from A to B
(Fig. 50). This can be done with a stout stab-awl and a
sewing-thread (size about 9 cord of “Patent No. 9”),
with the stitches quite close to the sole. Then, at A,
bore through the sole a hole, A C (Fig. 49), being careful to
make it exactly opposite the centre of the first stitch on
the upper, A (Fig. 50). Lift up this stitch by putting
the point of the sewing-awl under. Put an end through
this stitch and through the hole made in the sole, and
halve thread as before. This leaves one end in the sole
on the left and one through the stitch on the right, as
at C and D. There are three stitches set to show how
each stitch is caught up and drawn down; the two loops
at E are left loose to illustrate. Each
stitch must be pulled in quite tight, as
that is what draws the upper to the
sole.
Fig. 51.—Stitch Drawing.
The stitch-draw is a ready means of
finding the hole inside a boot, where it
cannot be seen. For instance, take the
fore part of a boot (Fig. 51), and to get
a bristle through at A from the inside;
B B B is a spare end of thread, which can
be put from the outside through the hole
A, and drawn nearly through; then, some
little distance away from the bristle (say
at C), a hole can be made
through B with a fine
awl; then take out one
end of the sewing-thread,
and put the bristle D
through the hole C, till
you get to the junction
of the bristle
where the
thread goes
between, as
shown at C;
then at E pull
the thread,
B B B, until
the bristle D F is through to the outside; take it out of
B B B, hold it at D with the left hand, while B B B is
pulled through with the right from the inside. This, it
will be seen, is blind-stabbing with less learning; and
although this is very handy, it will prove to be blind
stabbing with less speed.
To sew on a loose toe-cap, first put a last into the
boot, double the cap, to find the half or centre. The
half of the longest curve of the cap—that is, the part
that will be sewn down to the sole, is placed exactly
central on the toe, and a tack is driven through it into
the sole. The two ends of the toe-cap are then held firm,
one drawn down tight at either side, and a tack put
in to keep each corner in its place, seeing first that the
toe-cap is perfectly straight; otherwise, it will look very
unsightly when finished. Previous to sewing down,
drive the toe-cap, with rather a blunt chisel, between
the upper and the welt. This will enable the sewing
stitches to be put further back, and make a neater job.
CHAPTER III. RE-WELTING AND RE-SOLING.
To re-welt and re-sole hand-sewn boots are certainly the
two most difficult repairs, they are also the most important,
being the nearest approach to the making of a
boot. When, by practising with repairs, skill has been attained
in using the awl and thread, although the present
work is the harder, it ought to come easier than some of
the minor repairs did at an earlier stage. In shoe repairing,
a week seldom passes without a job of some kind to
give a little varied practice and keep the hand in trim.
To proceed with the work in hand, a last must
always be put in and fitted well to the boot or shoe, or
you will not be able to make them look well, and there
is a chance of making them smaller. Pieces of stout
leather can be put on top of the lasts, or even pieces of
bundle-of-firewood will do, tapered at one end, and
the thin end knocked in first; but then, this must be
done carefully, or the vamp may break just in front of
the lacing. Fitting them up well in this form should
make the bottom solid all over, and keep them in their
proper shape.
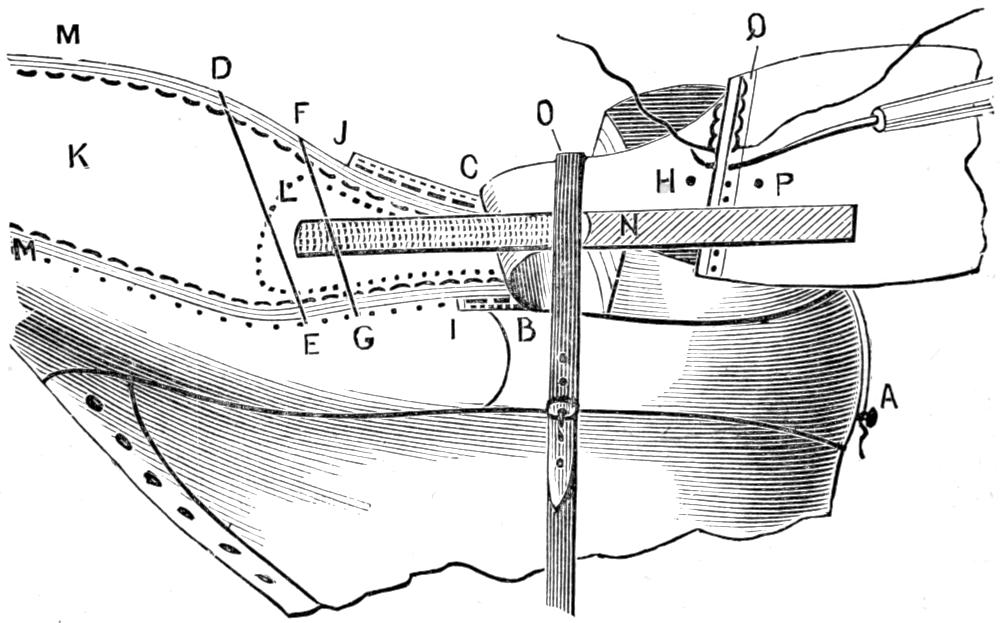
A thin long tack must be put in the back of the
boot to keep the last in its place, as at A (Fig. 52). Then
put the sole and welt part in water, and when wet, take
out the boot, wipe it, and cut the old sole off. This is
done by putting a knife between the sole and welt at B,
and continuing right along, round the toe, and down the
other side to C. The old sole can then be cut away,
cutting across from D to E to make a riveted or pegged
graft, as shown on p. 51, or from F to G to make a sewn
graft.
In either case a small hole can be made in the old
leather at H, and a piece of wax-end put through, that it
may be drawn down flat on to the top of the heel,
securing it there by tying the thread round the nail at A.
This keeps the old sole in position while grafting, and
while sewing in the welt. If you intend to welt the
boot all round, carefully cut the old welt away from I to
J, and temporarily remove the bottom filling, K. The
next thing is to fit the welt, which is a long strip of oil-dressed
leather, costing from 1d. per pair. The welt
must be buffed on the grain side, cut in two straight
down the centre, tied in a loose knot, and put into water
to get thoroughly soaked; for they have to be used wet.
Before they are ready for use, an angular piece is taken
off the grain side, as shown at A (Fig. 53). Grain side
down, the welt will show an end like Fig. 53, and this is
the position it is held while being sewn in.
Fig. 52.—Grafting Sole to Waist.
The sewing is done as shown in Fig. 54, starting by
putting the thread in at A, then halving the thread, and
making a hole at B, and while the awl is in place the
welt against the upper at its point, and make a hole in it
at I. The hole is made as shown by the arrow in Fig. 53.
First put the bristle in the left hand through, then the
one in the right, and pull them both out, changing the
bristles by this means into the other hands, and set the
stitch with a final pull. Continue this (as in Fig. 54)
until the old welt on the other side is reached.
Fig. 53.—Cutting Welts.
Use a sewing-awl and a thread of about the same substance
to sew in the welt. When this is sewn in, hammer
the seam down all round, giving firm blows, so as not to
break or bruise it. Then carefully skive off any stuff
above the seam that may make it uneven or clumsy, but
do not cut near the seam stitches to weaken them.
For repairs, it is only necessary to skive the ends at
the waist part of the welt a little thinner after they are
sewn in. This can, and should, be done first; but a
novice is apt to make the welt too thin, and weaken it
where it should be solid, having to stand against the
splice or graft in the sole. A piece of bone should now
be rubbed round to make the welt flat to receive the
stitches with which the sole will have to be stitched on.
The edge of the welt must now be rounded to the shape
required. Generally, the proper width for a pair of
welts is that of the leather when split in two; but
at places the stitching somewhat contracts it, and thus
leaves prominent parts, which are best cut off; and, as
shown by the dotted line in Fig. 54, the welt is always a
little too wide at the waist.
If the old bottom filling is good, paste it in again at
K (Fig. 52); if not, replace it with new. Felt is used for
this purpose; cut a piece a little larger than the old,
and paste down the shank—this is generally a piece
of skived leather, which reaches from under the heel to
the dotted line, L (Fig. 52), and just the width of the
waist. Then paste the new piece of felt in the bottom,
well hammer it in all over; and when dry skive off
the edge all round at M M (Fig. 52), making it level with
the welt stitch and the centre, K. It is then ready to
receive the sole.
Fig. 54.—Welt prepared
for Sewing.
Fig. 55.—Sewn
Graft.
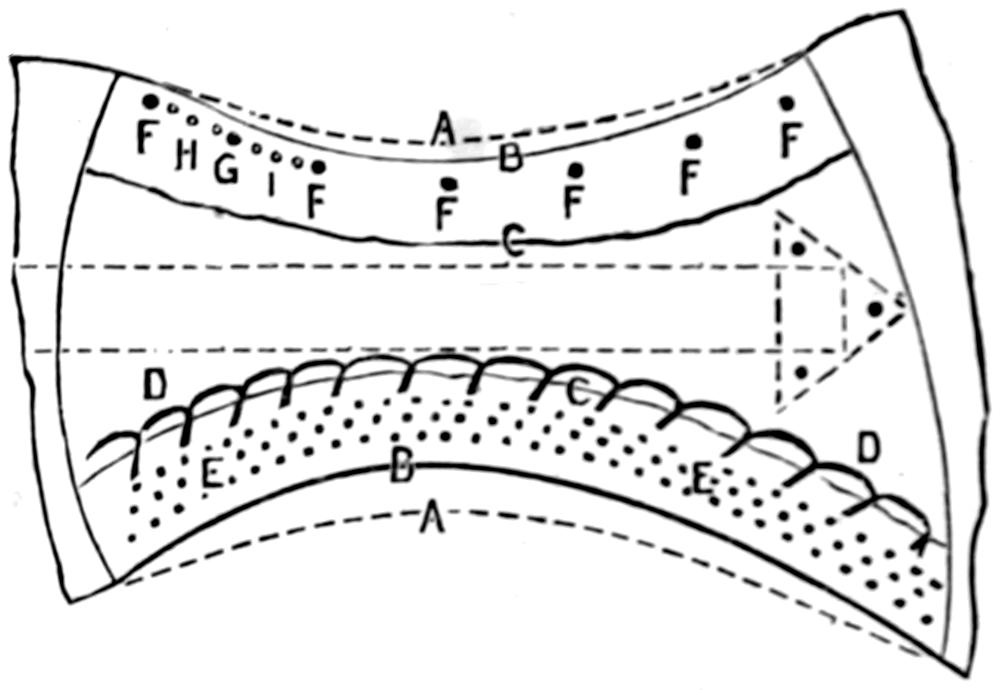
But if you intend to make a sewn graft, this graft
must be made prior to placing the sole down. To
do this, it is important to have the old leather
cut straight across, and straight through from A to A
(Fig. 55), and the same with the new sole from B to B.
Then draw a line from C to C about ³⁄₈ in. from the edge,
and about ¹⁄₈ in. from this a second one from D to D.
From D to D on the first line cut in the leather a
groove about ¹⁄₁₆ in. deep, but not going through, holding
the knife quite upright; this cut can then be opened with
any blunt instrument, to show the depth of it. Then
from this channel cut away one side towards the toe to
the second line, C C, holding the knife quite slanting.
This is to make a channel, as shown at E, to receive the
stitches, and so make a flat sunk seam to the graft.
Make a series of holes (about five to the inch) from
D to D with a sewing-awl, placing the point on the
bottom of the channel, and pushing it until the point
comes through the edge of the leather, B B, about ¹⁄₁₆ in.
from the grain side. All this should be done on the flesh
side, with the leather fitted in the same way as shown
on page 24, with the exception that, this being sewn
work, the leather has to be used a little wetter.
The boot is now put across the knees, in the position
shown in Fig. 52, with the toe towards the left and the
back part towards the right knee, and—as also shown in
the illustration—with the old waist tied back. The
new sole can be put against the old leather, and an old
rasp, N, put along the top, as shown, and the strap
or rope, O, placed round the waist of the boot, as
shown, and passing over the rasp. The strap will, as
it is pressed by the worker’s foot upon the shank, L, the
old waist, H, and the new sole, P, keep them all solid
while the graft is being sewn. A strong thread—about
fifteen strands of No. 9 Patent, or its equivalent of
stouter hemp—should be used, and plenty of wax should
be worked into the thread before it is twisted.
The sewing should commence at the upper end in
Fig. 55, and continue across to the lower, tying a small
but firm knot, as shown at F, as each end of the seam
must be particularly solid. For this reason it is well
to make two short threads, using one for each graft: this
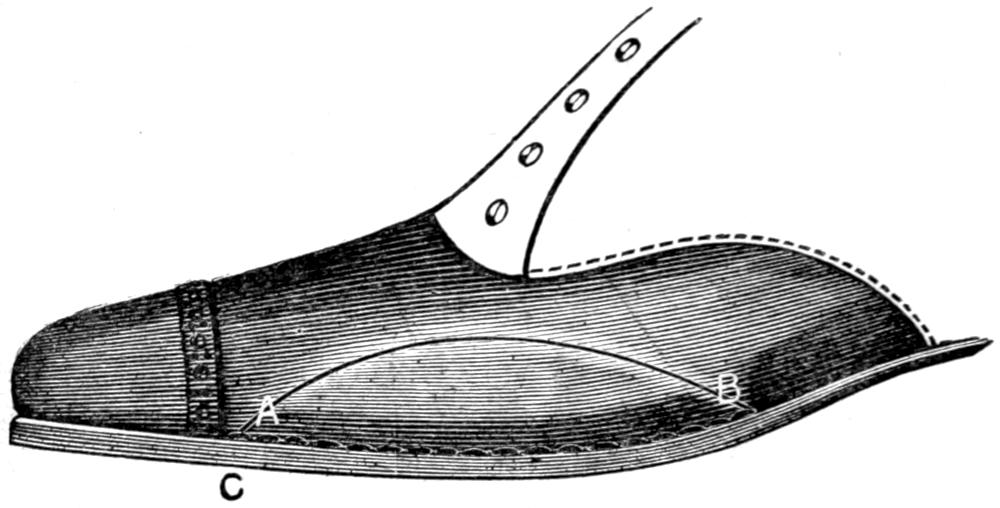
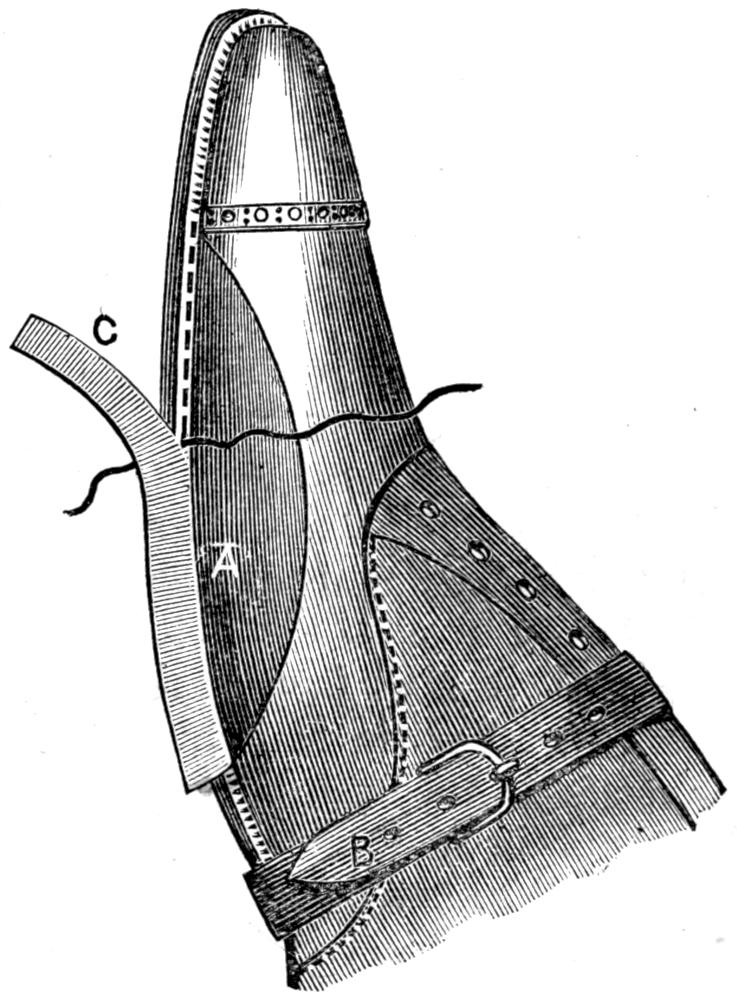
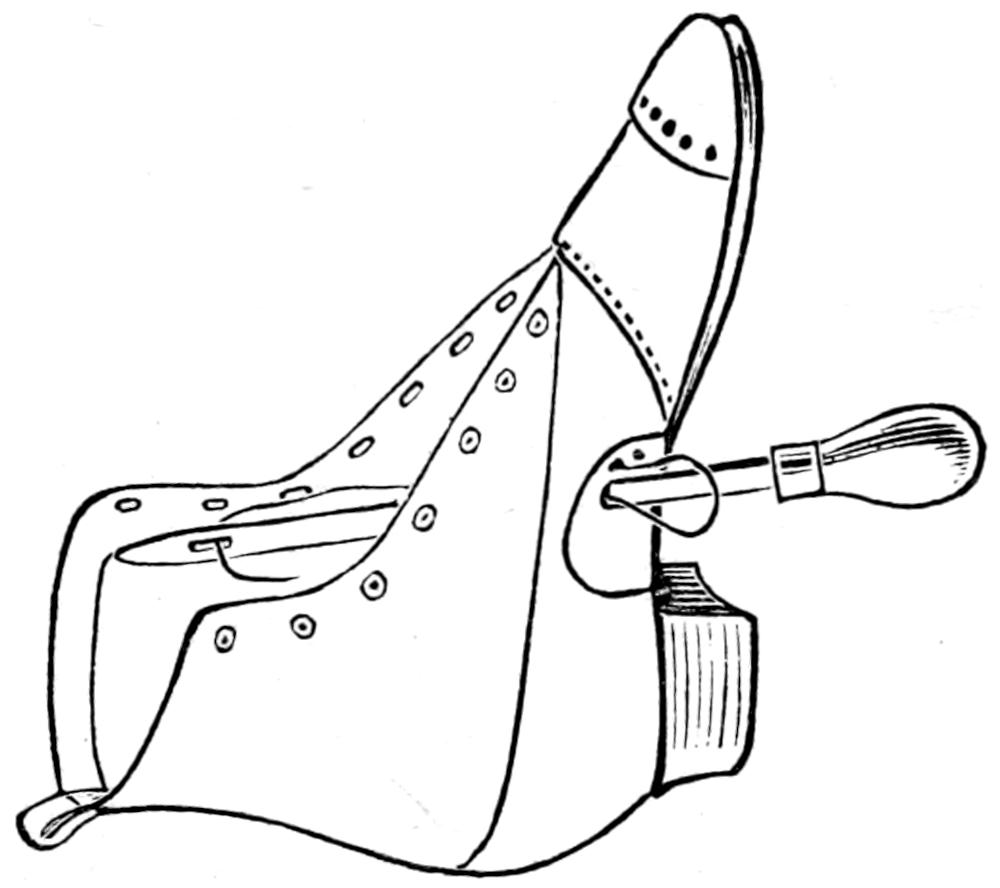
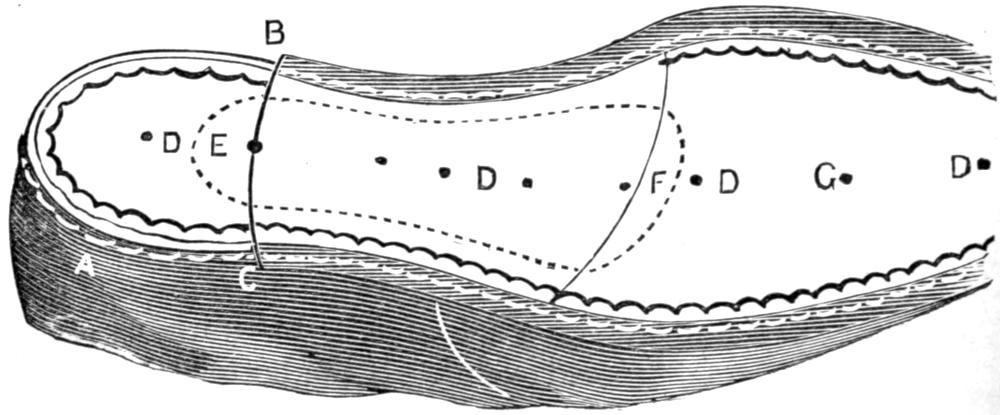
is better than starting and ending with a knot. Novices
wear out a thread quicker than experienced workmen
do, as they handle it more, and pull it through
with occasional jerks. Even at the expense of neatness,
this seam must be made solid; this cannot so well be
attained in riveted work.
This grafting is done with the piece on the top of the
heel, according to the position of the old leather, as will
be seen in Fig. 52. This is the most convenient plan,
and the old top-piece of the heel provides a flat surface
to work upon.
If it is found difficult to keep the sole firmly in
position by means of the rasp only, a long rivet can
be put in through into the old lifts at H, and another at
P (Fig. 52). The heeling should be left till the soling is
done, and the two holes can be rubbed out in the
finishing.
Fig. 56.—Fitting, Stitching, and Sewing.
After the graft is sewn the whole of the bottom, K
and L; the new sole, P, and the old shank, H, should
have a thin coat of paste. The sole can now be put
into its place, and pulled towards the toe to keep it
in position. A rivet is put through at A (Fig. 56), and
another through the hole, P, in Fig. 52.
This done, hammer the sole evenly all over, and
then pare it all round the edge, close to the welt, as
shown at B B (Fig. 56). As the sole is wet, with a little
care this can be done easily without cutting the upper
part, and should form one even edge all round, kept
square or at right angles with the flat of the sole, taking
care not to go too close to the welt. A line can now be
drawn all round with the compasses, about ¹⁄₁₆ in. from
the edge; and upon this line the channel is to be cut to
receive the stitch.
The boot is held sole upwards between the knees, with
the toe towards you; and to cut the channel, use a sharp-pointed
knife, held near the point between the thumb and
finger, letting the second finger rest upon the edge of the
sole. The knife will be somewhat in the position of a pen
while writing; but it must be held firmly, and it should
form an angle of about 50° with the flat of the welt.
The channel should be cut through the grain and into
the fibrous and wear-resisting part of the sole deep
enough to let the thread lie well below the surface.
This will be nearly half-way through the leather, whatever
its thickness may be, as it is the substance of
the sole that will govern the thickness of the thread,
which will have to lie in the channel. The thread being
thus embedded in the firm part of the sole gives solidity
to the stitching, and leaves the grain free to form a
covering for the stitch.
When the cut has been made (Fig. 56) from B round
the toe to C, it can be opened with any blunt instrument.
This is so that you may see the point of the awl
when it comes out in the pit or centre of the channel,
and also to give space for the stitch to fall into. To
prevent the stitching-awl from notching the inner edge
of the channel, which would make it irregular
and unsightly when finished, it can be turned over
for about two inches; and when about a dozen stitches
have been made, pass the left-hand thumb-nail along the
channel from the last stitch, and turn over for another
two inches.
Stitching on the sole is generally done when a boot
has been welted; and before this, the waist will have to be
sewn down. It does not matter about a channel being
cut in the old waist leather, as this can be blacked: which
helps to hide the stitch; though if the leather is sufficiently
thick to admit of a channel, this will make a
neater finish.
The sewing is started at D (Fig. 56), and the sewing-awl
(Fig. 57) is used till the first stitch on the new
leather is reached at B; then the stitching-awl (Fig. 58)
is used. At the two points, B and C, the sewing and
stitching should be so arranged that a stitch extends
across the graft from the old to the new leather at B, and
from the new to old at C, so as to make these weakest
points quite solid.
The technical meaning of sewing is that two or more
pieces are held together, and shoemakers call all work
sewn that is treated with a round awl; while stitching
is only technically applied where the square awl is used.
Fig. 57.—Sewing-awl.
Fig. 58.—Blade of Stitching-awl.
The stitching-awl is put into the same sort of handle,
and is a similar tool to the sewing-awl, with the exception
of being flat (as shown in Fig. 58); and it is now
almost generally known as the square awl. From this
figure it will be seen that when put into the handle the
stitching-awl has a double curve. This makes it more
handy to get into awkward places, and pressure on the
handle gives a power that could not otherwise be
obtained. The action of this awl is peculiar; it must
not be wriggled about in the same manner as the
sewing-awl; and in use it must be passed through by
one rapid and almost straight push.
The boot is held by the strap on the knees, toe towards
you, on its side, with the sole to the left, and the upper
to the right. The thumb of the left hand is pressed firmly
against the bottom of the sole, as shown by E in Fig. 56,
just beyond where the point of the awl is to come out.
The awl is then laid against the upper, with the point on
the flat of the welt, and it is pushed through. One
sharp push, at the same time dropping the elbow a little,
sends the point through the leather into the channel cut
in the new sole, as shown at B B (Fig. 59).
Fig. 59.—Section of
Boot.
A good idea of how a hand-made boot is put together
can be gained by careful examination of Fig. 59. It
shows a boot cut through at the centre of the sole.
The various parts are lettered as follows: A, stitching-awl;
B B, channel cut for stitches; C, sole; D, upper
leather; E E, space for foot; F,
in-sole; G G, welt stitch; H H,
welt.
The stitching is continued
round as far as the new leather
goes; the old leather is then
sewn, as was done on the opposite
side. The channel is again
opened, and the stitches within
it are well rubbed down with the
bone. A little paste is rubbed
in all round with a piece of rag
put over the right thumb-nail,
which is put in the channel, and
passed all round the channel in
the sole.
The raised edge of the channel
is rasped away with an old file,
taking strokes outward from the
centre of the sole, the boot being held in the left hand,
with the heel towards you. The file strokes proceed,
as shown by the arrow at A B (Fig. 60), towards the toe,
and are continued all round.
The boot is then replaced in the same position as at
first, and the ridge over the channel is rubbed hard up
and down with a bone or long stick, held with one end
in each hand, as shown from C to D in Fig. 60, until the
whole is smoothed. By these means the thin narrow
strip of grain, H (Fig. 56), is thrown towards the edge,
where it forms a burr all round. The boot is then held
with the toe towards you. With the back of the knife the
edge of the sole is scraped upwards, to throw this burr
over the face of the sole. The knife is then held flat on
to the sole, and the burr cut off level with the face. The
stitches on the welt side are then rubbed down a little
with the tapered bone, wetting a little with the mouth
while using it.
The sole is then
well and evenly
hammered all
over.
Fig. 60.—Rubbing down Channel.
Fig. 61.—Fudge-wheel.
As the stitch is
wanted to show
up boldly on the
welt, the fudge-wheel
(Fig. 61)
should be run
round it before the stitching is commenced. This wheel
makes an impression on the leather resembling stitching,
and the real stitching will appear regular if the
awl is put through exactly in the wheel-marks. To get
a bold and even stitch,
the principal factor is a
mode of setting the
stitch. Each time that
the awl is taken out,
put in the left-hand
bristle first, as usual,
and in putting in the
other bristle, on the right
side, let it pass on top of
the first. This will throw the stitch up towards
the edge; and if carefully done with each one, the
stitches will show one straight line. The stitches
can be set from 12 to 16, or even 18, to the inch,
according to the style of work; 14 will do well for
ordinary repairs.
After the stitches are rubbed down, the warmed
fudge-wheel can be carefully run round the sole, each
cog to go between each stitch. This will prick up the
stitch; or a prick-stitch can be used between each stitch.
The boots are then finished in the way described in
Chap. VIII.
To make a thread for either stitching or sewing, flax
or hemp is used. This is sold in balls ready for casting
and twisting, and should always be drawn from the
inner end. It is convenient to place the ball in a box
and draw the thread through a hole. The thread is
first broken at about 6 in. from the end to the form
shown at A (Fig. 62). This is done by rolling it on
the right thigh
with a long
sweep of the
right hand. This
action untwists
the fibres, as at
B, and a smart
jerk with the
left hand parts
the threads,
leaving the flossy
ends as shown
at A; the short
end is thrown
away.
Fig. 62.—Waxing the Thread.
The length of thread commonly used is about three
yards, and several pieces of about this length are broken
from the ball. For stitching purposes the thread ranges
from about 5 to 9 strands, and for sewing-up to about 15
strands. At C is shown the end of a thread having 8
strands, and it will be noticed that these ends are
placed at different places, lengthways, so as to form a
tapering end to the threads when all are twisted together.
Having broken off the requisite number of strands
they are hooked midway of their length over a nail and
twisted by rolling on the knee in the way described for
breaking the strand. About a dozen sweeps of the hand
should suffice for each end. The whole thread is then
held at full length to allow the twisting to distribute
itself evenly, and wiped smooth with a cloth.
Waxing the thread is the next process, and to do this
follow the plan shown in Fig. 62, where L is the left
hand and R the right. The thread is wound round the
left hand leaving a length of about 2 ft. for waxing with
the wax, marked W, and held in the right hand as shown.
The thread is laid in the wax and held firmly upon it by
the thumb, T, and waxed by drawing the hands apart;
this is repeated a few times, as may be necessary. The
thread is then unwound from the left hand, and another
length of about 2 ft. is waxed.
Fig. 63.—Hand-leather.
Select a good pair of bristles to go on each end of
the thread; cut off the
bulby part from one
end by a slanting cut
as at D. At E, bend
both bristles across the
thumb-nail, and split
them to this point by
tearing asunder the
bushy part of the hair at F. Place the tapered end
of the waxed thread between the two split portions, and
carefully plait the whole together. Finally, a hole is
made with a fine awl at E, and the point of the bristle is
threaded through it; this secures the join against unplaiting.
A bristle may be twisted on by rolling the
fine-tapered point of the thread round it.
In order to draw the stitches tight in sewing, a hand-leather
(Fig. 63) is indispensable. It is easily made
from a piece of old leather, and its dimensions are from
about 8 in. to 10 in. long, and 2¹⁄₂ in. to 3 in. wide. The
shape is shown in the illustration; the leather is folded
at the dotted lines, B C, and F E, and the ends are laced
together at I J. In the position indicated at A a hole is
made, about 1 in. diameter, for the thumb to pass through,
the short strokes at B, D, and E show where the leather
is snipped. The ends G and H are laced together as
shown at I J, and the leather is placed on the left hand
with the lapped ends in the palm and the thumb passing
through the hole A.
CHAPTER IV. BOOT MAKING.
In making a pair of boots or shoes, the lasts are the first
requirements; and these cannot be done without. To know
the size wanted, it is necessary to take the measurement
of each foot. To do this, place a sheet of paper on the
floor or any smooth surface, then let the person stand
full weight upon it, and draw on the paper an outline of
the foot, being careful to hold the pencil quite upright,
especially at the toe, D, and heel, C (Fig. 64). Then,
to show the curvature of the waist, draw a second and
third line, as A and B. It is customary to take the
length of the foot with a size-stick, but as the only use
for this tool is to measure the last, it is not necessary to
give an illustration of it. A size-stick is in the form of a
rule, and has at one end an upright at right angles, and
another to slide along so that it can be set to the top of
the toe to indicate the length on the foot, as the stick
is pressed against the sole of the foot and the fixed
upright at the back of the heel.
Fig. 64.—Shape of Foot Drawn on Paper.
Fig. 65 represents a shoemaker’s penny tape measure;
on one side it has inches, and on the other sizes which
are three to an inch. With this tape take the length
of the draft from C to D (Fig. 64), and, supposing it to
measure size 5 (A 5’s last measures just 10 in), you will
need a last size 7. The length taken with a size-stick,
with the foot off the ground, would have shown size 4,
but a 7’s would have been needed just the same. This
proves that the joints in the toes elongate in walking,
and it shows the necessity of having the boot or shoe
longer than the foot. When the length of the foot has
been ascertained, it should be marked upon the drawing.
Fig. 65.—Shoemaker’s Tape Measure.
Fig. 66.—Measuring a Stockinged Foot.
The next measurement to be taken is the joint; and
this should be done in inches. The tape must encircle
the whole joint, and be drawn only just tight; it must
pass under the foot at E E (Fig. 64), and over the great
toe joint and knuckle of the little toe, A B (Fig. 66). This
measurement is then marked on the draft, and so with
each until all are taken. Take the second joint, C D
(Fig. 66), passing round the larger parts of the ball of the
foot. Next the instep, E F (Fig. 66), letting the tape
pass under the hollow of the inside waist, E, across the
bone marked F in Fig. 64, and the instep bone, F. The
heel measure is taken, passing round (G) the extremity of
heel, under the ankle bone (H), and across the throat of
the foot (I). The leg measure is taken about 1¹⁄₂ in.
above the ankle bone (H), and encircling the leg from
J to J.
Fig. 67.—Measuring a Last.
The measurements generally taken are those shown
in Fig. 67, where A B is the length, C D the girth round
the toe-joints, and E F the girth round the instep.
Fig. 68.—A Last.
In fitting up the last to the measures taken, if the
boots are wanted to be a good and not an easy fit for a
gentleman’s foot, one neither very bony nor very fat, let
the last be exactly the same measure as that of the foot.
For a lady’s foot, the last will need to be about half a
size—that is, one-sixth of an inch—smaller than the
measure at the joints and instep, unless the boots are
wanted very easy. If wanted easy for gentlemen’s boots,
make them about half a size over the measure. For all
children’s work about a quarter size over the measure
must be taken.
German-made lasts can now be got at prices ranging
from 9d. to 2s. per pair, according to whether they are
ladies’, gent’s, or children’s sizes. These lasts are often
not of good shape, but those of four or five fitting
have nearly always enough stuff to allow of their being
trimmed down to make a good-shaped last. Select a
last the toe of which is as nearly as possible the shape
required, then place it on the sketch of the foot, and see
if the lines of construction are similar in both, and if
the girths are right.
Fig. 69.—Bottom of Last.
The dotted lines in Fig. 68 indicate the parts of these
lasts that are usually faulty; but with a little skill and
trouble the superfluous material can soon be removed
with a good rasp. In doing this, the bottom of the lasts
should be shaped as in Fig. 69. This method will save
the trouble and expense of having a pair made by the
last maker, and a really good shape can be got to match
the shape of your foot by yourself as well as by anyone
else; you then take the credit of making the boot and
also of fitting the last, and this will give you confidence
to fit a pair to any other person’s foot.
Fig. 68 shows the proper shape of a last—it is not
rounded too much at the bottom (A), nor does it project
too much at B or C. A round bottom will make the toe
turn up, and, while the boot is being worn, will cause
undue strain on certain parts of the front or vamp part.
Too much stuff at B will tend to throw the heel of the
boot too far back, and also make it higher at the waist
(D) than at the back, as shown by the two lines B and D.
If the last has the dotted part at the heel rasped off, the
heel can be built all round in proportion, as shown by D
and E. The disadvantage of a last being too prominent
at C is that it makes the toe of the upper exceedingly
difficult to last in.
Fig. 70.—Long Leather.
Fig. 71.—Instep Leather.
Fig. 72.—Joint Leather.
Fig. 73.—Heel-pin.
Figs. 70 to 73.—Leather cut to Shape.
In Fig. 69 will be seen three shapes for toes; but the
shape of the toe should make no difference in the construction
of the last. No matter what the shape of the
last is to be, space must be given for the great toe, or a
bunion will be the result. It will be seen by comparison
with Fig. 64 that the bottom of the last (Fig. 69) is
designed to suit the requirements of the foot as it is
drawn on the sheet of paper (Fig. 64).
Should the last be a little too small in the fitting
(girth), or should larger boots be wanted to allow for
thicker stockings, or even boots for a foot larger than
the last is made for, a set of ordinary fittings will be
found very handy. These are best made from flank
ends of the leather, which is the softest part of crop
belly, and cheap, because it is not much use for any other
purpose. The leather must be well wetted, stretched
with a pair of pincers, and cut out roughly to the shapes
of Figs. 70, 71, 72, and 73. By carefully tacking these
fittings on to a small last a larger last can be made of
as good a shape as the original. Fig. 70 is called a
long leather (abbreviated L. L.); Fig. 71, an instep
leather (abbreviated In.); Fig. 72, joint leather (abbreviated
J.); Fig. 73, heel-pin (abbreviated H.-p.). Before
being fitted to the last they should be skived thin to
the edge; then while wet tack them on the last in their
proper position, as indicated by the figures 1, 2, 3, and 4
in Fig. 74.
Fig. 74.—Last in Parts.
Each piece must be put on the last separately and
allowed to dry before it is taken off in order to block it to
the last; then the edges can be cut evenly all round,
taking care not to destroy the block or shape. Each piece
must be served the same way. For facility in booking
the fittings, they can be marked 1, 2, 3, and 4, as shown
in Fig. 74. Supposing a last, numbered X for reference,
is used with no fittings on, book
it as 7’s, No. — bare; if used with
heel-pin, toe-pin, and one long
leather, book it 7’s, No. —, H.-p.,
In., and No. 1, L. L., and so on for any fittings. Bunion
pieces should be pegged on with fine ¹⁄₂ in. pegs. The
leather must be put on wet, and pegged so that it can
be skived down all round smooth to the last, leaving
an even projection to the shape desired. To put in
these pegs, a hole must be made with a peg-awl (Fig.
75) as deep as the peg is long, the peg being driven
home with one blow from the hammer.
Fig. 75.—Peg-awl.
An old shoe that is well worn to the shape of the
foot will be found the safest guide to fit the last up to.
If the toe you want to make is wider than that of
the old shoe, cut this round, to admit of the leather
spreading out to the shape of the last about to be put in.
If needed, rasp the last till it just fits in the shoe. Try
the old shoe again on the foot, and chalk mark where it
in any way hurts; replace the last, and with a fine awl
prick these marks through into the last, then put pieces
of wet leather on the last at these points, and make room
for corns. The last should be as big as the measure—a
sixth of an inch larger at the joint—if the shoes are
wanted very easy. A last placed inside an old shoe
soon shows if it is of the size and the shape to suit your
tread. A piece for a corn or bunion can soon be added
anywhere by pegging on a piece of leather. The exact
spot for such a piece is readily found while the last
is in the shoe; if the last is deficient at any part, the
leather of the old shoe will be baggy. An awl pierced
through it into the last will show exactly the place
where room is wanted, and where you will need to make
the last larger.
Iron lasts can be fitted up as explained for wood
lasts. If the dealers have not got any to suit you,
it is necessary to have holes drilled where you wish to
nail the fittings. These holes must be plugged with
wood to receive the nails. This is the best way; but
if put on wet, and bound on till dry, some fittings can be
fixed by Le Page’s fish glue. Buy the iron lasts under
the required measure, and fit them up afterwards to what
is wanted. Iron lasts used for riveted work ought not
to get rusty, as the leather for such work does not need
to be worked damp. It should be properly wetted and
hammered out, and then allowed to get so dry that it is
only just mellow. Even in repairing it is not wise to
sodden the leather too much before working upon it. If
boots have been soaked by accident, or from having been
worn in the wet and only just taken off the feet, they
should not be worked upon until the leather is at least
half-dry, or they will be knocked all out of shape. Any
portion of the lasts likely to come into contact with wet
leather could be covered with paper—either waterproof
packing-paper or that which buttermen use as a first
cover for butter; or, failing these, ordinary thin brown
paper.
Wood lasts must be used in making pegged work, as
the peg-awl must go through all the materials, and
a little way into the last. This is so that the peg shall
go through, and be rubbed down inside by the use
of the peg-rasp and peg-knife. Iron lasts would blunt
the awl each time it made a hole, and as the peg
could not go through all the layers of leather, solidity
would not result.
Iron lasts are used for riveted boots, as the rivets are
clenched as they reach the last. They are fitted up
according to their particular constructions, and a joint
or long-leather can be easily fixed with a wax-end to
the last before putting it on the last. Of course,
the leather must be fitted and blocked to shape on the
last first. Or another, and the better, way is to have
holes drilled in the last where fittings are wanted
to be fitted on. These holes can be plugged with
gutta-percha or wood, and the fittings nailed to the
plugs. Plaster casts are sometimes taken, so that the
customer leaves a model of his foot for the shoemaker to
adapt a last of wood to the requirements of that foot.
To make plaster casts of a foot, it must be oiled, and
a mould taken first.
In choosing the materials, it should be remembered
that a boot, like a house, depends upon the foundation,
for which reason the leather should be good of its class,
and every care exercised to fit it properly. Fig. 76 is
a top or upper for a gent’s lace (or Balmoral) boot, and
the technical name for each piece is given. For light
work the quarters are cut from calf-kid, levant, seal,
memel, calf, etc., and the vamps, golosh, and toe-cap,
are cut from French calf, krup, patent, etc. For stouter
work, English calf, porpoise, etc., are used; for very
heavy best work, memel, cow-hide, stout porpoise,
neat’s, etc. For rough working kip is employed. There
are many kinds of uppers other than that shown
in Fig. 76, such as button, elastic, Bluchers, Derby
Balmorals, etc. Shoe uppers, as shown in Fig. 77, are
termed Oxford shoes. There are button shoes, elastic
shoes, tie shoes, etc.
The leather for the bottoms of a pair of boots or shoes
is called a set of stuff, and consists of insoles, outward
soles, welts, stiffeners, shank pieces, side linings, felt, and,
according to height of heel, lifting and top-pieces. A
heel about an inch high is made up of the sole, the split-lift,
three whole lifts, and a top-piece; and for each additional
¹⁄₈ in. required, add one whole lift. The cost of a
gent’s medium-sized “set” should be about as follows:—Insoles,
cut from shoulder, 5d.; a pair of long outer
soles, 1s. 6d. These should be cut from English butt
leather, a pale nut brown, neither very yellow nor very
red, these coloured leathers being foreign. The English
leather should have a very fine grain, it being a thin
layer only, and the fibrous tissues of the true skin should
be very firm, close, fine, and of a nut-brown colour.
Gent’s soles are cut in one piece, called squares;
whereas ladies’ soles, which are also cut in one piece,
are called springs. Welts consist of a long strip of
oil-dressed leather about ³⁄₄ in. wide, and cost from 1¹⁄₂d.
to 2d. per pair; women’s cost 1d. Stiffeners, cut from
shoulder or middle, cost 3d.; lifting pieces, from first cut
of butt leather, about 6d. for three pairs; top-pieces for
the heels must be of good solid butt leather, like that
for the soles: a pair cost 4d. Gent’s soles are not cut
long enough to go through to the heel, so a piece of sole
leather is required to splice on to them; it need not be
of very good quality, and with the side-linings will cost
about 3d. These prices must serve only as a guide, for
much will depend upon the class of boots or shoes to
be made.
Having procured a set of stuff, the way to wet, flesh,
dry, buff, and hammer it, preparatory to using it, is as
follows:—Put the insoles, outer soles, stiffeners, lifts,
and top-pieces in a pan of clean water, letting the water
cover them. With a pair of compasses mark straight
down the centre of the welts, and cut them so that both
sides are the same width; tie them up in a knot, and
put them in the water. When all the pieces are perfectly
wet through, they should be laid in a draught—not near
a fire—to dry, with the exception of the welts, which
have to be used wet.
The insoles require to dry whilst fixed on the last.
They must be marked with the sewing-awl to the shape
of the last, then cut out, and while still wet the grain
side is buffed or scraped, and the insole tacked grain side
down on the bottom of the last with four tacks in the
middle, as A, A, A, and A, shown in Fig. 69, p. 65. The
sides should then be stretched all round with a pair of
pincers, and the leather tacked down to keep it tight
to the bottom of the last till nearly dry; this is called
blocking the insoles.
Fig. 78.—Inner Sole, Filled and Holed.
The outer soles should dry till they are only just
mellow; then lightly buff off the grain, and skive off the
thin layer of flesh or dressing from the back, and do the
same with the lifts and top-pieces. Sit upon a low
stool, and place the lap-iron face upwards on the thighs,
just above the knees; hold the leather grain side downwards,
and, commencing from the centre, hammer it all
over. Let each stroke be even, straight, and firm:
strike with the face of the hammer, and do not bruise
the leather. Leather is hammered to make the fibrous
tissues more dense, and thus less pervious to damp,
and offering more resistance to wear. The lifts do not
want to be hammered so hard as the soles and top-pieces.
When the insoles are nearly dry, carefully take out
the tacks from the edge, and with a knife round up each
to the shape of the last. At the waist the insole must
be trimmed narrower than the last, as shown at B B
(Fig. 78), where the dotted lines, A A, represent the last.
To make the awl work better in making the holes,
rub a little soap all over the leather. With a pair of
compasses draw a marginal line the whole way round
the sole from ¹⁄₄ in. to ¹⁄₃ in. from the edge, and by drawing
the two cross lines C and D, divide the sole into
three: the heel (1), the waist (2), and the fore part (3).
The margin should be a little wider at the middle of
waist, B B, particularly on the inside, the ends flowing into
the regular line. The smartness of the waist depends
upon this sweeping curve. According to the range and
pitch of the last, see p. 103, the width of margin should
be increased at the heel (Fig. 78). The more dead the
last is in the waist, the more the heel will want under-seating:
that is, to prevent the heel, when it has been
built, from pitching on the breast, it will want to be
feathered wide and sewn under at E, and feathered
narrow and sewn full at F and F. This marginal line,
when got to its proper shape, must be cut into the
leather to about one-third of its thickness, the knife
being held perpendicularly to the sole. This cut must
be opened with a prick-stitch tool (Fig. 79). The whole
of the narrow strip of leather is cut away, and this
leaves the feather as shown in Fig. 80. It is of even
substance all round the fore part, and of about two-thirds
the original thickness of the insole leather. At the waist
this can be thinner, and tapered towards the edge.
Fig. 79.—Prick-stitch.
Fig. 80.—Awl Holing the Inner Sole.
To hole this insole, make a new line on the face of
the leather gauged from the feather about the same
distance, and in the same way as that drawn from the
edge for the cut in the feather. Put the sewing-awl
through at this line, and bring the point out on the edge
of the feather, as at A A in Fig. 80, which shows a
transverse section of the insole and the feather, B B.
After it is fitted carefully, take the insole off the last,
and with a sharp knife take off the sharp edge of the
arris all round on the grain side, but not cutting away
so much as to destroy the feather. Sometimes it is
sufficient to scrape this sharp edge, and it can be removed
by running the knife round while the insole is on
the last; but this needs more skill. If this sharp angle
is not removed, it will probably curl up in wear, and
hurt the foot.
Fig. 81.—Stiffener.
Fig. 82.—Skiving Knife.
The stiffeners should be of good leather, and used
wet, that they may dry hard. Fig. 81 shows their shape.
Gent’s should be 1³⁄₄ in. high at the back; ladies’, 1¹⁄₂ in.
The dotted lines at A (Fig. 84) show about where they
should come to, and the length can be decided by
measuring the tops. They must be skived all round on
both sides, but not much on the grain side, or the
stiffness of the leather will be lost. Round the top the
leather should be skived or tapered to a feather edge,
but the bottom reduced only to half its original substance.
A knife for skiving is shown in Fig. 82.
Fig. 83.—Side Lining.
The side linings (Fig. 83) can be of almost any kind
of upper leather, though, as it is oil-dressed, calf is best.
The dotted line F, in Fig. 84, indicates its position in the
boot or shoe.
CHAPTER V. LASTING THE UPPER.
When the inner soles are fitted, blocked, holed, etc.,
on the lasts, they are ready to receive the tops. Select
the best of these for each particular foot. Much of
the beauty of a boot or shoe depends upon the maker
thoroughly mastering the principles of lasting.
Fig. 84.—Ready for Lasting.
The upper should be laced up as far as the bend or
throat, where the eyelets finish and the hooks start, to
prevent it gaping open while being lasted and sewn. The
stiffener H (Fig. 84) can be pasted on both sides, and put
into the upper between the lining and the leather, the
centre against the back seam of the golosh.
Fig. 85.—Sole of Last Showing Tacks.
Fig. 86.—Lasting Tack.
Place the last upon your knees, with the heel
to the left and the toe to the right, inner sole downwards.
Place the upper over the last, and with the
right hand pull it down at the toe; get the back seam
exactly in the centre of the last at the back, where the
upper covers only about two-thirds of the last, as shown
at D (Fig. 84). This is called “horsing,” or hoisting the
back of the heel, and enables the boot to be lasted more
forward. This will throw a draft into it which would
be very hard to get by the use of the pincers only.
Turn the last bottom upwards, hold the toe firmly with
the right hand, place the heel between the knees,
change the left hand for the right at the toe, and, with
the pincers in the right hand, very tightly draw the toe
of the upper over the toe of the last, taking care that
the back seam and centre of the vamp and toe are quite
straight on the last. With the left hand hold the upper
firmly where you have pulled it, place the forefinger on
the spot where the pincers are, and hold the leather
there till you can put in the first tack at A (Fig. 85).
Fig. 86 shows a lasting tack—³⁄₄ in. shoemaker’s rivets
will answer the purpose for light or medium work, but
Scotch tacks are best. This plan of the sole of the last
(Fig. 85) has each tack marked in alphabetical order, to
show which is the proper order to put them in. The
leather is then pulled over, and tacks put in at B and B,
working in reasonable and equal portions of stuff between
each two neighbouring tacks. All tacks used in lasting
are put right through all materials, and are driven into
the last far enough to keep the work solid; for although
they are there only temporarily, they have to remain till
the stitch takes their place in the sewn boot.
If the upper is quite straight upon the last, the two
tacks next to be put in are C and C (Figs. 84 and 85).
These are draft tacks, so called because they put and keep
a draft in the boot or shoe. This draft is got by pulling
hard with the pincers in the direction shown by the
line E E (Fig. 84). To get this draft the upper is hoisted
at the back as already mentioned; when the whole of
the fore part is lasted, the back or heel of the last is
knocked down into its place, and it must necessarily
form a line of tension at E E, and it is this tension which
is called draft.
The main principles to be observed are tightness
in lasting, drafting out of all the wrinkles and pipes
around the toe, equal strain at all parts, and uniformity
on both sides. It is this evenness in lasting which
gives the finished boot a good appearance and makes
it set nicely. A boot that is lasted properly when the
last is out will look as shapely as it was before the
last had been withdrawn.
The side linings (Fig. 83) are now put in between the
lining and outside leather, they are not pasted, and their
position is indicated by the dotted line F, Fig. 84. The
two tacks D and D can now be put in to hold the
side lining firm; while lasting up the sides or round the
heel, always see that the lining is lasted tightly; otherwise,
when the boot is finished, the lining will set in
puckers and hurt the foot.
It will be seen in Fig. 84 that the top leather does not
touch the last at G; but it must be lasted, first on one
side and then on the other, until all this fulness is got
away, or the work will be too large when finished.
When all the tacks are driven in the fore half as
far as E E (Fig. 85), the heel of the last can be knocked
into the upper until the bottom of the golosh is just
above the insole, for at the heel seats it does not need
much to last over. The waist and seat can now be lasted
similarly to the fore part, but here the leather need not
be pulled so hard, especially at the waist. In the case
of a shoe it will only be necessary to pull over the
leather with the thumb and finger, or all the draft may
be pulled from the quarters (see Fig. 76), which would
make them baggy at the sides in wear. The boot is
now lasted, with the exception of the toe.
Fig. 87.—Lasting the Toe.
In lasting stout, heavy leather it is likely to either
set away from the last or form itself into wrinkles at
the heel, and even up the sides. All these wrinkles
or pipes must be got clear away before commencing
to sew in the seat or the welt. The toe is a portion
that will always form itself into wrinkles, and special
instructions for dealing with this are given. The other
parts will not need so much humouring, though their
treatment is exactly the same.
“Pipes” and “wrinkles” are technical terms used in
lasting; they mean the hills and valleys that leather
will form itself into where there is surplus stuff, and
this fulness must be lasted away as explained. If
when the toe is lasted as far as shown in Fig. 87 a
V-shaped piece of leather is cut out of each pipe,
you would be able to hammer it down and get out the
wrinkles and pipes. This is sometimes done by slovenly
workers, but no good craftsman would resort to such
inferior means, for, although it looks very well at first
when finished and in wear, the result is far from
satisfactory.
Fig. 88.—Shoemaker’s Pincers.
We will now proceed with lasting the toe, which
process can very well be left till the end, after the
first three tacks, A B B, have been put in (Fig. 85), as
described on page 76. The toe is the most important
part to last, and if not well and properly done gives a
very ungainly appearance to the boot or shoe, both
before and after wear. There must necessarily be a lot
of wrinkles around the toe, and when a tack is put in, a
pipe forms between it and the tack next to it. To last
a toe properly, full stuff must be got round the toe end
as much as possible, and here it must be lasted away:
which means that, in putting in the draft tacks, stuff is
drawn as much as possible to the toe. All fulness must
be lasted away between these tacks, B B, dividing the
stuff equally between either side. These parts will need
care to last them well; negligence here causes great
defects, because an unsightly appearance of unevenness
is caused if these wrinkles are not lasted out. If the
toe is lasted well at the outset, it will keep up and look
smooth till the boot is worn out.
Next hammer the upper all round, A A and A (Fig.
87). This will knock out all the wrinkles in this region
that the “pipes” have caused, and will have to be done
each time a tack is put in or altered on the top. Before
putting in each tack, the leather must be pulled quite
tight. This is done according to the substance of
the tops; the stouter they are the harder will be the
work of lasting them.
Fig. 89.—Side of Lasted Toe.
Fig. 88 shows a pair of shoemaker’s pincers, A being
the jaws in which to hold the leather. Lever the
leather over, resting the fulcrum B on the inner sole,
meanwhile pulling and pressing upon the handles C and
C, holding them quite firmly, to give a proper grip of
the leather. When this has been pulled enough, hold it
in its place with the forefinger of the left hand until it
has been made secure with a tack or rivet.
Keep putting tacks in round the toe as far as the toe-cap
extends until all the pipes and wrinkles are out, and
the toe quite smooth as far as the dotted line A A. (See
Fig. 89.) It is often harder to smooth a wrinkle than it is
to get rid of a pipe, because if a tack is put through
the centre of the pipe, at B B (Fig. 87), between two other
tacks or the wrinkles they have made, this tack will
help to last the pipe out, and it can be got clear away with
a tap or two of the hammer. These means are useless
for a deep wrinkle, in which case the tack that has
formed it must be taken out and an awl put under
tacks to lift up the wrinkle C and form a pipe. Two
must be put in at D and D, and then the pipe can be
easily tapped out.
When there is a toe-cap to the shoe, the vamp
should be lasted first. While this is being done the
toe-cap can be turned back as far as the line B B
(Fig. 89). The vamp should be lasted as well as though
it were not going to be covered with the cap. Before
the cap is turned back into its place, to make an even
surface to last the cap upon, the vamp may be lightly
filed or rasped round in front of the tacks at C, C, C
on the top, and at D, D round the edge, and then
hammered again at both places.
In hammering the upper, do not give heavy blows,
but only tap it. This can be done well all round the
boot, especially at the toe, where there is double substance,
at the sides, where the side linings are, and at
the heel, where there are the stiffeners. This hammering
will all help to keep the boot in shape when made.
When a top is very hard to last, and is difficult to
get it close down to the last in front—which happens if
the last is very hollow here, or the tops are heavy—the
lasting may be done with the help of half of a pair of
medium welts. A half is quite sufficient for one boot,
and then the remaining half will do for the other boot.
Make a hole in one end, get two large lasting tacks
called sole tacks, cut two small circles of stout sole
leather, and drive the tacks about half-way through, as
at Fig. 86. Nail that end of the welt with the hole in
it to one side of the boot with one of the tacks,
knocking it into the round piece of leather. Hold the
boot firmly with the left hand, and letting the piece of
welt come right across the vamp, with the pincers pull
the free end of welt on the other side, and get any
fulness away. Put a tack in the vamp, or put the other
sole tack in through both the piece of welt and the vamp,
until you have put a tack in each end of the piece of
welt, then take out the sole tack and liberate the welt
while again trying to get more purchase to pull, and
the upper tighter to the last.
This system is also very good for the waist when
that is hard to get in. However, the mode of treatment
is different, although on the same principle, for if in
lasting the fore part it cannot be got tight enough with
the pincers, a sideways knock can be-given to the two
sole tacks which will send their heads nearer together
over the inner sole, and so tighten the welt. In the
waist the welt does not go over the upper, but simply
across the inner sole, from F to F (Fig. 85). Although
tops need not be lasted much in the waist, it-often
happens that they are cut so small that some means
like the above must be resorted to in this case to
tighten the upper. Put a chisel or file under the welt,
and gently lever it up while you knock the tacks sideways,
and at the same time drive them a little further
in. As this tack has the piece of leather on it, this
will prevent it from breaking away from the upper.
The welts should have been bought of the proper
substance, and being already divided into two long
strips and quite wet, all that is necessary is to take off
a fine shaving from the grain side. If wanted lighter,
reduce them from the flesh side by means of a welt
mill, going down a rack a tooth at a time on each side
till of the required substance, or an ordinary knife may
be used, see p. 52. The welt next needs to have an
angular piece taken off the whole length from a corner
on the grain side. This piece is about two-thirds of
the way through and about ³⁄₁₆ in. wide (as A in Fig. 85).
This process will give the welt an end section like
Fig. 53; this is shown grain side down, which is the
position in which it is sewn in the boot. The arrow, A, B,
indicates where the sewing-awl has to pass through. If
welt, this piece is to be skived for about 2 in. at B (Fig. 53).
The way to take off the angular strip is by digging the
point of the knife into the cutting-board, at an angle
so that the welt can pass between the knife, the board,
and the first and second joint of the forefinger of the
right hand. The position of the knife, hand, and welt
can be seen in the illustration (Fig. 53). Then, when the
welt is pulled at B with the left hand, this angular piece
will be cut clean off.
The width proper for a welt is generally in accordance
with the substance of the boot or shoe, but some
quite light work is made with what might well be
called an extra-full-wide welt. Gents.’ widths that are
generally recognised are half-wide welt, ¹⁄₄ in. full from
upper; three-quarter-wide welt, ⁵⁄₁₆ in.; wide welt, ³⁄₈ in.;
full-wide welt, ⁷⁄₁₆ in.; extra-full-wide welt, ¹⁄₂ in. In all
cases the welt can be worked a little close on the inside,
and full on the outside. A lady’s can be ¹⁄₁₆ in. less than
a gent.’s. For bevel work the welt should be thin before
sewing in, and it is the sole that needs to be bevelled to
fit the iron. To fit all leathers before using them for
their varied purposes is most essential in all parts of
boot making.
To make a welt for dress shoes with a ¹⁄₈ in. edge the
leather must be light, more particularly the sole and
welt; the latter should not only be very light, but the
fibres of the leather should be extremely fine in texture
on both sides. The grain must be buffed off the welts,
and then these are split down the centre and wetted.
If they are too thick, reduce them on the flesh side in
a welt mill or skiving machine, and then fit in the
ordinary way.
CHAPTER VI. SEWING AND STITCHING.
Now the welts are fitted, the threads made, the boot
lasted, and it is time to commence to sew. Before
sewing, if the boot has dried, damp it all round over the
holes, and well rub an old wet tooth-brush round the
heel part, to moisten the edge of the stiffener.
Fig. 90.—Sewing the Welt.
Sewing in the welt is one of the most important
stages in boot and shoe making, as the ripping of a welt-seam
nearly spoils the boot, since it cannot be well
repaired without re-welting—a process far from pleasant
if it has to be done before the sole is worn out. Before
starting to sew, see that the thread is nicely twisted,
waxed, and smooth throughout.
Commence sewing in the welt at the left corner of
the seat, proceeding towards the waist, the boot to be
held between your knees, toe towards you. In the right
boot this side, the inside of the waist, will be the longest.
With the welt, measure from this point to the corner of
the joint of the sole. Mark this point in order to know
the length the welt is to be in the waist, and for
this distance skive the welt from the grain side to
about half the substance. Then the welt is ready for
sewing in.
If a strap is used, it should have the buckle under
the left foot; or if a stout piece of cord or rope is used,
put the knot under the foot so that it is out of the way,
and the thread does not catch in it and break while
sewing. Place the boot, toe towards you, between the
legs (which should be held close together), letting the
strap go over the waist of the boot, as at A (Fig. 90), to
keep it fixed while it is sewn. The tack at B can now
be drawn, and the sewing-awl put in the first hole of the
waist, as at C.
Fig. 91.—Welt enlarged.
Fig. 91 shows a larger section of the welt being sewn.
It is used grain side downwards, with the surface from
which the angular piece was taken off against the upper.
While the awl is passed through a hole in the insole in
the position shown at C (Fig. 90), the welt shown (Fig. 91)
is placed so that the awl may be passed through it at A,
and is then withdrawn. The thread held in the left
hand has one of its bristles put through the holes A
(Fig. 91) and C (Fig. 90), which are now opposite. The
thread is pulled through until the twisted centre is
reached, and there is an equal length on each side,
taking one end in each hand; and, with the awl in the
right and the hand-leather, described on p. 61, in the
left, you are ready to set the first welt stitch. As before,
the awl is put through the next hole D (Fig. 90), about
2 in. of the left bristle is passed through; the right
bristle follows similarly, but from the opposite side.
The points of the bristle change hands, and each is
pulled through simultaneously for nearly half a yard.
This is done (with their points directed away from the
work) holding the bristles between the thumb and finger,
with the palms of the hands upwards. When the thread
is pulled out a little, the hands are twisted so as to give
the thread a turn round the hand, where it is held by
the thumb and finger of both hands, and so the first
pull is finished. The thread is then dropped, and
picked up again near the holes, the bristles being kept
between the thumb and finger, ready to use again.
Another stroke is made, and this will probably pull
the whole of the thread through. But if not, another
pull must be taken. These pulls must be made in quick
succession until the stitch is set at the final stroke,
which is a tightening pull. It must be hard, especially
on the side which pulls the stitch into the welt; but an
over-strong pull on the other side may possibly pull the
stitch through the in-sole. To give this extra strong
tightening pull, wind the left thread end round the
hand-leather on the left hand, and the right thread end
round the end, or knob, of the handle of the awl, as A
(Fig. 92). When this stitch is done and pulled in tight,
the next and all following stitches can be proceeded
with in a similar way.
Fig. 92.—Awl and Bristle.
After five or six stitches have been set, the seam can
be knocked down with a hammer to make it smooth;
but it must not be hit so hard as to bruise it. During
this stoppage in the work it is well to wax at least one
of the threads. It is best to wax only the end on the
right side; then set another stitch and wax the other
end, which this time is on the right. This is because the
first time the thread passes through the leather a little
wax is very apt to chip off and fly on to the work. In
this way if the wax falls on the inner sole, it does no
harm; otherwise, the wax would fall on the upper of
the boot, and would need getting off, and would spoil
Russian or any coloured leather. The waxing is done by
holding with the left hand one thread end straight above
the work, holding a ball of wax in the thumb and finger
of the right, and rubbing it up and down quickly and
evenly.
Proceed in the same way with the rest of the welt-sewing,
until the other joint (E, Fig. 90) at the commencement
of the waist is reached. Here skive off the
remainder of the grain which has been left on the welt,
turning it back upon the sole or upon a piece of thin
wood, and skiving it as was done the other end. Then
sew it in till the point F is reached; there it is cut off,
and the last welt stitch set over the end. When the toe
is reached, the boot will need turning end for end, toe
from you. It is best to draw each tack, so that the
work shall not come unlasted. When the seat is sewn
in before the welt, this can be sewn in with the same
thread.
The boot has now stitches in place of tacks, and all
round there is surplus upper stuff, which must be cut off
quite close to the stitch, but not so that it weakens the
seam. The knife must be sharp, and the point dipped
towards the inner sole, except at the heel seat, where it
is held flat with the inner sole. The whole seam can
be hammered down, to make it as smooth as possible.
Fig. 93.—Welt Sewn in.
Fig. 94.—Sole.
In sewing in the heel seat, well wax the two ends,
and there must not be a join in the thread; this must be
long enough to go the whole way round, otherwise a
new thread must be used. Commence sewing in the
same way as before, but use no welt; therefore, on one
side the stitch will lay on the inner sole, and on the
other on the upper, as at A (Fig. 93). This sewing commences
at B and ends at C. Make very solid stitches,
pull the last end through to the inner sole, and tie
the two ends into a good knot, to make a solid finish.
The four tacks D, D, D, D must be taken out.
A piece of chalk is rubbed round on the stitches, and a piece of
felt is laid on the inner sole and tapped all round. This
leaves a chalk mark to show the size that the felt will
need to be. The inner sole is pasted all over, the piece
of felt is laid upon it, hammered all over, and left to dry,
and it is then trimmed all round level with the welt. A
piece of good solid leather, of the size marked out by the
dotted line E and F, is pegged in the waist with about
four pegs. It should be skived thin at the ends and
sides, leaving it thick in the centre only. This leather
is pasted, and a thin piece of felt, by warming and
splitting the felt, placed over it. If the bottom is hollow
at G, the felt must be pasted, and another layer laid in
the same way as the first; the sole is required to be
made just level with the welt. The whole surface, from
heel to toe, should be quite smooth, and when a
sprinkling of powdered French chalk has been rubbed
in the boot is ready to receive the sole.
The sole leather has to be wetted, and dried until it
is just mellow. Scrape off the grain, flesh the back, and
then gently hammer it from the centre outwards. The
dotted line in Fig. 94 shows the shape of the soles when
bought in pairs, and also how the sole can be fitted to
the boot so that, if it be a narrow toe, the piece G is not
wasted. Two of these odd pieces will half heel a pair of
boots, or, spliced together, will make one top-piece.
Therefore, it is well to mark the sole round to the boot,
and cut this piece off before putting the sole on. In
this condition the sole leather is well pasted on the flesh
side. The bottom of the boot must also have a coat of
paste, and French chalk should be sprinkled upon the
felt to prevent the boot from creaking. A sole-tack is
put through the centre at the toe end, as at A (Fig. 94),
another at B, and two others at C and C. The sole is tapped
all over with the hammer, and the boot held firmly
on the knees by the strap which passes across the centre of
the waist, a little below B, and under the left toe. The
waist at either side should be treated
with a waist- or cramp-hammer, which
has a rounded face.
In very strong work the waist of
the sole is left to the full substance;
but this depends greatly upon the kind
of wear such boots are to be subjected
to, and also the desire of those who will
have to wear them. When left in this
way, and stitched through close to the
edge, it is called a square waist, and is
suitable for riding and other strong
boots. Usually the thickness of the
sole is reduced off the flesh side at
either side—not the whole way across.
The sole is placed flat upon a board,
grain side down, and a skiver taken off
from D to D, and (by turning the sole
the reverse way round) another from
E to E, leaving the skivers a little
thicker at F and F. When placed upon
the boot, these dark-shaded pieces, F and F, will be
next to the welt, not on top, as here shown.
When thus prepared, and the work has been hammered
to make the bottom quite smooth and level, it
can be taken off the knees. A piece of blunt bone or
hard wood run right round between the upper and the
welt will make the welt level, and cause it to set flat
against the sole. If well rounded up before the sole is
put on, the boot will form a good guide to the shape
that the sole should be, which has now to be rounded up.
Rounding or knifing-up the sole is a part of the
work needing care and attention, since it is this shaping-up
which makes the difference between boots well
finished and badly finished.
The boot should be held firmly with the left hand
upon its side on the knees. The knife must be very
sharp, and held in the right hand. The point should
lie on the first finger, the thumb on the top of the
blade, and the rest with the handle held firmly in the
hand. The point should overhang the side of the finger
only just the substance of the sole, and not as shown at
A in Fig. 95, which would cut the upper of the boot.
The finger is kept against the sole, as shown at point B,
and forms a guard to the knife. The piece (C) need not
be taken off at one cut; so as not to go too far, it can be
pared in very small pieces, and the shape of the boot
obtained gradually.
Fig. 95.—Rounding
up the Sole.
Fig. 96.—Channel
for the Stitches.
This paring is continued all round, but at C and D
the leather will be wanted to make the seat with
and to cover the stitches; so the cut must not be close.
As the upper does not overhang the sole so much
towards the toe, more liberty may be given to the knife.
The welt and sole should be pared closer at E than at F
(Fig. 95); starting very close at G, it becomes gradually
wider until reaching F, and similarly narrower until
reaching B, and the ends of the waist C and D should
match.
Great care is necessary to make and keep the edge
quite even and square. This is the only opportunity
now left to give the fore part of the boot shape and
form, and this should be done consistently with the
shape the heel is to be. A channel is cut round the sole
to contain the stitches with which it is sewn to the welt.
It will be seen by the dotted line in Fig. 96 that this
channel has to be cut very near the edge round the fore
part, from B to C, and it is wider in the waist from
A to B and C to D.
This line can be marked with a pair of compasses,
about ¹⁄₁₆ in. from the edge in the fore part
and about ¹⁄₄ in. in the waist. Another way of marking
the fore part is by filing off the sharp edge of the sole so
that the edge of the bevel on the grain will form a line.
The sole is channelled by holding the boot firmly with
the left hand between the knees. The knife must be
very sharp at the point, it should not be wide, and it is
held in the right hand, as we hold a pen, only a little
more upright. The third and little finger should be
free. The tip of the second finger is placed on the face
of the sole at the extreme edge. The knife is then dug
into the leather at A (Fig. 96), and the third and little
fingers are used against the edge of the sole and welt to
steady the movement of the hand while the knife is
being passed round the sole.
We have already shown on page 90 how to hold the
knife, and how its position should be at an angle of 50°
with the flat of the welt. The point of the knife should
pass through the grain of the leather and into the
fibrous portions sufficiently to allow the thread to be
well embedded in it. This will be nearly half-way
through the leather; but it is the substance of the sole
that decides the thickness of thread which shall lie in
this channel. The thread, lying in the firm part of the
leather in this way, leaves the grain free to form a
covering for the stitch when the channel is laid
down.
Fig. 97.—Channel laid open.
Care must be taken with the waist, as the leather
has been thinned down; and if the knife should go
more than half-way through, it would not hold the
stitch, and so the entire sole would be spoiled.
The channel can be opened with any blunt instrument,
but the prick-stitch (Fig. 79) is best. Put the
point in at B (Fig. 97), and open the channel the whole
way round, as shown at A, until C is reached. In doing
this, do not disturb the edge, but throw the grain on top
quite back so as to allow the stitching-awl to pass
through without cutting. If cut, it would make the
channel harder to lay down, and cause an unsightly
appearance in the finishing.
The bone can now be rubbed round the welt, and it
is ready for stitching with a thread made as directed
on p. 60.
In many boots and shoes the stitches on the welt
side are shown up yellow. For this result, yellow flax
is used to make the thread, and white wax or beeswax
to wax it. If the ordinary shoemaker’s brown wax is
used, the flax must be waxed very sparingly indeed.
Slate flax is very good for stitching, if the stitch is required
to show black; but whatever material is used to
form the thread it will need to be twisted lighter than
sewing-thread, and should be a firm wiry thread.
Fig. 98.—Stitching Awl.
Before commencing to stitch the sole, run the fudge
wheel round to make impressions upon the welt, then
you will be able to set a nice, regular stitch by placing the
awl carefully into each mark made by the fudge wheel.
In making a boot you may sew and need not
necessarily stitch the waist, or even the fore-part; but it
is better to do so, since it makes the work much more
solid. Should you sew the boot, either for quickness or
because you find a difficulty in using the stitching awl,
the seam will be much stronger if you use a small
sewing awl the side of which has been rubbed off a
little on the emery stick. Stitching is stronger than
sewing because the stitches are got closer together than
in sewing, and a much smaller hole is made owing to
the shape of the awl and the way it is used.
Before putting the awl through for the first time,
place the strap over the waist of the boot and the left
knee. The boot should lie on the lap, the toe towards
you, with the upper to the right and the sole to the left,
the knees being held together quite firmly. With the
thumb-nail of the left hand the channel can be opened
for a length of about 2 in. This is to prevent the
stitching awl (Fig. 98) from cutting or notching the thin
piece of grain thrown up to form this channel, and
which, if cut, would be very unsightly when laid down
and finished.
Fig. 99.—Stitching the Boot.
The stitching awl (Fig. 98) is a tool made like the
sewing awl, which is illustrated in Fig. 57, p. 57. It is
put into a handle similar, only a little smaller. The
differences between the sewing and the stitching-awl are
pointed out on p. 57, where the blade of the latter is
shown without the handle. As shown at A (Fig. 98), the
point has a drop or pitch, from B to C. As already
explained this awl must not be wriggled, as the sewing-awl
is, but passed right through by one rapid and almost
straight jerk, the boot being held firmly or the awl will
break. There are also other kinds of awls used by shoemakers,
such as the heel-awl, the use of which is explained
on p. 104, and the pegging-awl which is referred
to on p. 110.
Assuming the waist has been stitched or sewn, let
us see how to stitch the fore-part from the point where
you set the fudge on the welt. The left thumb is
pressed against A (Fig. 99), just beyond where the awl is
coming out, as shown by B. The curved part of the awl
is laid on the upper, as seen at C (Fig. 99), with the point
against the flat of the welt. It must then be pushed
through by one sharp thrust, dropping the elbow while
doing so, and sending the point through to the other
side of A, and into the pit of the channel. Then the
awl must be pulled out quickly, and in the same way,
but this time raising the elbow.
Fig. 100.—Making the Stitch.
The way the stitch is set depends, to some extent,
upon whether the work is to be “pricked up,” “fudged,”
left plain, which is called a “blind-welt,” or the stitch
sunk, and the welt fudged to imitate stitching. For
the first two it will have to be set up boldly by overcasting
the stitch, letting the end of the thread in
the right hand pass under the stitch during the whole
time it is being set, as at A (Fig. 100), until it is finally
pulled to the same tension as the other stitches. The
three black lines at B show the mark of the fudge
wheel, where the awl is to be put through each time.
The part at C shows how the stitch is each time thrown
the same way.
For a blind welt direction of the stitch and thread
can be reversed, and so much care need not be taken
with the work. The stitch shown in Fig. 100 wants
learning, and this is the best place to get the practice.
To sink the stitch in order to fudge it, take the sewing
awl, lay it on the upper as though you were going
to sew, and, with the point against the welt, draw it
round the welt from C to D (Fig. 99), letting it cut
a channel in the welt the depth of the grain, and in the
place where the stitches are to be set.
Fig. 101.—Rubbing the Channel down.
The stitching can be proceeded with, opening about
every inch or so of the channel with the left thumb-nail,
at the same time putting a little wax on the thread on the
left side. This process is continued the whole way
round, pulling out the nail at E when you come to
it. This nail is placed in the channel to avoid a mark or
hole at F, where the tack is generally put, and a peg
or piece of leather afterwards used to fill up.
The stitches that lie in the channel must be rubbed
down the whole way round with a piece of bone, and a
little paste is rubbed in, so that there is a thin uniform
coat all round inside the channel. This is done by
placing a piece of old soft rag over the right thumb, and
putting the nail in the channel and rubbing it from one
end to the other.
The boot is held between the knees, heel towards the
worker, and the channel is lightly laid down by passing
the smoother side of an old file over it from A to B
(Fig. 101), holding the file one end in each hand, and taking
strokes from A to C, and D to E, and so on.
Move the file in an outward direction, as indicated by
the arrow, starting contact at F and finishing at G.
This will throw over the edge as a burr the narrow margin of grain
made in cutting the channel. This burr is thrown back
again by the action of the back of the knife on the edge
of the sole, used as the file on the top. Then the boot
is turned round, and the knife is held in the right hand
and the boot in the left, the blade of the knife being flat
on the sole. In this position it is passed round to cut
off this burr level with the face of the sole.
The sole is then slightly damped all over and rubbed
down with a long-stick made from a piece of round boxwood,
about a foot long, smoothed by rubbing with fine
sandpaper. The sole is worked down by well rubbing all
round the seam, as at H, and then the centre. The long-stick
must be passed over the leather briskly, but not so
as to generate heat and thus injure the grain. For this
process the boot has to be held firmly between the knees,
the long-stick is used as the file was, one end in each
hand. The stick must form a right angle with the
channel, and the rubbing must be done with the centre
of it, as at H. When this is done, and the bottom is
smooth, the stitches on the welt can be lightly rubbed
down with the bone, and the sole also hammered all
over until it is perfectly even. A round-faced hammer
is necessary for the waist, this part being nicely
hammered.
So that the wax of the thread will not stick to the
sewing awl, the point is thrust occasionally into a piece
of soap. The awl is then passed under each stitch,
which fastens together the sole and upper, as at I—not
very far, but sufficiently to make the tight stitches
lie in loops a little way from the upper, as at I, J.
Fig. 102.—Sole-piece.
The end of the sole is filed about A, B (Fig. 101), to
throw the grain up and make it smooth. The edge K
is also made straight. The leather to make the seat-piece
must be cut straight at one edge, and filed on one
side. The two pieces are pasted, the edges put together,
and a nail placed at A (Fig. 102), then about five pegs are
driven in the sole-piece, and two in the sole; these pegs
are indicated by the seven dots on Fig. 102. The piece is
then pared to the shape required, as shown by the
dotted line. Plenty of stuff is left all round to overhang
the stitches ¹⁄₄ in. The angle must be taken off round,
for a third or bare half of the thickness of the leather,
to the inside dotted line on Fig. 102. The nail A is
drawn, the tops of the pegs taken off, the grain of the
leather cut away round them, and from the whole of the
top, from B to C, but most away where the pegs are
driven. These pegs should be ¹⁄₂ in. from the edge all
round, and when the cutting away has been done, the
leather can be rasped to make it rough, though fairly
level.
CHAPTER VII. MAKING THE HEEL.
The split-lifts to form the heel are made from a piece
of butt leather, generally first-cut, as it requires to be
tight, and must be supple. The piece should be about
7 in. long and 1 in. wide; this, split down the
centre while quite wet, makes a pair.
Fig. 103.—Cutting
Split-lifts.
The splitting is done as follows:—Place
the leather (Fig. 103), grain side up, on a board
held upon the knees, let the left-hand thumb
rest at A, and the little finger at B. With the
first, second, and third fingers press upon the
leather to keep the part marked C firm on
the board. The knife, held in a slanting
position, is put in at D, on top, and passed
through to E on the other side. The knife
is drawn along the dotted line D until it
reaches F, with the point on the lower side,
and following the dotted line C to A. This
splitting gives two wedge-shaped strips of
leather, A, B, as shown (Fig. 104). If not
made quite to this shape while splitting, trim
them up afterwards. One strip is then laid
on the lap-iron, with the thin edge towards
the worker. The left thumb is placed upon
A (Fig. 104), and the right upon B, with thumb-nails
towards you, the hands back to back, and the two forefingers
against C and D. In this way the thumbs can be
pressed very hard, and the two ends of the strip brought
round to the dotted shape E and F. The thin edge will
pucker up in the centre (G and H), but the puckers are
hammered flat by tapping round the centre while holding
the two ends between the thumb and finger of the
left hand. Thus one split-lift is made, and the process
must be repeated for the other. The leather to make
split-lifts must be split while wet, but it is best to let
the strips dry a little before blocking them on the lap-iron.
In drying they open a little at the ends, as shown
by the dotted lines. For this reason the ends are
brought together when making, in order that they may
dry the proper shape.
Fig. 104.—Turning the Split-lift.
The heel, as shown in Fig. 102, is rasped off and made
rough so as to receive a thin coat of paste the same
width as the split-lift, which is rasped on one side and
treated similarly; it is then put on as shown in Fig. 105,
the boot being held firmly, the heel end on the right and
the toe on the left knee, by the strap passing over the
waist and between the knees.
Fig. 105.—Split-lift in position.
The split-lift is placed with its edge flush with the
edge of the centre of the seat-piece at A. A peg is
driven in, another at B one at C, then one at D, and
another at E. These pegs will keep the split-lift in its
place while other pegs are being put in between them;
all must be placed towards the centre, as far away from
the edge as the thickness of the split-lift will admit.
This is then nicely pared round. If a gent’s or lady’s
square-heel boot, the outside corner should be left
square; towards the back and inside corner it can slant
in somewhat. The tops of the pegs may be cut off, the
top rasped as was the seat, and the two ends trimmed.
A piece of zinc slipped under the end previous to
cutting protects the grain of the sole from being scored
in the process.
Fig. 106.—Heel ready for Sewing.
The split-lift being now pegged in its proper place on
the seat, the top of it is roughed with a rasp and pasted.
The first entire lift, after roughing and pasting the
flesh side, is then put on grain side upwards. The
size for each lift piece should be got by placing a piece
of paper over the split-lift. Then stroke the paper over
the edge of the split-lift, until the edge of the heel
is shown. This pattern will do for roughing out all the
lifts for a square heel, and they should be a little larger
than the pattern. If a smart (hollowed) heel is to be
made, each successive lift may be a little smaller than
the one on which it lies. For the present boot only two
whole lifts are wanted to make the heel, shown in
Fig. 106, A being the sole and seat-pieces, B the split-lift,
and C and D the first and second whole lifts. In putting
on the first lift, about five pegs can be inserted midway
between the centre and edge, as was done in the split-lift,
the top of the pegs being cut off with a portion of
the lift. The top is rasped until nearly all the grain
is off the leather, then it is trimmed to the shape of
the heel. The second lift is then roughed, the two
surfaces pasted, and the lift placed and kept where it
belongs on the heel by driving in two ³⁄₄ rivets at E and
F; or two sole tacks may be used temporarily, and then
withdrawn when the sewing down has been done. At
the breast of the heel the first lift should overhang the
ends of the split-lifts a little, and the second should
overhang the first, and so on, until the heel is the height
required, and the top piece is on. A channel, shown by
the dotted line, must be cut in this top lift. If a second
cut be made an eighth of an inch from the first, with
the knife held slanting the reverse way, it will cut a
V-piece out and form a groove, which need not be deep,
for the stitch to lie in. The sole and seat-piece should
be rubbed round from G to H with the bone to open it a
little, so that the seat stitches may be clear.
Fig. 107.—Flat Waisted Last.
Fig. 108.—Alteration of Last for High Heels.
Fig. 109.—Another Way of altering Last.
If the last is out of range for the height of heel you
wish to make, it can be counteracted by feathering the
insole, and sewing close and full, unless the last is very
badly out, when its construction must be altered. All the
full lines circumscribing the lasts in Figs. 107, 108, and
109 are alike; and it will be seen by Fig. 107 that the
last is somewhat dead, or flat in the waist. By building
a high heel, one lift above the other, without reducing
them at the breast, the heel will be thrown out of range,
as shown at A, B, and C (Fig. 107). If to give a better
range the lifts are reduced at the breast when the boot is
worn, the pressure of the foot on D will press it down to
the ground line, and again throw the heel out of range.
To prevent this, there are two ways to fit up the last, and
if it fits someone, and will be again wanted to make low-heeled
boots upon with little trouble, the alteration will
be best made in a way that the last may be quickly
brought back to the original shape. To do this, take
the measure of the last round the joints at A B (Fig. 108),
and then peg a piece of wetted leather on the bottom
and right across the last from C to D; skive the leather,
as shown by the dotted line B, tapering to nothing at C
and D, but less abrupt from B to C than from B to D.
Rasp away the wood at A E, as shown by the dotted
line, until the new measurement is the same as first
taken. Peg on the heel a piece of leather, thick at F,
and tapered to nothing at G. A little wood can be taken
off at H, and if the lasts are to be used for high-heeled
boots only, it will be the best. Rasp off the bottom
at the toe a piece from A to B (Fig. 109), as shown by
the dotted line, and also from C to D, taking away most
at E; this deficiency can be made up with leather at
F and G. The two diagrams given in Fig. 110 contrast the
pitches of the same heel on the different-shaped lasts.
Fig. 110.—Heels Contrasted.
Fig. 111.—Stitching the
Lift.
Fig. 112.—Method of
Making the Stitch.
To sew down the heel the boot is placed on the
knees with the heel towards you, and the lifts to the
left, as shown in Fig. 111, and held very firmly by the
strap. The thread for the heel should be about four or
six strands stouter than sewing thread. The heel awl is
a tool nearly straight, but in other respects like the
sewing-awl. It is used in a large-sized sewing-awl
handle, and before making each hole the blade needs to
be dipped into soap. It has a thick substance to go
through, so the leather must be sufficiently moist, and
good bristles are wanted on the thread.
To make the first hole for sewing the heel, the awl is
put in at A (Fig. 111) and brought out at B. The exact
place where the point of the awl is to be put in the sole
is shown in Fig. 112, which is a section of the welt and
seat. The heel is indicated by the dotted lines B B, and
the first hole is made at near A the corner of the heel,
and the thread is drawn half-way through. In the same
way the second hole is made at C. In making all the
holes after the first, the awl must be kept clear of
the seat stitch (Fig. 112), as this might impoverish the
stitch and make it somewhat rotten. After the second
hole is made, the point of the awl is placed under the
seat stitch to raise it in line with the mouth of the hole,
so that the sewing thread may pass through the loop of
the seat stitch. The stitch is made by passing through
the two bristles from opposite ends of the hole one after
the other. The two ends are then drawn through together,
pulling the thread hard on both ends. The third
hole is made in the same way by putting the awl in at D,
and the sewing process is repeated. This will make
a stitch as seen at H, coming out of loop G, and returning
into loop I; and when the stitch is drawn tight
it draws the upper to the sole, and also holds the
heel on. This process is repeated, each hole following on
as at E and F, until all the stitches that lie on the
upper leather are sewn down. The stitches in Figs.
111 and 112 are shown loose to clearly illustrate their
positions. The heel thread should fall into the groove
cut on the top of the heel, the last stitch being finished
off with a knot. After each few stitches are set the heel
should be hammered down to keep it in its place. When
the heel is sewn all round, and the ends of the thread
cut off, it can be firmly and well hammered down all
over.
Now when the leather is damp and workable is the
time to make the seat; and after it has been hammered
on top, the stitches A D (Fig. 111) should be rubbed down
well with the bone. The heel can then be dressed carefully
with the pene end of the hammer, so that in the
process all the stitches are covered by the leather. In
commencing, the pene of the hammer must strike the
heel at the bottom of the split-lift and the top of the
sole and sole-piece, as shown in Fig. 113. This is to drive
the leather over the stitches as much as possible. When
this pening has been done all round the heel, turn the
boot and commence at the extreme edge B, holding the
boot in the position shown; and when hammering
towards the back, let the toe slip between the knees.
The blows of the hammer do not want to be hard, but
sharp and frequent, and repeated in various rows all
round the edge of the heel, as at A (Fig. 114), leaving no
part untouched. Then the leather can be slightly
flattened with the face of the hammer.
Fig. 113.—Pening to cover
the Stitch.
Fig. 114.—Trimming the
Seat.
The next step is to trim the rough edges of the seat
at B. Hold the boot firmly upon the knees (as at
Fig. 114), and just start cutting with the point of the
knife; and to save it from slipping into the upper,
a metal guard will be found very useful. The handle
of an old metal spoon hammered thin and flat (as A,
Fig. 115) makes a handy guard to the knife for several
purposes. This guard is placed on the upper, as at C,
and moved along with the knife when cutting off the
rough edge D. The seat is trimmed up, so that E is left
firm and solid, and well covering the stitch. The next
process is running the seat-breaker (Fig. 116) round from
the other corner of the seat. In the illustration A is the
cutter, B the guard, C the handle. The guard B is put
against the top of the seat at the opposite corner to B
(Fig. 114), and, taking three or four sweeping strokes in
one direction only, the seat should be made smooth and
even all round. If it is not, the lumps must be cut off
with the knife, and the breaker used again. This finishes
the edge E; and the edge B must now be rubbed round
with the welt file (Fig. 117), used for smoothing the welt,
etc., made with cross-cuts on one side only (as illustrated).
The heel can be allowed to dry, and it can then have the
remainder of the lifts put on.
Fig. 115.—Metal Guard
used when Trimming.
Fig. 116.—Seat
breaker.
If a pegged seat is wanted, it must be arranged for
before the boot is lasted, as it is necessary to skive the
stiffener (Fig. 74) much thinner and more tapered than is
wanted for a sewn seat. The inner sole is not fitted and
holed as described on p. 72 (Fig. 78), but it is left quite
square and plain to the edge, to where the heel is coming;
the waist and fore-part only are holed. The seat portion
is left its full substance, and it will be found that
even then the centre is higher than the sides, unless the
bottom of the last is very flat at the heel—which it
should not be, as this will make the boot feel very
uncomfortable to the heel in wear.
A pair of thin split-lifts about ¹⁄₂ in. wide must be
made, as described on p. 100, to go round the edge of the
inner sole. The thickness that these split-lifts should
be must be decided by the amount of drop that the last
has at the edge, as their purpose is to make the top as
near flat and level as possible. The split-lift can be
pegged on with a few short fine pegs, so that in pegging
the seat the sole and all the upper leather and stiffener
should lie quite flat. Pegs should go through everything,
inner included; otherwise they are never solid, and tend
to yield to any strain from top and bottom; so pegs
must go straight through each substance, and not on the
slant. Fig. 118 is a section of the seat, upper, stiffener,
inner sole, split-lift, and sole, with the right side with the
split-lift, and the left without. The difference between a
peg that is driven through straight, as the line A, and
the one driven aslant, as the line C, can be easily seen.
To get upon the leather on the left the same effect as
shown by the line A, the peg would have to be driven as
the line C, which is not nearly so strong as A.
Fig. 117.—Welt File.
Fig. 118.—Pegging a Seat.
When the inner sole is prepared, the top can be lasted
round the seat as described on pp. 75-77, excepting
that the lower edge of the upper leather must reach
towards the centre fully ³⁄₈ in. more than is needed for a
sewn seat. Bought tops are generally quite large enough
to allow this, without making the golosh too low at the
back; but tops not large enough must be sewn. There
are several ways of sewing the upper to the inner sole;
but this is not done as described for a sewn seat. The
upper leather can be stitched by felling to the inner
sole, or the stitch can be set, first on the sole side and
then on the upper; but that is not solid enough for
good work, as too much depends upon the pegs.
Fig. 119.—Seat Sewn for
Pegging.
Fig. 120.—Pegged Seat
and Split-lift.
The best method is as follows:—Hold the boot as
for stitching the sewn heel, with the heel towards you
(see Fig. 119). The sewing awl is put in at A, the point
is brought out at B, and a thread is put through and
halved. The awl is next put in at C and brought out
at D; this is a little on the slant, and the remainder of
the holes can follow the alternate dots from side to side
in like manner. The stitch is set like this: the thread
end hanging from B is held in the left hand, and when the
hole C D is made the end at A is put into C;
B is then put between A C under the thread that
is going to form the stitch across these two holes. The thread A
is then drawn out with the left hand at D, and the thread B
drawn through under the stitch A C. This will draw
the upper over at B. The next stitch is set in the same
manner, which will draw D over, and so on right round.
Each time a stitch is set it can be hammered down on
top and at the side; this drives the stiffener into its
place, and helps to make a nice square edge, shown
by the line E F, to form the seat upon. By the diagram
(Fig. 119) it can be seen at the last stitch that the two
ends G and H tied together will make a good finish,
with a solid and smooth seam, and that the top is flat
to receive the sole.
The sole and sole-piece are put on as with a sewn boot,
only they are pared nearer to the upper, leaving about
¹⁄₁₆ in. all round. A row of fine pegs, just long enough
to go through the inner sole, is put in (as shown by A,
Fig. 120) near to the edge of the sole and sole-piece;
and they must reach the edge of the inner sole and just
go through it. A straight fine awl is like an ordinary
fine bradawl, it should be used with a short stumpy
handle; and if the leather be too hard for it to be forced
in by hand pressure, it can be held in its place with the
left, and driven in with a hammer in the right. The
tops of the pegs must be cut off, rasped, and pasted,
ready to receive the split-lifts, as described on p. 101.
When the split-lift is put on, it must have a row of
pegs put round, as in Fig. 120, only they must not be
quite so near the edge, as shown by B. The first lift
is treated in the way described on p. 101, and, with
these exceptions, all is the same, as with a sewn seat.
Fig. 121.—Flexura Spring.
A steel spring inserted in each waist is useful for
those who like a boot or shoe to fit close under the waist
and instep, or for those who have a flat foot and want
to improve it. This spring need not be so strong as to
hurt the foot; and at first wearing it is best to have
springs very little curved, and stiff enough to keep the
waist from dropping by the weight of the body. As
you get used to them, a spring more flexible, yet
stronger, can be used. There are several kinds of
springs—single, double, twins, Goodyear’s, etc.; but a
good strong single spring will answer the best, using
women’s or men’s as wanted. Flexura springs can be
got at almost any grindery shop. The price is about
3d. or 4d. per pair, or from 2s. 2d. to 4s. per dozen. Two
pieces of brass or zinc for the plates, and about eight
copper tacks, should be included with each
pair. Fig. 121 shows their shape; they
are about 4¹⁄₂ in. long, and ¹⁄₂ in. to ³⁄₄ in.
wide; this is before they go in the boot.
They will not need padding, as the spring
should not be strong enough to hurt the
foot. Should this happen, it can be prevented
by bending the spring back very
gently at first, and increasing as you proceed,
so as to make the spring nearly
straight and yet not to break it.
To put the springs in, the boot is
unlasted after the inner sole is fitted, and
put on the lap-iron to have riveted upon it
a plate of brass or zinc. This plate of
metal has three holes made in it; it is laid
upon the flesh side of the inner sole, as at
A (Fig. 122), and three holes are pierced
with a fine awl in the inner sole. The
place for the end of the spring is just
below the end of the waist, as shown. If it is put
nearer the ball of the foot, the steel will work through
the metal plate and the leather also, and thus let
water in before the other parts of the boot are half
worn out.
Fig. 122.—Inner
Sole
for Pegged
Waist.
Then lay the sole on a board, and from the grain side
drive three copper tacks through, so that the heads are
well into the grain and smooth with the leather. Take
the shoe off the board and put it with the tack heads
flat on the lap-iron. Put the plate of metal over the
points of the tacks, and hammer it down to the leather.
Cut the points off near to the plate, and, while the heads
are flat on the iron, gently burr or rivet the ends to fix
the plate very solid.
Proceed, as previously described, with making until
the welt is in and the seat and waist sewn down; then
the steel spring is put in. It has a hole through one
end only, C (Fig. 122). The other end, A, is put under the
metal plate, as shown by the dotted lines in Fig. 122, a
tack is put through the hole C in the spring, and when
the boot is made it can be cut off and riveted in the
same way that was done for the plate. This is usually
enough to hold the spring, but a few stitches can be put
across from side to side if it needs it.
Fig. 123.—Pegged Waist Enlarged.
The boot is then proceeded with as before described;
but no welt is wanted in the waist if it is to be made
pegged, which, if done properly, is by far the best for a
flexura spring waist.
In fitting the inner sole for a pegged waist the waist
is skived at the edges only, and not very far in, excepting
at the centre of the inside waist (as D), where the outer
sole will have a greater curve, and still allow the pegs
to be put in, so that they will go through the whole
substance of the leather. For the pegged seat more
upper leather is wanted to last over than for sewn work,
and this can be sewn down as described for the seat.
For a pegged waist the sole need not be made
thinner in the waist than for a sewn one, unless it
is very stout; and in that case, it can be thinned
uniformly from the grain side; so that, although the
waist is thinner than the sole, it is all the same substance.
Assuming that the sole is stitched on and the seat pegged,
we have only to peg the waist. This is very important
work, for if the waists once give way they are exceedingly
difficult to repair.
A diagram of the waist is given in Fig. 123 on a larger
scale to show the essential points. The dotted lines
A and A show the inner sole. The full lines
B and B show where the outer sole is to be rounded
up. The lines C and C show the edge of the upper leather, and
DD show the stitches that hold it in its place, which are
like those in the seat. If the flexura spring should
require further fastening, the stitches D, D can be drawn
from one side to the other. EE show where three
rows of pegs should be put in. About six holes, marked
F, F, F, F, F,
F, should be made in each side, and as each
hole is made a peg should be put in. This holds the
waist in its place. Then between each two of these
another peg can be put in, as at G. The remaining
holes necessary to complete one row are made, as shown
at HI; each one is pegged as it is made. When one
row of pegs are in, trim off the tops with the knife or
rasp before putting in the second row, and proceed the
same with the second row if you intend to put a third,
which will be necessary for heavy work.
Fig. 124.—Split Strip for light Pegged Work.
For making light pegged work there need not be a
middle sole, as a simple runner will suffice. Measure
from joint to joint on the fore-part; select a piece of
firm leather, first-cut is best, and cut it to this length, and
about 1¹⁄₂ in. wide. Split this strip down the centre as
in making a split-lift; the cut, being ¹⁄₂ in. wide (as shown
in Fig. 124), will give on each side ¹⁄₂ in. width of solid
stuff to peg through. Skive the strip a little wider and
thinner at the toe, so that you may get it round
smoother. Hammer it, peg it on, cut the pegs off, skive
it down towards the centre, and fill the bottom up in
the ordinary way. By this means it may be made as
flat or round as you choose. No matter how broad the
bottoms are intended to be, the pegs must be far enough
from the edge to go through quite ¹⁄₈ in. from the edge
of the insole. It will be found best to slant the edge
with an ordinary knife, but be very careful not to cut
the upper. Hold in the left hand the piece being cut
away, twist it between the thumb and finger, and only
use the extreme point of the knife, guided by the second
finger of the right hand. The fore-part iron will do for
smoothing with as for sewn boots.
Fig. 125.—Completing the Heel.
The heel was left, on p. 101, built up to the second
whole lift, A (Fig. 125). To make a 1¹⁄₄ in. heel will need
two more lifts and the top piece. The top of A should
be roughed with the rasp, and pasted, and the third lift
laid on and secured by two rivets nearly in the centre;
this is also rasped and pasted, and the last or top lift put
on. This lift is rasped and pasted, and also the flesh
side of the top piece, which is held firm by headless
rivets put in at A and B (Fig. 126), so that it may be
rounded up. The heel can be rounded up to whatever
shape may be desired. Fig. 126 is a medium heel; it
can be built smarter, or quite square, as the dotted lines
show in A and B; either way, it should be longer and
more square on the outside corner C (Fig. 126) which in
this case shows the right heel. The remainder of the
rivets can be put in not very near the edge, as D and E
(Fig. 126). They should slant outward all round, as B
(Fig. 125).
To blind on the top piece drive six blinders, or
headless rivets, down the side of those at A, D, and F
(Fig. 126), as shown there by the small dots. Prior to
pasting the top lift these blinders are put in, leaving
enough to go through about two-thirds or three-quarters
of the substance of the top piece. The top piece is
laid on and hammered down, causing these portions of
rivets to embed themselves into it, and so hold it on.
For very light work, or when the wearer objects to his
heels making a noise in walking, blinders can be put in
all round, and other nails need not be used; but then
the top piece wears out quicker than if it has nails or
brads in it. The system has one advantage—that heels
need not be worn down badly, as it is not much trouble
to slip this piece off, knock another on, and pare it up
and finish. It need be renewed only as far as it is
worn; therefore it is as well to put this top piece on in
two pieces, joined as shown by the dotted line (Fig. 127),
when only the part C need be slipped off and replaced.
Fig. 126.—Shape of Lifts
for Blinding.
Fig. 127.—Top Piece
Bradded.
The position for the brads is as shown at C (Fig. 127),
being on the outside of the heel, unless the wearer
treads inside, when the heels should be bradded on the
inside. The top piece should be left about ¹⁄₁₆ in. wider
where the brads are to go, leaving something to trim off.
By this means the brads are got quite to the edge of
the top piece, where the hardest wear comes. One, two,
or three rows of brads or rivets can be put in, according
to the strength of the boot; a third row need only reach
from D to D, the inner row being the shortest.
Most of the care necessary to give symmetry to the
bottom of the boot lies in fitting the inner sole and
sewing in the welt and seat; and to have a boot well
ranged, this must be kept in mind. The inner sole
must be so arranged that when the heel is built to its
full height, and the top piece on, a straight-edge placed
as shown by the line D (Figs. 125 and 128) will show that
the flat of the top piece is level with the flat part of the
sole.
Fig. 128.—Pitch of Heel.
Fig. 129.—Heel Pitching
on Waist.
Fig. 130.—Heel Pitching
on Back.
This plan line of the inner sole’s edge may be thrown
out of level, as shown in Fig. 129, by the dotted line A,
through sewing the welt and seat corners too snug, as the
dotted lines E E show in Fig. 122. Raising the point
of the sewing-awl here and dropping it at F will make a
heel built lift upon lift too high in front, as at B (Fig. 129);
to make it stand flat upon the ground a wedge-lift would
be put in, as at C. The reason for this is that the
last is round at the bottom of the heel, it being highest
at C (Fig. 122) and lowest at F and E E. The closer
the two dotted lines E E, the higher they are, as at
A (Fig. 129), and the more they are sewn down at F
(Fig. 122), the lower they are at D (Fig. 129), and this
gives the result explained. If the reverse is done it will
make a heel too high at the back, as shown by A
(Fig. 130); but this fault is not nearly such a bad
one as the other, except in a spring waist; then
the spring would raise the waist and pitch the back of
the heel so prominently as to make it very uncomfortable
in wear.
Fig. 131.—Correct Range for Spring Waist on Last.
From Fig. 131 can be seen the importance of having
this line a curve sweeping towards the heel, and straight
at the sole. The way certain lasts have to be fitted
for particular types of feet sometimes makes it difficult
to do the fore-part in nicely; but it should range
correctly at least from the waist to the heel, as from
A to B.
A heel dropping, as at B (Fig. 130), which makes it
look higher in breast than at the back, or rising at
A (Fig. 129), which makes it look higher at the back than
at the breast, is very unsightly, and throws the boot
or shoe out of position in wear. It is this sort of heel
which gets worn down at the front, B E (Fig. 128),
and also causes the waist to drop, as though the wearer
had a flat foot. The effect is that the upper part is
drawn out of place, and wrinkles are made on the instep
of the boot, making it appear old with only a very
little wear.
The range of the heel has a certain effect upon the
pitch, because a little defect in the range can to a
certain extent be set right by properly pitching a heel;
but it is not advisable here to dwell upon makeshifts to
overcome defects, as the aim is to show how to be boot-makers,
not boot-doctors. Therefore, remember that
range depends upon pitch, and pitch upon the form
of heel.
A gent’s ordinary military heel (Fig. 131) should be
pitched as C, unless the boot has a spring waist; then it
can be pitched as shown by the dotted lines D and E.
When off the last, and also when on the foot, the waist
will have a tendency to rise, and so pitch the heel
forward, as shown by A (Fig. 132). The spring waist will
also have the effect of making the toe lie flat on the
ground, as at B, which adds beauty to the boot or shoe.
The higher the heel, the more forward it wants to
be pitched, as A (Fig. 133); or, for a lady’s, as shown at A
(Fig. 134). An extra smart high heel could come even as
far as the dotted line B. The last should then have
more drop in the waist, and more off the bottom of
the back of the heel, as at the dotted line C.
Fig. 132.—Spring Waist off the Last.
Fig. 133.—Square Military
Heel.
Fig. 134.—Smart Military
Heel.
The shape for a heel is to a great extent a matter of
fancy, though some heels would look out of place on
certain work. A boot for heavy wear should have a
square-shaped heel. A light dress-boot can have a small
top piece. For ladies, even if the heel is smart, it is
best to have the top piece somewhat large. Low heels
are best for walking, riding, shooting, or for any purpose
where the wearer is likely to be long on the feet. For
light walking-dress wear there is no objection to high
heels providing the wearer knows how to walk on them
which very few persons do.
CHAPTER VIII. KNIFING-UP AND FINISHING.
Fig. 135.—Heel in the Rough.
Now “all the stuff is on”; and the next process is
knifing-up, which is the paring off of all surplus stuff
that may be on the edge, waist, or heel, and the whole
process that gives the finishing touches to the shape
of the boot. It is by skilful knifing that the desired
shape is got to the heels, as the concave shape seen in a
very hollow or smart heel could not be got by rasping.
The heel with all the stuff on is very rough round the
edge, as at A (Fig. 135). Before taking this off, round up
the top piece to the required shape, as explained on
page 89, for the soles. The boot is now held very firmly
on the right arm, holding the heel in the hand, but
leaving the side B free to work upon. In the knifing-up
commence from A, in Fig. 136, not touching the top piece
nor the seat B. The position of the hand and knife
are shown at C and D, and the action of paring is to
drop the hand and raise the knife. The more hollow
the heel is to be, the deeper is the knife dug in, the more
the hand is dropped and the knife raised in the second
half of the cut. This process is continued all round
roughly, and then gone over a second and third time,
each time taking off the bumps left between the former
cuts. If necessary, the process must be repeated a fourth
and fifth time, or until the bumps are so small that
by passing the finger over the surface they can be
scarcely felt. At this stage do not touch the seat, and
so avoid cutting the upper; the top half of B is pared
round very carefully by itself afterwards. To save an
accident while doing this, it is advisable to put a piece of
horn or bone at E, between the upper and seat, to
prevent the knife from slipping into the upper.
Fig. 136.—Knifing-up the Heel.
Fig. 137.—Paring Waist and
Buffing Edge.
Fig. 138.—Peening Waist and
Breaking Heel Corners.
Holding the shoe on top of the knees, with the edge
up, as Fig. 137, the edge of the sole is now knifed-up with
the knife in the right hand, the point only between the
thumb and finger, as shown by B (Fig. 95, page 90),
commencing at A (Fig. 137), and going round to the joint
on the other side. Only little shavings are taken off, for
the sole has been already shaped; all that now remains
is to make the edge quite square.
To prepare for knifing-up the waist, the corners A
and B (Fig. 138) must be well knocked down by means
of a corner-beater or welt-beater, which is made by
heating an old file, turning it back for about a third of
the way, and while hot beating it up square, at A and B
(Fig. 139), on the lap-iron, with a hammer. Another form
for a corner-beater is shown at Fig. 140. When it is
the shape required, heat it again, and put it into cold
water, and when dry, brighten it a little with emery
cloth and temper it by reheating till the brightened
part turns blue.
Fig. 139.
Corner-beater.
Fig. 140.
Another form of Corner-beater.
The corners are knocked down by putting a corner-beater
(Fig. 140), right into the corner of the heel and
waist, at A or B, and hammering it well down until a
decided corner is made to the heel. While this is being
done, the boot is held in the position shown by Fig. 138,
by the stirrup, firm upon the knees. Then hammer each
side of the waist with the peen end of the waist or
cramp hammer; this will knock the edge of the waist
over, to cover the stitch, and also make it lie closer to
the upper. This process will leave marks at C; but a
second row of taps, made with the peen of the hammer
held so that these lines shall cross the others, will make
the edge more even, and also very firm at the side of the
stitches. The waist can now be hammered along each
side with the face of the hammer, and with the knife,
held in the hand as shown in Fig. 136, nicely trim each
side to make it round and even.
To peen the heel, hold the boot as Fig. 141, and
hammer the heel all round at A, as shown by the short
strokes. In this process, as in the knifing-up, there is no
need to touch the seat or the top piece. This peening is
continued till every part of the heel that was touched
with the knife has been hammered, and then an extra
touch up with the face of the hammer will make the
heel ready to be rasped.
Fig. 141.—Peening the
Heel.
Fig. 142.—Rasping the
Heel.
The Yankee heel-shave (Fig. 143), which costs 2s. in
an iron frame, is used before and after the heel is peened,
and will be found to save a lot of labour; the handle, A,
is placed in the left hand, and B in the right; C is the
blade, or cutting iron; D D are screws by which the cut
of the iron is adjusted. The boot is held firmly between
the knees, and the tool acts as a woodworker’s spoke-shave.
Held in the fingers with the two thumbs pressed
upon the heel, it will be found that a very even stroke
can be made by opening and closing the hand.
The edge of the sole can now be peened; this wants
to be done very carefully, as all the tools that follow
depend upon this having been done in a proper way.
The centre of the sole’s edge is made hollow, as shown
at Fig. 144, therefore the peen of the hammer must not
touch either the welt edge A or the sole edge B. The
sole edge must be struck only on the centre, where the
sole and welt meet at C and D. Here is shown how the
edge should be hit, and this should be continued all
round.
Fig. 143.—Yankee Heel Shave.
A shoemaker’s rasp used for smoothing has one side
cut as a file; but the rasp side is now used, and this has
one end flat, and the other round. For the edge of the
sole use the round side, and use the flat for the heel,
unless it has to be hollowed, then the round is used.
In rasping with the flat part upon the heel, the boot is
held, as in Fig. 142, upon the knees, and the fingers A
are kept as a guard over the edge of the seat that this
part may not be touched, while the rasp B is rubbed
lengthways, in a direction from C to D; and while
making each stroke, throw the rasp to the right, to give
it a diagonal motion from A to E, and continue this all
round, except on the seat and top-piece, until the heel
is quite smooth. The fingers must be passed round to
feel that it is even, and then the file side of the rasp can
be used in a similar fashion.
The edge of the sole must then be rasped. The position
of the rasp is shown at A in Fig. 145. The thumb
of the right hand must lie along it, so that its tip is at
A, the extreme end of the rasp. The hand is closed to
hold it quite firm, and the tips of all the fingers, except
the little one, will lie against the bottom of the sole at
B, and so form a guard whilst rasping all round the sole.
Held like this, the rasp is rubbed up and down, from
C to D, for about three inches at a stroke, touching only
the centre of the sole edge, and keeping clear of the welt
edge E and the sole edge F, as the edge when finished
should be hollow, as at G. The edge is filed or rasped
in the centre only, because the join of the welt and sole
at H is the only portion of it that is hard, as the edges
E and F are only the grain side of the welt and of the
sole. The edge can be filled finally in like manner with
the smooth side of the rasp; it should be finished level,
and with the hollow nice and even all round.
Fig. 144.—Peening Edge
of Sole.
Fig. 145.—Rasping Edge
of Sole.
The sole-plane (Fig. 146), which costs 1s. 6d., is not
in any way hard to use. It will be seen that A forms a
rest and B a guard; under B is the knife C. In use, B is
run on the edge in the same way that any other plane
would be used, putting equal pressure on all round, or a
little extra where most is needed off. This is an exceedingly
good tool for a novice to use, as with it he
cannot do much damage, whereas with the knife he can
soon spoil a boot.
With a very fine file again go all over the surfaces that
have been rasped, more particularly at the heel. The
process is as described above, so nothing further need be
said about it here, only that it requires to be done well.
The top of the top piece of the heel can be well filed
with the file side of the rasp. The boot is held between
the knees, in the position of Fig. 138, or reversed with
the toe towards you; it must be held very firmly, with the
stirrup over the waist, and the file also must be held
very firmly. That part where the nails are driven will
want most filing, as the nails make this part highest,
if the heel is built solid; the heel should be smooth and
straight, and the edges left quite square.
Previous to using the buffing-knife, which is described
on this page, damp the edge of the sole, and
lay the boot on its side to lie on your lap, with the sole
towards you, and the toe towards the right. The buffing-knife
D (Fig. 147) is held between the thumb and finger
of the right hand, the other fingers, shown at A, are put
on to the edge of the sole, the corner B being on the
edge, while the finger C rests on the bottom of the sole.
The top end of the buffing-knife should lean a little to
the right. The buffing should be done, as much as
possible, in the centre of the edge, so as to keep it hollow,
as in rasping. This process will throw a burr over at E
and F (Fig. 145).
Fig. 146.—Sole-plane.
Fig. 147.—Shoemaker’s
Buffing-knife.
To sharpen a shoemaker’s buffing-knife, run it through
a piece of tallow, lay it flat on a board with the edge to
be sharpened flush with the right-hand side edge of the
board, and hold the knife on firmly by pressing all four
fingers of the left hand upon it. With the stem of a
sewing-awl, a stiletto, or a steel burnisher, rub the edge
backwards and forwards. This will throw a burr over
the edge. Turn the knife over, and repeat the process
on the other side. Now hold the knife in the left hand,
edge upwards, and letting the awl run on both the burrs
at the same time, draw it from the centre to the corner;
keep stroking the edge till it is flat. This will throw
the burrs over the sides, and they will have a keen edge.
Each time the buffing-knife is sharpened, it throws over
a little more steel. Do not let other tools come in
contact with it, as they may damage its edge.
For buffing the heel the buffing-knife is held in the
same way, excepting that the three fingers A (Fig. 147) are
closed up to the palm of the hand. The knuckles will
act as a rest to the knife while it is scraping the edge of
the heel. If desired, the process of buffing the heel may
be deferred till after the seat is set.
Sand-papering is the next process, and a troublesome
one it may prove if the sand-paper is not soft, even, and
used in the proper place. To do the sand-papering of the
sole, the boot can be held in the position of Fig. 137 for
the last half, and in the reverse direction for the first
half. A sheet of sand-paper costs a halfpenny, and folded
uniformly it will make sixteen handy pieces. Double one
of these rough side out, and hold it between the thumb
and finger, as the buffing-knife in Fig. 145, except that
the three fingers and the forefinger are closed in the palm
of the hand, holding the paper between the thumb and
the knuckle of the forefinger, and so far from the edge
as to leave the paper under the thumb only. Supposing
D to be the sand-paper, the folded edge should be at B,
and being used upon the forepart, this edge must be
nearest to the upper; but it must not touch it, nor
must the hollowness in the edge be in the least interfered
with.
To sand-paper the heels the boot is held as at Fig. 142.
The fingers may rest on the upper in the position shown,
so that it cannot get rubbed; one of the small pieces of
sand-paper is then placed across the fingers of the right
hand, one end is slipped between the first and second
finger, and the other between the third and fourth. The
tips of the two middle fingers then form a pad for
the paper to rest on, while the first and little fingers
hold it firm. It is then rubbed round the heel like
the rasp was, again being careful of the two edges. A
new piece of sand-paper, size 1¹⁄₂ in., should be used first,
and an old piece used to finish with.
When the edge of the waist was peened as at C (Fig.
138), the process ought to have knocked the welt very
close to the upper. With the boot in the position shown
in Fig. 137, hold the knife upright, and, commencing at
the heel, and coming down to where the sole begins to
get thick (A), cut away the edge of this welt in the
waist. It will be only a very narrow strip, and as it was
skived very thin, it will not be hard to cut. You must
not cut very near the stitches, and take care not to slit
the upper. With the boot in the reverse position, the
same process is done on the other side in the same way,
only this is done so that the sole C (Fig. 138) shall itself
form the edge of the waist, which will then be solid.
Fig. 148.—Welt-Knife.
When this has been done, rub the bone round the
waist, pene it down a little more, and repeat the action
with the round head of the hammer, working all over
until it is even and smooth. Then again trim the edge,
keeping it a good shape, with the knife upright, so that
on each margin the sole leather is of equal width from
the upper. If it is then smooth, buff the waist all over,
and afterwards sand-paper it.
Levelling the welt comes next, and this is best done
with the welt-knife, though it can be accomplished with
an ordinary knife, placing the first finger of the right
hand so that the blade tip and the finger tip form a V,
and in this form the knife can be run round the welt
without touching the upper. But if a welt-knife (Fig.
148) is used, the welt can be trimmed well and easily, as
A forms the knife, and B the guard to protect the upper,
and if this tool is sharp it can be used with perfect ease,
to prepare for a double iron (Fig. 157), should this be
desired.
Breasting the heels—by which is meant the trimming
up of the front of the heels—adds much beauty to
a boot, and is one of the many points that makes shoe-making
an art. For gentlemen’s work, the breast is often
cut straight across, as from A to B (Fig. 149), and for heavy
work this is not objectionable; but for light work, or
ladies’, the boot or shoe is not properly finished until the
breasting is done. Previous to breasting, straighten the
sides or corners of the heel, so that you may know
where to commence each stroke and where to finish
it; or the heel may be cut straight across, as from A to B
(Fig. 149). Either way, the corners A and B must be
straight from the seat to the top-piece.
Fig. 149.—Breasting the Heel and Marking the Waist.
To breast out the heel a good sharp, stiff, narrow
knife will be needed. This knife must be put in at
C, and one sweep along the line D will take a piece, as E,
out of the top-piece. Next comes the top lift, and this
is cut away in front similarly with one sweeping curve.
This is easier, as the leather is not so hard, and the
curvature of the top-piece serves as a guide to rest
the blade of the knife against while it is cutting. This
process is continued till all the lifts are cut away; but
with the bottom lift F be very careful to cut only
just through it, and to avoid scoring the waist of the
sole. The two ends of the split-lift can be cut away by
a light pressure of the knife.
To make up the seat after the seat has been nicely
pared up, damp the leather and use the seat breaker,
rubbing it evenly round the seat (Fig. 150) from A on the
near corner to B on the far corner of the heel. The
seat must be knifed-up very cleanly, as shown from
A to C, all the stitches being entirely covered, and
the extreme edge of the seat A C being close to the
upper leather D. Following the breaker the seat-file
can be passed round the edge of the seat from A to B, to
make it quite level where trimmed up. Then give it
another rub with sand-paper should it need it.
Fig. 150.—Sole, Waist, and Top-piece set up.
Slightly damp the edge of the seat again, and warm
the seat-wheel (Fig. 151), but do not make it so hot that
it would fizzle if put into water. Run the seat-wheel
evenly round, so that it leaves at E (Fig. 150) one straight
line of regular indentations.
A seat-wheel is shown in section at Fig. 151. By
looking at this illustration, it will be seen that A is the
guard, which runs between the upper and seat at D
(Fig. 150), while B, the wheel, rotates and makes the
marks at E, in Fig. 150.
Using waist-iron next, start at F (Fig. 150), and
run it up and down, taking strokes of about 2 in., until
B is reached; then finish the corner nicely, lightly press
the iron down at A, and so finish the corner of the heel
G, and by doing so finish the wheel marks E, so that
none are to be seen at B; and the process must be repeated
on the further side.
Fig. 151.—Seat-wheel.
The leg of a common chair will make a very good
handle for a waist-iron as shown at Fig. 152. The iron
is placed in the handle at A, and the boot rests upon the
knees, in the position shown in Fig. 147. It can be held
by the left hand while the iron is held at B, with the
right; the end, C, can be placed against the right
shoulder to form a centre, with the handle as the radius;
describe an arc from F to A upon the edge of the waist
(Fig. 150). This gives the iron a sweeping curve, which
is necessary to give a good result.
Fig. 152.—Handle for Waist-iron made from a chair leg.
There are many kinds of waist-irons, as also of most
other sorts of irons; but you need not be hampered with
a quantity of tools, but may procure only those needed
as you progress with the work. To make a square waist,
an iron similar to a double iron is used; for other waists,
irons are used according to the shape required. These
irons can be made from the ends of old files; these can
be driven into handles, like Fig. 152. Figs. 153 and 155
are two of the most useful; one is concave, and the
other convex. Both must be convex from the front, as
shown in Fig. 154, where A is the guard, and B the part
of the iron which sets up the edge.
Fig. 153.—Hollow Waist-iron.
Fig. 154.—Side-view of Waist-iron.
Fig. 155.—Round Waist-iron.
Fig. 156.—Blind Double
Iron.
Fig. 157.—Double
Iron.
A double iron has two guards, marked A and B
(Fig. 156), and A lies or runs on the welt, while B is on the
top of the sole. So in ironing C will form a thin crease
on the edge of the welt; and if the iron is held firm, D
will keep the edge hollow. This iron must be run very
evenly, and must commence on the side opposite to the
joint F (Fig. 150); it is run round the toe, and finished at
E, on the near side. If not broken off too suddenly this
will give a nice finish to the waist-iron, that started
at this point.
Fig. 158.
Fig. 159.
Forepart iron: Front and Side Views.
In a forepart, iron shown at Figs. 158 and 159, the
guard must be shaped as A, the crease as B, and the face
as C; this is done with very fine kit files. The face and
guard can be cut with a three-cornered file; the face
must be dome-shaped, as shown in Figs. 158 and 159;
the top of the guard must be parallel to and about a
¹⁄₄ in. above the face. A fine thin crease file will cut the
crease B; this should be about ¹⁄₁₆ in. deep. A piece of
soft sole leather oiled, and with some powdered emery
on it, will soon put a smooth even face on the forepart
iron.
If the stitches are to be pricked up or fudged,
Fig. 157 is used in exactly the same way. It is slightly
different in shape, for at A there is a little shoulder just
above the crease, to give an even finish and sharp edge
to the welt. This will remedy any irregularity made by
the prick-stitch or fudge-wheel.
If a double iron is to be used, the edge of the work
must be specially prepared. The way in which a boot
is stitched to a certain extent governs the shape of
the iron to be used. For blind welts, Fig. 149 will be
suitable.
With regard to ironing, to get a good result in either
sewn or stitched work, the forepart iron must be applied
only on the sole side. The welt iron is to be used only
on the welt side (from joint to joint), and it is often
called a jigger-iron. The bevelled appearance is given
to boot soles with this iron (or this may be done with
the jigger side of a double iron).
Fig. 160.—Double Iron.
A welt iron is used for the welt-side of the sole’s
edge, and a forepart iron is used for the under-side only,
and serves the purposes of both these tools. A double
iron, shown at Fig. 157, is a welt and forepart iron combined;
but it is much harder to learn to use.
These irons should be only just warm, and the
leather must be slightly damped before the iron is used,
so as to give the edge a nice, polished, dark-brown
surface.
The whole edge of the heel H H (Fig. 150) can then be
ironed in the same way, only this is done with the glazing
or big iron (Fig. 30, p. 29). A good-shaped glazer has
one end longer and thinner than the other; so that
in ironing the waist it is easier to get in the breast of
the heel at F (Fig. 149); and other parts of the work are
facilitated as well. This iron can be applied in a direction
from H to H, or E to I (Fig. 150); but it must make no
indentation to rob the surface of its truth. The top-piece
iron is the next iron to apply. It is similar to
a fore-part iron, only the face is not quite so round.
This iron is run round the top-piece, and throws a crease
at I (Fig. 150). It gives a keen finish all round, and it
may also be run up each side at G.
The fudge-wheel, as will be seen by A, at Fig. 161,
makes the stitches, or what represents them, appear nice
and regular, which adds beauty to a boot. The fudge is
finished off with the shoulder of the double iron A (Fig.
157), when the edge is ironed; this shoulder will also
finish off the prick-stitch when the stitch is pricked up.
Fig. 161 shows an improved fudge-wheel, the shape
of which enables it to be used more freely than the
one shown at Fig. 61. As the wheel is tapering, its
prominent edge will run much closer under the upper at
that particular part which is marked A.
Fig. 161.—Improved Fudge-wheel.
A prick-stitch and how to make it is described on
page 73, and on page 95 is shown, in Fig. 100, an enlarged
section of stitching meant to be pricked up. The same
is shown on a smaller scale at B (Fig. 162). Here the point
of the prick-stitch (Fig. 79) must be pressed between
every stitch, which makes a mark like the fudge, only
that it throws up each separate stitch, and forms them
into a row like little beads, instead of making a series of
raised ridges from the edge of the sole to the upper, as
the fudge would have done. Fig. 162 shows the position
of the boot for pricking up the stitch, and this is commenced
at C, while fudging would be started on the
opposite side of the sole.
A blind welt will only want to be smoothed round
with a dull knife and left plain, but not so wide, as at
D. A welt that is half wide, three-quarter wide, or wide
must be pricked up, or fudged, to look at all well.
Fig. 162.—Position of Boot for Pricking up the Stitch.
Marking off the waist is done simply to show the
extremity of the waist, and how far to black when it is a
black waist. It can be done in various forms to suit the
taste. Two—the curve and double twirl—are shown at G
(Fig. 149). All irons used in finishing a pair of boots
should be applied prior to the colour going on.
Putting the soles into colour is the next process, by
which is meant putting the ink on. If they have been
ironed, as just described, it is necessary to first rub on a
little weak soda and warm water, or weak ammonia and
water, the parts to be made black to make the ink take,
or strike, as it is technically termed. The parts are then
inked according to fancy—that is, the welt, edge, waist,
heel, seat, etc. American ink is best diluted with an
equal quantity of water. If the leather is not ironed
while in the brown, the soda-water or ammonia-water
will not be needed; but a little thin paste or gum is run
over to make the edges smooth to receive the ink, and
prevent it opening the pores of the leather. Either must
be used very sparingly. When the boots have been got
into colour, let them get only just dry, when they will be
ready to iron. If American ink was used this will be
when nearly the whole of the inked parts will have
turned blue.
In all ironing, the boot or shoe must be held very
firmly upon the knees, and the irons must be only
slightly hot, or they will wrinkle the edge and spoil
it; therefore the iron will want a continuation of
heating all through the process. Take great care of
all irons, for if they get damaged, it will be useless to
expect them to work well and leave a keen edge behind
them.
So that your irons will not get smoked and dirty
your work, the proper way to heat them is either over a
spirit-lamp or a specially prepared atmospheric gas-jet
which burns only with a blue flame. If the irons have
to be heated in a fire be very careful, or the handles may
be burnt. Even though the irons are heated in this way,
it is well to have an old piece of rag just to wipe them
on each time before using.
Fig. 163.—Spirit Lamp for Heating Irons.
Fig. 163 is a sixpenny spirit-lamp made for this purpose,
A being a cap fitting the burner, to prevent
evaporation of the spirit; B, a rim fitting on the lamp
to support the stand, while the iron C is being heated.
Heating the irons will waste time unless while using
the small irons the glazer is kept just warm enough
to be used on the waist and the heel during the intervals
while the small ones are getting hot.
The irons must be held very firmly in the right
hand, and upright so that only the centre part touches
the leather, otherwise the surface will be roughed
through the edges of the irons dragging. They must
press very hardly, but uniformly, all over the leather, or
they will make hills and dales of what should be a
plane. The way to use the irons, so that one will give a
finishing stroke to the other, has been explained—this
course must be adhered to both in the second and third
ironing. These are a repetition of that explained as
the first, only that the work is black instead of brown;
all parts must be well ironed, so that there is not a patch
of dull black left anywhere.
When a good gloss has been got on all parts, heat
over your lamp one side of a hard heel-ball, and while
this is in a semi-liquid state dab small portions of it all
over the ironed portions, excepting just round the
seat where the seat-wheel is set. Then, with the irons
a degree cooler than before, repeat the two previous
operations at the same time, ironing the heel-ball evenly
all over. The irons must be warm enough to soften
the heel-ball with a very little pressure, or indentations
will be made in the leather, and the edges and surface
spoiled.
In all ironing it is well to habitually use a certain
method, so that you may have an instinctive conception
of results, and save repeating an operation unnecessarily.
Use glazing iron (Fig. 30, p. 29) first, then wheel (Fig.
151), so that the former shall not destroy the latter.
Now using the waist-iron (Fig. 153), press it a little
harder at the end of the waists and into the corner of
the seats, and so give a decided finish to waist, and also
press out any marks that the wheel may have made, thus
giving the seat the appearance of having had each piece
nicely finished at its corners.
Now use the prick-stitch (Fig. 79) if the stitches are
to be pricked up; if fudged, use the fudge-wheel (Fig.
161); if blind welts, smooth down with a dull knife.
Then setting the double iron (Figs. 157 and 160) round
the edge will finish off either of these, and if neither
started nor finished off too abruptly this will give a nice
finish to the waist-iron also.
The heel-ball spread over all the blacked parts will
want cleaning off with a cloth—a piece of old beaver or
kersey is about the best for this purpose, though other
kinds will do. This cloth is doubled, and then placed
over your right thumb, the ends are brought round so
that you can hold them firmly in the hand, and so make
a smooth pad of cloth upon the thumb, as Fig. 164, and
with this rub the parts where the heel-ball is, and continue
gently rubbing till the whole of it is cleaned off,
leaving a smooth, even, glossy surface. This process
can then be repeated with an old piece of soft rag held
in the same way.
Fig. 164.—Holding Heel-ball Cloth.
The bottoms and top-pieces of stout work are sometimes
made black, and if finished in this way they look
very nice if done well. Other styles are also given here.
For black bottoms, waists, and top-pieces the entire
bottom will have to be scraped with the buffing-knife,
and sand-papered till it is very smooth. Then a little
thin paste or gum should be rubbed over it carefully to
make it smooth. When dry, it can be polished all over
with a cold burnisher or a boxwood long-stick. Then
ink it in the same way as for the other parts.
The waists may be treated similarly, except that it is
better in this case to use a hot burnisher, of the shape
shown in Fig. 165. This is also easier to use than the
glazing iron for this purpose, as a handle in each hand
and the boot between the knees give much more power
over the tool. The waist is heel-balled and finished in
the same way as the edges.
Fig. 165.—Double-handed Burnisher or Glazer.
Buff bottoms and waists, which are easily dirtied
and easily cleaned, are made as just described, but
stopping short of inking, and instead a little powdered
pumice-stone is rubbed on, first with the face of the
sand-paper, and then with the back of it.
Damped-down bottoms do not get dirty so quickly,
and give a nice clean-looking finish; the process is a
repetition of the above, only instead of paste or pumice
the bottom is smoothed with a pad of damp, clean,
white flannel.
White bottoms are prepared in the same way as buff
ones, only instead of using pumice a little pipe-clay is
scraped on, and sand-papered in, and when even all
over, it is damped down with a piece of clean white
flannel. Another coat of pipe-clay is then scraped over,
and dabbed in with a dry part of the flannel. This
will dry with a clean, white, smooth surface, and then
any surplus pipe-clay can be rubbed off with the dry
flannel.
Fiddle waists for light work look as clean and nice
as any, and this process can be extended all over the
bottom. This kind of waist is generally used with a
stripe-waist—that is, the parts A and B (Fig. 166),
are made black. A light-coloured shoe is left brown,
then the stripes can be made a little darker by the use
of a warm iron. Fig. 167 shows a gent.’s boot, but a
lady’s looks even better, because the stripes can be made
a little wider at A and B, which makes the waist look
narrower and much smarter.
Fig. 166.—How to Mark Waist.
These waists must be buffed and sand-papered in
the usual way, and rubbed down with the back of the
sand-paper to make them very smooth. A piece of
clean white rag is drawn over the thumb of the right
hand, as in Fig. 164, so that the rag is quite smooth on
the cushion of the thumb. It can be held firmly with
the forefinger, just under A. On this pad is put a little
clean paste, and this is rubbed very lightly and very
evenly all over the part to be fiddled. See that one
place is not made damper than another, or the waist
will look mottled when done. Instead of paste, this
can also be done with a clear gum, or, better still, a
gum-dragon; a pennyworth from the chemist’s, put
into a small jar, and covered with water, will be ready
for use in a few hours.
When the waist is dry, rub it all over with a bone or
long-stick, holding the boot firmly between the knees,
and one end of the bone in each hand. Keep rubbing
till the whole waist is nicely polished, then change the
rag shown in Fig. 164 for a piece of clean cloth, and
upon this rub some white glazing-ball (which is white
heel-ball), and rub this all over the parts that have been
covered with gum or paste until a good even creamy
polish is got by rubbing evenly and briskly.
To make the stripe waist, the knife must be held as
a pen in the right hand, and the boot in the left, with
the toe towards you, as in Fig. 166. The point of the
knife is then put in at C, and drawn round the line B to
D. The position of the boot is then reversed, and the
other side treated in a like manner, to make the line A.
The knife must go only just through the grain of the
leather, say ¹⁄₃₂ of an inch. Though the knife is held as
a pen, the handle should point over the left shoulder,
so that the burr or thin edge of the cut-up grain
shall form a barrier to prevent the ink flowing on
to the fiddled part while the stripes are being inked.
When the bottoms are finished by this method, the
top-pieces may also be finished in the same way, or they
may be made black. Another good finish is to use a
little ink and a few pieces of oxalic acid, and rub them
all over with the end of a wine cork; this makes a bright
red top-piece, the more ink used the darker it is, or a
little water added makes it much lighter.
Spring waist, either pegged or sewn should be
finished as follows:—After the ordinary ink is on and
dried, a piece of damp rag is used to rub off all surplus
ink or dross; with the same rag rub a little Indian
ink on all over the waist. When dry, in a minute or so
after, rub it over with a dry cloth, and this will leave a
smooth dull surface. This is ironed or lined across with
a crease iron or a dull knife. With the former two or
three lines may be made at a time, but with the latter
only one. As very few are used, the iron now is rather
hard to obtain, the dull knife being as quick in the end.
With this line the waist as shown in Fig. 167, commencing
at the line A in the centre, and then making lines on
either side until both ends are reached. When ironing
up, give all the lines a finish by using the waist-iron up
each side.
Fig. 167.—Creasing for Flexura Waist.
In marking off the length of the waist, as E (Fig. 166),
the end of the line on either side is brought just over the
commencement of the thick part of the edge and the end
of the waist, as shown at A (Fig. 168.) The fudging or
pricking-up of the stitch, should start at B, and the wheel
top-piece iron (if used down the line C), and waist-iron
should all finish at D. The line from E to F should have
straight and even sweeps, the height of heel making a
difference in these. These points help to make a boot
look well.
Fig. 168.—Section of Boot.
The burnisher, or double-handled glazer (Fig. 165),
is a handy tool, as much more pressure can be got upon
it than on an ordinary iron, and being larger it holds the
heat longer. The top at A can be used for the heels, top-piece,
the bottom, and some part of the waist; the side
at B is used only for the heels, and the part C rests upon
the top-piece. For making black bottoms this tool is
almost indispensable. It is possible to make one by
heating and beating out the teeth of an old half-round
file, and rubbing it down smooth in the centre, and then
putting another handle on the point.
When drawing the last out of lace boots, cut the stay
stitches, which hold the two facings together on the
instep. If button boots, undo the buttons and cut the
stays at the edge of the fly lining. The screw of the
block must be taken out and the last hook (Fig. 169) put
in the hole in the side of the block, and it can then be
drawn out. The hook can then be put in a hole made
for it just over the heel the last; the upper should be
quite smooth, so that the last cannot catch it anywhere
and tear the linings.
Fig. 169.—Last Hook.
Your two feet must be put on the handle of the last
hook, the boot should be held with the toe raised in the
left hand, the heel of the boot can then be pulled off the
last with the right hand. In doing this care must be
taken not to break the waist, and it is sometimes
necessary to pull the upper right back over the heel of
the last, to save the waist from being bent. If the last
is exceedingly hard to get out, it can be eased a little by
gently tapping it on either side of the forepart, but take
care not to bruise the upper.
There is sure to be some roughness on the insides.
When the waist or seats are not pegged, this can be
removed by rubbing a peg-rasp (Fig. 170) over the rough
place. If the insides are very rough, or when the seats
or waists have been pegged, they must be well scraped
with a peg-knife (Fig. 171) until all the points are off.
Any nails inside should be knocked down previous to
this process, or they will spoil the peg-knife. After the
pegs are cut off, rub the whole of the inner-sole down
with the peg-rasp. These two tools are very handy, as
a pair of boots that have been worn some time often
become uneven inside, and application of the peg-knife
and peg-rasp may save a lot of discomfort.
Fig. 170.—Round-headed Peg-Rasp.
Fig. 171.—Peg-Knife.
Fig. 172.—Seat-sock for Gent’s Boots.
Gent’s boots or shoes will only want a seat-sock, as
Fig. 172. For shoes lined with dry-dressed leather, a piece
to match it can be used for a sock. If oil-dressed, or if
boots, a piece of cream roan or a piece of any coloured
morocco will do. They should be cut the shape of Fig.
172, a trifle larger than the inner-sole, which is shown by
the dotted lines. Both boots and shoes for ladies are
socked right through, and this makes such a great difference
to the finish of them. It is best when the fitting of
the inner-sole is finished to take it off the last, lay it on
a sheet of paper and cut this exactly to the sole (Fig.
173), except at A and B where it should be a little large,
particularly at B, the inside waist.
Fig. 173.—Sock for Ladies’ Boots and Shoes.
Fig. 174.—Putting in Sock not to Crease it.
Paste the socks on the wrong side of the leather, and
only to within an eighth of an inch of the edge, as when
the sock is pressed in the boot the paste is sure to work
out to the edge, and if too much paste is used it will
ooze out beyond, and if it comes in contact with the
linings it makes them very dirty. A thin stick about a
foot and a half long, tapered at one end, is used to put
in socks. In this stick put a stout needle, passing the
eye up into the wood so that there is only about a
quarter of an inch left out. After the sock is pasted,
put this needle point, from the paste side, through the
toe of the sock, lay it along the paste side, as shown by
Fig. 174, fold the sock, letting the clean side be at the
top, the stick underneath, and the two paste sides nearly
touching each other. By this simple means the toe of
the sock can be got right to the toe end of the boot, and
the whole sock right in, without dirt or paste getting on
the linings or top-bands. When the sock is up at the
toe, press the boot on the top of the toe so as to hold the
sock there while the point of the needle is drawn out,
and when this is done, nicely lay the sock all over the
inner-sole; see that it is in straight. Then put your
hand in and smooth it down all over. If the leather for
the socks is thick, it must be skived at the edge all
round, but if not very thick, cut the socks face downwards,
and hold the knife pretty fairly on the slant,
letting the handle always incline towards the centre.
When the sock is in there will not be a rough edge
showing all round, as is the case sometimes.
To tap down the feather, take hold of the boot or
shoe in the centre of the front or vamp with the left
hand, and pinch it so that all the stuff is away from the
sides, and while it is in this position, tap it down very
lightly on either side with a smooth-headed hammer.
This is to make the feather of the inner-sole even each
side, and to lay it, with the upper, closer to the outer-sole,
and so give it the appearance of having been
worked closer than it really was.
Your boots or shoes are now ready to wear, with the
exception of cleaning. A very thin coat of weak
paste will save you a lot of trouble in cleaning calf.
This should be put on while they are on the lasts, and
while they are there the first coat of blacking will save
a lot of trouble afterwards, as you can then well sleek
them with a piece of smooth bone, to give them a smooth
and even face. The foregoing instructions refer mainly
to an ordinary pair of boots or shoes, a few incidental
remarks and instructions as to spring waists, etc., being
included.
CHAPTER IX. MAKING RIVETED BOOTS AND SHOES.
When once the principles of lasting, explained in
Chapter V., are understood, the process of making
riveted boots and shoes is by no means a difficult one.
It is a very ready way, and also a very cheap way, of
making a good strong covering for the foot.
Riveted work will need a last made of iron, or one
having an iron bottom, which may be made by putting
an iron plate upon an ordinary wooden last. If making
for your own feet only, the latter would be best. If
making for customers, buy iron lasts, one at a time, till
a set of sizes is obtained. If making for your
own children, who naturally grow out of boots very
quickly, it is well to use an ordinary wooden last. In
this case be very careful not to use the rivets too long,
and when off the last, clench the rivets on a small iron
foot.
Fig. 175.—Thin Sheet Iron to cover Last.
On p. 64 will be found all the information needed
for buying the lasts and fitting them up to the measure
of the foot. A thin sheet of iron, as Fig. 175, with three
holes in it, at A, A, and A, can be made to cover the
whole of the bottom. The sheet-iron should be blocked
so as to fit the last’s bottom perfectly. It can be held
on by six screws, as shown by the six B’s. This will
allow the iron to be taken off when the last is wanted to
make hand-sewn work on.
This sheet of iron would make the boots too large;
but this is remedied by putting a pair of extra inner soles,
the thickness of the sheet-iron. These soles, blocked
and dried on the last, make a pair of riveted boots as
smooth as hand-sewn inside.
The inner sole proper is tacked at A, A, A, Fig. 176,
and rounded up to the last. It is skived down a little
at the waist only, and then merely at the edge.
Fig. 176.—Boot Bottom with Blinders and Split-lift
on Heel.
Chapter IV. (p. 70) gives information on buying the
tops and sole leather; but for riveted work welts are not
wanted, but, instead, a piece of soft first-cut about 14 in.
long and 2 in. wide. This treated like split-lifts will
make a pair of runners. Proceed to wet and fit it as
described for welts; but it must be used nearly dry,
and the stiffeners can be skived on the bottom the same
as on the top.
The principles of lasting are the same as those described
in Chapter V., to which reference should be
made; but for riveted work use very short tingles
(miniature tin-tacks), in place of lasting tacks; and
instead of these being put in as shown at B, B, D, D, and
C (Fig. 87, p. 78), they are put in at the extreme edge of
the overlapping leather, and are knocked right in and
clenched. Also, in lasting for riveting, the heel of the
last must be knocked into the top more at D (Fig. 84,
p. 75), so that there is enough stuff for the rivets to
catch while building the heel; the heel should be lasted
in nearly as well as the toe, so that when the lasting is
finished the upper should be quite smooth all round.
The centre should be filled up with a little felt, and the
whole bottom made flat and level all over. The way to
put the felt and the shank-piece in the waist is described
on p. 52.
For a boot of very light substance, the sole can now
be put on; but to make medium or stout boots, put on
the runner, or put on a middle sole, and then skive the
centre of it a little. If the runner is put on, it will need
preparing in the same way as a split-lift, described on
p. 99, only the twist will not be wanted up the sides, but
merely at the toe end, or centre, of the runner. It must
be tingled on all round, not using many tingles, and
these as far from the edge as possible, so that while the
sole is being put on, the rivets will not come in contact
with and drive them through, and so tend to make the
sole unsolid. The position of the runner is shown by A,
B, C (Fig. 177), the ends can be skived off at A and C.
Fig. 177.—Boot Lasted ready for Riveting.
If a middle sole is used, it is put all over the forepart
as far as A, C, where it will also want skiving. To
fit the sole on while rounding it up, put in a few iron
brads about ¹⁄₂ in. long—not rivets—and leave them
projecting about ¹⁄₈ in., or little more, as shown by the
short strokes near the A’s in Fig. 176; file up these till
they are somewhat pointed, then the centre and the
edge can be pasted.
A pair of soles of inferior quality towards the heel
would be less costly; with these it is best to make the
seat with a pair of good split-lifts instead of with the
soles. The split-lifts can be bradded on, as shown by B,
B, B, with ¹⁄₂ in. brads, and they can be driven in and
clenched. The runner or the split-lift can be rounded
up all round, to within ³⁄₁₆ in. of the upper. This allows
enough in the forepart to imitate a welt and to make
the seat at the heel.
The sole is now pasted, and laid on its place, and
a brad driven in at C, Fig. 176. It can then be tapped
down all over with the flat end of the hammer, first
striking gently over each of the brads marked A, and
then continuing till it is all flat and smooth, as Fig. 178.
The sole is now rounded up to the runner and split-lift,
and to within ¹⁄₈ in. of the upper at the waist on each
side; all this should be done to give as good form to the
boot as possible.
Fig. 178.—The Riveted Sole.
The instruction to leave on ³⁄₁₆ in. all round the forepart
must be qualified. Do so, if the wearer wears
straight; if, however, he wears unevenly, leave the stuff
a little full where the most wear comes, and trim it
close on the other side.
Now rivet the sole on. If not used to driving rivets,
make holes to receive them, and in doing this, and in
driving the rivets, see that their points incline distinctly
inward, or the rivets may run off the edge of the last
instead of clenching. If the work is light, the holes can
be made near to the edge, as the sole will in this case
need to be a shade closer; while for stout work the
rivets can be a trifle farther from the edge of the sole.
A second row may be put all round, or only at E and F;
but the single row even would be enough for light
work.
If the heel part is not flat, it is better to put a second
split-lift on the sole; or the first whole lift may be put
on, skiving away the centre till it fits. How to finish
building the heels, and the way to brad the top piece,
is described on pp. 114, 115.
If the boots have been made upon wood lasts,
without iron on them, at this stage the last should be
withdrawn, the whole of the bottom tapped down on
the iron foot, and the last then replaced. The rivets
may be driven with a hammer, but it is easier to do this
with a beater, as shown on p. 122, or with a driver like
Fig. 179, which is a patent rivet-driver (price 1s. 6d.,
made of hardened steel). A similar one can be made by
heating an old long rasp, and beating it somewhat
smooth, and then re-tempering it.
Fig. 179.—Rivet Driver.
Knifing-up, rasping, buffing, sand-papering, etc.,
breasting heels, seat setting, finishing-off waist, setting-up
fudge-wheel on welt (or runner in this case), putting
into colour, and finishing, etc., are explained in
Chapter VIII.
Having followed these directions, the boots are off
the last, and all that is now necessary is to sock them.
If made on last to the correct size, sock them as described
on p. 146; if made upon the wood last with the
extra iron bottom, sock them with a second inner sole.
Take the sheet iron off the last, block the sock, let it
dry, and then round and skive it up. Paste it well all
over the flesh side, put it in the boot. Replace the last
without the iron in the boot, and let the sock dry before
taking out the last. French chalk can be shaken in the
boot to prevent the last sticking to the sock and pulling
it out.
While the boots are on the last they may be cleaned,
as they will not be soiled by taking out the last this
time.
To avoid repeating information that has already
appeared, references have been given above to pages
in which some of the processes connected with boot
and shoe making are described.
In making riveted, pegged, or machine-sewn boots,
the tops are cut longer and wider than they would
be for hand-sewn work. From ¹⁄₄ in. to ¹⁄₂ in. more
stuff is left on all round the bottom of the uppers. In
this class of work the rivets, pegs, or stitches are nearer
the centre of the sole than hand-sewing is. The welt
is sewn in nearer the edge, and any upper leather
above the seam has to be cut off close to the welt. As
a rule, the leather is not subjected to any special treatment
to soften it, though, if very stubborn, it can be
made softer by damping it with water.
All leather will form wrinkles and pipes in lasting—at
the toe especially, at the extreme edge of the leather.
Any other work is easier to last than hand-sewn, in
which there is only just enough upper leather to hold
with the pincers. While lasting the toe, put a few tingles
in only, say, one in the centre, then the draft tacks, one
on each side. Last up the lining first, knocking the
tingles only just through the inner sole, so that they may
be drawn out when lasting the upper. When doing this,
see that you last the lining smooth previous to proceeding
with the upper. Then place a tingle between the
centre and draft tacks. There will now be a pucker
on each side; these you try to tap or hammer out
before putting in more tacks. Every tack put in after
should be through the top of one of these pipes, or
puckers; and when the toe has enough tacks in it, well
hammer it all round, starting at the edge of the sole, and
working towards its centre, till you get to the edge of
the toe-leather. All the pipes will not be got out by this
means, so cut a V-piece out of each remaining, and then
tap it down again, or the tops of the ridges may be
skived off. In either case, cut only to within about
³⁄₈ in. or ¹⁄₄ in. of the edge of the last, so that the rivets,
pegs, or stitches shall have firm and solid leather to go
through. By the above means light leather tops can
be lasted without the use of the knife at all.
This chapter may conclude with a few recipes which
the shoemaker is sure to find useful at some time or
other.
Shoemakers’ Size.—This is made in the following
manner: Ingredients, ¹⁄₄ lb. yellow soap, twopenny-worth
of glue, and one quart of soft water. Process: Cut the
soap up fine, and break the glue into small pieces; put
them into a saucepan, and pour the water over them;
put it on the fire, and well stir it till it just boils. Pour
it out into another vessel to cool It is then ready for
use.
Burnishing Ink.—To make good burnishing ink,
you will hardly be likely to better the following, which
is an American recipe: One pint of alcohol, 1¹⁄₂ oz. of
tincture of iron, 1 oz. of extract of logwood, 1 oz. of
pulverised nut-galls, ¹⁄₂ pt. of soft water, and ¹⁄₂ oz. of
sweet oil; the oil must be mixed with the alcohol prior
to adding the water and other ingredients.
Another: Soft water, 5 gallons; bring it to a boil,
and add 8 ozs. of pulverised logwood extract, keeping it
on the fire for three minutes only; then remove, and
stir in 2¹⁄₂ oz. of gum arabic, 1 oz. of bichromate of
potash, and 80 grs. of prussiate of potash.
Another: Soft water, 1 gallon; extract of logwood,
1 oz.; boil till the extract is dissolved, take from the
fire, and add 2 ozs. of copperas and ¹⁄₂ oz. each of bichromate
of potash and gum arabic, all well powdered.
Black and White Heel-balls.—To make black
heel-balls, take 8 ozs. of the best beeswax and 1 oz. of
tallow, melt, and well stir; then add 1 oz. of very finely
powdered gum arabic, stir again, and mix in lampblack
to colour. Another and better recipe is to melt together
2 lbs. of best beeswax and 3 ozs. of suet, and stir in 4 ozs.
of ivory black and 3 ozs. of lampblack; then add 2 ozs. of
finely-powdered gum arabic (best) and 2 ozs. of rock
candy. These must be well mixed, and, when partly
cold, poured into leaden moulds to the shape and size
you wish.
For white or bottom ball, leave out the above
colours, and if wanted only as a transparent polish this
will suffice; but if needed as a white substance, add a
little flake white.
Shoemaker’s Wax.—Take 4 ozs. of pitch, 1 oz. of
resin, and about a ¹⁄₄ oz. of good tallow, and heat them
well on a slow fire in a pipkin or old saucepan. Be very
careful they do not take fire, as they are very combustible.
Stir this admixture till the resin has melted
and mixed well with the other ingredients; then pour
the whole into a pail of cold water, and when it has got
sufficiently cool to handle, put one hand underneath,
and with the other turn the edges over to the centre,
to make the mixture into one ball. Take it out, and
make it into a roll. Take one end in each hand, and
pull it out as long as you can without breaking it.
Double it, and pull out again and again; the more it is
pulled (or worked), the better and brighter it will be.
This done, lay it out on a slab, seeing it does not stick.
Roll it out, cut it into strips about 1 in. wide, and
cut the strips into pieces about 1¹⁄₂ in. long; each
piece is called a ball. Wax has to be made hard in
warm weather, and soft in cold. To make it softer,
add more tallow; to make hard, use more resin. It is
best to make it hard, as it can easily be made soft
without being again heated—simply by working a little
tallow into it. The balls of wax should always be kept
in water, to prevent their sticking to anything or to
each other.
Making Fake.—Fake is not sold ready for use, but
it can be made in the following way: Take two hard
heel-balls and about two-thirds of a white glazing ball,
break them up into small pieces, and put them into a
small tin box. Proper fake tins can be bought; any
tin will do, but the deeper the rim of the lid is the
better, as it will prevent the spirit evaporating when
not in use. Just cover the contents of the tin with
mineral naptha, and then put the whole on the hob or
in the oven; but the fire must not be fierce, the lid
must not be on the box, and it must be well watched,
for this process, of course, rarefies the spirit and intensifies
its inflammability. The use of fake is to lessen
the labour in finishing, for if heel-ball is ironed on, it
is very hard to rub off. It is used after the edge has
been knifed, rasped, scraped, sand-papered, inked, dried,
and nicely ironed with warm irons, which gives it, in
itself, a good gloss. The fake is rubbed on with the
finger, and when it has set a little, it should be rubbed
off with a soft cloth till it leaves a bright even jet-black
gloss. Brown work is finished in the same way, and
the fake is made just the same, only all white ball is
used, and not any heel ball.
Printed by Cassell & Company, Limited, La Belle Sauvage, London, E.C.
30.1097
The text used is that of the original publication; inconsistencies in spelling,
hyphenation and lay-out have been retained.
Illustrations have been moved outside text paragraphs.
Some minor typographical and punctuation errors have been corrected silently; some page numbers in the Index
have been corrected to conform to the text.
Page 93: ...it will need to be twisted lighter than sewing-thread... changed to ...it will need to be twisted
tighter than sewing-thread....