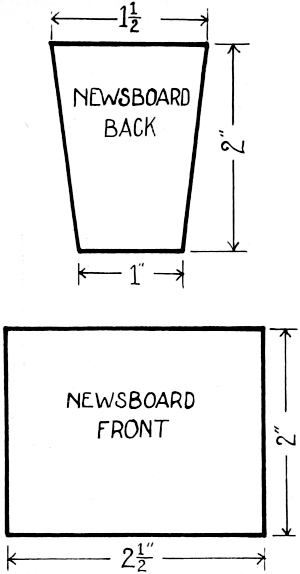
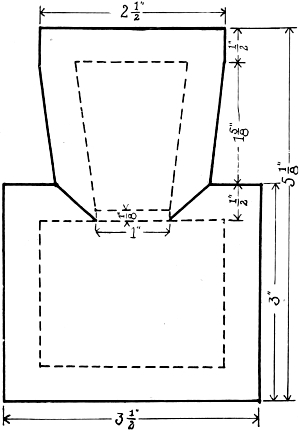
By FLORENCE O. BEAN Assistant in Manual Arts
Boston Public Schools
JOHN C. BRODHEAD Assistant Superintendent
Boston Public Schools
Collaborating
————
SECOND EDITION
————
PUBLISHED BY
THE DAVIS PRESS Worcester, Mass.
1918
Copyright 1914 School Arts Publishing Company
———— Second Edition
Copyright 1918 The Davis Press
INTRODUCTION
THE present day demand for industrial education has
had the effect of somewhat discrediting the more
formal manual training commonly found in the upper elementary
grades and early high school years. This work is
usually conducted in special shops and by special teachers,
and the question is being raised whether, with all these advantages,
more vital results might not be attained.
Whether these criticisms are justified or not, the present
interest in industrial education is strengthening the demand
for more effective construction work in grades four, five and
six. It is a growing conviction that there must be laid, in
the earlier grades, a strong foundation on which to build a
practical education in the later grades whether directed
toward industrial, commercial or professional life.
The appearance of this book, therefore, is timely because
it outlines a course suitable for grades five and six
which stimulates constructive activities and develops industrial
intelligence. It should be noted that its industrial
significance is much wider than its title, “Bookbinding for
Beginners,” would indicate, as even a hasty examination of
the book will show, and also that it is so planned that it
may be used successfully in schools where special teachers
and expensive equipments are impossible.
The book is different from, and, I believe, superior to
others of its kind for the following reasons:
First, because the projects it presents, the methods
it advises, and the results it anticipates have all been worked
out by actual experience with thousands of boys and under
conditions which may be duplicated in almost any schoolroom.
The author’s personal experience with the problems
incident to the giving of manual training by the grade
teacher includes that which she gained as a successful grade
teacher herself, supplemented by some years of supervisory
work in a large city system. She is therefore conversant
with every possible phase of the school problem.
Second, because the methods of instruction which the
book employs are such as to develop in the pupils the very
qualities which are the surest foundation for subsequent
success in manual or mental work of any kind, namely
initiative and originality combined with intelligent, logical,
careful attention to details.
Third, because it gives the teacher just the help needed
to save her from all unnecessary work in securing and handling
suitable material, in stimulating the pupils to intensive
activity and self-expression, and in judging or measuring
the results of her work, without relieving her of the necessity
of intelligent effort on her part. It thus gives the overburdened
teacher the maximum help, and the specially interested,
the maximum opportunity for original supplementary
work.
For the above reasons I confidently recommend the
volume to the attention of all who are seeking to introduce
an inexpensive but effective form of manual training into
the middle grades of the elementary schools.
Frank M. Leavitt
Associate Professor, Industrial Education.
University of Chicago.
FOREWORD
THE growing demand for various forms of manual training
in the lower elementary grades has led to the publication
of this little volume of “problems in elementary
bookbinding,” based on the work done in the fifth grade of
the Boston public schools, where their practicability has
been fully demonstrated. Some of the most valuable suggestions
have been obtained from the teachers and are an
outgrowth of their classroom experience. Nothing is here
presented which is simply theoretical.
To Mr. John C. Brodhead, a deep appreciation of his
keen criticism, his helpful suggestions, and his never-failing
interest cannot be too strongly expressed. For their valued
suggestions, thanks are due the teachers of Boston whose
efficient labors have insured the success of the course. Acknowledgment
is also made of indebtedness to the Sloyd
Training School for material, and to Miss Helen E. Cleaves
and Mr. Ludwig Frank for their interest and assistance in
the details pertaining to design.
The Author.
BOOKBINDING FOR BEGINNERS
AMONG the various materials which lend themselves
readily to a manual training course with large classes
are those of the bookbinders’ craft. They are inexpensive,
easily handled, and require no tools or equipment that cannot
be used in an ordinary classroom. The operations
necessary in the use of these materials not only give excellent
training in manual dexterity, but present remarkable opportunities
for the practical application of studies in proportion,
space division, color, lettering and applied design. The craft
itself is one that comes in touch with everyday life and any
skill acquired in the use of these materials is of permanent
value.
The lessons to be outlined in the following series presuppose
some instruction in paper-folding, cardboard construction,
and simple mechanical drawing. Though desirable,
this is not essential. While in some ways better suited
to the middle grades of the elementary schools, selection
may be made from the lessons here outlined which will give
excellent training to the upper grades in those schools where
the curriculum does not include shop-work, cooking, or
sewing.
To secure this flexibility of the course, each problem
is outlined in several ways, with varying degrees of difficulty.
The selection should depend upon the grade in which it is
to be given. Some of the more dexterous pupils may be
able to work out a problem in several ways.
In each lesson outlined, there is a chance for the exercise
of individuality in the details of the model as to size, shape,
decoration, and color. Concerning choice of material, it
seems wiser that this should be exercised by the teacher or
supervisor rather than by the pupil.
The object of the course is educational, not industrial,
therefore, those methods which stimulate inventiveness,
ability to plan simple work, and dependence on one’s own
initiative are most desirable.
The directions given under each problem have been so
worded that they call for the greatest amount of thought and
initiative on the part of the worker. The use of such instruction
develops power to think, to plan constructive work and
to carry it to completion. At first, it may be necessary for
the teacher to elaborate some points especially in connection
with the working drawings or sketches, but after a little
training, each pupil should be able to lay out and cut all
parts from his own drawings; as the work progresses, he
should depend less and less upon the teacher’s assistance
in making his plans.
High standards of work and correct processes should
always be set before the pupil, and these are best assured by
the teacher becoming thoroughly conversant not only with
the general construction of an article to be made, but with
the best methods of securing neat and accurate results.
Eventually, the pupil’s mental attainments will show in the
tangible work of his hands.
Two hours each week for one school year may profitably
be devoted to this work. In the upper grades some of the
easier problems should be omitted, and more time devoted
to actually bookbinding, introducing as much variety as
time and materials will allow.
EQUIPMENT
This equipment is sufficient for the whole course and
should last for several years. A strong wooden box with
compartments insures an orderly arrangement of tools and
prevents breakage. Several rooms may use one equipment
and by means of the box, transportation is greatly facilitated.
Some system of distributing and collecting material
should be devised, and not more than five minutes consumed
in making preparations for work.
One for each pupil
Rule
Pr. 6-inch Scissors
Pencil, medium
Tapestry Needle, No. 17
Wooden Triangle, 45°, 7-inch
For class use, the number to be governed by the way in which they are
to be used, by the amount of money to be expended. For twenty-five
pupils, 12 paste-brushes and 5 punches answer very well.
Paste-brushes 1 inch flat
Eyelet Punches
One of each helpful, but not necessary
Paper Cutter, 12 inch to 15 inch
Straight Edge
Large Shears
MATERIALS
The materials necessary for this course may be purchased
from any of the large school supply houses, or from
dealers in bookbinders’ supplies. Before an order is given,
it is recommended that the materials be seen, at least in
sample, as names sometimes vary in different commercial
houses. The sizes and prices are also liable to variation.
In selecting colored papers, avoid brilliant hues, and choose
soft colors.
For Stiff Foundation
Approximate
size
Newsboard
26” × 38”
Newsboard is in reality a box board, and differs from binders’ board
in the quality of the fibre. But for such articles as are described in
this course, it is the more satisfactory of the two. Both newsboard
and binders’ board are sold in bundles each weighing 50 lbs. The
board is numbered according to the number of sheets in the bundle.
Thus No. 50 means that the bundle contains 50 sheets. Board of
this number is light in weight, easily handled by small children, and
is well suited to the articles here described. Most book covers are
made of No. 30 (30 sheets to the bundle), which is twice as thick as
No. 60. The sheets of newsboard are rather large to be handled conveniently.
If desired, they will be cut in quarters by the dealer at
slight expense.
For Covering Foundation
Vellum de luxe
38” wide
Vellum de luxe is a sized and tinted cloth of an inexpensive grade of
cotton, which is quite suitable for the purposes of this course. If
material of a higher grade is desired, art canvas, art vellum, etc.,
may be purchased. These come in a great variety of colors. It
is better to use but one color in the class for economy’s sake, but,
if this is not to be considered, different articles may be of different
colors. Choose quiet colors such as “old blue,” “dull green,”
“deep red.”
Cover Paper (light weight)
22” × 28”
Wall Paper
By observing a harmony of coloring between paper and vellum some
beautiful results may be obtained. If one is fortunate enough to secure
a “sample book” there is a chance for great variety. If it must be
purchased outright two or three well chosen patterns will suffice.
For Lining
Marbled Paper
20” × 25”
Bark wove Paper
24” × 36”
For Limp Covers
Screenings
24” × 36”
Cover Paper
22” × 36”
Kraft Paper
24” × 36”
Drawing Paper (gray)
9” × 12”
Red Rope manila
24” × 36”
Oak tag stock
9” × 12”
Tough check
22” × 28”
For Inside
Page Paper
17” × 22”
Page Paper
8½” × 11”
Drawing Paper (white)
9” × 12”
Drawing Paper (gray)
9” × 12”
Drawing Paper (man.)
9” × 12”
Newspaper (white)
6” × 9”
For Stitching and Sewing
Linen Thread
40 yds. to skein
Silk
4 yds. to skein
Raffia (plain)
4 oz. package
Raffia (colored)
4 oz. package
Paste
Most of the various pastes on the market serve very well the needs
of these problems. A far less expensive and quite as satisfactory a
paste may be made from wheat or rice flour provided one has the simplest
facilities for boiling. Take two tablespoonfuls of flour and wet
with warm water. Over this pour one pint of boiling water and boil
three minutes. ½ teaspoonful of powdered alum added to this will keep
it sweet for some time. If an extra strong paste is desired a small
quantity of glue may be added to the paste while it is still hot. If solid
glue is used this should first be dissolved in hot water.
Accessories
Eyelets
250 in box
Purchase eyelets of the same make as the eyelet punch (see list of
equipment), since those of a different make are not always an exact
fit.
Macreme cord
8 oz.
ball
Tape (white)
4 yds.
in a piece
Tape (colored)
10 yds.
in a piece
Stay Tape (cloth)
¾”
wide
“ “ (paper)
¾”
“
“ “ (cloth)
1”
“
“ “ (paper)
1”
“
“ “ (cloth)
1¼”
“
“ “ (paper)
1¼”
“
Super
1 yd.
wide
Bookbinder’s Twine
½ lb.
ball
Head Bands
Different
widths
Gummed Tissue
Roll or
Envelope
of 5 or 6
yds.
Problem I
BOOKLET
Time: 4 hours. Materials: For the inside, any of the paper so listed.
For the cover, any of the paper so listed.
For stitching, any material so listed.
The simplest form of a book consists of a cover and
inside sheets in a single fold, sewed through the center.
Choose materials from the lists given.
Three definite methods of working out this problem
are here outlined, arranged in the order of their difficulty.
Other combinations will suggest themselves.
Method A. First determine the purpose for which the
booklet is to be used, and decide on shape and size of page
best suited to this purpose. If for spelling or pocket memoranda,
it may be long and narrow; if for language a larger
page is desirable; or if for map work, the size and shape of
the maps should be considered. Take any sheet of paper and
experiment in folding to obtain satisfactory size and proportions.
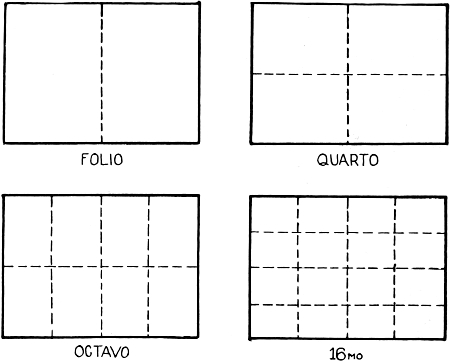
A single sheet of paper folded through the center is called
a folio. This sheet will be twice the width of a page and of
the same length. (Commercially, a folio is made from paper
varying from 22 × 16 to 44 × 32. Therefore, books to which
this term is applied are generally of large size.)
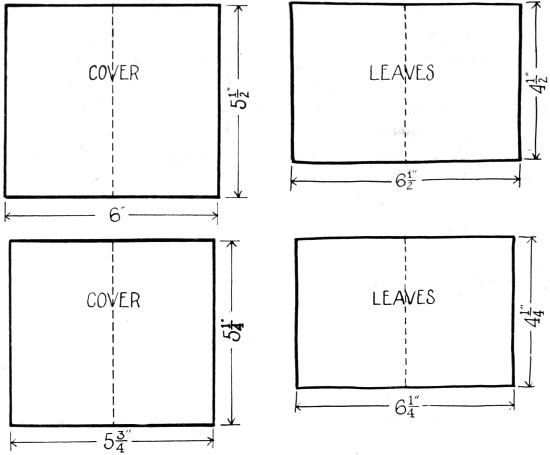
With pencil and rule draw a plan of the open folio and
properly dimension the drawing. (See Plate I.)
Plate I. Accurate working drawings and freehand sketches
such as children should produce before making the booklet.
If there has been no previous training in simple mechanical
drawing, the use of extension and dimension lines, arrow
heads, and the proper placing of figures should be explained.
If some proficiency in this kind of drawing has been acquired,
a freehand sketch may take the place of an accurate drawing.
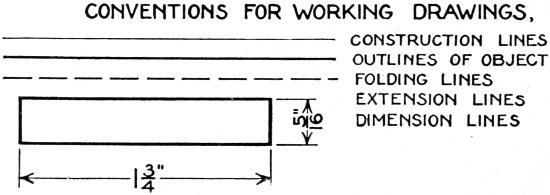
Plate II shows some of the line conventions used in making
a working drawing.
Plate II. Line Conventions.
In the same manner as for the pages, draw a plan of the
cover, which should project beyond the pages from ⅛ to ¼
of an inch. Lay out and cut the cover and one sheet for the
inside, keeping carefully on the lines.
Having cut one sheet of the inside, lay the sheet on as
many pieces of the paper as are needed, (from three to seven
make a booklet of desirable thickness); then make a hole
with a pin or needle at each corner, piercing all at one time.
On each sheet draw the four sides, using rule and pencil.
This is easier than to measure each one. The folded
sheets should be placed one inside the other to form the
inside of the booklet, and the whole placed inside the folded
cover, with the edges of the cover projecting slightly.
Plate III. Sketches illustrating a simple method of stitching a booklet.
With a needle make a hole through the center of the
fold, and another near each end of the fold (from one-half an
inch to an inch and a half from the end) according to the
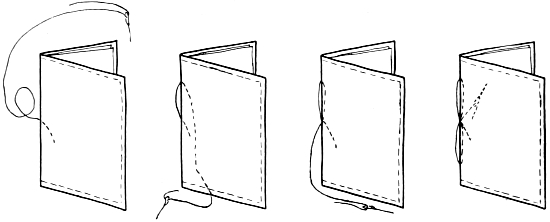
size of the booklet, as shown in Plate III. With thread or
raffia sew through the center hole, from the inside out, back
to the inside through an end hole, outside through the center
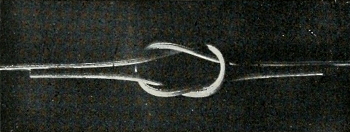
hole, inside through the other end hole, and tie the ends in a
square knot (see illustration, Plate IV) near the center of
the fold. Other equally satisfactory methods of sewing may
be worked out.
B. Determine the purpose of the booklet first and then
its size and shape. As in A draw plans of the inside and
cover. With rule and pencil lay out parts on materials to be
used. Cut and sew as in A.
Plate IV. The position of the threads
in tying a square knot.
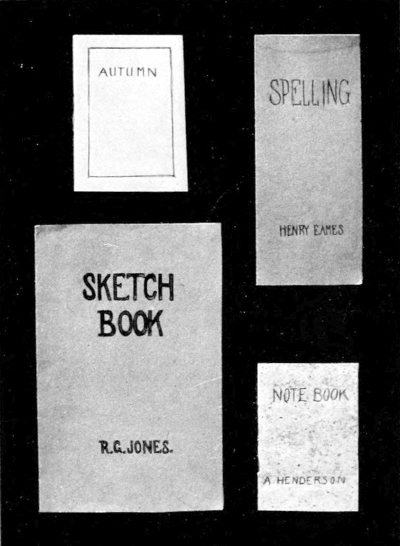
Simple lettering on the cover adds much to the appearance
of the booklet. Choose a title appropriate to its contemplated
use, as “Notes,” “Sketches,” etc., which
should be executed in rather large Roman capitals. On a
separate sheet, mark out an oblong of height and width
desired for the title and practise on this. If title is long,
make letters narrow, if short, letters may be broadened, to
fill up more space. When satisfactory results are obtained,
cut out and place on the cover, moving up and down to
determine its best position. The base line of the title
should be placed below the top at one-fifth to one-quarter of
the entire distance from the top to the bottom of the cover.
After the position is determined, the title should be transferred
either by tracing or copying. The pupil’s name in
much smaller capitals should be worked out in the same manner
and placed below the center with a somewhat wider margin
at the base than at the top. Do not enclose the title in
an oblong or other figure. A single or double line as a
border around the cover looks well, if carefully done. (See
illustration, Plate V.)
C. For the cover use gray drawing paper, tinted, other
materials as desired.
Draw plans as in A and B. A larger surface than required
for the cover should be tinted before it is marked out,
so that any streaking along the edge may be cut off. To mix
a wash of the color selected, put two or three tablespoonfuls
of water in the water-cup and add a little paint until the
desired tone is produced, being quite sure to have enough
to cover the whole surface. Try to have the wash clean, not
muddy, and beware of too much paint! The colors should
be soft, not crude, and somewhat neutralized by the addition
of the complementary color. The best results are produced
by the use of green, pale yellow, brown, dull orange, and red.
Blue is very likely to streak and is seldom satisfactory.
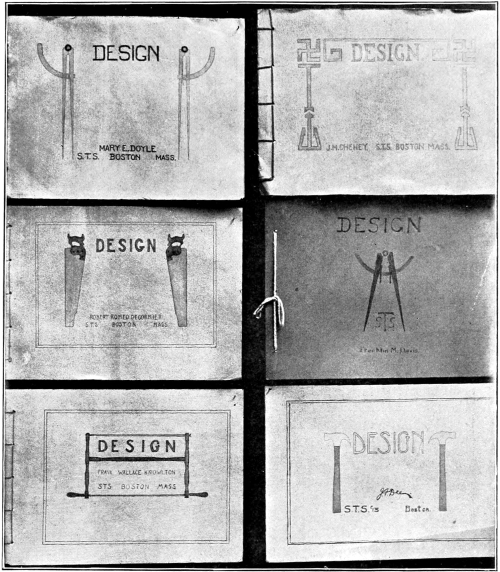
Plate V. The simplest possible designs for book
covers, involving good spacing and careful lettering.
When ready to apply the wash, place the paper on an
inclined surface—45° or more from the horizontal. A sheet
of heavy cardboard or a book answers this purpose admirably.
With a full brush make a horizontal stroke across the
top of the paper. The second stroke should be just below
this leaving no dry spots between. Being careful to keep the
brush full of paint, continue in this manner until the entire
surface is covered. The surplus amount of paint which will
settle along the lower edge should be taken up with the brush,
which has first been squeezed dry between the thumb and
finger. When the paper is dry, mark out the cover and cut.
Cut out the leaves and sew as in A. The cover may be
lettered as in B.
Scrap Book
A. This form of book is excellent for a thin scrap
book. The pages may be of any size but if definite ideas
are lacking it is advised that the size of an ordinary magazine
be taken as a basis. Wrapping paper may be used for
both leaves and cover.
B. Sometimes it is desirable to take two or three
stories from magazines and fasten the pages together,
inclosing all in covers. Trim neatly the edges of such
leaves where they were torn from the binding and assemble
them in proper order. For each pair cut a strip of thin
paper of exactly the same length as the page and say one
inch to one inch and a half in width. To each of these
strips paste two leaves. When all have been pasted and
dried assemble again and stitch through the backs as
already shown.
Problem II
A HOLDER FOR THE PARTS OF A MODEL
Before proceeding further, some kind of a permanent
holder should be provided to keep all together the various
pieces of the model. This prevents the confusion and loss
of time incident to passing several kinds of materials each by
itself.
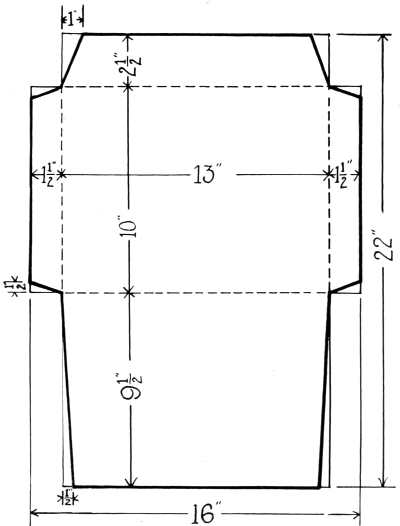
Plate VI. Pattern for a simple envelope.
One lesson might be used for the making of a portfolio
for this purpose, cut from screenings or heavy wrapping
paper, and patterned after an envelope, from 6” × 9” to 9”
× 12” in size. (See Plate VI.) The contents are more
securely held by providing some kind of a fastener. The
following method is a good one: In the center of one side
of the flap plan to punch a hole. This should first be re-enforced
by cutting from heavy paper a circle of ³⁄₁₆ to ⅜
radius and pasting it in the correct place. Through both
thicknesses punch the hole. Into this insert twine, first
looping it in the centre and then passing both ends through
the loop. Use this to tie the envelope.
If large pads of paper are used in the schoolroom,
their cardboard backs may be utilized. Take two of the
same size, punch holes along three sides of each, near the
edges and lace them together. If one of the long sides
of the resulting holder has been left open, materials can
be removed with greater ease than if a short side is so used.
A set of holders thus made is very durable.
New paper bags make good holders although less
desirable than either of the other two.
Problem III
MOUNTS AND PADS
Time: 6 hours. Materials: Newsboard, vellum, and paper for memorandum pad, or calendar,
or pad to be mounted.
We shall now begin to deal with materials that are
more exclusively employed in bookbinding work. The
simple articles considered at first are not books; but because
the processes involved and the materials used will be used
later in the more difficult work of binding a real book, they
are made a part of this course.
The wise teacher will become somewhat familiar with
handling the required materials before attempting to give
instruction. It is recommended that two or more models
from each problem be made by the teacher before selecting
one for the class.
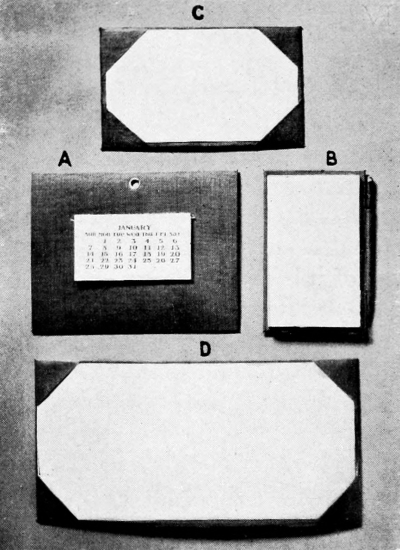
The articles described in Problem III (See Plate VII)
consist of a foundation of a single piece of newsboard, covered
back and front with a bookbinding cloth.
A. Mount of a Calendar or Picture
First secure the article to be mounted and then determine
the size and shape most desirable for the mount. Never
make the mount first and then attempt to find something to
fit it.
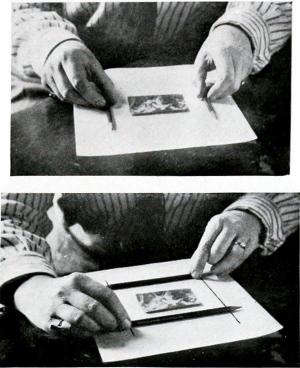
To determine the size of the mount, place the calendar
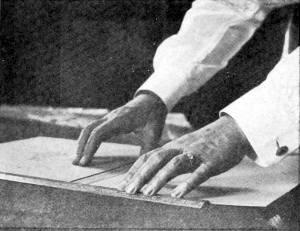
or picture on a sheet of paper and find the most pleasing
margins by laying a pencil on each side of the article. Increase
or decrease this margin by moving the pencils back
and forth until a satisfactory position is found, as shown in
Plate VIII. Indicate this position by a line on each side.
In the same manner, establish top and bottom margins.
The margin at the top may equal that at the side, or be a
trifle wider or narrower;[1] the one at the bottom may equal
the side margins or be wider, but never narrower, and
always greater than the top margin. Draw lines for top
and bottom and the size of the foundation is indicated.
A fraction of an inch may be added or subtracted to give
even measurements.
[1] In a vertical sheet, wider; in a horizontal sheet, narrower.
Plate VII. Mounts and pads made
by children.
Working drawings should now be made of the completed
model, showing the location of the calendar, also of
the front and back.
Make them either accurately or freehand as described
in Problem I. If the latter method is used, some sense of
proportion should be observed. That is, do not draw 3
inches as long as 6 inches, nor 4 inches longer than 7 inches.
The size of the foundation has already been determined.
The front covering should be ½ inch larger on each side than
the foundation, to allow for laps which are to fold onto the
back of the newsboard. The back covering should be from
¹⁄₁₆ to ⅛ of an inch smaller than the foundation on each side,
as the finished product looks much neater if no raw edge is
visible from the front.
Plate VIII. Deciding upon the right size mount
for a picture by experiment with pencils.
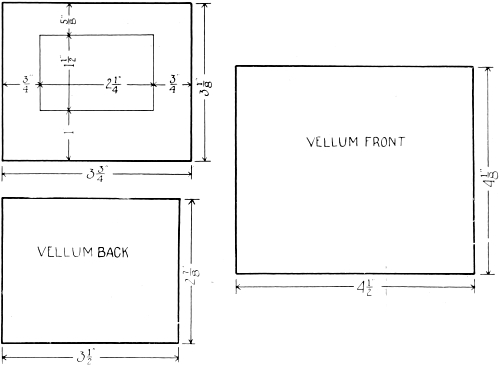
In Plate IX, the first drawing is of the face of the completed
model showing the location of the calendar. This
also shows the size of the foundation. The other two drawings
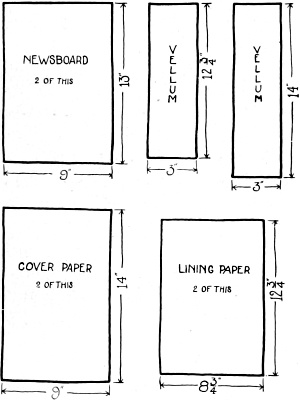
show the size of the two pieces of vellum. If the first
drawing seems too complicated, omit the location of the
calendar, and draw and dimension only the outside rectangle
to give the size of the foundation.
The pieces of material given out should be a little larger
than the finished size, although unnecessary waste should be
avoided. No attempt should be made to cut these pieces
carefully or regularly. Each pupil should be led to depend on
his own initiative in the use of the rule and triangle. An irregular
edge which is not a guide, is more educational than straightedges
and right angles which are of considerable assistance.
Plate IX. The completed mount showing the location
of the calendar, and the two pieces of vellum.
With rule, triangle, and pencil, carefully lay out each
part from the drawings already made, and cut the coverings
with the scissors.[2] The foundation is more successfully cut
with the paper cutter, as to cut it with scissors is a very
difficult task for little hands and likely to loosen the scissors
at the joint. The most desirable way is for each pupil to
cut his own newsboard, in which case the ruler fastened to
the cutter may be used to insure the correct size without any
preliminary measuring. If the cutter is deemed unsafe for
the pupils’ use, the proper size may be marked on the newsboard
with pencil and the pieces cut by a large boy or by the
teacher.
[2] Selvage should never be allowed to remain on a covering of vellum.
A “raw edge” pastes down more closely and is, therefore, less apparent.
Vellum tears very easily lengthwise, and a torn edge may be allowed if it
is to be covered. If not to be covered, all edges should invariably be cut.
When the pieces have all been cut, place the newsboard
on the back side of the front piece of vellum,
with the margins equal, and draw around it. Cover the
surface inside the pencil lines with a thin, even coat of
paste.
Much of the success of the work depends on the pasting
and rubbing. The paste is of the right consistency when
put up by the dealer, and if it dries somewhat after being
opened, a little water thoroughly stirred in will make it all
right. The brush well filled with paste should be passed
over the surface of the covering material with long even
strokes. No dry spots should be left, and especial pains
should be taken to cover the surface close to the pencil
lines. Look across the pasted surface toward the light to
see if it is entirely covered; looking directly down upon
it does not reveal the dry places. Rub the brush rather
heavily over the surface to make the paste sink into the
cloth.
While pasting, several sheets of newspaper are invaluable
to protect the desk, the model, and the fingers. With
a few quick strokes of the card-cutter, cut off the folds of a
newspaper, leaving loose sheets the size of half or a quarter
page. Each desk should have several sheets, placed one on
top of another. When the top sheet has become sticky,
discard it. A perfectly clean surface beneath it is ready to
be used in the same way. Press the newsboard on the pasted
surface, turn it over,[3] and rub it down very hard on the right
side of the vellum. When rubbing the vellum on the right
side, a small piece of cloth for each pupil prevents finger
marks, and enables the pupil to rub harder as the cloth protects
the hand.
[3] When turning over any part of the model which has a pasted surface,
take hold near the center as far as possible, as handling by the edges or corners
is likely to remove paste from the places where it is most needed.
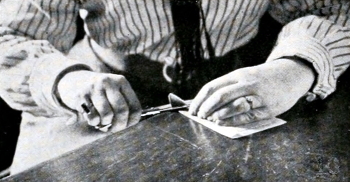
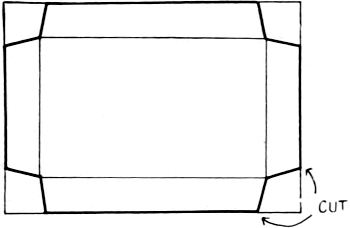
Before pasting projecting parts, the corners should be
cut. Two methods are shown in the illustrations. In the
first, two adjacent projections are turned onto the back of
the foundation. Be careful that they fit very closely to the
sides of the newsboard, press down with the fingers, and hold
them very firmly. At the corner will be a surplus piece
which should be pinched to stand upright. Slanting the
scissors very slightly upward, cut from the corner toward the
center. (See Plate X). The second method is to make
slanting cuts from the outside of the vellum toward the
corners of the newsboard. (See Plate XI). Apply paste to
the projecting sides, fold over and rub down; treat the ends
in the same manner.
Plate X. Clipping the corners.
If it is desired that the completed mount shall hang on
the wall, make a loop of ribbon, tape, or vellum. If tape or
ribbon is used, choose the color very carefully; that which
matches the vellum is the best choice; but, if a contrast is
preferred, choose a soft color which has some quality in harmony
with the vellum. Paste this loop to the back of the
foundation, allowing it to project above the top. Apply
paste to the back covering and rub it down very firmly, being
careful that no loose edges are left. Instead of pasting on a
loop, a hole may be punched near the top with the eyelet
punch, and an eyelet inserted. This should be done after
the back is pasted on.
Plate XI. One method of cutting the corners.
According to plan, paste on the calendar or picture.
Dry all under a weight. If several mounts are to be placed
under the same weight, it is better that each should be separated
from the others by a sheet of blotting paper, or several
thicknesses of newspaper. Allow them to stand over night.
In the morning they will be found sufficiently pressed.
B. Mount for Memorandum Pad
Secure a small pad, and plan a mount to extend beyond
the pad ⅛ inch or more on each side. Draw plans, work out,
and paste as in A. Instead of a loop by which to suspend
the pad, make a holder for a pencil to be placed on the right
side of the mount. Cut a strip of vellum one-half or three-quarters
the length of the mount. At each end of the strip
turn about ⅛ inch onto the wrong side to give a finished
edge. To secure the correct size, fold the strip over the
pencil to be used, and, with the pencil still folded in, paste
the two long edges of the strip together, and then to the back
of the newsboard, having it placed midway between the
top and bottom edges. The pasting of the back covering
then follows. Remove the cardboard back from the pad
before pasting it to the mount. Dry under weight.
C. Pocket Memorandum Pad
This is intended to be carried in the pocket, and its size
should be governed by its use. Avoid rectangles which
approximate the square, but choose rather such proportions
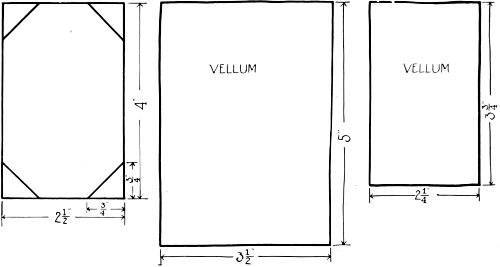
as 2 × 3 or 2½ × 4. As in A, make working drawings for the
three pieces. If desired, the first drawing may be of the
completed face. (See Plate XII.) Lay out and cut all
parts.
Plate XII. A front view of the memorandum pad accurately
drawn to show proportions; also drawings of the vellum coverings.
On the front piece of vellum lay the newsboard as in A,
and draw around it. From the corners indicated by the
pencil lines measure equal distances along adjacent lines,
and connect the points by straight lines. Be careful not
to make these lines too near the corners, ¾ of an inch to 1
inch being a good measurement for a small pad. Cut on
these lines with a sharp knife, or folding the ends of the line
together, cut along the line with scissors.
Apply paste to the front piece, being careful not to paste
outside the slanting lines at the corners, for this space should
be left free to hold the sheets of paper. One way to protect
these corners is to insert a piece of newsboard or paper in the
slits, from the right side of the vellum, so that the corners
on the wrong side are covered. The paste may then be
applied with freedom. Remove the protecting piece of newsboard
and paste the vellum to the foundation. Finish as in
A without the hanger, or, if desired, add pencil holder as in
B. Cut several sheets of white paper ⅛ of an inch smaller
than the newsboard, and, when the paste is thoroughly dry,
insert them in the slits.
D. Blotter
Like C except that it should be large enough to hold a
school blotter. Increase the size of the corners to be proportionate
to the size of the blotter.
Problem IV
Time: 8 hours. Materials: Newsboard, vellum, and lining paper.
Note: As in Problem II, each of these models has a foundation of a
single piece of newsboard, covered on the front with vellum, but on the back
with lining paper.
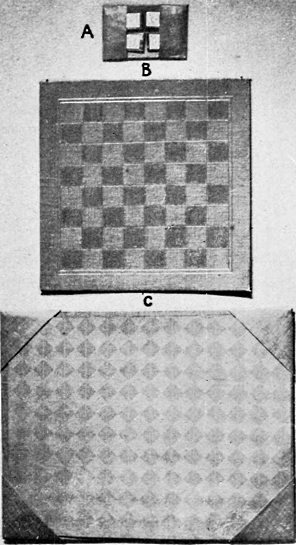
A. A Needlecase
As shown at A in Plate XIII, the needlecase should be
planned to hold four papers of needles, two at each end.
The size of the case will depend on the size of the papers of
needles, and must be planned accordingly. Make the width
a little more than twice the width of a paper of needles, and
allow a little space lengthwise between the papers of needles
to permit their easy removal. The pockets are formed of
strips of vellum pasted on to each end of the foundation,
and their depth should be a little more than half the length
of a paper of needles.
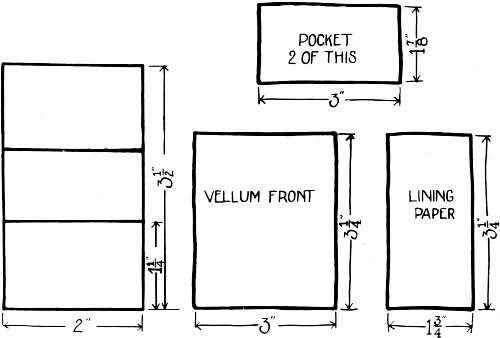
An accurate working drawing of the completed case
should be made (see Plate XIV). From this, mark out and
cut the newsboard to the correct size. The front covering of
vellum should have laps on the sides only and may well be a
little shorter than the foundation. Make freehand, dimensioned
sketches of this piece, of the vellum pockets, and of
the marbled paper. The pockets should have ½ inch laps
on three sides for pasting to the back. On the other edge,
which is to be free, allow at least an eighth of an inch to be
turned over like a hem onto the wrong side for a neat finish.
The paper for the back should be one-fourth of an inch narrower
and shorter than the foundation.
Mark out and cut with the scissors, the pieces of vellum
and marbled paper. The front covering should be pasted on
first. Before pasting the pockets (which should be fastened
to the back only) turn over the hem, and crease it hard, but
do not paste. The hem will extend onto the side laps. From
these laps cut off the under side of the hem that it may not
be double. Paste on the pockets and the back. Dry all
under weight.
Plate XIII. A needlecase, a checkerboard
and a blotter. Good problems upon which to
practise the processes involved in bookbinding.
B. A Checkerboard
First decide on the size of the small squares, remembering
that there are eight in each direction. Also allow for a
margin, outside the squares, which should vary in proportion
to the size of the squares. A single or double border
line enclosing the squares is a desirable addition. (See B,
Plate XIII.)
Make working drawings of the foundation, the front
covering of vellum, and the back covering of lining paper.
In selecting vellum for this model, have in mind the application
of a color which is to be used on alternate squares.
Either a deep red vellum with alternate squares of black or a
dull green vellum with alternate squares of red is a good
combination.
Plate XIV. An accurate working drawing of the completed needlecase,
and dimensioned sketches of the pieces used for covering.
Lay out and cut all parts, using the card cutter for the
newsboard, and the scissors for the vellum and the lining
paper. As in previous models, lay foundation on the back
of the piece of vellum, draw around it, and cover with paste
the surface enclosed by the pencil lines. Again place the
foundation on the vellum, press it down hard, turn over both
pieces and rub the vellum on the right side until it is smooth.
When thoroughly rubbed down, paste laps, being careful to
make neat corners. Paste on lining paper and dry under
weight.
During a subsequent lesson, mark out the checkerboard,
accurately, with rule and pencil. Only alternate
squares need be colored, and this may be done with water
colors, crayon, or pencil. If water colors are chosen, they
should be used with as little water as possible. Before applying
the paint to the vellum, the glaze of the surface may be
reduced by rubbing over it the powder which comes from
common white chalk. Rub the powder in with the fingers
and lightly brush off what remains. On a separate piece of
vellum, practice the application of color before applying it
to the checkerboard, both to test the color itself, and to
become somewhat familiar with the best method of application.
After the paint is thoroughly dry, the surface may be
cleaned by rubbing carefully with a piece of cloth. Finish by
putting on the outside border line with pencil.
C. A Blotter
This is to be a more elaborate production than the
blotter described in Problem III (D). Compare C, Plate
XIII.
First determine the size of the foundation, which may
vary from small-blotter to desk-blotter size. Consider proportions
very carefully. A small blotter admits greater
variance between length and width than one of larger size.
Make dimensioned drawings of foundation, front covering
of vellum or cover paper, and back covering of marbled
paper.
When the foundation has been cut and the front covering
pasted on, plan the corners which are to consist of separate
pieces. Determine their size by setting off a triangle
at one corner with a rule or pencil, moving the rule or pencil
to vary the size of the triangle until one of satisfactory size
is decided upon. Lay out on paper a triangle of the chosen
size. The thickness of the foundation, plus the thickness
of the one or more sheets of blotting paper which are to be
placed under the corners, must be taken into consideration.
Before adding the laps which are to extend onto the back
for half an inch or more experiment with patterns cut from
paper (see Plate XV).
Plate XV. Diagram for blotter corner.
The corners may be made of linen, vellum, cover paper,
or skiver (a prepared leather which has been split by machinery).
Cut them out by the pattern. To give a finish
to the edge which is to be free, turn it over about ¼ of an
inch. If leather is used, a portion of the under side along
the edges should be additionally skived off, before turning
over, to make the laps very thin. Cover paper, if used,
may be re-enforced by pasting a piece of muslin onto the
back.
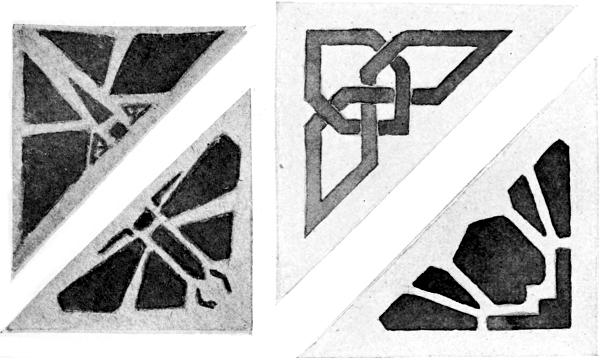
These corners present an opportunity for applied design.
The most satisfactory decoration for leather is “tooling.”
On the other materials suggested, a design may be applied
by stenciling or block printing.[4]
[4] Simple directions for these processes may be found in the School Arts
Book as follows: Tooling, June, 1908; Stenciling, June and October, 1908,
March, 1912; Block-printing, June, 1907.
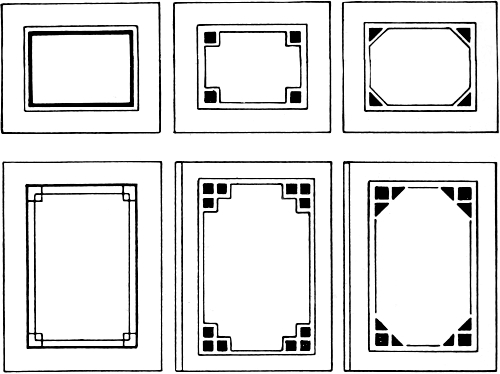
The designs should be simple and appropriate (see
Plates XVI), and the color scheme carefully planned. Unless
a special study has been made of color harmonies, a combination
of analogous colors or complementary colors is a
wiser choice than a more complicated combination. Practise
on paper until a pattern is secured, and apply it to the
corners by the method decided upon.
Plate XVI. Blotter pad corners with original units by grammar-school children.
When pasting on the decorated corners, the sheets of
blotting paper should be placed on the foundation so that
there will be room for their use. Paste the laps to the back
of the foundation, being very careful to place the corners
in exact position. Leave the sheets of blotting paper under
the corners until after the whole has been pressed; otherwise
the weight would crush the corners. When putting in
new sheets of blotting paper, they can be more easily slipped
under the corners if a small triangle has been cut from each
corner of the blotting paper. A sheet of lining paper about
⅜ of an inch shorter and narrower than the foundation
should be pasted to the back. Dry all under weight.
Problem V
MOUNTS AND COVERS
Time: 6 hours. Materials: Newsboard, vellum, and lining paper. Note: Each article in this problem has two foundation pieces covered
by a single piece of vellum, which forms a hinge between them, and the whole
is lined with marbled paper.
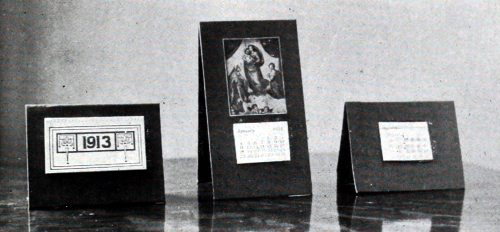
A. A Calendar Stand
First make or secure a calendar, which should be of small
size. If desired, a picture may be used with the calendar,
but it should harmonize with it in size and color. In such a
case plan to have the space between the two much smaller
than the margins, so that the eye will take them in as a
group, and not as two separate objects. Decide on the margins
as described in Problem II, and thus arrive at the proper
size for one of the foundation pieces of newsboard. (See
Plate XVII.)
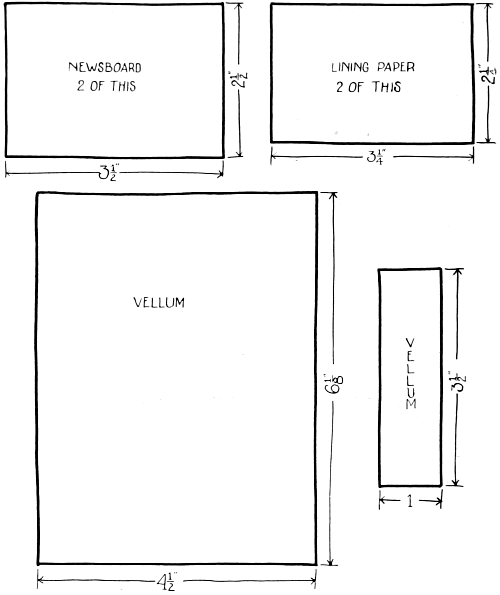
Make a dimensioned sketch of this piece, and plan to
have two made of newsboard. For the outside covering plan
a strip of vellum which shall be long enough to cover both
pieces of newsboard when placed about one-eighth of an inch
apart, and to make half-inch laps on each side and end. Plan
a strip of vellum about an inch wide and as long as the width
of the foundation pieces to form the back of the hinge; and
two pieces of lining paper, each one-eighth of an inch smaller
in both directions than the foundation pieces. Make dimensioned
sketches of these pieces (see Plate XVIII), lay out
and cut all parts.
Plate XVII. Calendars.
In the center of the narrow strip of vellum mark off a
space one-eighth of an inch wide, extending lengthwise of the
strip. Apply paste and lay the two pieces of newsboard on
the vellum and with edges against the lines drawn. Press
hard on the newsboard, turn it over, and rub down the
vellum. A hinge is thus formed for the two pieces of newsboard.
Lay these pieces on the large piece of vellum and
draw around the whole. Apply paste to the vellum inside
the pencil lines. Lay the double foundation on the pasted
surface with the narrow strip of vellum on top. Rub down
the outside surface very hard, leaving no wrinkles or rough
places; clip the corners as described in Problem II, paste
the laps, fold them over, rub them down, and line the mount
with the pieces of marbled paper. Connect the front and
back halves of the mount by a single or double strap of
vellum pasted to the inside of each. Finish by pasting on the
calendar and picture.
Note. If the calendars are made for Christmas, a most appropriate
time, the children are sometimes desirous of decorating with Christmas seals.
These are not so desirable as a decorative picture, but if the teacher feels that
to forbid their use would be dispiriting to the child, she should insist that
only one seal should be used and that on the back of the standard where it will
carry its message, but will not detract from the appearance of the face of the
mount. An envelope might be made in which to present the calendar, and
the seals used on the outside of the envelopes.
Plate XVIII. Freehand sketches of the parts of a simple calendar mount.
B. Another Calendar Mount
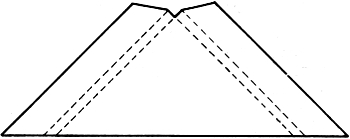
Plan the back standard to be smaller than the front
instead of the same size. Plate XIX suggests a suitable
trapezoidal shape. In this case the vellum must be of the
same length as before, but cut to fit the different widths of
the newsboard (compare Plate XX).
Plan a narrow strip of vellum to line the hinge, as in A.
Paste this piece and the outside covering as before. Cut the
lining paper of the correct shapes and apply to the back.
Plate XIX. The foundation pieces for an easel mount.
C. A Needle-book
This consists of covers with leaves of flannel. Decide
upon the size of leaves, which should not be too large and in
good proportion. One piece of flannel should form two
leaves, as in booklets described in Problem I. Plan the covers
to be one-eighth of an inch larger in each direction than the
leaves. These should be constructed like the calendar
mount already described in A, but the space between should
be greater, perhaps three-eighths of an inch. Make dimensioned
sketches of all parts. The parts should then be laid
out, cut, and pasted. Finish the edges of the leaves by pinking
(cutting in small points). Four leaves are sufficient.
Sew them to the cover as described in Problem I.
Plate XX. The flat of vellum for covering
the foundation.
D. A Covered Memorandum Pad
Secure a small pad. Plan covers, as described in B,
which shall project about one-eighth of an inch in each
direction beyond the pad. Plan to have the space between
them about ⅜ of an inch more than the thickness of the pad.
When the covers are finished, paste the pad firmly to the
inside of one cover. If desired, loops of vellum to hold the
pencil may be pasted on the side of the pad, as described in
Problem I.
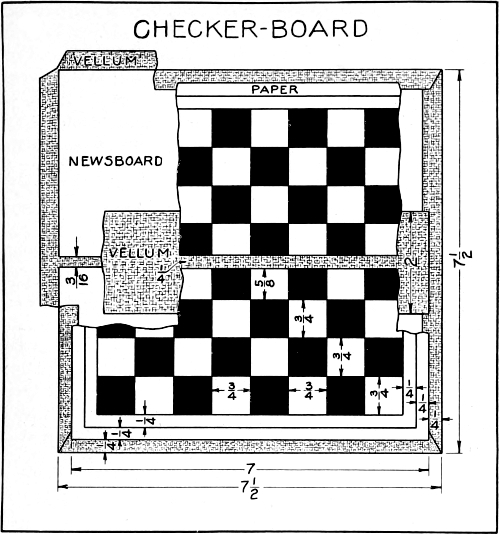
This checkerboard (Plate XXI) is planned with squares
¾” in size, and of these there should be 8 on each side
alternating dark and light. By making a foundation 7½”
square, it gives a margin of ¾” on all sides, resulting not
only in a satisfactory appearance, but providing a place
for extra checkers. This board folds through the center
and is small enough to be easily carried in the pocket.
The illustration is intended to show the construction to
the teacher. Such a drawing should not be attempted by
the pupils whose efforts should be confined to simple sketches
of the necessary pieces as in the other problems.
Cut two pieces of newsboard 3⅝” strong × 7½”, and
a piece of vellum about 9” square. It will be observed
that the width of the newsboard is less than half the length
in order to allow a space between the two pieces of newsboard
without which the completed board would not close.
On the back side of the piece of vellum mark off in
heavy lines the positions of the two pieces of newsboard and
allow ¼” or ³⁄₁₆” space between them. Paste the newsboard
to the vellum as already described, cut the corners and paste
the edges. A strip of vellum 2” × 7” should be pasted to cover
the space between the two pieces of newsboard and extend
well onto them.
The paper used for lining may be prepared in one of
several ways, either by machine or by hand, and may be
in one piece or two. The former is less likely to be confusing.
The easiest and quickest method is to have the squares
printed in dark ink on white or light gray paper of good
quality, and fairly tough. The use of linoleum is suggested
as one method of printing squares, or a line plate may be
made, the squares printed from it and finished linings for
the checkerboards furnished to those who are making
them. The light squares may be left as they are or may be
colored with water color, crayon, or oils. All the outside
squares should be lined in, either when printed or afterward
by hand. A border line about ¼” outside the squares
adds very much to the general appearance.
If all the markings and coloring must be done by
hand, paper commercially ruled into ¼” squares is recommended.
This secures accuracy, and saves much tiresome
ruling. Three such spaces on each side form a ¾ inch
square and when the checkerboard is laid off by small
dots on outside lines, proceed to color alternate squares
by one of the following methods:
A. With soft pencil darken alternate squares leaving
others of the original color. Begin with the upper row,
and take successive rows downward. Across the paper
lay a rule just below the lower edge of the squares to be
darkened. With the pencil make vertical strokes only,
using the side of the pencil to give an even surface free
from ridges. Be careful with the lines at the right and
left edges that they do not extend into the adjoining space.
The edge of the rule will stop the strokes at the right place
at the bottom and they should not extend quite to the top
as this can be adjusted later. When all rows are finished,
turn paper around so that what was top is now bottom,
and complete squares by the same method.
B. Instead of pencil, colored crayons may be used
in the same manner as already described.
C. Crayons of two colors may be used in alternate
squares, or one color and a black pencil. Orange and black
or red and black are pleasing combinations.
D. Ink or water may be applied with a brush.
When completed place the “board” so that a dark
square is in the upper left and lower right corners respectively,
and cut open vertically, removing about ¼” from
the center two halves. If no space is left, the paper soon
cracks in folding; if too little space is left, the edges soon
turn and later become ”dog-eared“; if too much is left,
it is confusing to the players, as theoretically there should
be no space at all. Paste these pieces to each half of the
cover, placing them about ¼” apart, and dry flat under
weight.
When thoroughly dry, the inner surface should be
varnished with shellac or valspar to give stability to the
color. Otherwise, it soon becomes rubbed and the appearance,
if not the utility, of the board is spoiled. One coat
is sufficient to hold the color, but if a polished surface is
desired two are needed.
The question of coating the outside with shellac or
other polish is an open one, and may be decided to suit
the individual taste.
It is sometimes desirable to show that an article is
the product of the schoolroom, and in this case a neatly
printed label with a space for the pupil’s name, etc., may
be pasted to the outside.
If larger boards are desired make the squares one inch
in size leaving ¾” margin. The foundation consists of
two pieces of newsboard, each 4⅝” × 9½” and the vellum
for covering should be 11½” square. The process of
assembling is like that used in the small board.
Checkers
I. Dowels. Checkers may be made from dowels
⅝” or ¾” for small checkerboards and ⅞” or 1” for the
larger boards. Broom handles, etc., may be used as substitutes
for the dowels.
The checkers should be of a uniform thickness, and
this is best secured by using a combination mitre-box,
saw, and gauge. If this is not available, any other means
may be employed to saw the dowels into disks ⅛” or ³⁄₁₆”
in thickness.
Lay a piece of sandpaper on a flat surface and rub the
checkers on this to remove saw marks. Two grades of
sandpaper give a better finish than one.
To play the game, it is necessary that there should
be two colors of checkers. Some woods present sufficient
difference in their natural colors to serve this purpose, but
it is generally better that one set at least should be artificially
colored. For this, use stain or ink. Place some of the
fluid in a shallow dish, and drop the checkers into it. Remove
at once with nippers or two sticks, and lay on a paper
to dry.
Most stains will stand some water, but common ink
would wash out if rained on. So to preserve the color,
checkers dyed with ink should afterward be dropped into
a thin shellac and taken out and dried. Those of natural
color should also be shellaced as they keep clean much
longer. After the shellac is dry, there is a little roughness
on the surface. If this is rubbed off with fine sandpaper
the checkers are much more agreeable to handle. Twelve
checkers of each color are needed for a set but three or four
extra ones may be added. Put these in a strong bag securely
tied.
II. Button Molds. Instead of using dowels, as just
described, wooden button molds may be colored and used.
III. Buttons. Two contrasting colors of flat buttons
make excellent checkers.
Problem VII
PICTURE FRAME
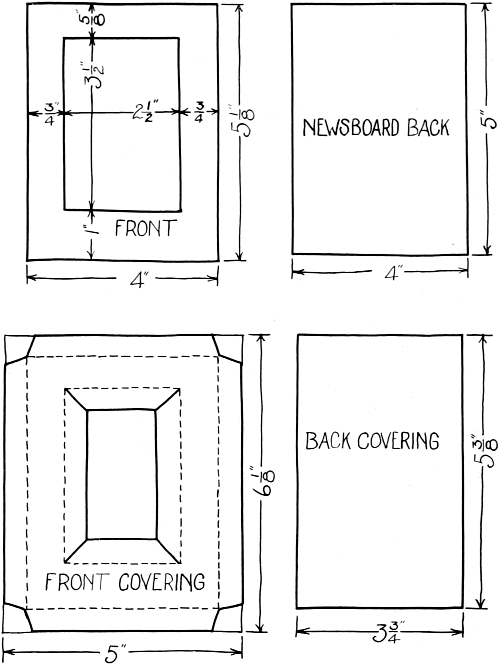
Time: 4 hours. Materials: Newsboard, vellum or paper.
First choose size of picture and then width of frame.
This may be uniform on all sides or one may observe the
rules for margins shown on pages 21 and 22. Make a careful
drawing of the outside of the frame and opening, and then
lay out and cut the newsboard as indicated. For covering,
plan and cut a piece of vellum, grass cloth, paper or other
material which shall extend beyond the newsboard on each
side for at least one-half an inch. On this material indicate
the position of the newsboard including the opening for
the picture. Also draw lines one-half an inch inside and
parallel to the lines showing opening. Cut on these
lines and at each corner cut oblique lines to allow the laps
to fold under. For the back there should be planned and
cut another piece of newsboard one-eighth of an inch shorter
than the front and of the same width; and to cover it a
strip of covering material three-eighths of an inch longer
and one-quarter of an inch narrower than the newsboard.
(See Plate XXII.)
Plate XXII. Dimensioned sketches of the parts of a picture frame.
To assemble: Paste the foundation of the front to
the covering and turn under and paste the laps at the
opening. At this time paste only one outside lap and that
the top one. Over one end of the newsboard-back turn the
outside strip about half an inch and paste this down leaving
the remainder of the piece free. Place this piece of newsboard
against the front, with the pasted end at the top, and over
both pieces of newsboard paste the three laps attached to
the front side. Fold back the free piece and paste as a
lining over the back. To this may be pasted a patent
hanger—a ring attached to a gummed disk. The picture
should be inserted at the opening in the top.
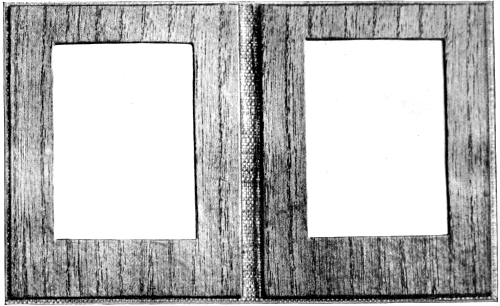
Plate XXIII. A folding picture frame.
If a double frame is desired (see Plate XXIII) make
a frame for each picture but use for the back of each a
piece of heavy paper which should not have an additional
covering. Make a foundation which folds through the
center planning to have it extend slightly beyond the frames
as shown in Plate XXII; to each half of this foundation
attach the frames already made.
C. Either style of frame may be made with a covering
of silk, grass cloth, leather, and slightly padded. For
this purpose use sheet wadding which should be firmly
attached to the front of the foundation. Over this lay the
covering material and paste the laps only, not the broad
faces.
Problem VIII
HINGED COVERS
Time: 8 hours. Materials: Newsboard, vellum, paper for leaves, eyelets, cord, and (if
desired) cover paper for C and D. Note: In selecting materials, choose those which harmonize with each
other, i.e., the vellum, cover paper, and lining paper should be of the same hue.
The problem is to make two separate hinged covers
between which loose leaves may be bound, the whole to be
fastened together with macrame or other cord. This may be
designed for one of many uses, suggestions for several of
which follow (see Plate XXIV).
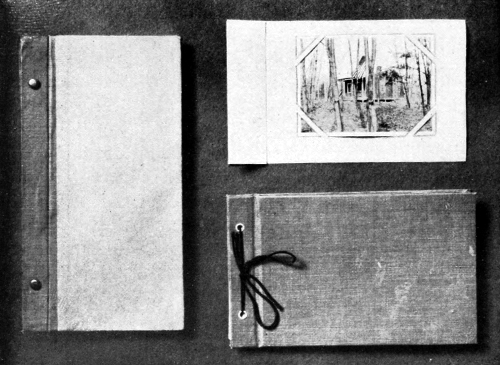
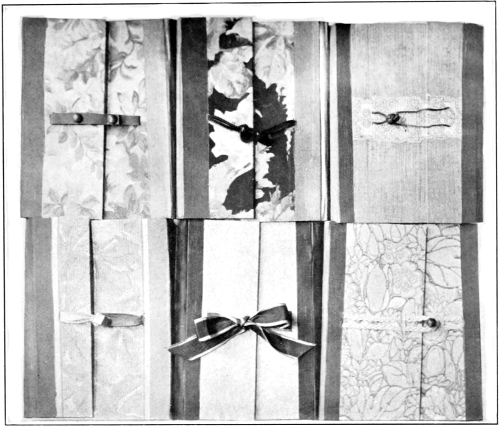
Plate XXIV. Examples of hinged covers made by grammar
school children.
A. A Sketch Book
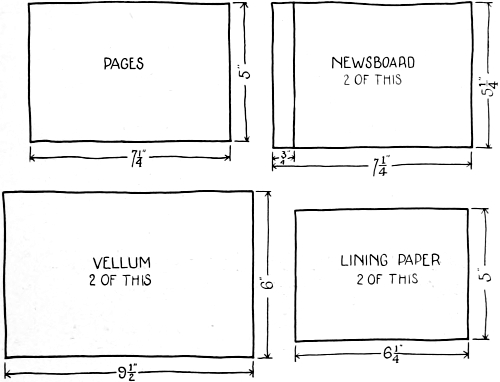
Plate XXV. Freehand dimensioned sketches showing parts
of a sketch book cover.
In making dimensioned sketches for the various parts
(see Plate XXV) determine first the size of the pages and
plan the covers to extend beyond them about one-eighth
of an inch. Make the sketches of the pages and the newsboard
foundations. Lay out and cut the latter, of full size,
and then from either a long or short side of each, in accordance
with plan, cut a strip to form a hinge. The width of
these strips may be from three-quarters of an inch to one
inch. Vellum should be planned to cover completely one
side of both pieces of each cover, to fold around the small
piece and to lap over onto the large piece about one-half
inch. It should also fold over the other three edges about
one-half inch. (See Plate XXVI.) The lining paper should
cover to within about one-eighth of an inch of the edges of
the large pieces and should not extend onto the hinge. Constant
bending soon breaks paper, but with ordinary use does
not affect the tough vellum. Make dimensioned sketches
of these pieces (see Plate XXV) and lay out and cut
all remaining parts.
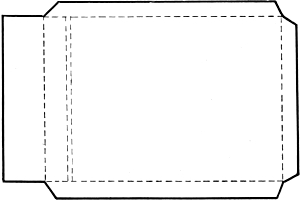
Plate XXVI. A diagram showing the position
of the two pieces of newsboard on a
piece of vellum.
Properly place main part of newsboard on vellum, drawing
around it. Lay small part one-eighth of an inch from
main part and draw around it. Remove the pieces of newsboard
and apply paste to vellum inside the pencil line, being
careful to cover the surface smoothly and evenly; lay both
back pieces in place, turn the vellum over and rub down.
Cut from the projecting vellum on the hinged side a small
piece even with the edges of the hinges as far as the outside
corners (see Plate XXVI), and clip off the outside corners
as before described. Apply paste to projecting vellum,
fold over first the hinged side and its opposite, then the other
two sides, and rub down. Paste the lining paper in and dry
the covers separately under weight. Remember to place
newspaper or blotting paper between each pair, otherwise
the moisture from one will cause wrinkles in the other.
For the leaves, use drawing paper, which may be cut
singly or in folio (with single fold). The latter method is
preferable, as folded sheets are easier to place at the back,
look better, and are more secure.
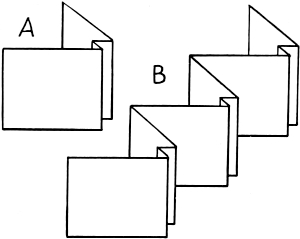
Plate XXVII. Two methods of cutting and
folding paper for the pages of a scrap book
or postcard album.
Two holes in each cover are sufficient for the cord, but
a little care should be taken to determine the best position
for them. The distance of each from the end of the hinge
strips should be from one-fifth to one-sixth of its length, and,
of course, they should be placed midway between the long
edges. After punching the holes, see that the leaves are
properly marked so that the holes in them will exactly fit
the holes in the cover. To do this, place one sheet on the
cover, leaving correct margins, and through the center of
each hole mark the paper which should then be punched.
Treat the other sheets in the same manner. Eyelets should
be inserted in the covers only, and for that purpose a good
eyelet punch is necessary. Directions for its use and sample
eyelets accompany punches when sent from the dealer.
Complete by tying all together with a piece of cord.
Make a small flat bow on the front cover.
B. A Scrap Book
This should be planned and worked out in the same
manner as the Sketch Book, but it should be somewhat
larger, possibly 6 × 8½ inches. For the leaves, screenings
or wrapping paper may be used.
To prevent covers from flaring after the book has been
filled, the thickness at the back should be increased by
additional folds in the paper, as shown in Plate XXVIIA.
The “stub” should be about one inch wide after it is folded.
The Japanese method, which is to fold a very long strip
many times in the same manner, forms a pleasing arrangement
(see Plate XXVIIB).
C. A Postcard Album
Make the covers described in A and the leaves of a
heavy paper. Green or brown screenings look well and give
a background generally harmonious with colored postcards.
The size of the leaves should be sufficient to leave a generous
margin around the card. If two are to be placed on one page,
have the space between less than the margins around the
edges. A little additional margin at the bottom is always
pleasing. Slits for holding the cards may be made in the
following manner: cut a blank sheet of paper of the size of a
postal card and from each corner measure both vertically
and horizontally 1 to 1¼ inches and connect the adjacent
corners with straight lines. Place this pattern in proper
position and use the ends of the lines on it to locate the lines
to be drawn on the page itself. It a hole is punched at each
end of the line, it gives a neat appearance and prevents the
paper from tearing easily. The lines on the page should be
cut with a sharp knife. Insert each card by placing its
corners in the slits.
A second set of oblique lines parallel to those already
described may be drawn and cut three-eighths of an inch farther
from each corner. This will form a strap to hold the cards
in place, and on the opposite side of the leaf cards may be
inserted in the outside slits.
D. A Clipping File
Between two separate covers several envelopes—say
five—are to be fastened and used for holding clippings, etc.
Select the envelopes—3½ by 9 inches is a convenient size.
Plan covers to be about one-eighth of an inch longer on each
end than the envelopes and seven-eighths of an inch wider.
This allows three-quarters of an inch for the guard and
also a projection of one-eighth of an inch on the opposite
side. Strips of vellum should be planned to cover completely
both sides of the hinge, to lap over onto the large piece
about one inch both outside and in, and to extend beyond
each end about one-half inch. To cover the rest of the
newsboard, cover paper should be used and the pieces
should lap over the vellum about three-quarters of an inch on
the side next to the hinge and fold over the other edges about
one-half an inch. The lining paper should cover to within
one-eighth of an inch of the edges of the large pieces of newsboard.
Make dimensioned sketches of all pieces and lay out
and cut all parts.
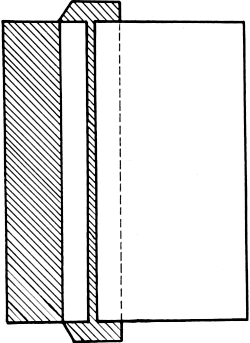
Plate XXVIII. Relative positions of
newsboard and vellum in making the
cover of a clipping file.
Draw a line through the center of the vellum showing
where the back edge of the small piece of newsboard should
come. Lay main part one-eighth of an inch from this line
and draw around the edges of both pieces except where the
large piece projects beyond the vellum (see Plate XXVIII).
Apply paste to vellum, lay pieces of newsboard in place, turn
it over and rub down. Cut from the projecting vellum a
small piece even with the ends of the hinges as far as the
outside corners. Apply paste first to projecting ends, then
to long strip; fold over and rub down.
Properly place cover on cover paper and draw around
it. Apply paste to cover paper and finish as when vellum is
used for entire cover. Paste in the lining paper and dry
under weight.
Strips of vellum about 2½ inches wide and one inch
longer than the envelopes should be folded lengthwise down
the middle to form guards. Cut strips of newsboard three-quarters
of an inch wide, and of the same length as the
envelope. Apply paste to half the vellum and lay the newsboard
on it with one edge against the center fold. Against
the other edge of the newsboard lay the lower edge of the
envelope with its ends and the ends of the newsboard in
the same straight lines. Treat the ends of vellum in the
same manner as on the covers. Punch holes in covers and
guards, insert eyelets, and fasten together by tying, or with
paper fasteners.
Problem IX
BOXES
Time: 6 hours. Materials: Newsboard, stay-tape or vellum, and a thin paper.
First determine the size of the box, which should be
made for a definite purpose. Consider the proportions of
the width, length, and height; also the height of the sides
of the cover.
A box consists of foundations of newsboard, the edges
of which are stayed with strips of tape or vellum, and the
outside covered with paper. The cover should be larger
than the bottom by ⅛ inch in both directions to allow it to
slip over the box. This amount will vary somewhat with
the thickness of the newsboard, the paper with which it is
covered, and the skill of the worker.
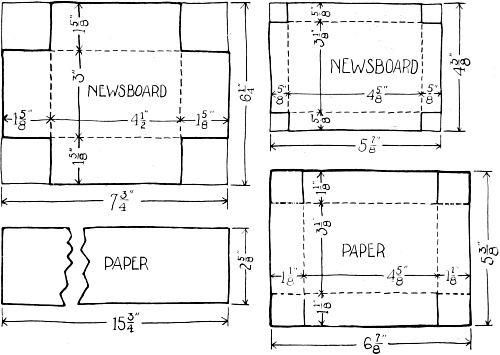
The foundation for each part is to be developed from a
single piece of newsboard. The box and cover are to be
covered with a thin paper. A great variety of paper for
this purpose may be purchased, either figured or in plain
colors.
For the box plan a strip of paper long enough to extend
around the four sides and to provide for a lap where the ends
join. Be generous with this lap, as it will be found that the
paper “takes up” when it is pasted on. The width of the
strip should be at least one inch more than the depth of the
box. For the cover, plan covering paper like the newsboard
development, but with its sides ½ inch or more wider to fold
over the edges. Let the corner squares serve as laps. Make
dimensioned sketches of all pieces and lay out and cut all
parts. (See Plate XXIX.)
Along folding lines of the foundations score deeply with
a knife, one blade of the scissors, or with a pin, and fold with
the crease on the outside. It is essential to the success of the
box to have this crease on the outside to insure a sharp,
straight, and strong edge, which might otherwise be rounded,
irregular, and weak.
Plate XXIX. Drawings of the pieces required in making boxes.
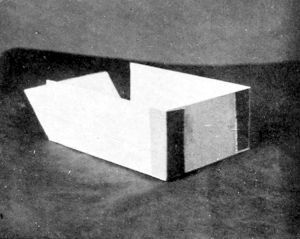
Fasten the corners of both box and cover together with
pieces of tape or strips of vellum, lapping onto the sides.
(See Plate XXX.) If possible, allow the corners to dry
before proceeding further.
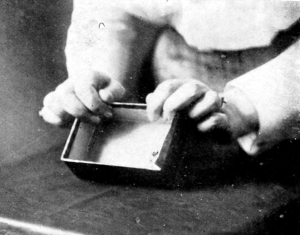
Paste the strip of paper around the box, allowing ½
inch to project beyond both top and bottom edges. Rub
down well. Make a vertical cut at each corner of upper
projection and fold and paste laps down on the inside. (See
Plate XXXI.)
Make a V-cut at each corner of the lower projection,
fold and paste the laps against the bottom. (See Plate
XXXII.) It will probably be necessary to apply more paste
before finally rubbing these laps down.
Plate XXX. The box in process of construction
showing method of “staying” the corners.
Plate XXXI. Showing method of pasting
the laps to the inside of the box.
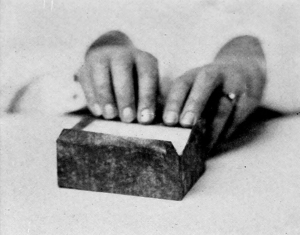
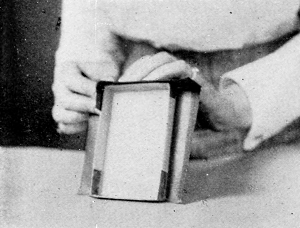
Paste top of cover to the paper, leaving equal margins
on all sides. From the two long edges make cuts to the
corners of the newsboard foundation at right angles to its
edges. Fold and paste paper over the ends of cover first, and
then onto the inside, using the thumb to push the paper
over the edges. (See Plate XXXI.) The cuts made from the
long edges give an extra length to end coverings. Paste this
extra piece onto long sides and then paste the part naturally
to be used to cover these sides. The appearance of the box
will be greatly improved by running the thumb and finger
along the folded edges of the cover to sharpen them.
Plate XXXII. The laps are being pasted
to the bottom of the box.
Plate XXXIII. Here the paper is being pasted
to the side of the cover.
In this manner, boxes of any size may be made. Small
boxes may be covered with linen, cretonne, or other kinds of
cloth. In this case it may be better (after making the foundations
as already described) to paste the covering to the
inside of the foundation only, otherwise the surface might be
discolored by the paste oozing through the cloth.
A box with a glass top is sometimes desirable for
holding specimens of various kinds. Such a box may be
made as above described with the following changes:
If it is to be a sealed box the specimens should be properly
placed in the box and the glass (which should be as large
as the outside measurement of the box to prevent its
dropping in) laid over the top before pasting down that
part of the covering which projects above the box itself.
When properly arranged this should then be pasted to the
glass exactly as the laps are pasted to the bottom of the box.
If a removable cover is desired, cut strips of newsboard
for the sides and a strip of material for covering them in the
same manner that the box is covered. After staying the
corners with vellum, paste on the strip of covering material;
one edge of this should lap over the newsboard and be
pasted to the inside of the cover and the other should hold
the glass in position after it has been placed on the newsboard.
Problem X
POSTCARD HOLDER
Time: 8 hours. Materials: Newsboard, vellum, and lining paper.
Before beginning this holder, it may be well to have
collections made of cards relating to a definite subject. Interest
in the study of various industries, history, and geography
is greatly increased by the use of pictures, and in many
places sets of cards prepared for such a purpose may be
purchased.
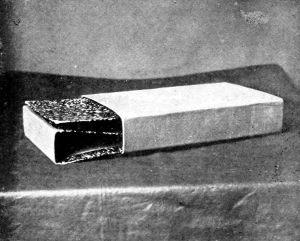
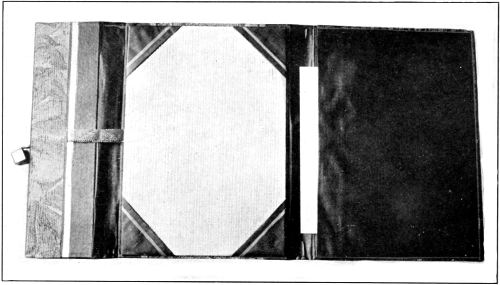
Plate XXXIV. The postcard holder partly open.
This holder consists of an outside case into which the
inner holder slips. (See Plate XXXIV.) The size of the
faces may be determined by individual pupils, but, if the
blocks to be described later are used, it will be quite essential
to have a uniform size so that the blocks may be used interchangeably
among the pupils. For this reason, it is recommended
that the broad faces of the outside be about one
inch larger in each direction than a postcard, and the narrow
faces 1¼” wide.
Plan the foundation of a single piece of newsboard, as
wide as the outside length of the holder, scored to divide it
into the four faces above referred to, and a fifth division
the exact size of one narrow face. Arrange these faces to be
joined at their long edges with a narrow face on each end
of the strip of newsboard so that when folded together one
narrow face will be double, which gives greater stability to
the shape of the holder. Plan a strip of vellum 2 inches
wider than the length of the case, and long enough to extend
around it, allowing for a lap at one corner. It will be found
in putting on this vellum that it will require a piece longer
than the sum of the width of the faces as, however closely it
may be put on, it “takes up” at the corners. Therefore be
generous with the lap as a little extra length does no harm.
For the inner holder plan a strip of newsboard ⅛”
narrower than the case, scored to divide it into five parts.
Two parts are to be of the same length as the case, alternating
with two narrow faces ⅛” less than thickness of the
case (that they may fit inside) and the fifth piece about one-half
the length of the long faces.
Plan two strips of vellum to cover the narrow faces,
and lap onto the adjoining faces about 1”. Allow ½” at each
end to turn over the edges. For each of the three broad
faces, plan a covering of lining paper which shall allow an
edge of vellum to show at the joints, and shall lap over the
other edges of the newsboard. Notice that these three pieces
are of three different sizes.
Make dimensioned sketches of all pieces (See Plate
XXXV) and lay out and cut all parts. Along the folding
lines of both newsboard foundations, score and fold as explained
in connection with the box.
Plate XXXV. Dimensioned sketches of
the parts of the postcard holder.
When pasting the vellum onto the outside case, it will
be found of great advantage to have blocks of wood to work
around. If there is a woodworking room in connection with
the school, these blocks may well be made there. They
should be at least the full length of the case and may project
beyond the ends. Their thickness should be the width of the
narrow faces, and their width may be the same as that of the
broad faces, or narrower. If narrower, the blocks may be
slipped along as the vellum is being rubbed down.
The strip of vellum for covering the outside is so large
that it is difficult for a child to cover it with paste, before a
part of it has dried. It is better, therefore, to paste a little
more than enough for one face at a time, rub this down, apply
paste again, and so on to the end. By putting the paste a
little beyond were it is needed there is a certainty of leaving
no dry areas at the corners.
Plate XXXVI. An illustration of the method
of covering the outside of the case when
a block of wood is used.
If blocks are to be used, paste together the two end
divisions of the newsboard, put the block inside, and paste on
the strip of vellum. Place one end of the vellum flush with
one edge of the case, and cover one broad face first. (See
Plate XXXVI.) Before rubbing down the vellum on the
next face, be sure that it is pulled as closely as possible over
the edge, leaving no wrinkles or loose places. When all the
faces have been covered, there should remain a margin of
vellum to lap onto the face first covered. If this is pasted
down very closely, it will be almost invisible.
If no blocks are available, three faces should be covered
before joining the two end pieces of newsboard, which should
then be covered as one piece. Lay each face as it is being
pasted so that one edge is at the edge of the desk or table,
and allow the rest of the case to hang over the side. (See
Plate XXXVII.) In this way the faces may be easily covered.
Next make a longitudinal cut on the projecting vellum as
far as the newsboard at each corner of the case. The resulting
laps may then be easily pasted down onto the inside of
the case.
Plate XXXVII. An illustration of the method of covering
the outside of the case when no block of wood
is available.
Over the narrow faces of the inner holder paste the
strips of vellum, cut for this purpose. Paste and fold their
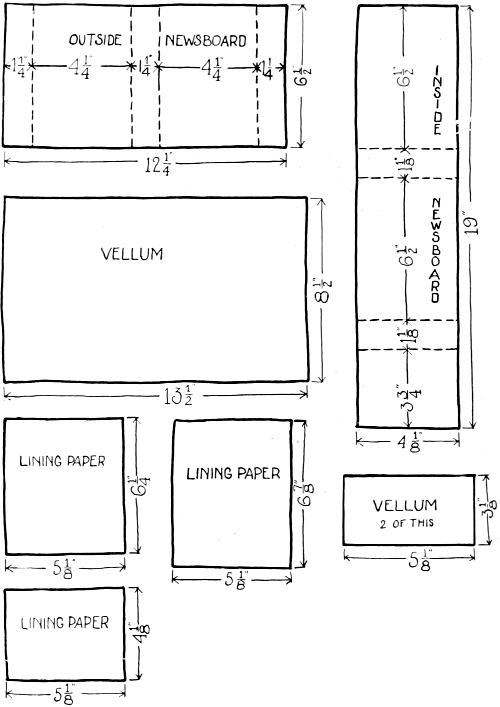
ends over the edges of the newsboard. These ends fit a little
better if two slits are made in each at the fold of the newsboard.
Cover the broad faces with the lining paper, turning
and pasting the laps over the edges closely. The corners
should be cut as in the flat objects described in previous
articles. This inner part should not be pressed as a flat piece
as this would cause the paper to crack open when folded for
use.
If desired, the inside may be lined with white paper, in
which case the pieces should be put in separately instead of
in one long strip. This is difficult for any but most skillful
workers.
B. A holder of similar construction, but of convenient
size to hold note or letter paper makes an excellent filing
case.
This box (Plate XXXVIII) by varying the size may
be used for holding pencils, checkers, a picture puzzle, or
for other purposes.
Accurately lay out the box on the newsboard as shown
in the drawing and cut on the outside lines, preferably
with the cardboard cutter. Along the edges of the base
score with a sharp knife or strong pin and turn up the sides
with the lines outside. The corners should be stayed with
a strip of vellum as shown to hold the box in shape.
Cut a strip of lining or other thin paper long enough
to extend around the box and lap over about ½ inch;
the width should be at least one inch greater than height
of sides. Paste this strip to the sides of the box allowing
surplus width to extend equally above and below.
At each corner of the box make cuts in the paper so
that it may be pasted to the inside of the box at one edge
and to the bottom of the box at the other. It is advised
that no attempt be made to line either the inside or the base.
The case should be enough larger than the box to allow the
latter to slip easily but not fall out. By making each side
of the case ⅛ of an inch wider than the corresponding sides
of the box, this is accomplished. It will be noticed that
three narrow faces are shown in the drawing. Lap the
broader outside face B over the narrower one A and paste
securely. This gives stability to the outside.
Cut a strip of vellum long enough to paste around the
box and extend beyond it at least ½ inch at each end.
Paste this to the foundation; at each corner make cuts in
the vellum, and paste projecting parts to the inside of the
foundation.
(A). This portfolio consists of two foundation pieces of
newsboard, covered and lined with paper and joined by a
back of vellum. Let the size and shape of these covers be
determined by the use to which they are to be put. They
may be for drawings, maps, compositions, etc. The size of
the newsboard will practically be the size of the finished portfolio,
and should be somewhat larger than the papers it is to
hold.
Plan the back, which consists of two pieces of vellum,
wide enough to allow for the space desired between the
covers, and also to lap onto each cover at least one inch.
One piece of vellum should be long enough to lap over the
ends of the newsboard about ½ an inch, and the other piece
should be about ⅛ of an inch shorter than the newsboard.
Plan the cover paper to be large enough to allow for ½
inch lap to fold over the three free edges, but remember to
allow a margin of vellum to show at the other edge. Plan
the lining paper to be small enough to allow the foundation
to extend beyond it at least ⅛ of an inch on all sides.
Make dimensioned sketches of all pieces and lay out and
cut all parts. (See Plate XXXIX.) Place the newsboard
foundations on the short piece of vellum the proper distance
apart, with equal amounts of vellum extending under
each. The newsboard, of course, will extend at each end a
trifle beyond the vellum. When the proper position is
determined, draw pencil lines lengthwise of the vellum indicating
the edge of each cover. Put paste on the vellum and
rub down well onto the newsboard forming the inside of the
hinge. To make sure that the upper and lower edges of the
covers are in a continuous straight line, place a rule or
straight edge against one cover, extending across and beyond
the vellum; place the second cover against the rule and the
edges will be in a straight line. (See Plate XL.) Paste
the second piece of vellum onto the outside and turn the
projecting ends over the newsboard, pasting them down.
Plate XXXIX. Dimensioned sketches
of the parts of a portfolio.
Properly place one foundation piece on the cover paper,
allowing the vellum to show where it laps onto the newsboard,
and draw around it. The amount of vellum which is
to show is a problem in space division. Just how much will
look well on the particular cover under consideration should
be carefully thought out.
Apply paste to the cover paper, noting that it requires
more skill to spread paste uniformly on a heavy paper than
on vellum or lining paper. Place one piece of newsboard
on the paper as previously marked, turn them over and rub
down. A piece of cloth held in the hand and used for rubbing
the surface prevents finger marks; or the rubbing may be
done on a piece of paper laid over the surface. The cover
paper should cling firmly to the foundation at every point
and this should be assured before proceeding. Apply paste to
the projecting laps, fold them over and rub down. Treat the
other half in the same manner.
Plate XL. Pasting the newsboard
to the vellum back.
It is desirable to tie the portfolio together on one side
at least. For this purpose secure tape of harmonizing color
and ⅜ or ½ inch in width. About ½ an inch from and
parallel to the front edges cut a slit through both paper and
newsboard of the same length as the width of the tape. (This
needs to be done with a knife or, better yet, with a chisel.)
Insert a piece of tape from 6 to 9 inches long in each slit and
securely paste at least 1 inch to the inside of the newsboard,
allowing the greater length to project from the outside.
Paste the lining paper on the inside of each half and this will
cover the pasted end of the tape. The portfolio is then
complete.
(B). By a different arrangement of tape the same kind
of portfolio may be used as a magazine holder or cover for a
paper book or pamphlet. Plan the newsboard foundations
to project ⅛ of an inch beyond the book on three sides. The
space between the two pieces of newsboard should be at least
an inch greater than the thickness of the book so that the
covers will lie flat when the book is inside. It will be seen
that with so wide a space the inner edge of the newsboard
will not extend as far back as the back of the book, and in
planning the newsboard it should actually be narrower than
the book. Make dimensioned sketches of all pieces and lay
out and cut all parts.
Plate XLI. A magazine in a stiff cover.
Construct the covers as for the portfolio, but insert the
tape as follows: About ¾ of an inch from both upper and
lower edges of the back cover, and just where the cover paper
laps onto the vellum, make slits of the same width as the
tape and parallel to the edges. Push one end of the tape
through from the outside and paste, with the end turned
toward the edge. Carry the tape over the adjacent edge
along inside of the cover and over the opposite edge where
it should be inserted in the second slit and pasted on the
inside as at the other end. A little slackness of tape is not
objectionable. The lining paper may come to the edge of
the tape, or, with more difficulty, be slipped under it.
Plate XLII. Simple borders suitable for use on a portfolio.
When one cover of the book has been placed under the
tape, it should hold it securely. (See Plate XLI.)
If desired, there is here an excellent opportunity for the
application of a cover design. This may consist of simple
straight line borders in lower grades, or of more elaborate
designs in upper grades. (See Plate XLII.) Lettering
also may be used either singly or combined with decorative
figures. The design should be carefully planned before any
attempt is made to place it upon the finished cover. Erasures
are always noticeable and should be avoided. It is
recommended that straight lines should be drawn with a
rule, and the distance of the border from the edge measured
either with a rule or a piece of paper. The decoration may be
applied with ink, crayons, or water color. Common ink
diluted gives the effect of a darker tone of the color of the
paper and as it is easily obtained it is on the whole a satisfactory
medium. (See Plate XLIII.)
Plate XLIII. Some cover designs made by students at the Sloyd Training
School, Boston, Mass.
Problem XIII
STATIONERY HOLDER
Time: 8 hours. Materials: Newsboard, vellum and paper.
A very satisfactory stationery holder (see Plates
XLIV and XLV) may be made by substituting pockets,
etc., for the plain lining of the portfolio. Make the outside
as described in Problem XII. Then cut for each half, a
piece of newsboard one-quarter of an inch shorter and
narrower than the outside pieces. Cover one of these
smaller pieces with the same paper that is used on the
outside turning over a margin of one-half an inch on each
of the four sides. At each corner attach suitable pieces
for holding a blotter. (See page 33.) When pressed and
dried this forms a lining for one side. The other piece of
newsboard should be used as a foundation for a “bellows
pocket” for holding stationery. First bind one long edge
with a strip of vellum having it show on the upper surface
for about an inch and a half. The pocket should be made
of vellum and when completed, should be as large as the
newsboard foundation. To give strength and stability
to this cut a piece of paper of the same size as the newsboard.
Plan and cut a piece of vellum 5 inches longer and
an inch and a half wider than this. Lay the paper lining
on the vellum with an equal amount of vellum projecting
at each end, and fold the vellum over one long edge of the
paper for its entire length and to the depth of about one
inch. Paste the hem thus made to the paper but do not
paste the broad face as this will cause wrinkling. Then
fold the vellum over each end of the paper sharply and make
a reverse fold one inch from the end. Place this vellum
on the newsboard with the hem of the pocket against the
bound edge of the newsboard, and on the other three sides
turn over the projecting vellum and paste to the under
side of the newsboard. Before pasting in this piece and
the blotter for linings, a fastener or tape should be
inserted as already described.
Plate XLIV. Stationery Holders (closed) made by students at the Boston
School of Occupational Therapy.
The holder may be made more elaborate by adding
a third page which should be narrower than the other two
and when folded together will appear as a flap. Cut a
piece of newsboard for its foundation and fasten to one
of the large pieces in the same manner as the two large
pieces are attached. To line this, cut a piece of newsboard
one-quarter of an inch shorter and narrower than the
outside piece and cover it with a single piece of vellum;
or pockets may be added and a strap for holding pen or
pencil.
Some very handsome cases can thus be made by using
wall papers on the broad faces. Narrow stripes or gold
bands used as border decorations on the corners of the
blotter or the edge of the pockets are very effective while
figures well cut may be appliqued to the outside or the inside.
Plate XLV. An open stationery holder made at the Boston School of
Occupational Therapy.
For fastening, use cord, tape or ribbon which should
be inserted before the linings are pasted in. To illustrate:
Pass a ribbon across the outside of the middle piece, putting
each end through a slit—say one inch from the edge—and
glue these firmly to the newsboard. Through a slit
in the other broad face pass another length of ribbon on
the end of which shall be a Japanese bead; on the narrow
face in similar fashion attach a loop of ribbon (made by
passing both ends through the same slit). When closed
the case may be fastened by putting the bead through the
loop.
Another style of fastener consists of a cord or braid
similarly inserted with a fancy knot in place of the bead.
Problem XIV
SEWING AND BINDING A BOOK
Time: 10 hours. Materials: Newsboard,[5] vellum, cover paper, white paper, tape, sewing
linen, and “super.”
There are several ways of sewing a book and even more
ways of binding it after it is sewed. The first method here
given is the simplest, and is such as is feasible in a fifth or
sixth grade without a sewing frame, a press, or other apparatus
than the simple tools required in the previous problems.
First determine the shape and size of the book. It is
better at first not to attempt a book which is very thick,
seven to twelve signatures being sufficient for a beginning.
A “signature” is the name applied to a folded sheet, several
of which go to make up the inside of a book. If the sheet is
folded once it is called a “folio”; if twice, a “quarto”; if
three times, an “octavo.” (See Plate XLVI.) These signatures,
when sewed together, form what is technically known
as “the book,” and the covers and back “the case.”
[5] A book-cover may be made of heavier newsboard than the articles
previously described, although in elementary grades it will probably be
more convenient to use one weight only. Number 30 is commonly used
for books of ordinary size (say 7½ × 5¼ inches), while for larger books
(10 × 7 inches) a still heavier board is used.
With a piece of cheap paper experiment a little, folding
it one or more times and if necessary trimming the edges to
change size or proportions. When the size is determined,
cut a sufficient number of sheets, fold, and “stack” (pile)
them for sewing. If the paper provided is too small to be
used for a “quarto,” place one “folio” inside another which
will give two thicknesses of paper at each fold and will have
the same effect as a “quarto.” If desired, two or three
sheets of paper may be placed together before folding so
that there will be several thicknesses at the back.
Plate XLVI. Diagram to show methods of folding sheets of paper.
These signatures are to be sewed over three pieces of
tape, one to be at the middle of the fold, one from 1 to 1½
inches from each end, according to the size of the pages.
On the back of the first signature mark carefully the position
of the edges of each piece of tape, and additional points ½
an inch from each end. The latter points show the location
of the “kettle stitches.”
Replace this signature on the others and mark across the
backs of all, locating similar points on other signatures with
as much accuracy as possible. (See Plate XLVII.) The major
folds should then be “jogged up” evenly at the back, and the
minor folds at the “head” or top.
At each point on each signature make a hole for sewing
by opening the signatures and piercing through with a
needle from the back. Replace the signatures in the same
order as before. Cut three pieces of tape about three inches
long. Place the first signature on the deck or table with the
fold of the back toward the operator. The left hand should
be placed inside the signature to receive and return the
threaded needle which is pushed through from the outside
by the right hand. (See Plate XLVIII.) Pass the thread in
through the first hole (leaving an end long enough for
tying), out through the second hole, over the tape, in through
the third hole, out through the fourth hole, over the second
tape, in through the fifth hole, out through the sixth hole,
over the third tape, in through the seventh hole, and out
through the eighth or last hole of the signature.
Plate XLVII. Marking the signatures before stitching.
Close this signature and place the second signature on
top of the first; then pass the thread in through the eighth
hole of the second signature, and out through the seventh
hole, over the tape, in through the sixth hole and so on until
the thread comes out through the first hole. Tie the thread
to the loose short end in a square or hard knot. Place the
third signature on top of the second and proceed as before.
On reaching the end of the third signature, pass the needle
under the stitch connecting the first and second signatures
and through the loop formed by the thread. (See Plate
XLIX.) Pull tightly to form the “kettle stitch” which
should be made at the end of every signature hereafter.
In the same manner any number of signatures may thus
be sewed to form a book.
Plate XLVIII. Sewing a book over tapes.
For fly-leaves, prepare four single sheets folded once,
to be of the same size as the leaves of the book. Place these
folded sheets one on top of another leaving about ⅛ of an
inch of the folded edge of each exposed, the upper sheet
being protected by a piece of waste paper. Rub paste over
the exposed surface of all four at the same time. (See Plate
L.) Remove the upper sheet and with its pasted edge
downward place it upon the front signature of the book, its
folded edge being flush with the folded edges of the sewed
part, and the tapes thrown back out of the way. After rubbing
this sheet well down, open it and place the second sheet
inside the first, having its pasted edge downward also. See
that the folds exactly fit, and rub down the second sheet.
Turn the book over and repeat the process on the opposite
side. (See page 93-D). Before proceeding farther the “book”
should be dried under weight.
Plate XLIX. The needle is in position to form the “kettle stitch.”
Plate L. Applying paste to the folds of the fly-leaves.
Lay the “book” flat on the desk and with a wooden
mallet hammer the folds at the back which will make the
signatures lie close together. Turn the “book” over and
repeat the process. A few strokes are sufficient. Cover the
back with paste (or, if available, hot glue; do not attempt
cold), and rub it well in with the fingers that it may hold the
signatures together and prevent their spreading. Use only a
thin, even coat of paste; pull the tapes tightly across the
back, and paste their ends to the outside leaves.
Plate LI. Dimensioned sketches of the parts of a book.
Cut a strip of “super” a little shorter than the length
of the back, and wide enough to extend on to the fly-leaves
about 1 inch. Place this over the freshly pasted back and
rub it well on. Paste the part of the “super” which extends
onto each side to the outside leaves over the tapes. When
perfectly dry cut off about two-thirds of the width of each
outside leaf, leaving a stub onto which the super and tapes
are already pasted. The ends of these stubs should be slanted
by cutting from the binding toward the front of the book.
The “case,” which should be a trifle longer than the
“book,” should be constructed similarly to the portfolio but
without tape or lining paper, and with but one strip of vellum
(the long one) on the back. Plan to have the covers extend
beyond the front and ends of the book about ⅛ of an inch;
but as the newsboard foundations should set forward from
the binding about ¼ of an inch. Their width should
be a trifle less than the width of the pages. Make dimensioned
sketches of all pieces and lay out and cut all parts.
(See Plate LI.)
Place the pieces of newsboard on each side of the “book”
in the exact position they are intended to occupy. Take a
narrow strip of paper and attach its ends to the outside of
the pieces of newsboard (see Plate LII) so that when the
latter are removed from the “book” they will be attached
to each other the correct distance apart; that is the space
between them will be at least ½ an inch greater than the
thickness of the book. Place them on the vellum and
trace along the inner edge of each after ascertaining that the
distance between them is the same at both ends. Remove
the paper which connects the covers and paste them to
the vellum in the position already marked out, but do not
yet turn over the ends of vellum. Cut a strip of heavy paper
of just the width of the back of the “book” and paste in the
middle of the piece of vellum, after which the ends of vellum
should be turned over and pasted down. Complete the
“case” by pasting on the cover paper after which it should
be pressed and dried.
Plate LII. Determining the distance
between covers.
When this is done place the “book” as far back in
the “case” as it is possible to do and be certain that the
edges of the covers are in alignment. Make tiny pencil
marks at the front edge of the leaves to guide the placing
of the “book” after the paste is spread. When necessary
lines or points have been located remove the “book” from
the “case” and prepare to paste.
Under the first whole leaf place a piece of newspaper
considerably larger than the “book” to protect the pages.
Spread paste over the surface of this leaf, first under the
stub which should then be pushed down with the brush
to hold it securely to the outside leaf; then cover the outside
of the stub with paste. Place the “book” in the
“case” following the guide lines previously made, and
press the covers together with the hands. Lay the book
on the desk or table with the pasted half down. (See
Plate LIII.) Open at the pasted leaf a very little way and
carefully rub the lining onto the cover, smoothing out any
wrinkles which may appear. Turn the book over and repeat
the process with the other cover. Do not open wide until
the book has been pressed.
Plate LIII. Pasting “book” inside the “cover.”
This should be done very effectually and for this
purpose two boards clamped together with handscrews
make a better press than a weight. If two thin pieces of
tin, zinc, or blotting-paper are placed between the “case”
and the “book” while in press it will prevent the moisture
from being absorbed by the leaves, causing them to wrinkle.
Variations
Several variations of the “case” are possible.
(A). The simplest is to cover the outside corners with
vellum. If this is to be done, the vellum corners are to be
applied before the cover paper. The width of the corner piece,
exclusive of the laps and measured on a line bisecting
the right-angle, should equal the width of the strip of vellum
which shows at the back. This rule holds true in all high class
bindings such as morocco, Levant, calf, etc. (See Plate LIV.)
By experimenting a little, a pattern (trapezoid) may
be made for the corner pieces by which to cut them. (See
Plate LIV.) Plan these pieces to extend under the paper
at least ¼ of an inch.
Plate LIV. Diagram to illustrate the size of separate corners, also
method of cutting them.
After the cover paper has been cut in rectangular shape,
according to the original plan, the two outside corners should
be trimmed to allow the proper amount of vellum to show.
This may be accomplished in one of two ways. Using the
same pattern as for the vellum corners, fit its two opposite
non-parallel edges as close to the corner as possible and cut
along the inside edge of the pattern. Or, one may place the
newsboard on the paper and trace around it, lay off the size
of the finished corner and cut on the resulting oblique line.
After the vellum corners have been pasted on firmly, place
the cover paper carefully and paste it on as already described.
(B). After the “case” is completed in either of the two
ways described, it may be decorated with lettering or by the
application of other design. In this instance the suggestions
given in connection with the portfolio should be followed.
(C). The entire “case” may be covered with vellum.
Generally a cloth covering is not desirable on a hand-sewed
book, but if for a special reason one is to be used, have a single
piece of vellum cut large enough to cover both back and
sides. After finding the correct distance between the two
pieces of newsboard, lay them on the vellum, in the manner
already described, trace around them, and complete the
“case” by pasting.
Problem XV
SEWING A BOOK ON A FRAME
Time and Materials: As for Problem X, except bookbinder’s twine is to
be used instead of tape.
To carry out this problem a few common wood-working
tools will be necessary. A sewing frame may be made by
older pupils, a working drawing for which is here given. (See
Plate LV.)
The wooden upright screws may be purchased. Instead
of tapes the book is to be sewed on bookbinder’s twine.
Cut three pieces 6 inches longer than the distance between
the upper and lower bars. Tie one end of each securely to
the upper bar and slide them along to position. (See Plate
LVI.) Tie the other ends to the lower bar, pulling them as
taut as possible.
The signatures should be “jogged up” and carefully
placed in a vise, back up and extending above the jaws about
half an inch. It may be better (depending on the shape and
size of the vise) to place the signatures between two boards,
and then the whole in the vise. On the back of one signature
mark off the position of the “kettle stitches” and twine
5 points in all—and, if T-square, try square or triangle are
available, square lines across; otherwise lay off these points
on both outside signatures and thus insure cuts which shall
be “square across” the back. At each point saw across all
signatures with a back saw, making a cut about ⅛ of an inch
deep. Hold the saw perfectly horizontally, that the cuts
may be of uniform depth on all signatures. If vise and saw
are not available, V-cuts may be made on each signature
with scissors instead.
Plate LV. Working drawing of sewing-frame.
To sew a printed book, begin at the front with the
“head” toward the right. Place the first signature on the
frame (page 1 down), with the back toward the operator
and the three inside cuts against the twine, leaving the cuts
at the ends for the “kettle stitches.” If necessary, move the
pieces of twine along the bars so that they exactly fit the
cuts and sink into them. (See Plate LVI). Tighten the
twine by turning the wooden nuts and commence to sew.
Hold the signature open with the left hand, and, commencing
at the head, (right) insert the needle from the outside through
the first hole. Bring the thread out through the second hole
on the right of the twine, cross it, and return the thread
through the same hole on the left of the twine. It will be
seen that this process is virtually the same as sewing over
tapes. Continue across the first signature and, when completed,
close it, lay the second signature on top, and, in the
same manner, sew across it from left to right. Pull the sewing
threads tightly and always forward in the direction of
the sewing. If they are pulled backward, the paper will be
torn.
Plate LVI. A sewing-frame in use.
After sewing across the second signature, tie the thread
to the loose end as in a book sewed on tapes. When the third
signature has been sewed, make loop stitch as already illustrated,
(forming a part of the “kettle stitch”) and repeat
this stitch at the end of each signature. When the sewing is
finished, grasp the book firmly and slide it up on the cords
about 1½ inches; then cut the twine from the frame, leaving
about 1¼ inches projecting beyond the book on both sides.
Pull the twine with both hands to straighten it. Put in
fly-leaves and “super” and bind as before. The ends of the
twine should be frayed out, and, after the fly-leaves are in,
pasted in fan-shape to the outside leaf. Put on the case as
shown in Problem XIV.
Additional Points
(A). The binding may be made stronger by “whip-stitching”
the fly-leaves after they are pasted in. For this
purpose, take an ordinary sewing needle (about No. 2) and
linen thread (No. 35). Begin at the right and, with “over-and-over”
stitches about ¼ of an inch apart, sew through
the outside signature and the fly-leaves. A knot should be
made at each end to fasten the threads. Turn the book over
and repeat the operation on the opposite side.
(B). If heavy paper is used for the fly-leaves, the outside
leaf should be torn or cut off carefully before putting
on the case. Leave just a narrow margin at the fold to hold
the other half from coming out. This being done, there is
but one thickness with which to line the cover, but two free
leaves are left as before.
(C). Head-bands may be used on a book sewed on a
frame. Cut pieces to fit across the back of the book and
paste one at each end after the “super” has been pasted on.
(D). Any book is made more attractive by using
colored “end papers” or fly-leaves. These may be of the
same material as the cover or of contrasting material.
A small surface pattern worked out in crayon or water
color for this purpose makes an excellent problem in applied
design and at the same time adds much to the appearance
of the book. When using any paper for fly-leaves which
has a right and wrong side, the sheets should be folded
wrong side out. Note that only two folios of colored paper
should be used while the other two are white—that is at
each end of the “book” there will be one white folio with
a colored one inside it. When stacking the sheets to apply
the paste, place a colored sheet at the bottom, then a white
sheet, then a colored sheet, and a white sheet on top.
When pasting these to the book, this brings a white sheet
first and a colored sheet inside, so that when pasted to the
“case” one-half forms its lining and the other half is free.
Problem XVI
REBINDING A PAPER-COVERED BOOK
Time and Materials: As for Problem XIV or XV except the “book.”
Signatures for sewing may be obtained by taking apart
some good paper covered book. Foreign books frequently
come in this shape, and are much less expensive than in any
other binding.
Carefully remove the cover and the sewing threads, if
any, and scrape the glue from the back. Then proceed with
the sewing and binding as already described.
It may be desired to have fly-leaves of lithographed or
lining paper. In this case have two rather heavy sheets of
such paper folded once with the plain side out, and two
folded sheets of white paper. When pasting these onto the
book, place a white sheet first, and then place a figured sheet
inside it. When completed, each cover will have a lining
of figured paper faced by a fly-leaf of the same, and a plain
second fly-leaf next to the printed pages.
Problem XVII
BINDING NEW PRINTED SHEETS
Time and Materials: As for Problem XIV or XV except the “book.”
Unsewed but printed signatures may sometimes be
obtained from a printer or publisher. Fold and assemble
the sheets, using great care to observe the correct order.
Sew and bind by one of the methods already given.
Problem XVIII
REBINDING AN OLD BOOK
Time and Materials: As for Problem XIV or XV except the “book.”
A school book whose leaves are still in good condition,
but with broken cover or loose binding, may often be preserved
for much longer service by rebinding. Sometimes
one has a worn book which has personal value, and a new
cover is desired.
First remove the old covers, being careful not to injure
the leaves, pull out the sewing threads and remove glue,
“super,” and fly-leaves.
Some repairing may also be necessary. Torn edges may
be pasted together or faced with gummed tissue, or, if the
tears are not to deep, the edges may be trimmed off.
Broken places in the folds may be mended if necessary
by using strips of paper about 1 inch in width and as long as
the leaves. If many strips are pasted onto the folds, the
back of the book will be thick and bulky. For this reason,
a thin tough paper should be used. Paste the fold of two
adjoining leaves lengthwise on the center of one of these
strips, so placed that, however badly torn, the leaves will
assume their proper position, and the extra piece will be on
the outside of the fold.
Illustrations are usually printed on a single sheet, often
of paper different from the leaves of the book. To insert
these, cover the back with a piece of waste paper, leaving a
margin along one edge as in the case of the fly-leaf. Cover
this margin with paste and insert the leaf in its proper place,
pasting it down to the adjacent leaf. The illustration should
usually be on the right of the book.
When all repairing has been done, re-assemble the signatures
and bind as a new book.
ORIGINAL PROBLEMS
A final test of the pupil’s efficiency lies in his ability to
plan and carry to completion an original project. Originality
does not consist in making an article never heard of
before, but in adapting to one’s specific needs, principles and
processes already learned through class instruction.
A fitting close to a course in elementary book-binding
is such a problem. If pupils choose to make articles
such as the memorandum pad or the hinged covers which
have already been taught, they should be accepted as original
work, provided that each pupil selects the size and
proportions himself, and does not depend on the teacher to
repeat the instruction in detail. Yet more credit should be
given one whose originality extends further as in the case
of a boy who made for his father’s use a holder for conductor’s
checks, or the one who made a mount for telephone
numbers.
All articles constructed should be such as are appropriately
made of the materials used. Models, such as are
sometimes made of cardboard, to be constructed later of
different materials should be excluded from this course.
It is by no means essential or desirable that originality
be held in abeyance until the end of the course but rather,
it should be fostered during each succeeding lesson. The
pupils who work more rapidly than the average of the class
may always have on hand an extra piece of work to be done
when the regular assignment has been completed.
The adaptation of any problem to a specific purpose
should always be considered an opportunity for the development
of class originality. For example, a principal may want
several portfolios in which to keep a particular kind of
papers; or a set of hinged covers to hold a “Course of
Study” may be desired for each teacher’s desk. These
should be considered class problems and worked out as
such.
It should be continually borne in mind that the object
of the course is the development of the child. When he is
conscious of the ability to make an article of intrinsic value
a long step has been taken. “To help the pupil to help
himself” is the highest aim of education.
TEAM WORK
Some of these problems may be given, especially in
older classes as “team work.” The class may be divided
into sections doing specific parts of the work under a foreman.
This method is a good one when the aim is the output
or when an insight into the construction of articles in large
quantities is desired.
AFTERWORD
The border-line between educational handwork and
technical bookbinding has now been reached, and it is not
the writer’s purpose to cross it. If this book of problems
assists others in solving the quest for interesting and educational
handwork, its mission will have been accomplished.
Transcriber’s Notes:
Variations in spelling and hyphenation are retained.