45
The word taxidermy is derived from
the two Greek words, taxis, which
means arrangement, and derma which
means skin. Hence this term is applied
to the art of preserving and
mounting the skins of animals for ornamental
and scientific purposes. Little is
known of the origin of this art, but it
would seem from books of travel and
natural history, that it is at most, not
more than three hundred years old. It
began to be practiced in England about
the beginning of the 18th century,
which fact is proven from the “Sloane
Collection” which was formed in 1825,
46as the nucleus of the present natural
history collection lodged in the galleries
of South Kensington. It was
about the middle of the 18th century
that the first book devoted to the principles
of taxidermy was published in
France. After this, others appeared
from time to time in France and Germany,
but England contributed no literature
on the subject until about the
beginning of the present century. In
1828 an Englishman named Scudder,
established a museum of mounted specimens
in an old alms house in New York
City. Previous to this, the art seems
to have been absolutely unknown in
America. It was not till the exhibition
of 1851, that the French and German
taxidermists taught the English
the principles of scientific treatment.
Since that time several works have
appeared from the pens of English and
American authors. Prominently among
the American writers, were Charles
47Waterton and Titian R. Peale who
greatly improved the art in this country.
Jules Verreaux, of Paris, brought
the art to a still higher perfection, and
introduced methods for giving to specimens
a life-like expression, which elevated
it quite to the realm of higher art.
Great were his accomplishments in the
art of expressing the actions and characteristic
attitudes of the living animals.
Since his day taxidermy has
rivaled the plastic art, and today, it has
reached such a degree of perfection
that the most artistic and æsthetic
effects may be wrought by the hands of
any operator who possesses artistic faculties.
The Illinois State Natural History
Society of Bloomington, published
an illustrated pamphlet from the pen
of one Mr. Holder, which is a very valuable
contribution to taxidermic literature.
The author was doubtless
greatly improved by his associations
48with Audubon and Bell, and in his
book he gives the results of a ripe experience.
This book ranks as one of
the best yet published. We submit
the results of our own patient study
and practical experience, and hope it
may prove a worthy addition.
Immediately after
the bird is killed, the nostrils,
throat and wounds
should be stuffed with
cotton to prevent the
blood from oozing out
and staining the plumage;
but should any
blood get on the plumage,
it should be removed
as soon as possible.
49This can be done by taking a
cloth or sponge and dipping it in clean
water, wringing it out so as to leave it
only moist, and rubbing the feathers
gently until all traces of blood stain are
removed. Now sprinkle the feathers
with plaster of paris, and shake out
before it sets. Repeat this until they are
perfectly dry,
and then wrap
the specimen in
paper to protect
the plumage until
ready to skin,
which should be
done as soon as
the bird cools.
In proceeding
to skin a bird,
spread a cloth on a board or table and
lay the bird on its back. Separate the
feathers on the breast with a scalpel or
knife. Insert the knife at the top of
breast-bone and cut the skin from there
50to the tail. Great care should be taken
not to cut too deep over the intestines,
as it is only necessary to cut through
the skin. Now begin where you first
inserted the knife and proceed to separate
the skin from the flesh, either with
the fingers or the back of the scalpel or
knife. Tear some small pieces of
paper, say about an inch square, and
put under the skin on the flesh as you
get them separated, which will keep
the feathers from sticking to the flesh
and becoming soiled; or sprinkling
cornmeal over the flesh and skin while
skinning, will answer the same purpose.
Press carefully down each side
to backbone. Now press the thighs forward
and inward, draw the skin from
the thighs, unjointing them at the first
joint from the body.
The skin is now removed over the
rump, and the tail unjointed, taking
care not to injure the tail feathers.
Now for convenience, take a cord and
51fasten it to a nail on the wall or ceiling,
put a wire hook on the other end, and
fasten in the bird so you can suspend
it high enough above the table to work
on it easily. Now pull the skin downwards
until you get to the wings,
which are to be unjointed at the shoulder
joint. It is then pulled down over
the skull until the ears are reached.
Here many valuable specimens are
spoiled by cutting the ears too close to
the skin, so be sure to cut the ears
close to the skull.
The eyelids are often spoiled also by
inexperienced hands. Be sure and cut
them well back and, if necessary, trim
them afterwards. Now remove the eyeballs
and unjoint the skull from the
neck, enlarge the opening at the base
of skull, where the neck came off, and
remove the brain with spoon made
for that purpose. Now remove the
flesh from the thigh bone down to
knee joint, and turn them back in place;
52then skin the wings out to first joint
and remove the flesh. There is yet one
job and the skinning process is completed.
Divide the feathers on the under
side of the wing between the second
and third joints, cut the skin, and with
a sharp knife cut out all flesh from the
bone, and put in some of the preserving
powder; cover it with a little cotton
and sew it up, being careful not to draw
any of the feathers in; press the feathers
down smooth, and see that each is
in its proper place.
There are some birds with large
heads and small necks. With these we
cannot draw the skin over the head,
but have to push the skin as near the
head as it is possible, and cut off the
neck bone; then make an opening under
the throat large enough to turn out
the skull and the remaining part of the
neck bone, and proceed to skin the skull,
take out brain, etc., as directed heretofore.
The flesh must be carefully removed
53from all parts of the skin, and
the preserving powder applied, being
very careful that all parts are well powdered.
If you now wish to mount the bird
it can be done immediately.
In the first place take some plaster
paris, mix it with water to a stiff paste,
and fill the eye-sockets with it, then
press the glass eye in the paris, using
great care to set them in as near a natural
position as possible. When the
plaster has hardened, which it does
very quickly, if the skin has become
dry, dampen it with a damp sponge,
and turn it back over the skull, then
lay the bird on the table and proceed
to put in the frame, stuff and sew up.
I give three kinds of frames. One
is the wire and wood frame, which you
see on page 78, Figs. 9 and 10. The
others, wire frames, on page 80, Fig. 3,
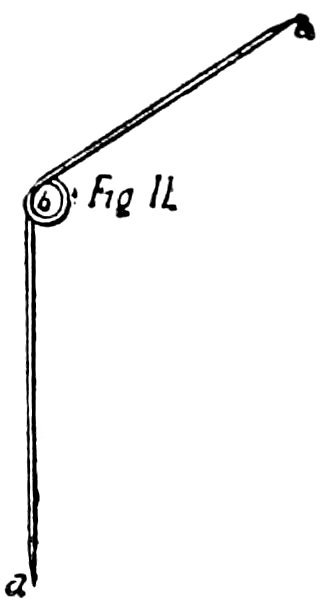
54for birds; also Fig. 11, for humming
birds and other small birds, on page 78.
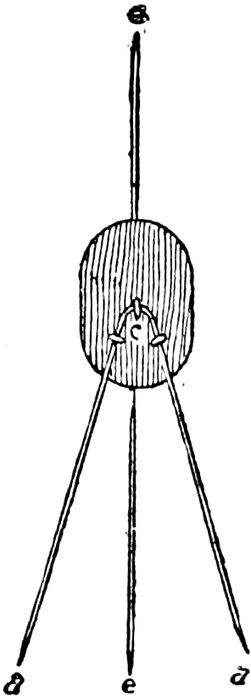
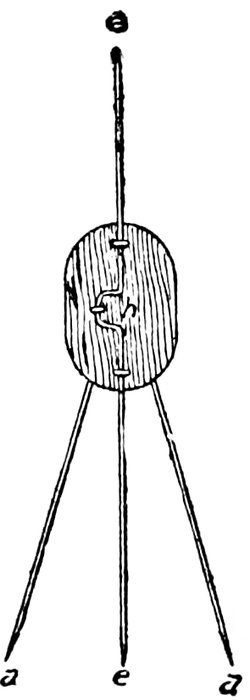
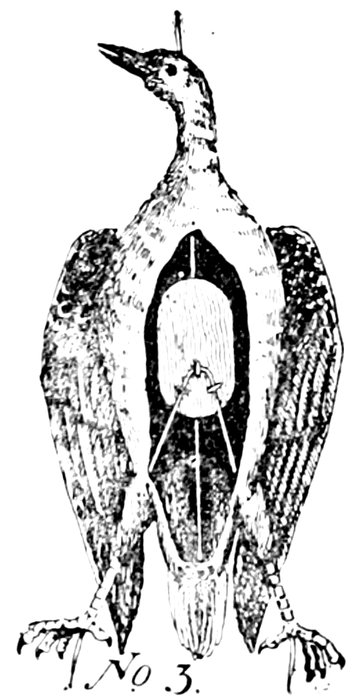
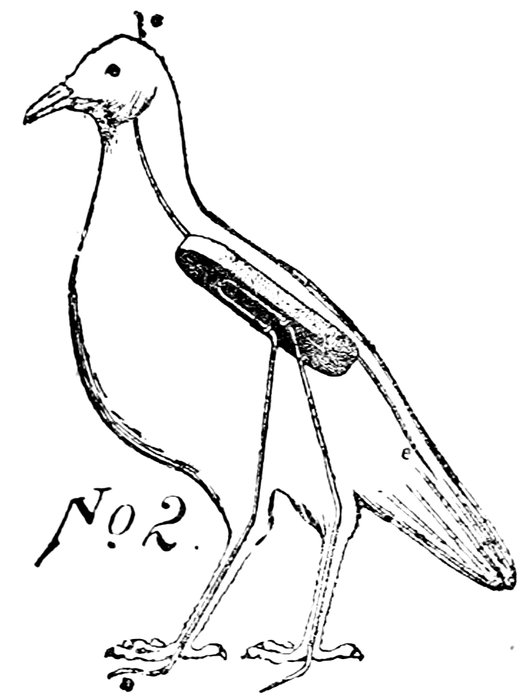
Take frame described Nos. 9 and 10,
having the leg wire AA detached from
body board, fill the neck with tow, being
careful not to fill it too full; run
neck wire E through the center of the
neck and pass it out at the top of head,
as shown in Figs. 2 and 3, or through
one of the nostrils. I prefer the latter,
because it does not break the skin and
holds the head more steady. Then put
the tail support E through the center
or heavy part of the tail, raise the body
board and place under it some tow or
cotton; or pad the board by placing
some cotton on it and tacking some
cloth over it to keep the frame off from
the back; then take the leg wires, Fig.
13, AA and put them in the legs, as
shown in cut No. 3, and fasten on to the
body board with blind staples, as represented
in cut No. 3; proceed with the
stuffing; finish filling out the neck and
55breast, shaping it while filling, using
care not to get it too full, as that is a
fault of most beginners; after filling it
down to the opening, the next should
be the legs; if the leg bone is left in
from the knee up, wrap it to the leg
wire with a strip of muslin and tie it;
then stuff the leg up to the body, fill
the body and sew up; in sewing be careful
not to draw any of the feathers
down with the thread. After it is all
sewed up, place all the feathers down
smooth and in their proper place, as
much depends on this.
Next place the specimen on a board
or perch; if on a board, procure a suitable
one, bore two holes the size of the
leg wires through it, then make a
groove on the under side of board running
off from each hole to lay wire
down in; place the specimen on the
board, running the leg wires through
it, and draw the wires down until the
legs set in proper position, bend the
56wires down into the grooves and fasten
them with small blind staples. In this
connection one should use his own judgment
in placing the bird on the board;
one leg should generally be placed a little
in advance of the other. If the bird
is to be placed on a limb perch, bore
the holes through the limb, place the
bird on, and draw the wires tight, and
drive a wooden wedge in beside the
wire to hold it, then file the wire off
close to the under side of the perch.
Pose the bird in as natural a position as
you can, imitating nature as near as
possible. Place the wings in position,
then take a piece of wire heavy enough
to hold the wings in place. Sharpen one
end, and make a square turn about one-fourth
of an inch from the other end
to keep it from pulling through the wing.
Now place the wings in proper shape.
Pass the wire through the wings and body
in a way to hold them in shape. Pull
the wire until the turn on the one end
57presses against the wing. Cut the wire
on other side of bird and turn it back,
as on the other side, so that the wire
cannot be pulled either way; then arrange
the whole body—wings, neck,
tail, head, etc. In case the specimen
is a web-footed bird, take a thin piece
of board, say from a cigar box, cut it
to fit in between the toes, and tack
them in to hold the web in shape while
drying. This should be removed when
dry. After all is completed bathe the
buts of wings, the feet, legs and beak,
with the preserving fluid; this should
be repeated for three or four days.
Then let the specimen dry in a shady
place. It can then be placed on another
board or perch and set in the cabinet.
(See directions for making frame.)
Skin the bird and prepare it as
directed in this article. Fill the neck
with tow, put in neck wire, letting the
58end come out through the nostril; bend
leg wires AA back so as to get them
in the legs; run them down on the inside
of the leg, or through the center
of leg bone, and come out in the center
of the foot. (See cuts Nos. 2 and 3.)
Put tail support E through the under
part of the tail, and proceed as directed
heretofore in this article, to
stuff, sew up, etc.
Where the tow can not be secured
and you have to use cotton in stuffing,
always put in the neck wire first, and
stuff around it or wrap the neck wire
with strips of muslin, old calico, or
anything that can be used for that purpose,
always being careful not to make
the neck too large. Excelsior can be
used to good advantage in stuffing large
bodies.
In dressing a pelican always use the
board and wire frame. For position,
59copy after some picture of the bird,
which you can find in any natural history.
The only difference in dressing
from the goose, etc., is they have a
game sack under the lower jaw, which
is often as much as ten inches wide and
sixteen inches long. I find the best
way to dress that is to take a fine shingle,
wide and long enough, and trim it
in the shape of a sleigh runner, and
put it inside of the pouch or game sack,
with the straight edge up and the
square end toward the neck. Draw
the pouch smooth over the shingle,
and tie the bill together, then wet well
with the solution of corrosive sublimate.
The board should be left in.
Wire can be bent and placed in to answer
the same purpose.
In dressing a pea-fowl, where the
wings and tail have to be spread, extra
wires have to be put in. The wires
60for the wings are fastened on to the
body board, as when used for the fore
legs of animals. Then, for the tail
support, take a wire about five feet
long and bend it in a hoop shape, leaving
enough of the ends to extend into
and fasten on the body board. This
must be put on the board before putting
it in the body. Dress the bird as
others, letting the hoop or tail support
extend out under the tail. After it is
all stuffed and set on the board, bend
the tail support up back of tail, and
fasten the feathers of the tail to it by
tying them, one at a time, with a heavy
thread, in such a way that when all are
fastened to the wire they will stand as
when the bird was strutting. Arrange
the wings and body to suit and let dry.
To dress a bird with wings spread,
either flying or sitting, it will be necessary
to put in wing wires to hold the
61wings out. The easiest way is to use the
wire and board frame, using the front
leg wires as used in animals, for the
wings. See Figs. 7 and 8, board and
body frame.
In dressing a bird this way, after
skinning and wiring, as directed for
bird, using frames 9 and 10, put in the
wing wires and fasten them to body
board, as directed for forelegs of animals.
If wishing to represent the bird as
flying, take four cords and fasten them
to the back of the bird in a way that
will balance it; tie them together a few
inches above the back and extend one
cord longer than the others. It can
now be hung from the ceiling by the
cord; this will let the specimen turn
about and present a fine appearance.
The feet should be placed in as near a
natural position as possible as when
flying. In all large footed birds use
plenty of the solution of corrosive sublimate
62or turpentine. The carbolic acid
and water mixture is also used, and is
good.
As a test case take a bird after killing
and smear it all over with blood,
let it lie until dry. Then put it in a
basin, and give it a good washing with
soap and water, then rinse it clean.
Now take a dry cloth and wipe it until
almost dry. Then sprinkle it with dry
plaster of paris and shake it out before
it has time to set. Repeat this powdering
and shaking until it is perfectly
dry, and the feathers will look bright
and nice. Try it.
Take a large moth fly or miller full
of eggs. Make an incision on the under
side of body and take out all the eggs
and entrails. Now put in some of the
preserving fluid and fill the cavity with
63cotton and sew it up. Then run a pin
down through the body and pin it to a
board. Arrange its feet, moisten its
body with the preserving fluid and the
job is complete. Butterflies and small
bugs need only the preparation over
the body. Heavy bugs can be placed
in a cup and the preparation poured
over them. Let them lie in it a few
hours and pin on board as directed in
moth flies. When dry place in a glass
case.
As soon as an animal is killed, take
cotton and stuff in the wounds, nostrils
and mouth, as directed in Article I. for
birds; then let it cool before commencing
to skin. In skinning a specimen
be very careful about cutting holes in
the skin, and also not to stretch it by
64pulling on it while skinning. All being
ready, lay the specimen on its back,
make an incision from the breast-bone
back to the center between the hind
legs, being careful not to cut too deep
over the abdomen. Divide the skin
right and left, putting cotton or paper
on the body as the skin is removed, or
sprinkle with corn meal, as directed for
birds in Article I, to prevent the fatty
matter from soiling the hair. When
you come to the hind legs, pull the skin
down over the thigh joint, and unjoint
it, cut the leg off and skin down to the
knee joint and unjoint there, taking out
all the flesh down to the foot, then
treat the other hind leg the same way.
Now skin down over the rump and
back to the tail. The tail is hard to
skin. Take a forked stick, and after
pressing the skin as far down on the
tail-bone as possible, holding the bone
as tight in the fork as you can, pull
downward and the bone will slip out.
65If the animal is not too large it should
be swung up with a rope or cord tied
around the body just in front of the
hind legs, or by attaching a hook to the
rope which fastens into the flesh. Remove
the skin down to the forelegs,
and unjoint them at the body, and skin
out in the same manner as directed for
the hind legs, unjointing at the knees.
Now skin the neck and head, and when
you come to the ears cut them close to
the skull; fine specimens are often
spoiled by cutting them too far out
from the skull. We next come to the
eyes. Be careful not to cut the eyelids.
It is better to cut close to the skull and
trim afterwards than to risk spoiling
them. Remove the skin. Unjoint the
neck close to the skull, enlarge the
opening at the base of brain and remove
all the brains. Take out the eyes and
tongue and remove all flesh from the
skull.
This completes the skinning, except
66when the animal has horns. In that
case, proceed as above until you come
to the neck. Skin as far forward as
you can and unjoint the neck at skull.
Then cut across from one horn to
the other and loosen the skin around
the horns. Then make another cut
from between the horns backwards
along the neck far enough to make the
opening large enough to take the skull
out; skin out the skull and the skinning
is completed. The flesh must now be
cleaned from the skull by boiling until
tender, then scraping it, or simply by
cutting and scraping it.
Take out the brains, eyes, etc., we
are now ready to anoint the whole
inside of skin, skull, etc., with the
preserving powder. Put in the frame
and stuff the body if ready; if not, the
ears, nose, feet and lips must be well
wet with the preserving fluid and laid
away in a cool, dry place.
67
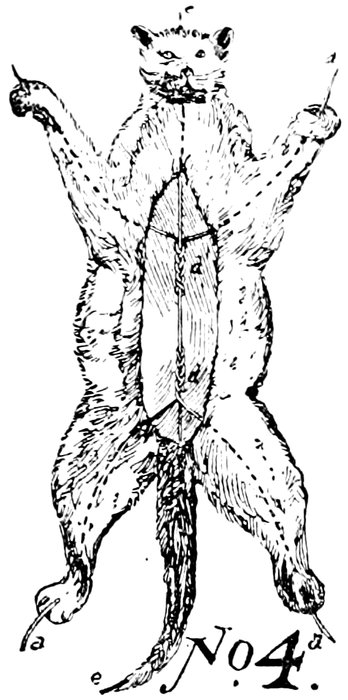
After the skin is prepared,
we will begin by
preparing the skull.
After cleaning as directed
anoint it with the
preserving powder, then
put in suitable eyes, as
directed in birds. Now
if the legs are large
enough to take in
the leg wires, drill
holes through the ends large enough to
receive said wires. Next divide the
skin of ears out to the points and place
a piece of tin in them the shape of ear.
Now turn the skin of head inside out
and sew up the mouth, draw the under
lip up under the upper lip and sew it
there so as when turned back the
stitches will not show. Next stretch
the hide on the bench and measure it.
In order to make the wire frame as
shown and described in wire frames,
68Nos. 4 and 6, make the frame of suitable
malleable wire, and place it in as
shown, except the neck wire should be
passed out at nostril. First put the
skull in place and pass the neck wire
through the nose. Then pass the leg
wires out through the leg bones, or on
the inside of skin where the bone is
not large enough to receive it. Now
cut the tail wire long enough to reach
to end of tail and put it in place.
Now, if the skin has not been previously
prepared with some of the preserving
preparations, powder the whole
inside with the arsenic and alum.
However, the head and legs have to be
prepared before putting in the frame.
We are now ready for the filling.
Stuff cotton in around the leg wires to
make the legs proper shape, being careful
not to get it in too tight. Take
some sand and mix some arsenic with
it; fill the tail with this, placing some
cotton at base of tail to hold the sand
69in. Now stuff the neck and body with
any suitable material, shaping and sewing
up as you proceed. Examine the
head, and where it needs filling out
pass the cotton in through nose and
ears, and shape it as in life, arranging
the ears, nose and mouth. Now pose
the specimen as you wish it to remain,
and place it in a cool, dry place
to dry. The leg wires should be bent
so as to allow the foot to rest on board,
and when dry the wires should be cut
off at bottom of feet, and the projecting
neck wire at end of nose should
also be cut off. Anoint the feet, nose
and ears with the preserving fluid once
a day for a few days. The wood and
wire frame is used in heavy animals,
the wood simply taking the place of the
wire along the back. By examining
the cuts it is easy to see how they are
to be used.
Wishing to stand animals, such as
squirrels, groundhogs, etc., on the
70hind legs, they have to remain on a
block or perch; so procure a suitable
block or perch, and varnish it before
putting the specimen on. Animals and
birds can be stuffed with hay, or anything
that you can get into them in
good shape. I often mow fine bluegrass
and dry it carefully, and find it
makes splendid stuffing, especially for
the bodies of animals and large birds.
Excelsior also makes a good filling.
In mounting a deer's head to look
life-like (having horns on), proceed to
skin, anoint with the preserving powder,
build up the nose with plaster
of paris, put in the eyes, sew up the
mouth and neck, for which see directions
in another article. Now take a
2×4-inch piece of pine for a neck support.
Fit the end of it in the brain
pit with plaster of paris. When the
plaster has hardened sew up the mouth
71as directed in cat. Draw the skin up
over the skull and sew the skin together,
drawing it close around the
horns. The skin being opened on back
of neck, sew it up to within six inches
of back end. Now make a board to fit
in back end of neck skin, and fasten it
to the neck support in such a way as to
hold the head on wall as desired. Tack
the skin around the board, being careful
not to draw the hair down. Stuff
the neck and finish sewing up. Cut the
skin off at back of board. Arrange
the whole head as directed in the cat
and set away to dry. See that the ears
and eyes are all right, and use plenty
of the preserving fluid. When the
head is completed make a suitable shield
to place on back end of the neck; this
should be of a neat pattern and nicely
polished. Fasten this on to neck board
with screws, then on the wall, also with
screws, which should be passed through
the shield, under edge of hair, to conceal
the heads of screws.
72
Take a scale fish, say one that weighs
two pounds, more or less, and if a fish
on which the scales are tight, you can
skin and dress it without losing any of
the scales; but if a loose scaled fish, it
will be better to protect them as follows:
Take some tissue paper and press
it gently on one side of the fish, then
73turn it over and treat the other side in
the same manner. The natural glutinous
matter which covers the scales will
be sufficient to make it adhere firmly.
Without this precaution the skin could
not be removed from some fish without
losing the scales, which would ruin the
specimen. When these papers dry, lay
the fish on its back, take a pair of scissors
and open the skin down the center
of the belly, beginning close up the
gills and running clear back to the end
of the body.
The skin should now be taken off
with great care, using a smooth-edged
knife for skinning, and a pair of scissors
to clip the fins and other fine
bones with. After the body has been
skinned, take out the gills, tongue and
eyes.
It is now ready for the preserving
powder, which should be spread or
dusted over the inside of the skin, being
careful to reach all parts around
74the gills, in the mouth, eye sockets,
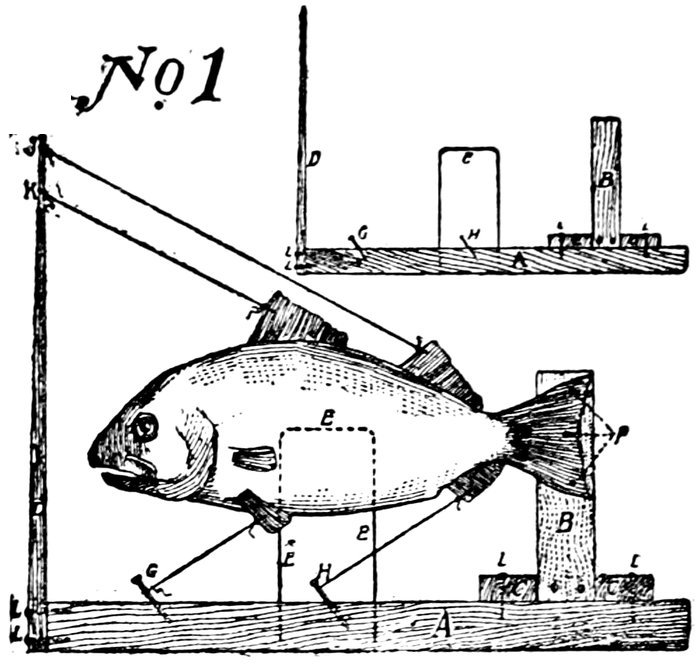
etc. We now insert the frame E (see
cut No. 1), which is simply a wire bent
as shown in the cut, and sew up, beginning
at the tail and ending at the gills,
leaving the ends EE of frame projecting,
as represented in cut No. 1. We
now proceed to fill the body with plaster
paris. Mix up a sufficient quantity,
take a funnel, open the gills or mouth
and insert the tube of the funnel therein,
and pour in enough plaster paris to fill
the body. Handle the body carefully,
and shape it properly, while the plaster
is setting, being careful to keep the
frame EE straight with the body.
When the plaster has set (or hardened),
bore two holes in a rough board to set
the frame rods EE in, which will hold
the body up off the board. (See cut.)
Now proceed to stuff the head with cotton,
being careful not to press the gills
out of shape, then draw the mouth together
with a thread and tie it. Fill
75the eye socket with plaster paris or
putty, and set the eye in the proper
position.
We are now ready for the fins and tail;
if they have become dry, wet them
with water and spread them out; then
take a needle and thread and draw them
up, as shown in cut No. 1.
To make the frame, take a rough
board, say one inch longer than the
fish you intend to dress. For a fish a
foot long, the board should be one inch
thick and about three inches wide, and
for larger fish in the same proportion,
or large enough to support the fish.
To one end of the board nail a piece
of lath a foot long (see D in cut); on
the other end nail a block (C in cut),
to which nail an upright piece (B in
cut). Tack the tail to the upright (B)
with tacks (P). Raise the upper fins
by drawing a thread through them and
tying to upright piece, as shown in cut.
Drive two nails in board (A), as shown
76(GH), to which fasten threads attached
to lower fins as shown in cut. Set
away to dry and when thoroughly dry
wash the whole body, take off the tissue
paper. When the fish gets dry, dampen
all the outer surface with corrosive sublimate
and set away. Take off the
threads and place it on a nice, smooth
board and give a light coat of varnish.
The specimen is then ready for the
cabinet.
Should you prefer to stuff the body
with cotton instead of using plaster
paris, proceed as follows: After skinning
as directed, make a frame, EE,
and take a straight piece of wire long
enough to reach from the point of the
nose to the other end of the body,
fasten this to the frame, EE, at the
upper end, by wrapping them together
with a small wire or cord, leaving the
frame EE as near the center as possible.
Take cotton or tow and wrap
the wire that is to run lengthwise of
77the body, say one-fourth as big as the
body, then insert it in the skin and
proceed to stuff with cotton, being very
careful to get the natural shape. When
this is completed, proceed to sew up
and mount as directed when dressed
with plaster paris. The Gar fish makes
a fine specimen, by simply filling the
skin with dry sand while drying, and
let it out when dry.
In hunting specimens, birds or animals,
it is best to take a double-barreled
shot-gun, have your cartridges loaded
some with fine shot, and some with
coarse; keep one barrel loaded with one
number and the other barrel with the
other number, then you are ready for
either small or large game. Have some
cotton and old newspaper with you,
78and as soon as you kill a specimen, stop
up the shot holes with the cotton, and
it is sometimes best to stuff some in the
nostrils and mouth. If any blood has
run out on the hair, or feathers, as the
case may be, wipe it off carefully, then
wrap the body in paper and pack it in
the game sack, using all care not to
bend, break or soil the feathers, for if
once soiled it is hard to make the work
look well again.
On removing the birds from the
game sack, if there is any blood on the
feathers, wash it out with clear water,
and wipe until nearly dry; then sprinkle
with plaster of paris and shake until
dry. In this way the feathers will
look smooth and natural; but if, after
washing, you let them dry without
stirring, they will present a bad appearance.
Where the blood has remained
on the feathers they must be well
washed and treated as directed in a test
case as given at close of Article I.
79
The above cuts represent my wood
and wire frames for animals and birds.
Fig. 7 is Fig. 8 reversed; Fig. 8,
showing the way the neck and tail supports
EE are fastened to the body board
with blind staples. Fig. 7 shows the
way the leg wires AA are fastened in
the same manner. In making the
frame, measure the animal from shoulder
to hip, and cut the board a little
longer than the measure taken; round
80the corners as shown in cuts, and round
the upper edges to keep them from cutting
the skin should it come in contact
with it. Now take a wire or rod long
enough to reach from the end of the tail
to the end of the nose, bend the wire
as shown in Fig. 8, and fasten it to the
body board with blind staples, unless
the specimen be a large one, then it
will be necessary to put them on with
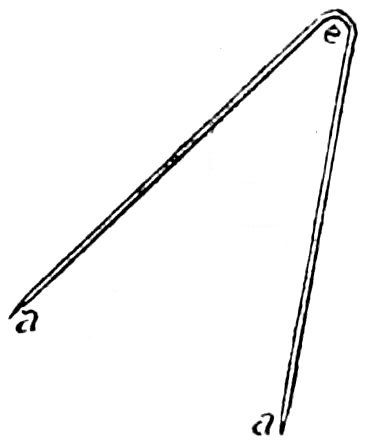
strong wire staples. Next bend the
wires for legs as shown in Fig. 12,
which should not be fastened to the
board until after being placed in the
legs of the animal being dressed. They
are then bent up as shown in Fig. 13
and fastened to the body board with
staples to suit.
The frame for birds is made in the
same way, excepting the forelegs, which
is used on bird frames only when wanting
to spread the wings. Fig. 11 is a
single wire frame, to be bent in the
manner shown, and to be used in dressing
small birds. (See small bird page 5).
81
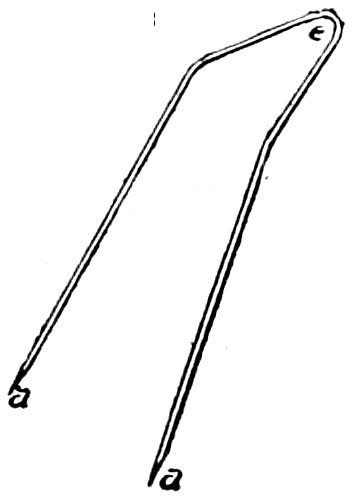
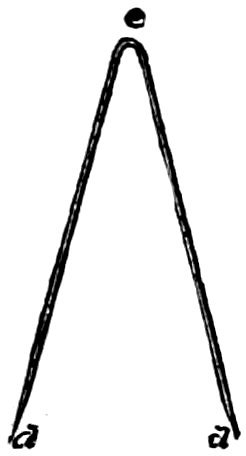
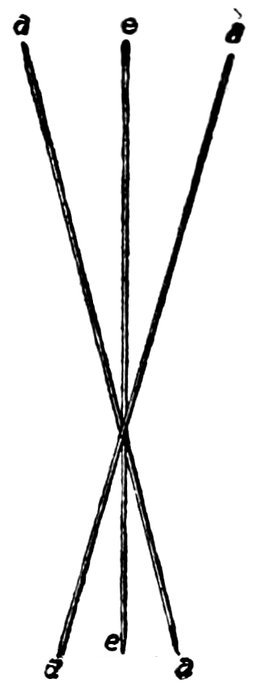
The above frames are made as
follows: Take a straight wire and turn
a loop in the center as shown at B,
Fig. 1. Take another wire about the
same length and bend it as shown
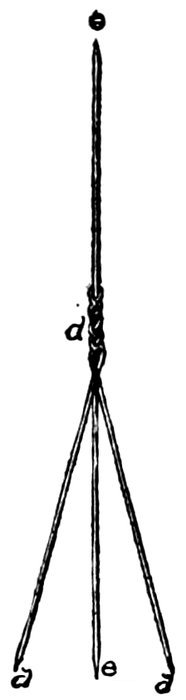
in Fig. 2. Now run Fig. 2 wire through
the loop B in Fig. 1 down to bend E,
fasten them in a vice at the loop B in
Fig. 1, and plait the three together as
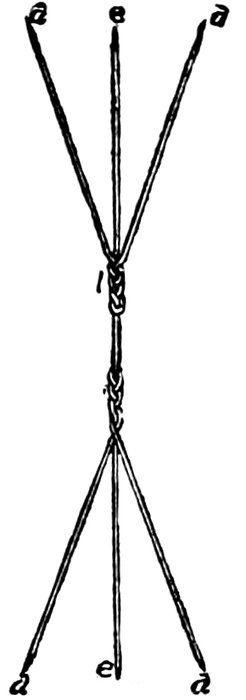
shown in Fig. 3. To form the Fig. 4
82frame, make another loop two or three
inches or further up the neck wire E,
bend another wire as Fig. 2, put this
through the loop, and plait together as
in Fig. 3. This forms the frame for
animals, as shown in Fig. 4.
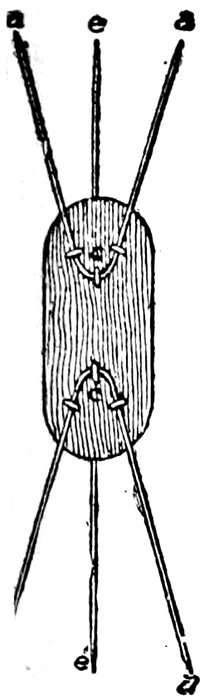
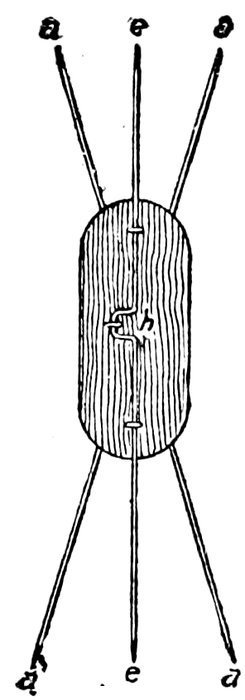
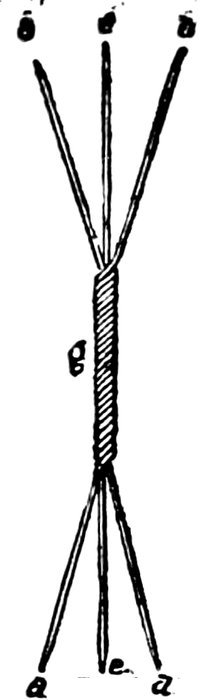
For Figs. 5 and 6, lay three wires
together as shown in Fig. 5, put them
in a vise and twist or plait together as
shown in Fig. 6. This forms three
wire frames—Figs. 3, 4 and 6.
The advantage Fig. 4 frame has over
Fig. 6, is that it is easier bent in the
center, there only being one wire.
It is not necessary to give more than
one way to dress a mole. An expert
can skin, stuff and sew up a mole in
ten minutes in the following manner:
After killing a mole, let it cool; then
83make an incision along the abdomen,
commencing at the tail and running
forward two inches, or about to the
center of the body. Skin out the hind
legs, bone and flesh, down to the foot
and unjoint. Press the skin back to
the tail and unjoint it close to the
body. Pull the skin off the body,
taking care of front feet, not to pull
them loose from the skin; unjoint them,
or break the arm bone close to the foot;
skin on down to mouth and cut the body
loose, leaving only the jaw bones in the
skin. Spread on the whole skin all the
preserving powder that will stick to it,
and turn the skin back inside out.
Turn the hind legs and proceed to fill
the body with cotton, using a wire to
stuff the cotton in with, as in all other
animals, being careful not to stretch
the skin, and also not to get the cotton
knotted up. After the body is filled
sew it up and place on a board to dry.
Place the feet in position, and wet
84them and the tail and nose with the
solution of corrosive sublimate.
Other small animals, such as rats,
mice, ground squirrels, gophers, etc.,
can be dressed in the same manner.
After stuffing smooth the hair and
shape the body before laying away.
A good sized turtle may be thoroughly
preserved without the tedious
process of unjointing, skinning, digging
out the flesh, sewing up, etc., by
observing the following directions:
Take a snapping, or any other hard
shell turtle, say one that measures ten
inches across the back, or smaller,
down to the smallest.
The first thing to be done is to kill
it, which is the hardest part of the operation,
85as it clings to life tenaciously,
and large ones are very strong and hard
to manage. One way is to get it to
open its mouth, and catch it by the under
jaw with a pair of strong pliers,
hold its mouth open and make it swallow
a quantity of the solution of corrosive
sublimate; this being a deadly
poison, it will soon kill it.
Another way is to hold its head as
far out as you can pull it, and stick it
as close to the under shell as you can,
running the blade well back into the
body. It takes some time for it to
die after being stuck.
And still another way is to open its
mouth and stick a knife blade up
through the roof of the mouth into the
brain.
I prefer the poisoning, as it seems
to die easier and quicker, and it does
not disfigure it. As soon as it dies, lay
it on its back, and make an opening in
the skin, under one of the back legs,
86large enough to take out all the entrails;
now take a pair of pliers or a
hook (made for the purpose); pull out
all the entrails, liver, heart, etc. If
the specimen is a large one, pour in
some water and rinse out thoroughly,
then put in a lot of the preserving
powder, being careful to get it well distributed
through the body. Then take
some cotton and dust it well with the
preserving powder, and fill up the inside,
pressing the cotton in tight, filling
the body full and sew up. Now open
the mouth and pour some of the solution
of corrosive sublimate down
its throat, and press some cotton
sprinkled with the powder down its
throat, being careful not to stretch the
neck out of proportion. Remove the
eyes and insert the artificial eyes in
their stead; fill the mouth with cotton
and close it. Cut a hole in the bottom
of each foot, and probe the legs with a
knife or the blunt end of a wire; pour
87in some of the solution of corrosive
sublimate, or work in enough of the
powder to preserve the flesh; if the tail
is a large one, it should be treated in
the same way, and all sewed up. Now
set it on a board and tack the feet to
the board in as near the way it would
hold them while walking as you can.
Pull the neck out a very little, and put
a little block or a small roll of cotton
under it to hold it up in position while
drying. Before putting it on the drying
board, take a small paint brush,
pour out some of the solution of corrosive
sublimate in a dish and give the
whole outer surface a thorough wetting.
This should be repeated once a
day for several days. This completes
the dressing. After the specimen is
dry, take it off the board and set in the
cabinet.
Another way: After killing, as directed,
lay the specimen on its back and
unjoint the breast shell from back shell
88with a chisel or heavy knife blade;
open the skin from the front part of
the foreleg back and around to front
of the other foreleg, cutting under the
legs. Skin out all the flesh and bones
of the legs and unjoint them at the foot,
skin out the tail, then unjoint the neck
bone from backbone, and skin it out
and unjoint at the back of the skull.
Take the flesh from back and breast
shells, then anoint all parts with the
preserving powder. Take a frame as
Fig. 8, in article V, of the wire and
wood frame, and put in legs, neck and
tail, as directed in animals, letting the
neck wire pass out through the mouth
or nostril. Stuff the legs, neck and
tail with cotton or tow, and sew up the
sides, leaving an opening to stuff the
body; fill the body, then finish sewing
up. In stuffing the legs, neck and tail
be careful to keep the wires in the center
of each. Open the mouth and take
out the eyes from inside and put in the
89glass eyes; put some cotton back of
them to hold them in place while drying.
Close the mouth, and wet the
whole body with the solution of corrosive
sublimate. This should be done
once a day for several days. Place the
specimen on a board to dry. For position,
copy after nature as near as possible.
After the skin is dry a coat of
varnish adds much to its appearance.
To kill a snake without bruising or
breaking the skin is a difficult undertaking,
for, as a general thing, we are
not looking for snakes, therefore we
are not prepared to capture one.
When we do run across them, we
generally kill them with the first thing
we get hold of. If the snake is not
too large, strike it across the back
90with a small stick. This disables him,
and you now have time to prepare to
finish him. Watch your chance and
when the opportunity presents itself,
tap it on the head a few times, and you
can soon kill it without bruising.
When it is dead, open its mouth and
cut the tongue and fangs out, then unjoint
the backbone from the skull and
skin back on the body an inch or two,
turning the skin inside out. Tie a cord
to the skinned part of the body and
pull on this with your right hand,
while with your left hand you pull the
skin off from the body, which is easily
done if the snake is not too large in the
center of the body; in that case it must
be opened in the largest part of the
body. Make the opening on under
side of body, lengthwise of the snake,
and long enough to allow you to remove
the skin all around the body,
then cut the body in two. Skin out
both ends, unjointing the body close to
91the skull, turn the skin right side out
and sew up the opening, taking short
stitches. Now mix some plaster paris
and water, leaving it thin enough to
run; place a funnel in the mouth and
pour the plaster in until the body is
full. Lay the snake on a level board
and coil it before the plaster gets dry,
placing the head in the position in
which you want it to remain. Take
out the eyes and put in the glass ones;
then wet the whole skin with the solution
of corrosive sublimate. This
should be repeated once a day for three
or four days.
Another method is to skin and sew
up as directed, then take a long wire
and stuff the body with cotton or tow,
being careful to get the stuffing in
smooth, so that no lumps will show on
the outside.
Another way is to fill the body with
sand, and when the skin has thoroughly
dried, make a hole in the under
92part of the body and let the sand run out.
In either of the above modes the
snake should be coiled as soon as
stuffed in the shape you want it to remain,
and plenty of the solution of corrosive
sublimate used over the skin.
Eels, frogs and toads are skinned
and stuffed in the same manner as the
snake, no frames being used.
Take an alligator, say five feet long,
make an incision the full length of the
body, on the under side, and skin out
all the flesh and bones, as recommended
in skinning animals. Scrape off all the
fat or flesh that may be left on the
inside of the skin, and give it a thorough
coat of the preserving powder.
Now proceed to stuff it without using
any frame. First stuff the legs with cotton
or tow, pressing it in very tight—their
93skin being very tough, there is no
danger of stretching it. Sew the neck
up, down to the front legs, and stuff
tight; now sew up the tail to hind legs
and stuff it; then take a piece of pine
board, say an inch thick, two inches
wide, and twelve inches long, place this
inside of the skin, draw the edges together
over it, and tack both edges
close together on the board, fill the
body up to the end of this board, and
put in another board in the same way,
and again stuff; when the full length of
the opening is closed up in this way,
before putting in the last section, have
the body thoroughly stuffed and put
the section in afterward.
The advantage in putting in the board
is this: It is almost impossible to sew
the skin, and as it is to lay flat, it is
much easier to use the boards; they
could also be used in the neck and tail,
if you wish to lay them straight with
the body. Lay the specimen on a flat
94board, and place his feet and tail as
you wish to have them. The eyes
should now be removed, some of the
solution of corrosive sublimate put in
the sockets, then put the glass eyes in
with putty or plaster paris. Close
the mouth and set a block under the jaw
to hold it up while drying. Give the
body a thorough wetting with spirits of
turpentine, repeating it once a day for
three or four days. After the skin
becomes well dried give it one or two
coats of varnish and you have a fine
specimen.
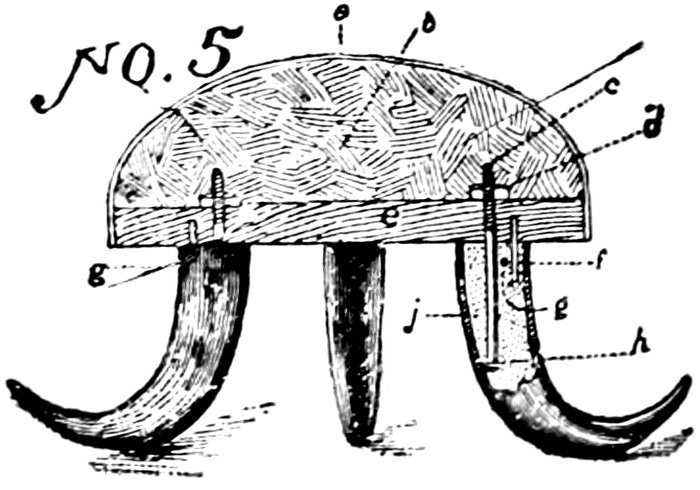
Letter (A)
represents the
covering, (B)
the moss or hair
filling, (C) the
bolt which fastens
95the horn to the stool brace, (D)
the tap of said bolt, (E) the wooden
base of stool, (F) a small rod or nail set
in the plaster paris, (G) a rivet through
the horn, (H) head to bolt, (J) plaster
paris in the horn.
Take three cow horns of good shape
and size; rasp them and sand-paper
down, as hereafter directed in Article
XII; then, after deciding what height
you want the legs, make a frame to
saw them off on, as illustrated and
directed in Article XII, cut No. 6.
After sawing off, drill a hole through
in the horn about three-quarters of an
inch from the large end. This hole
should be large enough to take in a ten-penny
nail. Put the nail through and
file it off even with the horn on both
sides, and rivet it with a small riveting
hammer. Now level up the ends of
the horns where they were sawed off,
96by taking a coarse piece of sand-paper,
and laying it on a level board, rub the
ends of the horn round and round on it
until it is perfectly level. Now take
the bolt C, of size and length to suit the
horn, put it down in the horn to see
that it will suit; sometimes it has to be
bent in the shape of the horn; after
fitting it to the horn, leaving about 1¼
inches projecting out to go through the
wooden base E and leaving room for
the tap D. Now mix some plaster paris
and water until about as thick as it
will run; pour this in the horn until
nearly full, put in the bolt, as shown,
and while the plaster paris is yet soft,
take an eight-penny wire nail and push
it down head first in the plaster paris,
leaving about half an inch sticking out;
this nail and the bolt should both come
straight up from the level of the end
of the horn. When the plaster is partially
dry, level up around the bolt and
nail at the end. The horn should now
97be polished as directed in Article XII.
The next is the wooden base E; have a
board turned or cut round, say twelve
inches across and one inch thick. This
should be made of walnut, or some
other hard wood, but when the hard
wood can not be procured pine will do.
If pine is used it should be painted, or
stained and varnished on the under side,
and if walnut it should be sand-papered,
filled and varnished. Now strike a
circle within about two inches of the
outer edge and bore three holes at equal
distances apart and set in the bolts;
when you get them in the position you
want them, press down on them to get
the imprint of the nails F, then remove
the horns and bore a hole the size of
the nails F. Now put the bolts in again
and screw the top on tight. The nail
F is to keep the horns from turning
around and getting out of place. See
that the butt of horn fits tight to the
wooden base E.
98
Go to a saddler and get either curled
hair, deer hair, or moss sufficient for a
heavy pad; lay it on the floor and beat
all the dirt out of it, then pick it all
apart to get all the matted lumps out,
lay it on the stool top and pile it up
about a foot high while loose, take a
piece of muslin or drilling, lay it on
top of the moss or hair and draw all
the four corners down tight, tacking
them about the center of the edge of
the wooden base E, then draw it all
down and tack in the same manner,
drawing very tight, being careful to
get it round and even and leaving no
wrinkle. In case the moss is not evenly
distributed, take a long awl and run it
through the covering and carefully distribute
it.
Next in order is the outside covering,
which should be a fine piece of silk
plush or velvet. Get a piece large
enough to work some fine flower or
99motto in the center, then put it on in
the same manner as the first, only tacking
it down near the lower edge of the
wooden base E; by being careful you
can get it on without wrinkling it.
The tacks should be small and very
close together. Put a piece of braid
around the edge and tack it on with upholstering
tacks and the stool is completed.
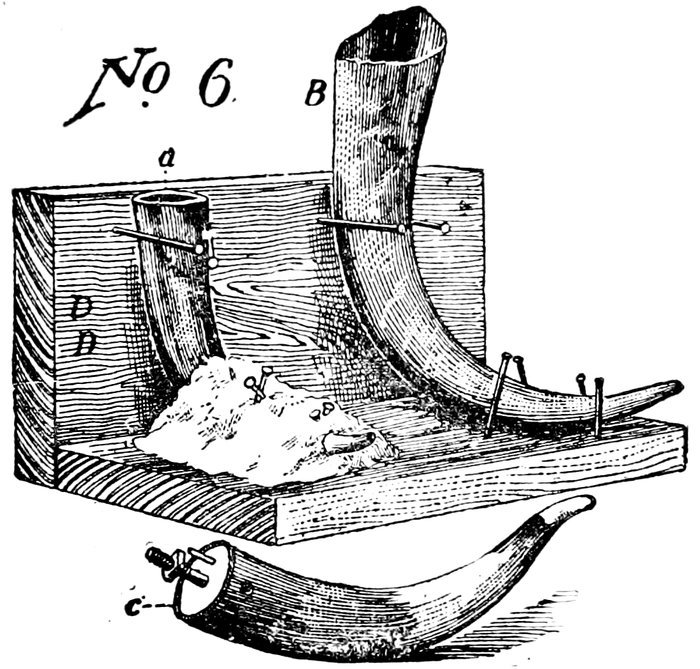
100Cut No. 6 is to illustrate a frame on
which to cut horns to be used for footstool
legs. Without a frame of this
kind it is almost impossible to cut them
to set level with stool and floor. In
fact, it is more difficult than it would
be for a carpenter to cut molding to
fit corners, etc., without a mitre box.
It is very simple and is made as follows:
For a frame large enough to cut four
horns, take a fencing board and cut off
a piece from it two feet long. The
board is supposed to be about six inches
wide and one inch thick. Saw off
another piece the same length and nail
it to the edge, as shown in cut. This
we will call the back of frame and the
other the bottom. The back then is
five inches high, measuring from bottom
board up. This completes the
frame as shown. The horns are now
placed on the frame and nails driven
around them into the frame to hold
them firmly in place. Place the horns
101close together in setting on the frame
and pour plaster paris over the points
of all, as shown in cut horn A. After
the plaster paris has thoroughly hardened,
saw off another piece of the same
board and nail it to front edge of bottom
board, and proceed to saw off the
horns level with the upper edge of back
and front boards, as in horn A. Should
you want the legs longer or shorter,
take wider or narrower boards for back
and front of frame. After taking the
horns from the frame, proceed to put
in the wire through the butt of horn
and rivet it; then put in the bolt and
nail F (as directed in a former article)
and fill the horn with plaster paris, as
shown in the above cut (C). The horn
is now ready, after polishing, to be
placed on the stool. It can also be
placed on a board and used for a hat
hook, or for holding back window curtains,
etc.
102
Go to a hardware store and buy two
good wood rasps, flat on one side and
round on the other; then get three
grades of emery or sand-paper, say No.
1, No. 0, No. 00; then go to a drug store
and buy ten cents' worth of sweet oil
and ten cents' worth of rotten stone.
Get an old felt hat and an old case
knife and you are ready for business.
Take of either horns or hoofs, several
at a time, and put them in an old pot
or kettle of boiling water, let it boil
until they become soft, which usually
takes about half an hour; take out one
at a time and rasp it until it begins to
cool and harden, put it back and take
out another, and keep this up until all
are rasped down to the shape you want
them. Now take one at a time in the
same manner and scrape them until
103they are scraped smooth of all rasp
marks, using the case knife for the
scraper, the edge of which has been
ground square off like that of a shear
blade. Now take the No. 1 sand-paper
and sand-paper down, then use the No.
0, and finally finish up with the No. 00,
rubbing-lengthwise of the horn. We
are now ready for the finishing touch.
Take a piece of felt sufficiently large to
rub with, pour some of the sweet oil
on it, then dust with the rotten stone,
and give the horn a thorough rubbing,
putting more of the rotten stone on occasionally,
and keep up the rubbing
until you get a high polish. Such a
polish will remain on for years.
Another way to polish horns: Fasten
them firmly on a bench or to the wall.
Take a strip of ticking or felt about
three inches wide and three feet long.
Wet it in water and sprinkle powdered
emery over both sides. Take hold of
both ends, place it around the horn and
104draw backwards and forwards, around
and around, until the horn presents a
smooth surface; then take another strip
of the same description and use in the
same manner, except using rotten stone
instead of the emery. There are different
grades of the emery, and only
the finest is to be used in polishing; a
coarser grade can be used in the same
manner in the place of sand-paper, and
is very good.
If you wish to give a horn a flesh
color, secure a very light colored horn,
rasp and scrape it down very thin, and
polish so that the horn is transparent.
Get some red paint (with plenty of
dryer in it) give the inside of the horn
a coat of the paint, and set it away to
dry. Before applying the paint, wash
the horn out well with soap and warm
water and dry well. The above gives
a beautiful flesh color, which will last
105for years, especially when filled with
plaster paris.
After the plaster paris has become
thoroughly dry it is very hard; therefore
to cut it out with a chisel is very
tedious; but it often has to be done.
If the inside of the horn is smooth
and a little tapering, it is very easy to
remove by boiling it until the horn expands
or becomes soft; then tap the
horn with a smooth stick or hammer,
and the plaster will drop out in a
whole piece. If you have put a rivet
through the horn before putting in the
plaster paris it is more difficult to remove,
as the rivet holds the plaster
firmly in the horn. In such a case take
a chisel and dig out the plaster paris
down to the rivet, then either cut the
rivet with the chisel or file it in two
106and take it out; then proceed as above
directed.
To make the butt of a horn round,
put the horn in boiling water; let it remain
about ten minutes; have a round
wooden plug ready, which should be
wedge shaped; drive this in the horn
while hot, and let it cool; afterwards
remove the plug, and the horn will remain
round. This makes quite a difference
in the appearance of the horn
where you wish to use it for a hat rack,
footstool, etc.
Make an extra strong lye, using the
granulated lye and hot water, say one
tablespoonful of lye to half pint of hot
water. Give the whole horn a thorough
bath in the mixture, and let it set
about one hour; then take a stiff brush
and give the horns a thorough washing;
this cuts off all the dirt that has accumulated
in the rough knotty parts. The
107horns should now be put in a barrel of
water and let soak a day or two, to
take off all the lye, then wash well
using a stiff brush. Now take an old
hand-saw and cut down through the
skull, commencing one inch back of
the horns and coming out at the eye
sockets, being careful to saw straight
through, so that when placed on a
board they will set level. Take a two-inch
pine block as wide as the skull and
three inches longer, round off the top
and bottom ends to suit the shape ox
the skull, place the horns on the block,
holding them there with the hands.
Put it up against the wall and if the
horns pitch too far forward take down
and cut off from the front of the board,
sloping it backwards until the horns
hang at a proper pitch. Now drill
about four holes through the skull, and
screw the skull fast to the board. Take
a dozen or more shingle nails and drive
in the front of board an inch or more
108apart, leaving the heads sticking out.
These are to hold the plaster paris,
which is put on to level up before putting
on the covering. After the nails
are all in, mix some plaster paris and
pour over the skull and around the
edges to round it up in shape for the
covering. After the plaster paris is
partially hardened, smooth it by scraping
down the high places, then let it
dry. Take a piece of strong unbleached
muslin large enough to stretch over the
skull and board, tack the muslin on the
back part of the skull board, then draw
it down between the horns and tack it
to the under side of the board at the
lower end, drawing very tight; now
commence at the edge of the muslin
and cut straight in to the inner side
of horns, round out a little for the horn,
and proceed to draw it all down tight,
and tack it on the under side of the
block, being careful not to make any
wrinkles in the covering; trim it off to
109the tacks on the under side. (Some
prefer to have the muslin wet while
putting it on.) We are now ready for
the outer covering, which should be
plush or velvet, and is put on in the
same way as the first covering. It requires
some skill to make a smooth job
of the first; yet by going slow, any one
should do a fair job. Next make a
board to screw on the back of this,
which should be made in diamond shape
or rounding on both ends, and about
six inches longer and one inch wider
than the skull board; this should be
made of walnut and nicely varnished;
after it has thoroughly dried fasten it
tight to skull board with screws, counter-sinking
their heads. Bore one hole
at each end of the base board and
counter-sink them; then screw it to the
wall. Varnish the rough part of the
horns and let them dry; then take some
chenille or tinsel cord to trim around
the butt of the horns and around the
110back part or edge of the skull board.
Tack it on with upholstering tacks.
Cow horns and sheep horns are mounted
in the same manner. The sheep horns
should be cleaned with the lye, as directed
for the deer horns, but no scraping
or polishing is necessary; they look
better rough. The cow horns should
be polished, as directed on page 102,
before they are put on the board. No
polished horn should be varnished.
The cow hoof takes a high polish,
and a number of useful articles can be
made of them—which are not only
useful, but quite a novelty. Take a
pair of cow hoofs, which are neither
bruised nor scaled, rasp them down in
good shape, then scrape, sand-paper
and polish the same as directed in polishing
horns. The hoofs should be
good matches, and both from the same
111foot. Bore or drill two holes in one
of them on the inner side, about one-half
inch apart, and place the two
hoofs side by side on a level board,
seeing that the toes are even with each
other. Take a piece of wire or an awl
and put through the holes in the hoof
and mark the place to make the holes
on the other, so that when they are
wired together they will set even with
each other. Drill small holes around
the tops, say a quarter of an inch apart;
take a piece of malleable wire of sufficient
size and draw it through the
holes in the sides of the hoofs, drawing
them firmly together, and twist the
ends of the wire together; this will
hold them in place. Bind the upper
edge of hoofs with piece of cloth, sewing
through the holes drilled for that
purpose. Stuff each hoof with tow or
moss, and stuff with any goods to suit
your fancy, silk plush, velvet, etc.
Put the filling in tight and let it come
112above the level of hoof to make the
cover rounding, then drawn down tight.
Draw the edges of the cover down and
sew them with a strong thread to the
binding. Take a piece of fancy cord
or ribbon and tack it around the edge
of the cover and you have a fancy pin
cushion. To make a match safe or
tooth-pick case, polish the hoofs, wire
together, and drill the holes around the
edge as before; then take some glue
and spread it well over the inside of
each hoof; cut some red flannel to fit
the inside and press it in with your fingers
until it is all smooth; cut it off at
the edge of top of hoof, and bind the
edges with ribbon. This makes a very
pretty match safe or tooth-pick case.
All hoofs are polished in the same manner.
Should the hoofs not set level
after they are put together, take a
coarse piece of sand-paper and tack or
hold it on a level board, set the bottom
of the hoofs on it and rub round and
113round until they do set level. It
would be best to attend to this as soon
as they are fastened together.
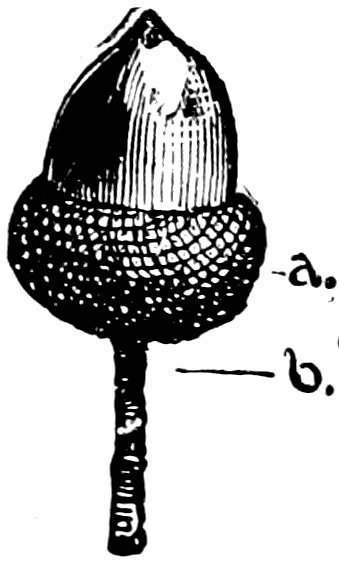
A nickel-plated acorn, as
shown in the accompanying
cut, makes a very fine finish
on the point of a polished
horn. B is a wire stem attached
to the acorn, and is
intended for fastening it to the horn.
They are made as follows: If made of
metal, they are cast on the stem and
then turned. If brass, they are polished;
but if iron, turned and then
bronzed, painted or nickel-plated. If
made of horn, first put in the stem and
then turn and polish them. To put
them on the horn, saw off the point of
114the horn, drill a hole in the end of
same, the size of the stem, put a little
glue in the hole and drive the stem in
tight. The horn should be polished
before putting the knob on. Round
knobs are also very nice, put on in the
same way. This way of putting them
on is much better and easier than the
old way of screwing them on.
| Corrosive sublimate |
1 |
teaspoonful |
| Alcohol |
½ |
pint |
Mix and let stand twelve hours, and
it is ready for use.
115
| Arsenic in powder |
3 |
pounds |
| Salts of tartar |
1 |
pound |
| Camphor gum |
6 |
ounces |
| Cocoanut oil soap |
1½ |
pounds |
| Powdered lime |
5 |
ounces |
Cut the soap up fine and put it in a
kettle containing one gallon of soft
water and boil until the soap is well
dissolved, then add the lime, salts of
tartar and arsenic, stirring the mixture
thoroughly; put the gum camphor in a
half pint of alcohol and place in a mortar
and crush it; take the kettle off the
fire and add the camphor; mix well, and
when partly cooled put it in fruit jars
and seal up. It is now ready for use,
and great care should be taken in using
it, as it is a deadly poison.
| Arsenic in powder |
2 |
pounds |
| Alum in powder |
1 |
pound |
Mix thoroughly and keep in a dry
place. This is also very poisonous.
116
The following solution of carbolic
acid and water I have found very good
in preserving skins, bugs, etc.:
| Carbolic acid |
½ |
ounce |
| Soft water |
2 |
quarts |
Turpentine is also a good preservative,
and is sometimes used in place of
corrosive sublimate.
Never attempt to dress a bird when
its feathers are broken or badly blood
stained, unless it is a rare specimen.
Never dress a bird after the feathers
begin to slip.
Never dress an animal after the hair
begins to slip.
Never let a hide get dry before applying
the preserving powder.
Never stretch a hide out of shape
while taking it off.
Never forget to stop all wounds and
117the mouth and nostrils with cotton as
soon as you kill the specimen.
Never let a specimen get dry after
stuffing it before shaping and setting it
up.
Never inhale the preserving powder,
or get it in cuts or sores, for it is a
deadly poison.
Never be afraid of putting too much
of the preserving powder on a hide.
Never be afraid of charging a good
price for a well dressed specimen.
Always use the best material, such
as eyes, tow, cotton, wire, etc.
Always try to improve on each specimen
you dress that you may excel
others in the art.
Very little has ever been written in
regard to tanning skins with the hair
on. Indeed we may say there is scarcely
any literature on the subject, and this
article must necessarily be very brief.
118Tanning with the hair on is always
somewhat difficult, but of course, some
hides are more difficult to tan than
others. As an average, I will here give
directions for tanning a dog hide. The
same process obtains in the tanning of
other hides. The only difference being
in the length of time required which
must be regulated to suit each case.
We will start with the skin on the
dog's back, and hence the first operation
will be the skinning process. To
begin, make an incision from middle
of under lip back along the median line
to the tip of the tail. Then make an
incision from the middle of each foot
along the inner side of the leg to the
median line, and proceed to skin, being
careful not to cut holes in the hide, and
at the same time to leave no flesh sticking
to the skin.
When skinning the head cut the
gristle of the ear back close to the
skull and separate the skin as near out
119to the point of the ear as possible.
Unless this skin is separated, it is difficult
to tan the ears without losing the
hair, especially in warm weather. Be
very careful not to cut the eyelids;
skin on over the nose and cut loose
from the body.
Then go over the pelt and remove
every particle of flesh which may have
been left on the skin, and be especially
careful around the nose and mouth.
All the bones of the feet should be
removed except the bones of the toes.
Next bathe the nose, ears, feet and
tail with the preserving fluids used in
taxidermy. If you have none of the
fluid, use plenty of arsenic and alum,
and then stretch the hide on a floor
with the hair side down and tack all
the parts so that they will be stretched
perfectly smooth, after which salt all
over thoroughly. Let it remain until
perfectly dry, and then take a piece of
coarse sand-paper and rub it down
120smooth and clear of any remaining
vestige of fleshy particles.
Or instead of the preceding modus
operandi, remove the pelt from the
floor when about dry, and lay it on a
fleshing beam and with a fleshing knife
scrape off all remaining flesh and
grease. Should there be grease that
cannot be removed with fleshing knife,
tack hide back on the floor and spread
about three gallons of sawdust over it
and rub thoroughly. Clean the skin
and cover again with salt, and when
dry sand-paper as directed above. Next
place in warm water to soften it, and
when soft wash it thoroughly with
soap. Then rinse and wring it, and put
it into the following liquid which
should be contained in a wooden vessel.
The liquid consists of one gallon of
soft warm water, one-half ounce of
commercial sulphuric acid, and one-third
of a pound of corn starch. After
compounding, this liquid should be
121stirred about ten minutes before the
skin is introduced. When the pelt is
put in, it should be pressed well under,
and stirred with a wooden paddle for
thirty minutes or until it begins to
thicken and turn a dark reddish color.
Then take it out and hang it up, and let
it drain about thirty minutes, after
which put it into a weak lye made
either from wood ashes or from concentrated
lye which may be bought in
any grocery store; strain the liquid before
putting the hide in. Stir the hide
in this lye about thirty minutes again,
or until you are satisfied the lye has
had time to neutralize the acid from
the preceding bath. The object of this
latter bath is to counteract the acid effect
of the former. Take out of the lye and
hang up and let it drain about one
hour, and then give it a thorough washing
on a wash-board with plenty of
soap and warm water. Rinse perfectly
clean and again hang up to drain.
122When the hair is nearly dry, tack it
again on the floor taking care to stretch
it into proper shape. When partly dry
take it up and rub and pull it until
soft, which completes the tanning. We
are then ready to place the skull in
position. After skinning the head,
remove the brains and eyeballs, and
then boil the skull until all the flesh
can be scraped from the bones. The
skull being ready, fill the eye sockets
with plaster paris made with water into
the consistency of a plaster, and then
set in a pair of suitable glass eyes, being
careful to so adjust them as to give
them the appearance of natural eyes.
The under jaw should be wired to
the upper, or bound securely to it by a
small cord or wire. Saw the skull and
back corners of under jaw off, so that
when the sawed surface is fastened
down flat on a board, the nose will be
somewhat elevated from the floor,
while the back part of the skull will
123lie on the floor. Fasten the skull to
the small boards with wire, and then
stretch the skin over it. Soak only the
skin of the head in water, and sew up
the mouth by drawing the lower lips
up under the upper in the natural way.
The skin should be inside out while the
lips are being sewed. If in the process
of skinning you have cut the skin clear
out through the lip, it must be sewed
together far enough to inclose the skull
and the under board, which should not
extend more than two inches back of
the skull. Build out the end of the
nose with plaster paris to make it natural
shape and draw the skin over the
skull. Be very careful to have the
nose and eyes all right. Tack the skin
to the under side of the board which
should in width correspond to the thickness
of the dog's neck. The edges of
the neck skin should be sutured together
under the board and tacked to
it. Cut the skin, which is lapped under,
124following the line of back end of
board out to the side edges of the
board. Turn this flap out and sew the
underlying end to the upper skin, or to
the skin of back of neck, and close to
the back end of board; this brings the
skin on a level of under side of board;
now round off the turned out flap so as
to conform with the line of the neck
and fore legs; the head will now need
some stuffing to round it up in proper
shape. Take some cotton and put it
in through the ears with a wire, placing
it where needed to give the head
a proper shape; arrange the skin around
the eyes, nose and mouth; then let dry
before lining. Put a good supply of
the alcohol and corrosive sublimate on
the ears, nose and lips, as soon as head
is dressed. Now for the lining, procure
a sufficient amount of felt to line
it, say of a dark green color; then get
enough to make a strip one and a half
inches wide and long enough to go
125around the edge of hide; this should
be an orange color.
Take this strip and pink one edge of
it, then baste the lining on to skin
letting the edges of it project about
two inches out from edge of hide.
Now comb the hair around the edges of
hide back towards the center of same.
Then take the pinked strip and lay it
on the hair side of skin, the smooth
edge along the edge of the hide and
the pinked edge laying back on the
hair; then sew the pinked strip, lining
and hide together, running close to
the edge of hide. Now turn the pinked
strip out on to the projecting lining
and sew another seam around just out
side of the hide, thus sewing the lining
and the pinked strip together. Now
pink the out edge of lining to suit
your taste; then take some yarn or
zephyr and knot the lining and hide
together, the same as in knotting a
comfort, and the job is complete.
126To make a robe sew a number of
hides together and line them, simply
binding the edge with a straight strip.
Where a hide has become hard by
getting wet, or from some other cause
after tanning, wet it on flesh side with
water and hang up. When partly dry
give it a thorough rubbing. If that
fails to soften it, oil it with Neatsfoot
oil and rub it in well.
When rugs and furs become dirty
from use take hardwood sawdust, dampen
it and rub well into hide. Shake
out and repeat until clean.
Sprinkle them well with arsenic
shaking it well down on hide. Tie up
and lay away for a few days. Then
dust all the arsenic out and clean with
127the sawdust. In stuffed birds use the
arsenic alone, but handle it with care
for it is a deadly poison.
| Alcohol |
1 |
pint |
| Gum Camphor |
½ |
ounce |
| Aqua ammonia |
3 |
ounces |
| Oil of Sassafras |
½ |
ounce |
| Laudanum |
½ |
ounce |
Mix.
Wishing to use the above for neuralgia
or rheumatism, add to three
ounces of the preparation 4 grains
menthol (in crystals).
128
| Cannabis |
5 |
grains |
| Salicylic Acid |
29 |
grains |
| Collodion |
½ |
ounce |
| Caster Oil |
10 |
drops |
Directions:
Mix thoroughly, and before applying
dampen the corn or wart with
turpentine; then apply, being careful
not to get the preparation on the sound
flesh. Repeat this every night before
going to bed for five successive nights.
Now bind a slice of lemon on excrescence,
let it remain one hour, and then wash
and scrape off corn or wart. You may of
course repeat as often as necessary, or
until excrescence is entirely removed.
| Turpentine |
½ |
pint |
| Yellow lubricating oil |
½ |
pint |
| Muriatic acid |
1 |
ounce |
Directions:
129Mix and let stand two days, and
then apply with a sponge after which
thoroughly dry with a woolen cloth.
| Best white glue |
½ |
pound |
| Soft water |
2½ |
pints |
Directions:
Mix and heat over a slow fire until
dissolved; then stir in 4 ounces dry
white lead, ¼ pint alcohol, and 1 ounce
aqua ammonia.