10. Sanitation Emphasized.—All application of
color to toys should carry with it a realization
that toys are meant primarily for children and
that all paints should therefore be free from
poisonous compounds.
All paints used should be of good quality so
that it will not come off easily to discolor the
hands or tongues of children who cannot resist
the temptation of sticking everything possible
into their mouths.
11. Preparation of Surfaces.—Wooden toys
may be finished quite bright and in various
colors.
Before applying the color it is absolutely
necessary that every part of the toy has been
thoroly sanded. Where sanding is done by
machine, care should be taken not to sand the
wood too much. Many difficulties may arise
from too much as well as from too little sanding.
In hand sanding, the use of a block 2½" × 3½",
to which is glued a piece of cork, is recommended.
12. Application of Water Colors.—Toys may be
colored by the use of different materials and by
various methods. Kalsomine colors, opaque
water colors, variously known as show card
colors, liquid tempera, and letterine,—all come
under the heading of water colors. All but the
kalsomine may be obtained in small jars and
ready for use. Kalsomine colors come in powder
form in various colors and may easily be prepared
by mixing with water and a little glue to
bind the parts together. They are much
cheaper than the ordinary forms of transparent
and opaque water colors. They may be applied
with the ordinary water color brushes.
After a coat of water color has been applied
to the toy, it may be necessary to remove the
rough parts with very fine sand paper. Care
should be taken not to "cut thru" when sanding.
To preserve and protect the water color on
the toy a coat of white shellac may be applied.
If a more durable finish is desired a coat of
good clear varnish over the shellac will serve the
purpose.
13. Analine Water Stains.—For general finishing
of toys analine water stains will produce
excellent results. They are known for their
ability to penetrate the wood deeply and the
ease with which any shade can be produced.
Water stain raises the grain of the wood more
than any other. This makes it necessary to
sandpaper down the raised grain until smooth
and then proceed with the shellacking and
varnishing until the desired results are obtained.
In preparing analine water stains, only analines
that are soluble in water are used. Place
an ounce of the analine to a quart of hot or
boiling water, pouring the water over the dye-stuff
and stirring meanwhile with a wooden
paddle or stick. Soft water is the best. In
about an hour the dye may be filtered thru a
piece of fine woven cloth. As metal is apt to
discolor the dye, it is better to use a glass container.
If the prepared solution is too strong
it may be diluted in more water. Use hot
water for diluting the stain.
The work with water stain must be done
quickly in order to obtain a uniform coloring
on the surface. Water stains are used a great
deal where the dipping process is employed in
the finishing of toys. A hot dipping stain is
preferable to a cold dipping stain, first, because
it penetrates more readily and second, because
it dries quicker.
14. Formulas for Analine Water Stains.—(Stock
Solutions).
Red: Rose benzol five parts, water ten parts.
Rose Red: Dissolve 3 oz. Rose Bengal in 5
pints of water.
Blue: (a) Dissolve 1 oz. of the best indigo
carmine in 8 oz. of water. (b) Prussian blue
dissolved in water.
Dark Blue: Dissolve 3 oz. Bengal blue in 3½
pints of boiling water, and stir and filter the
fluid in ten minutes time.
Green: Mix Prussian blue and raw sienna in
such proportions as will give the desired color.
Mix in water.
Brown: Dissolve 3 oz. of Bismark brown in
½ gal. of water.
Yellow: Auramine 4 parts, sulphate of soda
10 parts, mixed in water.
Black: Nigrosine black, four ounces, dissolved
in one gallon of boiling water.
When wanted for use, these analines may be
diluted with water. The rule is, an ounce of
analine to the gallon of water to form a working
stain. Or to a pint of the stock solution, as
it is called, you may add three pints of water.
15. Oil Stains.—It will be found that quicker
work can be done with oil stain than with water
colors. For that reason, oil stains are also
used a great deal as a dipping stain. In preparing
oil stains, the best mineral or earth pigments
to dissolve with turpentine are Van Dyke
brown, chrome green, burnt and raw sienna, and
lamp black.
16. Shellacking.—There are two kinds of shellac,
orange and white. The white shellac is
orange shellac that has been bleached. The
purpose of shellac as commonly understood is
to give a quick coat over the stain. The thin
coat formed serves as a protector for the stain
and also as an undercoater for the following coat
of varnish. In this way at least one coat of
varnish is eliminated and a great deal of time
saved because the shellac dries within a few
minutes. To thin shellac use denatured alcohol.
On cheaper toys a coat of shellac only may be
used as a covering for the color stain. If orange
shellac is used it will be found that it effects
the color of the stain used. White shellac also
produces a slight change in color and for this
reason many working with toys will use a good
clear varnish instead.
17. Varnishing.—Two or three coats of varnish
will produce a very durable finish. The first
coat of varnish ought not be quite as heavy as
the succeeding coats. If the varnish is of extra
heavy body it should be reduced slightly for the
first coat. The best varnish reducer is thin
varnish. To prepare this reducer, take one part
varnish (the same varnish to be reduced), and
two parts of turpentine. Shake these together
well and let stand twenty-four hours before
using. This will reduce the consistency of the
varnish without tearing down the body as pure
turpentine would. The first coat of varnish
should be allowed to dry thoroly before the
second coat is applied.
Oil varnishes made from good hard gums,
pure linseed oil, and turpentine, are the most
valuable. In using turpentine to thin varnish
care should be taken that adulterated turpentine
is not used. To play the game safe it is
advisable to use a little benzine, for it will not
injure the varnish, but will evaporate entirely,
and not flatten the varnish as turpentine does.
18. Points on Varnishing.—(1) The less varnish
is worked under the brush the better its
luster. (2) Use clean brush and pot, and clean
varnish. See that the surface is clean before
beginning to varnish. (3) Allow a coat of
varnish plenty of time for drying until it becomes
hard.
19. Colored Varnish.—Colored varnish is that
in which a proportion of varnish is added to the
pigment and thinned. The base is usually an
earth color such as ochre, sienna, venitian red,
Van Dyke brown, umber, lamp black, etc.
With this the work can be done in one coat.
This method of finishing is usually employed
on the cheaper class of toys where it isn't
advisable to apply an expensive finish.
20. Another Suggestion for Finishing.—Tint a
gallon of benzine or gasoline with chrome green,
chrome yellow, and vermilion, ground in Japan
until the desired shade is obtained. This
formulae is especially good for dipping purposes.
21. Use of Paint.—Although paint can be
bought ready prepared and in any color, as has
been stated, it is advisable to have the students
mix their own colors and choose their own color
scheme.
22. Ingredients of good Paint.—The best
paints are usually made by mixing together
white lead, linseed oil, pigment of the desired
color (colors ground in oil), and a drier.
While white lead is sufficient as the pigment
for white paint, a better result is obtained by
mixing zinc oxide with the white lead. These
two substances have the convenient property
of balancing each other's disadvantages. For
instance, zinc oxide has a tendency to crack and
to peal, which is overcome by the tougher
coating formed by the white lead. Again, when
white lead is exposed to light and weathering, it
becomes chalky, which fault is remedied by the
property possessed by zinc oxide, of remaining
hard.
The linseed oil used is obtained from flaxseed
by pressing the thoroly ground seed. About
twenty-three gallons of oil can be obtained from
one bushel of the seed. By boiling the oil with
lead oxide or manganese oxide it can take more
oxygen from the air, and thereby its drying
powers are increased.
Driers are substances that absorb oxygen
from the air and give part of it to the oil. The
raw linseed oil absorbs the oxygen from the air
very slowly, but the addition of turpentine is a
great aid in overcoming this defect.
To insure the best results in painting, one
must first consider the kind and condition of the
surface to be painted, and to what use the toy
will be put; then decide on the proper composition
and consistency of the paint.
23. Application of Paint.—In applying the
paint to the toy the first coat should be thinned.
This will act as a primer or undercoat for the
succeeding coats of paint. Care should be taken
that plenty of time is allowed between coats
for the paint to dry thoroly. Three coats of
paint will produce a good finish.
24. Preparation of surface.—All woodwork
must be sanded and thoroly dry before any
paint is applied. Care should be taken to see
that all knots and sappy streaks shall be covered
with a coat of orange shellac. Then apply the
first coat.
After the priming coat of paint is thoroly
dry, putty up all knot holes, dents, cracks, and
other defects in the surface with a pure linseed
oil putty composed of equal parts of white lead
and whiting. When putty is dry, proceed with
the other coats.
25. Tinting Materials.—Formulas for making
tints are to be followed only in a general way.
Make some allowance for slight variations in
the strength and tone of different makes of
colors. Chromes and ochres vary noticeably.
Weigh out your color and add it gradually, not
all at once, noting the effect as you go. When
you reach the desired shade, stop, regardless of
what the formula calls for. Turpentine and dark
driers will slightly alter shades. Make allowance
for this.
26. Mixing Paints.—Faulty mixing, even with
the best of materials, is not likely to make durable
paint. The important thing is to give the
lead and oil a chance to incorporate themselves
in that close union which they always make if
allowed to do so. The following directions give
best results. The order is important.
(1) Break up the white lead with a paddle,
using only enough oil to bring it to the consistency
of colors in oil.
(2) Add your colors for tinting. Coloring
matter added after the paint has been thinned is
likely to break up in lumps which leave streaks
when brushed out.
(3) Put in drier.
(4) Add remainder of oil, stirring well.
(5) Last of all, put in turpentine.
Thinners help only the flow of the paint
never the quality.
To strain paint thru cheese cloth before
using will be a safeguard against lumpy colors
and streakiness. Paint also spreads further if
strained.
27. Paint Formulas.—As most toys are exposed
to the weather a great deal, the following
formulas are recommended. These take no
account of tinting materials.
(a) Priming Coat:
25 pounds pure white lead
1 gallon pure raw linseed oil
½ gallon pure turpentine
¼ pint drier, free from rosin
(b) Body Coat:
25 pounds pure white lead
3⁄8 gallon pure raw linseed oil
3⁄8 gallon pure turpentine
¼ pint drier, free from rosin
(c) Finishing Coat:
25 pounds pure white lead
1 gallon pure raw linseed oil
¼ pint pure turpentine
¼ pint drier.
One must exercise his own discretion in using
a larger or smaller quantity of oil according to
whether the wood is oil absorbing, as white
pine, poplar, and basswood, or less permeable,
as yellow pine, cypress, spruce, and hemlock.
28. Formulas for Making Tinted Paint.—Any
color or tint may be obtained by varying
the addition of tinting colors. These tinting
colors are called "colors in oil." The colors
should be added to the white lead before the
paint is thinned.
To twenty-five pounds of white lead ground
in oil add colors in oil as follows:
| Medium Blue Slate | 3½ oz. lamp black |
| |
| Gray Blue | ¼ oz. lamp black |
| 1 oz. Prussian blue |
| ¼ oz. medium chrome green |
| |
| Dark Drab | 5 lbs. French ochre |
| ½ lb. lamp black |
| ¼ lb. Venitian red |
| |
| Dark Slate | 2 oz. lamp black |
| 3 oz. medium chrome yellow |
| |
| Dark Lilac | 1 oz. lamp black |
| 5 oz. Venitian red |
| |
| Lilac | ½ oz. lamp black |
| 1½ oz. Venitian red |
| |
| Forest Green | 1½ oz. lamp black |
| 8 lbs. light green |
| 5 oz. medium chrome yellow |
| |
| Buff | 1½ lb. French ochre |
| 3⁄8 oz. Venitian Red |
| |
| Cream | 5 oz. French ochre |
| |
| Sea Green | 3⁄8 oz. lamp black |
| ½ oz. medium chrome green |
| 1¼ oz. medium chrome yellow |
Where tinting colors are used in sufficiently
large quantities to alter the consistency of the
paint, add one-half as much linseed oil and
turpentine, by weight, as you add tinting
material.
29. Enameling.—When using enamel as a
finish for toys, care should be taken that the
surface of the toy is in proper condition. To
obtain good results proceed as follows: Give the
wood a coat of shellac. Sand lightly and dust.
The following coat should consist of part of
white paint and one part of the enamel to be
used. This coat should be slightly tinted with
the finishing color, if the finishing coat is not
white. Allow twenty-four hours for drying
thoroly; then sand with No. OO sand paper.
Next apply a coat of enamel of the color desired
for the finished work. (Enamels may be tinted
with colors ground in oil.)
Should the enamel not work freely, add a
spoonful of benzine to a gallon of enamel. Turpentine
may also be used as a thinner for
enamel.
A better finish of enamel consists of two coats
of paint before applying the enamel. This gives
it a stronger body and of course makes it more
durable.
Because of its durability and for sanitary
reasons enamel is the most desirable finish for
toys. Its glossy finish is attractive and very
appealing to children.
30. The Dipping Method.—When a considerable
quantity of toys is to be finished, the problem
to be faced will be the cost of application of
the paint rather than the cost of the paint
itself. The dipping process, (immersing the
material to be covered) is found to be the most
successful, especially in toy making, where so
many small parts are used.
Many of the small pieces made can be subjected
to the dipping process at quite a saving
of time and labor, with probably better results
than where the application of paint or stain is
done with a brush.
The success of the dipping process depends on
the arrangement adopted for holding the toys
while the actual dipping is done and while they
are drying. Here the exercise of a little ingenuity
on the part of the students and teacher, will
overcome most difficulties.
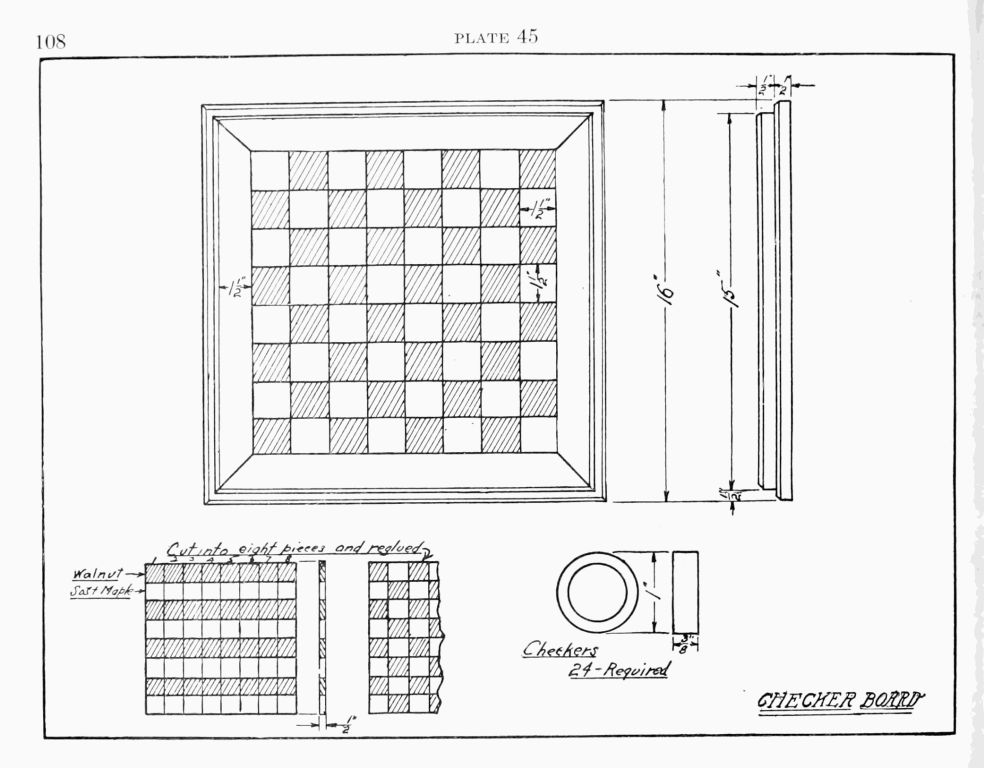
Supposing that a number of checkers, or
handles, or small wheels are to be stained. A
dipping frame as shown in Fig. 8 could very
easily be prepared. You will notice the screen
tray (which is removable), and the tin sheet
which slopes towards the container. The small
pieces to be stained can be handled in wire baskets
with mesh just small enough so that the
pieces will not fall thru.
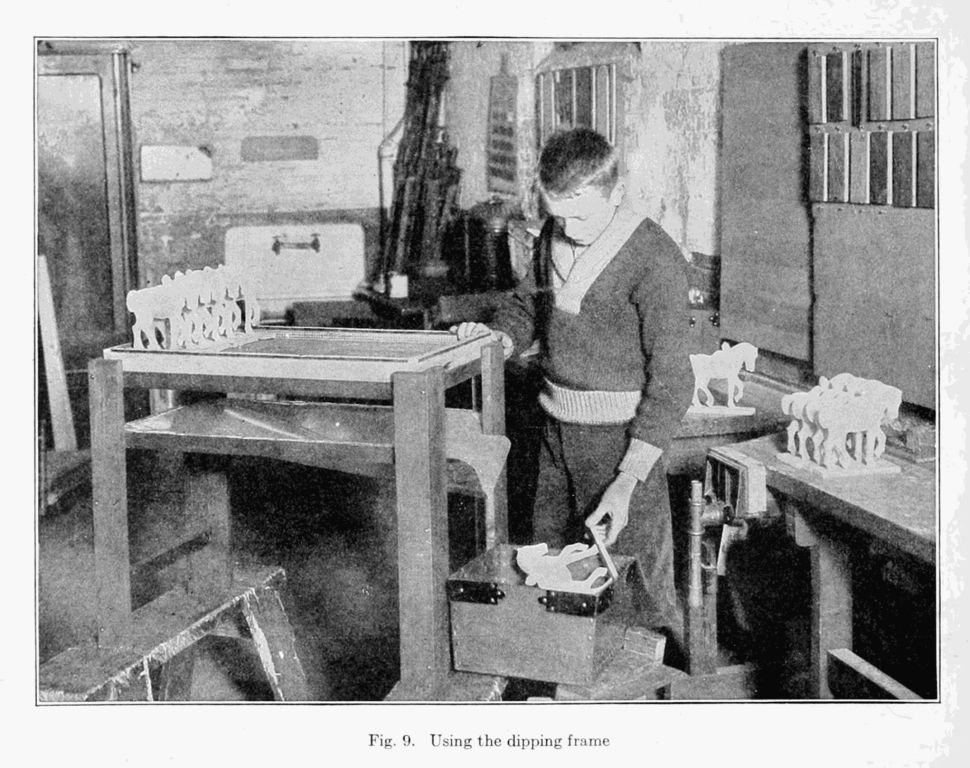
The wire basket is then immersed in the container
and worked up and down, so that the
liquid will penetrate and touch all pieces. It
is then pulled up and swung over the screen
tray, where the contents of the wire basket is
dumped. Here, the superfluous paint will drip
off on the tin sheet, which, because of its slope,
will cause the superfluous paint to flow back
in to the container. Fig. 9 shows the dipping
frame in use.
The screen tray can be removed and placed in
a rack to allow for further drying. Several
trays could then be made and a rack to hold them
could very easily be constructed.
The paint used for dipping purposes must so
be prepared that too much does not run off or
too much stay on, for this is surely one way to
spoil the work. It should be thinned to the
right consistency and care should be taken that
the thinners used are of the best quality.
Where larger pieces of work are to be dipped,
wire attachments could be devised and each
part hung separately over the dipping frame
until ready to be placed in a rack. If the wire
attachment forms a hook on one end, it will be
possible to hang up the toy until drained and
dried. In removing the toy from the paint it
should be drawn out very slowly so that the
surface of the paint may be left as smooth as
possible.
Where one desires line effects on toys, these
may be lined in afterwards with a small size
striping brush or sign painter's pencil.
Fig. 8. Dipping frame
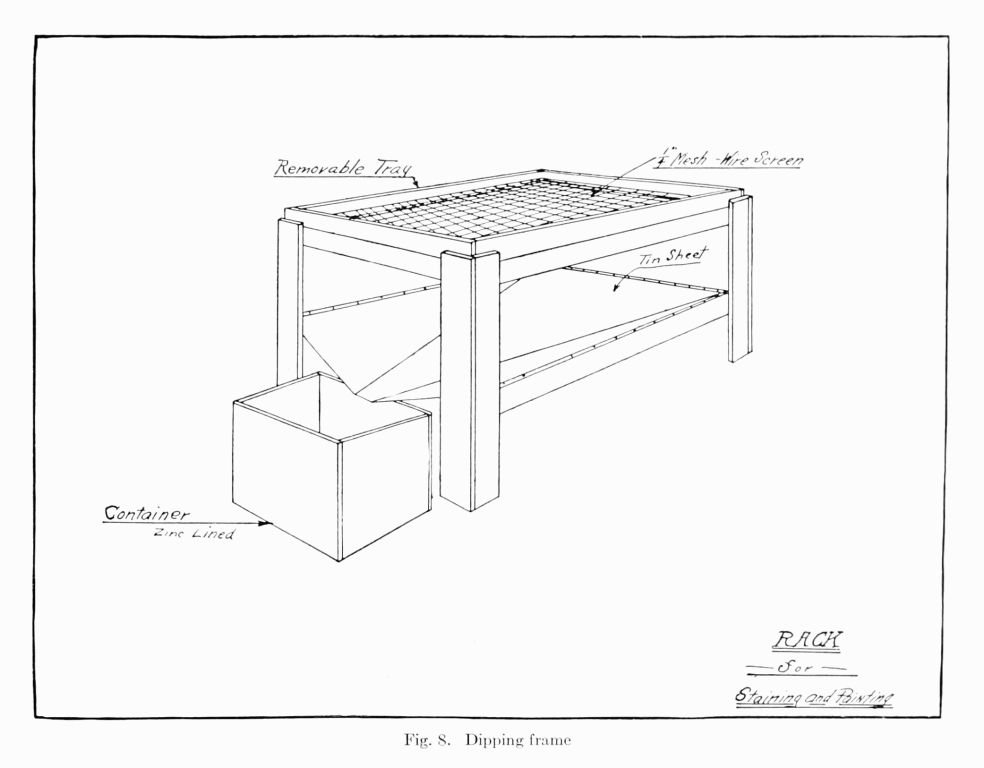
Fig. 9. Using the dipping frame
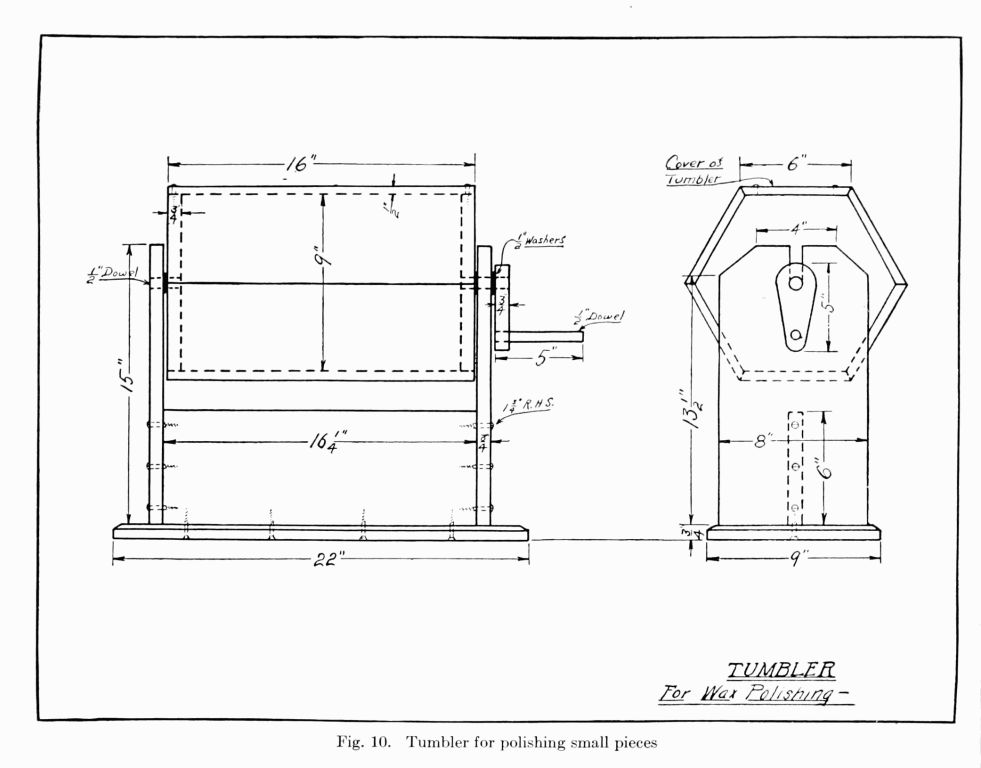
31. Polishing by Tumbling.—-Excellent results
in polishing large quantities of small pieces,
may be obtained by tumbling. The material
to be polished should be thoroly dry. The
parts are then placed in a tumbler as shown in
Fig. 10. Cut up paraffine wax into small pieces,
using about one-fourth pound to each tumbler
full of toys. Allow these to tumble several
hours. This will distribute the wax evenly over
the parts and produce a polished surface.
The tumbler as shown in Fig. 10 is turned by
hand, altho it could very easily be placed in a
lathe, where one is available.
Fig. 10. Tumbler for polishing small pieces
32. Care of Brushes.—A suitable place should
be provided for brushes that are not in use. A
tin-lined keeper is recommended. Brushes
should be suspended so that their bristles will
not touch the bottom of the keeper, and have the
liquid in which they are kept come well up over
the bristles, so that none of the paint or varnish
may dry in the butt of the brush.
33. Paint Application by Means of Compressed
Air.—In recent years, great advancement has
been made in the application of paint by means
of compressed air. The early use of pneumatic
painting equipment was confined almost exclusively
to the application of finishing materials
such as japans, enamels, lacquers, varnishes,
etc., on manufactured products. But in the
past few years improvements have been made
which eliminate all of the difficulties originally
experienced and make possible the use of this
method for interior and exterior painting, such
as buildings, ships, etc.; and at present, a large
portion of factory maintenance work is done in
this manner. Excessive fumes have been
eliminated and all materials can be applied
without removing the volatile thinners, solvents,
binders, etc., thru air reduction. This is
brought about thru the use of low pressure and
the perfection of ingenious patent nozzles and
other improvements.
34. Uses of Pneumatic Sprayers.—Pneumatic
paint sprayers, or air brushes, are extensively
used in the manufacture of toys, furniture,
automobile bodies, sewing machines, telephones,
electrical equipment; in fact, very nearly all
manufactured products, as well as on ships,
structural steel and iron work, bridges and
buildings.
The speed of the air brush is very great compared
with hand-brush work. Usually, an air-brush
operator will accomplish as much in one
hour as a hand or bristle-brush worker will in
one day; and it is possible to obtain an even
coating, free from sags, runs or brush-marks
and better results are obtained than with the
hand brush method. A film of paint can be
applied in one operation equal to two hand-brush
coats, as it is not necessary to reduce
paints by thinning as much for air brush application,
in a great many instances, as is the usual
practice for hand-brushing. The air sprayer
can also reach places inaccessible to the hand
brush, and a perfect coat can be applied over
rough, uneven surfaces, which could not be
obtained by hand-brushing.
In considering pneumatic painting equipment,
the most important thing to be kept in mind is
the proper application of materials. This can
be successfully accomplished only thru the use
of compressed air at low pressures. By this is
meant using only sufficient main-line air to lay
the paint, enamel, varnish or whatever finish
may be used, on the object. Excessive pressure
results in fumes, waste of material and air reduction
taking place. By air reduction is meant
the removal of the more volatile solvents, thinners,
binders, etc., thru evaporation, and the
material thus loses its adherent and coherent
properties.
Both types of air-brush equipment illustrated
here require three cubic feet of air per minute
to operate and the pressure necessary depends
on the density, consistency or viscosity of the
material used. For example, undercoaters,
japans, etc.; require from twelve to fifteen
pounds of pressure to apply perfectly; while
enamels and varnishes take from eighteen to
twenty-five pounds. Water stains require about
five pounds of pressure.
35. Construction of Pneumatic Painting Outfit.—A
pneumatic painting outfit for finishing work
consists essentially of an air brush, either of the
attached-container type or the gun-type with
separate paint tank, and a small compressor of
sufficient capacity to operate the air brush,
which can be belt-driven from shafting or direct
connected. An exhaust hood with fan, for the
removal of fumes, is advisable where the operation
is reasonably continuous and especially
where lacquers are used. The paint, ready for
application, is poured into the tank; and the
compressed air line leads to the tank with a
branch line for air and paint from the tank to
the nozzle of the gun type of machine; while only
the air line is required with the attached-container
type.
The air hose used is 5/16" in diameter while
the paint or fluid hose is the same size. The
paint hose is made of a special compound to
resist the action of the thinners, solvents, etc.,
used in the paint; and it is important to have
this correct, so that the lining will not disintegrate
and clog the air brush or gun.
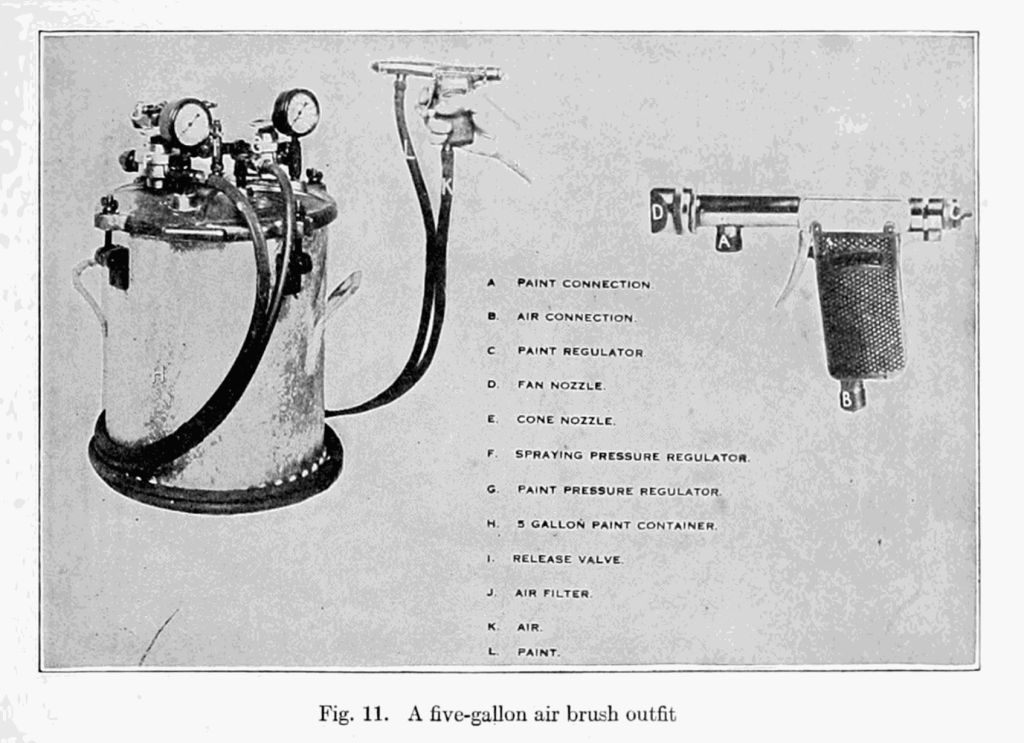
Fig. 11 shows a five-gallon container type.
It will be noticed that the fluid connection is
nearest the nozzle and that the air connection is
at the bottom of the grip.
Fig. 11. A five-gallon air brush outfit
36. Special Attachments for Different Surfaces.—A
cone nozzle is furnished for painting irregular
surfaces and a fan nozzle for wide, flat work.
Adjusting and locking the nozzle regulates the
degree of atomization. The jets of the fan
nozzle are depressed to prevent being knocked
out of alignment. Final regulation of the flow
of material is made on the back of the gun,
independent of the pressure on the material container.
A wide variety of adjustment is possible
with this positive regulation.
The first pull on the trigger gives air only,
which can be used for dusting ahead of the
work; and as the trigger is released, the air
valve closes last, which prevents clogging and
dripping. When adjustments have been made
the trigger action is the only moving part of
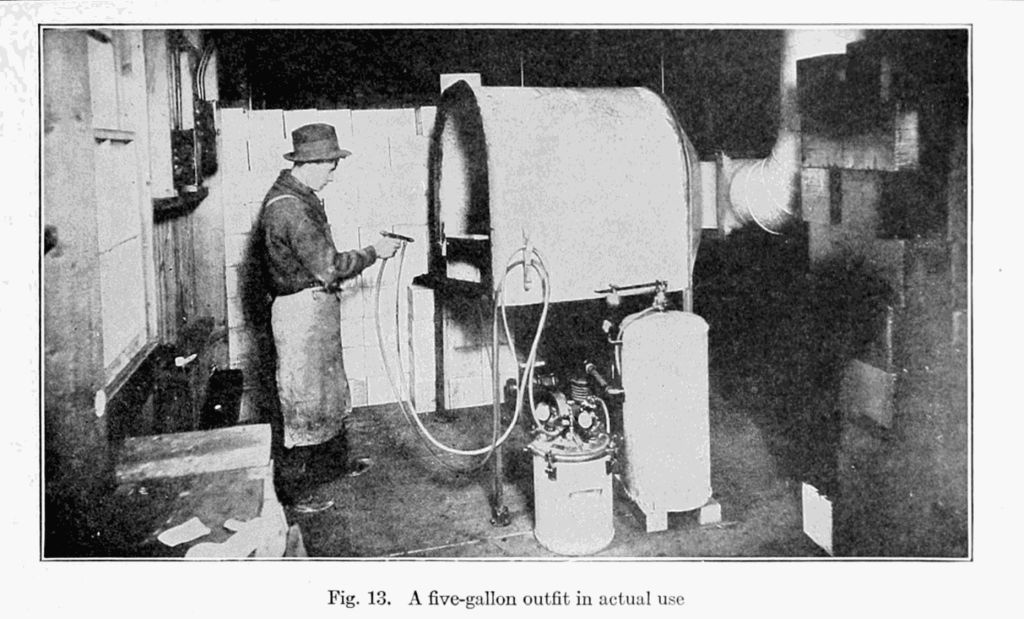
the machine. Figs. 12 and 13 show the five-gallon
container type in actual use.
Fig. 12. Using pneumatic paint sprayers
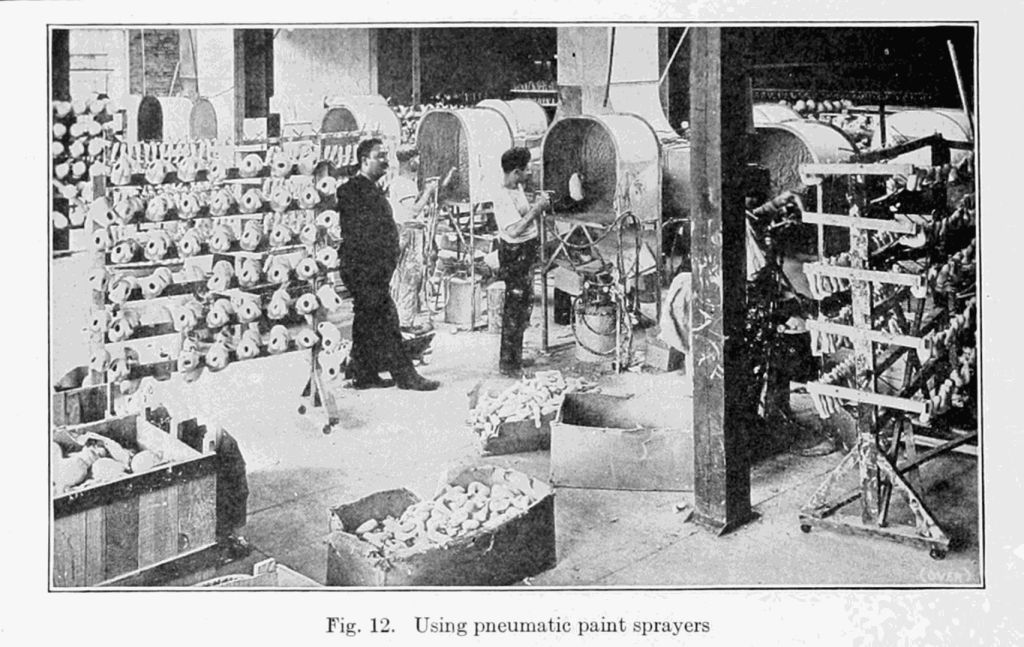
Fig. 13. A five-gallon outfit in actual use
37. Cleaning Pneumatic Machines.—It is not
necessary to take the gun apart nor disconnect
the hose to clean the machine. Thinner can
be run thru the device without loss by placing
a small can of reducer of the last material used
in the machine, and forcing it thru in the usual
manner.
38. Directions for Cleaning Machine.—Close
right-hand Air Valve and open release valve.
Unscrew air nozzle a few turns. Obstruct outlet
with thumb and pull trigger. Spraying pressure
is thus forced thru gun and fluid hose and
the material backed into the container. It is
advisable frequently to run thinner thru the
machine as follows: (1) Place small can of thinner
in center of container directly beneath fluid
tube. (2) Replace cover and tighten wing-nuts.
(3) Close left-hand air valve and open right-hand
air valve. Pressure on container will
force thinner thru the machine and clean
perfectly without loss. Do not use spraying
pressure in cleaning. The thinner can be used
again for either cleaning or thinning purposes.
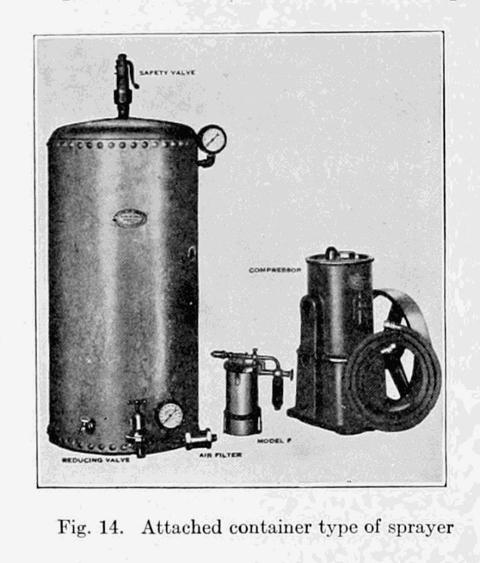
Fig. 14. Attached container type of sprayer
39. Directions for Operating Pneumatic Equipment.—
1. Attach main-line air hose to air filter.
2. Attach fluid hose to connection marked
"Fluid" on tank and to the front connection
near air nozzle on hand-piece.
3. Attach air hose to connection marked
"Air" on cover and to the handle connection on
hand-piece.
4. Thoroly mix and strain material so that
it is entirely free from skins, lumps, and foreign
materials.
5. Tighten wing-nuts until paint container
is air-tight.
6. See that release valve is closed. Then
open right-hand air valve, turn fluid-pressure
regulator until gage shows 5 lbs. pressure in
container. Pull trigger and use fluid regulator
on gun to control the flow. If material is heavy,
increase pressure in container.
7. Open left-hand air valve and turn spraying
pressure regulator until sufficient pressure
(5 lbs. to 25 lbs.), is obtained to lay the material
on.
8. Make final adjustment of the flow of
material with fluid regulator on back of hand-piece
and get proper spray by adjusting the air
nozzle.
9. Spraying pressure and pressure in the
container depends upon the density of the
material used and the size of the surface to be
coated. A little experimenting on the part of
the operator will determine the best pressure to
use. When the fan nozzle is used, 3 to 5 lbs.
more pressure should be applied to the material
container and from 5 to 8 lbs. more atomizing
or spraying pressure used.
Fig. 14 shows a complete attached container
which operates on identically the same principles
as the type shown in Fig. 11. It consists
of a 1½ pint container, reducing outfit, compressor,
and air tank. The 1½ pint container
as shown in Fig. 15 is supplied complete with
two fluid tips, gasket, agitator tube, cup-holder,
hose union, and six feet of air hose.
Fig. 15. A one and one-half pint container and parts
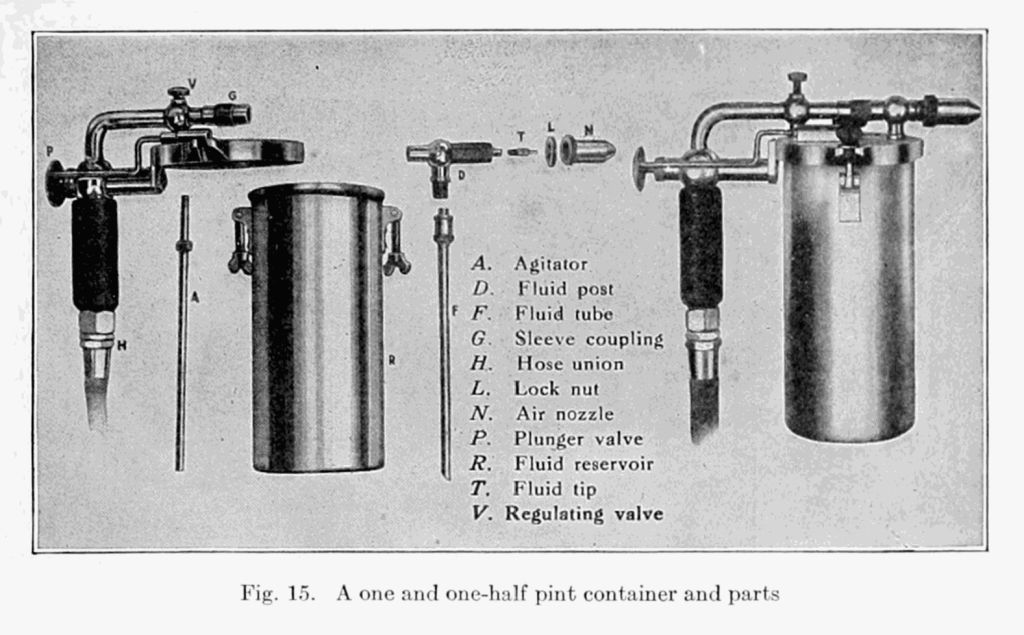
Fig. 16. Reducing outfit
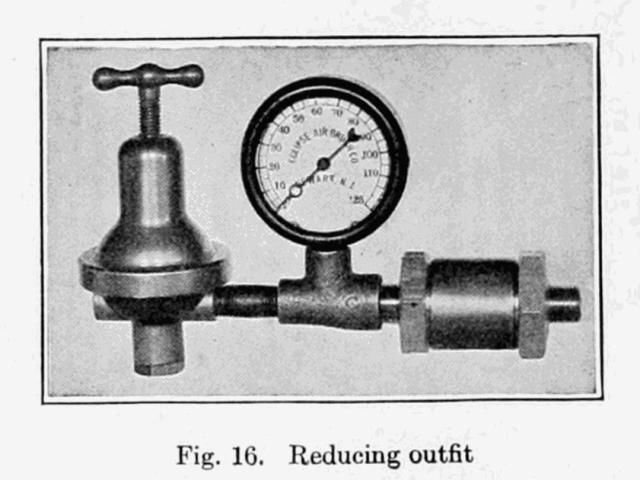
The reducing outfit in Fig. 16 consists of a
regulative valve, an air gage, and an air filter,
complete with connections and fittings. This
outfit is for the purpose of maintaining an even
low spraying pressure.
Regulated pressure is applied to the air-tight
material container, raising the coating
material to the nozzle where only sufficient
main-line pressure is used to lay the coating on.
The spraying pressure necessarily depends on
the density, consistency and viscosity of the
material used.
For fine finishing work, where the quantity of
materials used each day is not great, or where
the colors are changed frequently, the attached
container type is recommended.
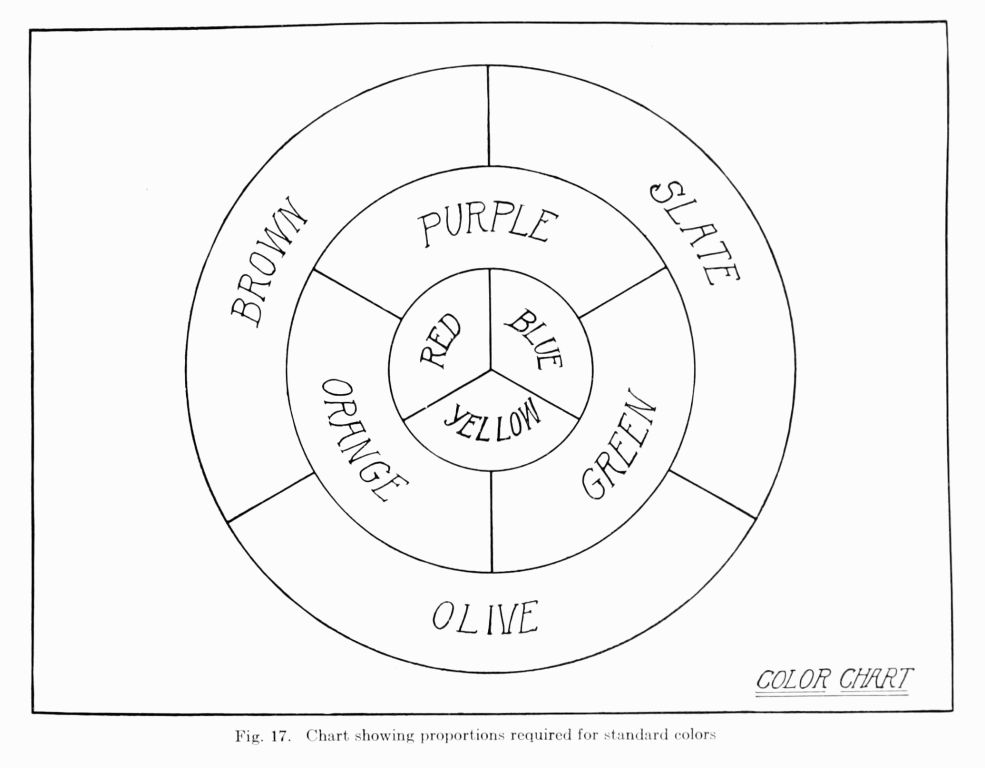
40. Preparing Colors.—The three primary colors
are red, blue and yellow. With the three
primary colors at hand, almost every variety of
color desirable for ordinary use can be easily
prepared. Fig. 17 shows a color chart.
Red mixed with yellow will result in orange.
Red mixed with blue will result in purple.
Yellow mixed with blue will result in green.
The colors obtained by mixing any two
primaries are called secondary colors. Therefor
the secondary colors are orange, purple and
green.
Orange mixed with purple will result in
brown.
Orange mixed with green will result in olive.
Purple mixed with green will result in slate.
The colors obtained by mixing any two
secondaries are called tertiary colors.
The tertiary colors are brown, olive and
slate.
Of course different tones of each color can
be made up by mixing unequal proportions.
Fig. 17. Chart showing proportions required for standard colors